

2 years ago, at WWDC 2017, Apple released the Vision framework, an amazing, intuitive framework that would make it easy for developers to add computer vision to their apps. Everything from text detection to facial detection to barcode scanners to integration with Core ML was covered in this framework.
This year, at WWDC 2019, Apple released several more new features to this framework that really push the field of computer vision. That’s what we’ll be looking at in this tutorial.
What We’ll be Building in this Tutorial
For many years now, Snapchat has reigned as the popular social media app among teens. With its simple UI and great AR features, high schoolers around the world love to place cat/dog filters themselves. Let’s flip the script!
In this tutorial, we’ll be building Snapcat, the Snapchat for Cats. Using Vision’s new animal detector, we’ll be able to detect cats, place the human filter on them, and take pictures of them. After taking pictures of our cats, we’ll want to scan their business cards. Using a brand new framework, VisionKit, we’ll be able to scan their business cards just like the default Notes app on iOS.
That’s not all! If you remember 2 years ago my tutorial on using Vision for text detection, I ended by saying that even though you could detect text, you would still need to integrate the code with a Core ML model to recognize each character. Well finally, Apple has released a new class under Vision to recognize the text it detects. We’ll use this new class to grab the information from the scanned cards and assign it to our cat. Let’s get started!
The project in this tutorial was built using Swift 5.1 in Xcode 11 Beta 7 running on macOS Catalina. If you face any errors when go through the tutorial, try to update your Xcode to the latest version or leave a comment below.
Getting the Starter Project
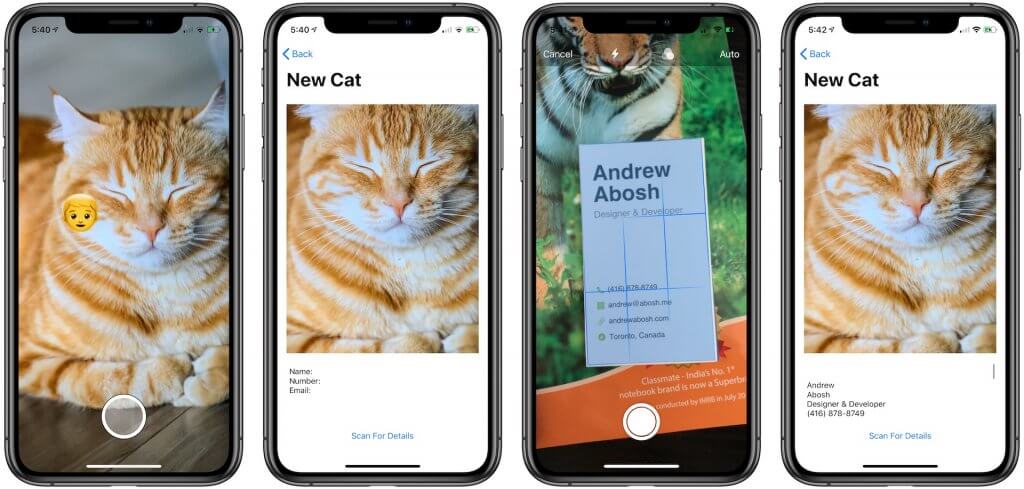
To begin, download the starter project here. Build and run on your device. What we have is the iconic Snapchat camera view. To create this, I added a ARSCNView, or an SceneView that is capable of displaying AR content, and overplayed it with a button.
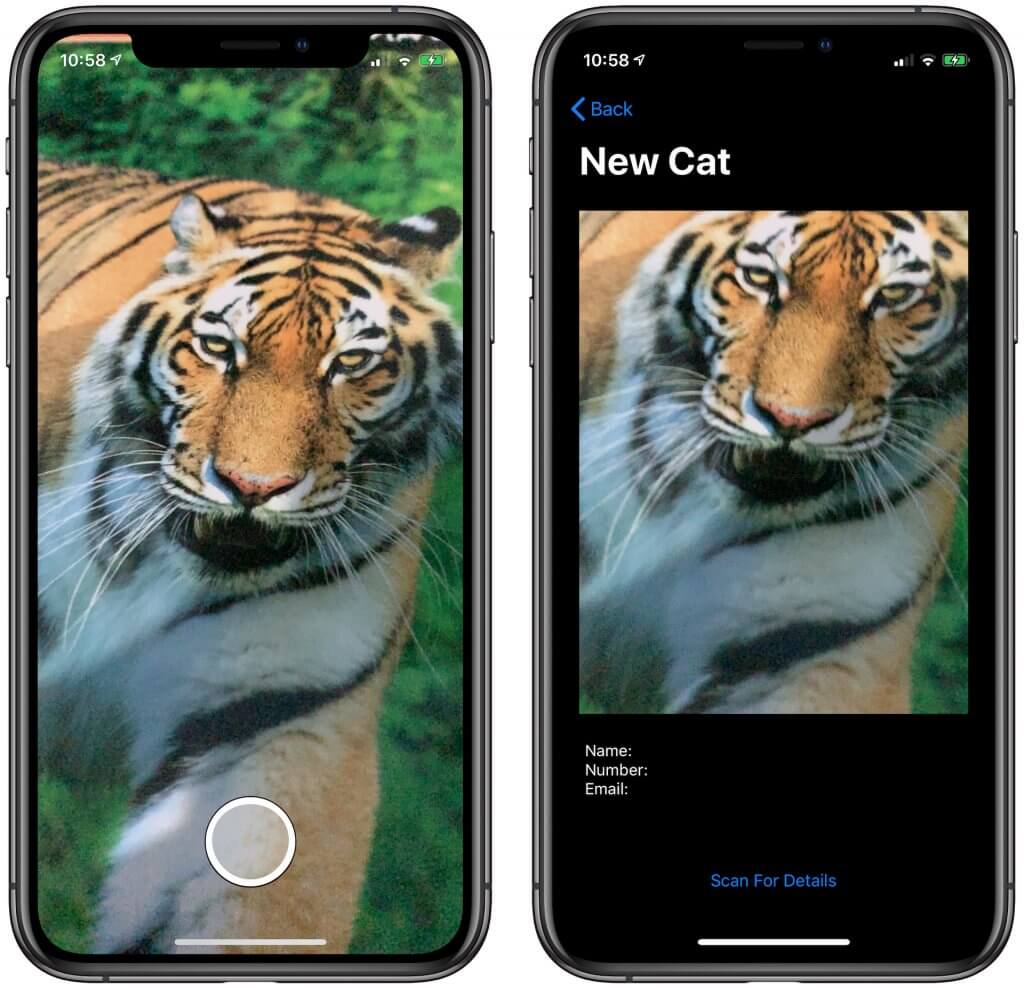
When the shutter button is pressed, the app takes a snapshot of the current frame of this scene view and passes it along the navigation stack to the Cat Profile View where it’s loaded the profile image. In this view, we have empty fields for the data: Name, Number, and Email. This is because we haven’t scanned the business card yet! Clicking on the button has no action yet because this is where we’ll implement the document scanning program via VisionKit.
Image Recognition – Detecting a Cat Using VNRecognizeAnimalsRequest
Our first step is to detect cats in our camera view. Head over to CameraViewController and at the top of the file, type import Vision. This imports the Vision framework into this file, giving us access to all the classes and functions.
Now we want our app to automatically place the human filter (“the human emoji”) on our cat with no input from us whatsoever. This means that we need to scan the frames in our camera view every few milliseconds. To do this, modify your code to look like below:
@IBOutlet var previewView: ARSCNView!
var timer: Timer?

override func viewWillAppear(_ animated: Bool) {
    super.viewWillAppear(animated)
    let configuration = ARWorldTrackingConfiguration()
    previewView.session.run(configuration)
    timer = Timer.scheduledTimer(timeInterval: 0.5, target: self, selector: #selector(self.detectCat), userInfo: nil, repeats: true)

}
We create an instance of timer and define it in our viewWillAppear function. We schedule the timer to perform the function detectCat() in the interval of every half a second.
However, you’ll experience an error displayed because we have not created the function called detectCat. This is a simple fix. Here is the viewWillAppear function. Insert the code in the CameraViewController class:
@objc func detectCat() {
    print("Detected Cat!")
}
Let’s build and run the project so far. The moment our CameraViewController is initialized, we should see the text “Detected Cat!” printed to the console every half second.
Now here comes to the fun part where we’ll use the new VNRecognizeAnimalsRequest, a built-in class that lets you detect cats and dogs.
Modify the detectCat() function to look like this:
@objc func detectCat() {
    guard let currentFrameBuffer = self.previewView.session.currentFrame?.capturedImage else { return }
    let image = CIImage(cvPixelBuffer: currentFrameBuffer)
    let detectAnimalRequest = VNRecognizeAnimalsRequest { (request, error) in
        DispatchQueue.main.async {
            if let results = request.results?.first as? VNRecognizedObjectObservation {
                let cats = result.labels.filter({$0.identifier == "Cat"})
                for cat in cats {
                    print("Found a cat!!")
                }
            }
        }
    }

    DispatchQueue.global().async {
        try? VNImageRequestHandler(ciImage: image).perform([detectAnimalRequest])
    }
}
There’s quite a bit going on here but I’ll go through it line by line. First, we implement a guard function that checks to make sure that the current frame in our Preview View has an image. If this image can be captured, we create a special CIImage using the pixel buffer of that frame’s image.
Here’s some terminology! The CIImage class we’re using is a representation for an image as a CoreImage. This type of images are great when you want to analyze the pixels in them. A pixel buffer stores an image data in the main memory.
Before explaining the next few lines of code, it’ll help to understand how Vision works in case you’re unfamiliar. Basically, there are 3 steps to implement Vision in your app, which are:
- Requests – Requests are when you request the framework to detect something for you.
- Handlers – Handlers are when you want the framework to perform something after the request is made or “handle” the request.
- Observations – Observations are what you want to do with the data provided with you.
So first, we create a VNRecognizeAnimalRequest to detect animals. This is a new VNImageRequest that was introduced in iOS 13 specifically for animal detection.
Next, within the handler of this request, we get the result and filter the labels in our first result. Why are we doing this? This is because currently, the VNRecognizeAnimalRequest can detect both cats and dogs. For our use, we only want cats which is why we define an array called cats where the identifier is equal to “Cats”. Finally, for each cat observation, we print that we found a cat to the console. This is just to see if Vision is detecting cats.
Remember, we’ve only defined the request. Now we need to ask Vision to perform the request. After defining the request, we ask VNImageRequestHandler to perform the request on our CIImage we defined earlier. A VNImageRequestHandler is basically a specific type of VNRequest that is used to process images using one or more image analysis requests.
Build and run the project on a device. I don’t have a cat so I’ll be using some images from online. If Vision correctly detects the cat, then we should be able to see it printed to the console.
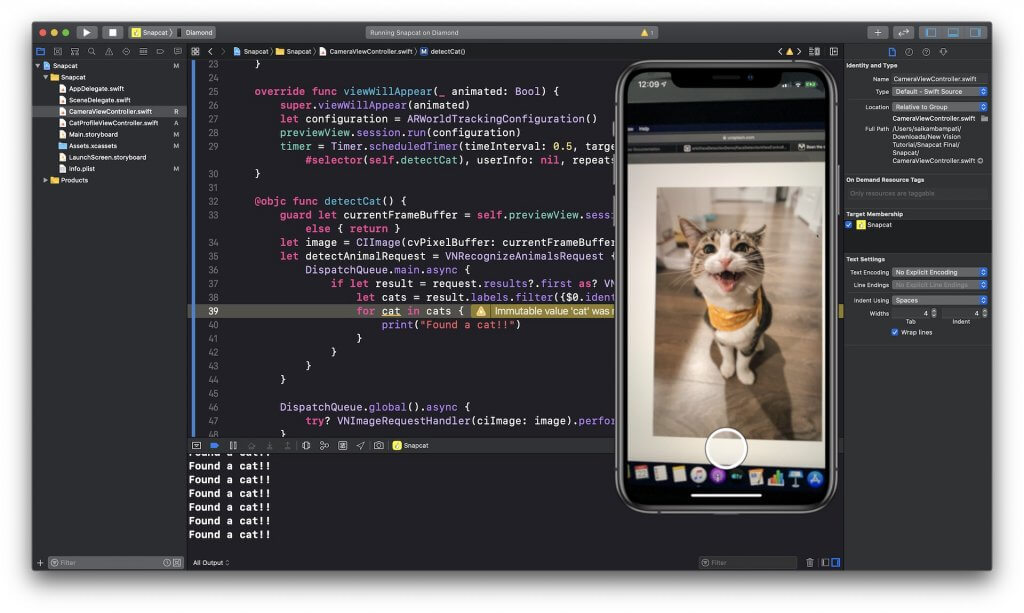
It works!! But how should we let users know that the app detects a cat? It’s time to code again.
At the top of the class where we initialized the timer object, type the line: var rectangleView = UIView(). This initializes a UIView which we can modify to be a box. We’ll place this box around the coordinates where our Vision function can detect the cat.
Inside the detectCat() method, insert self.rectangleView.removeFromSuperview() at the beginning. Then modify the for loop to look like this:
for cat in cats {
    self.rectangleView = UIView(frame: CGRect(x: result.boundingBox.minX * self.previewView.frame.width, y: result.boundingBox.minY * self.previewView.frame.height, width: result.boundingBox.width * self.previewView.frame.width, height: result.boundingBox.height * self.previewView.frame.height))

    self.rectangleView.backgroundColor = .clear
    self.rectangleView.layer.borderColor = UIColor.red.cgColor
    self.rectangleView.layer.borderWidth = 3
                        self.previewView.insertSubview(self.rectangleView, at: 0)
}
Here’s what we’re doing. We are defining our rectangleView to have the bounds of the result’s bounding box. However, this is something worth mentioning.
In Vision, the size of the result’s bounding box is smaller than the size of your previewView. This is because when Vision analyzes the image, it scales down the image to speed up computer vision processes. That’s why when we create the bounds for our rectangleView, we have the multiply it by the constant to scale it up.
After defining the frame, all we do is set the view to have a transparent background and a border of width 3 and color red. We add this to our previewView. Now, you may be wondering why we included the line of code self.rectangleView.removeFromSuperview() at the beginning of the function. Remember, our Vision code is running every half a second. If we don’t remove the rectangleView, we’ll have a lot of boxes on our view.
Ok! Build and run the app! Are you seeing the boxes?
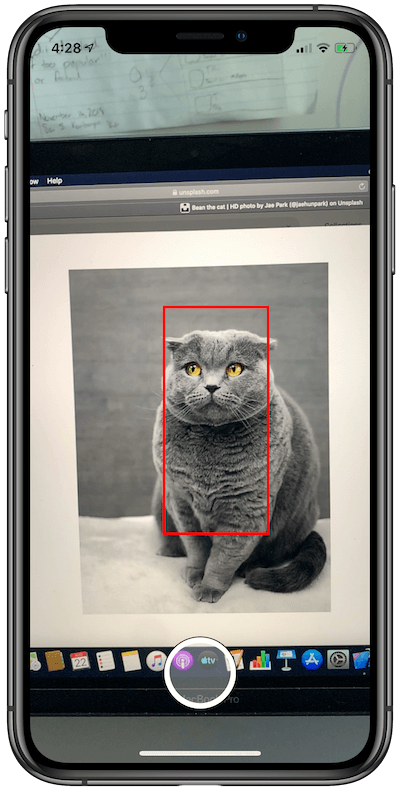
Yes! It’s working. Now we have one last thing to do: place a human emoji near the cat. This is really simple. Here’s what we do.
Ath the top of the class, underneath where we define our rectangleView, type the line: var humanLabel = UILabel().
Inside the for loop of our detectCat() function, we need to add this label to our view. Here’s how to do that.
for cat in cats {
    self.rectangleView = UIView(frame: CGRect(x: result.boundingBox.minX * self.previewView.frame.width, y: result.boundingBox.minY * self.previewView.frame.height, width: result.boundingBox.width * self.previewView.frame.width, height: result.boundingBox.height * self.previewView.frame.height))

    self.humanLabel.text = "👦"
    self.humanLabel.font = UIFont.systemFont(ofSize: 70)
    self.humanLabel.frame = CGRect(x: 0, y: 0, width: self.rectangleView.frame.width, height: self.rectangleView.frame.height)

    self.rectangleView.addSubview(self.humanLabel)
    self.rectangleView.backgroundColor = .clear
    self.previewView.insertSubview(self.rectangleView, at: 0)
}
This is really easy to follow. We still have the same frame for our rectangleView. Now, we set the text of the label to be an emoji followed by the font size. Since we want the labels to cover the entire box, we set its width and height to be the same as the rectangleView. Finally, we removed the code that would create a border and instead add the label to our box and add the box to the previewView.
Build and run the app. Is the code working? Can you see the human emoji on the cat?
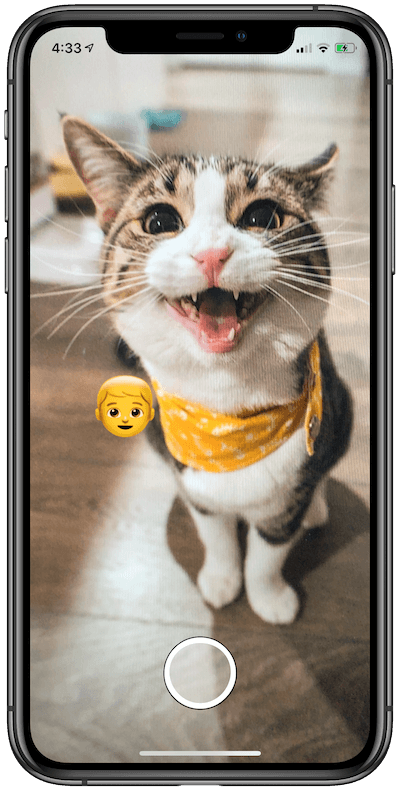
It works! We’ve got a human emoji placed on the cat. Now, of course, it’s not perfect because Vision only detects a cat object, not the facial features of the cat. Hopefully Apple will add that soon and we can further refine the filter.
Scanning the Business Card Using VNDocumentCameraViewController
Whew! We made it through the first part. From here on, it gets a little easier. When you snap the picture of your cat, you automatically get pushed to the Cat Profile view where you can see the image you’ve taken, the details of the cat, and a button that says “Scan For Details“. We’ll be pulling up the new document scanner code when this button is tapped on.
Navigate to CatProfileViewController.swift. At the top of the file, underneath import UIKit, type import VisionKit. The difference between Vision and VisionKit is that while Vision lets your perform computer vision analyses on an image, VisionKit is a small framework that lets your app use the system’s document scanner.
Now within the scanDocument() function, all you need to add are three lines of code.
@IBAction func scanDocument(_ sender: Any) {
    let documentCameraViewController = VNDocumentCameraViewController()
    documentCameraViewController.delegate = self
    self.present(documentCameraViewController, animated: true, completion: nil)
}
The VNDocumentCameraViewController() is a special type of view controller created by Apple which is used to scan the documents. We set the delegate of that controller and present the view controller.
Next, you need to implement the VNDocumentCameraViewControllerDelegate in the class. Change the line where we define out CatProfileViewController class to look like this.
class CatProfileViewController: UIViewController, VNDocumentCameraViewControllerDelegate {
    ....
}
Build and run the app. After taking a picture, when you press “Scan for Details”, the device’s document scanner should pop up.
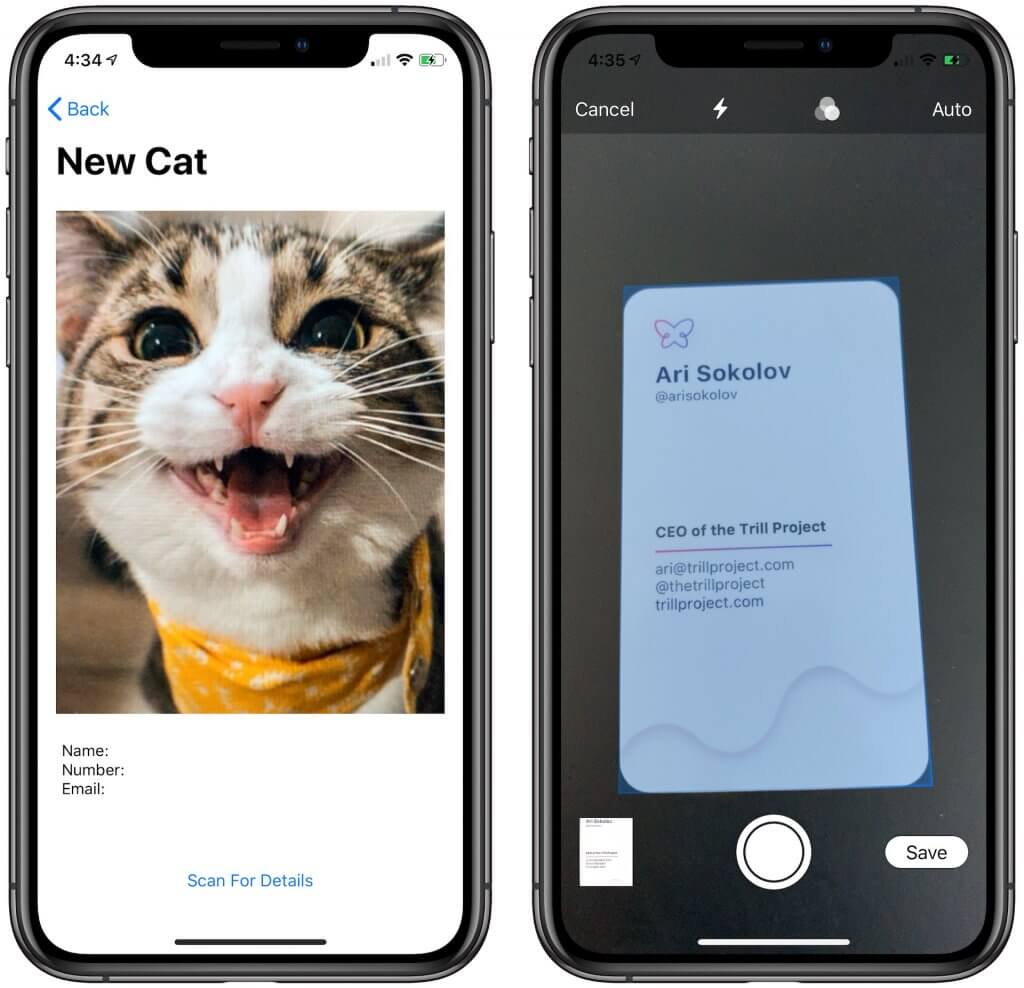
Looks like it’s scanning! However, when we press “Save”, nothing happens. This is because we haven’t implemented any delegate methods yet. Underneath, the scanDocument() function, type the following.
func documentCameraViewController(_ controller: VNDocumentCameraViewController, didFinishWith scan: VNDocumentCameraScan) {
    let image = scan.imageOfPage(at: 0)
    self.catImageView.image = image
    controller.dismiss(animated: true)
}
The documentCameraViewController(didFinishWith:) is a method that runs when the Save button is clicked. We take the first scan, make it an image, and set the catImageView to display this image. We’re doing this to make sure that the scanner is working well.
Build and run the app. When you have to scan for details, scan over any business card and when you click “Save”, it should dismiss the document scanner and set the image to the catImageView.

Now that the app is able to detect the business card, let’s further implement it to extract the textual data from the card.
Text Recognition Using VNRecognizeTextRequest
With the new API, VNRecognizeTextRequest, introduced in iOS 13, it’s pretty easy to finds and recognizes text in an image.
Again, first import VisionKit in the file because the new API is bundled in the framework. As explained earlier, this will bring over the Vision API’s. Next, before the viewDidLoad() function, type the following:
var textRecognitionRequest = VNRecognizeTextRequest()
var recognizedText = ""
The VNRecognizeTextRequest is just like the VNRecognizeAnimalsRequest class that we’ve used earlier. This request tells Vision to run text recognition on whatever image we pass to it. Later, when Vision detects text in a image, we’ll assign it to the variable recognizedText.
Head over to the viewDidLoad() function and update the code like below:
 override func viewDidLoad() {
super.viewDidLoad()
    self.navigationController?.setNavigationBarHidden(false, animated: true)
    self.title = "New Cat"
    catImageView.image = catImage

    textRecognitionRequest = VNRecognizeTextRequest(completionHandler: { (request, error) in
        if let results = request.results, !results.isEmpty {
            if let requestResults = request.results as? [VNRecognizedTextObservation] {
                self.recognizedText = ""
                for observation in requestResults {
                    guard let candidiate = observation.topCandidates(1).first else { return }
                      self.recognizedText += candidiate.string
                    self.recognizedText += "\n"
                }
                self.catDetailsTextView.text = self.recognizedText
            }
        }
    })
}
In the code, we initiate a VNRecognizeTextRequest. Vision returns the result of this request in a VNRecognizedTextObservation object. This type of observation contains information about both the location and content of text and glyphs that Vision recognized in the input image.
For every item in the requestResults array, we choose the first topCandidates. What is this? Well for every observation Vision makes, it outputs a list of potential candidates for the detected text. In some cases, it may be useful to consider all the possible text. For our case, we only care about the most accurate prediction.
Finally, we take the candidate.string and add it to our recognizedText. After going through every observation in the requestResults array, we set the text of the catDetailsTextView to our recognizedText.
Your code should look a little like the image below:
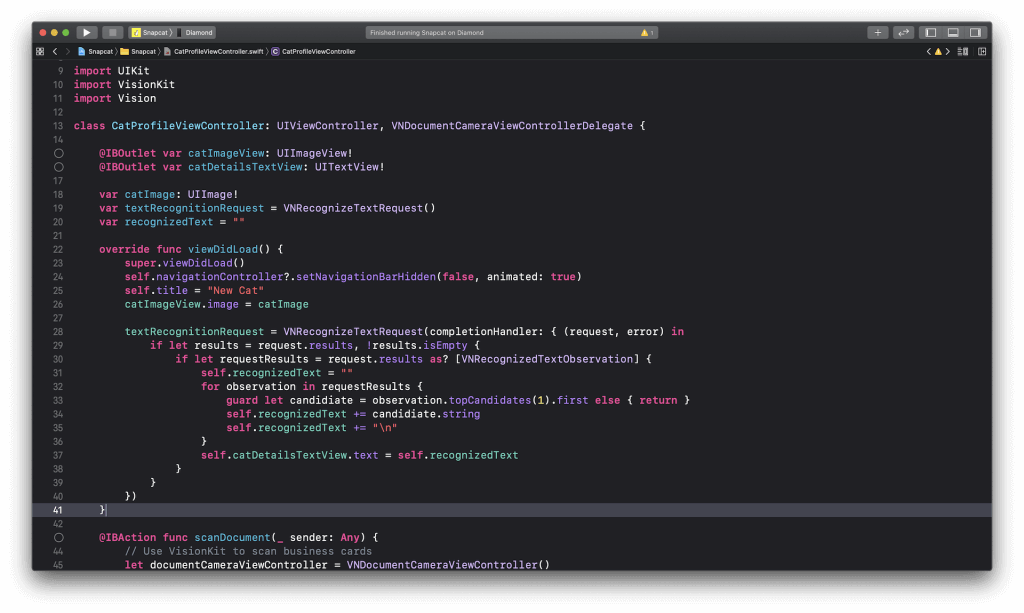
You can build and run the app now but nothing will happen. Why? This is because we still haven’t defined a handler to perform the request. This can be accomplished in a couple lines of code. Head back to the documentCameraViewController(didFinishWith:) function and modify it like this:
func documentCameraViewController(_ controller: VNDocumentCameraViewController, didFinishWith scan: VNDocumentCameraScan) {
    let image = scan.imageOfPage(at: 0)
    let handler = VNImageRequestHandler(cgImage: image.cgImage!, options: [:])
    do {
        try handler.perform([textRecognitionRequest])
    } catch {
        print(error)
    }
    controller.dismiss(animated: true)
}
The code above should look familiar as we used it in the first section of the tutorial. We define a handler of type VNImageRequestHandler and input the cgImage of our scan.
A VNImageRequestHandler is an object that processes one or more image analysis requests pertaining to a single image. By specifying the image, we can begin executing the Vision request. In the do block, we ask the handler to perform the Vision request we defined earlier. x
Build and run the app. Is it working?
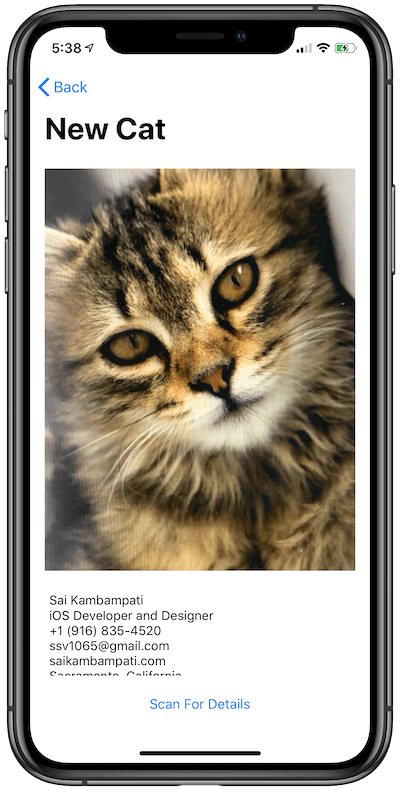
It seems to be working quite well! We’re able to gather all the text from the scanned card and place it onto the text view.
Fine Tuning the Text Recognition
Now in my image above, the text recognition worked great. However, I’ll try to help you fine tune our VNRecognizeTextRequest in case it didn’t work so well for you.
At the end of our viewDidLoad() function, type the following:
textRecognitionRequest.recognitionLevel = .accurate
textRecognitionRequest.usesLanguageCorrection = false
textRecognitionRequest.customWords = ["@gmail.com", "@outlook.com", "@yahoo.com", "@icloud.com"]
These are some of the values that the VNRecognizeTextRequest has. You can modify them to fine tune your application. Let’s go through these.
.recognitionLevel: You have two options between these:.fastand.accurate. When you want the request to recognize text, you can choose between recognizing faster or more accurately. Apple advices to use.accuratebecause even though it take slightly more time, it works well for recognizing texts in custom font shapes and size. The advantage with.fastis that it takes up less memory on the device..usesLanguageCorrection: Here’s how Vision Text Recognition Request works. After grabbing the text from each observation, it doesn’t just output that text to you. It goes through another layer of Natural Language to change any misspelled words. Think if it like a spell and grammar check. By changing this Boolean value, you can enable this on or off. When should you set this to true? If your application is being used to recognize text from a book or a document, then you should enable this setting. However, in our scenario, we’re using it to detect names, numbers, and email addresses. If we enable this setting, it’s possible that the request may think the number 1 is the lowercase letter l. Or another example is the last name He which Vision may correct to Hey or Hi..customWords: This value is an array that can be used for specific words. In our scenario, we’re detecting emails which generally end in @email.com. While this isn’t a word on its own, we wouldn’t want Vision predicting these characters to be something else. By offering custom words, the text recognition request analyzes the image a second time to see if any of those words appear so it can recognize them properly.
Build and run the app. Is there any improvement? Did the recognition system get better or worse? By fine tuning these parameters, you can utilize Vision’s text recognition system to be the best in your app.
Conclusion
In this tutorial, as you can see, it is so easy to take advantage of all the new API’s in Vision to perform object recognition. You learned how we can use the brand new animal detector to recognize cats and dogs in an image. You should also understand how the new framework, VisionKit, makes scanning documents a breeze. Finally, the coveted text recognition APIs became available in Vision. With easy-to-use API’s and lots of parameters for fine tuning the system, you can easily implement text recognition in your apps.
However, this isn’t all that was announced at WWDC 2019. Vision also introduced API’s to classify images into categories, analyze saliency, and detect human rectangles. I’ve attached some great links if you want to continue learning more about Vision.
- Vision Documentation
- WWDC 2019 Session: Understanding Images in Vision Framework
- WWDC 2019 Session: Text Recognition in Vision Framework
- AppCoda Tutorial: Using Vision Framework for Text Detection in iOS 11
I’d love to know what you’re building with Vision! Leave a comment below if you have a question or want to share what you’re working on. You can download the full tutorial here. Thanks for reading! Catch you in the next article!


