

Apple’s “app group” technology allows a collection of macOS (or iOS) apps from the same development team, developer, vendor, etc., to all communicate with each other, coordinate functionality, share resources, and minimize redundancies. Apple says this capability “allows the apps within the group to share Mach and POSIX semaphores and to use certain other IPC [interprocess communication] mechanisms among the group’s members.”
A word of caution, though: I’ve experienced inconsistent and erratic behavior with macOS app groups, especially on OS X 10.15, Catalina. As explained below, you may have to experiment with the app group ID format. Nonetheless, this tutorial will help those developers who submit macOS apps through the Mac App Store and those who distribute their apps outside of the Mac App Store by using 3rd Party Mac Developer Application and Developer ID certificates — including signing and notarization.
Today, I’ll walk you through the configuration and encoding of an app group whose members communicate through a shared instance of UserDefaults, more commonly known as user preferences. One app allows me (and my users) to pick a view background color — like a theme color — and write it to my shared UserDefaults. The other app can read that same shared preference and update its view’s background color to the currently saved value. This process is dynamic. As I change the theme color in one app, the other app can update its view’s background color immediately.
We’ll build these apps and app group together in this tutorial. You can download the sample apps here. Here’s a video of the two apps coordinating together:
Probably one of the most intriguing aspects of app groups is that their commonly shared container, a mini folder and file system, transcends sandboxing. To highlight this attribute of app groups, one of my sample apps is sandboxed while the other is not.
App groups are a great feature, but unfortunately they’re not well-documented and therefore generally not well understood. For example, Apple has a section in it’s macOS developer documentation called “Adding an App to an App Group” which strongly implies that all you have to do is add an entitlement to your app’s project. In another developer document, Apple states “You control the groups that your app belongs to by manipulating its entitlements.” No mention is made of a very crucial step.
For awhile, adding an app group identifier to an Xcode project’s entitlements was sufficient in macOS to create and join an app group. Only iOS required that developers have an account with Apple and that they register the app group ID on the Apple Developer portal. That requirement now applies to macOS app groups, too, or does it? We’ll talk about this in-depth below.
If you have a number of related apps, especially ones you sell as part of an App Store bundle, then app groups might be for you. Keep in mind that apps can be members of more than one app group, too.
Let’s walk though all the required steps to create two macOS apps that demonstrate app groups — and note that almost all the content herein applies to iOS app groups.
Remember that you’ll have to provide your own Apple Developer account’s Team ID for creating your own app group ID and for using both of my sample apps.
Registering your app group’s ID
The first thing to do when creating an app group is to register an app group ID. Note that each of your apps can belong to, or not belong to, multiple app groups. Have a copy of your Apple Developer account’s Team ID ready, like copied into your clipboard. In the screenshots shown below, you’ll substitute your own Team ID where I’ve redacted my own. Let’s get started:
- Login to your Apple Developer account;
- Select Certificates, IDs & Profiles from the left sidebar or the center of the screen;
- You’ll land on the Certificates screen by default, but select Identifiers from the left sidebar;
- Click the dropdown labelled App IDs, like so:
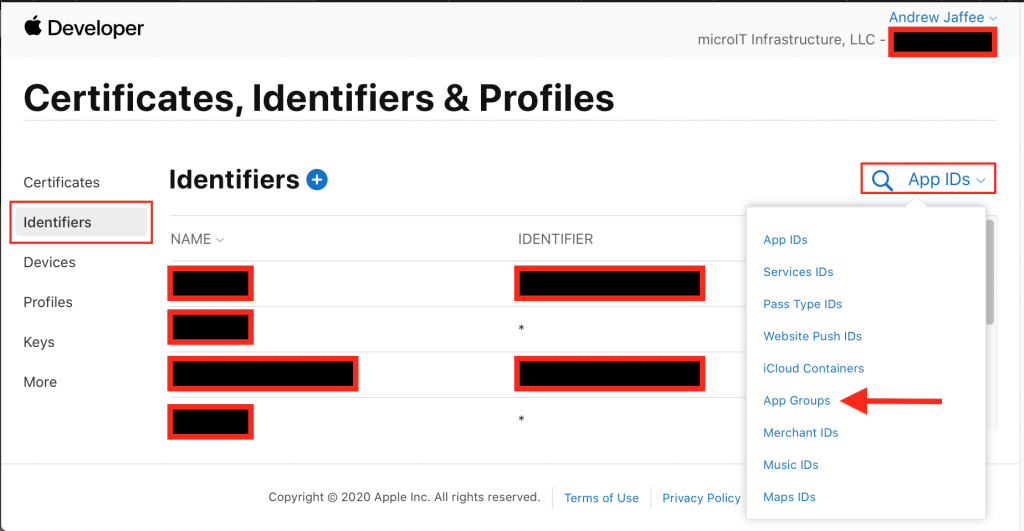
- Select the App Groups option from the dropdown;
- Now that you’re on the Identifiers for App Groups page, click the plus-sign-inside-the-circle button;
- On the Register a New Identifier page that comes up, the App Groups radio button will be auto-selected, like this:

- Click the big, blue Continue button on the upper right-hand side of the same page;
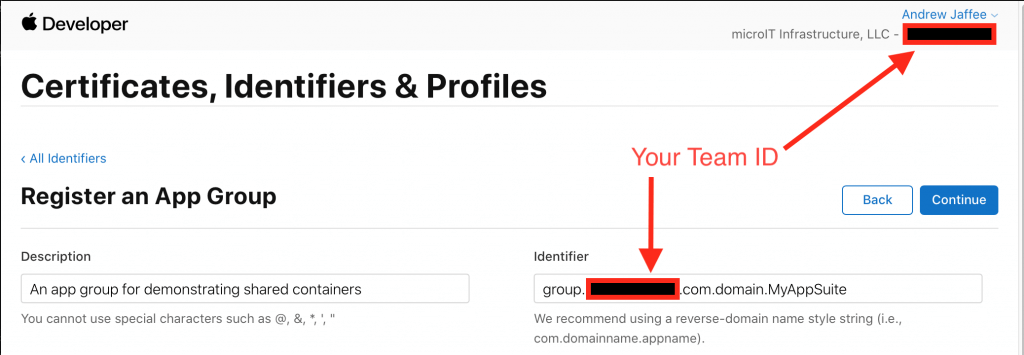
- You’ll land on the Register an App Group page where you’ll get ready to fill in the Description and Identifier fields;
- Type in a meaningful Description and type/paste your Team ID into the Identifier field;
- Notice that “group.” is prepended to the Identifier, and that I added some meaningful text, following Apple’s suggestion, like this:
- Click the big, blue Continue button;
- You can review your new app group ID, are given the chance to click Back to make changes, but we’ll select the Register button; and,
- Now back on the Identifiers for App Groups page, you’ll see that you’ve created a new app group.
What if app group ID registration causes problems?
Remember that I called app group ID registration a “crucial step” above? Some people may experience problems with an app group ID of the form group.TEAM_ID.com.domain.MyAppSuite. If you find that you can’t sign your app or that your shared container is not created, then remove the group. prefix from your app group’s ID. So instead of an app group ID of the form group.TEAM_ID.com.domain.MyAppSuite, you’ll use one like this: TEAM_ID.com.domain.MyAppSuite.
The app group’s shared container
By definition, an app group is a collection of two or more apps. Whichever app that is a member of the app group, and runs before any of the other member apps run, creates what’s called the group’s “shared container.” It does this once unless someone deletes the container, in which case macOS recreates the container when it is next referenced by one of the group’s member apps. That container is a mini folder/file system like those that macOS provides for sandboxed apps. It’s a bit like the folder system that macOS builds for each user on a Mac or MacBook. Every shared container is stored in the macOS file system in a folder that has the same name as the app group ID, like group.TEAM_ID.com.domain.MyAppSuite. That folder is always stored in the macOS file system in ~/Library/Group Containers/. So the full container path is ~/Library/Group Containers/group.TEAM_ID.com.domain.MyAppSuite.
The app group has its own user preferences data store, accessible via a special instance of UserDefaults. These preferences are stored in a .plist file just like they are for all macOS apps. In this tutorial, those preferences are stored in the file at this path:
`~/Library/Group Containers/group.YOUR_TEAM_ID.com.domain.MyAppSuite/Library/Preferences/group.YOUR_TEAM_ID.com.domain.MyAppSuite.plist`All apps in the app group have read and write access to the shared container, including access to the shared preferences.
A Word about my Sample Code
My code is semantically clear and well commented — but simple. You shouldn’t have any trouble reading it and understanding it. Remember that my code and this accompanying article are pedantic in nature. We’re talking about app groups, not about using MVC, robust error handling, testing, etc.
“FirstApp” – Creating an app that is part of an app group
Let’s walk through building my app group’s first app, ingeniously named “FirstApp.” It reads from and writes to the shared container. My FirstApp writes a color to the shared container’s preferences so that my “SecondApp” can read that preference, and thus we have interprocess communication.
Open up Xcode (I’m using 11.2.1) and create a new application based on the macOS App template.
Follow these steps in TARGETS -> Signing & Capabilities:
- Tick the Automatically manage signing checkbox and then set the Team and Bundle Identifier appropriately;
- Make sure to that you have the App Sandbox and Hardened Runtime capabilities;
- Click the + button next to Capability and add the App Groups capability by dragging it in from the Library, like this:
- Add your app group ID to the App Groups slot (it’s actually an array element in the .entitlements file).
Remember that your app group ID should look like this:
group.YOUR_TEAM_ID.com.domain.MyAppSuiteNote that I specifically sandboxed this app to show you that an app group app can read the shared container, which is outside of this app’s sandbox.
Everything you need to see is in the ViewController.swift file. Let’s briefly walk through the most important code in FirstApp — a few selected snippets.
Let’s examine how I write user-selected color values from my app’s NSComboBox to the app group’s shared preferences. The interprocess communication comes into play when my SecondApp, described below, reads that color preference. Notice that I’m getting a special type of reference to UserDefaults by calling its init(suiteName:) initializer, where the full definition is init?(suiteName suitename: String?), and note the optional return value. So here’s how I access user preferences and set a key/value for my app group by initializing UserDefaults with my app group’s ID:
...
/** 3a) Write user preference to shared container. */
func setPreferenceValue(_ value: Any?, forKey key: String, in appGroup: String) {

    // 3b) If we can access preferences to our app group...
    if let groupUserDefaults = UserDefaults(suiteName: appGroup) {

        // 3c) Write the value for the given key
        // to our shared container.
        groupUserDefaults.set(value, forKey: key)
        print("Wrote to shared user defaults.")

    }

} // end func setPreferenceValue
...
If you’re going to do something with your app group like store common files or maintain a shared cache, you’ll need to be able to get a valid macOS file system path to read from, and possibly write to, files/folders in the shared container. To get a URL to the root folder of your shared container, you use the containerURL(forSecurityApplicationGroupIdentifier:) instance method of FileManager, passing it your app group ID. Notice that instead of testing to see if a file exists first before reading from it, I proactively read from it using NSData and then check for a return value:
...
/** 4a) If you're going to manage and access common resources
 or assets in the shared container, remember that "It’s far better to
 attempt an operation (such as loading a file or creating a directory),
 check for errors, and handle those errors gracefully than it is to try
 to figure out ahead of time whether the operation will succeed."

 - returns: True if plist exists; false if it doesn't exist
*/
func sharedPreferencesPlistExists() -> Bool {

    var containerExists = false

    let sharedFileManager = FileManager.default

    /* 4b) "In macOS, a URL of the expected form is always returned, even if the app group is invalid, so be sure to test that you can access the underlying directory before attempting to use it." */
    let sharedContainerFolderURL = sharedFileManager.containerURL(forSecurityApplicationGroupIdentifier: appGroupID)
    // 4c) Now we build a standard path ("Library/Preferences/")
    // to the preferences data store file (plist). Note
    // the format of the plist's name.
    let sharedContainerPrefsPlistURL = (sharedContainerFolderURL?.appendingPathComponent("Library/Preferences/group.YOUR_TEAM_ID.com.domain.MyAppSuite.plist"))!
    // 4d) Try to read data from the preferences
    // plist file.
    let sharedContainerPrefsPlistData = NSData(contentsOf: sharedContainerPrefsPlistURL)
    // 4e) If the file exists...
    if let fileData = sharedContainerPrefsPlistData {

        // 4f) if the plist file has contents (bytes)...
        if fileData.length > 0 {

            // 4g) We know that the plist is valid.
            print(".plist file size: \(fileData.length)")
            containerExists = true

        }

    }

    return containerExists

} // func sharedContainerExists()
...
Upon clicking the Check for .plist button in FirstApp, the console shows:
.plist file size: 90
Shared plist created.
“SecondApp” – Creating another app so we have an app group
To restate what I would hope is now the obvious, “an app group is a collection of two or more apps.” SecondApp is, well, the other app that makes up my little app group. SecondApp reads a preference from the shared container. That preference for color is written by FirstApp. SecondApp sets its view controller’s NSView background color to the shared container’s preference and thus we have interprocess communication.
Open up Xcode (I’m using 11.2.1) and create a new application based on the macOS App template.
Follow these steps in TARGETS -> Signing & Capabilities:
- Tick the Automatically manage signing checkbox and then set the Team and Bundle Identifier appropriately;
- In this case, make sure to remove the App Sandbox capability;
- Make sure the app has the Hardened Runtime capability;
- Click the + button next to Capability and add the App Groups capability by dragging it in from the Library, like this:
[DragToAddAppGroupCapability.gif] - Add your app group ID to the App Groups slot (it’s actually an array element in the .entitlements file).
Remember that your app group ID should look like this:
group.YOUR_TEAM_ID.com.domain.MyAppSuiteEverything you need to see is in the ViewController.swift file. Let’s briefly walk through the most important code in SecondApp — just one selected snippet. Again, I’m getting a special type of reference to UserDefaults by calling its init(suiteName:) initializer with my app group’s ID as an argument. This is how I read the user preference for color that was set in FirstApp. I then change my main window’s view background color to the preferred color. Here’s the code:
...
func setViewBackgroundColor() {

    // 1) Get a reference to the shared user defaults for the
    // app group we created.
    if let groupUserDefaults = UserDefaults(suiteName: appGroupID) {

        // 2) Read the value for the "BackgroundColor" key stored
        // in our app group shared container's preferences
        // (user defaults).
        if let backgroundColor = (groupUserDefaults.object(forKey: "BackgroundColor")) as? String {

            // 3) Set the background color of our NSView to
            // the value we read from the our shared container's
            // preferences.
            self.view.wantsLayer = true

            self.view.needsDisplay = true

            if backgroundColor == "Red" {
                self.view.layer?.backgroundColor = NSColor.red.cgColor
            }
            else if backgroundColor == "Green" {
                self.view.layer?.backgroundColor = NSColor.green.cgColor
            }
            else if backgroundColor == "Blue" {
                self.view.layer?.backgroundColor = NSColor.blue.cgColor
            }
            else {
                self.view.layer?.backgroundColor = NSColor.gray.cgColor
            }

            print("Read background color, \(backgroundColor), from shared user defaults.")

        } // end if let backgroundColor =...

    } // end if let groupUserDefaults =...

} // end func setViewBackgroundColor()
...
Note that I specifically didn’t sandbox this app to show you that macOS apps don’t necessarily need to be sandboxed (especially those distributed via 3rd party signing) and that non-sandboxed apps can access their app group’s shared container.
Installing and distributing your macOS apps
Remember that if you want to install and/or distribute macOS apps like the ones I discussed here, you have two choices. You can go the 3rd party route and sign and notarize your apps outside of the Mac App Store or you can submit your apps for review by staying within the Mac App Store. macOS apps are more flexible in terms of distribution than iOS apps.
Conclusion
I hope you see the benefits that can be gained by use of app groups, whether it be in iOS or macOS. You can control and update your apps more easily by centralizing shared resources. You can eliminate redundancies. And you can get really advanced by using technologies like shared memory (as long as you remember to keep things thread safe). I could go on and on about the benefits of app groups, but I hope you’ll see that, for a relatively small price, you can get a high return on investment.


