

In a previous tutorial I presented a specific new multitasking feature in iOS 7, the Background Fetch, showing how easy it is to make an app to schedule downloads in the background. In this tutorial, I am going to work with another great multitasking feature, named Background Transfer Service.
Prior to iOS 7, only a few kinds of application were allowed to download resources or content on the background while they would not run, and just for a limited time. Big downloads should actually occur while the app was in the foreground, and that was a hard fact for all developers. However, things changed in iOS 7 with the Background Transfer Service coming, as it totally eliminates all the limitations presented above. Not only every app can download content while it’s not running, but it can also have as much time as it’s required at its disposal until all downloads are over.
Great flexibility and more power comes when the Background Transfer Service is combined with other multitasking features, such as the Background Fetch. For example, using the Background Fetch an app can schedule and initiate a download in the limited time that has at its disposal, and then using the Background Transfer Service to perform the actual data downloading.

When the Background Transfer Service gets in action, what is actually happening is that the operating system takes charge of all the download process, performing everything in background threads (daemons). While a download is in progress, delegates are used to inform the app for the progress, and wakes it up in the background to get more data if needed, such as credentials for logging in to a service. However, even though everything is controlled by the system, users can cancel all downloads at any time through the application.
Many times, the Background Transfer Service is synonymous with a new API introduced in iOS 7, the NSURLSession. This class actually replaces the NSURLConnection which was used until iOS 6, providing more features, flexibility and power when dealing with online content. With NSURLSession, three types of actions are allowed: File downloading and uploading, and data fetching (for instance, HTML or JSON). To communicate with online servers, it uses the HTTP (and HTTPS) protocol.
Sessions created by the NSURLSession class, use as parts of them objects of the NSURLSessionTask class, called tasks. The NSURLSessionTask is an abstract one, therefore it cannot be used directly. However, there are three concrete subclasses of it that they can be used instead. These are:
- NSURLSessionDataTask: This class is used to fetch data.
- NSURLSessionDownloadTask: This one is used for downloading files.
- NSURLSessionUploadTask: It is used for uploading files to a server.
The above three classes provide ways to create tasks that perform all the allowed actions by the NSURLSession. Further more, a variety of delegate methods are provided for controlling all task actions and states, as well as for keeping track of the progress of a task.
The theory regarding the Background Transfer Service does not stop here. There are a lot more that can be written, but that’s the basic knowledge you need to have before we go any further. Of course, you are encouraged to visit Apple’s official documentation and make a comprehensive reading there as well.
In this tutorial we are going to see how to download files using the NSURLSession and the NSURLSessionDownloadTask classes. You will learn how to initiate download processes, how to track their progress while being in the foreground, and how to make your app able to cooperate with the system and get messages while being in the background. After having finished this tutorial, you’ll be almost ready to create apps that make use of the Background Transfer Service. So, keep on reading to learn some new pretty interesting multitasking stuff.
Demo App Overview
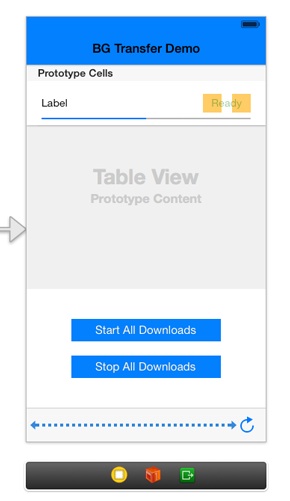
Our main goal in this tutorial is to manage to download some PDF files from Apple, using the NSURLSession and the NSURLSessionDownloadTask classes, and save them to the app’s Documents directory. Before I go into more details, here is a screenshot of the final product:
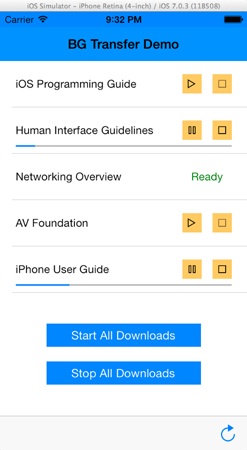
Looking at the above image, let’s discuss about it. As I said, our target is to download some files from Apple, five in total. Their size will vary: From about 700 KB to about 29 MB. In our sample app, we will add a table view, with five rows, each one matching to a file. On each cell, we will have the following subviews:
- A label for displaying the file name.
- A button for starting and pausing the downloading.
- A button for stopping the downloading.
- A progress view for tracking visually the progress of each download.
- A label that will be placed over the two above buttons (the buttons will become hidden), informing that a download is over.
Let me underline at this point that a NSURLSessionDownloadTask task object can be either paused or totally stopped. In both cases, when talking about pausing or stopping, we actually talk about cancelling the task, with one great difference: In the first case the class produces data for resuming the downloading of a file, while in the second that does not happen. So, by adding the buttons described above in each table view cell, we will manage to resume, pause or stop each file download separately.
In the introduction of this tutorial I mentioned that the Background Transfer Service reports the progress of a task to our app using delegate methods. That’s one more element we are going to try out, and for that reason we will use the progress bar on each cell. The progress bar will keep us informed about the progress of each download.
Further than the work we’ll do on each cell, we will add two more buttons under the table view. By using the first one, we will be able to start simultaneously (not really, but it will look like that) all file downloads. By using the second one, we will cancel all tasks. The functionality of those two buttons won’t be difficult to be implemented, as everything that we want them to perform, it will have already been implemented for a single download.
Lastly, we are going to add a navigation bar for showing the title of the app, and a toolbar at the bottom side of the screen where we will add a bar button item. This one will be used to delete all downloaded files from the app’s Documents directory, and to re-initialise all those properties that take part on a download process. For keeping a visual consistency, we will also apply the color of the navigation bar to the status bar.
Beyond all that, we are going to create an auxiliary class, which will be used to store various data regarding a file and its download status. I won’t get into more details on that, as we are going to devote a whole section to it. I want just to make clear that this class will be very important to us, as it’s going to be our primary tool during implementation. Actually, an object of that class will match to a file, so we are going to have five objects in total stored into an array. More about all these later.
As a final note, for testing the background download of the files (meaning when the app is not running), we are going to send a local notification to inform us when they are all finished. That will be the greatest proof of the Background Transfer Service functionality, of which the importance and usefulness I’m confident that you’ll manage to get through this tutorial.
Before we do the first step, please download the icons that will be used to the app from here.
Creating the App
Let’s start by creating our demo project. Launch Xcode and create a new project. In the guide window that will appear, make sure to select a Single View Application, in the Application category under the iOS section.
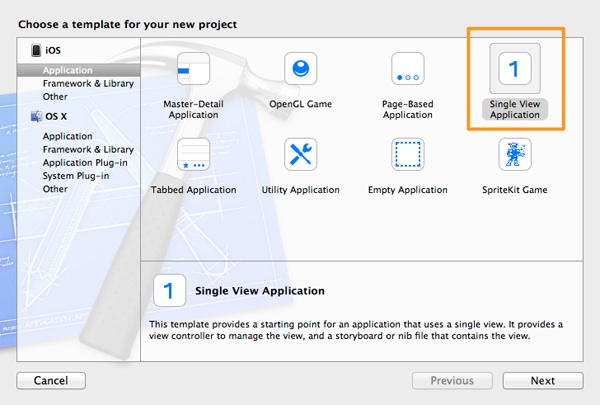
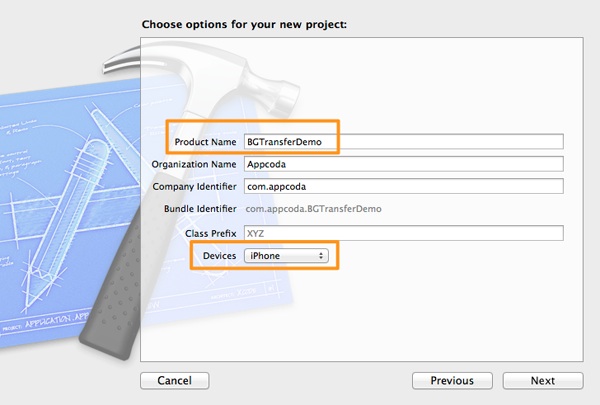
Click on the Next button to proceed. In the second step of the guide, in the Product Name field set the BGTransferDemo value as the project’s name (or anything else you like), and make sure that in the Devices drop down menu the iPhone value is selected.
Once you are ready, click one again on the Next button to go to the last step of the guide. In this window, just select a place to save your project and click Create. You are ready to go!
Interface Setup
We are going to begin the development of our app by setting up and configuring the interface using the Interface Builder. Click on the Main.storyboard file and wait until the IB screen appears in front of you.
For starters, grab from the Object Library a Navigation Bar, add it to the view and set its following attributes:
- Frame: X=0, Y=20, Width=320, Height=44
- Bar Tint: From the Crayons Palette, select the Aqua color.
- Title: BG Transfer Demo
Next, get a UIView object, and set the following:
- Frame: X=0, Y=0, Width=320, Height=40
- Background Color: Aqua (as before)
By adding this view on the status bar area, we manage to have a color consistency.
Until now, here is how your view should look like:

Next, get a UIToolbar and place it to the bottom of the screen. Select the existing bar button item, and set its Identifier to Refresh. Also, get a Flexible Space Bar Button Item and add it to the left of the existing bar button item. Here it is:

Let’s continue building our user interface, by adding a UITableView object to the view. Set its frame to (0, 64, 320, 300).
After that, get a UITableViewCell object and place it on the table view that you added previously to the view. Select it and set the next couple of attributes:
- Identifier: idCell
- Row Height: 60
- Selection: None
In the cell prototype, we are going to add some subviews. Begin with a UILabel, by setting the next properties of it:
- Frame: X=20, Y=19, Width=208, Height=21
- Font Size: 14.0
Next, add two *UIButton objects. For the first one, set these:
- Frame: X=236, Y=17, Width=25, Height=25
- Title: None
- Image: play-25
- Background Color: From the Crayons Palette, select the Cantaloupe color.
To the second button, set the next attributes:
- Frame: X=275, Y=17, Width=25, Height=25
- Title: None
- Image: stop-25
- Background Color: From the Crayons Palette, select the Cantaloupe color.
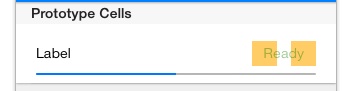
Get another UILabel from the Object Library, add it to the prototype cell, and set its next properties:
- Frame: X=236, Y=17, Width=64, Height=25
- Text: Ready
- Font Size: 14.0
- Color: From the Crayons Palette, select the Clover color.
- Hidden: YES
- Text Alignment: Center
Finally, add a UIProgressView object, setting its frame to (20, 49, 280, 2).
Your prototype cell should be similar to this one:
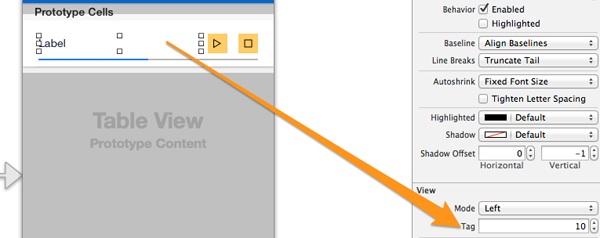
Before we add any more subviews to the interface, let’s set the tag values to the subviews of the prototype cell as shown below (the order matches to the order they presented):
- Label: 10
- Start button: 20
- Stop button: 30
- Progress view: 40
- Label (Ready): 50
Now, let’s keep going and let’s a couple of UIButton objects to the view, right under the table view.
For the first one:
- Frame: X=60, Y=404, Width=200, Height=30
- Title: Start All Downloads
- Text Color: White
- Background Color: Aqua
For the second one:
- Frame: X=60, Y=453, Width=200, Height=30
- Title: Stop All Downloads
- Text Color: White
- Background Color: Aqua
The user interface is ready. Here is a preview:
Now that all the subviews have been added to the main view, we must declare an IBOutlet property for the table view, and some IBAction methods that should be connected to the appropriate controls. Begin by opening the ViewController.h file. In there, add the next code segment:
@interface ViewController : UIViewController

@property (weak, nonatomic) IBOutlet UITableView *tblFiles;


- (IBAction)startOrPauseDownloadingSingleFile:(id)sender;

- (IBAction)stopDownloading:(id)sender;

- (IBAction)startAllDownloads:(id)sender;

- (IBAction)stopAllDownloads:(id)sender;

- (IBAction)initializeAll:(id)sender;


@end
Return to the Interface Builder and connect the tblFiles property to the table view. Next, match the action methods with the subviews as shown below:
- startOrPauseDownloadingSingleFile: Connect it to the start button of the prototype cell.
- stopDownloading: Connect it to the stop button of the prototype cell.
- startAllDownloads: Connect it to the first button below the table view, titled Start All Downloads.
- stopAllDownloads: Connect to the second button below the table view, titled Stop All Downloads.
- initializeAll: Connect it to the bar button item of the toolbar.
The interface is now set up and configured, and that means that we can move forward to the implementation of the app.
An Auxiliary Class
Now that the interface of our app is ready, we can proceed in coding. However, before we perform any implementation, we are going in this part to create an auxiliary class that will help us keep vital data throughout the project. We’ll see everything in details, but first let’s add the class’s file to the project.
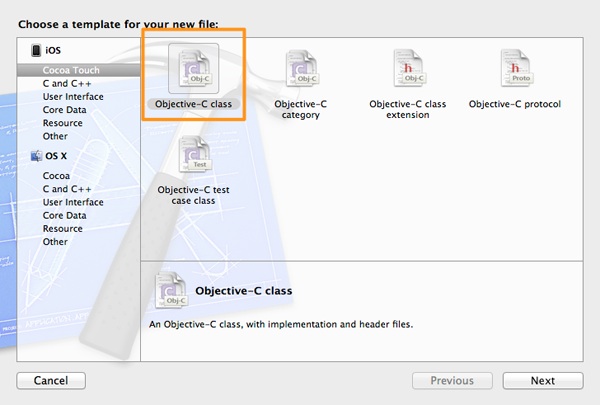
On your keyboard hit the Command-N combination to let Xcode present the guide for adding a new file. In the first window, select the Objective-C class in the Cocoa Touch category under the iOS section.
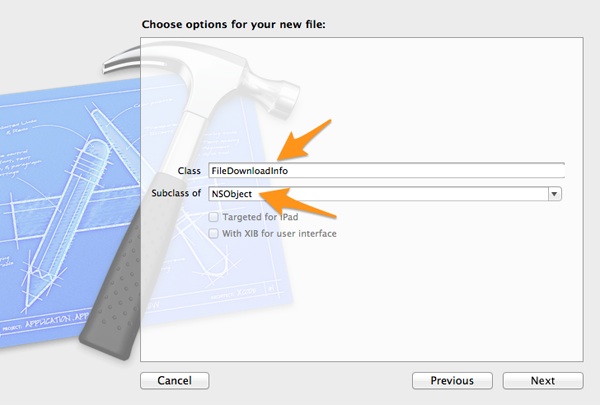
Click Next and in the second step, in the Subclass of field add the NSObject value. Then, in the Class field set the FileDownloadInfo as the class name.
Click on the Next button once again, and in the last step click on the Create button.
In this class we are going to declare a bunch of public properties, and a custom init method. Right next, I’m giving you the declarations in the FileDownloadInfo.h file. After that, I’ll provide a short description about each one.
@interface FileDownloadInfo : NSObject

@property (nonatomic, strong) NSString *fileTitle;

@property (nonatomic, strong) NSString *downloadSource;

@property (nonatomic, strong) NSURLSessionDownloadTask *downloadTask;

@property (nonatomic, strong) NSData *taskResumeData;

@property (nonatomic) double downloadProgress;

@property (nonatomic) BOOL isDownloading;

@property (nonatomic) BOOL downloadComplete;

@property (nonatomic) unsigned long taskIdentifier;

@end
Here is what each property is for:
- fileTitle: This property keeps a title describing the file to be downloaded (not the file name).
- downloadSource: The URL source where a file should be downloaded from as a NSString object.
- downloadTask: A NSURLSessionDownloadTask object that will be used to keep a strong reference to the download task of a file.
- taskResumeData: A NSData object that keeps the data produced by a cancelled download task that can be resumed at a later time (in other words, when it’s paused).
- downloadProgress: The download progress of a file as reported by the NSURLSession delegate methods.
- isDownloading: This flag, as its name suggests, indicates whether a file is being downloaded or not.
- downloadComplete: Indicates whether a file download has been completed.
- taskIdentifier: When a download task is initiated, the NSURLSession assigns it a unique identifier so it can be distinguished among others. The identifier values start from 0. In this property, we will assign the task identifier value of the downloadTask property (even though the downloadTask object has its own taskIdentifier property) just for our own convenience during implementation.
Note that a download task provides ways for checking the download status of a file. However, we declared our own properties here so we can work more in convenient way.
Now that all the necessary properties have been declared, let’s create a custom init method. In this one, we will provide the file title and the download source as parameters. Here is the declaration:
-(id)initWithFileTitle:(NSString *)title andDownloadSource:(NSString *)source;
Now, go to the FileDownloadInfo.m file, and implement it:
-(id)initWithFileTitle:(NSString *)title andDownloadSource:(NSString *)source{
    if (self == [super init]) {
        self.fileTitle = title;
        self.downloadSource = source;
        self.downloadProgress = 0.0;
        self.isDownloading = NO;
        self.downloadComplete = NO;
        self.taskIdentifier = -1;
    }

    return self;
}
Our class is ready. As a final step, go to the ViewController.m file and import it, so we can use it later:
#import "FileDownloadInfo.h"
Enabling Background Modes
Before we dive deep in writing code, we must do a necessary configuration, so our app be able to use the Background Transfer Service.
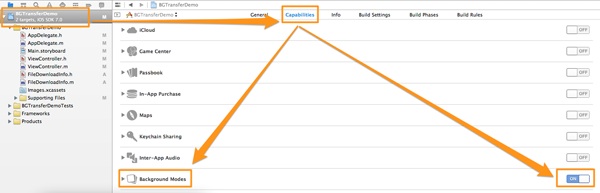
In the Project Navigator, select the project target at the top side. Next, in the main window click on the Capabilities tab, and all the features that you can enable or disable simply using a switch button will be displayed there. Among them, locate the Background Modes area (second from the end), and click on the switch button at its right to enable it.
Properties Initialization
In this part of the tutorial we are going to perform two tasks: The first one is to declare some private properties in the ViewController class, as well as some constants, and the second is to initialize five FileDownloadInfo objects that will be used for handling all the download process.
Let’s begin by declaring some constants using the #define preprocessor command. These constants match to the tag values we set to the subviews of the prototype cell in the Interface Builder. We will perform this step even though is optional, so instead of having to remember the tag value of each subview, we will just use the constant name when we want to make a reference to any of them.
In the ViewController.m file, go to the top of it, right under the last #import command. Add the next lines:
// Define some constants regarding the tag values of the prototype cell's subviews.
#define CellLabelTagValue               10
#define CellStartPauseButtonTagValue    20
#define CellStopButtonTagValue          30
#define CellProgressBarTagValue         40
#define CellLabelReadyTagValue          50
Now, go to the private section of the class, and add the following three declarations:
@interface ViewController ()

@property (nonatomic, strong) NSURLSession *session;

@property (nonatomic, strong) NSMutableArray *arrFileDownloadData;

@property (nonatomic, strong) NSURL *docDirectoryURL;

@end
The session object is the NSURLSession session that we will create and use in our application. We will work with that in the next section. The arrFileDownloadData mutable array, is the array in which they will be stored the five FileDownloadInfo objects that we will create in a while, where each such object matches to a file. Finally, the docDirectoryURL property will be assigned with the URL of the Documents directory of the app. I emphasize to the fact that the path to the Documents directory will be expressed as a NSURL object instead of a NSString object, because when working with the NSURLSession class we mostly deal with NSURL objects.
Further than the above properties, declare a private method as well, in which we will make the array’s and the the FileDownloadInfo objects’ initialization. Here it is:
@interface ViewController ()
...
...

-(void)initializeFileDownloadDataArray;

@end
Let’s proceed now with the initializeFileDownloadDataArray method implementation. In the code fragment that follows, the array is firstly initialized and then they are added to it five FileDownloadInfo objects. These objects are initialized and added to the array at the same time. Note that we use the custom init method we created to the FileDownloadInfo class, so we provide as parameters both the file title and the download source for each one.
-(void)initializeFileDownloadDataArray{
    self.arrFileDownloadData = [[NSMutableArray alloc] init];

    [self.arrFileDownloadData addObject:[[FileDownloadInfo alloc] initWithFileTitle:@"iOS Programming Guide" andDownloadSource:@"https://developer.apple.com/library/ios/documentation/iphone/conceptual/iphoneosprogrammingguide/iphoneappprogrammingguide.pdf"]];
    [self.arrFileDownloadData addObject:[[FileDownloadInfo alloc] initWithFileTitle:@"Human Interface Guidelines" andDownloadSource:@"https://developer.apple.com/library/ios/documentation/UserExperience/Conceptual/MobileHIG/MobileHIG.pdf"]];
    [self.arrFileDownloadData addObject:[[FileDownloadInfo alloc] initWithFileTitle:@"Networking Overview" andDownloadSource:@"https://developer.apple.com/library/ios/documentation/NetworkingInternetWeb/Conceptual/NetworkingOverview/NetworkingOverview.pdf"]];
    [self.arrFileDownloadData addObject:[[FileDownloadInfo alloc] initWithFileTitle:@"AV Foundation" andDownloadSource:@"https://developer.apple.com/library/ios/documentation/AudioVideo/Conceptual/AVFoundationPG/AVFoundationPG.pdf"]];
    [self.arrFileDownloadData addObject:[[FileDownloadInfo alloc] initWithFileTitle:@"iPhone User Guide" andDownloadSource:@"http://manuals.info.apple.com/MANUALS/1000/MA1565/en_US/iphone_user_guide.pdf"]];
}
Now that this method has been defined, it must be called every time the app is launched. Therefore, go to the viewDidLoad method and make that call:
- (void)viewDidLoad
{
    [super viewDidLoad];

    [self initializeFileDownloadDataArray];
}
So far, so good! The array we just initialized and filled with objects will be used multiple times during the app implementation, and now that it’s ready we can move on and assign the appropriate value to the docDirectoryURL property. Add the next couple of lines to the viewDidLoad method:
NSArray *URLs = [[NSFileManager defaultManager] URLsForDirectory:NSDocumentDirectory inDomains:NSUserDomainMask];
self.docDirectoryURL = [URLs objectAtIndex:0];
Lastly, add the next few lines that make self the delegate and datasource of the table view, and disable the scrolling on it:
// Make self the delegate and datasource of the table view.
self.tblFiles.delegate = self;
self.tblFiles.dataSource = self;

// Disable scrolling in table view.
self.tblFiles.scrollEnabled = NO;
Table View Preparation
Up to this point, we created the custom class that we will use in our project, we declared some private properties and we did some initializations. Now, before we dive in the Background Transfer Service details, it’s the best time to implement the minimum delegate and datasource table view methods required by our app to run.
First of all, open the ViewController.h file and modify the @interface header line, so our class conforms to the UITableViewDelegate and UITableViewDataSource protocols as shown below:
@interface ViewController : UIViewController
Now, return to the ViewController.m file, and add the next three methods:
-(NSInteger)numberOfSectionsInTableView:(UITableView *)tableView{
    return 1;
}


-(NSInteger)tableView:(UITableView *)tableView numberOfRowsInSection:(NSInteger)section{
    return self.arrFileDownloadData.count;
}


-(CGFloat)tableView:(UITableView *)tableView heightForRowAtIndexPath:(NSIndexPath *)indexPath{
    return 60.0;
}
We’ve left the tableView:cellForRowAtIndexPath: method to implement. Before I present it, let me say in short what is going to take place in it.
- At first, we will dequeue the cell.
- We will get the appropriate FileDownloadInfo object from the arrFileDownloadData array based on the indexPath.row value for accessing the respective file’s download properties.
- We will get all the cell’s subviews using their tag values, and we will assign them to local variables for easy access.
- We will declare a local variable for storing the appropriate image name for the start button.
- We will set the file’s title to the appropriate label of the cell.
- If the file is not being downloaded, meaning that the isDownloading property of the respective FileDownloadInfo object is false, then: A. The progress view will become hidden, B. The stop button will become disabled. C. Depending on whether the download is complete or not (the downloadComplete property of the FileDownloadInfo object), we will either display the start and stop buttons, or the label with the Ready text. D. We’ll define the play-25 as the image name for the start button, which will prompt to tap it for starting the download.
- If the file is being downloaded, then: A. We will show the progress view. B. We will enable the stop button. C. We will change the start button’s image name to pause-25.
- Finally, we will set the appropriate image to the start button depending on any case of the above.
Here is the implementation:
-(UITableViewCell *)tableView:(UITableView *)tableView cellForRowAtIndexPath:(NSIndexPath *)indexPath{
    UITableViewCell *cell = [tableView dequeueReusableCellWithIdentifier:@"idCell"];
    if (cell == nil) {
        cell = [[UITableViewCell alloc] initWithStyle:UITableViewCellStyleDefault reuseIdentifier:@"idCell"];
    }

    // Get the respective FileDownloadInfo object from the arrFileDownloadData array.
    FileDownloadInfo *fdi = [self.arrFileDownloadData objectAtIndex:indexPath.row];

    // Get all cell's subviews.
    UILabel *displayedTitle = (UILabel *)[cell viewWithTag:10];
    UIButton *startPauseButton = (UIButton *)[cell viewWithTag:CellStartPauseButtonTagValue];
    UIButton *stopButton = (UIButton *)[cell viewWithTag:CellStopButtonTagValue];
    UIProgressView *progressView = (UIProgressView *)[cell viewWithTag:CellProgressBarTagValue];
    UILabel *readyLabel = (UILabel *)[cell viewWithTag:CellLabelReadyTagValue];

    NSString *startPauseButtonImageName;

    // Set the file title.
    displayedTitle.text = fdi.fileTitle;

    // Depending on whether the current file is being downloaded or not, specify the status
    // of the progress bar and the couple of buttons on the cell.
    if (!fdi.isDownloading) {
        // Hide the progress view and disable the stop button.
        progressView.hidden = YES;
        stopButton.enabled = NO;

        // Set a flag value depending on the downloadComplete property of the fdi object.
        // Using it will be shown either the start and stop buttons, or the Ready label.
        BOOL hideControls = (fdi.downloadComplete) ? YES : NO;
        startPauseButton.hidden = hideControls;
        stopButton.hidden = hideControls;
        readyLabel.hidden = !hideControls;

        startPauseButtonImageName = @"play-25";
    }
    else{
        // Show the progress view and update its progress, change the image of the start button so it shows
        // a pause icon, and enable the stop button.
        progressView.hidden = NO;
        progressView.progress = fdi.downloadProgress;

        stopButton.enabled = YES;

        startPauseButtonImageName = @"pause-25";
    }

    // Set the appropriate image to the start button.
    [startPauseButton setImage:[UIImage imageNamed:startPauseButtonImageName] forState:UIControlStateNormal];

    return cell;
}
Ready! At this point, you may test the app for first time. Don’t expect anything to work yet, you will just see its appearance.
Creating a Session
Previously, we declared a private property named session, which is an object of the NSURLSession class, and now we are going to work with it. In order to create a session for initiating download or upload tasks either on the background or the foreground, another class must be used, and that is the NSURLSessionConfiguration class. Through this, various session properties and policies can be set, a list of which you can find here.
What we are going to do here is pretty straightforward: At first, we will instantiate a NSURLSessionConfiguration object using the backgroundSessionConfiguration class method, we will set a desired property value, and then we will instantiate the session property.
Note: The backgroundSessionConfiguration class method is used when it’s desirable to perform background tasks. However, there are two more class methods for instantiating a session configuration object: The defaultSessionConfiguration which causes the session to behave just like the NSURLConnection with a default configuration, and the ephemeralSessionConfiguration which is useful when no persistent data storage of cookies or credentials is required.
The backgroundSessionConfiguration class method accepts one parameter, an identifier, which uniquely identifies the session started by our app in the system. It’s not possible two sessions with the same identifier to exist at the same time. In the returned configuration object by the above method, we will set only one property, the HTTPMaximumConnectionsPerHost. Through this, we will allow five simultaneous downloads to take place at once. In code, go to the viewDidLoad method and add the next lines:
NSURLSessionConfiguration *sessionConfiguration = [NSURLSessionConfiguration backgroundSessionConfiguration:@"com.BGTransferDemo"];
sessionConfiguration.HTTPMaximumConnectionsPerHost = 5;
You see that as the identifier value for our configuration object we set the com.BGTransferDemo. That is not set of stone, you can use any string that uniquely identifies the app in the system.
The next step that must be performed, is to instantiate the session property using the sessionConfiguration object. Here is how this is done:
self.session = [NSURLSession sessionWithConfiguration:sessionConfiguration
                                                 delegate:self
                                            delegateQueue:nil];
By writing three simple lines, a NSURLSession session has been instantiated and is now ready to be used in order to fire background download tasks.
Don’t worry if by setting self as the delegate of the session will make Xcode to issue some warnings. To silence it, open the ViewController.h file and modify the @interface header line to adopt the next protocol, as it seems right next:
@interface ViewController : UIViewController
Starting a Download Task
The session object we just instantiated, offers a variety of methods that allow to initiate a background download task. In our case, we’ll use the downloadTaskWithURL: method, which accepts a NSURL object as its parameter. Once it gets called, the file download begins. However, before we get there, let’s see everything step by step.
Earlier, when we designed the app interface in the Interface Builder, we declared some IBAction methods and we connected them to various subviews. To initiate, pause and resume a download task, we are going to use the startOrPauseDownloadingSingleFile: one. The steps we will make in it, are the following:
- At first, we will make sure that the start button of a table view cell was tapped, simply by checking its superview class.
- Next, we will specify the index path of the cell the start button belongs to.
- Based on the index path’s row property, we will get the FileDownloadInfo object from the respective index of the arrFileDownloadData array.
- We will check the isDownloading property, and if the specific file is not being downloaded, or if the download task is not paused, we will create a new download task using the downloadTaskWithURL: method of the session property.
Let’s see the implementation now, and we’ll discuss a bit more later:
- (IBAction)startOrPauseDownloadingSingleFile:(id)sender {
    // Check if the parent view of the sender button is a table view cell.
    if ([[[[sender superview] superview] superview] isKindOfClass:[UITableViewCell class]]) {
        // Get the container cell.
        UITableViewCell *containerCell = (UITableViewCell *)[[[sender superview] superview] superview];

        // Get the row (index) of the cell. We'll keep the index path as well, we'll need it later.
        NSIndexPath *cellIndexPath = [self.tblFiles indexPathForCell:containerCell];
        int cellIndex = cellIndexPath.row;

        // Get the FileDownloadInfo object being at the cellIndex position of the array.
        FileDownloadInfo *fdi = [self.arrFileDownloadData objectAtIndex:cellIndex];

        // The isDownloading property of the fdi object defines whether a downloading should be started
        // or be stopped.
        if (!fdi.isDownloading) {
            // This is the case where a download task should be started.

            // Create a new task, but check whether it should be created using a URL or resume data.
            if (fdi.taskIdentifier == -1) {
                // If the taskIdentifier property of the fdi object has value -1, then create a new task
                // providing the appropriate URL as the download source.
                fdi.downloadTask = [self.session downloadTaskWithURL:[NSURL URLWithString:fdi.downloadSource]];

                // Keep the new task identifier.
                fdi.taskIdentifier = fdi.downloadTask.taskIdentifier;

                // Start the task.
                [fdi.downloadTask resume];
            }
            else{
                // The resume of a download task will be done here.
         }
        }
        else{
            //  The pause of a download task will be done here.
        }

        // Change the isDownloading property value.
        fdi.isDownloading = !fdi.isDownloading;

        // Reload the table view.
        [self.tblFiles reloadRowsAtIndexPaths:@[cellIndexPath] withRowAnimation:UITableViewRowAnimationNone];
    }
}
First of all, let me justify the use of [[[[sender superview] superview] superview] in the first if condition. All the subviews we added to the prototype cells, belong to a view named content view, and this content view is a subview of a scroll view. The scroll view is actually a direct subview of the cell, that’s why we use the superview property so many times.
If you carefully see the above code snippet, you’ll notice that we check if a download task exists or not by using the taskIdentifier property of our custom class. When a new download task gets started, this property gets the tasks’s identifier value, so it stops having the −1 value. Further than that, the newly created download task is assigned to the downloadTask of the fdi object, so we can have a strong reference to it and access it directly later on.
Note that at the end of the method we change the isDownloading property value and we assign it the exact opposite value. The last step that is being performed, it the reloading of the appropriate table view row.
Beyond all that, it’s now clear how handful the FileDownloadInfo custom class we previously created is. By using its simple properties, we can control the behavior of a download task. Finally, as you see there are two else cases, which will be used for pausing and resuming a task, but that’s something that we will work with later.
At this point, you may run the app and tap on the start button (or click on the Simulator) of any file. I guarantee that the file will be perfectly downloaded, however you are not going to acknowledge it, as for the time being we haven’t implemented any report or other delegate methods. Moreover, the downloaded file is never going to be placed to the Documents directory, as that’s something that we must implement too.
Tracking Progress
A very important step was just implemented, by making a download task to get started. However, we are unable to know if the download is actually being performed, as we haven’t implemented any delegate method that could help us with that yet. So, in this part of the tutorial, let’s focus our attention on how we can manage to get the progress of a file download, and how we can reflect this progress visually to the user. That means in our app that we must update the progress view of each file that is being downloaded. By doing so we will succeed two things: The first (and obvious) is to keep us or our users informed about the whole progress, and the second is that by using a progress view, the app will become more alive.
There are numerous delegate methods that one could implement depending on the requirements of each application. To keep track of the download progress, there is the URLSession:downloadTask:didWriteData:totalBytesWritten:totalBytesExpectedToWrite: delegate method, which we are going to implement right now. Let’s have a look at it first, then we’ll talk about it:
-(void)URLSession:(NSURLSession *)session downloadTask:(NSURLSessionDownloadTask *)downloadTask didWriteData:(int64_t)bytesWritten totalBytesWritten:(int64_t)totalBytesWritten totalBytesExpectedToWrite:(int64_t)totalBytesExpectedToWrite{

    if (totalBytesExpectedToWrite == NSURLSessionTransferSizeUnknown) {
        NSLog(@"Unknown transfer size");
    }
    else{
        // Locate the FileDownloadInfo object among all based on the taskIdentifier property of the task.
        int index = [self getFileDownloadInfoIndexWithTaskIdentifier:downloadTask.taskIdentifier];
        FileDownloadInfo *fdi = [self.arrFileDownloadData objectAtIndex:index];

        [[NSOperationQueue mainQueue] addOperationWithBlock:^{
            // Calculate the progress.
            fdi.downloadProgress = (double)totalBytesWritten / (double)totalBytesExpectedToWrite;

            // Get the progress view of the appropriate cell and update its progress.
            UITableViewCell *cell = [self.tblFiles cellForRowAtIndexPath:[NSIndexPath indexPathForRow:index inSection:0]];
            UIProgressView *progressView = (UIProgressView *)[cell viewWithTag:CellProgressBarTagValue];
            progressView.progress = fdi.downloadProgress;
        }];
    }
}
The first thing we have to do, is to check if the system is aware of the size of the file that’s being downloaded. We will proceed with the progress update if only this data exists. If the file size is unknown, we simply display a message to the debugger, as there is no need to do anything else here.
The important part however is in the else clause. First of all, with these two lines:
int index = [self getFileDownloadInfoIndexWithTaskIdentifier:downloadTask.taskIdentifier];
FileDownloadInfo *fdi = [self.arrFileDownloadData objectAtIndex:index];
we locate the index of the appropriate FileDownloadInfo object in the arrFileDownloadData array, based on the task description of the downloadTask parameter object, and we use a local pointer to access it. The getFileDownloadInfoIndexWithTaskIdentifier: is a private method that we will implement in a while.
Next, because the download task works in background threads, any visual upgrades must take place in the main thread of the app. So, inside the block of the addOperationWithBlock: method of the main queue operation, at first we calculate the progress as a double value and then assign it to the downloadProgress property of the fdi object:
fdi.downloadProgress = (double)totalBytesWritten / (double)totalBytesExpectedToWrite;
Next we locate the cell matching to the file index that’s being downloaded:
UITableViewCell *cell = [self.tblFiles cellForRowAtIndexPath:[NSIndexPath indexPathForRow:index inSection:0]];
Then we get access to the progress view of the cell:
UIProgressView *progressView = (UIProgressView *)[cell viewWithTag:CellProgressBarTagValue];
Finally we update its progress value:
progressView.progress = fdi.downloadProgress;
That easy! Every time that the system reports back any progress, we reflect it to the respective progress view.
Now, let’s implement the getFileDownloadInfoIndexWithTaskIdentifier: we just used. First, it must be declared, so go to the private section of the interface and make its declaration:
@interface ViewController ()
...
...

-(int)getFileDownloadInfoIndexWithTaskIdentifier:(unsigned long)taskIdentifier;

@end
It’s implementation is very simple. In a loop, we’ll access all FileDownloadInfo objects of the arrFileDownloadData array one by one, until we find the task with identifier matching to the parameter’s one. When it’s found, we’ll just break the loop and we’ll return the found index value. Here it is:
-(int)getFileDownloadInfoIndexWithTaskIdentifier:(unsigned long)taskIdentifier{
    int index = 0;
    for (int i=0; i<[self.arrFileDownloadData count]; i++) {
        FileDownloadInfo *fdi = [self.arrFileDownloadData objectAtIndex:i];
        if (fdi.taskIdentifier == taskIdentifier) {
            index = i;
            break;
        }
    }

    return index;
}
Go and give the app a try now. When you'll start a file download, you'll see the progress view indicating the progress of the download. That's fine, but yet there's the need to handle the downloaded file, and that's something that we'll do in the next part.
Finishing Actions
Every time a download is over, the downloaded file must be copied from a temporary location where it resides to the Documents directory of the app. Besides that, it's necessary to know when a download has finished, so we can update our interface.
Previously, we implemented one of the many delegate methods provided, and using it we managed to report progress to the user. Now, we are going to implement two other delegate methods as well, where the most work will be done to the first one.
So, the first delegate method we are going to work with, is the URLSession:downloadTask:didFinishDownloadingToURL:. This one is called by the system every time a download is over, and is our duty to write the appropriate code in order to get the file from its temporary location (the third parameter of the method).
Before I comment any further, let me present its implementation and after that I will point out the most important parts of it:
-(void)URLSession:(NSURLSession *)session downloadTask:(NSURLSessionDownloadTask *)downloadTask didFinishDownloadingToURL:(NSURL *)location{

    NSError *error;
    NSFileManager *fileManager = [NSFileManager defaultManager];

    NSString *destinationFilename = downloadTask.originalRequest.URL.lastPathComponent;
    NSURL *destinationURL = [self.docDirectoryURL URLByAppendingPathComponent:destinationFilename];

    if ([fileManager fileExistsAtPath:[destinationURL path]]) {
        [fileManager removeItemAtURL:destinationURL error:nil];
    }

    BOOL success = [fileManager copyItemAtURL:location
                                        toURL:destinationURL
                                        error:&error];

    if (success) {
        // Change the flag values of the respective FileDownloadInfo object.
        int index = [self getFileDownloadInfoIndexWithTaskIdentifier:downloadTask.taskIdentifier];
        FileDownloadInfo *fdi = [self.arrFileDownloadData objectAtIndex:index];

        fdi.isDownloading = NO;
        fdi.downloadComplete = YES;

        // Set the initial value to the taskIdentifier property of the fdi object,
        // so when the start button gets tapped again to start over the file download.
        fdi.taskIdentifier = -1;

        // In case there is any resume data stored in the fdi object, just make it nil.
        fdi.taskResumeData = nil;

        [[NSOperationQueue mainQueue] addOperationWithBlock:^{
            // Reload the respective table view row using the main thread.
            [self.tblFiles reloadRowsAtIndexPaths:@[[NSIndexPath indexPathForRow:index inSection:0]]
                                 withRowAnimation:UITableViewRowAnimationNone];

        }];

    }
    else{
        NSLog(@"Unable to copy temp file. Error: %@", [error localizedDescription]);
    }
}
At the beginning of the method, with these two lines:
NSString *destinationFilename = downloadTask.originalRequest.URL.lastPathComponent;
NSURL *destinationURL = [self.docDirectoryURL URLByAppendingPathComponent:destinationFilename];
we specify the destination URL where the file will be copied permanently. The lastPathComponent property seen above is very useful, as it provides the actual file name, along with its extension (for instance, networkingoverview.pdf). You may wonder why we use that way to get the destination file name first, and then form the destination path with that file name, instead of using the location parameter value. Well, the truth is that the location value does not contain the actual name of the file; a random series of characters or digits is used instead.
The next move is to check if the file already exists in the Documents directory, using the fileManager object that was instantiated at the beginning of the method, and the destinationURL value. If it already exists, then is being removed.
The file copying process takes place here:
BOOL success = [fileManager copyItemAtURL:location
                                        toURL:destinationURL
                                        error:&error];
We're taking the file from the location path and we're copying it to the destinationURL path. The outcome of this is stored to the success flag.
If the copying above is successful, then a series of actions must be taken. At first, using the getFileDownloadInfoIndexWithTaskIdentifier: private method we previously implemented, we locate the index of the respective FileDownloadInfo object in the arrFileDownloadData array, and we use the fdi pointer for easier access. Next, we indicate that the file is not being downloaded and that the download is complete. The taskIdentifier property gets its initial value (-1), while the taskResumeData property gets the nil value in case it contains any resume data. Finally, using the main thread, the appropriate table view row is reloaded, so the label with the Ready text to be shown and the start and stop buttons to be hidden.
The other delegate method we will implement, is useful in case we want to track down any error that may occurred during a download process. It's implementation is very simple as you'll see, and of course, the way this method is used to every application depends on its nature. Here it is:
-(void)URLSession:(NSURLSession *)session task:(NSURLSessionTask *)task didCompleteWithError:(NSError *)error{
    if (error != nil) {
        NSLog(@"Download completed with error: %@", [error localizedDescription]);
    }
    else{
        NSLog(@"Download finished successfully.");
    }
}
As you see, we only log a message depending on whether there is an error or not. However, let me clear out that is called even when a download task is cancelled, as the cancelation is treated as an error by the method. Later on, when the pause and stop functionality will have been implemented, you'll notice that every time you stop a task, the Download completed with error: Cancelled message will appear to the debugger.
In our implementation we didn't do much here. In real-world applications, you'll definitely need to add some serious code here and handle each state.
Feel free now to run the app, and initiate a download. Wait until it finishes, and then see the start-stop buttons going away, while the Ready label is appeared. Moreover, locate the Documents directory of the app on your hard drive, and confirm that the file has been downloaded.
Pause, Resume and Stop a Download Task
Until now, we are able to initiate a file download process, to track its progress and to perform any required actions upon finishing, however we still cannot pause or stop a download task. In this part, we are going to implement these two features too, so our sample app reaches the perfection even more.
Before getting into details, let me clarify a couple of facts. First of all, the phrase pause a download task is good enough to make us understand the concept of our discussion, however programmatically speaking this is not accurate. The truth is that either we want to pause or stop a download task, we must perform the same action, to cancel the task. The difference is that in the first case the download task produces some data for resuming the download, while in the second case that doesn't happen. In both cases, the task gets destroyed and if it's desirable to resume the download, a new task is created using the resume data earlier produced.
So, after having made that clarification, let's see how to implement everything described in the title of this section. For starters, go to the startOrPauseDownloadingSingleFile: IBAction method, and locate the second else case with the next comment in it:
// The pause of a download task will be done here.
As you understand, we'll begin by pausing a task. The NSURLSessionDownloadTask class, provides a really convenient method to cancel a task and get the resume data at the same time, the cancelByProducingResumeData:. It's parameter is a block, where the resume data is provided as an argument, and in there we must implement the logic code for storing the resume data.
Right next, it is the implementation of the pause functionality. It's quite simple, as we just get the resume data provided by the block and we store it to the taskResumeData property of the appropriate FileDownloadInfo object. If you want, take a look to the already implemented part of the method in order to remember what we've done so far.
// Pause the task by canceling it and storing the resume data.
[fdi.downloadTask cancelByProducingResumeData:^(NSData *resumeData) {
if (resumeData != nil) {
    fdi.taskResumeData = [[NSData alloc] initWithData:resumeData];
}
}];
If you go and run the app, you'll see that by tapping (or clicking) on the pause button, the download stops, and in the debugger is shown the Download completed with error: Cancelled message. That's really cool, but we must now be able to resume the download.
To do so, find the next comment in the IBAction method you are currently in:
// The resume of a download task will be done here.
In its position, add the following code segment that performs the resuming.
// Create a new download task, which will use the stored resume data.
fdi.downloadTask = [self.session downloadTaskWithResumeData:fdi.taskResumeData];
[fdi.downloadTask resume];

// Keep the new download task identifier.
fdi.taskIdentifier = fdi.downloadTask.taskIdentifier;
This time, a new download task is created by using the downloadTaskWithResumeData: method of the session object. This new task is assigned to the downloadTask object for future access, and then it's resumed. Finally, the new task identifier is stored to the respective property.
Easy enough, don't you agree? Test again the app if you want. This time you can start a download, and then pause and resume it. That's great, but how to stop a download?
Well, stoping a download will seem to you pretty straightforward, after having done all the above with the download task. We are going to implement the stopDownloading: IBAction method, and as you'll see in the code segment that follows, it's pretty much like the startOrPauseDownloadingSingleFile: method at its beginning:
- (IBAction)stopDownloading:(id)sender {
    if ([[[[sender superview] superview] superview] isKindOfClass:[UITableViewCell class]]) {
        // Get the container cell.
        UITableViewCell *containerCell = (UITableViewCell *)[[[sender superview] superview] superview];

        // Get the row (index) of the cell. We'll keep the index path as well, we'll need it later.
        NSIndexPath *cellIndexPath = [self.tblFiles indexPathForCell:containerCell];
        int cellIndex = cellIndexPath.row;

        // Get the FileDownloadInfo object being at the cellIndex position of the array.
        FileDownloadInfo *fdi = [self.arrFileDownloadData objectAtIndex:cellIndex];

        // Cancel the task.
        [fdi.downloadTask cancel];

        // Change all related properties.
        fdi.isDownloading = NO;
        fdi.taskIdentifier = -1;
        fdi.downloadProgress = 0.0;

        // Reload the table view.
        [self.tblFiles reloadRowsAtIndexPaths:@[cellIndexPath] withRowAnimation:UITableViewRowAnimationNone];
    }
}
In short, once the appropriate FileDownloadInfo object gets located, the downloadTask property is used to cancel the download. Note that all the other related to the downloading properties get their proper values. Finally, the table view row is reloaded to visually upgrade the results of our action.
Now, you the app that can properly initiate, pause resume and stop a file download. So, give it a try.
Starting Downloads All Together
Now that we can download a single file, as well as to pause, resume and stop it, let's see how we can initiate a mass download of all files. Actually, we can't just start all downloads at once, but we can use a loop and then initiate every file download one by one.
For starters, let's see the code that should be added to the startAllDownloads: IBAction method:
- (IBAction)startAllDownloads:(id)sender {
    // Access all FileDownloadInfo objects using a loop.
    for (int i=0; i<[self.arrFileDownloadData count]; i++) {
        FileDownloadInfo *fdi = [self.arrFileDownloadData objectAtIndex:i];

        // Check if a file is already being downloaded or not.
        if (!fdi.isDownloading) {
            // Check if should create a new download task using a URL, or using resume data.
            if (fdi.taskIdentifier == -1) {
                fdi.downloadTask = [self.session downloadTaskWithURL:[NSURL URLWithString:fdi.downloadSource]];
            }
            else{
                fdi.downloadTask = [self.session downloadTaskWithResumeData:fdi.taskResumeData];
            }

            // Keep the new taskIdentifier.
           fdi.taskIdentifier = fdi.downloadTask.taskIdentifier;

            // Start the download.
            [fdi.downloadTask resume];

            // Indicate for each file that is being downloaded.
            fdi.isDownloading = YES;
        }
    }

    // Reload the table view.
    [self.tblFiles reloadData];
}
Nothing new takes place here. We have already met every single step, and now we just combine them. Using the for loop, we access one by one every FileDownloadInfo object in the arrFileDownloadData array. Our first concern is to check whether a file is already being downloaded or not, so if it isn't to start it now. Next, it's required to check using the taskIdentifier property if a new download task should be created for a full download, or simply to use any existing resume data and continue from where it was left off. In any case, all or any files that are not currently being downloaded begin doing so now. Finally, the table view is reloaded to update the interface as well.
After you have added the above code in the IBAction method, you can try the app and tap (or click) on the Start All Downloads button. For simplicity reasons, we don't support mass pausing functionality.
Canceling All Downloads
Stoping all file downloads at once, is easier that starting them. Once again, our work almost in its entirety will take place in a loop. The logic is simple: Using a for loop, we'll access each FileDownloadInfo object in the arrFileDownladData array. We will check if the isDownloading property is true, meaning that a download is in progress, and then we will cancel the respective task. Then, we will set the appropriate values to all related properties, and lastly we will reload the table view.
The implementation will take place in the stopAllDownloads: IBAction method. Here it is:
- (IBAction)stopAllDownloads:(id)sender {
    // Access all FileDownloadInfo objects using a loop.
    for (int i=0; i<[self.arrFileDownloadData count]; i++) {
        FileDownloadInfo *fdi = [self.arrFileDownloadData objectAtIndex:i];

        // Check if a file is being currently downloading.
        if (fdi.isDownloading) {
            // Cancel the task.
            [fdi.downloadTask cancel];

            // Change all related properties.
            fdi.isDownloading = NO;
            fdi.taskIdentifier = -1;
            fdi.downloadProgress = 0.0;
            fdi.downloadTask = nil;
        }
    }

    // Reload the table view.
    [self.tblFiles reloadData];
}
If you run the app now, you will manage to stop all downloads at once.
Handling Downloads on the Background
When the app is not running and background transfers (downloads or uploads) are active, the system wakes the app up in case it needs any credentials or it is necessary to inform it about a complete transfer. The second case is what we care about in this tutorial, and to be more precise, in here we will add the code that will handle all downloads that finish on the background while our app is inactive. To make it more spicy, after all transfers have finished, we will show a local notification to inform us about it.
Every time that the background thread of the system (the deamon) that is responsible for a file download of our app has messages for it, it calls the application:handleEventsForBackgroundURLSession:completionHandler: application delegate method. By doing so, the session identifier that woke the app up, along with a completion handler are passed to the app. The completion handler of the parameter must be stored locally, and called when all downloads are finished so the system knows that no more background activity is required (all transfers are complete) and any reserved resources to be freed up. Of course, upon each download finish, the URLSession:downloadTask:didFinishDownloadingToURL: delegate method is called to do all the finishing actions, such as copying the downloaded file from the temporary location to the Documents directory.
Let's see all in action. At first, go to the AppDelegate.h file, and add the next property declaration:
@property (nonatomic, copy) void(^backgroundTransferCompletionHandler)();
Next, go to the AppDelegate.m file, and add the next implementation of the application delegate method I previously mentioned:
-(void)application:(UIApplication *)application handleEventsForBackgroundURLSession:(NSString *)identifier completionHandler:(void (^)())completionHandler{

    self.backgroundTransferCompletionHandler = completionHandler;

}
As you see, the completion handler passed from the system to our app is stored to the property we just declared. The backgroundTransferCompletionHandler is the one that is called when all downloads are complete.
Further than the above method, when the system has no more messages to send to our app after a background transfer, the URLSessionDidFinishEventsForBackgroundURLSession: NSURLSession delegate method is called. In that method we will make the call to the completion handler, and we will show the local notification.
For starters, go to the top of the ViewController.m file, and import the AppDelegate.h header file.
#import "AppDelegate.h"
In the implementation that follows, notice that we first make sure that all downloads are over. Once that's true, we store locally the completion handler and make nil the backgroundTransferCompletionHandler property. The call to the local copy of completion handler must always take place in the main thread.
-(void)URLSessionDidFinishEventsForBackgroundURLSession:(NSURLSession *)session{
    AppDelegate *appDelegate = [UIApplication sharedApplication].delegate;

    // Check if all download tasks have been finished.
    [self.session getTasksWithCompletionHandler:^(NSArray *dataTasks, NSArray *uploadTasks, NSArray *downloadTasks) {
        if ([downloadTasks count] == 0) {
            if (appDelegate.backgroundTransferCompletionHandler != nil) {
                // Copy locally the completion handler.
                void(^completionHandler)() = appDelegate.backgroundTransferCompletionHandler;

                // Make nil the backgroundTransferCompletionHandler.
                appDelegate.backgroundTransferCompletionHandler = nil;

                [[NSOperationQueue mainQueue] addOperationWithBlock:^{
                    // Call the completion handler to tell the system that there are no other background transfers.
                    completionHandler();

                    // Show a local notification when all downloads are over.
                    UILocalNotification *localNotification = [[UILocalNotification alloc] init];
                    localNotification.alertBody = @"All files have been downloaded!";
                    [[UIApplication sharedApplication] presentLocalNotificationNow:localNotification];
                }];
            }
        }
    }];
}
Beyond than calling the completion handler, you see that we setup and present a simple local notification, without playing any sound or showing a badge number to the app icon.
Making the operating system work with our app while it's not running, is more or less that simple. Of course, in a real-world app the handling code could differentiate from the above, but the important is that you are now aware of the actions you should make.
Reset All
During the interface setup in the Interface Builder, we added to the toolbar a bar button item with the refresh icon, and at the moment is the only control in our app that we haven't worked with. The purpose of this button is to re-initialize everything, so we can test the app without having to terminate and re-launch it. More specifically, when tapping this button, the properties of all the FileDownloadInfo objects will get their initial values, and all the downloaded files will be removed from the Documents directory.
The whole job will take place in the initializeAll: IBAction method. Here is the implementation:
- (IBAction)initializeAll:(id)sender {
    // Access all FileDownloadInfo objects using a loop and give all properties their initial values.
    for (int i=0; i<[self.arrFileDownloadData count]; i++) {
        FileDownloadInfo *fdi = [self.arrFileDownloadData objectAtIndex:i];

        if (fdi.isDownloading) {
            [fdi.downloadTask cancel];
        }

        fdi.isDownloading = NO;
        fdi.downloadComplete = NO;
        fdi.taskIdentifier = -1;
        fdi.downloadProgress = 0.0;
        fdi.downloadTask = nil;
    }

    // Reload the table view.
    [self.tblFiles reloadData];

    NSFileManager *fileManager = [NSFileManager defaultManager];

    // Get all files in documents directory.
    NSArray *allFiles = [fileManager contentsOfDirectoryAtURL:self.docDirectoryURL
                                   includingPropertiesForKeys:nil
                                                      options:NSDirectoryEnumerationSkipsHiddenFiles
                                                        error:nil];
    for (int i=0; i<[allFiles count]; i++) {
        [fileManager removeItemAtURL:[allFiles objectAtIndex:i] error:nil];
    }
}
Note that this feature on the sample app is totally auxiliary, and it has nothing to do with the Background Transfer Service. We add it just for our own convenience.
Compile and Run the App
During the project's implementation, there were many opportunities where you could have tried out the application. However, if you still haven't done so, now that we're almost at the end of this tutorial it the best time to do so. Run the app, either on the Simulator, or on a device, and play around with all the functionalities we added to it. Start, pause, resume and stop downloads, either for single files, or all together. Feel free to modify any part of the code, or download files other than those used here.
Summary
The Background Transfer Service, along with the NSURLSession and all related classes, consist of a big evolution regarding the multitasking in iOS. In this tutorial I tried to demonstrate only a way of using all that stuff, but there are more you should study if you are about to build such an app. Just a word of caution, be careful when using multitasking technologies so your app doesn't exhaust the device's resources (such as draining the battery). If you have never worked with that new technology in iOS but you are planning to do so, I hope I managed to show you the way. If not, I hope you find the tutorial interesting. Remember that the only thing that limits the creation of amazing new apps, is your imagination. So, get some ideas and start working. You have the tools, now add the art! Happy multitasking!
For your reference, you can download the complete Xcode project from here.
Disclaimer: The copyright of the icons belongs to icons8.


