

Blockchain is one of the many disruptive technologies that has just started to gain traction among many people. Why? This is because blockchain is the founding technology for many cryptocurrencies like Bitcoin, Ethereum, and Litecoin. How exactly does Blockchain work though? In this tutorial, I’ll be covering everything there is to know about the blockchain technology itself and how to make your own “blockchain” in Swift. Let’s get started!
Blockchain: How does it work?
As the name implies, blockchain is a chain comprised of different blocks strung together. Each block contains 3 pieces of information: the data, a hash, and the previous block’s hash.
- Data – Depending on the use, the data that is stored in a block depends on the type of blockchain. For example, in the Bitcoin blockchain, the data stored is the information relating to the transaction: the amount of money transferred and the information of the two people involved in the transaction.
- Hash – You can think of a hash as a digital fingerprint. It is used to identify a block and its data. What’s important about hashes is that it’s a unique alphanumeric code, usually about 64 characters. When a block is created, so is its hash. When a block is modified, the hash is also modified. In this way, hashes are vital if you want to detect any changes made to the block.
- Previous block’s hash – By storing the hash of the previous block, you can see how each block is linked to form a blockchain! This is what makes a blockchain so secure.
Take a look at this picture:
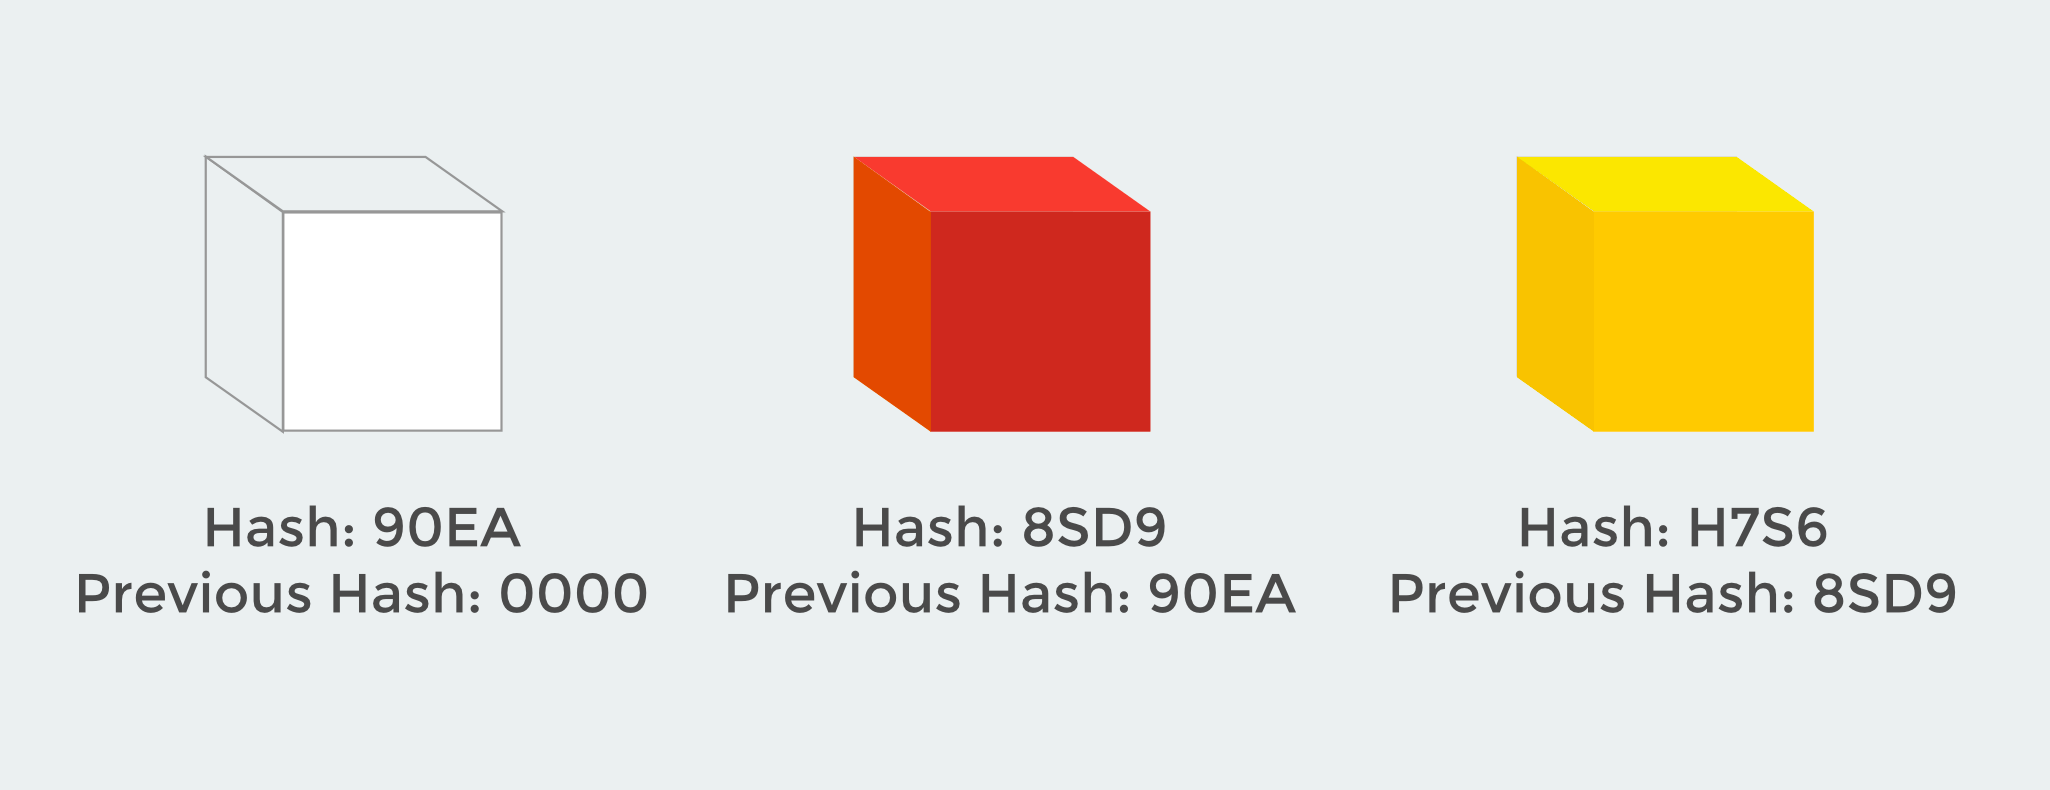
As you can see, each block consists of data (not shown), a hash, and the previous block’s hash. For example, the yellow block contains its own hash: H7S6, and the red block’s hash: 8SD9. This way, they all form a chain and are connected as such. Now, let’s say that a malicious hacker comes along and tries to modify the red block. Well remember, every time a block is modified in any way, the hash of that block changes! That way when the next block runs a check and sees that its previous hash does not match, it will not be accessible to the hacker since it effectively cut itself away from the chain.
This is what makes blockchain such so secure. It’s close to impossible to try to go back and change any data. While hashes do provide a great sense of secrecy and privacy, there are two more safeguards to keep blockchain even more secure: Proof-of-work and Smart Contracts. While I won’t be going into the details, you can read more about it over here.
The last way a blockchain secures itself is based on its location. Unlike most data which is stored on servers and databases, blockchain uses a peer-to-peer network (P2P). A P2P is a type of network that allows anyone to join and the data on that network is distributed to each recipient.
When someone joins this network, they get a full copy of the blockchain. When someone creates a new block, it is sent to everyone on the network. Then, through several complex programs, the node determines whether or not the block has been tampered with before adding it to the chain. That way, the information is available for everyone, everywhere. This may sound familiar if you’re a fan of HBO’s Silicon Valley. In that TV show, the protagonist uses a similar technology to create his new internet.
Since everyone has a copy of the blockchain, or nodes, they can form a consensus and determine which blocks are valid and which are not. Therefore, if you want to hack one block, you’ll have to hack more than 50% of the blocks on the network in order to pass along your information. This is why blockchain is perhaps one of the most secure technology created in the past decade.
About the Sample Application
Now that you have an understanding of how blockchain works, let’s get started with our sample application! Download the starter project here.
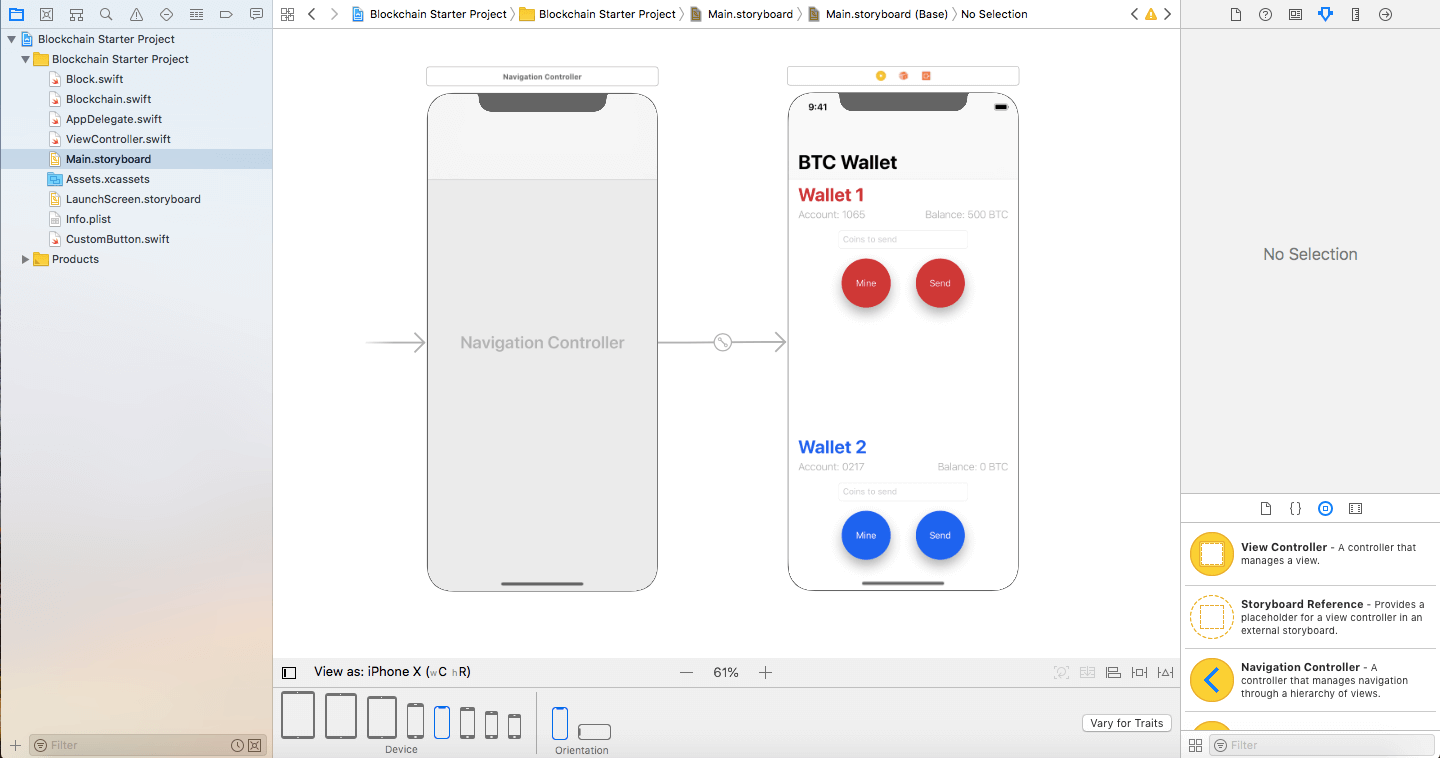
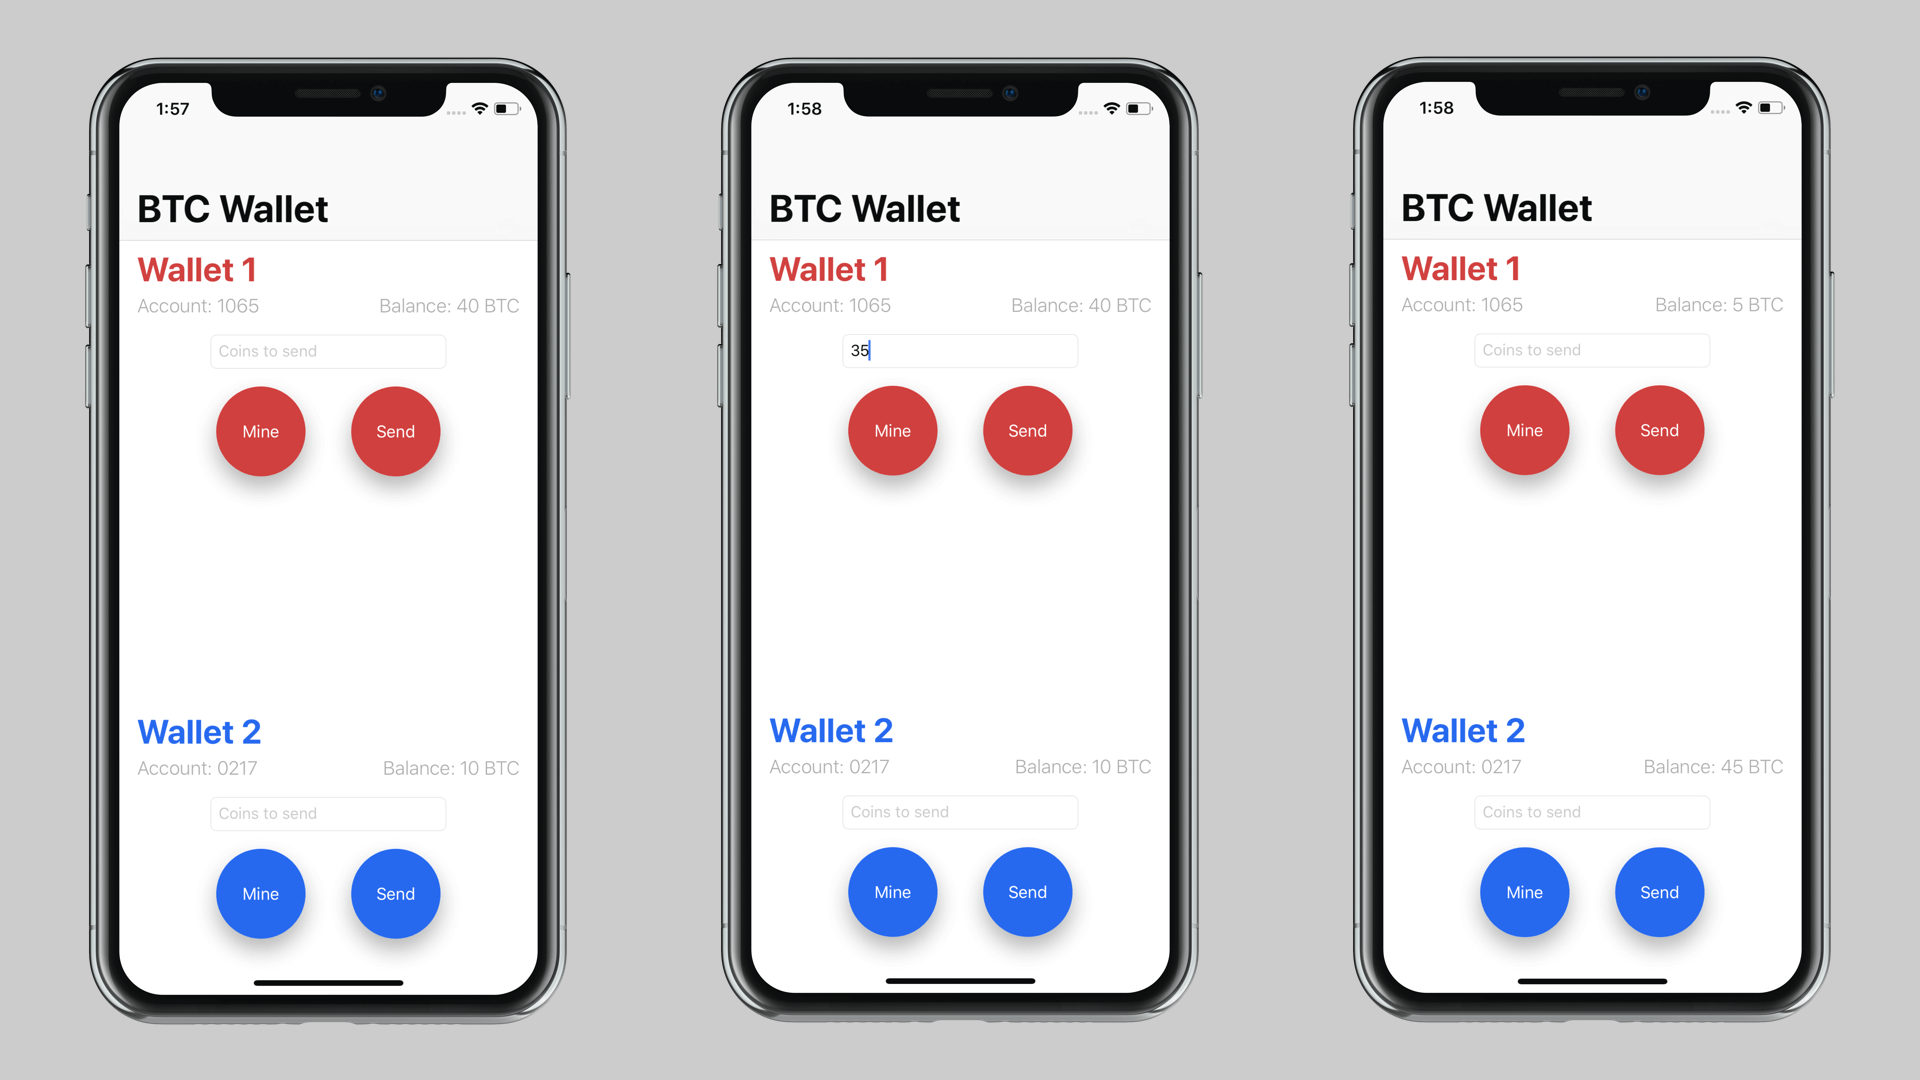
As you can see, we have two Bitcoin wallets. The first account, Account 1065, has 500 BTC available while the second account, 0217, has nothing. We send bitcoins to the other account using the send button. To earn BTC, we can press the Mine button which will give us a reward of 50 BTC. Basically what we are doing is observing the transaction that takes place between 2 Bitcoin accounts by looking at the console when the app is running.
You’ll notice that in the sidebar there are two important classes: Block and Blockchain. Opening these files, you’ll see that they’re empty. That’s because I’ll walk you through writing the logic for these classes. Let’s get started!
Defining the Block in Swift
Going over to Block.swift and let’s add the code which would define a Block. To begin, let’s break down what a Block is. We defined earlier that a block consists of 3 pieces of data: the hash, the actual data to be recorded, and the previous block’s hash. When we want to build our blockchain, we have to know whether the block is the first or the second. Well we can easily define this in Swift. Add to the class:
var hash: String!
var data: String!
var previousHash: String!
var index: Int!
Now, one last important code needs to be added. I mentioned earlier how every time a block is modified, its hash changes. This is one of the features of a blockchain which makes it secure. So we have to create a function which generates a hash filled with random letters and numbers. This function only requires a few lines of code:
func generateHash() -> String {
    return NSUUID().uuidString.replacingOccurrences(of: "-", with: "")
}
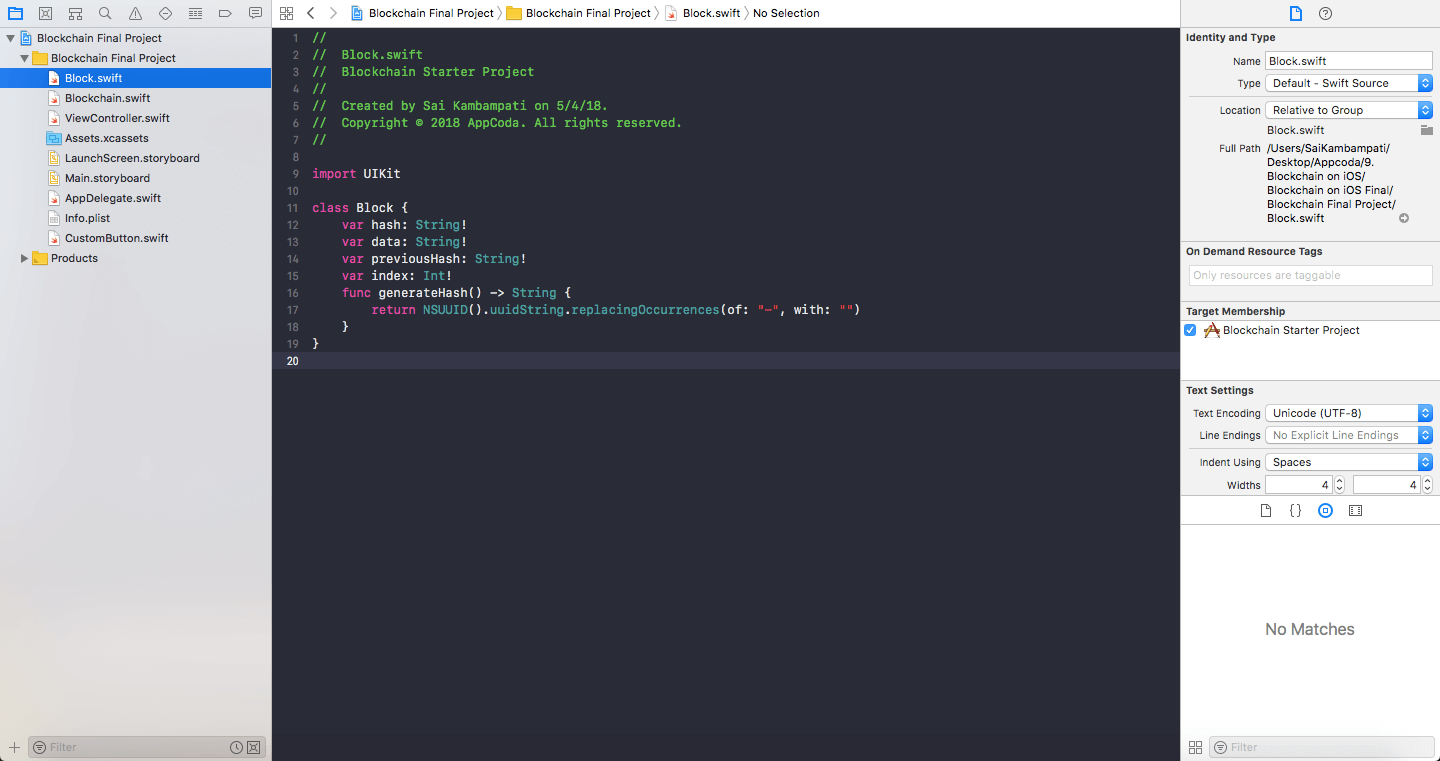
NSUUID is an object which represents a universally unique value that bridges to UUID. It’s built right into Swift and great for generating 32 character strings. This function generates a UUID, erases any hyphens, and returns the String, now known as the block’s hash. Block.swift should now look like this:
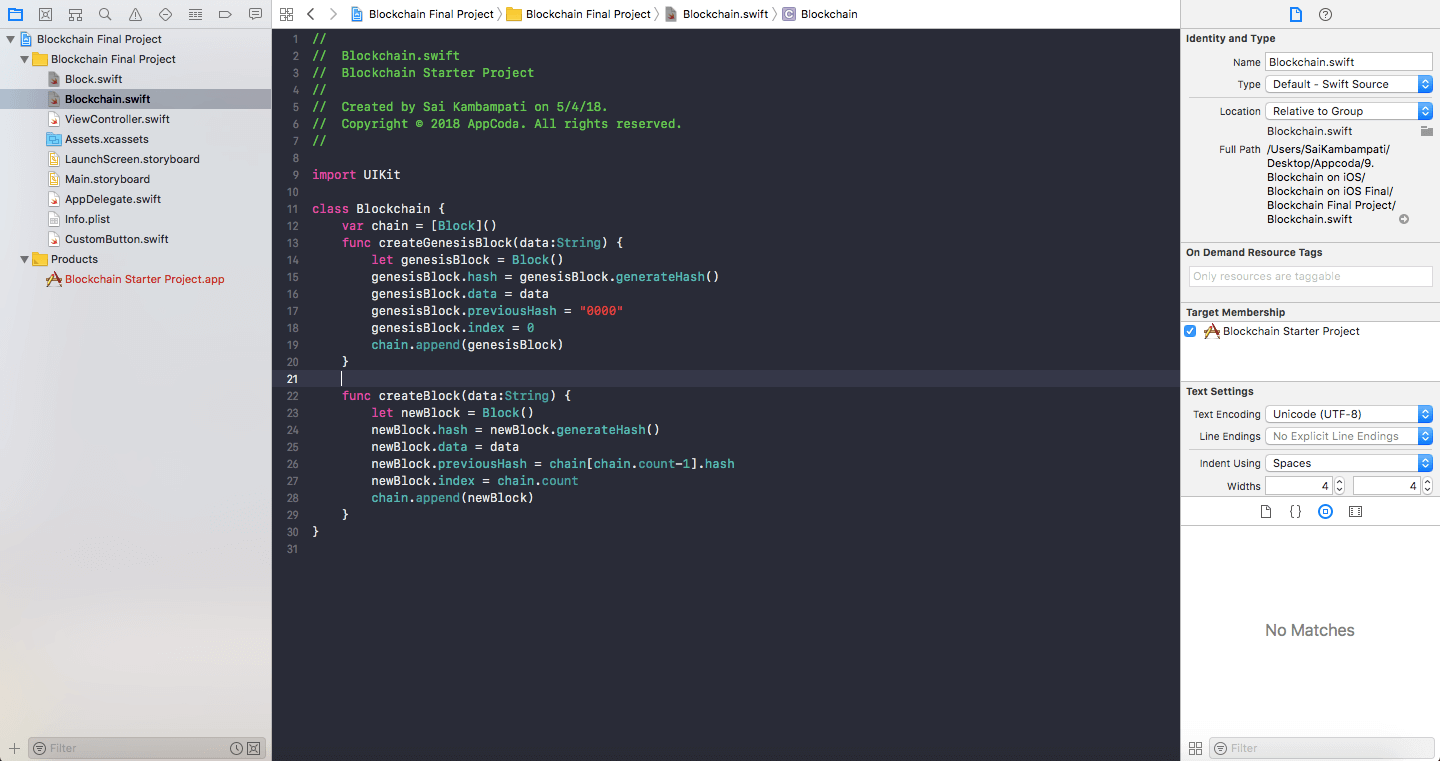
Now that we have defined the Block class, let’s define our Blockchain class. Switch over to Blockchain.swift to begin.
Defining the Blockchain in Swift
Just like before, let’s try to break down a blockchain into its fundamentals. In very basic terminology, a blockchain is nothing but a chain of blocks strung together, or in other words, a list with items held together. Does that sound familiar? If it does, that’s because it’s the definition of an Array! And this array is held together by blocks! Let’s add this to our code!
var chain = [Block]()
You’ll notice that inside the array is the Block class which we defined earlier. That’s all the variables we need for the blockchain. To finish up, we need to add two functions to our class. Try to answer this question based on what I taught earlier.
What are the two main functions in a blockchain?
I hope you were able to answer this question! The two main functions a blockchain has is to create the genesis block (the initial block) and to add a new block to its end. Now, of course, I’m not going into decentralizing the chain and adding smart contracts, but these are the basic functions! Add the following code to Blockchain.swift:
func createGenesisBlock(data:String) {
    let genesisBlock = Block()
    genesisBlock.hash = genesisBlock.generateHash()
    genesisBlock.data = data
    genesisBlock.previousHash = "0000"
    genesisBlock.index = 0
    chain.append(genesisBlock)
}

func createBlock(data:String) {
    let newBlock = Block()
    newBlock.hash = newBlock.generateHash()
    newBlock.data = data
    newBlock.previousHash = chain[chain.count-1].hash
    newBlock.index = chain.count
    chain.append(newBlock)
}
- The first function we are adding is creating the genesis block. To do this, we create a function which takes in the data of a block as input. Then we define a variable named
genesisBlockand make it of typeBlock. Since it is of typeBlock, it has all the variables and functions we defined earlier inBlock.swift. We set the hash togenerateHash()and its data to the inputdata. Sice it’s the first block, we set the previous block’s hash to 0000 in order to let us know that it’s the initial block. We set its index to 0 and we append it to the blockchainchain. - The next function we create is applicable for all the blocks after the
genesisBlockand it creates the rest of the blocks. You’ll notice it’s very similar to the previous function. The only difference is that we set thepreviousHashto the previous block’s hash and by setting itsindexto its place in the blockchain.
And that’s all! We are done defining our Blockchain! Your code should look like something below!
Next, we’ll connect all the pieces to our ViewController.swift file and see it running in action!
The Wallet Backend
Switching over to ViewController.swift, we can see that all our outlets are connected. All we need to do is handle the transaction and print them to the console.
Before we do that however, we should explore the Bitcoin blockchain a little bit. Bitcoins come from an overall account, let’s say this account number was 0000. When you mine a BTC, it means that you solve math problems and are issued a certain number of bitcoins as a reward. This provides a smart way to issue the currency and also creates an incentive for more people to mine. In our app, let’s make the reward 100 BTC’s. First, let’s add the variables we need to our View Controller:
let firstAccount = 1065
let secondAccount = 0217
let bitcoinChain = Blockchain()
let reward = 100
var accounts: [String: Int] = ["0000": 10000000]
let invalidAlert = UIAlertController(title: "Invalid Transaction", message: "Please check the details of your transaction as we were unable to process this.", preferredStyle: .alert)
We defined an account with number 1065 and another account with number 0217. We also added a variable called bitcoinChain to be our blockchain and we let the reward be 100. We need a master account from where all the bitcoins come: this is our genesis account with number 0000. It has 10 million bitcoins. You can think of this account like a bank where for every reward, 100 bitcoins are taken out of it into the rightful account. We also define an alert which will be shown every time a transaction could not be completed.
Now, let’s code some generic functions which will run. Can you guess what these functions are?
- The first function is for handling the transaction. We make sure that the sender and recipient accounts receive or deduct the right amount and this information is recorded into our blockchain.
- The next function is for printing to the console the entire record- it will show each block and the data in each block.
- The final function is for verifying whether the blockchain is valid by making sure the previous block’s hash matches with the information the next block has. Since we won’t be demonstrating any hacking methods, in our demo, the chain will always be valid.
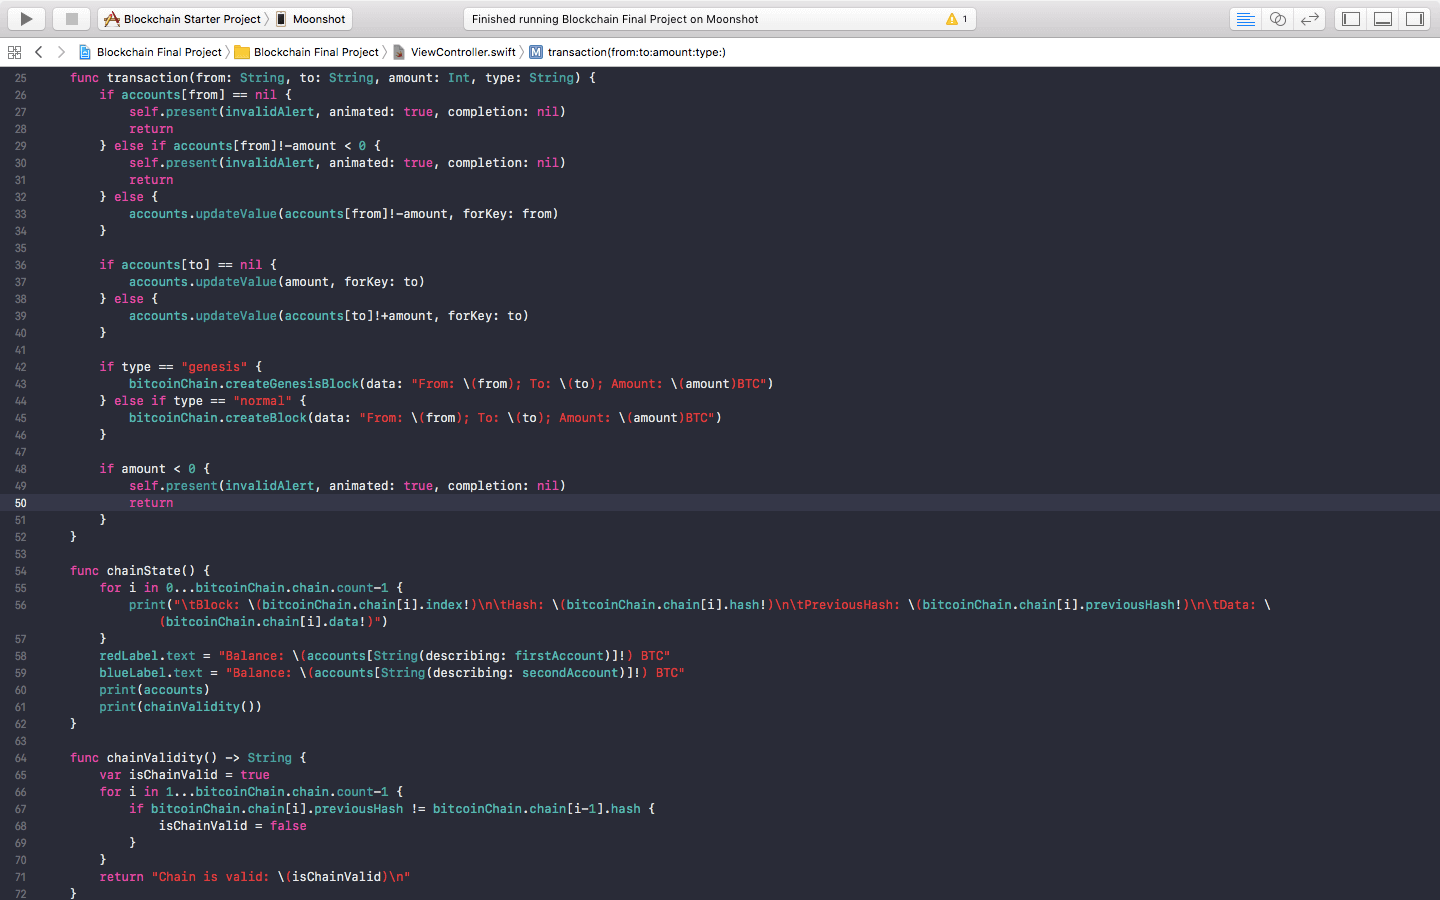
The Transaction Function
Here’s the generic transaction function we have. Enter the following code right underneath the place where we defined our variables.
func transaction(from: String, to: String, amount: Int, type: String) {
    // 1
    if accounts[from] == nil {
        self.present(invalidAlert, animated: true, completion: nil)
        return
    } else if accounts[from]!-amount < 0 {
        self.present(invalidAlert, animated: true, completion: nil)
        return
    } else {
        accounts.updateValue(accounts[from]!-amount, forKey: from)
    }

    // 2
    if accounts[to] == nil {
        accounts.updateValue(amount, forKey: to)
    } else {
        accounts.updateValue(accounts[to]!+amount, forKey: to)
    }

    // 3
    if type == "genesis" {
        bitcoinChain.createGenesisBlock(data: "From: \(from); To: \(to); Amount: \(amount)BTC")
    } else if type == "normal" {
        bitcoinChain.createBlock(data: "From: \(from); To: \(to); Amount: \(amount)BTC")
    }
}
This may seem like a lot of code but at its core, it’s just defining some rules to follow for each transaction. At the top, we have 4 parameters for this function: to, from, amount, and type. To, From, and Amount are self-explanatory but Type is basically defining the types of transaction. There are 2 types: normal and genesis. A normal type of transaction would be between account 1065 and 0217 where as a genesis account would involve the account 0000.
- The first
if-elsecondition regards the from account. If it doesn’t exist or is short of money, we display the Invalid Transaction alert and return the function. Otherwise, we update the values as is. - The second
if-elsecondition regards the account we send it to. If it doesn’t exist, then we leave it alone and return the function. Otherwise, we send the right amount of bitcoins to the account. - The third
if-elsestatement deals with the type transaction. If there is a transaction involving a genesis block, we create a new genesis block, otherwise, we create a new block storing the data.
The Printing Function
At the end of every transaction, we want to see a list of all the transactions to make sure we know everything that is going on. Here’s what we type right underneath the transaction function.
func chainState() {
    for i in 0...bitcoinChain.chain.count-1 {
        print("\tBlock: \(bitcoinChain.chain[i].index!)\n\tHash: \(bitcoinChain.chain[i].hash!)\n\tPreviousHash: \(bitcoinChain.chain[i].previousHash!)\n\tData: \(bitcoinChain.chain[i].data!)")
    }
    redLabel.text = "Balance: \(accounts[String(describing: firstAccount)]!) BTC"
    blueLabel.text = "Balance: \(accounts[String(describing: secondAccount)]!) BTC"
    print(accounts)
    print(chainValidity())
}
This is a simple for loop where for every block in out bitcoinChain, we print the Block number, the hash, the previous block’s hash, and the data is stores. We update the labels on our UI so that they show the correct amount of BTC in each account. Finally, print a list of each account (which should be 3) and check the validity of the chain.
Now you should be getting an error on the last line of that function. This is because we haven’t defined our chainValidity() function yet so let’s get to it!
The Validity Function
Remember that a chain is valid if the previous block’s hash matches with what out current block says it is. We can easily to that with another for loop to iterate over every block:
func chainValidity() -> String {
    var isChainValid = true
    for i in 1...bitcoinChain.chain.count-1 {
        if bitcoinChain.chain[i].previousHash != bitcoinChain.chain[i-1].hash {
            isChainValid = false
        }
    }
    return "Chain is valid: \(isChainValid)\n"
}
Similar like before, we iterate over every block in our bitcoinChain and we check to see if the previous hash of a block matches with what our current block says it is.
And that’s it! We have defined our functions that will be used every time! Your ViewController.swift should now look like this:
All that’s left is to just link up the buttons to the functions. Let’s begin the final phase now!
Linking Everything Together
When our app first starts, we want the genesis account 0000 to send 50 BTC to our first account. From there, we’ll have the first account give 10 BTC to the second account. This can be done quite simply in 3 lines of code. Change your viewDidLoad function to look like this:
override func viewDidLoad() {
    super.viewDidLoad()
    transaction(from: "0000", to: "\(firstAccount)", amount: 50, type: "genesis")
    transaction(from: "\(firstAccount)", to: "\(secondAccount)", amount: 10, type: "normal")
    chainState()
    self.invalidAlert.addAction(UIAlertAction(title: "OK", style: .default, handler: nil))
}
We use the function which we defined earlier and we call the chainState() function at the end of it. Also, we add an OK action to our Invalid Transaction alert
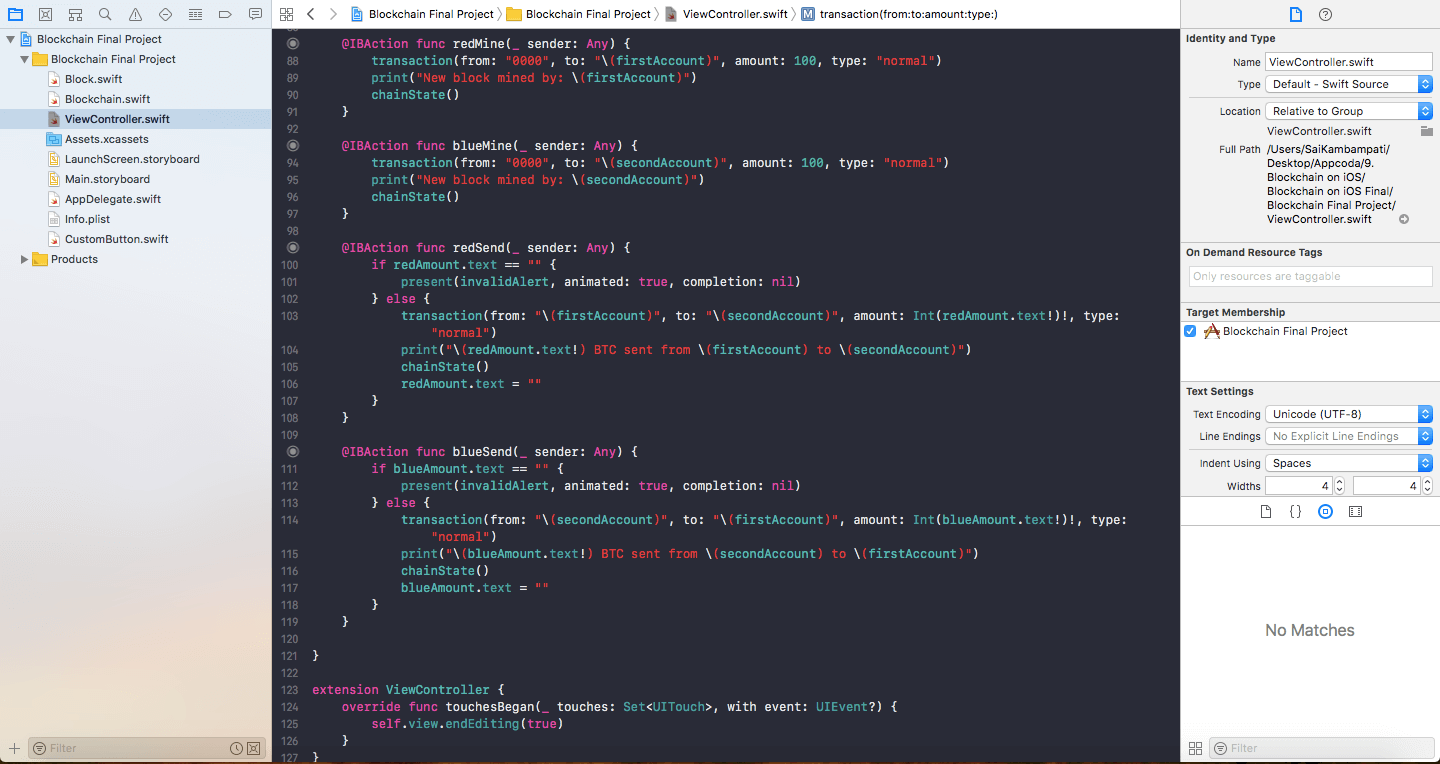
Now let’s see what to add in the remaining four functions: redMine(), blueMine(), redSend(), and blueSend().
The Mining Functions
The mining functions are very easy and require only 3 lines of code. Here what to add:
@IBAction func redMine(_ sender: Any) {
    transaction(from: "0000", to: "\(firstAccount)", amount: 100, type: "normal")
    print("New block mined by: \(firstAccount)")
    chainState()
}

@IBAction func blueMine(_ sender: Any) {
    transaction(from: "0000", to: "\(secondAccount)", amount: 100, type: "normal")
    print("New block mined by: \(secondAccount)")
    chainState()
}
In the first mining function, we use our transaction function to send 100 BTC from the genesis account to our first account. We print that a block was mined and print the chainState. Similarly, we send 100 BTC to our second account in the blueMine function.
The Sending Functions
The sending functions are also slightly similar.
@IBAction func redSend(_ sender: Any) {
    if redAmount.text == "" {
        present(invalidAlert, animated: true, completion: nil)
    } else {
        transaction(from: "\(firstAccount)", to: "\(secondAccount)", amount: Int(redAmount.text!)!, type: "normal")
        print("\(redAmount.text!) BTC sent from \(firstAccount) to \(secondAccount)")
        chainState()
        redAmount.text = ""
    }
}

@IBAction func blueSend(_ sender: Any) {
    if blueAmount.text == "" {
        present(invalidAlert, animated: true, completion: nil)
    } else {
        transaction(from: "\(secondAccount)", to: "\(firstAccount)", amount: Int(blueAmount.text!)!, type: "normal")
        print("\(blueAmount.text!) BTC sent from \(secondAccount) to \(firstAccount)")
        chainState()
        blueAmount.text = ""
    }
}
First, we check to see if the redAmount or blueAmount text field is empty. If it is, we display the Invalid Transaction alert. If not, we’re clear to go. We use our transaction function to send money from the first account to the second account (or vice versa) with the amount entered and set the type to normal. We print how much has been send and we call our chainState() function. At the end, we clear the text field.
And we’re all done! Check to see if your code matches the image below!
Run the app and try it out! From the front end, it looks like a normal transaction app, but you’ll know what’s going on behind the scenes! Play around with the app transferring BTC from one account to another, try to trick it, and have fun with it!
Conclusion
In this tutorial, you learned how to create a blockchain in Swift and made your own Bitcoin transaction. Do note that in a real cryptocurrency’s backend, the implementation would look nothing like above as it would need to be decentralized with Smart Contracts but the above example is for learning purposes.
In this example, we used Blockchain for cryptocurrency but can you think of any other ways blockchain can be used? Let me know in the comments below! Hope you learned something new!
For reference, you can download the full project on GitHub.


