

One of the greatest tasks that developers have to perform, is to find and implement a proper way to store the application data. Undoubtably, there’s no application in any platform that doesn’t need to save some kind of data at some point. Depending on the nature of the application usually, the amount of data that should be saved varies, and most times everything is stored locally, to the same device running the application. This is not the only option though. With all the cloud services being available today, an app can also store data on the cloud, and either totally avoid to keep data locally, or handle it both locally and remotely.
There are various web services providing cloud services, which are usually free up to a specific space. Among them of course is Apple, and the cloud service it provides is the well-known iCloud. Developers have access to iCloud, and they can use it as a storage mechanism. There are various ways to store and fetch data from iCloud, but in this tutorial we’ll focus on a specific one: The CloudKit framework.
CloudKit is the best tool you have in your hands when you deal with structured data (meaning not just files and documents) and want to save it on the web. The way CloudKit works, could be easily compared to the way of any database, as the data handling is taking place using databases, records, etc. Actually, a CloudKit record is what we all know in iOS as a dictionary, enriched of course with extra data that CloudKit needs and handles. As you’ll see through the next parts of this tutorial, working with that framework is fun and not especially difficult.
My intention is not to enter in many theoretical details, as we have a lot to see next. For your reference, you can find useful documentation from Apple here and here. However, there are some specific things I have to mention, because you need to know about them before we proceed. So, let’s go through them.
The first and most important thing you need to know, is that CloudKit organizes and handles the data of an application using containers. A container is the “space” given to an app, or in other words the part of the iCloud that is given to the app. When enabling the CloudKit feature in Xcode, a default container is created, however it can be ignored and a custom one (or many) to be created manually. Each container has two databases; a private and a public. Any data written to the private database, can be accessed by the user that owns it only. On the contrary, data existing in the public database, can be visible to all users of the same app.
All what I described right above is almost what we’d call a database management system and a database in other cases. Based on the same logic, a database table in CloudKit is called record type, while the table rows are called just records. There’s a variety of data types that can be stored to iCloud using the CloudKit framework, but they’re not unlimited. Here’s what is supported:
- NSData (single bytes)
- NSDate (date and time)
- NSNumber (both Int and Double)
- NSString (or String in Swift)
- NSArray (list)
- CKReference (used to create relationships between objects)
- CLLocation (location)
- CKAsset (file)
(The data types beginning with the CK prefix are part of the CloudKit framework)
You’ll see in the upcoming parts how you can deal with the above data types. To be honest, we’ll work only with String, Dates and Assets (which are a special case). We won’t mess with the CKReference and CLLocation ones (also special types); the remaining ones are used in the same way as strings and dates.
Before I reach the end of this introduction, let me give you a few facts that you should be aware of.
- A user that’s not signed in to his iCloud account can fetch records from a public database, however he can’t write any until he enters his credentials to the device. When talking about the private database, being logged in is a prerequisite.
- Make sure to upgrade to iCloud Drive either using an iOS 8 device, or from Yosemite, if you haven’t done so already. Note however that you’ll lose compatibility between the iCloud and any previous iOS or Mac OS versions.
- A container cannot be deleted once it’s created in iCloud. Record types can, but not the containers.
- There’s a web platform named CloudKit Dashboard where you can find the data of all your apps that use the CloudKit framework, and in a following part of this tutorial I’ll make a quick presentation of it. In the dashboard there are two environments; the development and the production. Make sure that you won’t switch to the second during this demo, and most importantly, that you won’t deploy the container schema to the production environment (there’s a special button for that).
Once again, I advice you to read the official documentation for more theoretical stuff, or at least use it as your reference in your future apps. Whatever I described in the previous paragraphs is a really short version of what you should already know before you keep reading. Without losing any more time, let’s keep going as we have a lot of new things to meet.
Demo App Overview
So, it’s time to leave all the theory behind us, and start talking about more practical things. As usually, in this tutorial you can get a starter project as well to work with. So, once you download it, keep reading to see what we are going to deal with.
In this demo we’ll create a really simple note taking application. It will be parted by two view controllers: A master and a detail view controller (the app is navigation based). In the first one, which is called ListNotesViewController, we’ll list in a tableview all the notes that have been created by this app, and they’ve been stored to the iCloud using the CloudKit. In other words, we’ll fetch all of our records from iCloud and show them in the tableview. In the second view controller, named EditNoteViewController, we’ll create a new note or we’ll edit an existing one.
Regarding a note now, we’re going have the following data:
- Title
- Text
- Last edited date
- An image
As you see in the next screenshot, the EditNoteViewController view controller is separated in two large areas: In the upper area there’s a textfield for the title, and a textview for the text. To the bottom area, there’s a button which when’s tapped, it presents an image picker view controller so we can select a photo from the library. When that happens, that button becomes hidden, and the image view containing the selected photo along with a new button (which is used to remove the photo from the image view) are shown.
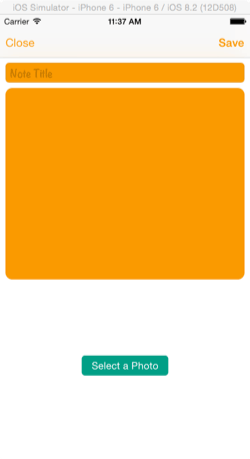
Besides that, we are not going to have a Back button in the navigation bar so we pop to the first view controller. Instead, we’ll use a custom button to do that, and there’s a reason for that. I won’t mention it now, you’ll see it later. Lastly, when tapping on the Save button, our note will be stored to the iCloud, along with the selected photo. If no photo has been picked, a default “no-image” image will be uploaded instead.
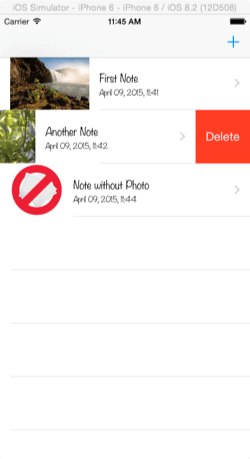
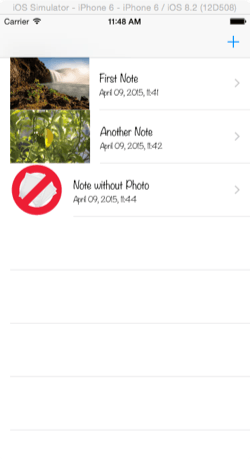
In the ListNotesViewController view controller, nothing extraordinary is going to take place, at least other than what you expect. That means that when tapping on a record (a note) we’ll be navigated to the next view controller for editing, and furthermore we’ll be able to delete a note. Here’s a sample:
Before we start working, let me tell you that in this demo application we are going to download all note records each time the app starts. Of course, this is not something you should do in a real one. under real conditions you should find a way to store locally your data, and to fetch only any new data existing in the iCloud. However, doing that in this tutorial would be pointless; my goal is to show you how to deal with CloudKit, and not how to create local structures or other solutions for keeping data locally as well. So, I just leave this to you.
Lastly, I must tell you in advance that you should not forget to enable the iCloud capability even in the final project that you can download at the end of the tutorial (read about enabling iCloud right next).
Getting Ready For The CloudKit
Before you use the CloudKit for first time, there are some tasks you have to mandatorily do. They’re not many, and actually Xcode takes the lift of the boring work from you. What you need, is to get an entitlements file so the app can access your iCloud and write records using the CloudKit. Let’s see everything in the proper order.
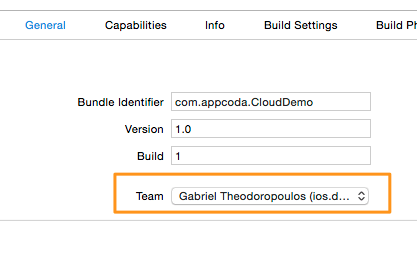
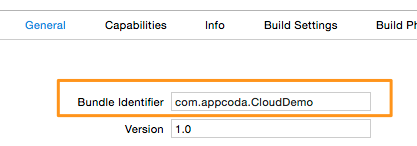
First of all, select the project in the Project Navigator, and then open the General tab. In the Identity section, you must set a real Apple ID to the Team dropdown menu (your developer’s Apple ID), and not to leave the None option.
If you have no other options further than the default one (None), then open the Xcode > Preferences… menu, and go to the Accounts tab. There, click to the small plus button at the bottom-left side to add your Apple ID, and once you enter your credentials you can go back to the General tab and select it.
The second step is to go to the Capabilities tab and turn on the iCloud capability. Once you do so, make sure to select the following services:
- Key-value storage
- CloudKit
In the containers section, just leave the default selection as it is. If there are no problems, you should see four checkmarks in the Steps section right below, which means that everything went okay. Furthermore, you’ll see a new file in the Project Navigator named CloudKit.entitlements (it’s what you ultimately want).
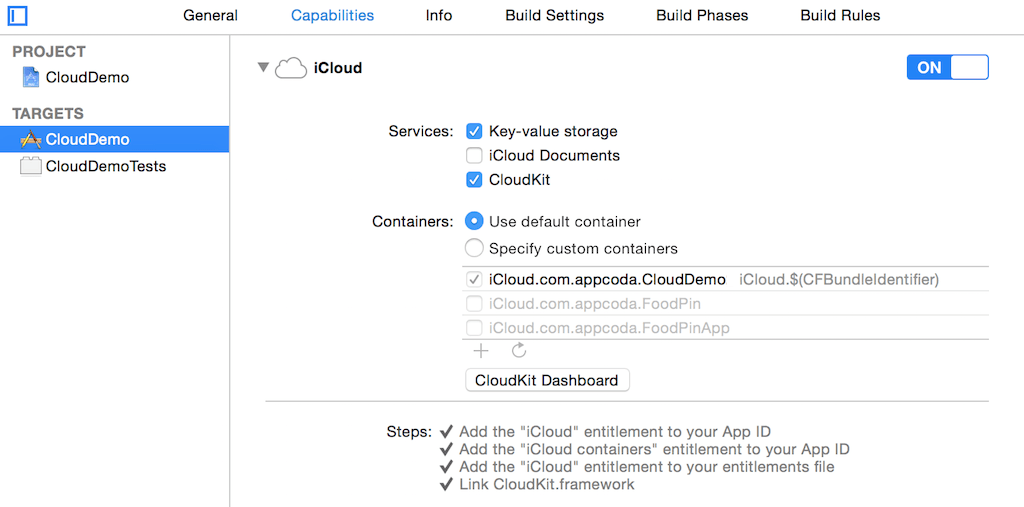
In case that Xcode is unable for some reason to perform all the needed actions in the background, it will display a Fix Issues button. Use it so Xcode can resolve any issues. If you still have problems, then you might need to modify the Bundle Identifier value, and change the com.appcoda.CloudDemo to com.YOURID.CloudDemo (replace the YOURID part).
Normally, you should not have any issues, so once you get finished with all the above you can proceed to the next step. Note that Xcode automatically adds the CloudKit.framework to the project. In the two view controllers that we’ll need that framework, I have already added the needed import command, so you don’t have to do that:
import CloudKit
However, in your projects, don’t forget the above line, otherwise you won’t be able to access the framework’s classes.
Importing Photos
Now that everything regarding the CloudKit has been set up, it’s time to start writing some code. The first thing we’re about to do, is to make our demo application capable of importing photos from the Photo Library of the device. If you’ve ever worked with such kind of stuff in the past, then you already know that we’re going to use the UIImagePickerController class to access the photo library, and make it possible to select a photo. If not, then you’ll witness how easy it is to do that in the lines that follow next.
The UIImagePickerController is actually a pre-made view controller existing in the iOS SDK. What it does is really simple: It brings up a new view controller that accesses the photo library of the device, and provides delegate methods so we’re able to handle the picked media (saying “media” is intentional, as you can access more than photos with it), or the case that the user simply dismisses that view controller. Having said so, the first thing we need here is to adopt two required protocols so the UIImagePickerController works properly: The UIImagePickerControllerDelegate and the UINavigationControllerDelegate. It’s simple to adopt them; all you have to do is to open the EditNoteViewController.swift file, and modify the class heading line as shown next:
class EditNoteViewController: UIViewController, UIImagePickerControllerDelegate, UINavigationControllerDelegate
Now, we can write the necessary code to display that image picker view controller. By taking a quick look to the project, you can find all the IBAction methods we’re going to need already being there, but without any implementation at all. We’ll do that as we move forward here. For now, let’s visit the pickPhoto(_:) method, where we’ll write the first real code in this project. The way we initialize and call the image picker view controller is more or less always the same, but it depends on the kind of media (photos, videos) and a couple more other factors that we actually don’t really care about right now. Let’s see the first part of the implementation:
@IBAction func pickPhoto(sender: AnyObject) {
    if UIImagePickerController.isSourceTypeAvailable(UIImagePickerControllerSourceType.SavedPhotosAlbum) {
        let imagePicker = UIImagePickerController()
        imagePicker.delegate = self
        imagePicker.sourceType = UIImagePickerControllerSourceType.PhotoLibrary
        imagePicker.allowsEditing = false
    }
}
First of all, it’s important to check that the device can access the photo library, otherwise we’ll face serious problems when it will running. So, inside the above if statement body, first we initialize an image picker object and then we set this class as its delegate. Next, we specify the source of the media; we could have set for example the camera of the device as the source type. At the end, we prohibit editing the picked image, however that’s up to you to change it if you want.
There’s one remaining task in the above method, and that is to present the imagePicker to the screen. Note that because this demo app is supposed to run only in iPhone devices and it’s not universal, we just present the image picker view controller modally. In case you want to do that in iPad devices also, then you have to present it as a popover. Look here (in the introduction part) for more information about that.
@IBAction func pickPhoto(sender: AnyObject) {
    if UIImagePickerController.isSourceTypeAvailable(UIImagePickerControllerSourceType.SavedPhotosAlbum) {
        ...

        presentViewController(imagePicker, animated: true, completion: nil)
    }
}
The above method is now ready, and that means that every time you tap on the “Select Photo” green button the image picker controller will be displayed on the screen. You can test that even right now, however don’t expect anything to be working at this point.
The next step is to implement two delegate methods, so we know when the user taps on the Cancel button of the image picker controller, or when he picks a photo, and of course, to take the proper actions. Let’s begin with the easy one, the case where the Cancel button is tapped:
func imagePickerControllerDidCancel(picker: UIImagePickerController) {
    dismissViewControllerAnimated(true, completion: nil)
}
As you see, we do nothing more than simply dismissing the image picker view controller.
In the next method we are going to perform four distinct tasks:
- To set the picked photo as the image of the image view.
- To store temporarily the picked image to the documents directory (there’s a reason to do that, you’ll see later).
- To show the image view and the image remove button, and at the same time to hide the select Image button.
- To dismiss the image picker view controller.
Let’s see all the above in code:
func imagePickerController(picker: UIImagePickerController, didFinishPickingMediaWithInfo info: [NSObject : AnyObject]) {
    imageView.image = info[UIImagePickerControllerOriginalImage] as? UIImage
    imageView.contentMode = UIViewContentMode.ScaleAspectFit

    saveImageLocally()

    imageView.hidden = false
    btnRemoveImage.hidden = false
    btnSelectPhoto.hidden = true

    dismissViewControllerAnimated(true, completion: nil)
}
Let’s do some discussion about what happens above. As you witness, we use the info parameter dictionary with the UIImagePickerControllerOriginalImage key to access the photo that the user has picked. As we don’t allow editing, we ask for the original image. If editing was allowed, we could have asked for the edited image instead. Anyway, once we set the image to the image view, we specify the content mode value, so the image fits in the image view.
The saveImageLocally() that comes next, is obviously a custom method that we’ll implement in a while. If we wouldn’t deal with the CloudKit, storing the image to the documents directory would be totally pointless. However, and according to what you’ll see to the next part, we’ll need to create a file URL (a special NSURL object) that points to that file and provide it to the CloudKit, so it can find the image and upload it to the iCloud.
Finally, we properly hide and show the necessary subviews and we dismiss the view controller. If you take a look in the viewDidLoad method, the initial state of the above subviews has already been set there.
Let’s implement now the saveImageLocally(). Before doing that however, let’s go to the top of the class (right below the IBOutlet property declarations), and let’s declare the next property:
var imageURL: NSURL!
This is the NSURL object I mentioned right above, and we’re going to specify it to the next method. But before doing so, let’s declare two more properties. You’ll understand what they’re for once you see them:
let documentsDirectoryPath = NSSearchPathForDirectoriesInDomains(.DocumentDirectory, .UserDomainMask, true)[0] as! NSString

let tempImageName = "temp_image.jpg"
Now, let’s see the new custom method:
func saveImageLocally() {
    let imageData: NSData = UIImageJPEGRepresentation(imageView.image, 0.8)
    let path = documentsDirectoryPath.stringByAppendingPathComponent(tempImageName)
    imageURL = NSURL(fileURLWithPath: path)
    imageData.writeToURL(imageURL, atomically: true)
}
Initially, we convert the image to a NSData object simply by using the UIImageJPEGRepresentation(…) method. Then, we compose the path to the documents directory, and once that’s ready, we convert it to a file URL object. Of course, we store that to the imageURL property we declared previously. At the end, we write the data object to the specified path, and we’re good to go.
As I have already said, we need to store the picked image temporarily, and that means that at some point we have to delete it from the documents directory (it won’t be deleted on its own). The best place to do that, is in the dismiss(_:) IBAction method, which we’ll use to pop the current view controller. All we have to do there right before the popping occurs, is to check if the imageURL property is nil or not, and in case it has a valid value, to delete the file pointed by it. Simple enough, so let’s see it:
@IBAction func dismiss(sender: AnyObject) {
    if let url = imageURL {
        let fileManager = NSFileManager()
        if fileManager.fileExistsAtPath(url.absoluteString!) {
            fileManager.removeItemAtURL(url, error: nil)
        }
    }

    navigationController?.popViewControllerAnimated(true)
}
Lastly, there’s one last task related to our work in this part. We must make the remove image button capable of unsetting the image view’s image. Here we go:
@IBAction func unsetImage(sender: AnyObject) {
    imageView.image = nil

    imageView.hidden = true
    btnRemoveImage.hidden = true
    btnSelectPhoto.hidden = false

    imageURL = nil
}
As you notice, further than setting the nil value to the image view’s image, we also hide the image view and the remove image button, and we show once again the select image one. At the end of course, it’s necessary to make nil the imageURL property as well.
The first part of our demo application is ready. Right next you can see how it works, and of course, go ahead and test it by yourself too.
Creating A New CloudKit Record
Let’s go now to the first important task regarding the CloudKit. In this part, we’ll make our application capable of storing data to iCloud, and more specifically to the default container that Xcode created for us. I have already presented the data types that can be stored there in the introduction, but obviously we’re not going to use all of them. Actually, by saving a note in this demo application we’ll make use of the following types:
- String: The note title and note text will be stored as string values.
- NSDate: We’ll store the last time the note was edited as a NSDate object. To be honest, we don’t really need to do that because the CloudKit keeps track of the creation and the last edited date and time by default. However, we will simply overlook that fact, so we can see how a date is actually handled.
- Asset: The image of the image view will be stored as an asset to the iCloud. The truth is that the image will be uploaded by the CloudKit to the iCloud drive, but at the same time there will be an entry regarding it in every single record.
All the rest data types are easy to be used, and they’re similar to the String data type. There’s only one exception to that, and it concerns the CLLocation type. In that case, special handling is required, but we won’t deal with something like that here. In case your app needs to save CLLocation data, I prompt you to the official documentation where you can find pretty nice guidance.
There’s also one more fact I’d like to highlight before we proceed. If the user won’t pick an image to save along with the rest note data, then we’ll use a default image that already exists in your app bundle (no_image.png). That way, we make sure that there will be an image to upload in any possible case.
A record in the CloudKit is represented by the CKRecord class. It’s our duty to create such an object, to set all the values we want to like working with a dictionary and then to provide it to the CloudKit so it can be stored to a database. Being a bit more detailed now, four things are required to be done so a record is possible to be saved:
- To create a unique identifier that will be used as the key for the record. More precisely, not only we need to create such a key, but we must find a way so these keys are unique.
- To create a CKRecord object and “feed” it with all the values that should be stored.
- To specify the container and the database that the data should be stored to.
- To perform the actual saving.
Let’s get started. Initially, go to the saveNote(:_) IBAction method, and add the following content. We must be sure that we’ll always have some data to send:
@IBAction func saveNote(sender: AnyObject) {
    if txtNoteTitle.text == "" || textView.text == "" {
        return
    }

}
In a real application of course, it would be nice to display a message to the user asking from him to enter the missing data, or handle the above situation in a more proper way. For now, the above approach is more than perfect.
A nice way to ensure that every new record identifier we generate is going to be unique, is to use the current timestamp, which by default is unique. This timestamp is given to us using the timeIntervalSinceReferenceDate() method of the NSDate class, and it’s in the form of abc.def (where abc and def are real digits and more than three of course). Keeping the dot (.) in the identifier is not important, as only the integer part of the number is good for our cause. So what we’ll do is simple:
- We’ll get the current timestamp as a String value.
- We’ll split it to the integer and decimal parts.
- We’ll use the integer part as the identifier of the new record.
In code now:
@IBAction func saveNote(sender: AnyObject) {
    ...


    let timestampAsString = String(format: "%f", NSDate.timeIntervalSinceReferenceDate())
    let timestampParts = timestampAsString.componentsSeparatedByString(".")

    let noteID = CKRecordID(recordName: timestampParts[0])

}
As you can see, we created a new CKRecordID object named noteID. This is the key of the new record, and we’ll use it right next. In the following part, we create a new CKRecord object, and we set to it all the data we want to be saved, except for the image. We’ll see that in a while.
@IBAction func saveNote(sender: AnyObject) {
    ...

    let noteRecord = CKRecord(recordType: "Notes", recordID: noteID)

    noteRecord.setObject(txtNoteTitle.text, forKey: "noteTitle")
    noteRecord.setObject(textView.text, forKey: "noteText")
    noteRecord.setObject(NSDate(), forKey: "noteEditedDate")
}
Two things happen above: At first, we create the CKRecord object I said about, where we make use of the noteID object we created right before that. Next, we set all the values that should be saved in a familiar and easy way.
Let’s handle now the image saving. As I have already mentioned, in case the user has picked an actual image we can proceed as planned. However, if no image has been picked, we’ll provide the default one existing in the app bundle. Note in the next snippet that first we create a CKAsset object (required for assets like images), and then we provide it to the noteRecord object.
@IBAction func saveNote(sender: AnyObject) {
    ...

    if let url = imageURL {
        let imageAsset = CKAsset(fileURL: url)
        noteRecord.setObject(imageAsset, forKey: "noteImage")
    }
    else {
        let fileURL = NSBundle.mainBundle().URLForResource("no_image", withExtension: "png")
        let imageAsset = CKAsset(fileURL: fileURL)
        noteRecord.setObject(imageAsset, forKey: "noteImage")
    }

}
In the next step, we must specify the container that is used by the app (in this case is the default container), and then the desired database. According to what I said to the introduction, there are two kinds of databases: A public and a private. In this demo, we’ll use the private one. Here’s how we can achieve what I just said:
@IBAction func saveNote(sender: AnyObject) {
    ...

    let container = CKContainer.defaultContainer()
    let privateDatabase = container.privateCloudDatabase
}
Now, we can save the record to the CloudKit:
@IBAction func saveNote(sender: AnyObject) {
    ...

    privateDatabase.saveRecord(noteRecord, completionHandler: { (record, error) -> Void in
        if (error != nil) {
            println(error)
        }
    })

}
That’s it. By doing all the above actions, the app can now store data to the iCloud using the CloudKit. Note that the first time a record is saved, a record type is also created automatically (let’s say, the table in the database). It’s important to remember that if you need to change the record data and to add or remove “fields”, you’ll have to delete first the record type in the CloudKit Dashboard platform. We’ll see a few things about the Dashboard in the following part.
At this point I should inform you in advance that we’re going to pay a visit to the above method for a second time a bit later, as we’ll need to update an existing record. But for now, we are almost done.
I purposely say “almost”, because there’s a situation we should consider, and that is to prevent the user from interacting with the note while the data is saved and sent to the CloudKit. In a real-world application, you should probably allow the user to keep working with the app while that task is in progress, however here we won’t do that. We’ll display an activity indicator and prevent access to the subviews until everything is over.
In the EditNoteViewController scene in the Interface Builder, you can find a UIView object with an activity indicator as its subview. That view has been already connected to an IBOutlet property, and it’s named viewWait (for obvious reasons). Right now, this view (along with the indicator) is hidden, so we’ll make it visible, we’ll bring it in front, and that way we’ll prohibit any interaction with the note. But that’s the half way, as it can’t “cover” the navigation bar. The navigation bar is always at the top of any subview, so, further than simply showing the viewWait view, at the same time we’ll hide the bar. Then, when everything is over, we’ll go in the completion handler that exists in the above method, and we’ll bring everything back to normal.
So, initially go to the beginning of the saveNote(_:) method. There, and right before the creation of the record identifier, add the next code:
@IBAction func saveNote(sender: AnyObject) {
    if txtNoteTitle.text == "" || textView.text == "" {
        return
    }

    viewWait.hidden = false
    view.bringSubviewToFront(viewWait)
    navigationController?.setNavigationBarHidden(true, animated: true)

    ...
}
Now, upon finishing we want to revert the changes we just made, so inside the completion handler add the following lines. Note that the changes regard visual updates, so they have to take place in the main thread:
@IBAction func saveNote(sender: AnyObject) {
    ...

    privateDatabase.saveRecord(noteRecord, completionHandler: { (record, error) -> Void in
        if (error != nil) {
            println(error)
        }

        NSOperationQueue.mainQueue().addOperationWithBlock({ () -> Void in
            self.viewWait.hidden = true
            self.navigationController?.setNavigationBarHidden(false, animated: true)
        })
    })

}
That’s all we had to do here. Notice that by saving the note the view controller is not dismissed. You need to use the Close button to do that.
Now you can go and test everything we did here. You can run the app either in the Simulator, or in a real device. However, make sure to be connected to your iCloud account, and for real devices especially, make sure to upgrade to iCloud Drive (if you haven’t done so already). You can find directions about getting connected or creating an iCloud account here.
Previewing Data in the CloudKit Dashboard
All the records we create using the CloudKit framework can be previewed and edited in a special platform named CloudKit Dashboard. To access it, you just have to visit this and enter your credentials.
In the top-right corner you can see the container of the app we’re currently developing. In case you have other containers too, then you can select the proper one. Further than that, let’s see what are the most common tasks you can do here. Probably, you won’t be wanting to do any task on the dashboard, except for previewing the records. You can however prepare the record type (or record types) for your app manually here, instead of letting it be created automatically when the first record is about to be added. In case you do that (which in most cases is pointless), make sure that the attributes you specify match to those you set in code when creating records.
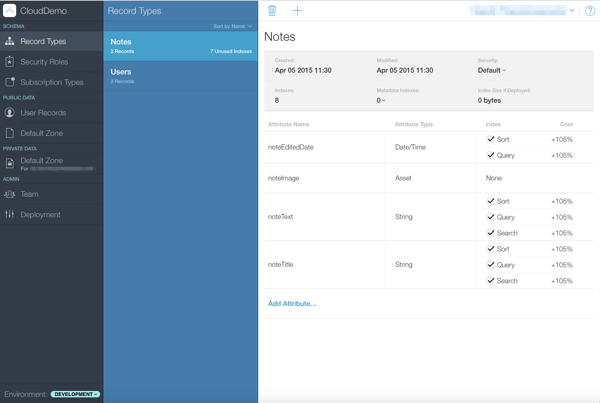
Regarding our demo app now, by clicking to the Record Types option at the left menu, you get a list of all the existing record types in the app. By default there’s the Users record type, and of course our own record type, named Notes. You can see that in the following screenshot. As you notice, in the right side of the window there’s a list of all the attributes. You can delete the record type if you click to the Trash button, or add a new one with the Plus button.

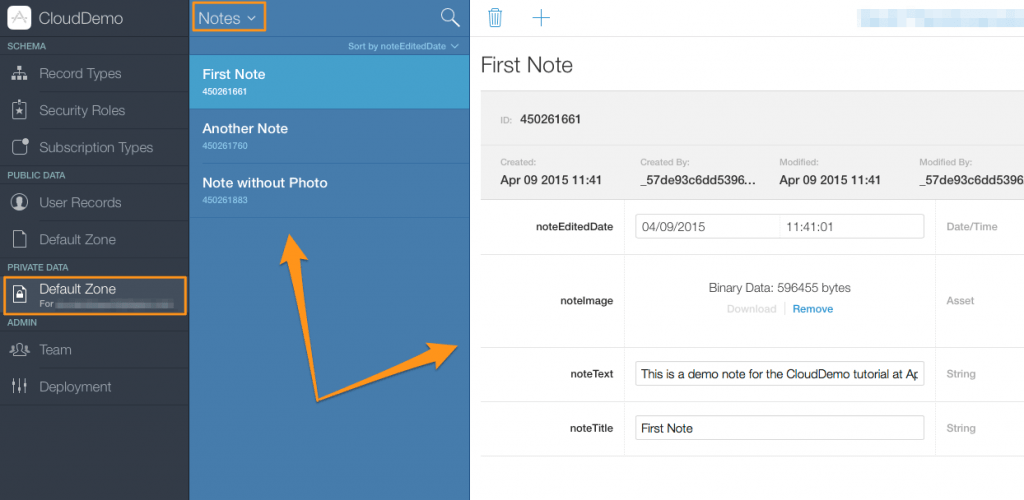
The records for the Notes record type can be found to the Default Zone option, in the Private Data category. Remember that we write our records to the private database, that’s why this is the place you can find them. They’re listed in the middle panel, and if you click on any record you can see the contained data to the right side. You can remove or add records using the buttons at the top area, but generally this is a bad idea, unless you have a specific goal.
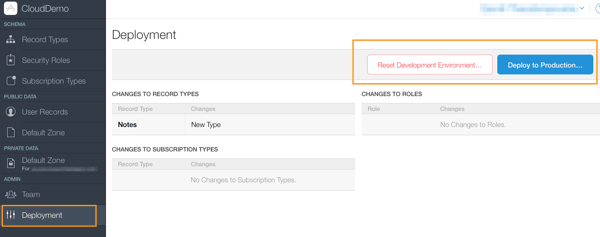
Notice that at the bottom-left area the current environment is shown. During the app making period, make sure that the Development is the selected value there. At some point however you’ll need to switch to the production mode, and deploy your container schema for that environment. In that case, use the Deployment option in the menu, where you’ll find a button titled Deploy To Production….
Also, under the same option you can find the Reset Development Environment…, which deletes all of your data in the development mode.
Navigate yourself around in the dashboard, and see what options you’re given with. Once you get finished, you can continue to the next part.
Fetching Data
When working with the CloudKit, the logic that must be followed has many similarities to the logic required when working with databases. That means that saving and updating records is usually somehow more difficult to do, while fetching them consists of the “easy” part of the job. So far we’ve managed to save new records to the CloudKit, but we’ve done no updates yet. We’ll do that later. In this part, we’ll focus on that “easy” part, as we’re going to fetch any stored records to the private database of the default container of the app in the iCloud and display them to the user.
So, as you guess, for the time being we’re leaving our work in the EditNoteViewController.swift file, and we’re moving to the ListNotesViewController.swift. In this class, you can find the tableview methods we’re going to need already being there without however being implemented. We have to do that now, along with the logic to retrieve the stored data.
Let’s get started, but first things first. As always when working with tableviews, we need an array to be the datasource, so, of course, we’ll create one. However, it’s really important to set the proper data type of its contents, because that will make a huge difference to our upcoming work. The best choice is to let that array accept CKRecord objects, and let me tell you why:
- The records we’ll fetch from the iCloud are CKRecord objects, so we can append them straight away to that array.
- We can access all the properties of a CKRecord object directly, especially when we’ll need to display each note details to the tableview.
- Selecting (by tapping) and passing a CKRecord object to the EditNoteViewController class really makes things easy.
- Getting a CKRecord object back from the EditNoteViewController class allows to instantly display its details with no further processing.
So, based on all the above, we can go to the top of the ListNotesViewController.swift class and declare the following property:
var arrNotes: Array = []
Our next step is to create a custom method, where we’ll write all the code required to get the data we want from the CloudKit. But, what data do we want?
Well, the answer always depends on the nature of the app you’re implementing. You can ask for just one record, for a set of records matching to some criteria, or simply ask for all records existing in a specific record type in the iCloud. In this demo app we won’t bother with the first two cases; I prefer we keep moving in more general lines, otherwise we might risk to lose the goal of the tutorial. However, I ensure you that all you need to know for these cases can be found in the Apple documentation mostly here and here.
If you visit the second link, you’ll see that predicates (NSPredicate) are needed to specify criteria and limit the records that you’ll fetch. Actually, predicates are still needed even if you’re about to fetch all records, but they’re used in a simpler way.
With all the above being said, it’s time to focus on our code again. Our goal here is to access the default container and the private database, to create a query (CKQuery) object and then run it so we get the records we want. Let’s do all these by creating a new method:
func fetchNotes() {
    let container = CKContainer.defaultContainer()
    let privateDatabase = container.privateCloudDatabase
    let predicate = NSPredicate(value: true)

    let query = CKQuery(recordType: "Notes", predicate: predicate)
}
As you see, the CKQuery object accepts two arguments: The first one is the name of the record scheme, the second is the predicate object that was set right above. Next, that query must be run:
func fetchNotes() {
    ...

    privateDatabase.performQuery(query, inZoneWithID: nil) { (results, error) -> Void in
        if error != nil {
            println(error)
        }
        else {
            println(results)

            for result in results {
                self.arrNotes.append(result as! CKRecord)
            }

            NSOperationQueue.mainQueue().addOperationWithBlock({ () -> Void in
                self.tblNotes.reloadData()
                self.tblNotes.hidden = false
            })
        }
    }
}
As you see, a results array is returned in the completion handler above. In case that no error occurs, we first keep all the found records to the arrNotes array (the one we declared earlier), and then we make sure that the received data will be displayed to the tableview by simply reloading it and making it visible. Note that we do that in the main thread. By making the tableview visible, we “cover” the activity view indicator that is spinning by default.
Note that intentionally added the println(results) line, so you can see in the console what the fetched records contain.
The above method has to be called somewhere, and that will happen in the viewDidLoad method:
override func viewDidLoad() {
    ...

    fetchNotes()
}
Now, all the existing records in the CloudKit will be fetched but they won’t appear to the tableview. We have to add the missing implementation in the tableview methods. So, let’s begin by the easy ones:
func tableView(tableView: UITableView, numberOfRowsInSection section: Int) -> Int {
    return arrNotes.count
}


func tableView(tableView: UITableView, heightForRowAtIndexPath indexPath: NSIndexPath) -> CGFloat {
    return 80.0
}
For each record existing in the arrNotes array, we must get and show the note title, the last edited date and the picked image. We won’d display the note text; it’s not necessary to exist in the notes listing. As the date and the image need some kind of processing, let’s see the easy things first:
func tableView(tableView: UITableView, cellForRowAtIndexPath indexPath: NSIndexPath) -> UITableViewCell {
    var cell = tableView.dequeueReusableCellWithIdentifier("idCellNote", forIndexPath: indexPath) as! UITableViewCell

    let noteRecord: CKRecord = arrNotes[indexPath.row]

    cell.textLabel?.text = noteRecord.valueForKey("noteTitle") as? String

    return cell
}
All we do above is to dequeue each cell, and assign each object of the arrNotes array to a local variable. Then, we get the note title and set it as the text of the main cell’s label.
Regarding the last edited date, we need to convert it to a String object before we display it. For that cause, we’ll use a NSDateFormatter object, and we’ll set a custom format for its display:
func tableView(tableView: UITableView, cellForRowAtIndexPath indexPath: NSIndexPath) -> UITableViewCell {
    ...

    let dateFormatter = NSDateFormatter()
    dateFormatter.dateFormat = "MMMM dd, yyyy, hh:mm"
    cell.detailTextLabel?.text = dateFormatter.stringFromDate(noteRecord.valueForKey("noteEditedDate") as! NSDate)

    return cell
}
If you’ve ever worked with NSDate objects, then you know that without the NSDateFormatter‘s help we can’t use a date as a String. Needless to say that you can change the above date format, and customize it on the way you want.
Before we use the image returned along with the rest data in each record, it’s important to say that during the fetching process all the assets are stored to the cache directory of the app. That means that all images are downloaded every time we fetch the note records, and they stay there temporarily until the app gets terminated. Now, every image existing in each record, is expressed as a CKAsset object. This object also contains the temporary image path, and we’ll use it so we load each image and set it to the cell’s image view. Here we go:
func tableView(tableView: UITableView, cellForRowAtIndexPath indexPath: NSIndexPath) -> UITableViewCell {
    ...

    let imageAsset: CKAsset = noteRecord.valueForKey("noteImage") as! CKAsset
    cell.imageView?.image = UIImage(contentsOfFile: imageAsset.fileURL.path!)
    cell.imageView?.contentMode = UIViewContentMode.ScaleAspectFit

    return cell
}
Finally, this part has come to its end. Go once again and try the app. If you haven’t created any note records yet, then this is your best time to do it. Also, look at the output on the console, and try to locate the temporary images that are downloaded during the records fetching.
Modifying and Updating Records
Saving and fetching records are important tasks, but equally important is to be able to change and update a record. In CloudKit, modifying a record isn’t difficult at all; all we have to do is to change the data to an existing CKRecord object which already has an identifier, and then save it in the way we’ve already implemented. For our demo application, this means that it would be extremely convenient to pass a CKRecord object from the ListNotesViewController to the EditNoteViewController class once a note is selected in the tableview, and use that object to perform any updates required.
So, having in mind the general idea, let’s see the details. Initially, open the EditNoteViewController.swift class, and at the top of it declare the next property:
var editedNoteRecord: CKRecord!
As you understand, the editedNoteRecord is the CKRecord object that will be assigned with the one that should be edited after it has been selected in the tableview.
Now, let’s go back to the ListNotesViewController.swift file, and let’s declare there at the top of the class another property too:
var selectedNoteIndex: Int!
In the above property, we’ll save the index of the row that was tapped, so we can pick the proper CKRecord object from the arrNotes array and pass it to the next view controller.
Time for a new tableview delegate method:
func tableView(tableView: UITableView, didSelectRowAtIndexPath indexPath: NSIndexPath) {
    selectedNoteIndex = indexPath.row
    performSegueWithIdentifier("idSegueEditNote", sender: self)
}
By writing the above lines, we make the tableview responding to our tappings on its cells. What we do is really easy; at first we store the index of the tapped row, and then we perform the segue that will make the transition to the EditNoteViewController view controller. Of course, this is not enough so we can edit a note. We need to pass the proper object from the arrNotes array to the EditNoteViewController view controller. Let’s do that:
override func prepareForSegue(segue: UIStoryboardSegue, sender: AnyObject?) {
    if segue.identifier == "idSegueEditNote" {
        let editNoteViewController = segue.destinationViewController as! EditNoteViewController

        if let index = selectedNoteIndex {
            editNoteViewController.editedNoteRecord = arrNotes[index]
        }
    }
}
An important detail here is that we necessarily have to use the if let statement, as the selectedNoteIndex property is going to contain a valid value only when editing a note; it’s going to be nil when creating a new one. It’s the only way to avoid unwanted crash of the app.
Once again now, let’s change class, so open the EditNoteViewController.swift file. Our first task here is to get all data from the CKRecord we passed to this view controller right above (the editedNoteRecord object) and set it to the subviews properly. So, in the viewDidLoad method add the following piece of code. Note that we have already seen in previous parts everything that takes place next:
override func viewDidLoad() {
    ...

    if let editedNote = editedNoteRecord {
        txtNoteTitle.text = editedNote.valueForKey("noteTitle") as! String
        textView.text = editedNote.valueForKey("noteText") as! String
        let imageAsset: CKAsset = editedNote.valueForKey("noteImage") as! CKAsset
        imageView.image = UIImage(contentsOfFile: imageAsset.fileURL.path!)
        imageView.contentMode = UIViewContentMode.ScaleAspectFit

        imageURL = imageAsset.fileURL

        imageView.hidden = false
        btnRemoveImage.hidden = false
        btnSelectPhoto.hidden = true
    }
}
As you understand, it’s important to check first if the editedNoteRecord has a valid value, otherwise if the EditNoteViewController is loaded for creating a new note, the app will crash. The editedNoteRecord will be nil.
There’s one last thing we have to do, and that is to save to iCloud any changes that might have happened to the note. As we already have a saving method implemented, we don’t really need to create a new one. We’ll use the same, but necessarily we’ll do some modifications. Right now, the saveNote(_:) IBAction method begins as follows:
@IBAction func saveNote(sender: AnyObject) {
    if txtNoteTitle.text == "" || textView.text == "" {
        return
    }

    viewWait.hidden = false
    view.bringSubviewToFront(viewWait)
    navigationController?.setNavigationBarHidden(true, animated: true)

    let timestampAsString = String(format: "%f", NSDate.timeIntervalSinceReferenceDate())
    let timestampParts = timestampAsString.componentsSeparatedByString(".")
    let noteID = CKRecordID(recordName: timestampParts[0])

    let noteRecord = CKRecord(recordType: "Notes", recordID: noteID)

    ...
}
With the last command we create a new CKRecord object. However, when editing a note, we already have such an object on our hands, so obviously creating a new one should not happen. As you may suspect, the solution is simple: We’ll check if we’re editing a note, and in this case we’ll assign the editedNoteRecord to the noteRecord object. We won’t initialize a new one. After all, from there on, all the further processing on the noteRecord object remains the same, no matter whether we first-save or update a note.
So, here’s once again the beginning of the above method. This time, it has been modified so the app knows if it should create a new CKRecord object, or use the existing one:
@IBAction func saveNote(sender: AnyObject) {
    if txtNoteTitle.text == "" || textView.text == "" {
        return
    }

    viewWait.hidden = false
    view.bringSubviewToFront(viewWait)
    navigationController?.setNavigationBarHidden(true, animated: true)

    var noteRecord: CKRecord!

    if let editedNote = editedNoteRecord {
        noteRecord = editedNote
    }
    else {
        let timestampAsString = String(format: "%f", NSDate.timeIntervalSinceReferenceDate())
        let timestampParts = timestampAsString.componentsSeparatedByString(".")
        let noteID = CKRecordID(recordName: timestampParts[0])

        noteRecord = CKRecord(recordType: "Notes", recordID: noteID)
    }

    ...

}
Pretty simple solution, and helpful as we still can use the previous implementation.
Now you can test the app once again and edit an existing note. You’ll see that any change you perform to it, it’s also reflected to iCloud once you save the note.
Updating The Notes List
If you’ve tested the demo app so far, then you have definitely noticed that when creating a new note or updating an existing one the notes list in the ListNotesViewController view controller is not updating, unless you terminate and re-run the app. In this part we’ll fix that issue, but let me highlight a fact first. It’s totally pointless to force the app to re-fetch all the existing records from the CloudKit once a note gets saved, as this would result in two (unwanted) things:
- The note list wouldn’t be updated in real time. Instead, this would happen once all records have been downloaded.
- It’s a waste of resources re-fetching all records just because a new one has been added, or an existing one has been edited.
So, a more proper solution to keep the notes list up-to-date is to pass either the new note record, or the edited one back to the ListNotesViewController, and this can happen once we save it to iCloud. That means that we need to use the delegation pattern, as it’s the easiest approach to do what we want to do.
Let’s fix everything step by step, and the first thing is to go to the EditNoteViewController.swift file an create a new protocol, containing just one delegate method; the one shown next:
protocol EditNoteViewControllerDelegate {
    func didSaveNote(noteRecord: CKRecord, wasEditingNote: Bool)
}
As you see, that method accepts two parameters. The noteRecord is the actual CKRecord object we’ll pass to the ListNotesViewController class. The second one indicates whether the record is new, or an edited one. This is an important information for the app, because if the record is new, it will just append it to the arrNotes array. If it’s an edited one, then it will replace the proper CKRecord object to the arrNotes array.
The next step is to declare a delegate property. To the top of the EditNoteViewController class, add the next line:
var delegate: EditNoteViewControllerDelegate!
Now, two modifications are required to the saveNote(_:) IBAction method. At first, we need to use a flag to indicate whether that method saves a new or an existing note record. We’ll declare and set the value of that flag in the beginning of the method, where we distinguish whether it’s a new or not record. Right next, you’re given the part of interest, where you can see how the isEditingNote flag is used (note the comments):
@IBAction func saveNote(sender: AnyObject) {
    ...

    var noteRecord: CKRecord!
    var isEditingNote: Bool!   // Flag declaration.

    if let editedNote = editedNoteRecord {
        noteRecord = editedNote

        isEditingNote = true // True because a note record has been edited.
    }
    else {
        let timestampAsString = String(format: "%f", NSDate.timeIntervalSinceReferenceDate())
        let timestampParts = timestampAsString.componentsSeparatedByString(".")
        let noteID = CKRecordID(recordName: timestampParts[0])

        noteRecord = CKRecord(recordType: "Notes", recordID: noteID)

        isEditingNote = false   // False because it's a new note record.
    }

    ...
}
Now, we have to call the delegate method we declared previously. The best place to do that is in the completion handler (closure) body, where we’ll create an else case that indicates that the saving process was successful:
@IBAction func saveNote(sender: AnyObject) {
    ...

    privateDatabase.saveRecord(noteRecord, completionHandler: { (record, error) -> Void in
        if (error != nil) {
            println(error)
        }
        else {
            self.delegate.didSaveNote(noteRecord, wasEditingNote: isEditingNote)
        }

        NSOperationQueue.mainQueue().addOperationWithBlock({ () -> Void in
            self.viewWait.hidden = true
            self.navigationController?.setNavigationBarHidden(false, animated: true)
        })
    })

}
Our work in this class is over. Let’s head now to the ListNotesViewController.swift file, and initially let’s adopt the new protocol:
class ListNotesViewController: UIViewController, UITableViewDelegate, UITableViewDataSource, EditNoteViewControllerDelegate
Then, let’s make this class the delegate of the other one:
override func prepareForSegue(segue: UIStoryboardSegue, sender: AnyObject?) {
    if segue.identifier == "idSegueEditNote" {
        let editNoteViewController = segue.destinationViewController as EditNoteViewController

        editNoteViewController.delegate = self

        ...
    }
}
Finally, let’s implement the delegate method. As you’ll see, we first check if a new or an existing record was saved. In the first case, we just append it to the arrNotes array. In the second case, we replace the object in the index pointed by the selectedNoteIndex, and then we make that variable nil. At the end, we ensure that the tableview is visible we reload its data:
func didSaveNote(noteRecord: CKRecord, wasEditingNote: Bool) {
    if !wasEditingNote {
        arrNotes.append(noteRecord)
    }
    else {
        arrNotes.insert(noteRecord, atIndex: selectedNoteIndex)
        arrNotes.removeAtIndex(selectedNoteIndex + 1)
        selectedNoteIndex = nil
    }


    if tblNotes.hidden {
        tblNotes.hidden = false
    }

    tblNotes.reloadData()
}
Now every time that a record is created or updated, it will be shown to the tableview straight away once it gets saved.
Deleting Records
Our demo application would be incomplete if we wouldn’t add one more feature, the capability to delete existing note records. Doing so consists of the easiest task in this app, as all it takes is to make a call to a new CloudKit method (you’ll see it next), and provide it with the record identifier that should be deleted.
In the following tableview delegate method we’ll implement, at first we get the record ID of the record matching to the tapped row. Then, as usual, we specify the container and the database, and finally we make a call to the deleteRecordWithID(…) of the CloudKit. If everything works without errors, we remove the respective object from the arrNotes array, and of course, we update the tableview. Simple things, so let’s see everything at once:
func tableView(tableView: UITableView, commitEditingStyle editingStyle: UITableViewCellEditingStyle, forRowAtIndexPath indexPath: NSIndexPath) {
    if editingStyle == UITableViewCellEditingStyle.Delete {
        let selectedRecordID = arrNotes[indexPath.row].recordID

        let container = CKContainer.defaultContainer()
        let privateDatabase = container.privateCloudDatabase

        privateDatabase.deleteRecordWithID(selectedRecordID, completionHandler: { (recordID, error) -> Void in
            if error != nil {
                println(error)
            }
            else {
                NSOperationQueue.mainQueue().addOperationWithBlock({ () -> Void in
                    self.arrNotes.removeAtIndex(indexPath.row)
                    self.tblNotes.reloadData()
                })
            }
        })
    }
}
Once again, I remind you that any visual updates must always happen to the main thread, therefore we use above the NSOperationQueue class.
If you test the app now, you can delete a row simply by swiping a cell to the left so the red Delete button to become visible.
Summary
Now that we’ve come to the end of the tutorial, you can see that working with CloudKit isn’t a difficult thing to do. One could say it’s a way to deal with a different kind of a database. All the information provided in this tutorial is to help you get on the right track, in case you are about to support such a feature in your apps. Storing data to iCloud definitely leads to an advanced user experience, as users are able to find their data to more than one devices. Of course, what I presented in this tutorial doesn’t consist of the only task you can do with iCloud. However, it’s a big part that can be used in many cases. It’s up to you from now on to search for more resources, but in any case I hope you’ve learned something new here. Closing, I’d like to say as a last word that iCloud is used for many purposes by Apple, so why not developers do the same thing? Think of that, and start making use of it.
For reference, you can download the Xcode project here.
Credits: no_image.png by courtesy of Mathieu Jeannot


