

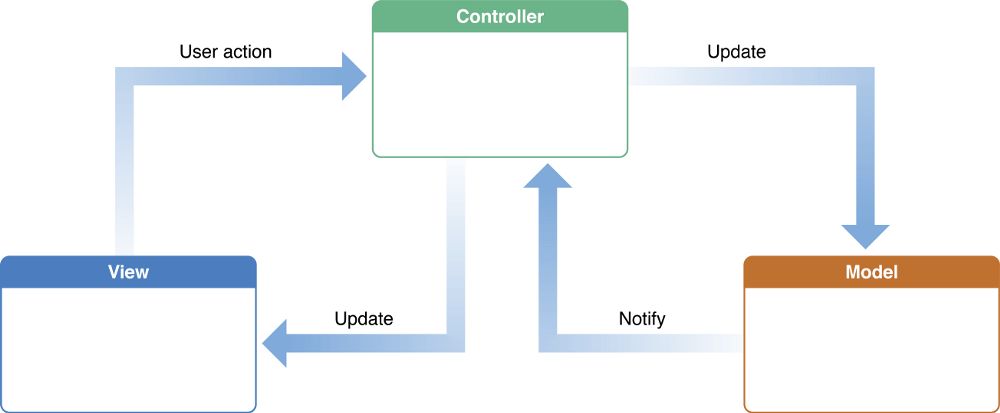
View Controller is the component that provides basic building block that we use as a foundation to build application in iOS development. In Apple MVC world, it sits as a middle man between the View and Model, acting as an orchestrator between both of them. It starts with the controller acting as an observer that reacts to Model changes, updates the View, accepts user interaction from the view using the Target Action, and then updates the Model.
Courtesy of Apple Inc.
As an iOS developer, there are many times that we will face an issue of handling Massive View Controller, even if we use architectures like MVVM, MVP, or VIPER. Sometimes, the View Controller has too many responsibilities to handle in one single screen. It’s violating the SRP (Single Responsibility Principle), creating tight coupling between modules, and making it hard to reuse and test each of the components.
We can take the app screenshot below as an example. You can see there are at least 3 responsibilities in one single screen:
- Display a list of movies;
- Display a filter list that can be selected to be applied for the list of movies;
- Clear selection of the selected filters.
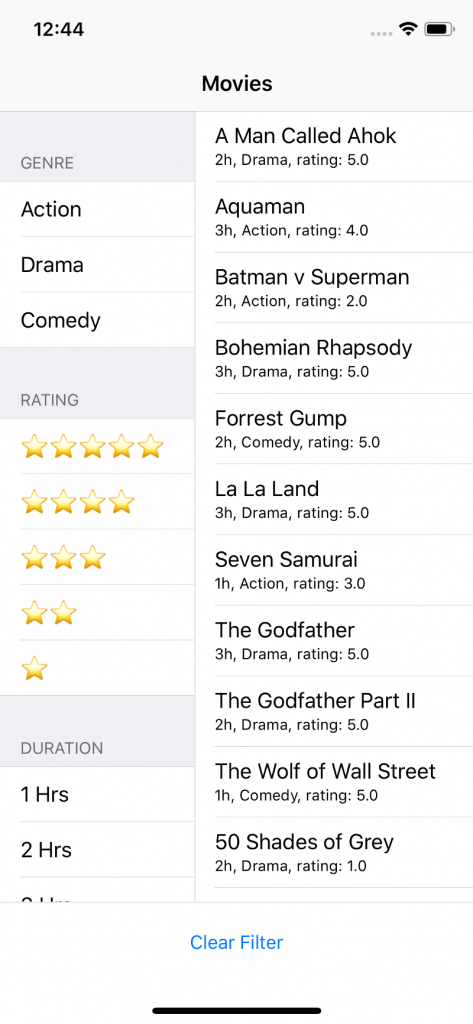
If we are going to build this screen using Single View Controller, it is guaranteed that the view controller will become very massive and bloated as it handles too many responsibilities in one single view controller.
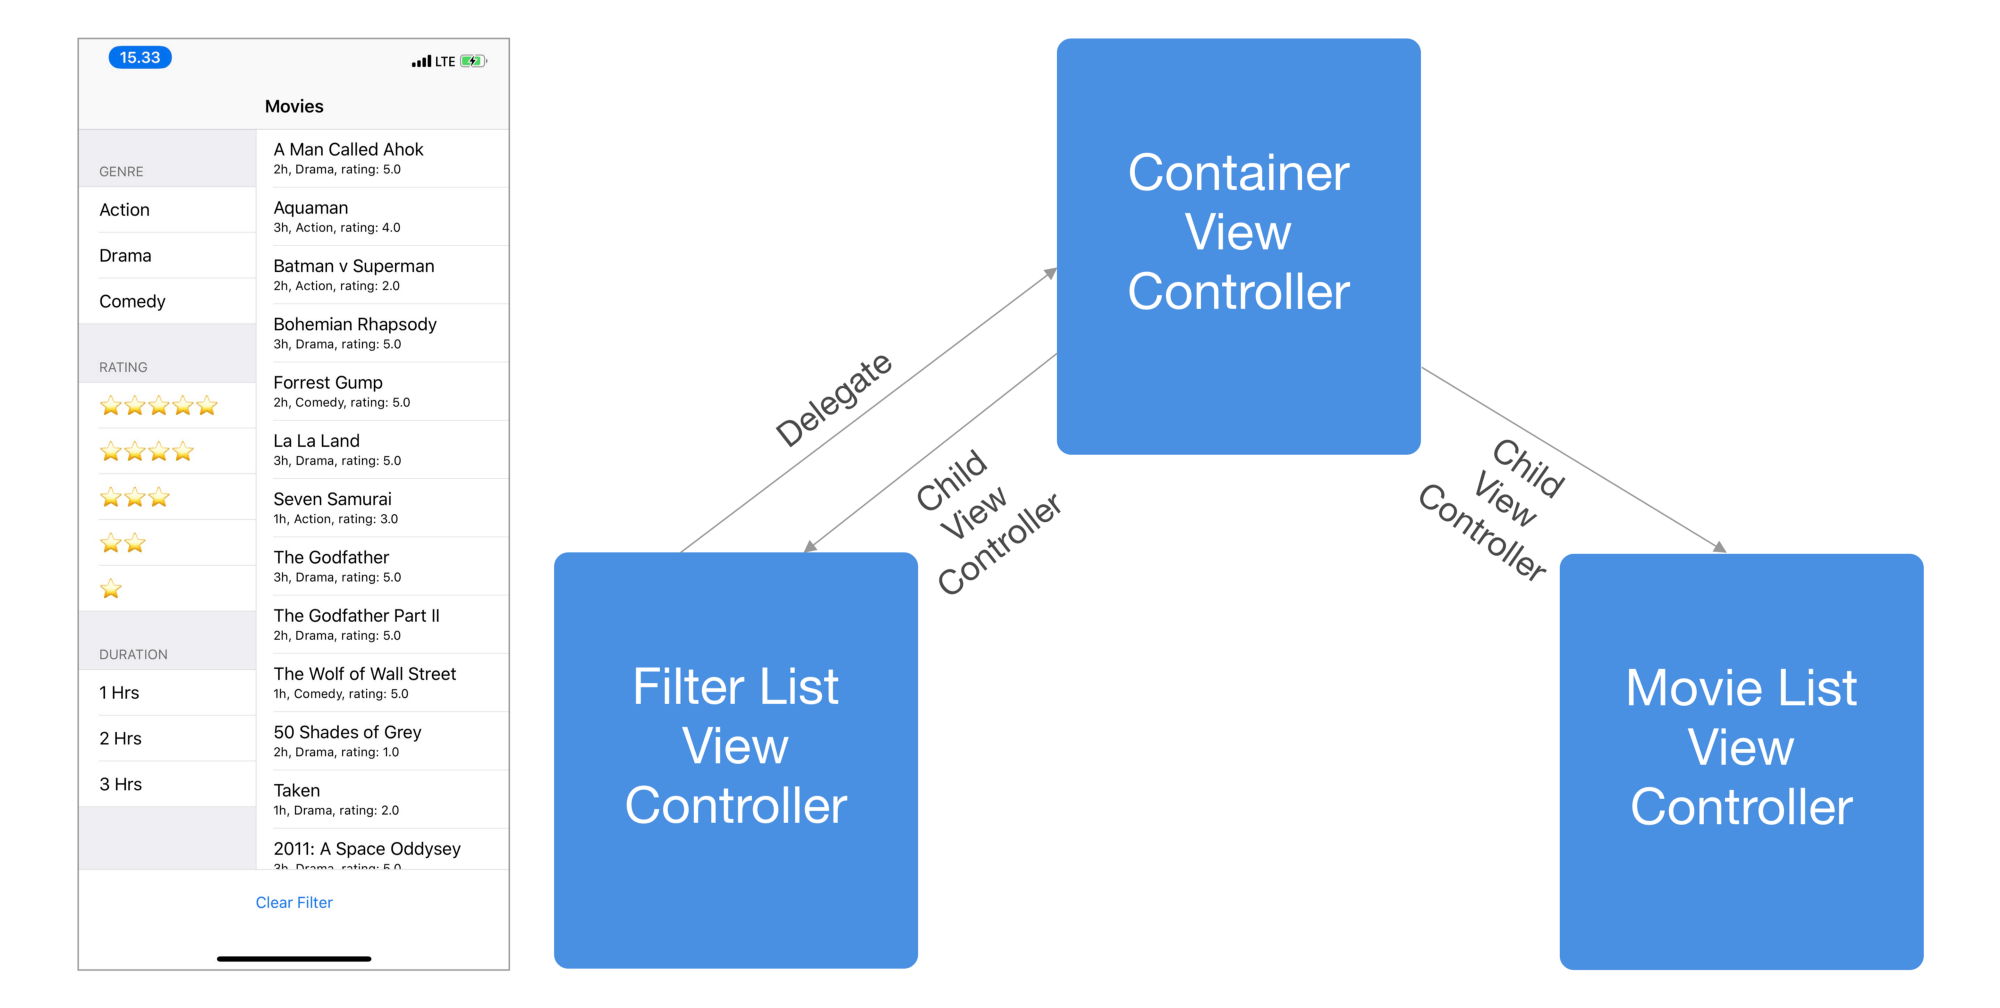
How can we solve this problem? One of the solution is using View Controller Containment and Child View Controller. Here are the benefits of using this solution:
- Encapsulate the listing of movies into
MovieListViewControllerthat has single responsibility to just display list of movies and reacts to changes inMovieModel. We can also reuse thisMovieListViewControllerin another screen if we want to just display list of movies without filter. - Encapsulate the listing and selection of filters logic into
FilterListViewControllerthat has single responsibility to just display and handles the selection of filters. We can use delegation to communicate with the parent View Controller when user select and deselect filters. - Slimming down the main View Controller into one
ContainerViewControllerthat just has the responsibility to apply the selected filters from the Filter List to theMoviemodel inMovieListViewController. It also sets up the layout and adds the child view controllers using the container views.
You can view the complete project source code here in the GitHub Repository below.
Composition of the View Controllers using Storyboard
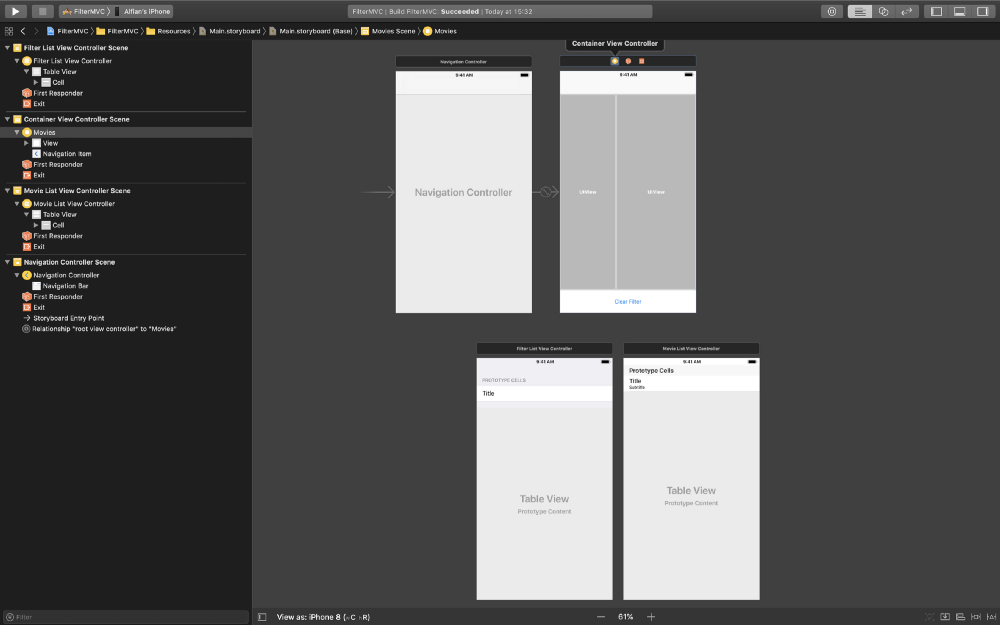
According to the above storyboard, here are the View Controllers that we use to build our Filter screen:
ContainerViewController: The Containment View Controller provides 2 container views to embed the Child View Controller inside a horizontalUIStackView. It provides a singleUIButtonto clear the selected filters as well. It also embedded in aUINavigationControllerthat acts as the initial View Controller.FilterListMovieController: The View Controller that is the subclass of theUITableViewControllerwith Grouped style and one prototype standard Cell to display the name of the filter. It also has its Storyboard ID assigned so it can be instantiated from theContainerViewControllerprogramatically.MovieListViewController: The View Controller that is the subclass of theUITableViewControllerwith Plain style and one prototype subtitle Cell to display the attributes of theMovie. It also has its Storyboard ID assigned like theFilterListViewController.
The Movie List View Controller
This view controller has the responsibility to display the list of Movie model that is exposed as an instance property. We are using Swift didSet property observer to react to changes in model, and then reload the UITableView. The cell displays the title, duration, rating, and genre for the Movie using default subtitle UITableViewCellStyle.
import UIKit

struct Movie {

    let title: String
    let genre: String
    let duration: TimeInterval
    let rating: Float

}

class MovieListViewController: UITableViewController {

    var movies = [Movie]() {
        didSet {
            tableView.reloadData()
        }
    }

    let formatter: DateComponentsFormatter = {
        let formatter = DateComponentsFormatter()
        formatter.allowedUnits = [.hour, .minute]
        formatter.unitsStyle = .abbreviated
        formatter.maximumUnitCount = 1
        return formatter
    }()

    override func tableView(_ tableView: UITableView, numberOfRowsInSection section: Int) -> Int {
        return movies.count
    }

    override func tableView(_ tableView: UITableView, didSelectRowAt indexPath: IndexPath) {
        tableView.deselectRow(at: indexPath, animated: true)
    }

    override func tableView(_ tableView: UITableView, cellForRowAt indexPath: IndexPath) -> UITableViewCell {
        let cell = tableView.dequeueReusableCell(withIdentifier: "Cell", for: indexPath)

        let movie = movies[indexPath.row]
        cell.textLabel?.text = movie.title
        cell.detailTextLabel?.text = "\(formatter.string(from: movie.duration) ?? ""), \(movie.genre.capitalized), rating: \(movie.rating)"
        return cell
    }

}
The Filter List View Controller
The Filter List displays the MovieFilter enum in 3 separate sections: genre, rating, and duration. The MovieFilter enum itself conforms to Hashable protocol so it can be stored inside a Set uniquely using the hash value of each enum and its properties. The selections of the filters are stored under an instance property with Set containing the MovieFilter.
To communicate with other object, a delegate pattern is used using the FilterListControllerDelegate. There are 3 methods for the delegate to implement:
- Selection of a filter.
- Deselection of a filter.
- Clear all selected filters.
import UIKit

enum MovieFilter: Hashable {

    case genre(code: String, name: String)
    case duration(duration: TimeInterval, name: String)
    case rating(value: Float, name: String)

    var hashValue: Int {

        switch self {
        case .genre(let code, let name):
            return "\(code)-\(name)".hashValue

        case .rating(let value, let name):
            return "\(value)-\(name)".hashValue

        case .duration(let duration, let name):
            return "\(duration)-\(name)".hashValue

        }
    }

}

protocol FilterListViewControllerDelegate: class {

    func filterListViewController(_ controller: FilterListViewController, didSelect filter: MovieFilter)
    func filterListViewController(_ controller: FilterListViewController, didDeselect filter: MovieFilter)
    func filterListViewControllerDidClearFilters(controller: FilterListViewController)

}

class FilterListViewController: UITableViewController {

    let filters = MovieFilter.defaultFilters
    weak var delegate: FilterListViewControllerDelegate?
    var selectedFilters: Set<MovieFilter> = []

    override func viewDidLoad() {
        super.viewDidLoad()
    }

    func clearFilter() {
        selectedFilters.removeAll()
        delegate?.filterListViewControllerDidClearFilters(controller: self)

        tableView.reloadData()
    }

    override func numberOfSections(in tableView: UITableView) -> Int {
        return filters.count
    }

    override func tableView(_ tableView: UITableView, numberOfRowsInSection section: Int) -> Int {
        return filters[section].filters.count
    }

    override func tableView(_ tableView: UITableView, titleForHeaderInSection section: Int) -> String? {
        return filters[section].title
    }

    override func tableView(_ tableView: UITableView, didSelectRowAt indexPath: IndexPath) {
        tableView.deselectRow(at: indexPath, animated: true)
        let filter = filters[indexPath.section].filters[indexPath.row]
        if selectedFilters.contains(filter) {
            selectedFilters.remove(filter)
            delegate?.filterListViewController(self, didDeselect: filter)
        } else {
            selectedFilters.insert(filter)
            delegate?.filterListViewController(self, didSelect: filter)
        }
        tableView.reloadRows(at: [indexPath], with: .automatic)
    }

    override func tableView(_ tableView: UITableView, cellForRowAt indexPath: IndexPath) -> UITableViewCell {
        let cell = tableView.dequeueReusableCell(withIdentifier: "Cell", for: indexPath)
        let filter = filters[indexPath.section].filters[indexPath.row]

        switch filter {
        case .genre(_, let name):
            cell.textLabel?.text = name

        case .rating(_, let name):
            cell.textLabel?.text = name

        case .duration(_, let name):
            cell.textLabel?.text = name

        }

        if selectedFilters.contains(filter) {
            cell.accessoryType = .checkmark
        } else {
            cell.accessoryType = .none
        }

        return cell
    }

}
Integrating inside the Container View Controller
In the ContainerViewController, we have several instance properties:
FilterListContainerView&MovieListContainerView: The container views that will be used to add the child view controllers.FilterListViewController&MovieListViewController: The reference to Movie List and Filter List View Controllers that will be instantiated using the Storyboard ID.movie: TheMoviearray that is instantiated using default hardcoded Movies.
When the viewDidLoad is invoked, we call the method to setup the Child View Controllers. Here are several tasks it performs:
- Instantiate the
FilterListViewControllerandMovieListViewControllerusing the Storyboard ID; - Assign them to the instance properties;
- Assign the
MovieListViewControllerthe movies array; - Assign the
ContainerViewControlleras thedelegateofFilterListViewControllerso it can respond to the filter selection; - Set Child Views frames and add them as the Child View Controller using the helper method extension.
For the FilterListViewControllerDelegate implementation, when filter is selected or deselected, the default Movies data is filtered for each respective genre, rating, and duration. Then, the result of the filter is assigned to the MovieListViewController‘s movies property. For the deselection of all filters, it just assigns the default movies data.
import UIKit

class ContainerViewController: UIViewController {

    @IBOutlet weak var filterListContainerView: UIView!
    @IBOutlet weak var movieListContainerView: UIView!

    var filterListVC: FilterListViewController!
    var movieListVC: MovieListViewController!

    let movies = Movie.defaultMovies

    override func viewDidLoad() {
        super.viewDidLoad()
        setupChildViewControllers()
    }

    private func setupChildViewControllers() {
        let storyboard = UIStoryboard(name: "Main", bundle: nil)

        let filterListVC = storyboard.instantiateViewController(withIdentifier: "FilterListViewController") as! FilterListViewController
        addChild(childController: filterListVC, to: filterListContainerView)
        self.filterListVC = filterListVC
        self.filterListVC.delegate = self

        let movieListVC = storyboard.instantiateViewController(withIdentifier: "MovieListViewController") as! MovieListViewController
        movieListVC.movies = movies
        addChild(childController: movieListVC, to: movieListContainerView)
        self.movieListVC = movieListVC
    }

    @IBAction func clearFilterTapped(_ sender: Any) {
        filterListVC.clearFilter()
    }

    private func filterMovies(moviesFilter: [MovieFilter]) {
        movieListVC.movies = movies
            .filter(with: moviesFilter.genreFilters)
            .filter(with: moviesFilter.ratingFilters)
            .filter(with: moviesFilter.durationFilters)
    }

}

extension ContainerViewController: FilterListViewControllerDelegate {

    func filterListViewController(_ controller: FilterListViewController, didSelect filter: MovieFilter) {
        filterMovies(moviesFilter: Array(controller.selectedFilters))
    }

    func filterListViewController(_ controller: FilterListViewController, didDeselect filter: MovieFilter) {
        filterMovies(moviesFilter: Array(controller.selectedFilters))
    }

    func filterListViewControllerDidClearFilters(controller: FilterListViewController) {
        movieListVC.movies = Movie.defaultMovies
    }

}
Conclusion
By looking at the sample project, we can see the benefit of using View Controller Containment and Child View Controller in our app. We can divide the responsibilities of single View Controller into separate View Controllers that only has single responsibility (SRP). We also need to make sure that the Child View Controller does not know anything about its parent. For the Child View Controller to communicate back to the parent, we can use the Delegation pattern.
This approach also provides the benefit of loosely coupled modules that can lead to better reusability and testing of each components. It really helps us scale our app as it grow larger and more complex. Let’s keep learning 📖, Merry Christmas🎄, and Happy New Year🎊 to all of you! Keep on Swifting with Cocoa!!😋
This is a guest post by Alfian Losari. The article was first published on Medium.


