

At WWDC 2017, Apple announced a long wanted system framework for developers, CoreNFC. If you are not familiar with NFC, simply put, NFC (short for Near Field Communication) allows two devices to communicate with each other when placed within 4cm of each other. Most businesses put NFC chips in cards, enforcing tighter security of who can enter a building. Apple’s CoreNFC currently supports one single NFC format, NFC Data Exchange Format, or NDEF (commonly used in most tablets and phones on the market today).
What is CoreNFC?
“Using Core NFC, you can read Near Field Communication (NFC) tags of types 1 through 5 that contain data in the NFC Data Exchange Format (NDEF). To read a tag, your app creates an NFC NDEF reader session and provides a delegate. A running reader session polls for NFC tags and calls the delegate when it finds tags that contain NDEF messages, passing the messages to the delegate. The delegate can read the messages and handle conditions that can cause a session to become invalid.”
NFC is by no means a “new” technology; however, Apple has finally opened up this API to developers so that we can take advantage of the NFC reader.
Here’s a practical use-case: You run a shop and want the customers to just walk in, scan an item using NFC, and walk out. There’s no hassle and no wait time. As an app developer, without access to NFC, the second best thing would probably be bar-codes or QR-codes, but that’s annoying and takes a lot more work to scan.
So, what’s the catch? Though Apple finally opens up the NFC reader, the company strictly limits our access. This means CoreNFC only supports the NDEF format mentioned earlier. If you are planning to use CoreNFC to replace your RFID iClass cards (a commonly used format in business security cards), think again.
CoreNFC Demo
Let’s work on a demo app to see how to use CoreNFC. Our app is going to reveal a secret message stored on a NDEF-formatted card.
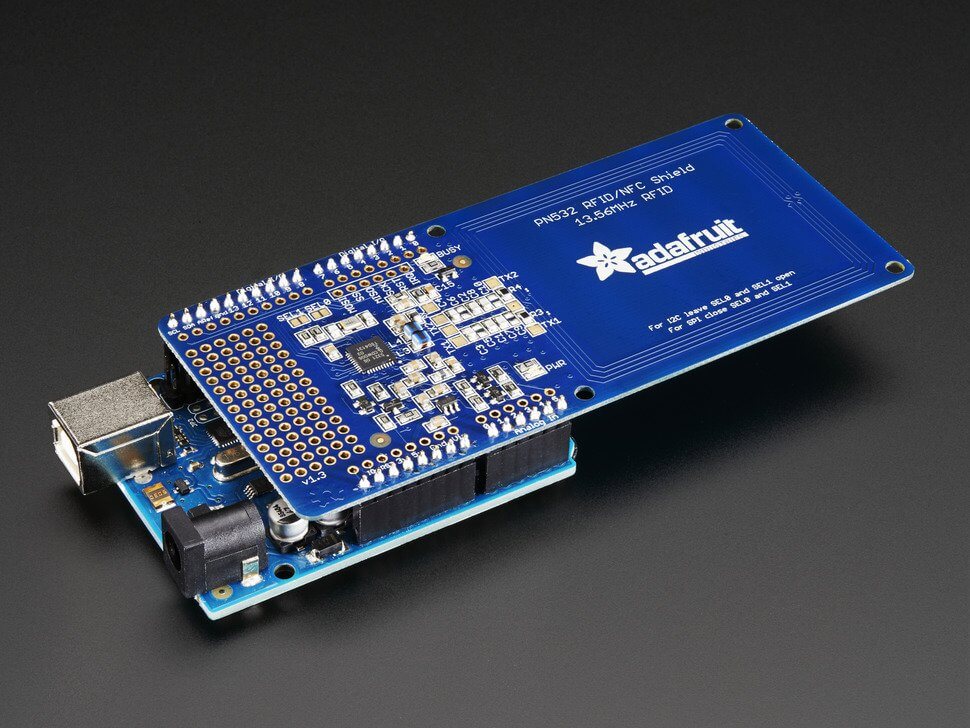
To do this, I programmed a message onto a sample NDEF-formatted card using an Arduino Uno paired with a Adafruit PN532 Shield. If you don’t have these tools or simply don’t want to invest the time and money in such hardware, try and find a pre-formatted card with a message on it. I won’t be covering NFC formatting, or embedding messages in a NDEF card in this tutorial.
Getting Started
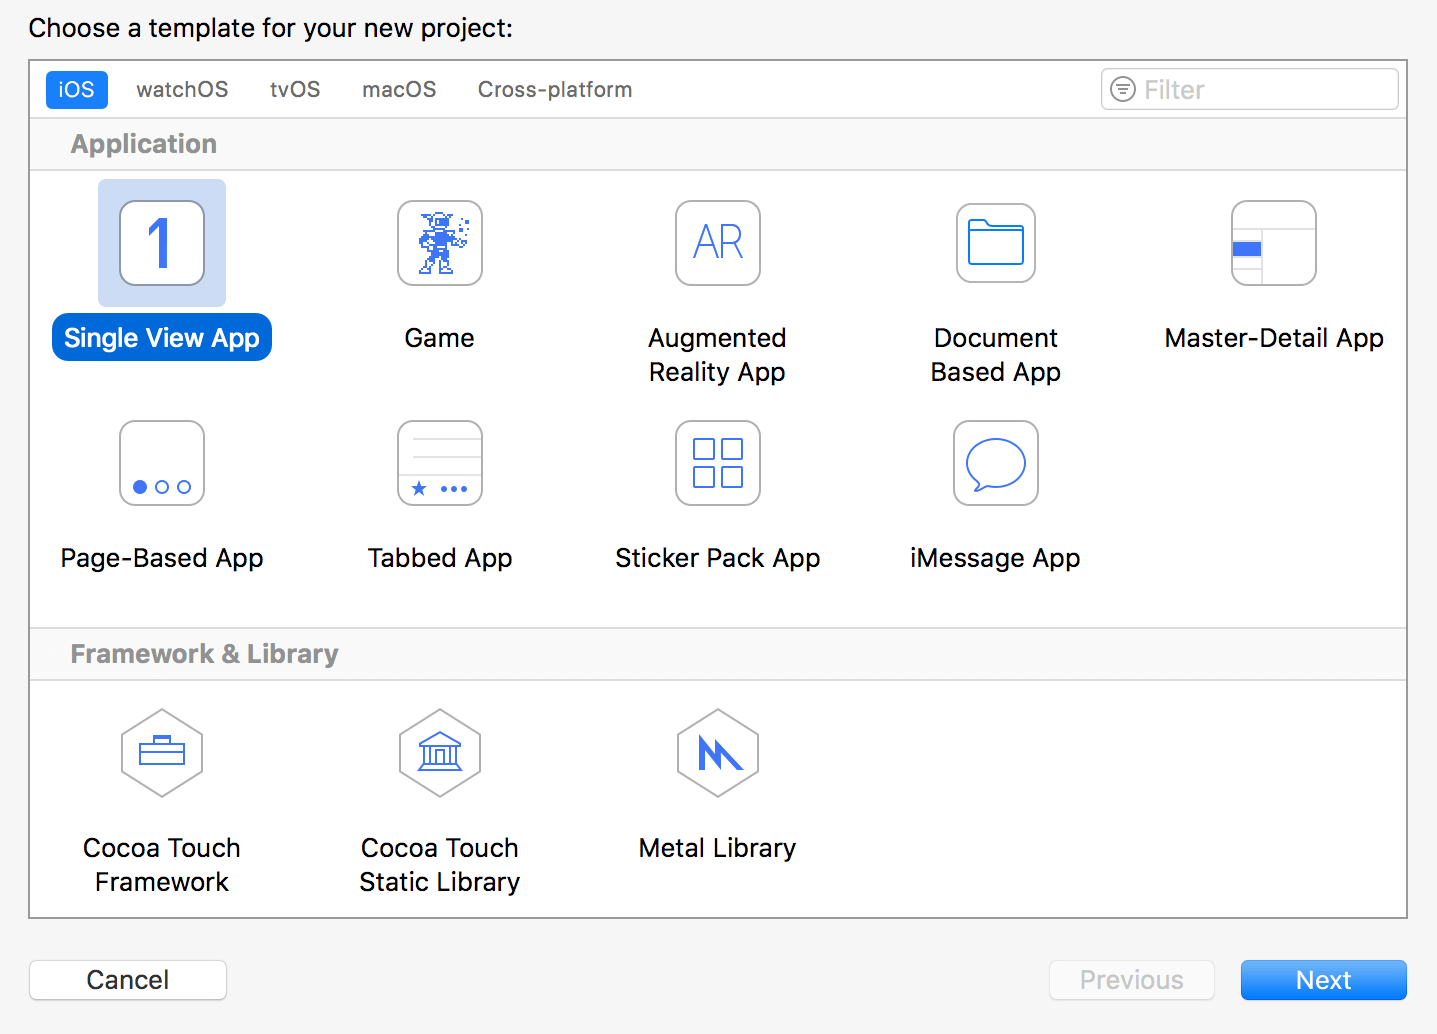
To create our project, open Xcode 9 and create a new single-view application. Proceed to name your project and make sure to choose Swift as your language.
Designing the Message View
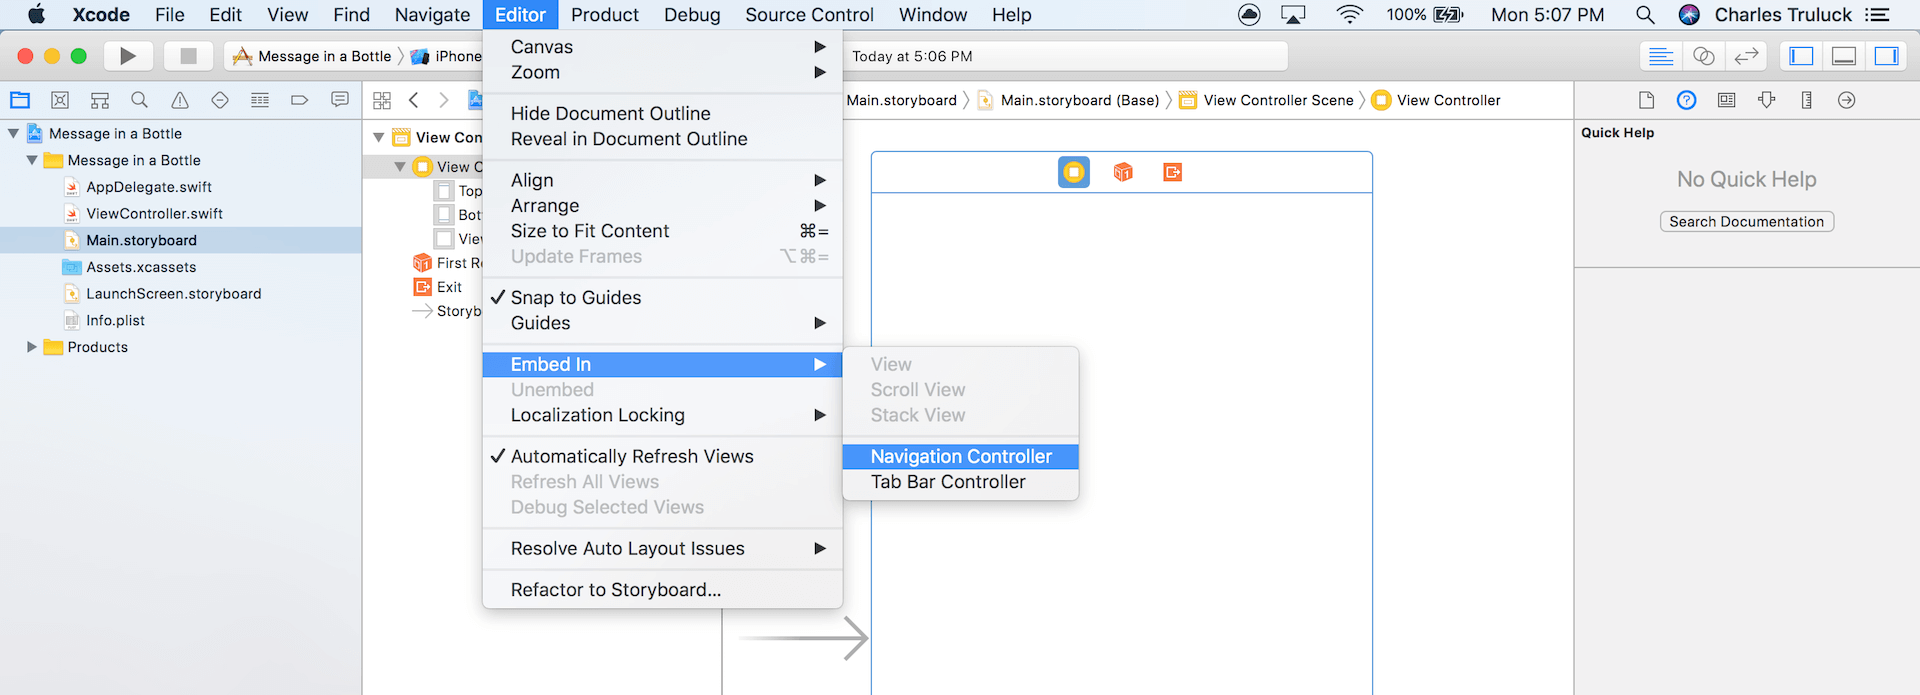
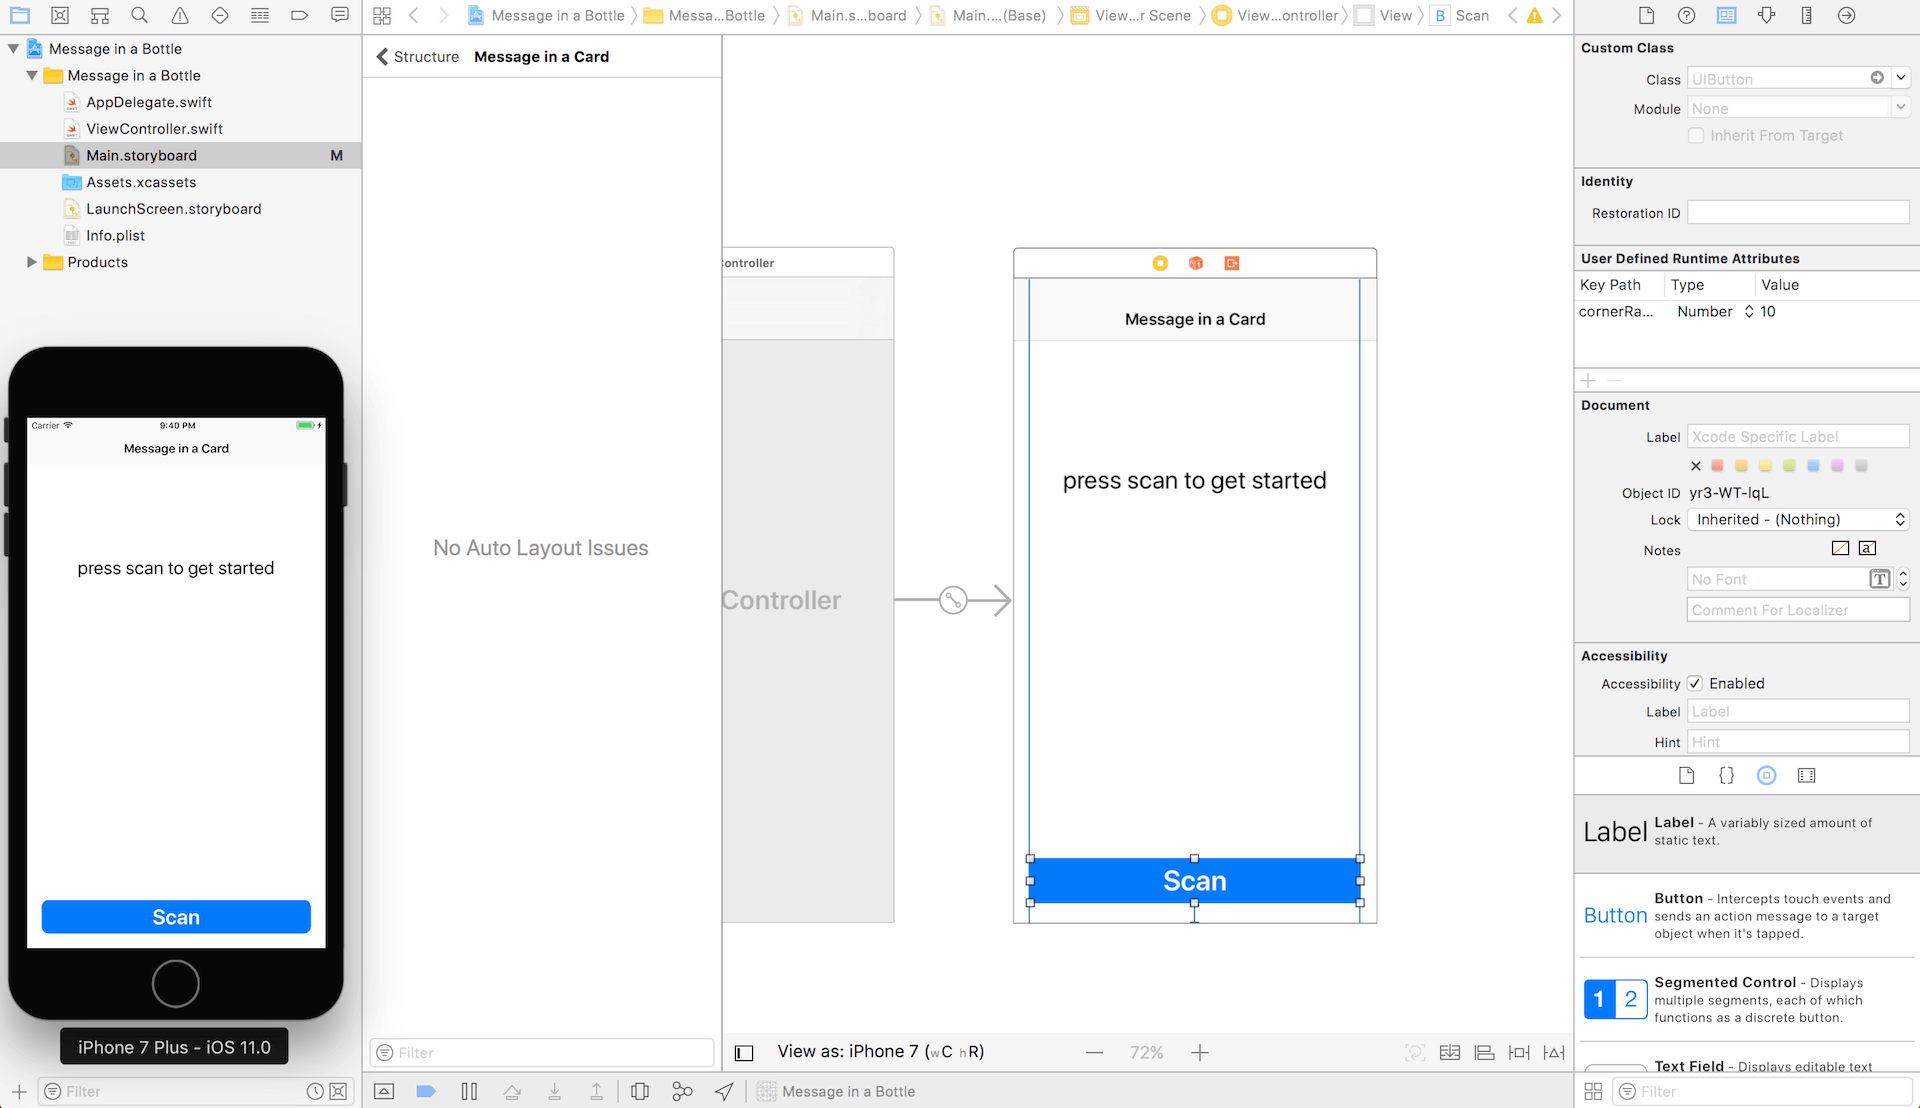
To being, we need to make a user interface (UI) for the user to interact with. Let’s start by creating a navigation controller. Go to Main.storyboard and select the view controller. Then, go to the status bar and click Editor > Embed In > Navigation Controller. This should create a nav bar at the top of your main view. Feel free to customize the title of this nav bar if you see fit. I went with “Message in a Bottle”.
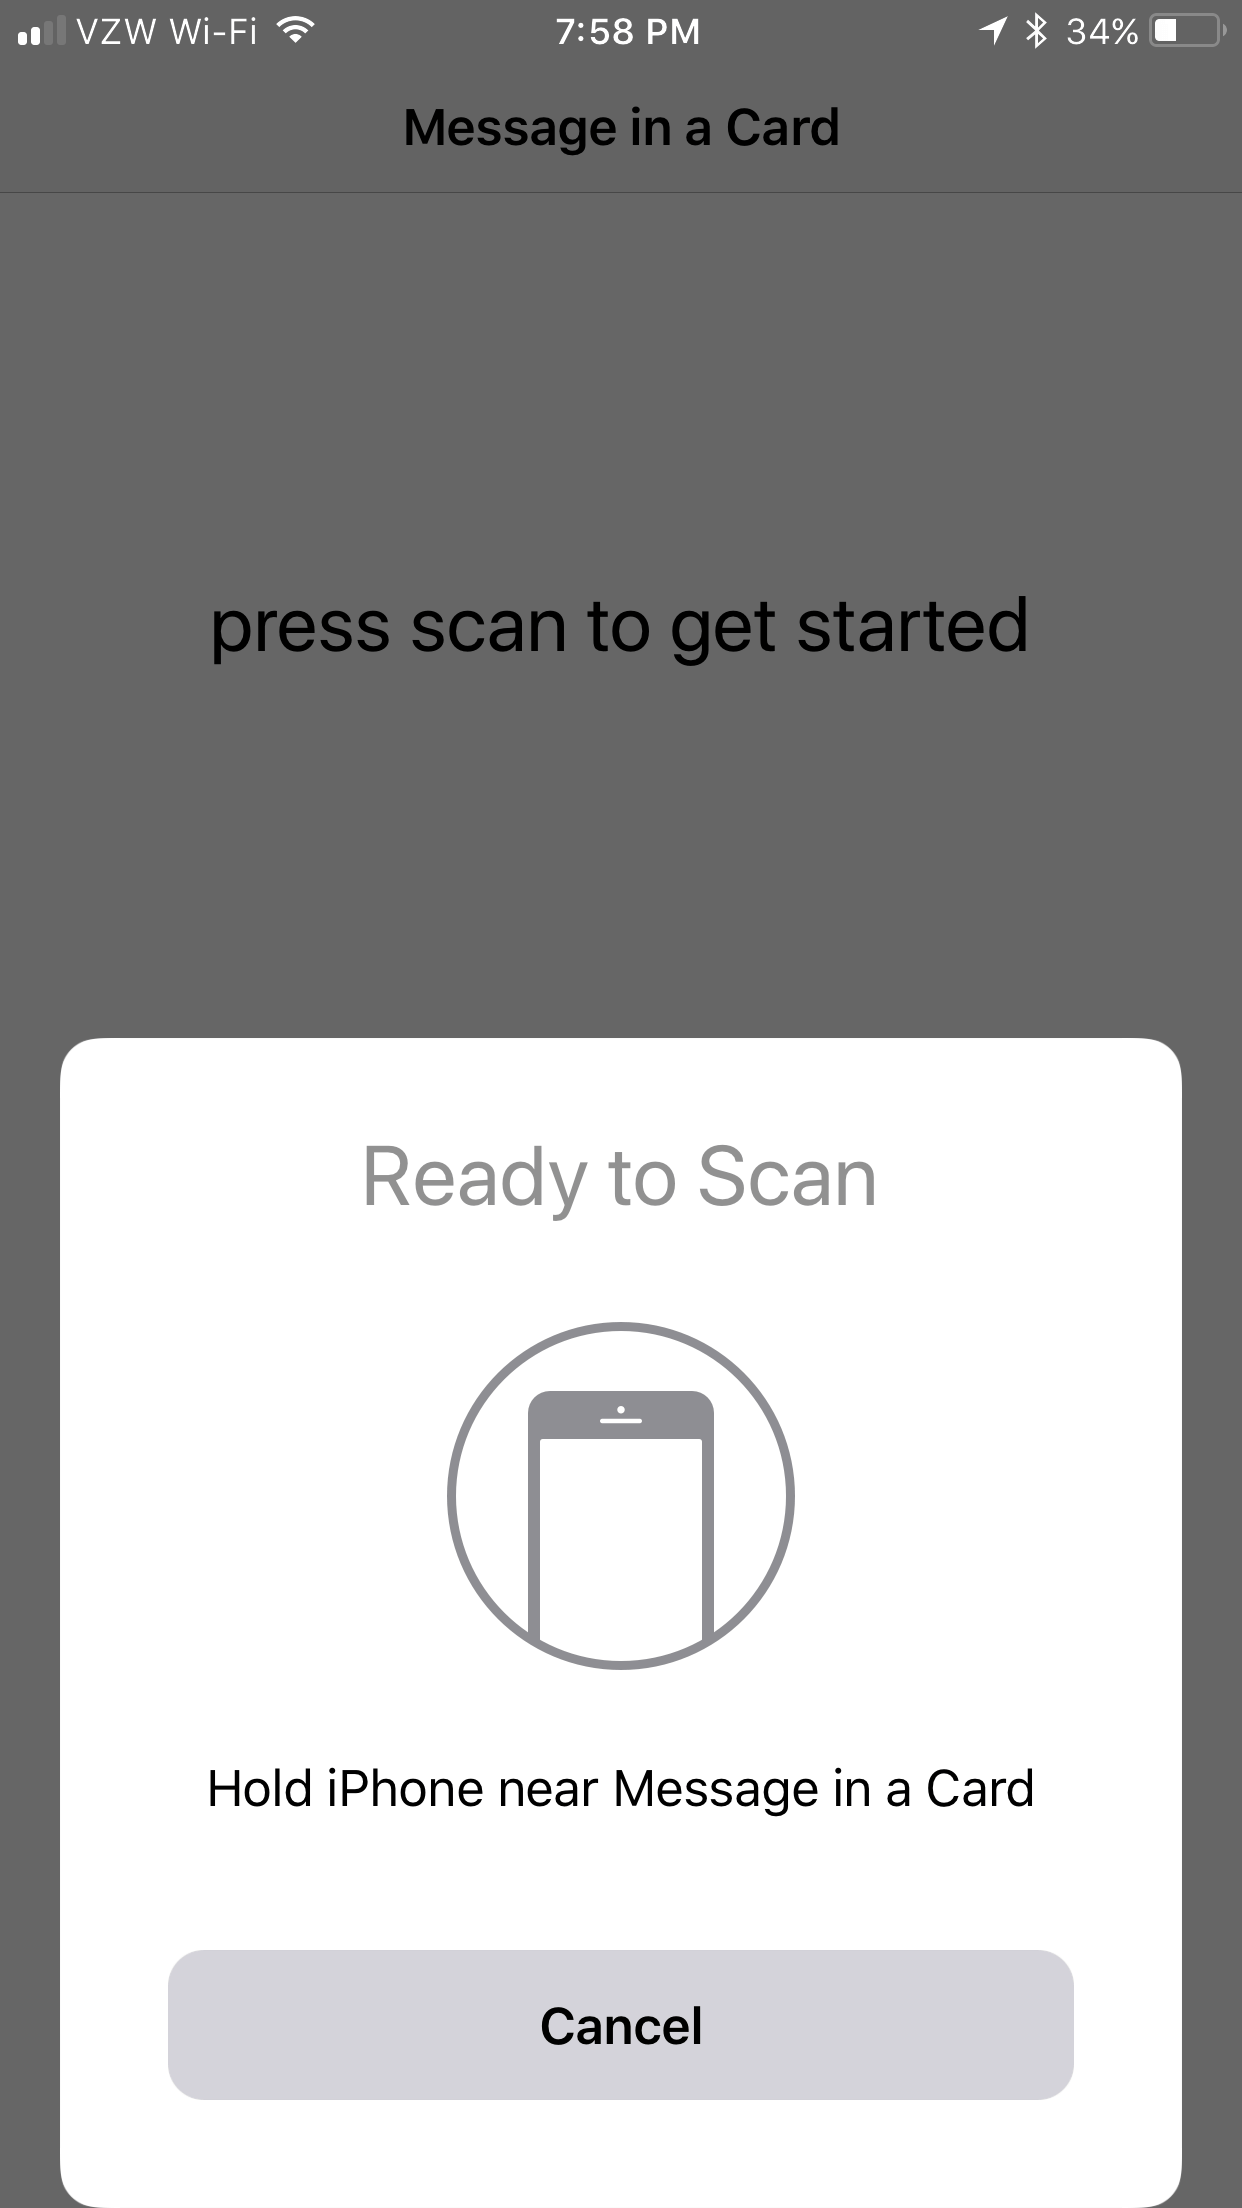
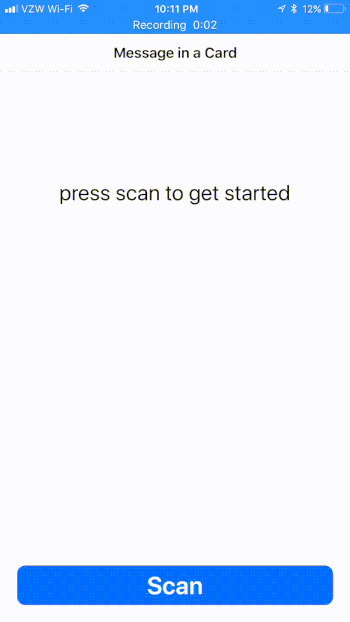
Next, drag in a UIButton and place it at the bottom of the view. Change the button’s text to ‘scan’, and format it as you like. After you add the scan button, let’s also add a UILabel for the scanned message to go and format it as you please. Now our app should look something like this:
Setting up Scan and Message
Now that we’ve setup the necessary components of our app, let’s get our hands dirty in code. We will start off with connecting the label and button. Open the assistant-editor (two circles at the top of Xcode) and control-drag from the UILabel to your code to create an outlet.

Now, do a similar connection with the scan button. In the connection details pop-up change ‘outlet’ to ‘action’. Name your IBAction function whatever you’d like, I called mine scanPressed Here’s what our ViewController.swift should look like:
import UIKit

class ViewController: UIViewController {

    @IBOutlet weak var messageLabel: UILabel!

    override func viewDidLoad() {
        super.viewDidLoad()
        // Do any additional setup after loading the view, typically from a nib.
    }

    override func didReceiveMemoryWarning() {
        super.didReceiveMemoryWarning()
        // Dispose of any resources that can be recreated.
    }

    @IBAction func scanPressed(_ sender: Any) {
        // this is our newly created IBAction
    }

}
Setting up App Entitlements and Privacy
Next, before we can really start working on our NFC implementation, we need to set up our app entitlements.
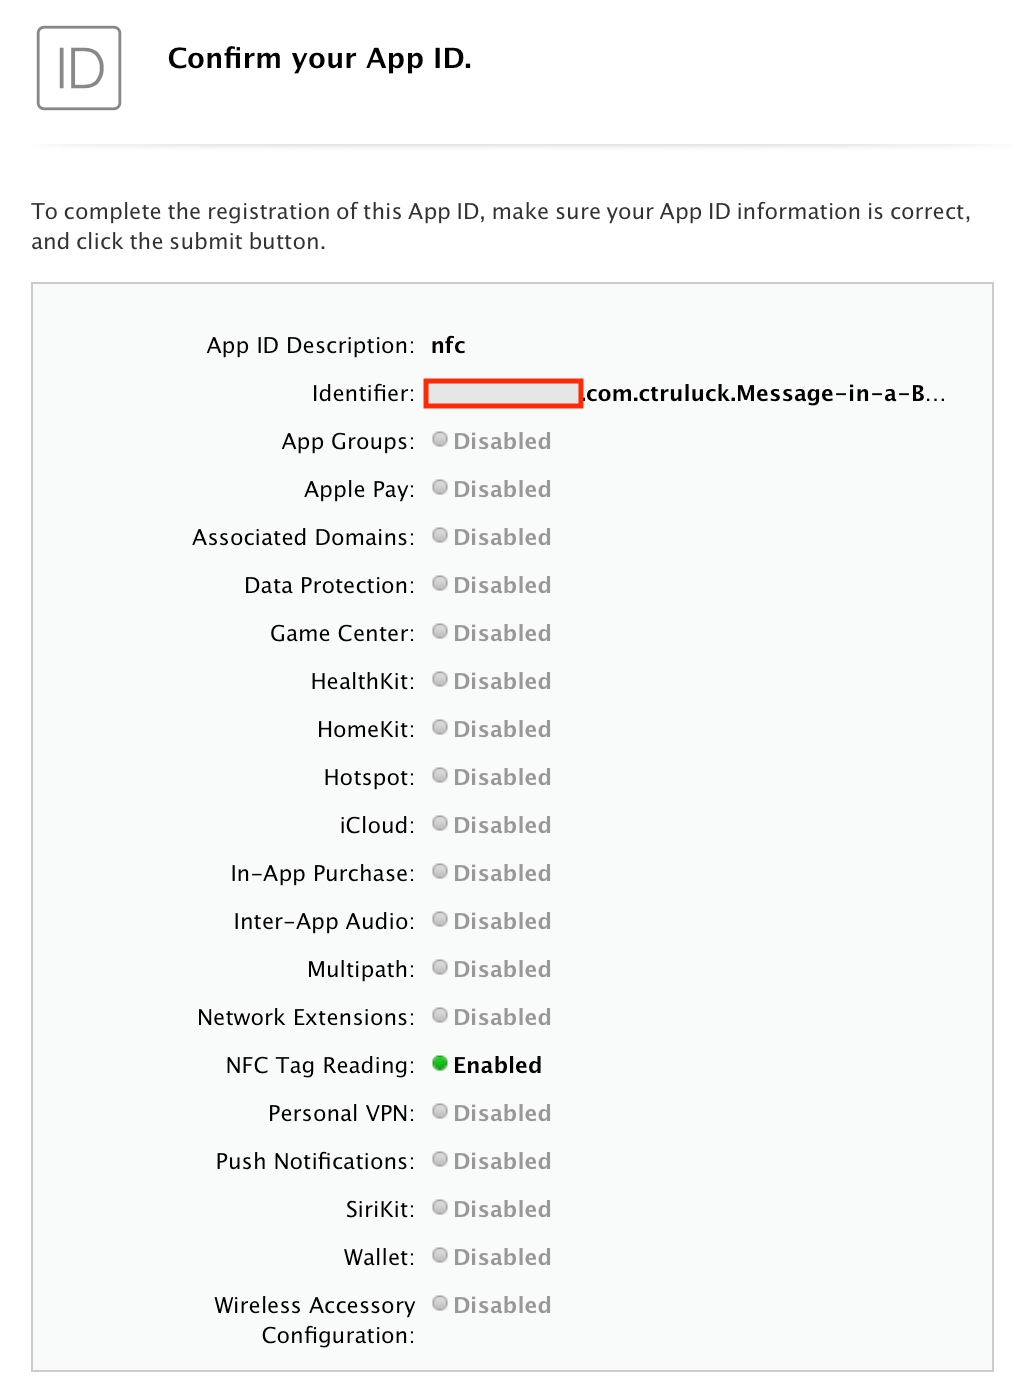
To start, head on over to developer.apple.com. Sign into your account, and once you’re in the Account panel, head to Certificates, Identifiers & Profiles tab. Under Identifiers, click App IDs. Then, click the (+) to register a new App ID. The App ID Description should be simple (i.e. nfc). You Explicit App ID and the Bundle ID must match the Bundle Identifier you used in your Xcode project exactly My Bundle Identifier is com.YOURDOMAIN.Message-in-a-Bottle. Once you’ve put your Bundle Identifier in, scroll down and check NFC Tag Reading in the list of services. Click next and make sure your confirmation page looks similar to mine:
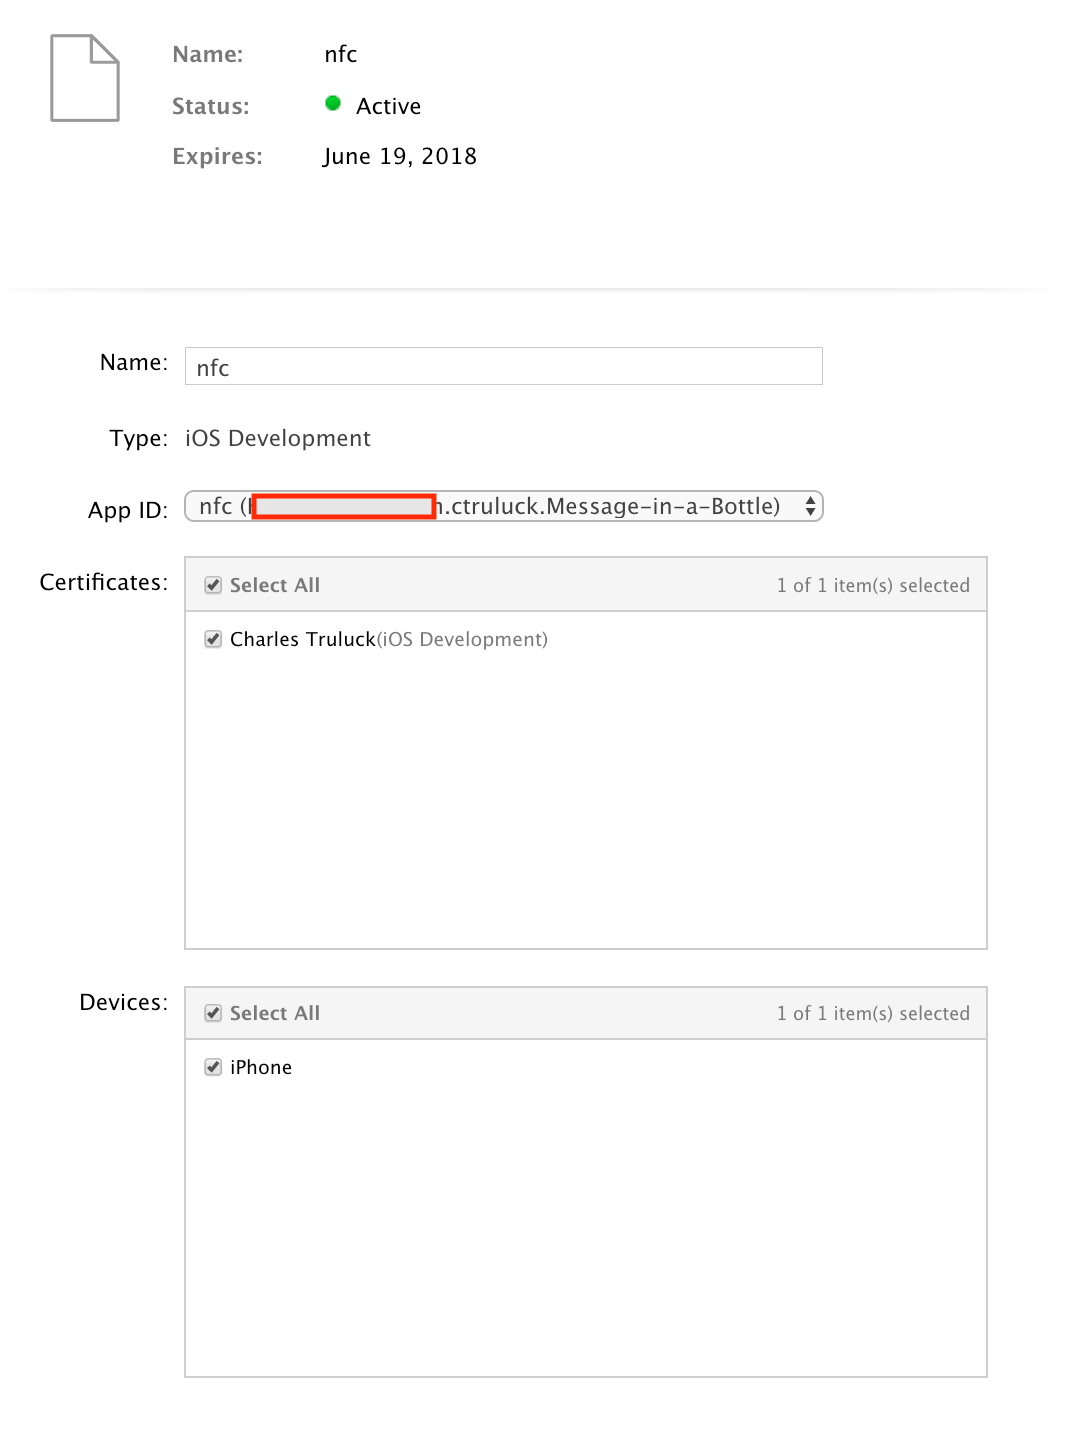
Once that is all set up, we need to create a new provisioning profile for this app. Go to the Provisioning Profiles tab and click all. Then, click (+) to make a new provisioning profile. Choose iOS Development, continue. Select your App ID’s name (mine is nfc), and continue. Choose the certificate you use, and select any phone you might want to test this app on. Name your profile whatever you feel like, and finish! You should have a new active provisioning profile.
What’s a provisioning profile? A provisioning profile authenticates a particular bundle Id (and app) to run on selected devices. This way, you can be sure the apps running on your device are traceable and secure.
We still need to select that specific profile for our app to build with. To do so, navigate back to Xcode > Project settings > then disable Automatically manage signing. For both Debug and Release, select the dropdown menu and choose Download profile. Find your profile (again, mine is nfc and select it. With that, you’re all set! Phew, the hard work is almost done!
Now, here’s where things get a little sketchy. We need to add app entitlements; however, the Xcode team has not enabled automatic entitlements for CoreNFC yet. For now, download this prebuilt entitlements file and put the file location in the text-box at Project > Build Settings > Code Signing Entitlement.
We anticipate Apple will update this feature in the near future, but for now this is the route to go. So if you can’t figure it out, come back to this tutorial once a new beta is released.
There’s only one more privacy policy we need to follow! (Last one I swear) 🙂
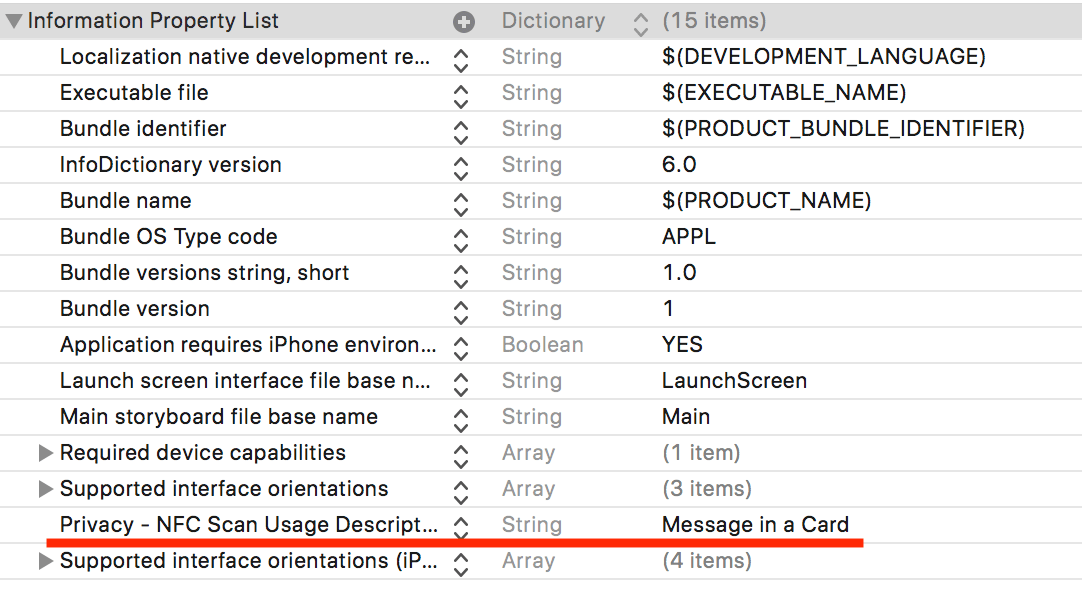
Open Info.plist and right click to add a row. In the ‘key’ column, open the dropdown menu and choose Privacy - NFC Scan Usage Description. Set the value to a string of whatever you’d like! This update to our plist file allows our app to access the necessary permissions for NFC.
Implementing CoreNFC
Ok, that was a lot. Take a breath, even I’m tired after that! It’s done now though. Let’s get on to the fun part! We’ll go ahead and add a few lines to our ViewController.swift but before we jump into the code, I need to mention an issue that had me tripped up for a couple hours.
Currently, the CoreNFC framework has not been compiled into the iOS simulator yet. This means if you try to import CoreNFC you will get an error saying there is no module named CoreNFC. Simple fix though, select either your iPhone or Generic Device in the active-scheme device selector.
import UIKit
import CoreNFC

class ViewController: UIViewController, NFCNDEFReaderSessionDelegate {

    @IBOutlet weak var messageLabel: UILabel!
    var nfcSession: NFCNDEFReaderSession?

    override func viewDidLoad() {
        super.viewDidLoad()
        // Do any additional setup after loading the view, typically from a nib.
    }

    override func didReceiveMemoryWarning() {
        super.didReceiveMemoryWarning()
        // Dispose of any resources that can be recreated.
    }

    @IBAction func scanPressed(_ sender: Any) {

    }

    func readerSession(_ session: NFCNDEFReaderSession, didInvalidateWithError error: Error) {
        print("The session was invalidated: \(error.localizedDescription)")
    }

    func readerSession(_ session: NFCNDEFReaderSession, didDetectNDEFs messages: [NFCNDEFMessage]) {
        // Parse the card's information
    }
}
Whoa, Charles, I don’t know what any of that does!
Let me break it down for you.
Line #2– First, we imported CoreNFC.
Line #4 – Then, we adopted and conformed to NFCNDEFReaderSessionDelegate protocol. The two readerSession functions allow us to either figure out what invalidated our NFC session, or receive data from the NFC scan. Having this all set up gives us a basic outline of what we’re doing.
We’re about to be able to see our NFC scanner in action, just two more lines of code need to be added to start the NFC listener.
Let’s update the scanPressed method we created before to invoke the NFCNDEFReaderSession initializer.
@IBAction func scanPressed(_ sender: Any) {
    nfcSession = NFCNDEFReaderSession.init(delegate: self, queue: nil, invalidateAfterFirstRead: true)
    nfcSession?.begin()
}
These lines are pretty self explanatory, but let’s look into them anyways.
We are initializing the NFC reader, setting the delegate to self (so we call our readerSession functions) and then we invalidate (or stop searching for) the NFC session. It’s always good to understand your code, so I’ll always break down what I’m doing for you.
With that in mind, let’s build and run the app!
If you got an error along the lines of Session is invalidated unexpectedly when running the app, go back and take another look at the “Setting up App Entitlements and Privacy” section — chances are you didn’t do something right there. If it works, congrats!
In concept, that was pretty simple, however Apple has really locked down access to use NFC, and for a good reason too. Getting to this point might have been a bit challenging, but parsing the records is a real blast! Let’s look into that.
Parsing the Message Records
First, let’s take a look at func readerSession(_ session: NFCNDEFReaderSession, didDetectNDEFs messages: [NFCNDEFMessage]) {
For those of you who are eager to see what messages[0] contains, let’s take a look — I’m just going to print the contents of the first object in messages and annotate it:
( // Payload one (There's only one payload in this card)
    "TNF=1, /* Type Name Format */
    Payload Type=<55>,
    Payload ID=<>,
    Payload=<0048656c 6c6f21>" /* What we're really interested in */
)
Amazing, right? Apple is actually giving us more than we need! Anyways, if you’ve messed with reading NFC-NDEF tags, you will recognize a lot of these objects. If not, then let’s break it down!
To make this output easier for us to dissect, I’m going to help you visualize this object:
messagesis an array ofNFCNDEFMessages, one for each scan we perform before the NFC session becomes invalidated, though in our app, we invalidate the session automatically after the first scan. We only need to worry about one object in the array.messages[0]is aNFCNDEFMessage, and it contains aNFCNDEFPayload.-
messages[0].recordsis an array ofNFCNDEFPayloads. This is an array because NDEF cards can contain multiple payloads. For our use, we only will have one payload.
A single NFCNDEFPayload contains 4 items of information:
1.identifier,
2.type, and
3.typeNameFormat. We’re only going to worry about payload.
4.payload is an object of type Data (if we convert the data to a string, we’ll have our message).
Cool! Hopefully that helps a little bit. If it doesn’t, don’t worry too much. It will make more sense as we go.
Let’s just go ahead and start parsing our records:
func readerSession(_ session: NFCNDEFReaderSession, didDetectNDEFs messages: [NFCNDEFMessage]) {
    var result = ""
    for payload in messages[0].records {
        result += String.init(data: payload.payload.advanced(by: 3), encoding: .utf8)! // 1
    }

    DispatchQueue.main.async {
        self.messageLabel.text = result
    }
}
*”Wait, Charles, I have a few questions. Why are you 1. advancing by 3? What’s the point of that DispatchQueue stuff?” *
First of all, I was a little confused at first with why my NFC tag always started with “enHello” or “enMessage”. After doing some research on NDEF specifications and regulations, I figured this out:
“All language codes MUST be done according to RFC 3066 [RFC3066]. The language code MAY NOT be omitted. The language code length is encoded in the six least significant bits of the status byte. Thus it is easy to find by masking the status byte with the value 0x3F.”
- NFC Data Exchange Format (NDEF) Technical Specification, NFC Forum
For legal reasons, we cannot link to the NDEF regulations PDF, but you may search for it on the internet in your own time to find out more about this restrictions.
In short, section 3.3, “Language Codes”, states that language codes may not be omitted and is a requirement.
In conclusion, line 3 converts the payload from type Data to a human-readable string. I’m skipping the bytes of data which include language codes, so the app does not display, “enMessage in a card!”
On the subject of DispatchQueue, messageLabel is not accessable by readerSession. I’m accessing messageLabel through the main queue, which is the easiest way to exchange the information between threads.
Here’s the final product in action:
Recap
In this tutorial, we explored the new CoreNFC framework and built a sample app to demonstrate its potential.
In this app we used CoreNFC to tap a physical card against our iPhone, and used the NFC Data Exchange Format to send a message from the card to the iPhone. You can download the complete project here
How will you use CoreNFC in your business? How do you hope to see it used? Leave a comment and let me know!


