Previously, we have created a simple Table View app to display list of recipes with a pre-defined image. In this tutorial, we’ll continue to work on the app and make it even better:
- Display different images for different rows – lastly, we display the same thumbnail for all rows. Wouldn’t be better to show individual image for each recipe?
- Customize the table view cell – instead of using the default style of table view cell, we’ll take a look how to build our own.
Display Different Thumbnails
Before we move on to change the code, let’s revisit the code for displaying thumbnail in table row.

Lastly, we’ve added a line of code to instruct UITableView to display “creme_brelee.jpg” in each row. Obviously, in order to show different images, we need to alter this line of code. As explained before, the “cellForRowAtIndexPath” method is called by iOS automatically each time before a table row is displayed.
- (UITableViewCell *)tableView:(UITableView *)tableView cellForRowAtIndexPath:(NSIndexPath *)indexPath
If you look into the method parameter, it passes the “indexPath” when invoked. The indexPath parameter contains the row number (as well as the section number) of the table row. You can simply use “indexPath.row” property to find out which row it currently points to. Like an array, the count of table row starts from zero. In other words, “indexPath.row” property returns 0 for the first row of table.
So to display different thumbnails, we’ll add a new array (i.e. thumbnails) that stores the file name of thumbnails:
@implementation SimpleTableViewController
{
    NSArray *tableData;
    NSArray *thumbnails;
}

- (void)viewDidLoad
{
    [super viewDidLoad];
	// Initialize table data
    tableData = [NSArray arrayWithObjects:@"Egg Benedict", @"Mushroom Risotto", @"Full Breakfast", @"Hamburger", @"Ham and Egg Sandwich", @"Creme Brelee", @"White Chocolate Donut", @"Starbucks Coffee", @"Vegetable Curry", @"Instant Noodle with Egg", @"Noodle with BBQ Pork", @"Japanese Noodle with Pork", @"Green Tea", @"Thai Shrimp Cake", @"Angry Birds Cake", @"Ham and Cheese Panini", nil];

    // Initialize thumbnails
    thumbnails = [NSArray arrayWithObjects:@"egg_benedict.jpg", @"mushroom_risotto.jpg", @"full_breakfast.jpg", @"hamburger.jpg", @"ham_and_egg_sandwich.jpg", @"creme_brelee.jpg", @"white_chocolate_donut.jpg", @"starbucks_coffee.jpg", @"vegetable_curry.jpg", @"instant_noodle_with_egg.jpg", @"noodle_with_bbq_pork.jpg", @"japanese_noodle_with_pork.jpg", @"green_tea.jpg", @"thai_shrimp_cake.jpg", @"angry_birds_cake.jpg", @"ham_and_cheese_panini.jpg", nil];
}
As you can see from the above code, we initialize the thumbnails array with a list of image file names. The order of images are aligned with that of the “tableData”.
For your convenience, you can download this image pack and add them into your project. Make sure “Copy items into destination group’s folder” is enabled.
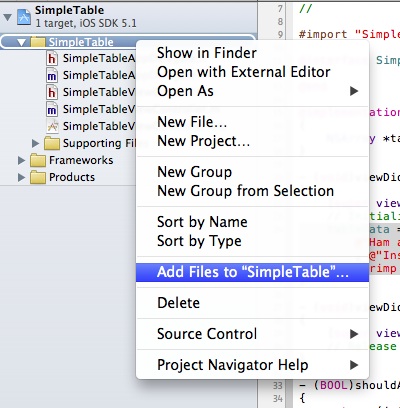
After adding the image files, you should find them in the Project Navigator like the screen shown below:
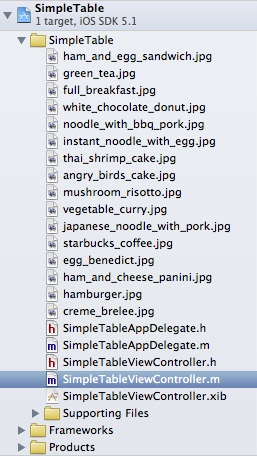
Lastly, change the line of code in “cellForRowAtIndexPath” method to:
cell.imageView.image = [UIImage imageNamed:[thumbnails objectAtIndex:indexPath.row]];
What’s [thumbnails objectAtIndex:indexPath.row]?
The line of code retrieves the name of images for the specific row. Say, for the first row, indexPath.row property returns 0 and we picks the first image (i.e. egg_benedict.jpg) from the thumbnails array using the “objectAtIndex” method.
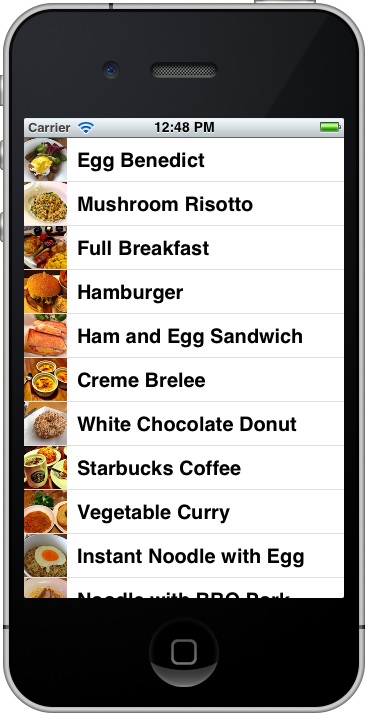
After saving all the changes, try to run your app again. It should now display different thumbnails for the table rows:
Customize Table View Cell
Does the app look better? We’re going to make it even better by customizing the table cell. So far we utilize the default style of table view cell. The location and size of the thumbnail are fixed. What if you want to make the thumbnail bigger and show the preparation time for each recipe just like the below screen?
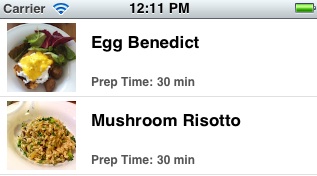
Custom Table View Cell with Different Style
Designing the Cell
In this case, you have to create and design your own table cell. Go back to Xcode. In Project Navigator, right click “SimpleTable” folder and select “New File…”.
As we’re going to design our own table cell, we have to create a new Interface Builder file for the cell. For this case, we just need to start with an “Empty” user interface. Click “Next” to continue.
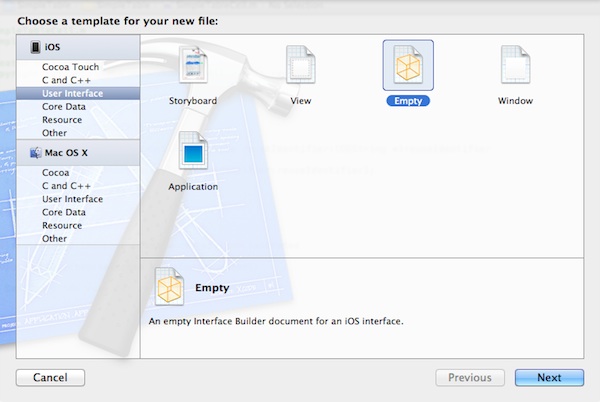
Select an Empty Interface Builder Document
When prompt to choose the device family, select “iPhone” and click “Next” to continue. Save the file as “SimpleTableCell”.
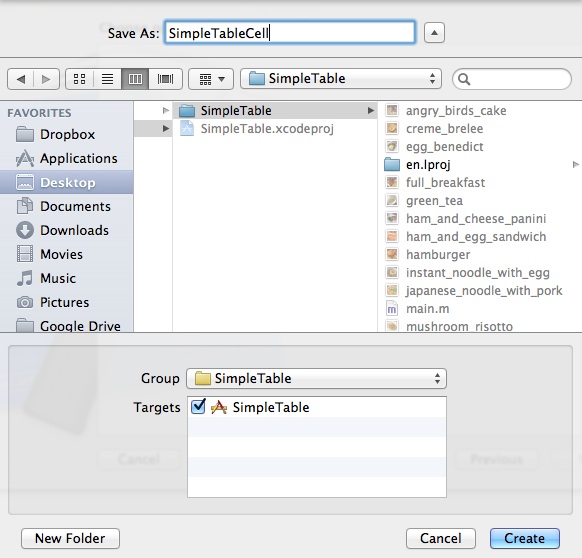
Once the file is created, you should find it in Project Navigator. Select “SimpleTableCell.xib” to switch to Interface Builder. We’re going to design the look and feel of the custom table cell.
In the Object Library, select “Table View Cell” and drag it to the design area of the Interface Builder.
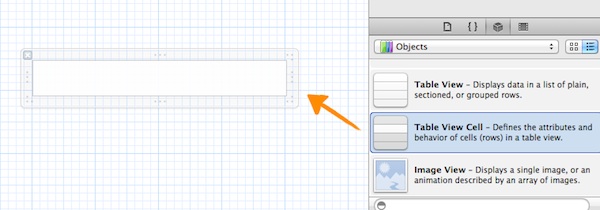
In order to accommodate a larger thumbnail, we have to change the height of the cell. Just hold the lower/upper side of the cell and scale the height to 78.
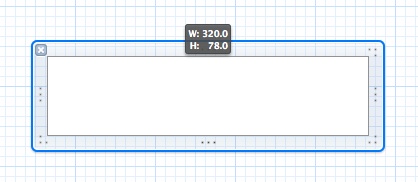
Alternatively, you can also use the “Size Inspector” to change the height.
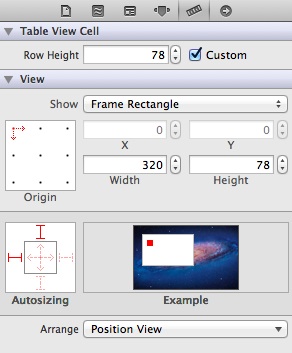
Size Inspector for Table View Cell
Next, select the “Attributes Inspector” in the upper part of the Utility area and set the “Identifier” of the custom cell to “SimpleTableCell”. This identifier will be used later in your code.
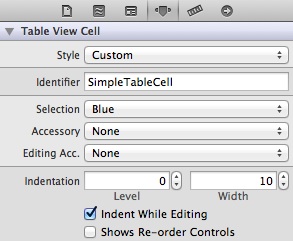
After configuring the table cell view, we’ll put other elements inside it. Select “Image View” and drag it into the Table View Cell.
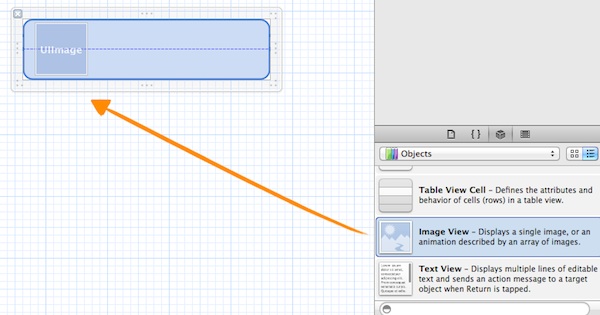
This image view will be used for displaying the thumbnail. You can resize it to make it fit the cell. For your reference, I set both the height and width to 69 pixels.
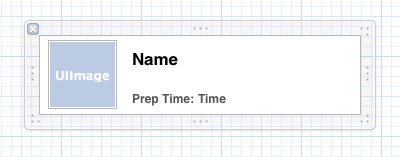
Next, we’ll add three labels: Name, Prep Time and Time. The “Name” label will be used to display the name of recipe. The “Prep Time” is a static label that only displays the text of “Prep Time:”. Lastly, the “Time” label is a dynamic label that is used to show the actual preparation time for the specific recipe.
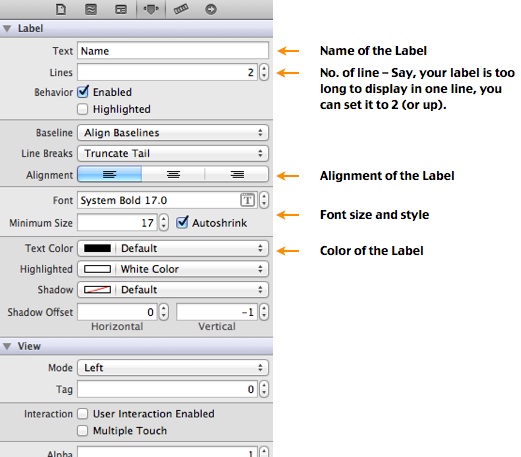
To add a label, select “Label” in Object library and drag it to cell. You can double click the label to change its name.

You may notice your font size and style are different from the one shown above. To change the font style, simply select the Label and select the “Attribute Inspector”. From here, you can alter the setting of “Font” and minimum font size. You can also change the text color and alignment through the inspector.
Your final design should look similar to this:
Creating a Class for the Custom Cell
So far, we’ve designed the table cell. But how can we change the label values of the custom cell? We’re going to create a new class for the custom table view cell. This class represents the underlying data model of the custom cell.
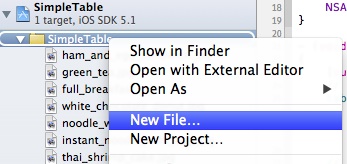
Just like before, right click the “SimpleTable” folder in Project Navigator and select “New File…”.
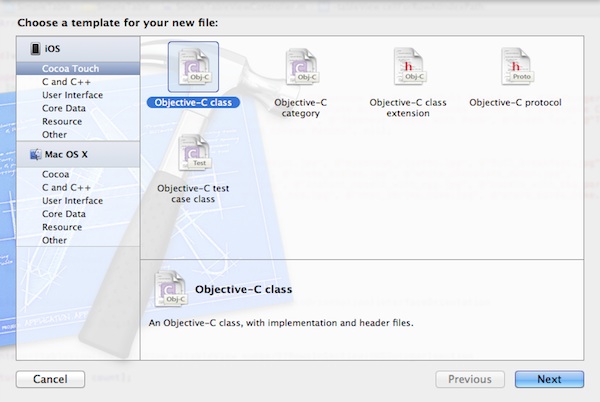
Pick a Template for the New File
Right after selecting the option, Xcode prompts you to select a template. As we’re going to create a new class for the custom table view cell, select “Objective-C class” under “Cocoa Touch” and click “Next”.
Create New File for Your Project
Fill in “SimpleTableCell” for the class name and select “UITableViewCell” for the “Subclass of” option.
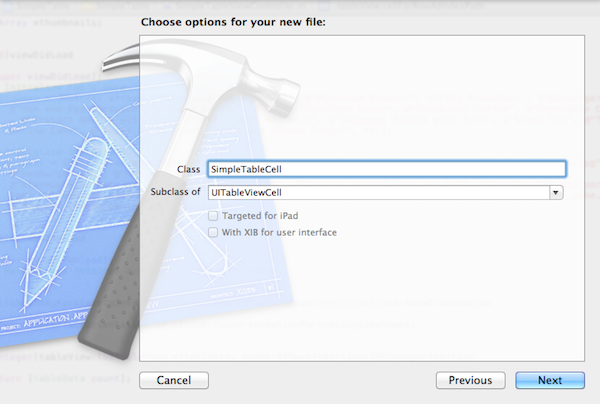
Click “Next”, save the file in the SimpleTable project folder and click “Create” to continue. Xcode should create two files named “SimpleTableCell.h” and “SimpleTableCell.m” in the Project Navigator.
As mentioned before, the SimpleTableCell class serves as the data model of custom cell. In the cell, we have three values that are changeable: the thumbnail image view, the name label and the time label. In the class, we’ll add three properties to represent these dynamic values.
Open “SimpleTableCell.h” and add the following properties before the “@end” line:
@property (nonatomic, weak) IBOutlet UILabel *nameLabel;
@property (nonatomic, weak) IBOutlet UILabel *prepTimeLabel;
@property (nonatomic, weak) IBOutlet UIImageView *thumbnailImageView;
Property and Outlet
The above lines of code defines three instance variables that later to be associated with the table cell view in Interface Builder. The keyword “@property” is used to declare a property within a class in the following form:
@property (attributes) type name;
Referring to the lines of code above, weak and nonatomic are the attributes of the property. UILabel and UIImageView are the types, while the “nameLabel”, “prepTimeLabel” and “thumbnailImageView” are the names.
So what’s IBOutlet? You can think of IBOutlet as an indicator. To associate the instances variables with the elements in the Table View Cell (i.e. SimpleTableCell.xib), we use the keyword “IBOutlet” to let Interface Builder know that they’re allowed to make connection. Later, you’ll see how to make a connection between these outlets and the objects in Interface Builder.
Now, open “SimpleTableCell.m” and add the following code right below “@implementation SimpleTableCell”:
@synthesize nameLabel = _nameLabel;
@synthesize prepTimeLabel = _prepTimeLabel;
@synthesize thumbnailImageView = _thumbnailImageView;
@synthesize Directive
The “@synthesize” keyword tells compiler to automatically generate code for accessing the properties we declared earlier. If you forget to include this directive, Xcode will complain like below:

Making the Connections
Save the changes and select “SimpleTableCell.xib” to go back to Interface Builder. Now we’ll make connections between the properties of the class and the Label/ImageView created in the Interface.
First, select the cell and change the class to “SimpleTableCell” in “Identity Inspector”. This associates the cell view with our custom class created earlier.
Now, we’ll establish the connections with the properties. Right click the “SimpleTableCell” under “Objects” to display the “Outlets” inspector. Click and hold the circle next to “nameLabel”, and drag it to the “Label – Name” object. Xcode automatically establishes the connection.
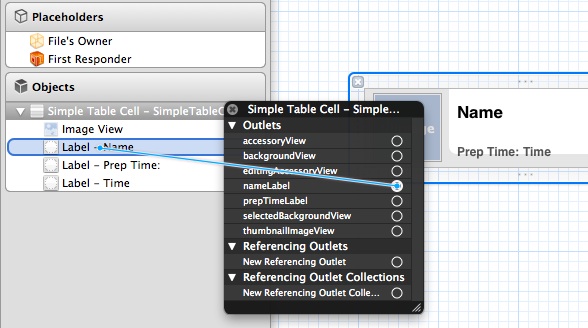
Repeat the above procedures for “prepTimeLabel” and “thumbnailImageView”:
- Connect “prepTimeLabel” with “Label – Time” object
- Connect “thumbnailImageView” with “ImageView” object
After you made all the connections, it should look like this:
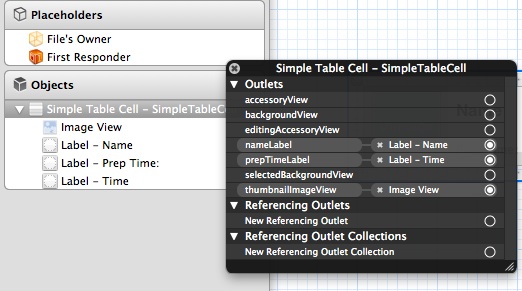
Updating SimpleTableViewController
We have completed the design and coding for the custom table cell. Finally we come to the last part of the change – to make use of the custom cell in the SimpleTableViewController.
Let’s revisit the code in “SimpleTableView.m” that currently used to create table row:
- (UITableViewCell *)tableView:(UITableView *)tableView cellForRowAtIndexPath:(NSIndexPath *)indexPath
{
    static NSString *simpleTableIdentifier = @"SimpleTableItem";

    UITableViewCell *cell = [tableView dequeueReusableCellWithIdentifier:simpleTableIdentifier];

    if (cell == nil) {
        cell = [[UITableViewCell alloc] initWithStyle:UITableViewCellStyleDefault reuseIdentifier:simpleTableIdentifier];
    }

    cell.textLabel.text = [tableData objectAtIndex:indexPath.row];
    cell.imageView.image = [UIImage imageNamed:[thumbnails objectAtIndex:indexPath.row]];

    return cell;
}
We use the default table view cell (i.e. UITableViewCell) for showing the table items. In order to use our custom table cell, we have to alter this part of code in “SimpleTableView.m” to the following:
- (UITableViewCell *)tableView:(UITableView *)tableView cellForRowAtIndexPath:(NSIndexPath *)indexPath
{
    static NSString *simpleTableIdentifier = @"SimpleTableCell";

    SimpleTableCell *cell = (SimpleTableCell *)[tableView dequeueReusableCellWithIdentifier:simpleTableIdentifier];
    if (cell == nil)
    {
        NSArray *nib = [[NSBundle mainBundle] loadNibNamed:@"SimpleTableCell" owner:self options:nil];
        cell = [nib objectAtIndex:0];
    }

    cell.nameLabel.text = [tableData objectAtIndex:indexPath.row];
    cell.thumbnailImageView.image = [UIImage imageNamed:[thumbnails objectAtIndex:indexPath.row]];
    cell.prepTimeLabel.text = [prepTime objectAtIndex:indexPath.row];

    return cell;
}
However, as soon as you update the code, Xcode detects there are some errors as indicated in the source code editor.

Source Code Error Indicated by Xcode
What’s the problem? The code we’ve just changed tells “SimpleTableViewController” to use “SimpleTableCell” class as the table cell. However, “SimpleTableViewController” doesn’t have any idea about it. That’s why Xcode displays errors.
As explained in the first tutorial, a header file declares the interface of a class. For “SimpleTableViewController” to get to know “SimpleTableCell”, we have to import the “SimpleTableCell.h” in the “SimpleTableViewController.m”.
Import SimpleTableCell.h
By importing “SimpleTableCell.h”, the “SimpleTableViewController” knows what it is and can make use of it.
Lastly, as the height of table cell is changed to 78, add the below code above “@end”.
- (CGFloat)tableView:(UITableView *)tableView heightForRowAtIndexPath:(NSIndexPath *)indexPath
{
    return 78;
}
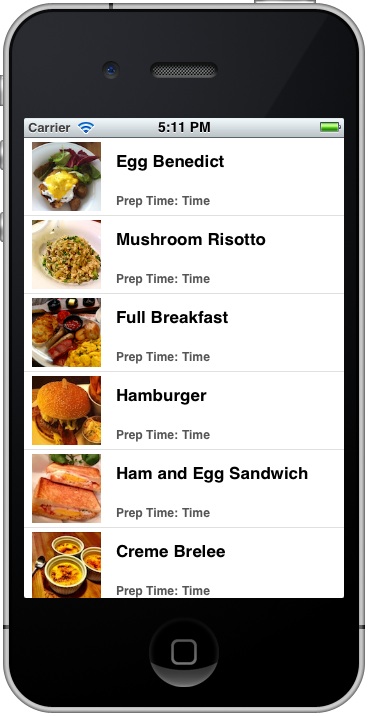
Now, hit the “Run” button and your SimpleTable app should look like below:
Your Homework
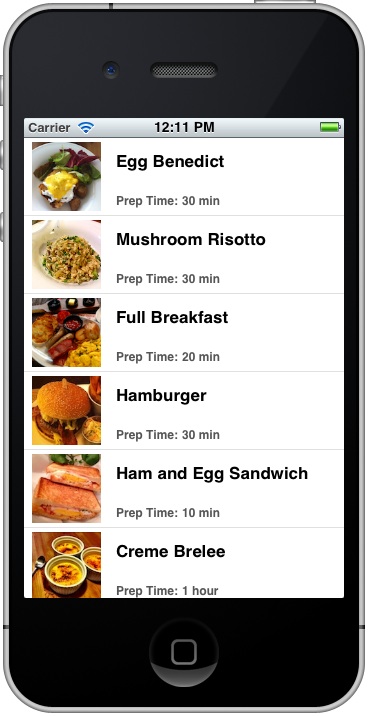
You may notice the app just displays “Time” for “Prep Time:”. I intentionally leave this for you. Try to make some changes of your code and update the preparation time. Your final app will look very similar to below:
What’s Coming Next
After working through this tutorial, you should have a better idea about UITableView and how you can create your own table cell. Next up, we’ll further talk about how to handle row selection.
As always, I love to hear your feedback. Does the tutorial give you a better idea of iOS programming? Drop me comment below or head over to our forum to ask question.
Update #1: Check out our new tutorial about how you can style the table view cells!
Update #2: You can now download the full source code of the Xcode project.


