

Drag & Drop is the user interaction that works naturally when we want to build an app where user can move data around the screen. It’s being used heavily by apps like Trello, Jira, and many others to move data between boards.
Building an iOS app with drag & drop interaction before the release of iOS 11 SDK was not a straightforward process. In my previous experience, there were several tedious tasks that we have to perform manually, such as:
- Add a long press gesture recognizer to the view that we want to drag.
- Create a snapshot view when user begins to drag.
- Handle updating of the dragged snapshot coordinate as user drag the snapshot around the screen.
- Detect and handle when the user drops the item into a coordinate location.
- Sync the dropped data destination and dragged data source, then update the UI respectively.
Even with all those tasks, it’s really hard to get it working smoothly. Thankfully with the release of iOS 11, Apple finally provided the Drag & Drop API into the Cocoa Touch SDK. While iOS 12 is the latest version of the mobile operating system, iOS 11 was the biggest OS update for iPad since the device initial introduction in January 2010 by Steve Jobs as a third device that sits between PC and Smartphone. It offers support for multitasking with several apps running simultaneously on Split Screen and Slide Over interface. Dock from macOS was also introduced for the first time that allows user to customize their favorite apps and recently used apps.
Drag & Drop API is the best way to communicate between apps. Here are several of the main features:
- Support system-wide drag & drop on iOS. Move text, images, and files between apps using Split View or dragging to app icon on Dock.
- The API automatically handles all the animations when dragging and dropping a view. Developers only need to implement the protocols for greater flexibility and customization.
- Support dragging multiple items by dragging an item and tap on other items to select.
Drag and Drop API in a Nutshell
Based on Apple Documentation page, here are the brief summaries of the Drag & Drop API overview:
- Drag & Drop works both in a single app or between multiple apps. In iPhone environment, drag and drop only works in a single app. In multiple apps environment, the app that the user begins to drag a view with will become the source app. The destination app is the app that the user drop the view to.
- When the user is in the process of performing dragging and dropping gestures, the system initiates the
Drag Activity. The system also manages the state of the object that the user is dragging byDrag Session. - The
UIViewcan be configured to support drag and drop using object that implementsUIDragDelegateandUIDropDelegate. BothUITableViewandUICollectionViewalso have its own separated view properties and protocols to handle drag and drop between the cells. The API provides flexibility to customize the behavior of the drag & drop. - The system also securely and automatically handles moving and loading data between apps using
UTI (Uniform Type Identifier)for text, images, contacts, and many others.
What We Will Build
In this tutorial, we will use the drag & drop API to build a Trello like app with several basic features:
- Create a board.
- Add items to a board.
- Move items between board using the drag & drop.
To successfully create those features, here are the tasks that we will be implementing in the project:
- Application flow diagram.
- Create and setup our initial project in Xcode.
- Create a model for the Board with list containing the items.
- Setup the user interface layout.
- Setup the View Controller and Cells.
- Handle dragging an item in UITableView with UITableViewDragDelegate.
- Handle dropping an item in UITableView with UITableViewDropDelegate.
You can clone the finished project repository in the GitHub repository page.
Without further ado, let’s get started by understanding the application flow diagram.
Application Flow Diagram
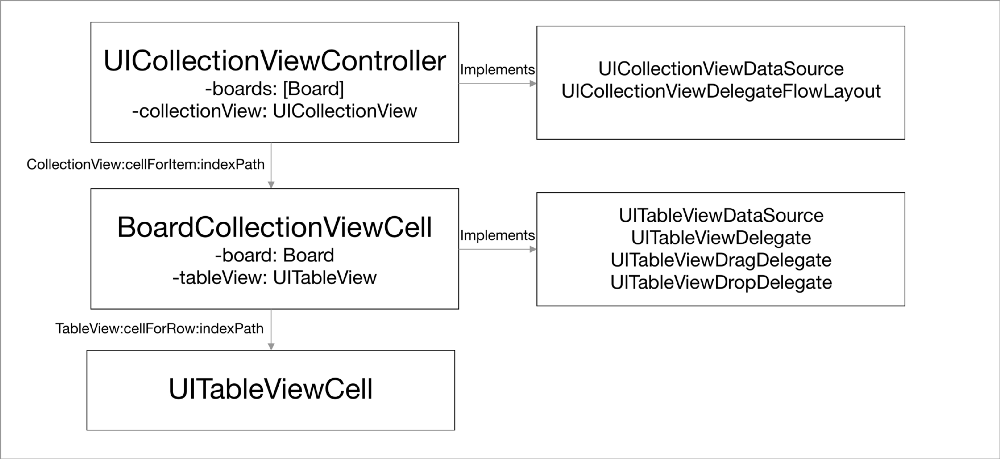
To build an app that displays a collection of boards with items, we need several UIKit components to plan our strategy accordingly. Here are the overviews of the flow:
- Our main screen will use the
UICollectionViewControllerwithUICollectionViewFlowLayout. - We will setup the
UICollectionViewLayoutscroll direction property toHorizontalso that we can scroll the board horizontally. - We will create a prototype
UICollectionViewCellwith aUITableViewas itsContent View. TheUICollectionViewControllerwill pass the reference of a Board model when theUICollectionViewdequeues its cell. - The
UICollectionViewCellwill act as thedatasourceanddelegateof the UITableView. It also provides the data for the item whenUITableViewdequeues its cell. - We will set the
UITableViewproperties to enable the drag interaction, and also set theUICollectionViewCellas theUITableViewDragDelegateandUITableViewDropDelegateof theUITableView.
Getting Started with the Xcode Project
To begin, open Xcode and create a new project. Choose Single View App as the template, and uncheck use unit tests and Core Data. Name the project anything you want and click confirm to create the project.
Delete the ViewController.swift file, then also delete the UIViewController.swift file in main.storyboard. We will come back to the storyboard later to configure the app UI. Next, we’ll create the Model to represent a Board containing list of items.
Create the Model for the Board
Create a new File and name it Board.swift. Inside the file, declare a class with the same name as the file.
class Board: Codable {

    var title: String
    var items: [String]

    init(title: String, items: [String]) {
        self.title = title
        self.items = items
    }
}
In the class declaration, we declare 2 instance properties with an initializer:
- Title of the board as
String. - List of items as array of
String.
That’s all for our Model. We just keep it simple and clean for the purpose of this tutorial.
Setup the User Interface Layout
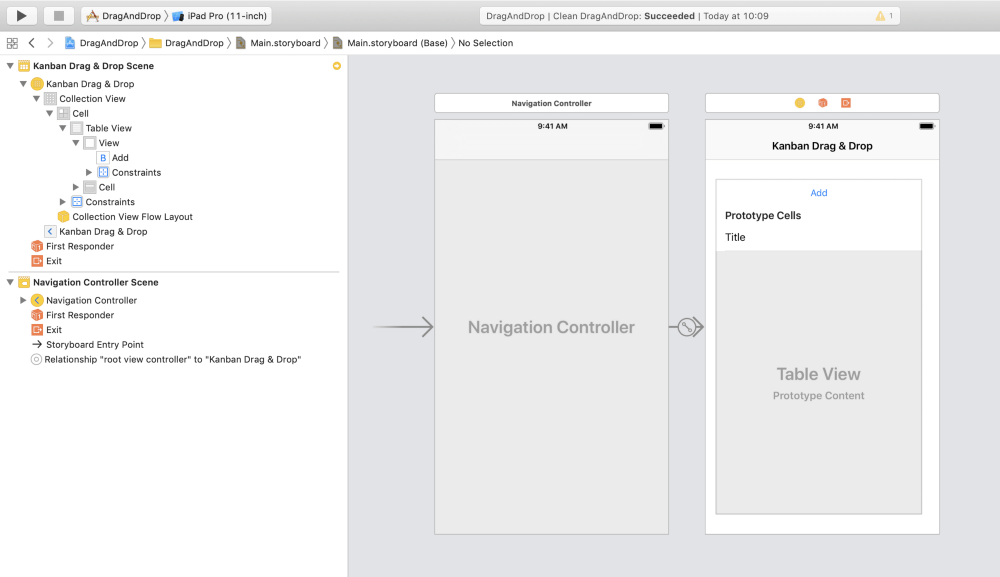
Let’s create our app user interface, open main.storyboard and do the following steps:
- Click and drag
Collection View Controllerfrom the object library. - Select it, then go to
Editor, and click on embed inNavigation Controller. Set it as theInitial View Controller. - Select the
Collection Viewinside theCollection View Controller. - In the
Attribute Inspector, set the property ofScroll DirectiontoHorizontal, and set thebackgroundcolor to#0070BF. - In the
Size Inspector, set themin spacingto10for bothCellsandLines. Then, set theSection Insetsfor all directions to0. At last, set theCell Sizewidth to320and height to480. - Select the
Collection View Celland set itsidentifiertoCell. - Open the object library, then drag a
Table Viewinside theCollection View Cell. - Set the
Table Viewauto layout constraints forleading,trailing,top,bottomto0. Make sure to uncheckConstrain to margins. - Drag a
Table View Cellfrom the object library into theTable View, set itsidentifiertoCell. Then, set it’sstyletoBasic. - Drag an
UIViewto theTableView Header View, set the height to44. - Drag an
UIButtonto theTableView Header Viewyou just create, then set its constraints for all directions to0. At last, set the title text toAdd.
After you perform all those steps above, your storyboard scene should look like this.
Setup Board Collection View Cell
Create a new File and name it BoardCollectionViewCell. Type or paste this snippet of code below into the file.
import UIKit
class BoardCollectionViewCell: UICollectionViewCell {

    @IBOutlet weak var tableView: UITableView!
    var board: Board?
    weak var parentVC: BoardCollectionViewController?

    override func awakeFromNib() {
        super.awakeFromNib()

        self.layer.masksToBounds = true
        self.layer.cornerRadius = 10.0
tableView.dataSource = self
        tableView.delegate = self
        tableView.tableFooterView = UIView()
    }

    func setup(with board: Board) {
        self.board = board
        tableView.reloadData()
    }

    @IBAction func addTapped(_ sender: Any) {
        let alertController = UIAlertController(title: "Add Item", message: nil, preferredStyle: .alert)
        alertController.addTextField(configurationHandler: nil)
        alertController.addAction(UIAlertAction(title: "Add", style: .default, handler: { (_) in
            guard let text = alertController.textFields?.first?.text, !text.isEmpty else {
                return
            }

            guard let data = self.board else {
                return
            }

            data.items.append(text)
            let addedIndexPath = IndexPath(item: data.items.count - 1, section: 0)

            self.tableView.insertRows(at: [addedIndexPath], with: .automatic)
            self.tableView.scrollToRow(at: addedIndexPath, at: UITableView.ScrollPosition.bottom, animated: true)
        }))

        alertController.addAction(UIAlertAction(title: "Cancel", style: .cancel, handler: nil))
        parentVC?.present(alertController, animated: true, completion: nil)
    }
}
extension BoardCollectionViewCell: UITableViewDataSource, UITableViewDelegate {

    func tableView(_ tableView: UITableView, numberOfRowsInSection section: Int) -> Int {
        return board?.items.count ?? 0
    }

    func tableView(_ tableView: UITableView, titleForHeaderInSection section: Int) -> String? {
        return board?.title
    }

    func tableView(_ tableView: UITableView, cellForRowAt indexPath: IndexPath) -> UITableViewCell {
        let cell = tableView.dequeueReusableCell(withIdentifier: "Cell", for: indexPath)
        cell.textLabel?.text = "\(board!.items[indexPath.row])"
        return cell
    }

    func tableView(_ tableView: UITableView, didSelectRowAt indexPath: IndexPath) {
        tableView.deselectRow(at: indexPath, animated: true)
    }

}
Here are the brief explanation of what the code does:
- Create a
UICollectionViewCellsubclass with the name ofBoardCollectionViewCell. - We declare 3 instance properties: the
tableView,boardmodel, andweakreference to theBoardCollectionViewController. - Override
awakeFromNibmethod so that we can set the cell’s layer to make the corners a bit rounded. Next, we set the table view’sdelegateanddatasourceto theBoardCollectionViewCell. - We create an
IBActionmethod which is invoked when the user taps on the Add button. Inside the method, we create aUIAlertControllerwithalertstyle, and add aUITextFieldto enter the name of the item to be added to the board. When a user adds the item, we just append it to the board model items array. Then, we tell theTable Viewto insert the new row at the bottom and scroll to the specifiedIndexPath. - Create the
setupWithBoardmethod that accepts aBoardmodel as the parameter. It stores the passed board into the instance property, then invoke theTable ViewreloadDatamethod to update the view. - Create an extension that implements the
UITableViewDataSourceandUITableViewDelegate. - For the
tableView:numberOfRowsInSection:, we just return the number of items in our board. - In
tableView:cellForRowAtIndexPath:, we dequeue theTable View Cellwith identifier we set in storyboard, get the item using theIndexPathrow from the board items, and set the celltextLabeltext property with the item to display it.
That’s it, make sure you have set the class of the UICollectionViewCell in the storyboard as BoardCollectionViewCell. Then connect the Add Button touchUpInside action to the addTapped: selector.
Setup Board Collection View Controller
Create a new File and name it BoardCollectionViewController. Type or paste this snippet of code below into the file.
import UIKit
class BoardCollectionViewController: UICollectionViewController, UICollectionViewDelegateFlowLayout {
var boards = [
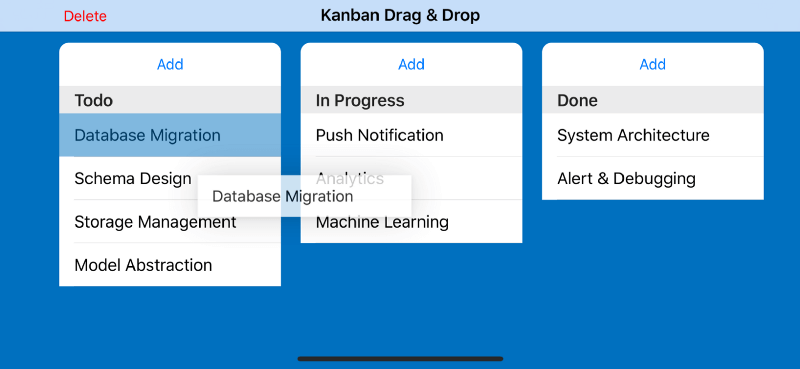
Board(title: "Todo", items: ["Database Migration", "Schema Design", "Storage Management", "Model Abstraction"]),
Board(title: "In Progress", items: ["Push Notification", "Analytics", "Machine Learning"]),
Board(title: "Done", items: ["System Architecture", "Alert & Debugging"])
]
override func viewDidLoad() {
super.viewDidLoad()
setupAddButtonItem()
updateCollectionViewItem(with: view.bounds.size)
}
override func viewWillTransition(to size: CGSize, with coordinator: UIViewControllerTransitionCoordinator) {
super.viewWillTransition(to: size, with: coordinator)
updateCollectionViewItem(with: size)
}
private func updateCollectionViewItem(with size: CGSize) {
guard let layout = collectionView.collectionViewLayout as? UICollectionViewFlowLayout else {
return
}
layout.itemSize = CGSize(width: 225, height: size.height * 0.8)
}
func setupAddButtonItem() {
let addButtonItem = UIBarButtonItem(barButtonSystemItem: .add, target: self, action: #selector(addListTapped(_:)))
navigationItem.rightBarButtonItem = addButtonItem
}
@objc func addListTapped(_ sender: Any) {
let alertController = UIAlertController(title: "Add List", message: nil, preferredStyle: .alert)
alertController.addTextField(configurationHandler: nil)
alertController.addAction(UIAlertAction(title: "Add", style: .default, handler: { (_) in
guard let text = alertController.textFields?.first?.text, !text.isEmpty else {
return
}
self.boards.append(Board(title: text, items: []))
let addedIndexPath = IndexPath(item: self.boards.count - 1, section: 0)
self.collectionView.insertItems(at: [addedIndexPath])
self.collectionView.scrollToItem(at: addedIndexPath, at: UICollectionView.ScrollPosition.centeredHorizontally, animated: true)
}))
alertController.addAction(UIAlertAction(title: "Cancel", style: .cancel, handler: nil))
present(alertController, animated: true)
}
override func collectionView(_ collectionView: UICollectionView, numberOfItemsInSection section: Int) -> Int {
return boards.count
}
override func collectionView(_ collectionView: UICollectionView, cellForItemAt indexPath: IndexPath) -> UICollectionViewCell {
let cell = collectionView.dequeueReusableCell(withReuseIdentifier: "Cell", for: indexPath) as! BoardCollectionViewCell
cell.setup(with: boards[indexPath.item])
return cell
}
}
Here is a brief summary of what the code actually do:
- Create a subclass of
UICollectionViewControllerwith the name ofBoardCollectionViewController. It also implements theUICollectionDelegateFlowLayoutbecause we have set ourCollection View Controllerto use the flow layout in the storyboard. - In
viewDidLoad, we invoke thesetupAddButtonItemmethod. This method adds anUIBarButtonItemto theNavigationBarright bar button item. We set thetarget action selectorto theaddListTapped:method. At last, we invoke theupdateCollectionViewItempassing the size of ourviewto set the item size of the cell. - In
updateCollectionViewItemmethod, we calculate the height ofCollection View Cellitem dynamically to be0.8of theviewheight. The width of the cell is fixed at225points. This method will also be invoked when the screen get rotated passing the new size of theview. - When
addListTappedis invoked, we create anUIAlertControllerwithalertstyle. Next, we add theUITextFieldto enter the name of the board that the user wants to create. After the user fills theText Fieldand confirm, we create a newBoardwith the text from the user as thetitleproperty and append it to theBoardarray. Lastly, we tell theCollection Viewto insert the new item to the lastindexPathand scroll automatically to the new position. - For the
collectionView:numberOfItemsInSection:, we simply return the size of theboardsarray. - For the
collectionView:cellForItemAtIndexPath:, we dequeue the cell using the identifier we set in storyboard and cast it toBoardCollectionViewCell. Then, we get the board using theindexPathitem and invoke the cell’ssetupWithBoard:method passing the board to the cell.
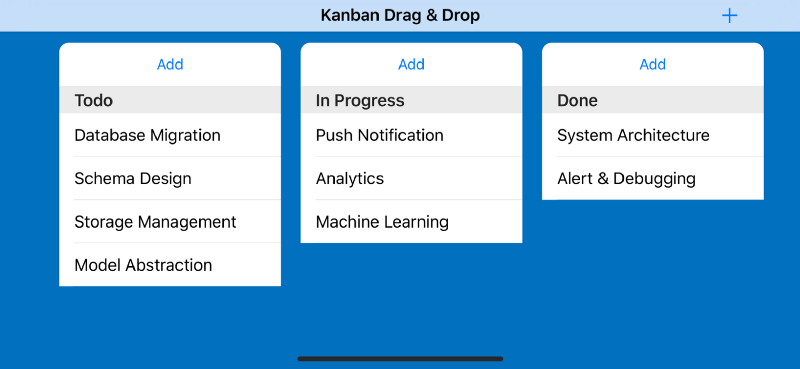
Run the app for the first time
Try to build and run the app for the first time, you should see the list of boards with their items. Also, try to add new boards and items, and scroll horizontally around the screen. Next, we are going to implement the Drag & Drop API into the Table View to move the items around the boards.
Handle Dragging an Item in UITableView with UITableViewDragDelegate
Adding the drag support to the Table View is pretty straightforward. All we need to do is set 2 properties, the dragInteractionEnabled to true and dragDelegate to the BoardCollectionViewCell. Open the BoardCollectionViewCell and go to theawakeFromNib method and add these lines:
...
    override func awakeFromNib() {
     ....
   tableView.dragInteractionEnabled = true
      tableView.dragDelegate = self
    }
...
The compiler will complain because the BoardCollectionViewCell has not implemented the UITableViewDragDelegate yet. So, go to the bottom of the file and add the snippet code below as the extension.
extension BoardCollectionViewCell: UITableViewDragDelegate {

   func tableView(_ tableView: UITableView, itemsForBeginning session: UIDragSession, at indexPath: IndexPath) -> [UIDragItem] {
        guard let board = board, let stringData = board.items[indexPath.row].data(using: .utf8) else {
            return []
        }

        let itemProvider = NSItemProvider(item: stringData as NSData, typeIdentifier: kUTTypePlainText as String)
        let dragItem = UIDragItem(itemProvider: itemProvider)
        session.localContext = (board, indexPath, tableView)

        return [dragItem]
    }

}
Here are the explanations of what the UITableViewDragDelegate does:
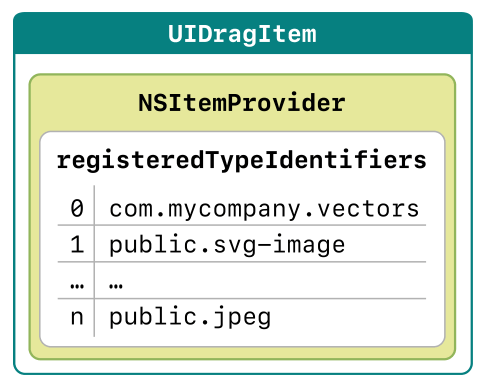
-Courtesy of Apple Inc.
- The
UITableViewDragDelegaterequires the delegate to implement the methodtableView:itemsForBeginningSession:atIndexPath:that returns the array ofUIDragItemobjects. This method will be used by theTable Viewto begindrag sessionwith a givenindexPath. We need to return the array of theUIDragItemthat is not empty if we want to start thedrag session. - The
UIDragItemis initialized by passing theNSItemProvider. TheNSItemProvideris the data representation of the items we want to drag and drop to. It uses theUTIs (Uniform Type Identifiers)to represent data such asPlain Text,Image,Contact Cardand many others. It acts as a contract/promise between the drag source app and the drop destination app to handle and load those data based on those representations. - Inside the method, we get the item from the board using the
indexPathand convert it to theDatatype usingutf8as the encoding. - We initialize the
NSItemProviderpassing the data and set its type identifier tokUTTypePlainText. To be able to use the constant, you need to importMobileCoreServicesat the top of your source file. - Next, we initialize the
UIDragItemwith the item provider. Also, we set thelocalContextproperty to attach additional information to the drag item. Here, we assign the tuple containing the board, indexPath, and the table view which will be used later when we drop an item to differentTable View. - At last, we return the array containing the
UIDragItemwe created.
Try to build and run the app, then perform dragging of an item inside the board. Voila! You can initiate the dragging of an item around the screen. Surely, dropping the item won’t do anything right now. Let’s implement the dropping of an item next!
Handle Dropping an Item in UITableView with UITableViewDropDelegate
Next, we are going to add the drop support to the Table View. It’s almost the same with adding drag support. We just need to set the Table View dropDelegate property to the BoardCollectionViewCell. Go to the BoardCollectionViewCell awakeFromNib method and add this at the bottom.
...
    override func awakeFromNib() {
     ....
      tableView.dropDelegate = self
    }
...
The compiler will complain because the BoardCollectionViewCell has not implemented the UITableViewDropDelegate yet. So, go to the bottom of the file, and add the snippet code below as the extension.
extension BoardCollectionViewCell: UITableViewDropDelegate {

    func tableView(_ tableView: UITableView, performDropWith coordinator: UITableViewDropCoordinator) {
        if coordinator.session.hasItemsConforming(toTypeIdentifiers: [kUTTypePlainText as String]) {
            coordinator.session.loadObjects(ofClass: NSString.self) { (items) in
                guard let string = items.first as? String else {
                    return
                }
                var updatedIndexPaths = [IndexPath]()

                switch (coordinator.items.first?.sourceIndexPath, coordinator.destinationIndexPath) {
                case (.some(let sourceIndexPath), .some(let destinationIndexPath)):
                    // Same Table View
                    if sourceIndexPath.row < destinationIndexPath.row {
                        updatedIndexPaths =  (sourceIndexPath.row...destinationIndexPath.row).map { IndexPath(row: $0, section: 0) }
                    } else if sourceIndexPath.row > destinationIndexPath.row {
                        updatedIndexPaths =  (destinationIndexPath.row...sourceIndexPath.row).map { IndexPath(row: $0, section: 0) }
                    }
                    self.tableView.beginUpdates()
                    self.board?.items.remove(at: sourceIndexPath.row)
                    self.board?.items.insert(string, at: destinationIndexPath.row)
                    self.tableView.reloadRows(at: updatedIndexPaths, with: .automatic)
                    self.tableView.endUpdates()
                    break

                case (nil, .some(let destinationIndexPath)):
                    // Move data from a table to another table
                    self.removeSourceTableData(localContext: coordinator.session.localDragSession?.localContext)
                    self.tableView.beginUpdates()
                    self.board?.items.insert(string, at: destinationIndexPath.row)
                    self.tableView.insertRows(at: [destinationIndexPath], with: .automatic)
                    self.tableView.endUpdates()
                    break


                case (nil, nil):
                    // Insert data from a table to another table
                    self.removeSourceTableData(localContext: coordinator.session.localDragSession?.localContext)
                    self.tableView.beginUpdates()
                    self.board?.items.append(string)
                    self.tableView.insertRows(at: [IndexPath(row: self.board!.items.count - 1 , section: 0)], with: .automatic)
                    self.tableView.endUpdates()
                    break

                default: break

                }
            }
        }
    }

    func removeSourceTableData(localContext: Any?) {
        if let (dataSource, sourceIndexPath, tableView) = localContext as? (Board, IndexPath, UITableView) {
            tableView.beginUpdates()
            dataSource.items.remove(at: sourceIndexPath.row)
            tableView.deleteRows(at: [sourceIndexPath], with: .automatic)
            tableView.endUpdates()
        }
    }

    func tableView(_ tableView: UITableView, dropSessionDidUpdate session: UIDropSession, withDestinationIndexPath destinationIndexPath: IndexPath?) -> UITableViewDropProposal {
        return UITableViewDropProposal(operation: .move, intent: .insertAtDestinationIndexPath)
    }

}
Here is a brief summary of what the code do:
- We implement the required method
tableView:dropSessionDidUpdateSession:withDestinationIndexPath:. What this method does is telling the system how we want to consume the dropped item data via theUITableViewDragProposalin the specifiedindexPathwhen user dragging the item around theTable View. - The
UITableViewDragProposalaccepts 3 types of operations,copy,move, orcancel. In our app case, we only want to move the data, so we return theUITableViewDragProposalwith themoveas the operation and set theintenttoinsertAtDestinationIndexPath. - At last, we need to implement
tableView:performDropWithCoordinator:. This method will be invoked when user lift the finger from the screen. Inside the method, we have the opportunity to load dragged item data representation from the coordinator’s session drag items. We also need to handle syncing of our datasource. Then, we ask theTable Viewto perform animations of the move operation. Remember that we can drag item between different Table Views. - Inside the method, we asks the coordinator’s session if it has an item that conforms to the
kUTTypePlainText. If yes, we load the object using theloadObjectOfClassmethod passing theNSStringas the type. The system will perform the loading of the dragged item data and pass it into a closure. - We use a
switchconditional statement for the dragged item sourceindexPathand the session destinationindexPath. - If the source indexPath and destination indexPath exist, that means the user is dragging and dropping within the same
Table View. Here, we just remove the source item from the board using the source indexPath, then insert the item using the destination indexPath. We then tell theTable Viewto reload the rows between the source and destination indexPath. - If the sourceIndexPath is
niland the destination indexPath exists, that means the user is dragging and dropping between differentTable Viewin same app. To handle this, we can retrieve the source table view, source IndexPath, and source board using thelocalContextfrom thedrag sessionthat we attach inUITableViewDragDelegatemethod. We remove the items from the source board using the source indexPath row and tell the source table view to delete the row. At last, we insert the item to the destination board using destination indexPath row and tell the destination table view to insert the row. - The last case is when the destination and source indexPath are
nil. This happens when user drag a text from a different app to our app. In this case we just need to insert the item into our destination board and tells theTable Viewto insert the item.
Try to build and run the app, you should be able to move the item around the boards using Drag & Drop! If you want more challenges, you can check the project GitHub repository to see how to handle the deletion of an item by dropping the item to custom UIView with UIDragDelegate.
Conclusion
Congratulations, you made it! We have finished building our Trello like app using the Drag & Drop API. The API is really simple and powerful to use and we only scratch the surface of the what the API can do here. There are many more features to explore, like creating a placeholder when dropping an item that will took time to load the data, drag and drop multiple items, and many other awesome features. So what are you waiting for? Let’s keep learning and build new things. Improve our world using technology to make it a better place for us to live. Stay calm and keep on 😘 Cocoa.
This is a guest post by Alfian Losari. The article was first published on Medium.


