Core Image is a powerful API built into Cocoa Touch. It’s a critical piece of the iOS SDK. However, it often gets overlooked. In this tutorial, we’re going to examine Core Image’s face detection features and how to make use of this technology in your own iOS apps!
What We’re Going to Build
Face detection in iOS has been around since the days of iOS 5 (circa 2011) but it is often overlooked. The facial detection API allows developers to not only detect faces, but also check those faces for particular properties such as if a smile is present or if the person is blinking.
First, we’re going to explore Core Image’s face detection technology by creating a simple app that recognizes a face in a photo and highlights it with a box. In the second example, we’ll take a look at a more detailed use case by creating an app that lets a user take a photo, detect if a face(s) is present, and retrieve the user’s facial coordinates. In so doing, we’re going to learn all about face detection on iOS and how to make use of this powerful, yet often overlooked API.
Let’s roll!
Setting up the Project
Download the starter project linked here and open it up in Xcode. As you can see, it features nothing more than a simple storyboard with a connected IBOutlet and imageView.
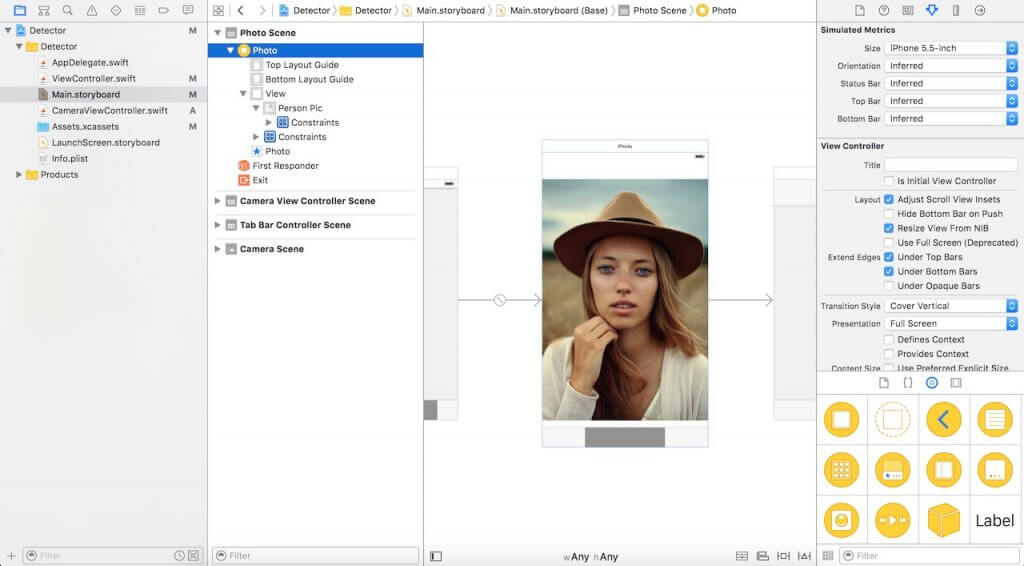
To begin detecting faces in Core Image, you’ll need to import the Core Image library. Navigate to your ViewController.swift file and insert the following code at the top:
import CoreImage
Detecting Faces Using Core Image
In the starter project, we have an imageView in the storyboard, and that component has been connected to the code as an IBOutlet. Next, we will implement the code for face detection. Just insert the following code into your swift file, and I’ll explain that later:
func detect() {

    guard let personciImage = CIImage(image: personPic.image!) else {
        return
    }

    let accuracy = [CIDetectorAccuracy: CIDetectorAccuracyHigh]
    let faceDetector = CIDetector(ofType: CIDetectorTypeFace, context: nil, options: accuracy)
    let faces = faceDetector.featuresInImage(personciImage)

    for face in faces as! [CIFaceFeature] {

        print("Found bounds are \(face.bounds)")

        let faceBox = UIView(frame: face.bounds)

        faceBox.layer.borderWidth = 3
        faceBox.layer.borderColor = UIColor.redColor().CGColor
        faceBox.backgroundColor = UIColor.clearColor()
        personPic.addSubview(faceBox)

        if face.hasLeftEyePosition {
            print("Left eye bounds are \(face.leftEyePosition)")
        }

        if face.hasRightEyePosition {
            print("Right eye bounds are \(face.rightEyePosition)")
        }
    }
}
Let’s talk about what’s going on here:
- Line #3: we create a variable
personciImagethat extracts the UIImage out of the UIImageView in the storyboard and converts it to aCIImage. CIImage is required when using Core Image - Line #7: we create an
accuracyvariable and set toCIDetectorAccuracyHigh. You can pick fromCIDetectorAccuracyHigh(which provides high processing power) andCIDetectorAccuracyLow(which uses low processing power). For the purposes of this tutorial and we chooseCIDetectorAccuracyHighbecause we want high accuracy. - Line #8: here we define a
faceDetectorvariable and set it to theCIDetectorclass and pass in the accuracy variable we created above. - Line #9: by calling the
featuresInImagemethod offaceDetector, the detector finds faces in the given image. At the end, it returns us an array of faces. - Line #11: here we loop through the array of faces and cast each of the detected face to
CIFaceFeature. - Line #15: We create a UIView called
faceBoxand set its frame to the frame dimensions returned fromfaces.first. This is to draw a rectangle to highlight the detected face. - Line #17: we set the faceBox’s border width to 3.
- Line #18: we set the border color to red.
- Line #19: The background color is set to clear, indicating that this view will not have a visible background.
- Line #20: Finally, we add the view to the personPic imageView.
- Line #22-28: Not only can the API help you detect the face, the detector can detect the face’s left and right eyes. We’ll not highlight the eyes in the image. Here I just want to show you the related properties of
CIFaceFeature.
We will invoke the detect method in viewDidLoad. So insert the following line of code in the method:
detect()
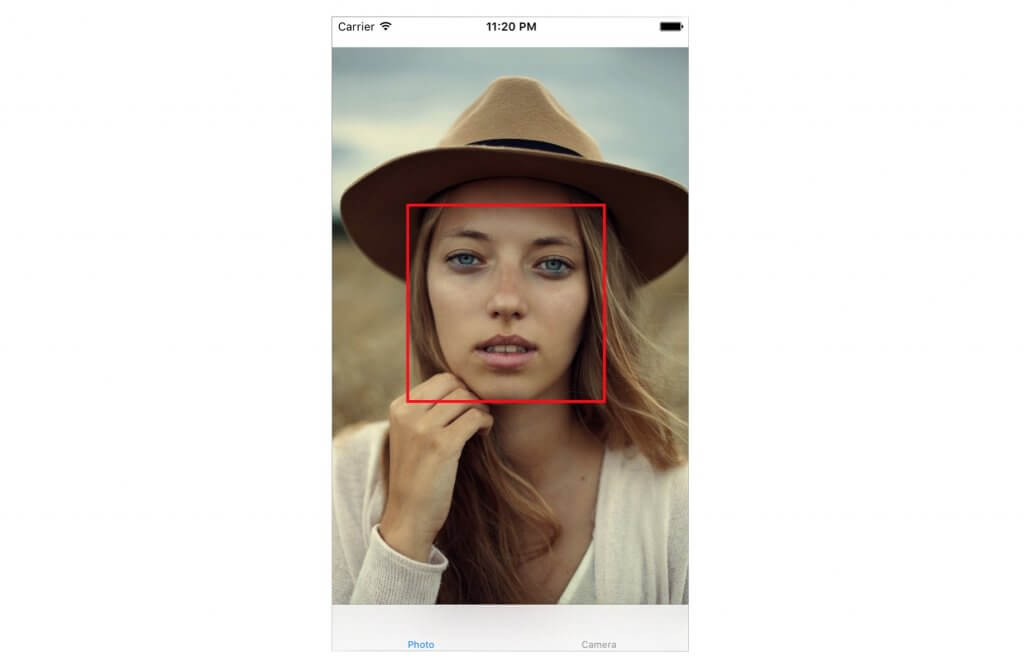
Compile and run the app. You will get something like this:
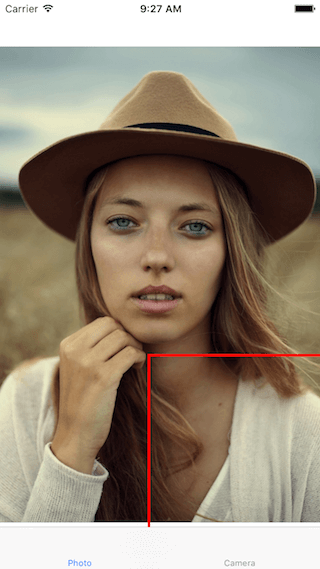
Base on the console output, it looks like the detector can detect the face:
Found bounds are (177.0, 415.0, 380.0, 380.0)
There are a couple of issues that we haven’t dealt with in the current implementation:
- The face detection is applied on the original image, which has a higher resolution than the image view. And we have set the content mode of the image view to aspect fit. To draw the rectangle properly, we have to calculate the actual position and size of the face in the image view.
- Furthermore, Core Image and UIView (or UIKit) use two different coordinate systems (see the figure below). We have to provide an implementation to translate the Core Image coordinates to UIView coordinates.
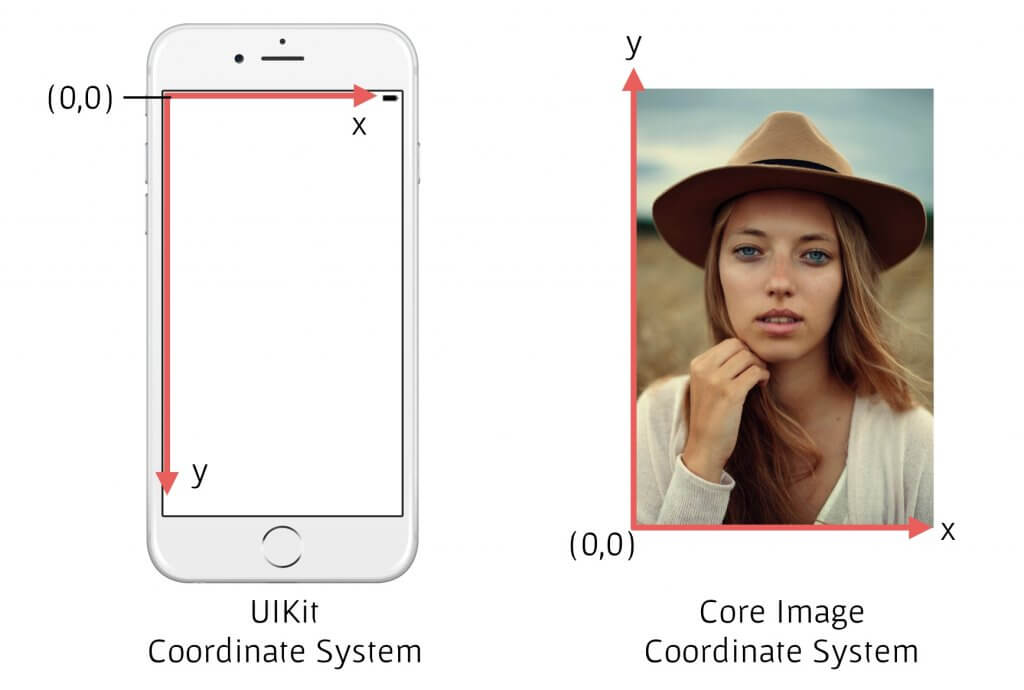
Now replace the detect() method with the following code:
func detect() {

    guard let personciImage = CIImage(image: personPic.image!) else {
        return
    }

    let accuracy = [CIDetectorAccuracy: CIDetectorAccuracyHigh]
    let faceDetector = CIDetector(ofType: CIDetectorTypeFace, context: nil, options: accuracy)
    let faces = faceDetector.featuresInImage(personciImage)

    // For converting the Core Image Coordinates to UIView Coordinates
    let ciImageSize = personciImage.extent.size
    var transform = CGAffineTransformMakeScale(1, -1)
    transform = CGAffineTransformTranslate(transform, 0, -ciImageSize.height)

    for face in faces as! [CIFaceFeature] {

        print("Found bounds are \(face.bounds)")

        // Apply the transform to convert the coordinates
        var faceViewBounds = CGRectApplyAffineTransform(face.bounds, transform)

        // Calculate the actual position and size of the rectangle in the image view
        let viewSize = personPic.bounds.size
        let scale = min(viewSize.width / ciImageSize.width,
                        viewSize.height / ciImageSize.height)
        let offsetX = (viewSize.width - ciImageSize.width * scale) / 2
        let offsetY = (viewSize.height - ciImageSize.height * scale) / 2

        faceViewBounds = CGRectApplyAffineTransform(faceViewBounds, CGAffineTransformMakeScale(scale, scale))
        faceViewBounds.origin.x += offsetX
        faceViewBounds.origin.y += offsetY

        let faceBox = UIView(frame: faceViewBounds)

        faceBox.layer.borderWidth = 3
        faceBox.layer.borderColor = UIColor.redColor().CGColor
        faceBox.backgroundColor = UIColor.clearColor()
        personPic.addSubview(faceBox)

        if face.hasLeftEyePosition {
            print("Left eye bounds are \(face.leftEyePosition)")
        }

        if face.hasRightEyePosition {
            print("Right eye bounds are \(face.rightEyePosition)")
        }
    }
}
The code changes are highlighted in yellow above. First, we use the affine transform to convert the Core Image coordinates to UIKit coordinates. Secondly, we write extra code to compute the actual position and size of the rectangular view.
Now run the app again. You should see a box around the face. Great job! You’ve successfully detected a face using Core Image.
Building a Camera App with Face Detection
Let’s imagine you have a camera/photo app that takes a photo. As soon as the image is taken you want to run face detection to determine if a face is or is not present. If any given face is present, you might want to classify that photo with some tags or so. While we’re not here to build a photo storing app, we will experiment with a live camera app. To do so, we’ll need to integrate with the UIImagePicker class and run our Face Detection code immediately after a photo is taken.
In the starter project, I have already created the CameraViewController class. Update the code like this to implement the camera feature:
class CameraViewController: UIViewController, UIImagePickerControllerDelegate, UINavigationControllerDelegate {
    @IBOutlet var imageView: UIImageView!
    let imagePicker = UIImagePickerController()

    override func viewDidLoad() {
        super.viewDidLoad()

        imagePicker.delegate = self
    }

    @IBAction func takePhoto(sender: AnyObject) {

        if !UIImagePickerController.isSourceTypeAvailable(.Camera) {
            return
        }

        imagePicker.allowsEditing = false
        imagePicker.sourceType = .Camera

        presentViewController(imagePicker, animated: true, completion: nil)
    }

    func imagePickerController(picker: UIImagePickerController, didFinishPickingMediaWithInfo info: [String : AnyObject]) {
        if let pickedImage = info[UIImagePickerControllerOriginalImage] as? UIImage {
            imageView.contentMode = .ScaleAspectFit
            imageView.image = pickedImage
        }

        dismissViewControllerAnimated(true, completion: nil)
        self.detect()
    }

    func imagePickerControllerDidCancel(picker: UIImagePickerController) {
        dismissViewControllerAnimated(true, completion: nil)
    }

}
The first few lines setup the UIImagePicker delegate. In the didFinishPickingMediaWithInfo method (this is a UIImagePicker delegate method), we set the imageView to the image passed in from the method. We then dismiss the picker and call the detect function.
We haven’t implemented the detect function yet. Insert the following code and let’s take a closer look at it:
    func detect() {
        let imageOptions =  NSDictionary(object: NSNumber(int: 5) as NSNumber, forKey: CIDetectorImageOrientation as NSString)
        let personciImage = CIImage(CGImage: imageView.image!.CGImage!)
        let accuracy = [CIDetectorAccuracy: CIDetectorAccuracyHigh]
        let faceDetector = CIDetector(ofType: CIDetectorTypeFace, context: nil, options: accuracy)
        let faces = faceDetector.featuresInImage(personciImage, options: imageOptions as? [String : AnyObject])

        if let face = faces.first as? CIFaceFeature {
            print("found bounds are \(face.bounds)")

            let alert = UIAlertController(title: "Say Cheese!", message: "We detected a face!", preferredStyle: UIAlertControllerStyle.Alert)
            alert.addAction(UIAlertAction(title: "OK", style: UIAlertActionStyle.Default, handler: nil))
            self.presentViewController(alert, animated: true, completion: nil)

            if face.hasSmile {
                print("face is smiling");
            }

            if face.hasLeftEyePosition {
                print("Left eye bounds are \(face.leftEyePosition)")
            }

            if face.hasRightEyePosition {
                print("Right eye bounds are \(face.rightEyePosition)")
            }
        } else {
            let alert = UIAlertController(title: "No Face!", message: "No face was detected", preferredStyle: UIAlertControllerStyle.Alert)
            alert.addAction(UIAlertAction(title: "OK", style: UIAlertActionStyle.Default, handler: nil))
            self.presentViewController(alert, animated: true, completion: nil)
        }
    }
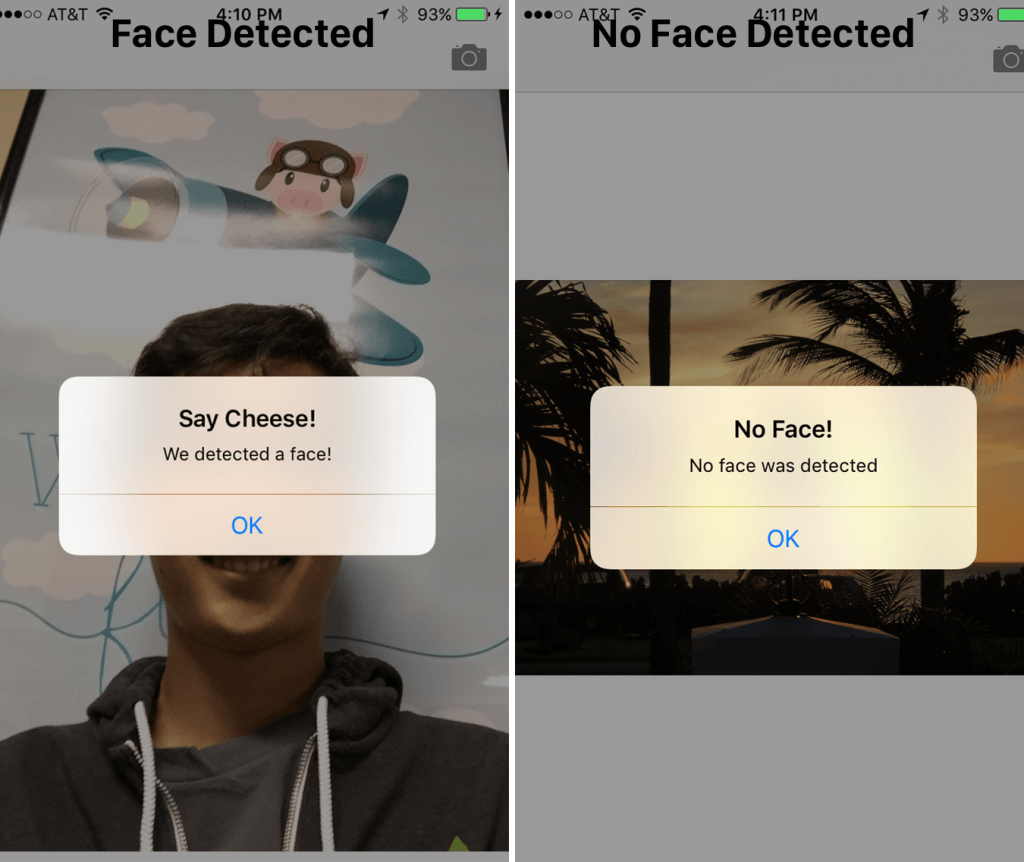
Our detect() function is very much similar to its previous implementation. This time, however, we’re using it on the captured image. When a face is detected, we display an alert message “We detected a face!” Otherwise, we display a “No Face!” message. Run the app and have a quick test.
CIFaceFeature has several properties and methods we have already expolored. For example, if you wanted to detect if the person was smiling, you can call .hasSmile which returns a boolean. Alternatively, you could call .hasLeftEyePosition to check if the left eye is present (let’s hope it is) or .hasRightEyePosition for the right eye, respectively.
We can also call hasMouthPosition to check if a mouth is present. If a mouth is present, we can access those coordinates with the mouthPosition property as seen below:
if (face.hasMouthPosition) {
     print("mouth detected")
}
As you can see, detecting facial features is incredibly simple using Core Image. In addition to detecting a mouth, smile, or eyePosition, we can also check if an eye is open or closed by calling leftEyeClosed for the left eye and rightEyeClosed to check for the right eye.
Wrapping Up
In this tutorial, we explored Core Image’s Face Detection APIs and how to use this in a camera app. We setup a basic UIImagePicker to snap a photo and detect whether a person present in an image or not.
As you can see, Core Image’s face detection is a powerful API with many applications! I hope you found this tutorial useful and an informative guide to this less known iOS API!
Feel free to download the final project here.


