

Not so long time ago I was asked to integrate Facebook ads in a project. Without having done so before, I prepared myself for a potentially long process, even a little bit painful, and then I got started searching the docs. Against my initial thoughts though, I went through the docs pretty fast, and after a few minutes I had my first Facebook ads up and running!
Facebook ads consist of a nice way to embed advertisements in your apps and make some money out of them if they gain significant visibility. The process to get there (to embed ads) is not complicated at all, as Facebook SDK (an SDK with frameworks made by Facebook) contains an ad-related framework called Audience Network. That framework is pretty much all you need for having ads being served inside an app.
There are various types of ads that Facebook provides for various platforms, but when talking about mobile devices then there are actually three types: Native, Interstitial, and Banners. Here’s a super-quick look at each type:
- Native ads can be placed anywhere in the app, and the views that they appear to can be customised so they do not distinguish from the rest of the UI. Those views are either manually created views (custom controls that are assigned with an ad’s details), or a view template given by the Audience Network Framework that has certain attributes for customisation. However, a special and interesting case is when you want to display ads in a tableview, where you have two options: Either you create your custom views (in that case custom cells) that will contain the ads and you perform all the related tableview handling manually, or you use some specific classes from the Audience Network Framework (real gems) and you get the tableview handling almost for free. The drawback here is the fact that you lose the option to customise the appearance of the ads, but in several cases that’s not a problem at all.
- Interstitial ads are actually full screen ads, and as you understand, they hide the entire content of the app when they’re being displayed. Therefore, no need for customisation here regarding the appearance of the ads.
- Banner ads are small views that usually appear either to the top or to the bottom of the screen, but no customisation is allowed here as well, except for the height of the banner.
We are going to go through all the above cases in this post together, but besides that, I will also show to you how to make the necessary required configuration to the Facebook Developers portal. Actually, I will guide you to the configuration needed to make the app capable of showing ads, and for the rest (providing information, payout info, etc) I will give you just one, ancient advice that’s always true: Read the documentation (also known as RTFM).
You may be wondering why I decided to write a tutorial about Facebook ads when I admit that it’s easy to integrate them in an iOS app. There are two reasons for that: Firstly, as I found almost nothing on the web to get me straight into the point, I considered to be a good idea to give you an immediate how-to guide so you can have ads being served in your app in no time at all. Secondly, all the sample code you can find on Facebook docs is written in Objective-C, so new developers that know about Swift only and not Objective-C will probably encounter some problems to “translate” the code from one programming language to another.
Lastly, and just for the records, keep in mind that the demo project that I’m about to present right next and you can download was made in Xcode 7.3.1 and Swift 2.2. That’s the official version still for both, so don’t start complaining if something doesn’t work in Swift 3.0.
A Few Words About The Demo App
There’s not even one programming topic that can be explored and learnt without getting your hands dirty, so a demo app is accompanying this tutorial too. This app is simple and suitable in order to focus on how Facebook ads can be embedded to a project. You will begin by a starter project that you can download here, which we’ll make more and more complete as we move on.
The demo app is actually a tab bar application, and it consists of four tabs, where each one is dedicated to a different type of ad:
- The view controller behind the first tab is called SingleAdsViewController, and here we’ll talk about the native ads. Not only we’ll see how we can use custom views to show an ad’s details, but also we’ll see how we can use a template with attributes that can get overrode instead of creating custom views.
- Next, in the second tab there is the TableViewAdsViewController. Here we’ll see how native ads can be integrated into a tableview, but by using additional tools that the Audience Network Framework gives us. If you download and run the starter project, you’ll find some sample data already contained in the tableview. Our goal is to display the ads between the rows of the currently displayed data.
- In the third tab a new view controller exists, called FullScreenAdsViewController. This is the place where we’ll display a full screen ad simply by tapping on a button.
- Lastly, the BannerAdsViewController view controller lies behind the fourth tab, and as you understand we’ll see the details of the banner ads there.
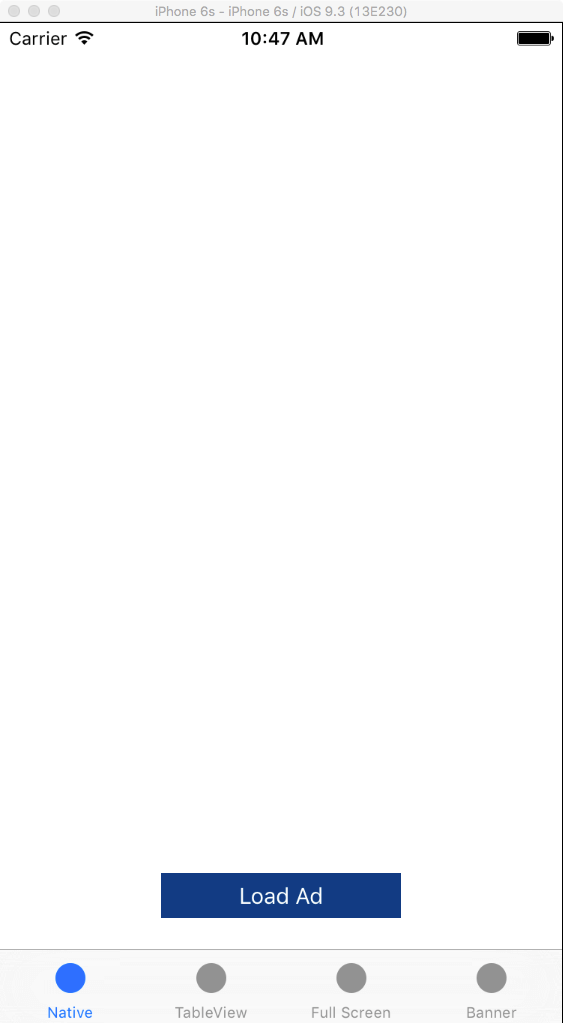
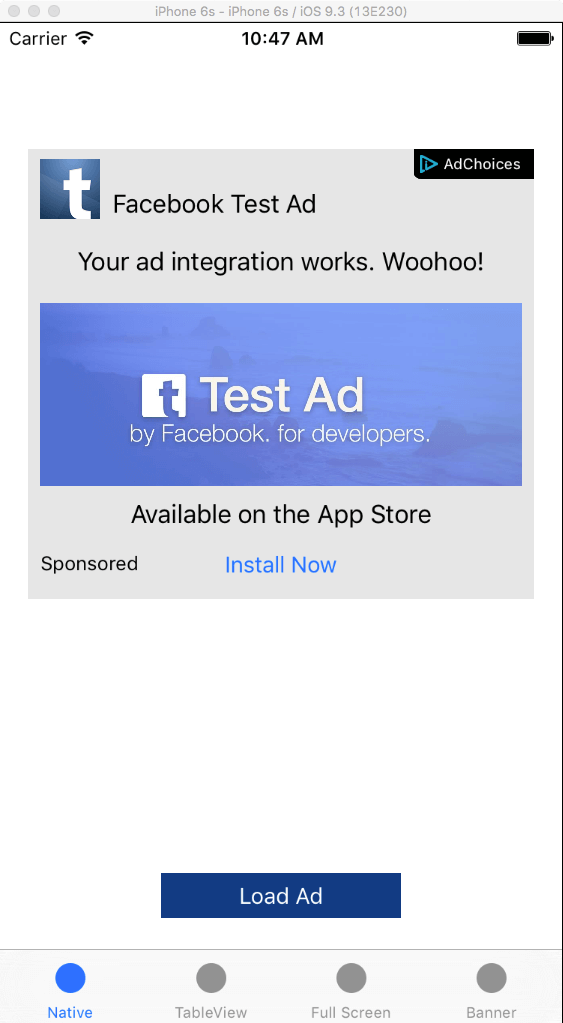
The following screenshots will let you understand what our goals are:
Native ads using custom views:
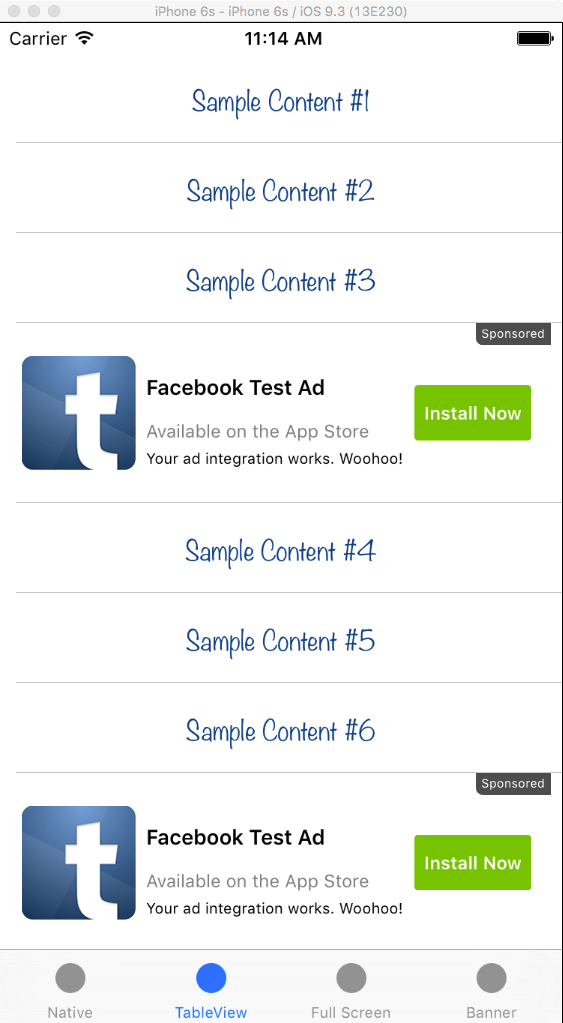
Native ads in a tableview:
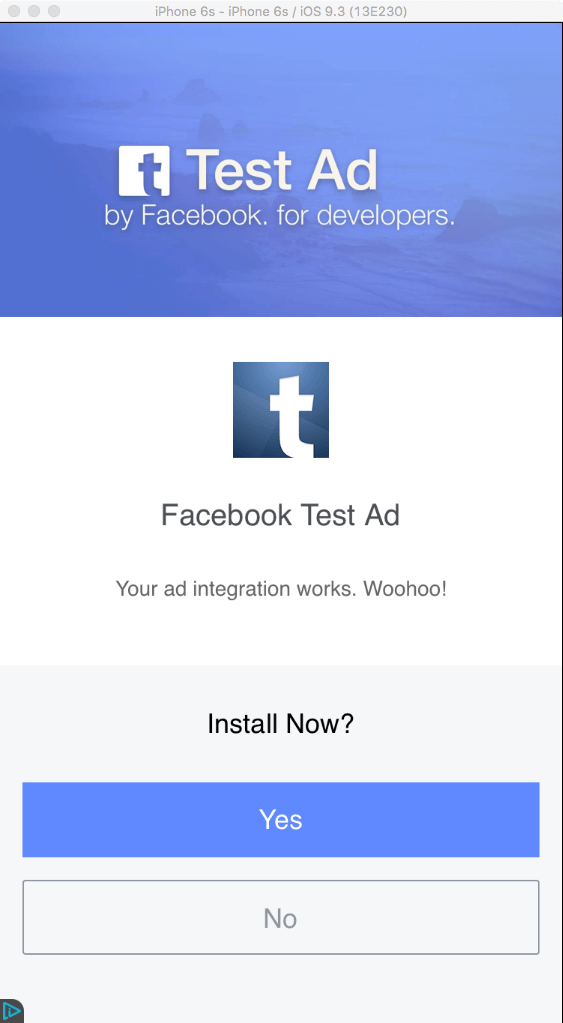
Full screen ads:
Banner ads:

What we are about to discuss in the next parts is good enough to get you covered in most cases. However, if you want to do some additional fine-tuning or to change one or two details, then you can go deeper by digging the official docs. And actually you should do that in order to have a better picture of the topic!
Preparing the Ground
The place you have to always start from when integrating ads is the Facebook Developers portal, because there are actions you have to take in there, and some vital data to fetch as well. Quickly mentioning them, you need to create a new Facebook app and then do some configuration, with ultimate goal to get some unique identifiers that will be used for the ads that will be displayed in your iOS app.
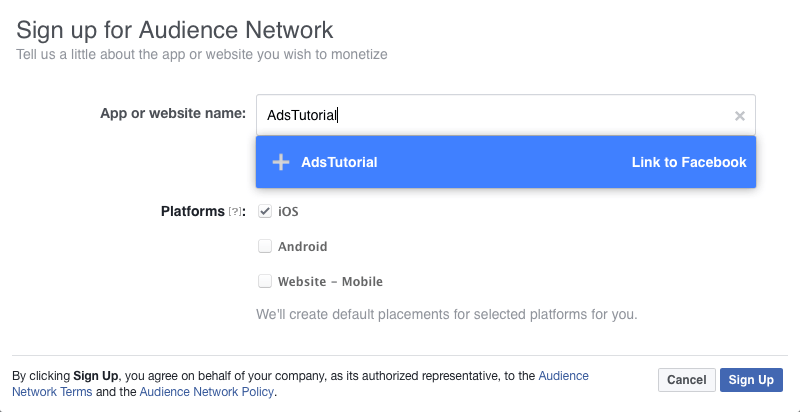
Let’s be specific now, so first of all open your favourite browser and log in to your Facebook account (you have one, right?). Then go to this address and click to the green Start Now button. You will see a window popping up, where you have three things to do there:
- Type in the name of your app.
- Select iOS as the target platform.
- Click to the Link to Facebook option that appears while you’re typing the app name. By doing so, a new app record will be created automatically and it will be added to My Apps section in the Facebook Developers portal. It’s important, so don’t miss this step.
Once you do so, two additional fields will appear in that form: In the first one provide an email address so they can get in touch with you, and select the best category that your app matches to in the second one.
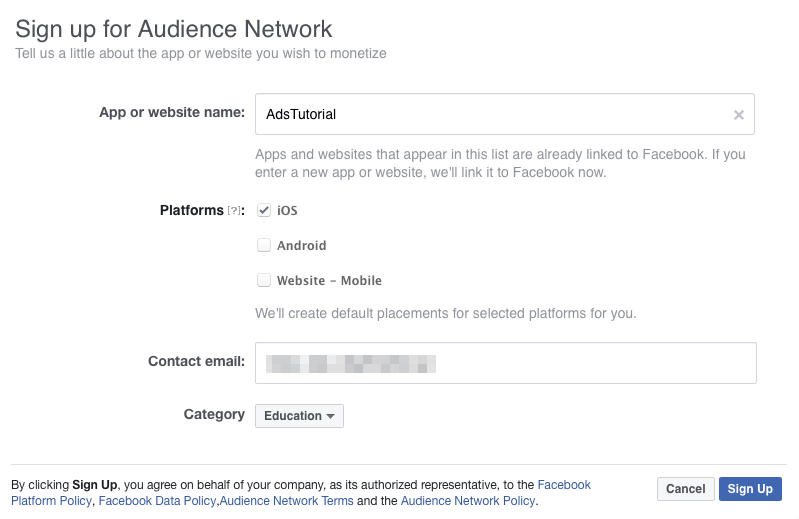
When you finish providing all information, click to the Sign Up button. Then pass the security check and you’re good to go. If everything has been done properly, you will be landed to a settings page, and to the Placements settings of the Audience Network product specifically. There’s something important that has to be done now, and that is to create placement IDs for the ads that are going to be displayed in the app. A placement represents the position of an ad inside the app, and by creating IDs for those placements Facebook can collect data for the ads tapped by the users, as well as to make suggestions or optimise the displayed ads.
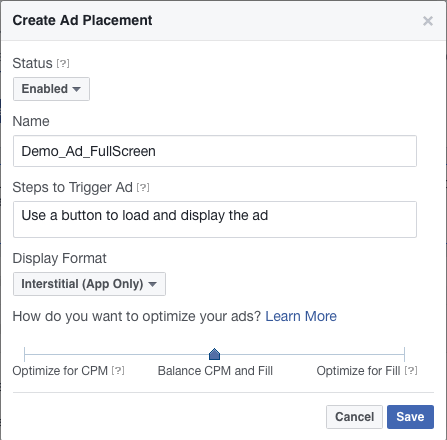
By scrolling the page, you will notice that a placement has been created for you automatically. In our demo app we will need four placement IDs, so we definitely need to create new ones. To do that, just click to the Create Ad Placement button, and get ready to provide some information to a new popup window.
The first ad that will be displayed in our demo app is a native one, and we’ll use a button to load it and show it. By having that in mind, here’s how you should configure the new placement details:
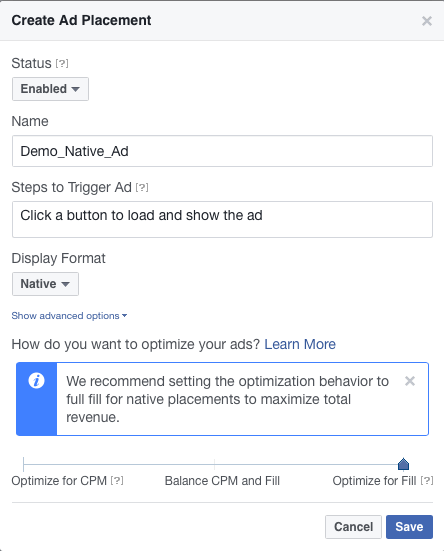
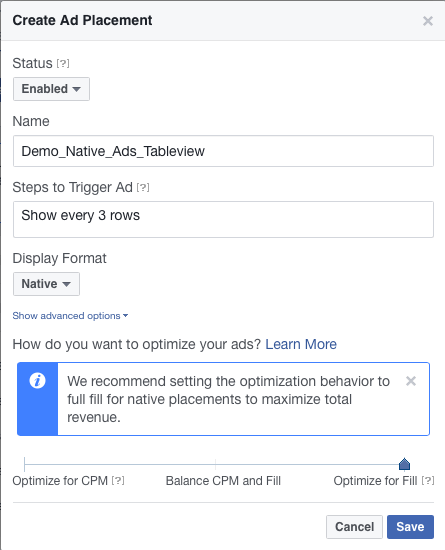
Click to the Save button once you’re done, and the new placement will appear in the settings webpage. The second ad is actually a collection of native ads that will be shown in the tableview existing in the view controller of the second tab in our app, so here are the details for the second placement:
The third ad is supposed to be a full screen one.
I leave the creation of the fourth placement ID to you as an exercise. For this placement, either edit the one that was automatically added, or create again a new one. Keep in mind that the banner ad will be displayed when a button will be tapped in this case as well.
Notice that each new placement gets a Placement ID value once it’s added to the settings page. We are going to use those IDs in the app later.
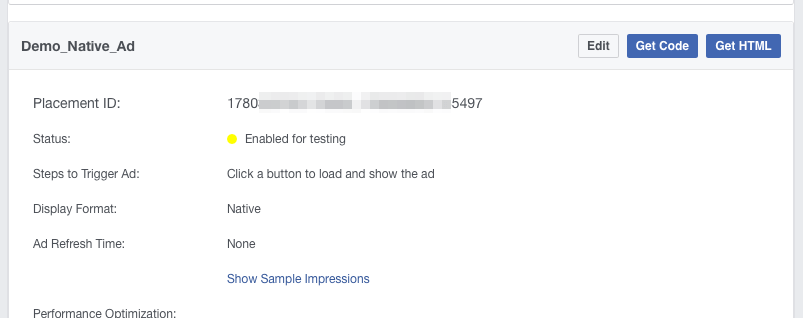
Furthermore, if you just click to the Get Code button you get instantly some sample code on how to use the selected ad and its placement ID. The only drawback: It’s in Objective-C, so you have to convert it to Swift. But don’t worry, this is what we’re going to do next.
An Important Notice
Before we continue, it’s really important to mention something you should definitely know regarding the ads that will be served by Facebook to your app. According to the docs, you can have test ads in your app in two cases only:
- When you run the app in the Simulator.
- When you run on a device straight from Xcode by following this (an extract from the Facebook docs):
To enable test ads on a device, add the following line of code before loading an ad: [FBAdSettings addTestDevice:@”HASHED ID”];. Use the hashed ID that is printed to the console when you first make a request to load an ad on a device.
In other words, when you run the app on a device a hashed ID value is given to you (printed to the console) for that specific device. You must use that value as the above extract dictates so as to indicate that you want test ads to be served to the device.
In any other case, your app will request for real ads from Facebook, and you won’t see them at all until a Facebook review team reviews the app. The review can happen right after you publish your app on a public location (like the App Store, or a custom enterprise store) so the review team can download the app. If the app passes the review, then you can have real ads served in the app, otherwise nothing will appear.
Furthermore, a textfield to type your app’s URL so the review team gets the app from will appear at the top of the Placements settings webpage in the Facebook Developers portal (it’s also possible that you have that textfield already there). Use that field to type the app’s download URL in (when you have it), and give a couple of days for the review to happen. Also, take a look at the Alerts section of your app on that portal, because you’ll receive messages there.
In-App Configuration
Having finished with the configuration required on Facebook, let’s grab the starter project and let’s start taking some actions there too. The first thing is to get the Facebook Audience Network framework, and that’s something that can be done in two different ways:
- By using Cocoapods.
- Manually by downloading the Facebook SDK for iOS.
In the Set Up the SDK section of this page you can find directions for both options. I preferred to download the SDK, and then drag and drop the Facebook Audience Network framework straight into Xcode.
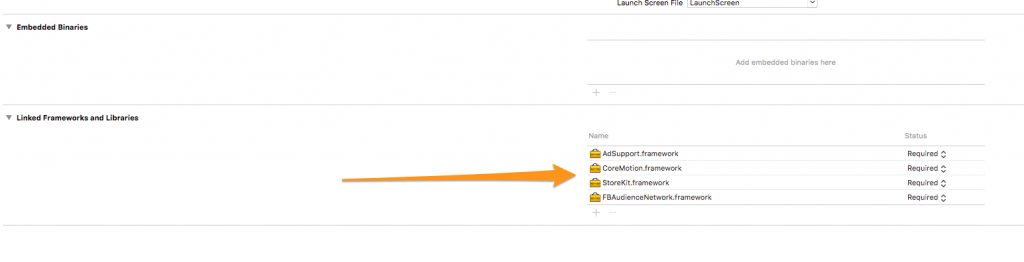
After having added that framework to your project by following any of the two possible ways, you have to add three more frameworks. For that, click to your project name in the Project Navigator, and then scroll down until you see the Linked Frameworks and Libraries in the General tab. Use the + (plus) button three times to add these:
- StoreKit
- CoreMotion
- AdSupport
As I’ve already mentioned, the Facebook SDK is written in Objective-C, therefore we need a bridging header file to import the library we want to use in our Swift code. You can do that very easily by following these steps:
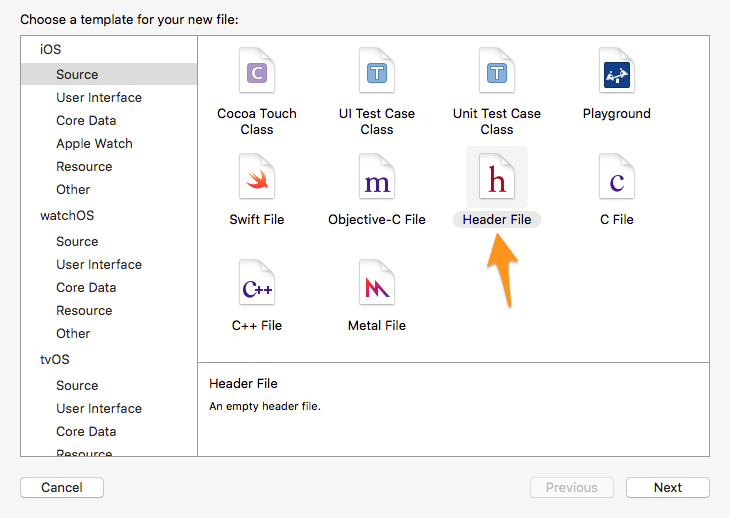
- In Xcode, go to the menu File > New > File….
- In the file template window, select the Source category under the iOS section.
- Select the header file from the templates.
- Name the file AdsTutorial-Bridging-Header.h and save it.
Right after you see the new file in the Project Navigator, select it and paste the following line in the editor:
#import
Next, select your project again in the Project Navigator and click to the Build Settings tab. Make sure you display All settings, and then search for the Bridging Header term in the search field to the right. Double-click to the value area (to the right side of the Objective-C Bridging Header title) and type or paste the following:
AdsTutorial/AdsTutorial-Bridging-Header.h

Press the Return key, and you’re all set. The configuration has been finished, and it’s time to start implementing now.
Showing Native Ads
As I’ve said already, native ads can be fully customised and look similarly to the rest of the UI of your app. And there are two ways to do that. The first one involves the manual creation of all the views and subviews needed to display the ad details. The second one uses a default template where some specific attributes (colors and fonts) can be overridden, and there’s no need to create even one view manually. We are going to see both ways, and we’ll start from the first one in this part. In any case, since there’s almost nothing else displayed in our demo app things are going to be simple and clear.
If you open the Single Ads View Controller scene in the Interface Builder (just click to the Main.storyboard file), you will find a button to load the ad, and a view with several other subviews that we’ll use to display the details of the ad that we’ll request for in a while. For every single control you find there, there’s a respective IBOutlet property already connected to the SingleAdsViewController class. Let’s see them one by one:
viewAdContainer: It’s the view that contains all other subviews that display the ad details. When the app starts, this view is hidden because there’s no ad loaded yet.lblAdTitle: It’s a label displaying the ad title.lblAdBody: It’s a label displaying the ad body text.imgAdIcon: It’s an image view that displays the ad icon.btnAdAction: It’s a call-to-action button that can be used to open the ad details (in full screen mode) once it gets tapped. Alternatively, the whole container view can be used to trigger the full screen ad presentation. I’m going to show both.lblSocialContext: It’s a label displaying the message “Available on the App Store” or something similar.
There’s one important thing you should always have in mind when requesting for ads; the most basic fields will always contain a value (like for example the title and the icon). However, other fields may be empty (nil values), therefore you should handle these cases and avoid unwanted crashes. You’ll see that in a few moments.
Now, let’s start writing some code. At first, add the next two properties right after all IBOutlet properties:
var nativeAd: FBNativeAd!

var coverMediaView: FBMediaView!
The nativeAd object represents a native ad inside the application, and we’re going to use it a lot during our implementation. Here you can find all the details about the FBNativeAd class. The coverMediaView is a special kind of view (a UIView object) capable of displaying any kind of media an ad might contain, images or videos. This view will be the only one created programmatically, without having a respective visual control in the Single Ads View Controller scene (in the Interface Builder). If you’re curious enough about the FBMediaView, this is the place you should get more information.
Let’s use the nativeAd object for first time, and let’s try to load an ad (actually to request for an ad). That action should happen when we tap on the Load Ad button, so apparently we have to do so in the loadNativeAd(_:) IBAction method. This method will be triggered every time we tap on that button. Let’s see its (initial) implementation:
@IBAction func loadNativeAd(sender: AnyObject) {
    nativeAd = FBNativeAd(placementID: "PLACEMENT_ID")
    nativeAd.delegate = self
    nativeAd.loadAd()
}
As usually, the first thing required is to initialise the nativeAd object by using the method shown in the first line. Before you run the app, make sure to replace the “PLACEMENT_ID” string with your own, real placement ID that you created earlier. Just copy the placement ID from the Audience Network settings page (the placement ID regarding the native ad), and paste it here. Next, we set our class as the delegate for that object, and we’ll deal with that shortly. Finally, we call the loadAd() method to make the actual request and fetch an ad.
Optionally, you can take the above one step further and specify cache options. In that case, the Audience Network Framework pre-caches any images and videos contained in the ad. For example, if you want a video to start playing back immediately after it has been loaded, you could set the following caching option right before you load the ad:
nativeAd.mediaCachePolicy = FBNativeAdsCachePolicy.Video
No pre-caching is the default option. For a list of all the possible options, take a look right before the end of this page.
Our next step now is to adopt the FBNativeAdDelegate protocol. Previously, we set the SingleAdsViewController class as the delegate of the nativeAd property, but up until now our class doesn’t conform to that protocol. Go to the header line of the class, and complete it as shown next:
class SingleAdsViewController: UIViewController, FBNativeAdDelegate {
   ...
}
The collection of the methods provided by the FBNativeAdDelegate protocol is not large. However, two of them should be always implemented because they are the only way to know if an ad loading was successful or just failed, while the rest are optional and totally up to you to decide if you need them or not. Here’s their implementation:
func nativeAdDidLoad(nativeAd: FBNativeAd) {
    handleLoadedNativeAdUsingCustomViews()
}


func nativeAd(nativeAd: FBNativeAd, didFailWithError error: NSError) {
    print(error)
}
It’s possible that you want to do a better error handling than what I’m doing here, but for now just printing the potential error is sufficient. The interesting part is the nativeAdDidLoad(_:) delegate method, where there is a call to a method called handleLoadedNativeAdUsingCustomViews(). It’s obvious, even by its name, that this is a custom method that we’ll implement right away to deal with the loaded ad. Before we do so though, I think it’s necessary to explain and say that we’ll use the exact same delegate method in the next part where we’ll use the ad view template, and we will take a totally different way once the ad is loaded. So, having custom methods to handle each case is almost unavoidable and the best approach to make things clear in the scope of this post.
Inside the handleLoadedNativeAdUsingCustomViews() method we’ll assign all the ad details to the proper views, and we’ll make sure for certain data that there’s actually a value. Let’s see the first step of the implementation, as more things will be added next. The comments below will help you better understand what’s going on:
func handleLoadedNativeAdUsingCustomViews() {
    // Set the ad title.
    lblAdTitle.text = nativeAd.title

    // Set the ad body (if exists).
    if let body = nativeAd.body {
        lblAdBody.text = body
    }

    // Set the title of the call-to-action button.
    btnAdAction.setTitle(nativeAd.callToAction, forState: UIControlState.Normal)

    // Load and display the ad icon image.
    nativeAd.icon?.loadImageAsyncWithBlock({ (iconImage) in
        if let image = iconImage {
            self.imgAdIcon.image = image
        }
    })

    // Create a cover media view and assign the native ad object to it (it will display image(s) or video, depending on what ad contains).
    let yPoint = lblAdBody.frame.origin.y + lblAdBody.frame.size.height + 8.0
    let coverMediaViewFrame = CGRectMake(lblAdBody.frame.origin.x, yPoint, lblAdBody.frame.size.width, lblSocialContext.frame.origin.y - yPoint - 8.0)
    let coverMediaView = FBMediaView(frame: coverMediaViewFrame)
    coverMediaView.clipsToBounds = true
    coverMediaView.nativeAd = nativeAd
    viewAdContainer.addSubview(coverMediaView)


    // Set the social context title (if exists).
    if let socialContext = nativeAd.socialContext {
        lblSocialContext.text = socialContext
    }
}
There are three facts that you should pay attention to here:
- We don’t know for sure if the body or the social context of the ad have actual values, so we must check if they’re nil or not first. If you want to be more than 100% sure, perform this check even for the basic fields.
- The icon of the ad is loaded asynchronously as shown above. The
loadImageAsyncWithBlock(...)takes care of that, and all we have to do is to make sure that an image has been really fetched before we assign it to theimgAdIconimage view. - The
coverMediaViewis initialised and added manually to the container view (viewAdContainer). Notice the use of theclipsToBoundsproperty, which seems to be necessary. If you don’t use it, it’s quite possible that you see the media of the ad exceeding the frame (the width) of the container view.
In addition to the above, we should also provide an AdChoices view, where users can use to access privacy settings regarding the shown ad. That’s easy, as the Audience Network Framework gives us a class to do that:
func handleLoadedNativeAdUsingCustomViews() {
    ...

    // Add the AdChoices view.
    let adChoicesView = FBAdChoicesView(nativeAd: nativeAd)
    viewAdContainer.addSubview(adChoicesView)
    adChoicesView.updateFrameFromSuperview()
}
The call to the updateFrameFromSuperview() method will assign the proper frame to the AdChoices view, so it’s not necessary to do anything else. Optionally, and since this is a view object, you can set the frame manually.
An ad should interact when user taps on it and be presented in full screen mode. Being more precise, and ad should interact either when a user taps on the entire ad view, or when the call-to-action button is tapped. The choice is yours, but here I’ll show you both ways. To make the whole view tappable, add the following line to the above method:
func handleLoadedNativeAdUsingCustomViews() {
    ...

    // Use this to make the whole ad container view interact when tapping.
    nativeAd.registerViewForInteraction(viewAdContainer, withViewController: self)
}
Alternatively, when you want the call-to-action button to be the only tappable control, comment out or delete the above line and use the next one instead:
func handleLoadedNativeAdUsingCustomViews() {
    ...

    // Use this to make the call-to-action interactive only.
    nativeAd.registerViewForInteraction(viewAdContainer, withViewController: self, withClickableViews: [btnAdAction])
}
The last parameter of the above method gets an array of views as an argument, and that means that you can set more controls, and other than the action button to interact when users tap on them. For our demonstration purposes, passing the button as the only item of the array is enough.
Lastly, and once we have made all assignments, there’s just one thing left to do: To make the ad container view visible, because by default is hidden:
func handleLoadedNativeAdUsingCustomViews() {
    ...

    // Make the native ad view container visible.
    viewAdContainer.hidden = false
}
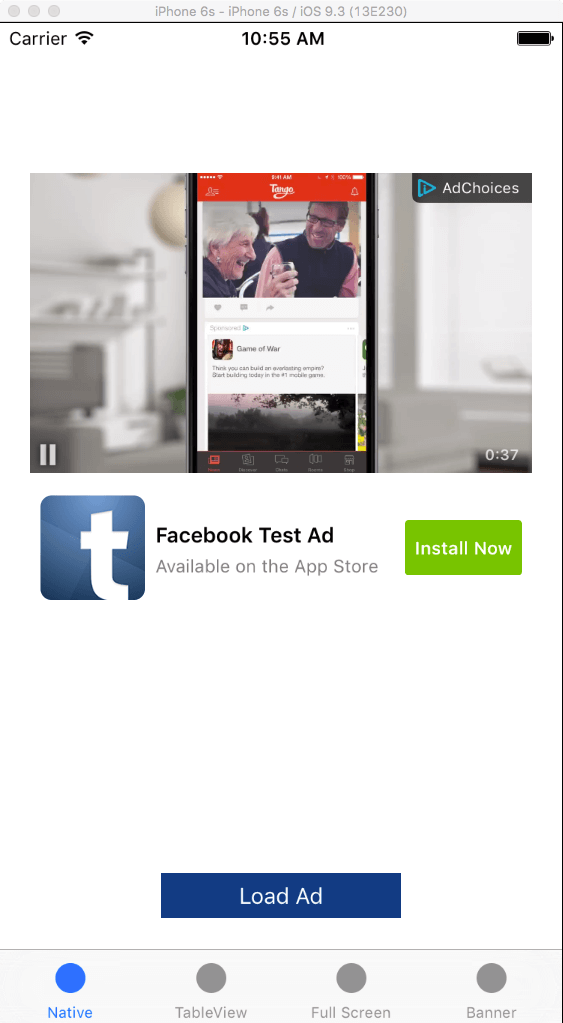
At this point you can run the app for first time, and use the Load Ad button in the view controller of the first tab. If you came up to this point following everything step-by-step, then you should see your first test ad being served to you (I would recommend to use Simulator for testing):
The FBNativeAdDelegate protocol has some optional methods that could be implemented. Read more on the official documentation about them or start typing “nativeAd” in Xcode (without the quotes) to get more info. As an example, the following method handles the tappings on an ad (the whole view or just the call-to-action button):
func nativeAdDidClick(nativeAd: FBNativeAd) {
    print("Did tap on the ad")
}
Before we reach the end of this part, there’s one last thing to do. Go to the loadNativeAd(_:) IBAction method and update it according to the following snippet:
@IBAction func loadNativeAd(sender: AnyObject) {
    if coverMediaView != nil {
        coverMediaView.removeFromSuperview()
        coverMediaView = nil
    }

    if nativeAd != nil {
        nativeAd.unregisterView()
    }

    nativeAd = FBNativeAd(placementID: "PLACEMENT_ID")
    nativeAd.delegate = self
    nativeAd.loadAd()
}
As you can see, two things have been added right before the ad loading: At first we remove from the superview the cover media view if it’s already there, and we make the respective object nil. If you remember, this object is re-created every time an ad is loaded. At second, if the nativeAd object has been already initialised and contains ad data, then we unregister the view that was registered for interaction (either the entire ad container view, or the call-to-action button) before we load a new ad. That’s necessary, because in a subsequent ad load the proper view will be registered again according to what you have set.
More resources about the native ads can be found here and here.
Native Ad Template
Knowing how to use native ads with custom views, we can go one step further and see how we can take advantage of a native ad template that the Audience Network provides. With that, there’s no need to create any views manually and assign any ad details to them like we previously did. All you really need is to specify the frame of the ad view (that view will be created automatically), and to make any potential configuration regarding the colors and fonts of the displayed items.
In the SingleAdsViewController class we are going to create a new method named handleLoadedNativeAdUsingTemplate(), and we’ll change the nativeAdDidLoad(_:) delegate method so this new method is called instead of the handleLoadedNativeAdUsingCustomViews() after an ad has been loaded. In its simplest form, that new method would contain the following code:
func handleLoadedNativeAdUsingTemplate() {
    let nativeAdView = FBNativeAdView(nativeAd: nativeAd, withType: FBNativeAdViewType.GenericHeight300)
    nativeAdView.frame = CGRectMake(20.0, 100.0, UIScreen.mainScreen().bounds.size.width - 40.0, 300.0)
    self.view.addSubview(nativeAdView)

    nativeAd.registerViewForInteraction(nativeAdView, withViewController: self)
}
We meet for first time a new class here, the FBNativeAdView. As its name suggests, its role is to create a view for displaying the details of a native ad. It’s clear that all it takes is to initialise such a view, set its frame and then just add it to the view that you’d like to be contained into. The last line simply registers the newly created nativeAdView to the native ad object, so there’s interaction when the user taps on the ad.
If you want to see the above in action, just go to the nativeAdDidLoad(_:) and update it as shown next:
func nativeAdDidLoad(nativeAd: FBNativeAd) {
    // handleLoadedNativeAdUsingCustomViews()

    handleLoadedNativeAdUsingTemplate()
}
Now run the app and click to the Load Ad button. You will see something like that:
The FBNativeAdView comes with four predefined heights that you should choose from. You define the type of the view upon initialisation (look the withType parameter above) by using any of the available options that the FBNativeAdViewType enum provides:
- GenericHeight100
- GenericHeight120
- GenericHeight300
- GenericHeight400
Apparently, the height of the view should match to the view type when setting the frame. For example, if you set the GenericHeight120 as the type of the native ad view, then you should change the frame accordingly and set the height to 120.0 points.
There are specific properties that you are allowed to change when using the FBNativeAdView, and they are described in the FBNativeAdViewAttributes class. In short, those are:
- Height
- Width
- Background Color
- Title Color
- Title Font
- Description Color
- Description Font
- Button Color
- Button Title Color
- Button Title Font
- Button Border Color
The above attributes should be changed and set before the initialisation of the native ad view in order to take effect. Let’s see that in action, and let’s update the handleLoadedNativeAdUsingTemplate() by setting some attributes before we initialise the native ad view:
func handleLoadedNativeAdUsingTemplate() {
    let attributes = FBNativeAdViewAttributes()
    attributes.buttonColor = UIColor.magentaColor()
    attributes.buttonTitleColor = UIColor.yellowColor()
    attributes.backgroundColor = UIColor.purpleColor()
    attributes.titleFont = UIFont(name: "Noteworthy", size: 20.0)
    attributes.titleColor = UIColor.whiteColor()
    attributes.buttonTitleFont = UIFont(name: "Futura", size: 12.0)
    attributes.descriptionColor = UIColor.whiteColor()

    ...
}
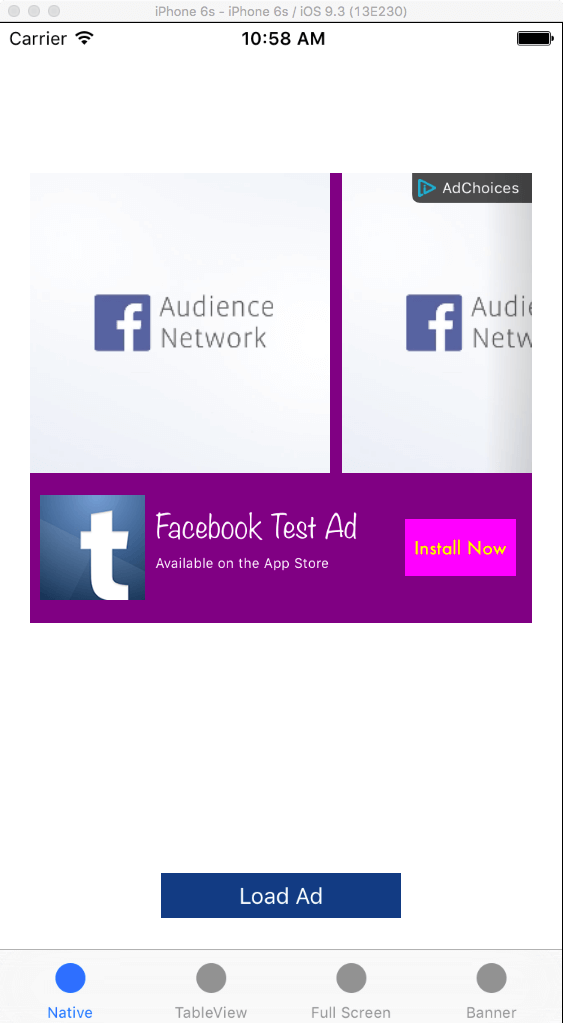
Feel free to change more attributes, or set values other than those I chose to use in the above properties. Undoubtedly, configuring the native ad view is more than easy. However, doing the above is not enough, as the attributes object must be used somehow. For that, we need to use a different method for initialising the nativeAdView view:
FBNativeAdView(nativeAd: nativeAd, withType: FBNativeAdViewType.GenericHeight300, withAttributes: attributes)
This one has one additional parameter (withAttributes) that expects a FBNativeAdViewAttributes object. By providing it the custom settings apply to the native ad view right after it gets initialised.
Here’s once again the entire method after all changes:
func handleLoadedNativeAdUsingTemplate() {
    let attributes = FBNativeAdViewAttributes()
    attributes.buttonColor = UIColor.magentaColor()
    attributes.buttonTitleColor = UIColor.yellowColor()
    attributes.backgroundColor = UIColor.purpleColor()
    attributes.titleFont = UIFont(name: "Noteworthy", size: 20.0)
    attributes.titleColor = UIColor.whiteColor()
    attributes.buttonTitleFont = UIFont(name: "Futura", size: 12.0)
    attributes.descriptionColor = UIColor.whiteColor()

    // let nativeAdView = FBNativeAdView(nativeAd: nativeAd, withType: FBNativeAdViewType.GenericHeight300)
    let nativeAdView = FBNativeAdView(nativeAd: nativeAd, withType: FBNativeAdViewType.GenericHeight300, withAttributes: attributes)
    nativeAdView.frame = CGRectMake(20.0, 100.0, UIScreen.mainScreen().bounds.size.width - 40.0, 300.0)
    self.view.addSubview(nativeAdView)

    nativeAd.registerViewForInteraction(nativeAdView, withViewController: self)
}
And here’s the result by running the app again:
More information about the native ad template can be found here.
Native Ads in TableView
Native ads can be easily integrated to tableviews, as the Audience Network Framework provides additional tools for doing that. Of course, you are always allowed to create your custom native views and add them to tableview cells, but definitely the hassle is going to be greater. When dealing with ads and tableviews, then two new classes come into the play: The FBNativeAdsManager and the FBNativeAdTableViewCellProvider (details here and here). The first one is responsible for fetching a set of ads and managing them within the application. One useful feature of that class is the fact that it clones the ads that has fetched already, so they can be repeatedly shown in a really long tableview (and not only). The second class provides mechanisms in order to automatically integrate native ads to tableviews, like for example methods to create cells or to calculate row heights. Those methods are used in conjunction to the default tableview’s delegate and datasource methods. In addition to the methods that the second class provides, we’ll also use some valuable methods from the FBNativeAdTableViewAdProvider class that comes along with the FBNativeAdTableViewCellProvider.
We’ll see how they’re used while we’re moving forward in this part, but first let’s open the TableViewAdsViewController.swift file and let’s start by declaring the next three properties:
let adRowStep = 4

var adsManager: FBNativeAdsManager!

var adsCellProvider: FBNativeAdTableViewCellProvider!
The adRowStep indicates how often ads will be displayed in the tableview, and in our case ads are going to be displayed after three rows of normal content (each 4th row the tableview will show an ad). The other two properties are objects of the first two new classes mentioned previously.
Next, we’re going to implement a new method. In this one, we’ll initialise the adsManager object, and we’ll load a bunch of ads to use in our tableview.
func configureAdManagerAndLoadAds() {
    if adsManager == nil {
        adsManager = FBNativeAdsManager(placementID: "PLACEMENT_ID", forNumAdsRequested: 5)
        adsManager.delegate = self
        adsManager.loadAds()
    }
}
The initialiser gets two parameters: The first one is the placement ID that you created earlier in the Facebook Developers portal, and now you have to fetch it and paste it here. The second parameter defines how many ads the manager will download, and the maximum value is 10. Obviously, there’s no need to initialise again if the adsManager has already been initialised, therefore we check if it’s nil or not. Before we call the loadAds() method of the FBNativeAdsManager class and trigger that way the downloading of new ads, we set the TableViewAdsViewController as the delegate of the ads manager object, because only through the delegate methods that we’ll define next the app can acknowledge whether ads have been fetched or not, and that’s also the point that we’ll continue from.
Just implementing the above method is not enough; we have to call it as well. So, go to the viewWillAppear(_:) method, and complete it by adding the next line:
override func viewWillAppear(animated: Bool) {
    ...

    configureAdManagerAndLoadAds()
}
It’s about time now to adopt two protocols. The first one called * FBNativeAdsManagerDelegate* will let us know if ads have been successfully fetched or an error occurred, while the second one named FBNativeAdDelegate (we’ve seen it before) will allow us to have controls over the actions taken to the ads. Go to the header line of the class and modify it so it includes these two protocols:
class TableViewAdsViewController: UIViewController, UITableViewDelegate, UITableViewDataSource, FBNativeAdDelegate, FBNativeAdsManagerDelegate {
   ...
}
Let’s work with the FBNativeAdsManagerDelegate methods now. In the first delegate method that we’ll define and that is invoked when the ads have been successfully fetched, we’ll initialise the adsCellProvider object and we’ll reload the tableview, so the ads to be displayed there along with the rest of the content:
func nativeAdsLoaded() {
    adsCellProvider = FBNativeAdTableViewCellProvider(manager: adsManager, forType: FBNativeAdViewType.GenericHeight120)
    adsCellProvider.delegate = self

    if tblAdsDemo != nil {
        tblAdsDemo.reloadData()
    }
}
For the initialisation we need to provide two arguments. The first one is the ads manager object that we used earlier, and the second is the native ad view type (FBNativeAdViewType) that we’ve already seen in the previous part regarding the template ad view. With it, we can set the height of the displayed ad, and according to what we know already there are four height values to choose from: 100, 120, 300 and 400 points. Make your tries and find what suits you the best. In addition to that, we make once again our class the delegate of the adsCellProvider so we can get notified about the actions made to the ads by implementing any delegate methods of the FBNativeAdDelegate protocol. Of course, that’s totally optional and you can skip it.
We should not forget that there’s also the case where fetching new ads fails, so we must handle that situation as well. We’ll keep it simple, so the following implementation is just fine:
func nativeAdsFailedToLoadWithError(error: NSError) {
    print(error)
}
Also, and just for the sake of the demonstration, we’ll implement one FBNativeAdDelegate method. In it we’ll “capture” the tappings made on an ad, and we’ll just print a message including the title of the ad that was tapped:
func nativeAdDidClick(nativeAd: FBNativeAd) {
    print("Ad tapped: \(nativeAd.title)")
}
There are more methods that you can optionally implement; just start typing “nativeAd” and Xcode will suggest them to you. Alternative, use the link I gave you back to the Showing Native Ads part and read the documentation of the protocol.
Having dealt with the delegate methods, our next move is to make use of the mechanisms that both FBNativeAdTableViewCellProvider and FBNativeAdTableViewAdProvider classes provide in order to perform the actual integration of the ads to the tableview. For starters, let’s accommodate the number of rows that will exist in the tableview:
func tableView(tableView: UITableView, numberOfRowsInSection section: Int) -> Int {
    if adsCellProvider != nil {
        return Int(adsCellProvider.adjustCount(UInt(self.sampleData.count), forStride: UInt(adRowStep)))
    }
    else {
        return sampleData.count
    }
}
Once again, I recommend you read the documentation regarding the FBNativeAdTableViewCellProvider and FBNativeAdTableViewAdProvider classes. But even without doing so, you understand that the above method adjusts the number of rows to the tableview, taking into account the ads that should be displayed too.
Next, we must create and use ad cells, depending always on the row index. We don’t have to check that manually. On the contrary, you’ll see that we’re given another method to easily do so, and one more to create and return the ad cell:
func tableView(tableView: UITableView, cellForRowAtIndexPath indexPath: NSIndexPath) -> UITableViewCell {
    if adsCellProvider != nil && adsCellProvider.isAdCellAtIndexPath(indexPath, forStride: UInt(adRowStep)) {
        return adsCellProvider.tableView(tableView, cellForRowAtIndexPath: indexPath)
    }
    else {
        let cell = tableView.dequeueReusableCellWithIdentifier("idCellSample", forIndexPath: indexPath) as! SampleCell
        cell.lblTitle.text = sampleData[indexPath.row - Int(indexPath.row / adRowStep)]
        return cell
    }
}
You might have realised up until now that all those new methods from the Audience Network Framework are using UInt (unsigned int) values, so the conversion between UIInt and Int is mandatory. Further than that, just see how simple is to determine if a row is and ad row or not, and how the FBNativeAdTableViewCellProvider class prepares the cell for us. There’s one small trick required to be done though, and that’s the index of the array in the else case. Notice that instead of having:
sampleData[indexPath.row]
… (and let the indexPath.row be the index for the array), we have this:
sampleData[indexPath.row - Int(indexPath.row / adRowStep)]
By doing that, we avoid crashes that can happen when scrolling to a row with an index greater than or equal to the length of the sampleData array. If you think about that, instead of 20 rows (as many as the items in the array), we’re going to have six more rows because of the ads that will be added to the tableview, therefore it’s important to adjust the index of the array.
Finally, let’s also give the proper height to the rows:
func tableView(tableView: UITableView, heightForRowAtIndexPath indexPath: NSIndexPath) -> CGFloat {
    if adsCellProvider != nil && adsCellProvider.isAdCellAtIndexPath(indexPath, forStride: UInt(adRowStep)) {
        return adsCellProvider.tableView(tableView, heightForRowAtIndexPath: indexPath)
    }
    else {
        return 60.0
    }
}
Run the app now, and go to the second tab. Wait a few moments, and the ads will be displayed between the rest of the content in the tableview.
Full Screen Ads
Full screen ads (interstitial ads), as well as the banner ads that we’ll see in the next part, are way more easy to handle comparing to what we’ve seen so far. All we need is to load the ad, and then present it to the view controller. For our purposes here, we are going to meet and use a new protocol named FBInterstitialAdDelegate. This protocol will provide us with methods that we’ll use to know if an ad has been loaded successfully or an error has occurred, or when an ad gets tapped or closed. Actually, we’ll make the adoption of that protocol our entry point here, so open the FullScreenAdsViewController.swift file and change the class header line according to what you see next:
class FullScreenAdsViewController: UIViewController, FBInterstitialAdDelegate {
   ...
}
Let’s declare now a property of the FBInterstitialAd class that will represent a full screen ad in code.
var fullScreenAd: FBInterstitialAd!
If you ran the starter project at least once, then you’d have found a button that is supposed to trigger the presentation of the full screen ad. For this button, I have already created an IBAction method for it, so let’s add the missing code, the steps of which are quite similar to what we’ve seen many times so far.
@IBAction func showFullScreenAd(sender: AnyObject) {
    fullScreenAd = FBInterstitialAd(placementID: "PLACEMENT_ID")
    fullScreenAd.delegate = self
    fullScreenAd.loadAd()
    btnShowAd.enabled = false
}
For the initialisation of the fullScreenAd object, we only need the placement ID that we created for the full ad specifically. So, make sure to get it and paste it in the first line above. The rest is easy. Notice that we disable the button once it’s tapped once, so we don’t make repeated ad requests.
Let’s deal with the delegate methods now. Initially, we’ll handle the case where an ad has been successfully loaded, so it must be presented:
func interstitialAdDidLoad(interstitialAd: FBInterstitialAd) {
    interstitialAd.showAdFromRootViewController(self)
    btnShowAd.enabled = true
}
Notice that the button becomes enabled again.
Next, the error case:
func interstitialAd(interstitialAd: FBInterstitialAd, didFailWithError error: NSError) {
    print(error)
    btnShowAd.enabled = true
}
As usual, we just print the error and we enable the button in addition to that, but that’s a simple approach absolutely not recommended in real apps.
For the sake of the demonstration, let’s add two more delegate methods (without doing anything important to them):
func interstitialAdDidClick(interstitialAd: FBInterstitialAd) {
    print("Did tap on ad")
}


func interstitialAdDidClose(interstitialAd: FBInterstitialAd) {
    print("Did close ad")
}
I think that there’s nothing to comment here.
Run the app now and go to the third tab. Use the button and wait to see the full screen ad being presented to the screen.
For more information about full screen ads, take a look here.
Banner Ads
If you want to use banner ads in your app, then the FBAdView class and the respective FBAdViewDelegate protocol are your tools. Likewise to the full screen ads, all we have is to initialise a FBAdView object and load an ad, and after that to present it in the view controller. There are some things that change upon initialisation, but we’ll discuss about them.
Let’s get started by opening the BannerAdsViewController.swift file and declaring the following property:
var bannerAdView: FBAdView!
Also, let’s modify the header line of the class in order to adopt the FBAdViewDelegate protocol:
class BannerAdsViewController: UIViewController, FBAdViewDelegate {
   ...
}
Now, in the loadBannerAd(_:) IBAction method, we have to initialise the bannerAdView object, and eventually load the ad. Keep in mind that we also have to specify the banner view’s frame.
@IBAction func loadBannerAd(sender: AnyObject) {
    bannerAdView = FBAdView(placementID: "PLACEMENT_ID", adSize: kFBAdSizeHeight50Banner, rootViewController: self)
    bannerAdView.frame = CGRectMake(0.0, 20.0, UIScreen.mainScreen().bounds.size.width, 50.0)
    bannerAdView.delegate = self
    bannerAdView.hidden = true
    self.view.addSubview(bannerAdView)

    bannerAdView.loadAd()
}
Three parameters are needed in this case: The placement ID matching to this ad (copy-paste yours here), the size of the ad, the the view controller that the add will be presented to. For the ad size there are predefined values that you can use, and you can find all of them here. What size you select depends on the requirements of your app, or the size that matches the best to the rest of the UI. Note that before we add the banner view to the main view, we hide it, and we’ll show it again once the ad has been loaded.
Now, let’s implement the missing delegate methods. We’ll start by the method that is invoked when the ad is successfully loaded. In that case, we just need to make the banner view visible again:
func adViewDidLoad(adView: FBAdView) {
    bannerAdView.hidden = false
}
Also, let’s add a couple more delegate methods:
func adView(adView: FBAdView, didFailWithError error: NSError) {
    print(error)
}

func adViewDidClick(adView: FBAdView) {
    print("Did tap on ad view")
}
And that’s all it takes to display a banner ad to your app. Run the app now, go to the last tab, and try it out.
For more information, this is the place you should pay a visit.
Summary
So, that’s all the possible options you have at your disposal once you decide to integrate Facebook ads in your apps. I think that there was nothing particularly difficult in any case of ads we met in the previous parts. What I presented in this tutorial is good enough to get you covered in most cases, but I have to say once again that you should definitely go through the official docs, because you’ll find details not mentioned here. Knowing how to integrate Facebook ads using the Audience Network Framework is an advantage for every developer, and also consists of an extra option to make some earnings out of an app. In any case, I hope you’ve found this post interesting and that you’ve learnt something new today. That’s what matters at the end. Have fun with the ads!
For the full Xcode project, you can check it out on GitHub.com.


