

In this day and age, it is practically impossible to build a fully self-contained app that users will really like. As such, iOS developers are reaching out beyond the tools and resources provided by Apple for access to data and storage. A fantastic option for developers is the backend-as-a-service, or BaaS.
Among the best and most popular BaaSs is Google’s Firebase. Actually, Firebase is positively fantastic in performance, implementation, and upkeep. The key to Firebase’s immediate value is its realtime database that stores data in JSON. Any change in the database is immediately synced across all clients, or devices, that use the same database. In other words, Firebase is ridiculously fast; everything is updated instantly.
Firebase also offers user authentication along with storage, and all data is transferred via a secure SSL connection. For authentication, we can choose from any combination of email and password, Facebook, Twitter, GitHub, Google, or a custom solution.
In addition to iOS, Firebase has SDKs for Android and JavaScript. All platforms can share the same database, and Firebase scales apps automatically.
It’s tough to imagine Firebase being an affordable option with all of these features. So here’s the catch…
Nope, there is no catch. At the time of writing this tutorial, Firebase is free for up to 100 simultaneous connections. That’s a ton. 100 open network connections can support a pretty popular app. For $49 per month, the cap disappears.
About FirebaseJokes
Today, we’ll be building a Joke posting app using Firebase. In the app, we will let users create an account and login using email and password. Users will be able to post a joke, and the table view will instantly update. The update will also immediately occur if another user posts a new joke. For fun, we’ll also add a voting function to the app, so the funniest jokes can receive the credit that they deserve.
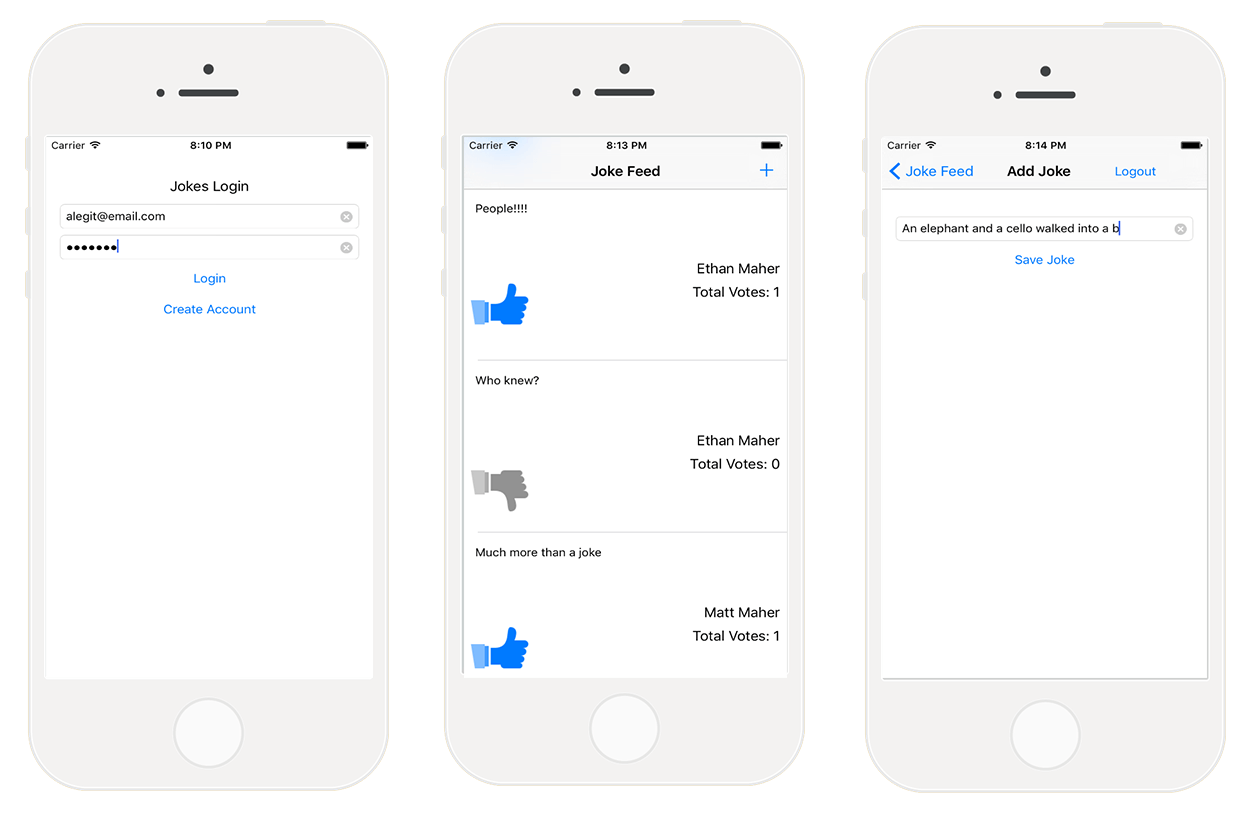
Here’s a list of the features that we will implement into FirebaseJokes:
- Create an account
- Login with email and password
- Logout
- Skip login for logged in users
- Post new jokes
- Load jokes onto a UITableView with author and a vote count
- Vote for the good jokes
Let’s checkout the Starter Project.
First, let’s open Main.Storyboard to get a visual idea of the app.

As we progress through the app, we will travel, logically, from point to point to ensure that the implementation of Firebase makes sense. This is a great product, and it’s easy and fun to use. Building FirebaseJokes will be time well spent.
Time to Checkout Firebase
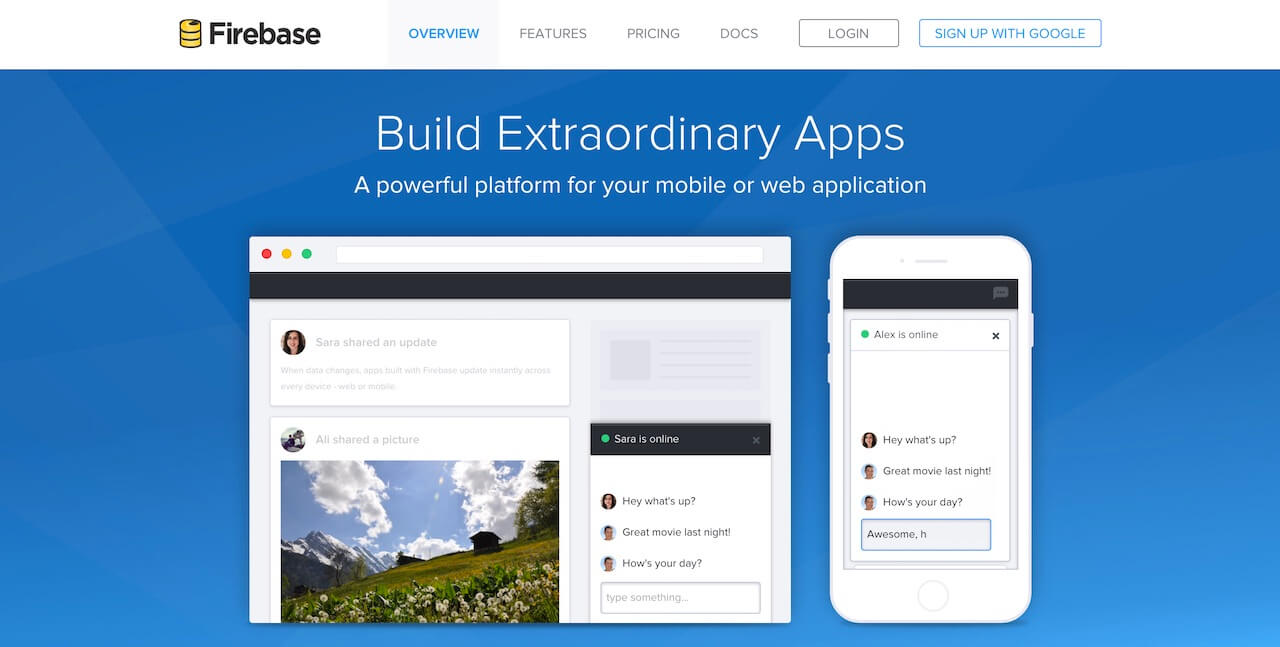
Let’s head over to Firebase and signup for a Firebase account, or login if you already have an account. The SIGN UP WITH GOOGLE option is a breeze. After signing up, we’re going to skip the 5 Minute Tutorial, as it is intended for JavaScript applications. We will, however, checkout an iOS version in a bit.
To get a look at what Firebase is all about, click Manage App in My First App. This new area is known as Firebase Forge. It is a very cool graphical debugger, and it’s worth taking the suggested tutorial. The Forge tutorial will guide you through creating keys, values, and even children using the plus symbol. Sort of has a JSON look to it, doesn’t it? To exit the brief Forge tutorial, click Dashboard in the upper-left corner of the screen.
Create a New App
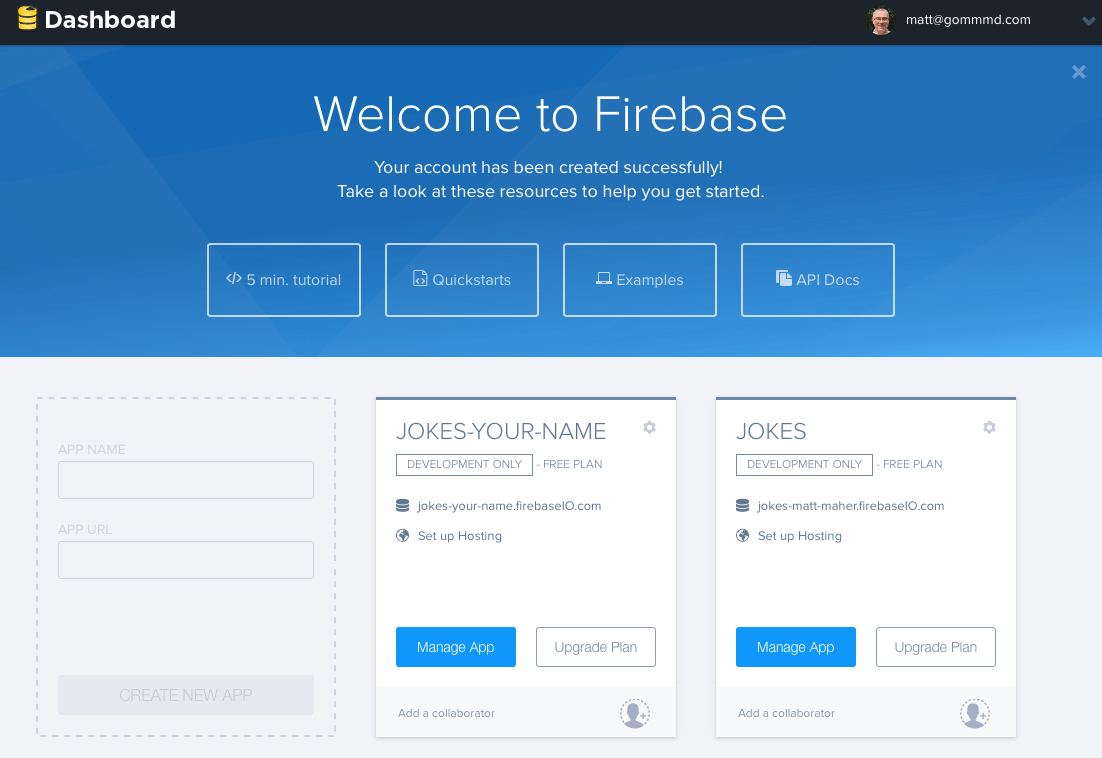
It’s time to create FirebaseJokes. To the left of My First App, click the faded box to create a new app. For the APP NAME, enter “Jokes”. In the APP URL field, enter “jokes-your-name”, with “your-name” being your personal name. This field must be unique, as it is the actual url for your app. Finally, tap CREATE NEW APP and then the Manage App button.
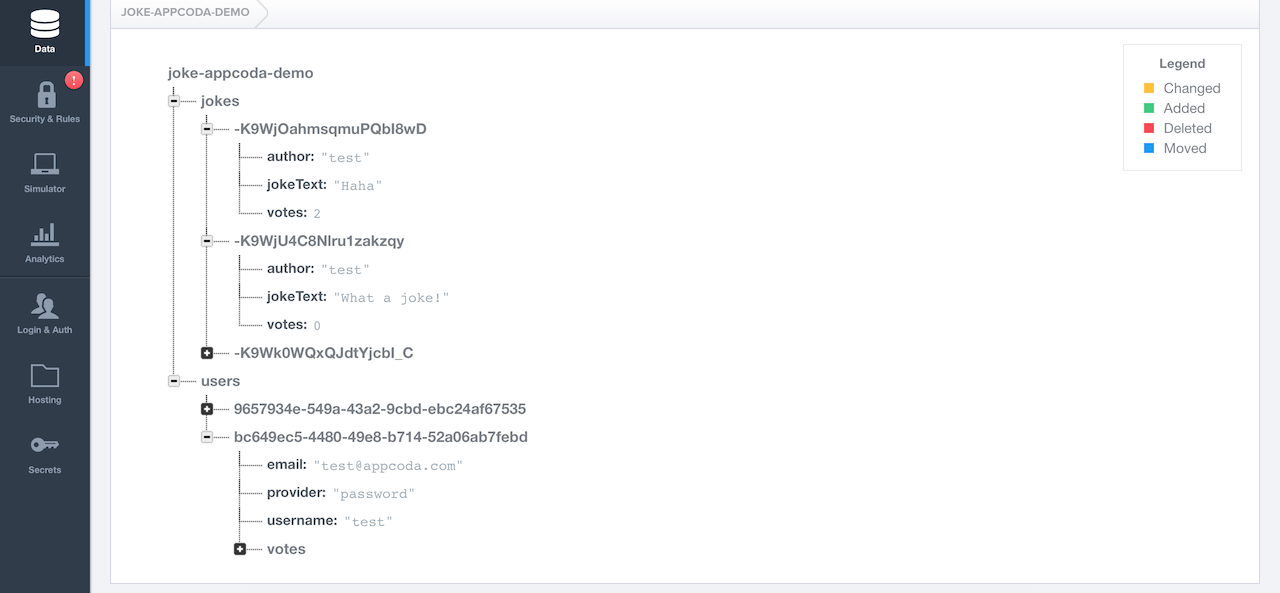
Here we are – our very own Forge screen. Here, we’ll actually be able to see the data instantly update as is does in our app. We can also enter app data directly into Forge. To get an idea of how our app will work, from a data perspective, we’ll enter some data manually.
- Click the Plus symbol in the jokes-your-name row.
- Enter “jokes” into the name field.
- Click the Plus symbol in the new jokes row.
- Enter a random number into the name field.
- Click the Plus symbol in the new random number row.
- Enter “jokeText” into the name field.
- Enter “What did one computer say to the other? 11001001010101” into the value field.
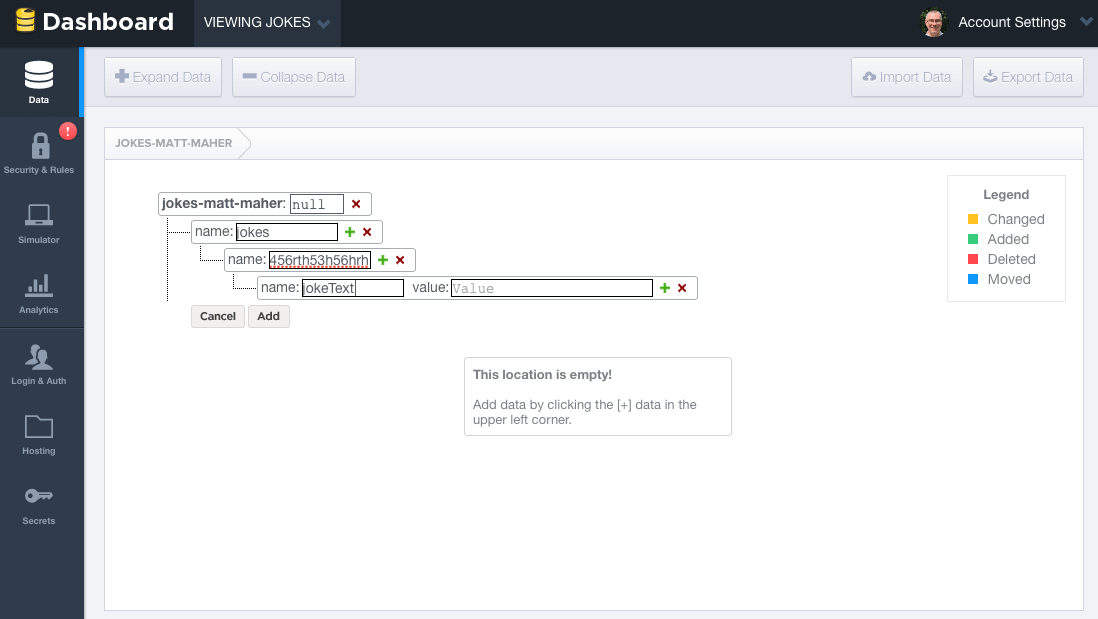
This is an example of how a joke will look. We’ll be adding a bit more to “jokes”, and we also need “users”, but it will look a lot like this. It’s fun and a good practice to peek back at Forge from time to time to look at the data created by an app.
One point I would like to point out is that all Firebase database data is stored as JSON objects. Unlike Parse, there are no tables or records. When we add data to Firebase’s database, it actually becomes a key in the existing JSON structure. For example, the data you just created looks as follows:
{
  "jokes" : {
    "e32e223r44" : {
      "jokeText" : "What did one computer say to the other? 11001001010101"
    }
  }
}
Now that you have some basic understanding of Firebase database data, let’s move on.
But before we move on to user authentication, let’s delete the data that we created, as we’ll be doing it all programmatically from within the app.
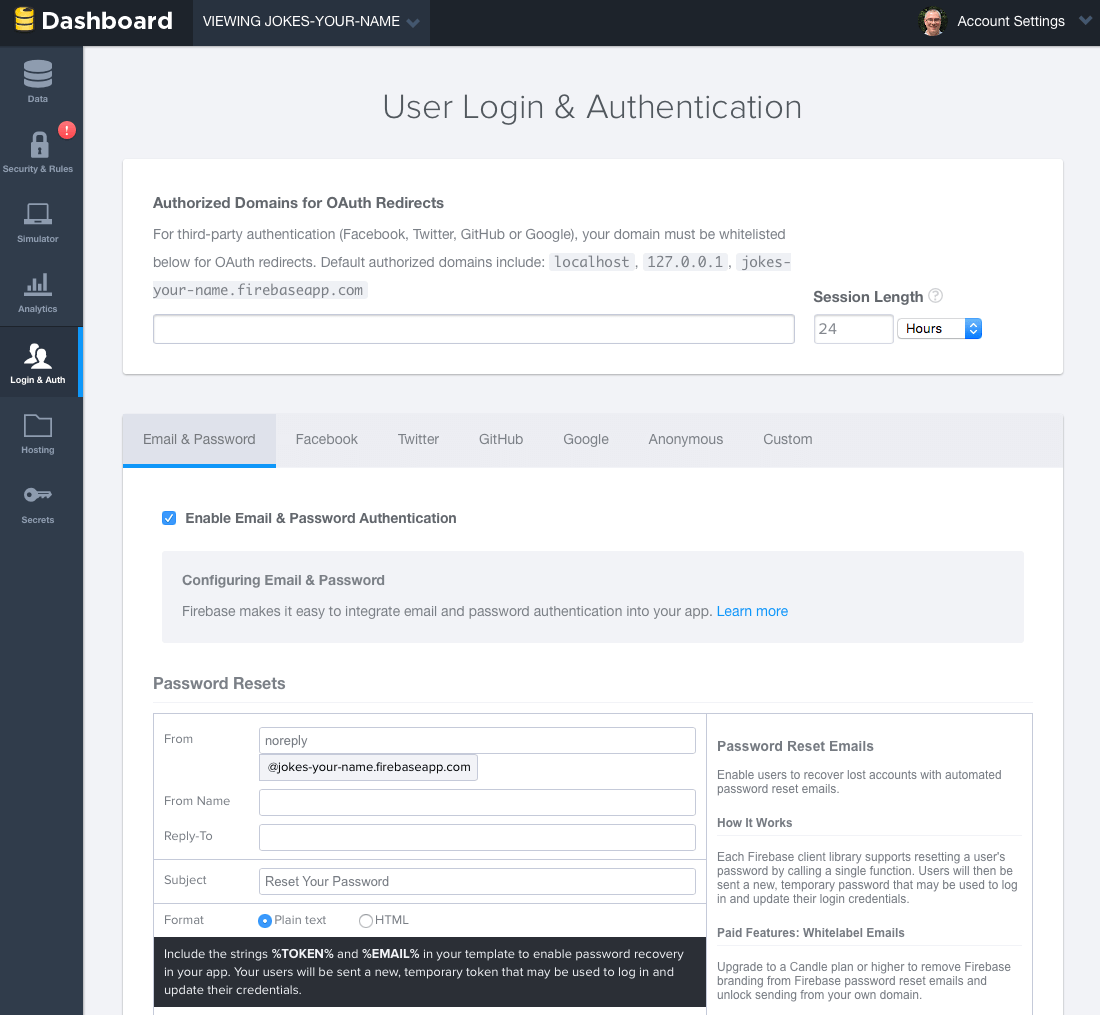
For FirebaseJokes, we will be using Email and Password authentication. To enable this feature, click Login & Auth in the left-side panel in Forge. In Email & Password, click the box to Enable Email & Password Authentication. This is also a good opportunity to browse. Just below the box that we clicked is information on password recovery. Also, it is worth looking through the other authentication options.
Installing Firebase SDK and Configuring the Base URL
To get the base url for our Firebase app, navigate back to Forge. The url for our Forge screen is the url for our app, so let’s copy it and paste is into BASE_URL in Constants.swift in Xcode.
import Foundation

let BASE_URL = "https://jokes-matt-maher.firebaseio.com"
Now, it’s finally time to install Firebase SDK into our app. Before we do that, however, we need CocoaPods. If you haven’t installed CocoaPods, excellent instructions for installing CocoaPods can be found directly from CocoaPods.
Once CocoaPods is up and running, open Terminal. Run the following commands to initialize Cocoapods in your Xcode project:
cdpod init
And then type the following command to open the Podfile in Xcode:
open -a Xcode Podfile
Next, edit the file like this:
platform :ios, '8.0'
use_frameworks!

pod 'Firebase', '>= 2.5.0'
Then, run the following command to download the Firebase SDK:
pod install
Now it’s time for Xcode. Make sure you open the FirebaseJokes.xcworkspace file to start coding.
Using Firebase SDK
First, we’ll be doing a little bit of setup in our DataService.swift file to make things a little easier. Primarily, we need some good references!
import Foundation
import Firebase

class DataService {
    static let dataService = DataService()

    private var _BASE_REF = Firebase(url: "\(BASE_URL)")
    private var _USER_REF = Firebase(url: "\(BASE_URL)/users")
    private var _JOKE_REF = Firebase(url: "\(BASE_URL)/jokes")

    var BASE_REF: Firebase {
        return _BASE_REF
    }

    var USER_REF: Firebase {
        return _USER_REF
    }

    var CURRENT_USER_REF: Firebase {
        let userID = NSUserDefaults.standardUserDefaults().valueForKey("uid") as! String

        let currentUser = Firebase(url: "\(BASE_REF)").childByAppendingPath("users").childByAppendingPath(userID)

        return currentUser!
    }

    var JOKE_REF: Firebase {
        return _JOKE_REF
    }
}
To use Firebase, all you need to do is import the Firebase framework. This DataService class is a service class that interacts with Firebase. To read and write data, we need to create a Firebase database reference with the Firebase URL. The base URL is the URL of our Joke database. Later we’ll save our users and jokes as child nodes. To access the child nodes, you can just append the node name (e.g. users) to the base URL. For easy access, we also create references to the child nodes.
Create a New User Account
CreateAccountViewController.swift is where we will start. As with all files that use Firebase, we’ll need to import it at the top.
import UIKit
import Firebase

class CreateAccountViewController: UIViewController {
In createAccount(), we will collect the text from the fields and attempt to use them to create a new user. This occurs with Firebase’s createUser() method. Update the method like this:
@IBAction func createAccount(sender: AnyObject) {
    let username = usernameField.text
    let email = emailField.text
    let password = passwordField.text

    if username != "" && email != "" && password != "" {

        // Set Email and Password for the New User.

        DataService.dataService.BASE_REF.createUser(email, password: password, withValueCompletionBlock: { error, result in

            if error != nil {

                // There was a problem.
                self.signupErrorAlert("Oops!", message: "Having some trouble creating your account. Try again.")

            } else {

                // Create and Login the New User with authUser
                DataService.dataService.BASE_REF.authUser(email, password: password, withCompletionBlock: {
                    err, authData in

                    let user = ["provider": authData.provider!, "email": email!, "username": username!]

                    // Seal the deal in DataService.swift.
                    DataService.dataService.createNewAccount(authData.uid, user: user)
                })

                // Store the uid for future access - handy!
                NSUserDefaults.standardUserDefaults().setValue(result ["uid"], forKey: "uid")

                // Enter the app.
                self.performSegueWithIdentifier("NewUserLoggedIn", sender: nil)
            }
        })

    } else {
        signupErrorAlert("Oops!", message: "Don't forget to enter your email, password, and a username.")
    }

}
Assuming that there are no issues with the information entered by the prospective new user, the user will be created and logged into the app. For any missing information, we’ll display an alert. Therefore, insert the following method in the class:
func signupErrorAlert(title: String, message: String) {

        // Called upon signup error to let the user know signup didn't work.

        let alert = UIAlertController(title: title, message: message, preferredStyle: UIAlertControllerStyle.Alert)
        let action = UIAlertAction(title: "Ok", style: .Default, handler: nil)
        alert.addAction(action)
        presentViewController(alert, animated: true, completion: nil)
    }
The actual saving occurs in createNewAccount() in DataService.swift.
func createNewAccount(uid: String, user: Dictionary) {

        // A User is born.

        USER_REF.childByAppendingPath(uid).setValue(user)
    }
To save data to the Firebase database, you can just call the setValue method. In the above code, it’ll save the user object to the users database reference under the given uid child node (e.g. /users/1283834/).
Other than saving the user to the Firebase database, we will be storing the uid for the user in NSUserDefaults. This will allow us to keep track of the current user.
Login a User
Before we dig too deep, let’s import Firebase into LoginViewController.swift. Here, we’ll check to see if someone is logged in already and attempt to log the user in if they are not.
In viewDidAppear(), we check if our stored “uid” is nil and if the user has an account. If the user passes, he or she can skip login. Otherwise, it’s time to punch in some credentials.
override func viewDidAppear(animated: Bool) {
        super.viewDidAppear(animated)

        // If we have the uid stored, the user is already logger in - no need to sign in again!

        if NSUserDefaults.standardUserDefaults().valueForKey("uid") != nil && DataService.dataService.CURRENT_USER_REF.authData != nil {
            self.performSegueWithIdentifier("CurrentlyLoggedIn", sender: nil)
        }
    }
tryLogin() is the action method that is invoked when the user taps the Login button. Update the method like below and insert the helper method loginErrorAlert:
@IBAction func tryLogin(sender: AnyObject) {

        let email = emailField.text
        let password = passwordField.text

        if email != "" && password != "" {

            // Login with the Firebase's authUser method

            DataService.dataService.BASE_REF.authUser(email, password: password, withCompletionBlock: { error, authData in

                if error != nil {
                    print(error)
                    self.loginErrorAlert("Oops!", message: "Check your username and password.")
                } else {

                    // Be sure the correct uid is stored.

                    NSUserDefaults.standardUserDefaults().setValue(authData.uid, forKey: "uid")

                    // Enter the app!

                    self.performSegueWithIdentifier("CurrentlyLoggedIn", sender: nil)
                }
            })

        } else {

            // There was a problem

            loginErrorAlert("Oops!", message: "Don't forget to enter your email and password.")
        }
    }

    func loginErrorAlert(title: String, message: String) {

        // Called upon login error to let the user know login didn't work.

        let alert = UIAlertController(title: title, message: message, preferredStyle: UIAlertControllerStyle.Alert)
        let action = UIAlertAction(title: "Ok", style: .Default, handler: nil)
        alert.addAction(action)
        presentViewController(alert, animated: true, completion: nil)
    }
Firebase has built-in support for user authentication with email address and password. The tryLogin() method uses Firebase’s authUser() method to see if the email and password match a user account. If so, we save the “uid” and navigate into the app. If not, we alert them to try something else.
Now that the app is ready for user registration and sign on, it’s time to dive into the jokes.
The Joke Model
What is a joke? This philosophical question might be best answered later, or turned into a joke on FirebaseJokes. For us, we’ll be mapping out our Joke model.
Let’s navigate to Joke.swift and import Firebase. In our database, a joke will be represented by an odd-looking ID number. This auto-generated number will contain all of the joke’s properties, which are as follows.
- jokeText
- jokeVotes
- username (the joke’s author)
We initialize a new joke in init(), where the joke’s id, or key, and the jokes data, in dictionary format, will be passed.
class Joke {
    private var _jokeRef: Firebase!

    private var _jokeKey: String!
    private var _jokeText: String!
    private var _jokeVotes: Int!
    private var _username: String!

    var jokeKey: String {
        return _jokeKey
    }

    var jokeText: String {
        return _jokeText
    }

    var jokeVotes: Int {
        return _jokeVotes
    }

    var username: String {
        return _username
    }

    // Initialize the new Joke

    init(key: String, dictionary: Dictionary) {
        self._jokeKey = key

        // Within the Joke, or Key, the following properties are children

        if let votes = dictionary["votes"] as? Int {
            self._jokeVotes = votes
        }

        if let joke = dictionary["jokeText"] as? String {
            self._jokeText = joke
        }

        if let user = dictionary["author"] as? String {
            self._username = user
        } else {
            self._username = ""
        }

        // The above properties are assigned to their key.

        self._jokeRef = DataService.dataService.JOKE_REF.childByAppendingPath(self._jokeKey)
    }
}
Adding New Jokes
In AddJokeViewController.swift, now would be a good time to import Firebase. Here, the user will enter a joke, and we will send it to where it needs to go to display, instantly, on all devices.
Starting in viewDidLoad(), we will get the current user’s username, so we can credit her or him as the author of the well-crafted new joke.
override func viewDidLoad() {
        super.viewDidLoad()

        // Get username of the current user, and set it to currentUsername, so we can add it to the Joke.

        DataService.dataService.CURRENT_USER_REF.observeEventType(FEventType.Value, withBlock: { snapshot in

            let currentUser = snapshot.value.objectForKey("username") as! String

            print("Username: \(currentUser)")
            self.currentUsername = currentUser
            }, withCancelBlock: { error in
                print(error.description)
        })
    }
When saveJoke() is called, the newJoke dictionary is created using the text from the jokeField, 0 for the current number of votes, and the current user’s username as the author. These values are assigned to their respective ids and sent over to createNewJoke() in DataService for saving.
Declare the following variable in the AddJokeViewController class:
var currentUsername = ""
And update the saveJoke method like this:
@IBAction func saveJoke(sender: AnyObject) {

        let jokeText = jokeField.text

        if jokeText != "" {

            // Build the new Joke.
            // AnyObject is needed because of the votes of type Int.

            let newJoke: Dictionary = [
                "jokeText": jokeText!,
                "votes": 0,
                "author": currentUsername
            ]

            // Send it over to DataService to seal the deal.

            DataService.dataService.createNewJoke(newJoke)

            if let navController = self.navigationController {
                navController.popViewControllerAnimated(true)
            }
        }
    }
We use a dictionary object to temporarily hold the joke data. The actual saving of the joke is passed to the createNewJoke method of DataService. In DataService.swift, add the createNewJoke method:
func createNewJoke(joke: Dictionary) {

        // Save the Joke
        // JOKE_REF is the parent of the new Joke: "jokes".
        // childByAutoId() saves the joke and gives it its own ID.

        let firebaseNewJoke = JOKE_REF.childByAutoId()

        // setValue() saves to Firebase.

        firebaseNewJoke.setValue(joke)
    }
Again, you can save the joke with the Firebase method, setValue(). But note that we use the Joke database reference and call the childByAutoId method. When childByAutoId is invoked, Firebase generates a timestamp-based, unique ID for each joke. This ensures that each joke is associated with an unique ID.
Logout the Current User
Normally, this would be placed in Settings or a Profile area, but we’ll go ahead and enable the user to logout in AddJokeViewController.swift. Actually, maybe this ought to be a joke.
logout() uses Firebase’s unauth() method to logout a user. In addition to logging out, though, we need to remove the user’s “uid” from our storage and send them back to LoginViewController.
Update the logout method like this:
@IBAction func logout(sender: AnyObject) {

        // unauth() is the logout method for the current user.

        DataService.dataService.CURRENT_USER_REF.unauth()

        // Remove the user's uid from storage.

        NSUserDefaults.standardUserDefaults().setValue(nil, forKey: "uid")

        // Head back to Login!

        let loginViewController = self.storyboard!.instantiateViewControllerWithIdentifier("Login")
        UIApplication.sharedApplication().keyWindow?.rootViewController = loginViewController
    }
Forgetting to remove the user’s “uid” will cause issues when a new user tried to log into the app, and that is a good thing to avoid.
Displaying All of the Jokes
Finally it comes to the retrieval of data from Firebase. We’ll be listing all of the jokes in a UITableView located in JokesFeedTableViewController.swift. Here, we will import Firebase, to no surprise.
Beginning is viewDidLoad(), we set our observeEventType() method. Firebase data is retrieved by attaching an asynchronous listener to a database reference. This awesome method is not only called in viewDidLoad() upon navigation to JokesFeedTableViewController.swift, it is called whenever there is a change in the jokes side of our database.
    var jokes = [Joke]()

    override func viewDidLoad() {
        super.viewDidLoad()

        // observeEventType is called whenever anything changes in the Firebase - new Jokes or Votes.
        // It's also called here in viewDidLoad().
        // It's always listening.

        DataService.dataService.JOKE_REF.observeEventType(.Value, withBlock: { snapshot in

            // The snapshot is a current look at our jokes data.

            print(snapshot.value)

            self.jokes = []

            if let snapshots = snapshot.children.allObjects as? [FDataSnapshot] {

                for snap in snapshots {

                    // Make our jokes array for the tableView.

                    if let postDictionary = snap.value as? Dictionary {
                        let key = snap.key
                        let joke = Joke(key: key, dictionary: postDictionary)

                        // Items are returned chronologically, but it's more fun with the newest jokes first.

                        self.jokes.insert(joke, atIndex: 0)
                    }
                }

            }

            // Be sure that the tableView updates when there is new data.

            self.tableView.reloadData()
        })
    }
A snapshot is provided by the method. Using this snapshot, we can build the array of jokes that we’ll be using to populate our tableView. For Firebase Jokes, we will be listing the newest jokes at the top. Since Firebase will return the jokes chronologically, by their creation time, we can just build the array backward.
As nice as it is to have a constantly up-to-date array of jokes, we should remember to reload the data in the tableView so everyone can see it.
The rest of our work is done between tableView:cellForRowAtIndexPath: and our custom cell, JokeCellTableViewCell.swift. In tableView:cellForRowAtIndexPath:, we send an individual joke to configureCell() in JokeCellTableViewCell.swift.
override func numberOfSectionsInTableView(tableView: UITableView) -> Int {

        return 1
    }

    override func tableView(tableView: UITableView, numberOfRowsInSection section: Int) -> Int {

        return jokes.count
    }


    override func tableView(tableView: UITableView, cellForRowAtIndexPath indexPath: NSIndexPath) -> UITableViewCell {

        let joke = jokes[indexPath.row]

        // We are using a custom cell.

        if let cell = tableView.dequeueReusableCellWithIdentifier("JokeCellTableViewCell") as? JokeCellTableViewCell {

            // Send the single joke to configureCell() in JokeCellTableViewCell.

            cell.configureCell(joke)

            return cell

        } else {

            return JokeCellTableViewCell()

        }
    }
configureCell(), in JokeCellTableViewCell.swift, is where we set the labels and listen for a vote tap.
func configureCell(joke: Joke) {
        self.joke = joke

        // Set the labels and textView.

        self.jokeText.text = joke.jokeText
        self.totalVotesLabel.text = "Total Votes: \(joke.jokeVotes)"
        self.usernameLabel.text = joke.username

        // Set "votes" as a child of the current user in Firebase and save the joke's key in votes as a boolean.

        voteRef = DataService.dataService.CURRENT_USER_REF.childByAppendingPath("votes").childByAppendingPath(joke.jokeKey)

        // observeSingleEventOfType() listens for the thumb to be tapped, by any user, on any device.

        voteRef.observeSingleEventOfType(.Value, withBlock: { snapshot in

            // Set the thumb image.

            if let thumbsUpDown = snapshot.value as? NSNull {

                // Current user hasn't voted for the joke... yet.

                print(thumbsUpDown)
                self.thumbVoteImage.image = UIImage(named: "thumb-down")
            } else {

                // Current user voted for the joke!

                self.thumbVoteImage.image = UIImage(named: "thumb-up")
            }
        })
    }
The UITapGestureRecognizer is set, programmatically, in awakeFromNib(). Also, we’ll be needing a Joke and Firebase reference.
var joke: Joke!
var voteRef: Firebase!

override func awakeFromNib() {
    super.awakeFromNib()

    // UITapGestureRecognizer is set programatically.

    let tap = UITapGestureRecognizer(target: self, action: "voteTapped:")
    tap.numberOfTapsRequired = 1
    thumbVoteImage.addGestureRecognizer(tap)
    thumbVoteImage.userInteractionEnabled = true
}
In voteTapped(), another listener waits for the tap. In this method, the vote is saved to the current user’s “votes” with a key matching the key id of the joke, and a value of true. This is sent via the voteRef path created in configureCell().
func voteTapped(sender: UITapGestureRecognizer) {

        // observeSingleEventOfType listens for a tap by the current user.

        voteRef.observeSingleEventOfType(.Value, withBlock: { snapshot in

            if let thumbsUpDown = snapshot.value as? NSNull {
                print(thumbsUpDown)
                self.thumbVoteImage.image = UIImage(named: "thumb-down")

                // addSubtractVote(), in Joke.swift, handles the vote.

                self.joke.addSubtractVote(true)

                // setValue saves the vote as true for the current user.
                // voteRef is a reference to the user's "votes" path.

                self.voteRef.setValue(true)
            } else {
                self.thumbVoteImage.image = UIImage(named: "thumb-up")
                self.joke.addSubtractVote(false)
                self.voteRef.removeValue()
            }

        })
    }
voteTapped() also relays the tap as a boolean value to addSubtractVote() in Joke.swift. A true value means that the user has voted for the joke; whereas, false means that the user has not yet voted for it.
// Add or Subtract a Vote from the Joke.

    func addSubtractVote(addVote: Bool) {

        if addVote {
            _jokeVotes = _jokeVotes + 1
        } else {
            _jokeVotes = _jokeVotes - 1
        }

        // Save the new vote total.

        _jokeRef.childByAppendingPath("votes").setValue(_jokeVotes)

    }
addSubtractVote(), in Joke.swift, uses the boolean value to add or subtract the vote from the joke. Then, Firebase’s setValue() method is used to update the vote in the Joke side of the database.
Test the App
Now you’re ready to test the app. Create a new user, and add a few jokes. You should be able to vote the jokes. And if you go up to the Firebase dashboard, you should see the users and jokes that have been created.
In Conclusion
We did it! This is a rather entertaining little app that users will love for its responsiveness. We’ve also gained valuable experience with Firebase.
Feel free to checkout the finished FirebaseJokes project on GitHub.
There are a world of possibilities with Firebase as an iOS developer. Working through FirebaseJokes will serve as a good start, but it is just the beginning.
Checkout some other user authentication options, add features to FirebaseJokes, explore some chat functionality; literally, the possibilities are endless.
A bit of advice regarding images: Firebase does have relatively modest storage allowances, so images should be stored elsewhere. Storage won’t be an issue with text-based apps like ours, but it would be a good idea to use another service for larger files.
Here’s to having a great time incorporating Firebase into your future projects!


