Like most developers, you’re probably looking for ways to make extra money from your app. The most straightforward way is to put your app in the App Store and sell it for $0.99 or more. This paid model works really well for some apps. But this is not the only monetization model. In this chapter, we’ll discuss how to monetize your app using Google AdMob.
Hey, why Google AdMob? We’re developing iOS apps. Why don’t we use Apple’s iAd?
Earlier this year, Apple announced it would discontinue its iAd App Network on June 30, 2016. Therefore, you can no longer use iAd as your advertising solution for iOS apps. You have to look for other alternatives for placing banner ads.
Among all the mobile ad networks, it is undeniable that Google’s AdMob is the most popular one. Similar to iAd, Google provides SDK for developers to embed ads in their iOS app. Google sells the advertising space (e.g. banner) within your app to a bunch of advertisers. You earn ad revenue when a user views or clicks your ads.
To use AdMob in your apps, you will need to use the Google Mobile Ads SDK. The integration is not difficult. To display a simple ad banner, it just takes a few lines of code and you’re ready to start making a profit from your app.
There is no better way to learn the AdMob integration than by trying it out. As usual, we’ll work on a sample project and then add a banner ad. You can download the Xcode project template from here.
Apply a Google AdMob Account
Before you can integrate your apps with Google AdMob, you’ll need to first enroll into the AdMob service. Now open the link below using Safari or your favorite browser:
As AdMob is now part of Google, you can simply sign in with your Google account or register a new one. AdMob requires you to have a valid AdSense account and AdWords account. If you don’t have one or both of these accounts, follow the sign-up process and connect them to your Google Account.
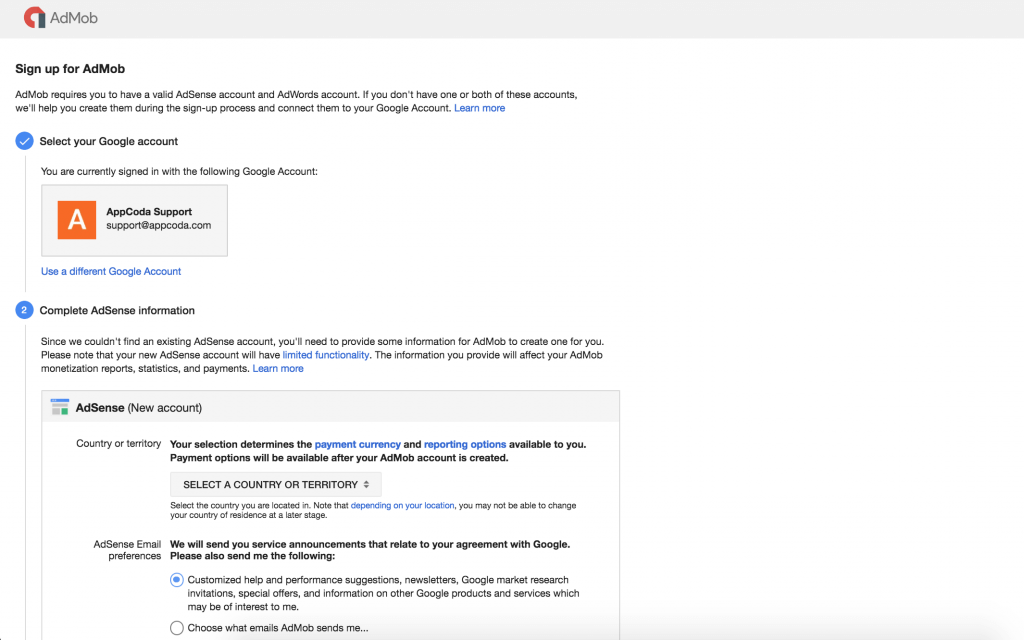
Once you finish the registration, you will be brought to the AdMob dashboard. Here you can click the Monetize New App button to create a new app in your AdMob account.

In the next screen, choose the Add Your App Manually option. We will register the app by filling in the form manually. In future, if you already have an app on the App Store, you can use the search option to retrieve your app.
Set the app name to GoogleAdMobDemo and choose iOS for the platform option. Click Add App to proceed to the next step. AdMob will then generate an App ID for the app and ask you to choose the supported ad format.
For this demo, we use the banner ad format. So select Banner and accept the default options. For the Ad unit name, set it to AdBanner.
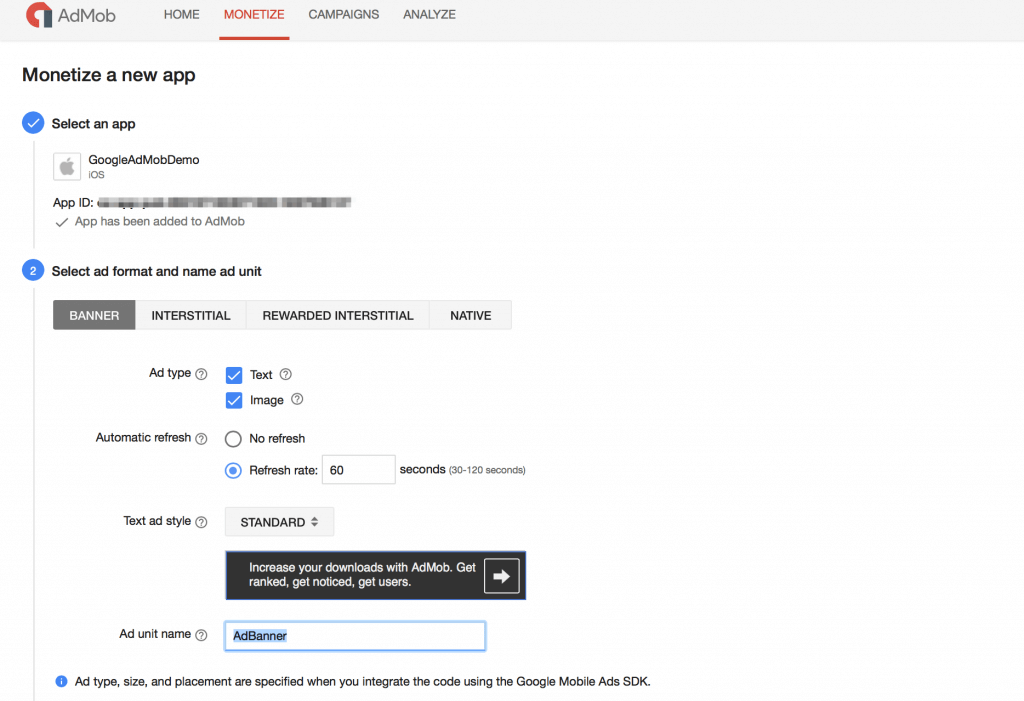
Click Save to generate the ad unit ID. In the next step, you can just click Skip to skip the configuration of Firebase Analytics.
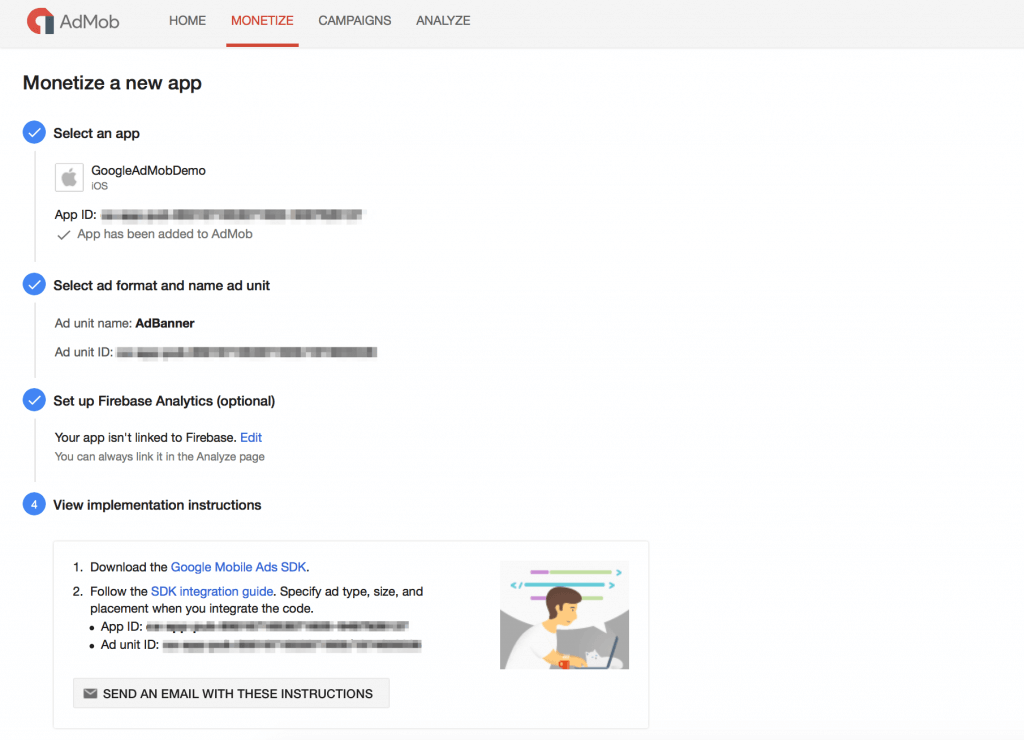
This completes the configuration of your new app. You will find the App ID and Ad unit ID in the implementation instructions. Please save these information. We will need them in the later section when we integrate AdMob with our Xcode project.
Using Google Mobile Ads Framework
Now that you have completed the configuration in AdMob, let’s move to the actual implementation. Fire up Xcode and open GoogleAdDemo.xcworkspace of the starter project. Please note that it is GoogleAdDemo.xcworkspace instead of GoogleAdDemo.xcodeproj I suggest you compile and run the project template so that you have a basic idea of the demo app; it’s a simple table-based app that displays a list of articles. We will tweak it to show an advertisement to earn some extra revenue.
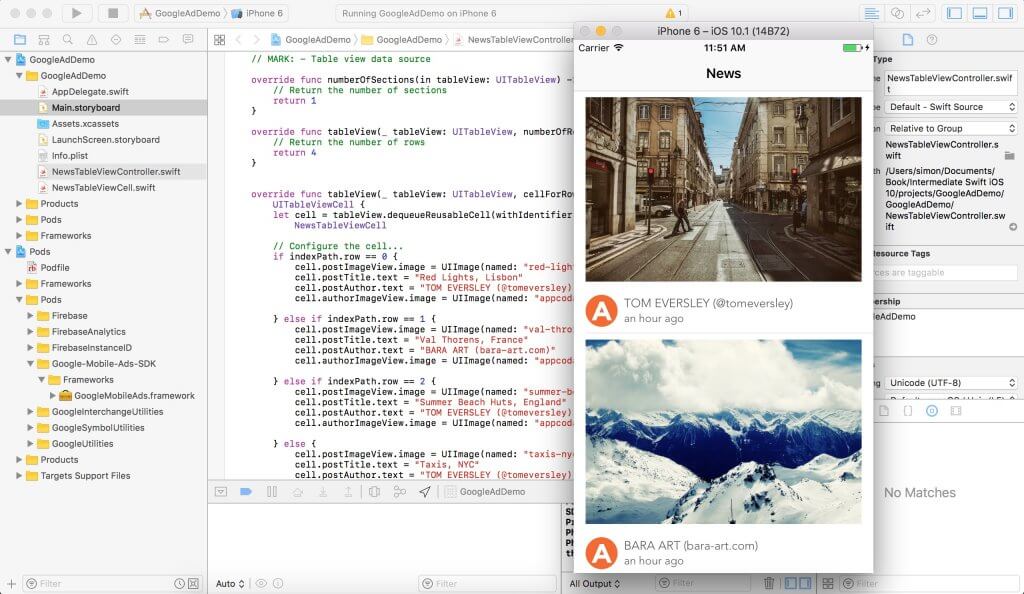
To integrate Google AdMob into your app, the first thing you need to do is install the Google Mobile Ads framework into the Xcode project. For the starter project, I have already added the framework using CocoaPods. If you have no idea about CocoaPods, you may refer to our CocoaPods tutorial or follow Google’s start guide to install Google AdMob in your Xcode project.
In the starter project, if you look closely at the project navigator, you will find two projects: GoogleAdDemo and Pods. The former is the original project, while the Pods is the project that bundles the Google Mobile Ads SDK. For details about how to install CocoaPods and use it to install the SDK, I recommend you to check out chapter 33. We will discuss CocoaPods in details.
To use the Google Mobile Ads SDK in your code, you will have to import the framework and register your App ID. We will do the initialization in the AppDelegate.swift file. Insert the import statement at the beginning of the file:
import GoogleMobileAds
Next, insert the following line of code in the application(_:didFinishLaunchingWithOptions:) method:
func application(_ application: UIApplication, didFinishLaunchingWithOptions launchOptions: [UIApplicationLaunchOptionsKey: Any]?) -> Bool {

    // Override point for customization after application launch.

    GADMobileAds.configure(withApplicationID: "ca-app-pub-8501671653071605~9497926137")

    return true
}
Please make sure you replace the App ID with yours. Initializing the Google Mobile Ads SDK at app launch allows the SDK to perform configuration tasks as early as possible.
Displaying Banner Ads in Table View Header
Let’s start with the simplest way to display a banner ad in your app. We will request an ad banner from Google and display the ad in the table header.
To display a banner ad at that position, all you need to do is create a GADBannerView object, set its delegate, and root view controller. Then you call its load method with an ad request to retrieve a banner ad. When the ad is ready to display, it will call adViewDidReceiveAd(bannerView:) method of the GADBannerViewDelegate protocol. So you just need to implement the method to show the banner ad in the table view header.
Okay, let’s now go into the implementation.
Now open NewsTableViewController.swift. First, import the GoogleMobileAds framework and adopt the GADBannerViewDelegate protocol:
import GoogleMobileAds

class NewsTableViewController: UITableViewController, GADBannerViewDelegate {
Next, declare a variable of the type GADBannerView. This is the variable for holding the banner view:
lazy var adBannerView: GADBannerView = {
    let adBannerView = GADBannerView(adSize: kGADAdSizeSmartBannerPortrait)
    adBannerView.adUnitID = "ca-app-pub-8501671653071605/1974659335"
    adBannerView.delegate = self
    adBannerView.rootViewController = self

    return adBannerView
}()
In the above code, we use a closure to initialize the adBannerView variable, which is an instance of GADBannerView. During the initialization, we tell the SDK that we want to retrieve a smart banner (kGADAdSizeSmartBannerPortrait). Smart banners, as the name suggests, are ad units that are clever enough to detect the screen width and adjust its size accordingly. We also set the ad unit ID, delegate and root view controller. Again, please replace the ad unit ID with yours.
We use lazy initialization (sometimes it is called lazy instantiation or loading) to initialize the adBannerView variable. In Swift, you use the lazy keyword to indicate that the variable can be initialized later. More specificially, the variable will only be instantiated when it is used. This technique for delaying an object creation is especially useful when it takes a considerable time to load an object or the object you’re referring to is not ready at the time of object creation. During initialization, we set the delegate and rootViewController properties to self. However, the NewsTableViewController is not ready at the time. We use lazy to defer the initialization of adBannerView.
Is it a must to use lazy initialization for creating a banner view? No, I want to take this chance to introduce you lazy initialization, and demonstrate how to use a closure for variable initialization. You can do the same without using lazy initialization like this:
var adBannerView: GADBannerView?

override func viewDidLoad() {
    super.viewDidLoad()

    adBannerView = GADBannerView(adSize: kGADAdSizeSmartBannerPortrait)
    adBannerView?.adUnitID = "ca-app-pub-8501671653071605/1974659335"
    adBannerView?.delegate = self
    adBannerView?.rootViewController = self
}
However, as you can see, the former way of initialization allows us group all the initialization code in the closure. The code is more readable and manageable.
Now that we have created the adBannerView variable, the next thing is to request the ad. To do that, all you need to do is add the following line of code in the viewDidLoad method:
adBannerView.load(GADRequest())
Lastly, we adopt the two option methods of the GADBannerViewDelegate protocol like this:
func adViewDidReceiveAd(_ bannerView: GADBannerView!) {
    print("Banner loaded successfully")
    tableView.tableHeaderView?.frame = bannerView.frame
    tableView.tableHeaderView = bannerView

}

func adView(_ bannerView: GADBannerView!, didFailToReceiveAdWithError error: GADRequestError!) {
    print("Fail to receive ads")
    print(error)
}
When the ad is successfully loaded, the adViewDidReceiveAd method is called. In the method, we simply assign the banner view to the table’s header view. This allows the app to show the banner ad in the table header. If the ad is failed to load, we just print the error message to console.
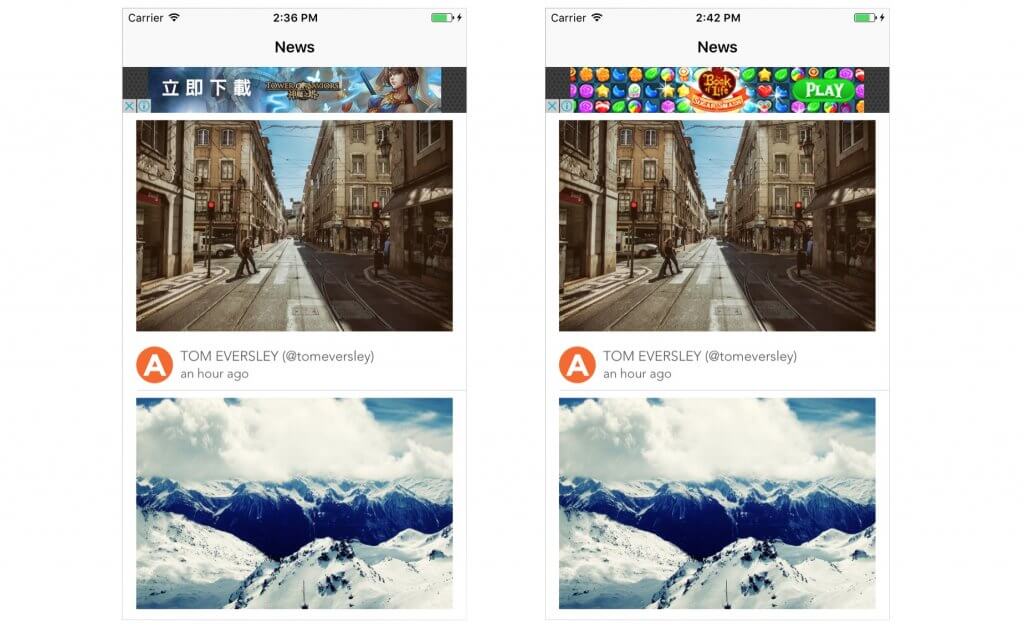
Try to run the demo app and play around with it. When the app is launched, you will see a banner ad at the very beginner of the table view.
Adding a Subtle Animation
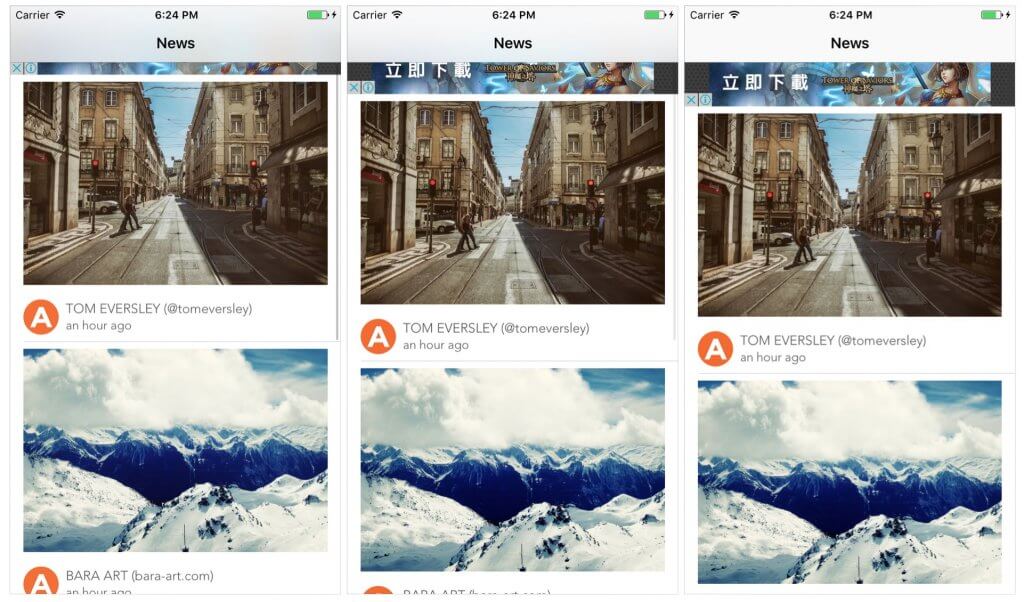
Sometimes adding a subtle animation to banner ads can give a better user experience about how the ad transitions onto the screen. In this section, I will show you how to animate the banner ad. We will add a slide-down animation when the ad transitions onto the screen.
The trick is to apply UIView animations to the ad banner. When the ad is first loaded, we reposition the ad banner off the screen. Then we bring it back using a slide down animation.
As mentioned before, the adViewDidReceiveAd method is called when an ad is ready. To animate the ad banner, all we need to do is modify the method like this:
func adViewDidReceiveAd(_ bannerView: GADBannerView!) {
    print("Banner loaded successfully")

    // Reposition the banner ad to create a slide down effect
    let translateTransform = CGAffineTransform(translationX: 0, y: -bannerView.bounds.size.height)
    bannerView.transform = translateTransform

    UIView.animate(withDuration: 0.5) {
        self.tableView.tableHeaderView?.frame = bannerView.frame
        bannerView.transform = CGAffineTransform.identity
        self.tableView.tableHeaderView = bannerView
    }
}
We first create a translateTransform to move the banner view off the screen. We then call UIView.animate to slide the banner down onto the screen.
Run the project again to test the app. The ad will be displayed with an animated effect.
Displaying a Sticky Banner Ad
As you scroll through the table view, the ad banner disappears. It doesn’t stick to the table header. You may wonder how you can display a sticky banner ad. That’s what we’re going to explore in this section.
The banner ad is now inserted into the table header view. If you want to make it sticky, you can add it to the section’s header view instead of the table’s header view.
Let’s see how to implement it.
Insert the following methods in the NewsTableViewController class:
override func tableView(_ tableView: UITableView, viewForHeaderInSection section: Int) -> UIView? {
    return adBannerView
}

override func tableView(_ tableView: UITableView, heightForHeaderInSection section: Int) -> CGFloat {

    return adBannerView.frame.height
}
We override the default tableView(_:viewForHeaderInSection:) method with our own method to return the ad banner view.
The default height of the header is too small for the ad banner. So we also override the tableView(_:heightForHeaderInSection:) method and return the height of the banner view frame.
Lastly, modify the adViewDidReceiveAd method like this:
func adViewDidReceiveAd(_ bannerView: GADBannerView!) {
    print("Banner loaded successfully")

    // Reposition the banner ad to create a slide down effect
    let translateTransform = CGAffineTransform(translationX: 0, y: -bannerView.bounds.size.height)
    bannerView.transform = translateTransform

    UIView.animate(withDuration: 0.5) {
        bannerView.transform = CGAffineTransform.identity
    }
}
We just remove those lines of code that are related to table view header, which are no longer necessary.
That’s it. It is now ready to test the app again. The ad banner displays at the fixed position.

Working with Interstitial Ads
Not only can you include banner ads in your apps, but the Google Mobile Ads SDK also lets you easily display interstitial ads (i.e. full screen ads). Typically you can earn more ad revenue through interstitial ads as it completely block out the app’s content and catches users’ attention.
The downside of this kind of mobile ad is sometimes irritating as it forces users to view the ad until they click out. But it really depends how frequentl and at what point you display the full screen ad. I have used some apps that keep displaying interstitial ads every couple of minutes. A well-thought ad placement can make your app less irritating. For example, you only display an ad once or between game levels if you’re developing a game. Anyway, my focus here is to show you how to display an interstial ad in iOS apps. My plan is to display the ad right after a user launches the demo app.
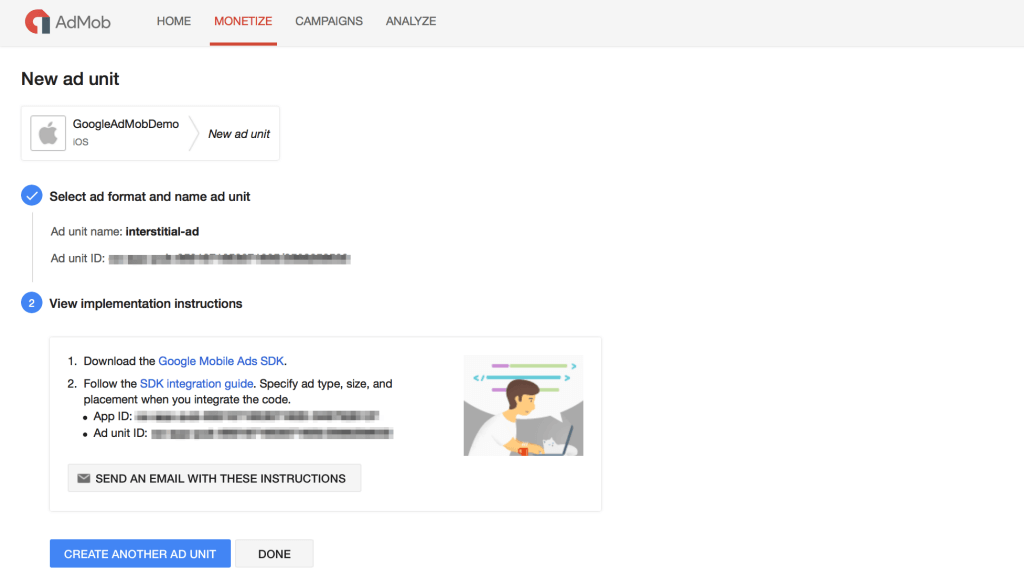
To do that, you have to first go back to AdMob’s dashboard (https://apps.admob.com) to create an interstial ad for the demo app. Select Manage your apps and click 1 active link next to GoogleAdMobDemo. In the next screen, click New Ad Unit to create a new ad unit.

This time, we create an interstitial ad. Give the ad unit a name and then click Save to create the unit. AdMob should generate another ad unit ID for you.
Now go back to the Xcode project.
The code for implementing an interstitial ad is very similar to that of a banner ad. Instead of using the GADBannerView class, you use the GADInterstitial class. So first declare a variable for storing the GADInterstitial object:
var interstitial: GADInterstitial?
However, one main difference between GADBannerView and GADInterstitial is that GADInterstitial is a one time use object. That means the interstitial can’t be used to load another ad once it is shown.
Due to this reason, we create a helper method called createAndLoadInterstitial() to create the ad. Insert the method in the NewsTableViewController class:
private func createAndLoadInterstitial() -> GADInterstitial? {
    interstitial = GADInterstitial(adUnitID: "ca-app-pub-8501671653071605/2568258533")

    guard let interstitial = interstitial else {
        return nil
    }

    let request = GADRequest()
    // Remove the following line before you upload the app
    request.testDevices = [ kGADSimulatorID ]
    interstitial.load(request)
    interstitial.delegate = self

    return interstitial
}
We first initialize a GADInterstitial object with the ad unit ID (remember to replace it with yours). Then we create a GADRequest, call the load method and set the delegate to self. That’s pretty much the same as what we have done for the banner ad. You may notice that we also set the testDevices property of the ad request. Without setting its value, you will not be able to load interstitial ads on test devices. Here kGADSimulatorID indicates that our test device is the built-in simulator.
We will creat the ad when the view is loaded. So insert the following line of code in the viewDidLoad() method:
interstitial = createAndLoadInterstitial()
Similar to GADBannerView, we need to adopt a protocol in order to check the status of an ad. Update the class definition to the following so as to adopt the GADInterstitialDelegate protocol:
class NewsTableViewController: UITableViewController, GADBannerViewDelegate, GADInterstitialDelegate
Now implement the optional method of the protocol like below:
func interstitialDidReceiveAd(_ ad: GADInterstitial!) {
    print("Interstitial loaded successfully")
    ad.present(fromRootViewController: self)
}

func interstitialDidFail(toPresentScreen ad: GADInterstitial!) {
    print("Fail to receive interstitial")
}
When the interstitial is ready, interstitialDidReceiveAd(ad:) will be called. In the method, we call the present method of GADInterstitial to display the ad on screen.
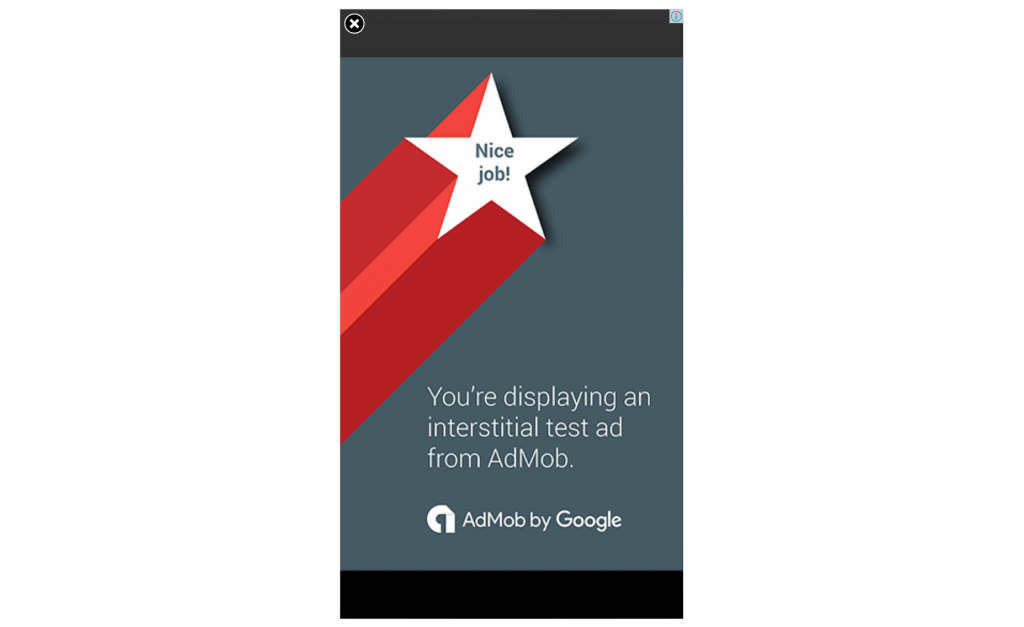
Now you’re ready to test the app. After launching the app, you should see a full-screen test ad.
For the complete project, you can download it from GitHub.


