Working with maps in iOS consists of an entire programming chapter, as there are tons of things that a developer can do with them. From just presenting a location on a map to drawing a journey’s route with intermediate positions, or even exploiting a map’s possibilities in a completely different way, dealing with all these undoubtably is a great experience that leads to amazing results.
Up to iOS 5.1 (including that version as well), iOS was using the Google Mobile Maps service to provide access to maps and all the related services. Since then however, things changed and Apple introduced the Map Kit, a brand new framework completely built in-house, which is used until today. By the time Apple stopped using Google’s map services, Google decided to create its own Maps SDK for all platforms, including iOS, and that way to compete the Map kit or any other map SDKs that other platforms use. Right now, Google consist of a strong player in this field, as many developers use that SDK. So writing for the Google Maps SDK for iOS is something that definitely worths to be done.

At the writing time of this tutorial, the Google Maps SDK for iOS is in the 1.9.2 version. It contains many features, the most of what’s included in the web version of maps, but on the other hand there are missing features as well that are unable to work on a mobile platform. The remarkable point is that in this version, the SDK is quite large in size (MB), and surely that’s something you have to consider if you want to copy the framework’s source files in your project. However, the features it offers are pretty interesting and important so to be rejected without second thought.
In contrary to other tutorials of mine, this time my introduction isn’t going to be long enough. That’s mostly because we have a lot of things to do in the upcoming parts, and it’s totally pointless to start discussing about various features here, since we’re about to see them in details later. All I want to say is to be prepared to meet some really interesting stuff, and if you’ve never worked with Google Maps SDK in the past, you’ll definitely enjoy working with them. In the sections that follow I’ll cover the most common tasks that developers usually perform when dealing with maps. In short, here’s what we are going to see:
- How to present the user’s current location on the map.
- How to spot a custom address.
- How to draw a route.
- How to add intermediate locations (waypoints) to a route.
- And more…
So, without losing any more time, let’s move forward to all the great stuff we are going to meet today!
Demo App Overview
Let me introduce you to the demo app of this tutorial, by telling first of all that we won’t create a new project from the beginning. Instead, you can get a starter project which will be our base, and then we’ll start adding new features to it. So, go ahead and download it, open it in Xcode, and be prepared.
The demo application is actually a single view application, which contains three subviews:
- A toolbar at the top side of the screen, where some bar button items can be found. These bar button items have already been connected to IBAction methods in the starter project, therefore we don’t have to deal with that. We’ll write just code when appropriate.
- A view (UIVIew) covering the most of the available screen area, where the map will appear.
- A label at the bottom where we’ll display the distance and duration of a route.
Now, the bar button items from left to right at the top toolbar are for:
- Specifying a custom address.
- Setting the start and end location of a route.
- Changing the travel mode.
- Changing the map type.
We’ll see about all of them in details as we move to the upcoming parts of the tutorial. For now, all you have to do is to take a quick look at the starter project, so you feel comfortable moving around in it. Right next, you can see a couple of screenshots as a sample of our goal in this tutorial:
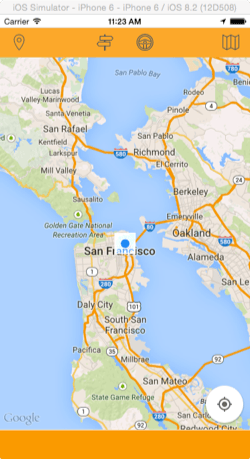
Important Note: If you’re going to download and test the final app, make sure to set your API key to the AppDelegate.swift file. See the next part for more information about that.
Obtaining an API Key
The first thing we need before we make use of the Google Maps SDK is to obtain an API key. In simple words, that means that we need to get from Google a special string which will enable us later to make calls to the Google API right from our app. That API key is fetched from the Google Developers Console, and as this title suggests, it’s a special “place” for developers. Obviously, you can do that if only you have a Google account, so if you still don’t have one, then just go and create it. On the other hand, if you already have a Google account, you’re good to proceed as described next.
In order to get an API key for use in the app, you can disregard the instructions presented here and follow the getting started guide by Google. However, during the writing of this tutorial, the Google Developers Console interface did not match to the guides given to the above link (obviously the interface has been updated but not the guidelines yet), so I’d advise you to go through the following steps to fetch your own API key.
So, let’s get started. Using your Google account, sign in to the Developers Console and then click to the API Project option given at the following screen:

Next, click to expand the APIs & auth menu, and then select the APIs option. By doing so, you’ll find all the available APIs provided by Google, but the one we’re interested in is the Google Maps SDK for iOS. Depending on the browser you’re using, you’ll see the APIs shown either as a list, so you have to scroll until you find the maps API, or as groups, so you just have to click to the proper one. The next two screenshots illustrate both of these options:

By selecting the Google Maps SDK for iOS API, you’ll be navigated to a new page, where all you have to do is to enable the API:
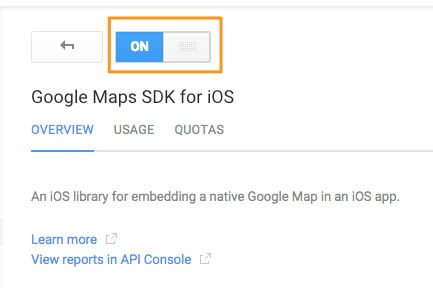
Once you do that, click to the Credentials options, once again under the APIs & auth menu. In the new page, click to the Create new Key button which is located at the bottom-left side:
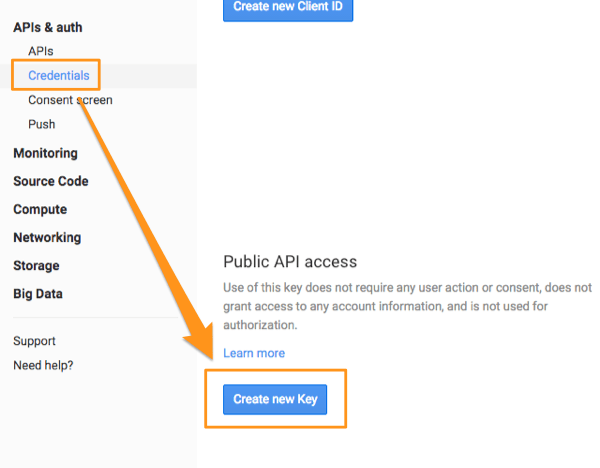
By clicking to that button, a dialog window pops up asking for the type of the key you want to create. Obviously, you have to click to the iOS Key button in order to produce a valid key for our application.
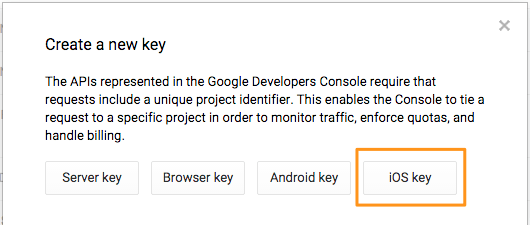
In the next dialog window you have to type or paste the bundle identifier (bundle ID) of the app. The bundle ID of the starter project is the com.appcoda.GMapsDemo value, so just copy it from here and paste it as shown next:

The above step is necessary, so our app is authorized to use the Google Maps API. Note that if you’re planning to use the same API key in more applications, then you first have to add their bundle IDs in this dialog (which of course you can find later as well).
Click to the Create button and the desired API key will be generated. At the bottom-right side of the window that you return to, you’ll see an area similar to this one:
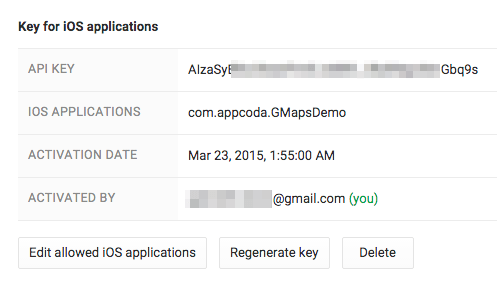
By clicking to the Edit allowed iOS applications you can add or remove app bundle IDs, as shown above. You can also re-generate the key, but that’s not necessary right now. All you have to do here is to select the API key and copy it, so you can paste it a bit later to the project.
Project Configuration
There is a drawback when using SDKs other than those provided by iOS, and that’s because some level of configuration is required to be done to the project, depending always on the SDK that’s about to be used. So, in this part we are going to perform some initial steps necessary for the Google Maps SDK to work, otherwise it will be impossible to use it. Note that some of the steps described next can also be found in the official documentation by Google. Some others however are not described there, and searching around is required to achieve them. Of course, all you need is here, so you don’t have to search anything by yourself.
So, first of all, you need to download the Google Maps SDK (the framework that must be added to the project). You can get it here; click to the Download the SDK button, and then to the version suggested in the page you’ll be landed to (currently 1.9.2). Once you get it, unzip the package and move on.
Continue by opening the starter project in Xcode, if you haven’t done so already. Then drag the GoogleMaps.framework from the Finder to the Project Navigator. When the Xcode asks you, make sure to select the Copy items if needed option, and of course, don’t forget to also check the GMapsDemo target as well:
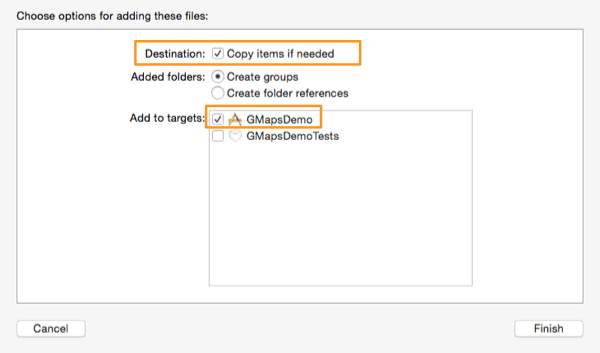
Next, go back to the Finder, and click to the GoogleMaps.framework once again. From the Resources directory, select the GoogleMaps.bundle and drag it to the Project Navigator in Xcode too. While adding that bundle to the project, make the same selections as above.
At this point, the next two should appear in your project too (the Google Maps SDK group is a custom one I created for better file organization):

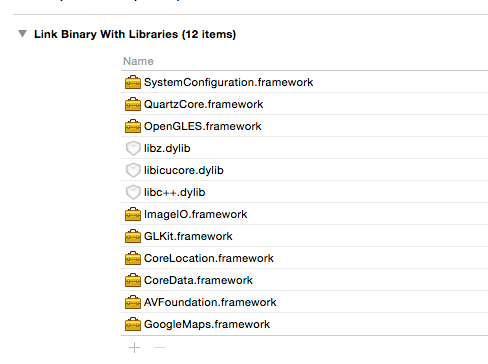
The Google Maps SDK needs several other frameworks to exist in the project in order to function properly. Before I give you the list of all the necessary frameworks and libraries that you have to add, make sure to select the project in the Project Navigator, then click to the Build Phases and expand the Link Binary With Libraries section. Use the plus (+) button to add one by one the following:
- AVFoundation.framework
- CoreData.framework
- CoreLocation.framework
- CoreText.framework
- GLKit.framework
- ImageIO.framework
- libc++.dylib
- libicucore.dylib
- libz.dylib
- OpenGLES.framework
- QuartzCore.framework
- SystemConfiguration.framework
Here’s what you should see at the end:
Next, click to the Build Settings tab, and search for the Other Linker Flags setting. Once you spot it, add the -ObjC value to it, as we are going to bridge the maps SDK written in Objective-C with the Swift project we currently have.

Speaking of bridging, unfortunately there’s still not a real straight way to embed Objective-C code in Swift. And in our case, we need to do that, because we must import in Objective-C the header file of the Google maps library. Actually, what we want from Xcode is to create for us an Objective-C header (.h) file, and as there’s no a direct way to do that, we’ll manage it indirectly following the next steps:
- Hit the Command + N keys in the keyboard to add a new file in the project.
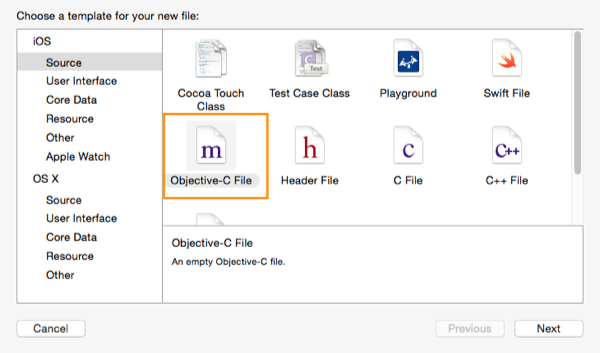
- In the file template selection, select the Objective-C File option. Proceed with the guide, name the file temp and create it.
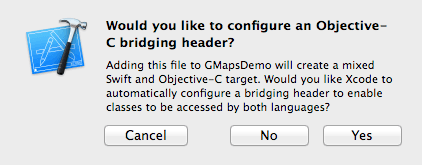
- By finishing the guide, Xcode will display the following message. Make sure to tap to the Yes button.
- Besides the temp.m, a new file named GMapsDemo-Bridging-Header.h will be also created. Select it to open in the editor, and add the following line to it:
- Delete the temp.m file, as we’re not going to need it.
import
Lastly, time to make use of the API key we generated to the previous section. Open the AppDelegate.swift file, and in the application(_:didFinishLaunchingWithOptions:) method add the next line:
func application(application: UIApplication, didFinishLaunchingWithOptions launchOptions: [NSObject: AnyObject]?) -> Bool {
    // Override point for customization after application launch.

    GMSServices.provideAPIKey("YOUR_API_KEY")

    return true
}
Of course, you have to replace the “YOUR_API_KEY” string with the real API key you generated in the Google Developers Console. Note that having access to the GoogleMaps framework and its classes (just like in the above snippet) would be impossible without having performed the previous steps regarding the bridging and having imported the header file.
The initial preparation of the project is now over, and we can dive right into the code from now on. As I said to the beginning of this part, this kind of configuration can’t be avoided when using external SKDs, but thankfully in this case all the preliminary tasks were easy enough, even though they were more than a few.
Displaying a Map
Now that all the required initial preparation has been done in the project, let’s start doing some real programming work by adding a Google map to the app for first time. As you’ll see right next, that’s pretty easy to do, but let’s do everything in the proper order.
If you open the Main.storyboard file, you’ll notice that in the View Controller scene there’s a view (UIView) in the center of the canvas.
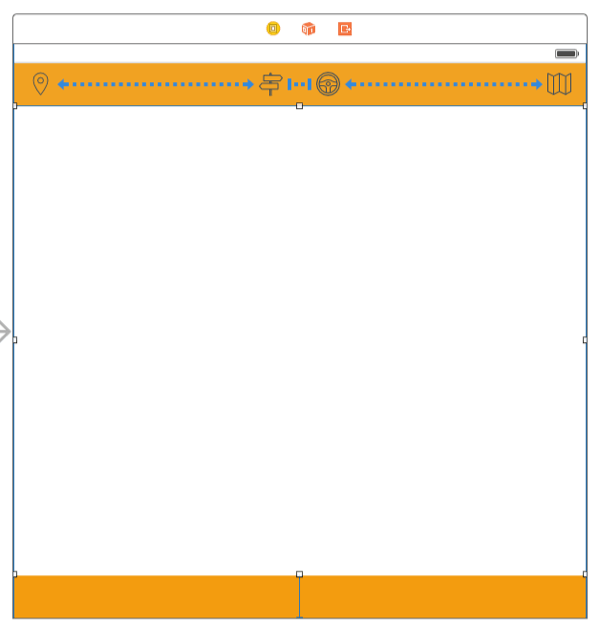
This view is going to be our map view, but in order to use it for that purpose we must perform a couple of modifications to it. So, first of all select it, and then open the Utilities pane. Go to the Identity Inspector, and in the class field set the GMSMapView value as its class name. The GMSMapView is part of the Google Maps framework, and actually it’s a UIView subclass.
There’s one more modification needed to be done in that view, but this time we must go to the ViewController.swift file. At the top of the class you’ll find the following IBOutlet property declaration:
@IBOutlet weak var viewMap: UIView!
All we have to do here is to change the viewMap property’s class from UIView to GMSMapView as shown next:
@IBOutlet weak var viewMap: GMSMapView!
Now, we can use the viewMap as our map view.
Adding a Google map in the app is really easy. Just go to the viewDidLoad method and add the following two lines:
override func viewDidLoad() {
    super.viewDidLoad()
    // Do any additional setup after loading the view, typically from a nib.

    let camera: GMSCameraPosition = GMSCameraPosition.cameraWithLatitude(48.857165, longitude: 2.354613, zoom: 8.0)
    viewMap.camera = camera
}
The first task when setting up a map is to initialize a GMSCameraPosition object. Using this, we specify the initial location that will be displayed in the map. The above coordinates center the map in Paris, but you can find other coordinates to use instead (this is just a demo). Besides the coordinates, we also need to specify the initial zoom level of the map.
The above object is assigned to the camera property of the map view. With that, the actual map can be successfully rendered in the viewMap view.
For first time now you can test the app. So, go for it either in a real device or in the Simulator, and wait until the map appears on the view.
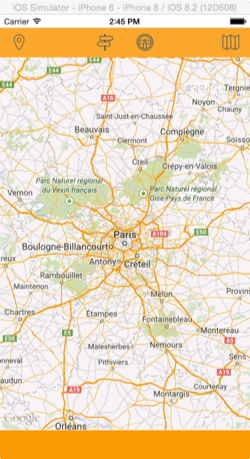
Let’s extend a bit what we did so far before we move to the next part, and let’s create an action sheet so we can select another map type. The Maps SDK provides three types in iOS:
- Normal
- Terrain
- Hybrid
The normal mode is the default one and it’s shown in the above screenshot. The other two options change the map appearance according to the respective type, and it would be really great if we would be able to set them to our map.
The map view contains a property named mapType. There are three constants in the Google Maps SDK that represent each type, and the desired one must be set to that property. These constants are:
- kGMSTypeNormal
- kGMSTypeTerrain
- kGMSTypeHybrid
Now, let’s go to the changeMapType(_:) IBAction method, where we are going to add the necessary code to display the action sheet and set the proper map type to the map view. The following snippet contains all you need:
@IBAction func changeMapType(sender: AnyObject) {
    let actionSheet = UIAlertController(title: "Map Types", message: "Select map type:", preferredStyle: UIAlertControllerStyle.ActionSheet)

    let normalMapTypeAction = UIAlertAction(title: "Normal", style: UIAlertActionStyle.Default) { (alertAction) -> Void in
        self.viewMap.mapType = kGMSTypeNormal
    }

    let terrainMapTypeAction = UIAlertAction(title: "Terrain", style: UIAlertActionStyle.Default) { (alertAction) -> Void in
        self.viewMap.mapType = kGMSTypeTerrain
    }

    let hybridMapTypeAction = UIAlertAction(title: "Hybrid", style: UIAlertActionStyle.Default) { (alertAction) -> Void in
        self.viewMap.mapType = kGMSTypeHybrid
    }

    let cancelAction = UIAlertAction(title: "Close", style: UIAlertActionStyle.Cancel) { (alertAction) -> Void in

    }

    actionSheet.addAction(normalMapTypeAction)
    actionSheet.addAction(terrainMapTypeAction)
    actionSheet.addAction(hybridMapTypeAction)
    actionSheet.addAction(cancelAction)

    presentViewController(actionSheet, animated: true, completion: nil)
}
There’s nothing particularly difficult in the above implementation. As you see, in each action (except for the cancel action) we specify the proper map type to the map view.
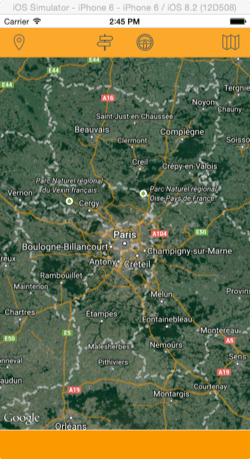
Now run the app once again. This time you can change the map type simply by using the far right bar button item in the toolbar at the top.
My Location
Displaying a map on the screen is absolutely interesting, but it’s not much helpful if there is nothing to point to. So, starting from this part, we’ll begin adding new features that will make our map really useful.
One of the most common tasks one has to deal with when working with maps, is to point to the current location of the user. This is easy to do, but it involves the user’s consent so the current location to be retrieved. Since iOS 8, asking for the user’s permission is a two-step job: First, a new entry must be added to the .plist file of the project. This entry will have as a key the kind of the required permission, and as a value a description that will be presented to the user in an alert view when the app will run for first time. The second step is to programmatically request for permission, and that will trigger the appearance of the alert controller, if the user hasn’t been presented with it yet. We’ll see that in a while.
When working with Core Location services (and we’ll work here a bit), the app can monitor for location updates either at all time (even if the app is on the background), or just while it’s being used. The kind of permission I mentioned right above is just that; depending on the way we want the app to monitor for location changes we’ll provide the proper key in the .plist file, and a bit later we’ll request for the respective permissions in code. In our case there’s no need for the app to always monitor for location updates. That would be totally meaningless as no changes are going to take place to the map when the app doesn’t run, and also it would be a great waste of the device’s battery. We’ll ask permission to access the user’s location only when the app runs.
In the Project Navigator locate and open the Info.plist file. Then, go to the Editor > Add Item menu to add a new entry. As a key specify the NSLocationWhenInUseUsageDescription string, and as a value write any description you like. Alternatively, use this: “Allowing access to your location, you can spot your position on the map.” (without the quotes).
![]()
Back in the ViewController.swift file now, let’s declare two properties that we’ll need right next. At the top of the class, just add the next two lines, right after the IBOutlet property declarations:
var locationManager = CLLocationManager()

var didFindMyLocation = false
The locationManager property will be used to ask for the user’s permission to keep track of his location, and then based on the authorization status to either display his current location or not. The didFindMyLocation flag will be used a bit later, so we know whether the user’s current position was spotted on the map or not, and eventually to avoid unnecessary location updates.
But, first things first. As you see in the snippet above, the locationManager object is initialized upon its declaration. However, that’s not enough. In the viewDidLoad method we must set the ViewController class as its delegate, and request for the user’s permission. Here we go:
override func viewDidLoad() {
    ...

    locationManager.delegate = self
    locationManager.requestWhenInUseAuthorization()
}
Note that the kind of request asked at this point must match to the kind of request we added to the .plist file. By making a call to the requestWhenInUseAuthorization() method of the location manager object, either the user will be presented with an alert view asking for his permission to track his current location if the app runs for first time, or the system will return his preference that was specified at an earlier time. In any case we must check the authorization status of the app using a special delegate method of the CLLocationManagerDelegate protocol, but prior to that, let’s adopt it. Go to the class header line and add that protocol declaration:
class ViewController: UIViewController, CLLocationManagerDelegate {
    ...
}
Let’s see now that delegate method:
func locationManager(manager: CLLocationManager!, didChangeAuthorizationStatus status: CLAuthorizationStatus) {
    if status == CLAuthorizationStatus.AuthorizedWhenInUse {
        viewMap.myLocationEnabled = true
    }
}
At this point we realize that the only case we are actually interested in is when the authorization status value matches to the one shown above. In that case, we only have to set the myLocationEnabled flag of the map view to true, and the Maps SDK will do the hard work of finding the current location of the user. However, it is our work to make the application capable of knowing when the map’s location has updated with the user’s location.
The current location of the user is described by a property of the map view object named myLocation. The good news regarding this property is that is a KVO-compliant (key-value observing compliant), meaning that we simply have to observe for changes on its value, and that way we’ll be able to know when the user’s location gets updated. If you want to know more about the KVO mechanism, you can take a look at this tutorial.
So, based on the above, our next move is to let our class observe for changes in the myLocation property of the viewMap object. Return in the viewDidLoad method once again, and add the following line:
override func viewDidLoad() {
    ...

    viewMap.addObserver(self, forKeyPath: "myLocation", options: NSKeyValueObservingOptions.New, context: nil)
}
What we really want to happen when the Google Maps SDK locates the user’s current location, it to center the map on that spot and display the well-known blue dot at that point. The truth here is that the blue dot will be automatically displayed, so no further coding is required from us for that task. So, let’s make the current location appear on the map once the user’s position has been spotted, and if we still haven’t done so:
override func observeValueForKeyPath(keyPath: String, ofObject object: AnyObject, change: [NSObject : AnyObject], context: UnsafeMutablePointer) {
    if !didFindMyLocation {
        let myLocation: CLLocation = change[NSKeyValueChangeNewKey] as CLLocation
        viewMap.camera = GMSCameraPosition.cameraWithTarget(myLocation.coordinate, zoom: 10.0)
        viewMap.settings.myLocationButton = true

        didFindMyLocation = true
    }
}
As I already said, the didFindMyLocation flag will help the app to avoid unnecessary location updates. Further than that, we get the new location for the map from the change dictionary. This dictionary is passed as a parameter to the method by the system, and by using the NSKeyValueChangeNewKey key we can fetch the new value of the changed property we observe. Using this location, we configure a new GMSCameraPosition object and and we set it directly to the camera property of the map view. This will make it center to the new position. Another interesting task here is that by setting the myLocationButton property of the settings property of the map view to true, we manage to display on the bottom-right side of the screen a default button for returning back to the current location, in case the user pans the map. This button is provided by the Google Maps SDK. There’s a also a compass button that can be enabled in the exact same way, but we don’t need it here.
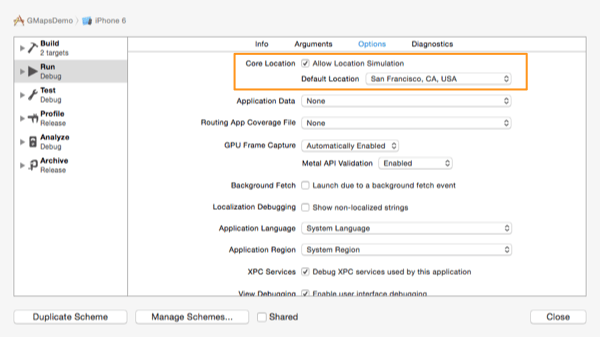
Now you can give another try to the app. If you’re going to test it in the Simulator, you must provide it with a fake location because your real location is not monitored there. To do that, simply edit the scheme of the project, and in the Options tab select a default location:

Spotting a Custom Location
Further than finding the current user’s location, another quite common scenario when working with maps is to spot a custom location. Always this is done by providing to the map API some kind of address (for example street name, city, country, area), and no coordinate (longitude and latitude) values, as nobody could remember them. But, have you ever really wondered how it’s possible for a map service to locate the exact address you provide without knowing the coordinate?
The answer is that there’s a process named geocoding, and according to this an address is translated into longitude and latitude values before it gets spotted to a map. Even more, a map service (such as Google Maps) doesn’t really care about the address we provide since it “translates” that to a geo-coordinate. So, the actual interesting point here is how can we manage to give an address to the Google Maps SDK, how it will convert it to a geo-coordinate, and how it’s going to be represented on our map.
Thankfully, Google provides the Google Geocoding API, a web service that in short accepts requests containing real addresses and returns responses with longitude and latitude values (among other values of course). If you are really interested in working with Google maps, then you definitely need to give a good reading in the geocoding API documentation. Actually, I encourage you to visit that documentation and take a quick tour on the service details right now. It will help you to better understand what we’re about to do next.
The response data of the geocoding API is either in JSON or in XML format. In this sample we’ll make use of the JSON format as it takes just one line to covert it to Swift (or Objective-C) data representation (dictionary or array). The following sample is grabbed from the Google documentation directly, and is a great example of a JSON response:
{
   "results" : [
      {
         "address_components" : [
            {
               "long_name" : "1600",
               "short_name" : "1600",
               "types" : [ "street_number" ]
            },
            {
               "long_name" : "Amphitheatre Pkwy",
               "short_name" : "Amphitheatre Pkwy",
               "types" : [ "route" ]
            },
            {
               "long_name" : "Mountain View",
               "short_name" : "Mountain View",
               "types" : [ "locality", "political" ]
            },
            {
               "long_name" : "Santa Clara",
               "short_name" : "Santa Clara",
               "types" : [ "administrative_area_level_2", "political" ]
            },
            {
               "long_name" : "California",
               "short_name" : "CA",
               "types" : [ "administrative_area_level_1", "political" ]
            },
            {
               "long_name" : "United States",
               "short_name" : "US",
               "types" : [ "country", "political" ]
            },
            {
               "long_name" : "94043",
               "short_name" : "94043",
               "types" : [ "postal_code" ]
            }
         ],
         "formatted_address" : "1600 Amphitheatre Pkwy, Mountain View, CA 94043, USA",
         "geometry" : {
            "location" : {
               "lat" : 37.42291810,
               "lng" : -122.08542120
            },
            "location_type" : "ROOFTOP",
            "viewport" : {
               "northeast" : {
                  "lat" : 37.42426708029149,
                  "lng" : -122.0840722197085
               },
               "southwest" : {
                  "lat" : 37.42156911970850,
                  "lng" : -122.0867701802915
               }
            }
         },
         "types" : [ "street_address" ]
      }
   ],
   "status" : "OK"
}
If you look thoroughly, this response represents the found address in two ways: As address components (an array with dictionaries as its items), and as a formatted address, where the full address is given as a single string. Besides that, there are two more interesting points in the above example: The geometry dictionary that contains that longitude and latitude values, and the status that obviously describes the result of the request made to the geocoding web service.
From all the above we’ll use three things in this app: The formatted address, the geometry details, and the status. I advise you to take a look at the status codes in the Google documentation; it’s really out of this scope to discuss about it here. Before you proceed, make sure that you can “read” the JSON data representation properly. If you feel uncomfortable with JSON, then you might want to take a look here and here. What I would just like to mention is that when something begins with “some_key” is a dictionary, and when begins with a bracket ([) it’s an array.
Back to our app now, we are going to create a new class to handle the request to and the response from the geocoding API. I’m talking for a new class here for two reasons:
- The code will be much more reusable.
- Later on we’ll make use of another Google web service (API), and it would be great to have all this kind of tasks gathered in one place.
So, create a new class, and make sure that it’s a subclass of the NSObject. Name it MapTasks and when it’s been added to the project you’re good to continue.
Let’s begin our work in the MapTasks.swift file by declaring some properties that we’ll use right next:
let baseURLGeocode = "https://maps.googleapis.com/maps/api/geocode/json?"

var lookupAddressResults: Dictionary!

var fetchedFormattedAddress: String!

var fetchedAddressLongitude: Double!

var fetchedAddressLatitude: Double!
The baseURLGeocode is the URL that we’ll use to do the request for the geocoding. Of course, we’ll add the address as a parameter to it, but as this is a dynamic value, it will be done programmatically. In the lookupAddressResults dictionary we’ll store the data of the first address that will be returned in the results. Note that it’s possible more than one result to be returned after having geocoded an address, but for simplicity here we’ll keep just the first one. Lastly, in the three remaining properties we’ll store the values that their names suggest.
At this point we must add an initializer function to the class, so we can create an object of it later in the ViewController class. As there’s no need for a custom init method, let’s stick to the default one:
override init() {
    super.init()
}
Now, let’s create a new method as shown next:
func geocodeAddress(address: String!, withCompletionHandler completionHandler: ((status: String, success: Bool) -> Void)) {

}
The first parameter is the address we want to spot to the map. The second parameter is a completion handler that will be called once we have received and processed the response data. The app will display results to the map only after this completion handler has been called by this method. As you see, it gets two parameters: In the first one we’ll provide the status string from the response, and in the second one we’ll indicate whether the geocoding was successful or not (meaning whether we have data for the map on our hands or not).
Let’s go now step by step to the implementation of that method. Initially, we must compose the URL string properly, convert it to the proper format, and then using it to create a NSURL object. Note that we first make sure that a valid address has been given:
if let lookupAddress = address {
    var geocodeURLString = baseURLGeocode + "address=" + lookupAddress
    geocodeURLString = geocodeURLString.stringByAddingPercentEscapesUsingEncoding(NSUTF8StringEncoding)!

    let geocodeURL = NSURL(string: geocodeURLString)
}
Next, we must make a request to the geocoding API and store the returned results to a NSData object. There’s an important detail here, and that is that we’ll do that (and all the upcoming processing) asynchronously, so the app be responsive during the data fetching period. Also, as you’ll see next, after we have the data taken back from the API, we convert it from the JSON format to a dictionary object:
dispatch_async(dispatch_get_main_queue(), { () -> Void in
    let geocodingResultsData = NSData(contentsOfURL: geocodeURL!)

    var error: NSError?
    let dictionary: Dictionary = NSJSONSerialization.JSONObjectWithData(geocodingResultsData!, options: NSJSONReadingOptions.MutableContainers, error: &error) as Dictionary
})
The last line in the snippet is all it takes to convert data from JSON to Swift representation.
As you notice, we use a NSError object to “catch” any errors that might occur during the conversion process. So, our first care now is to check if after the conversion this value is nil or not. If it’s not, then we’ll call the completion handler and we’ll set the flag argument to false:
if (error != nil) {
    println(error)
    completionHandler(status: "", success: false)
}
In case that everything went smoothly, then we’ll first get the status of the response. If it contains the “OK” value we’ll “extract” the first result and store it to the lookupAddressResults dictionary, and then we’ll fetch all the other values we are interested in (the formatted address, the longitude and the latitude). If the status has a value other than “OK”, then we’ll call the completion handler and we’ll pass the status value, but we’ll set the flag to false once again:
else {
    // Get the response status.
    let status = dictionary["status"] as String

    if status == "OK" {
        let allResults = dictionary["results"] as Array>
        self.lookupAddressResults = allResults[0]

        // Keep the most important values.
        self.fetchedFormattedAddress = self.lookupAddressResults["formatted_address"] as String
        let geometry = self.lookupAddressResults["geometry"] as Dictionary
        self.fetchedAddressLongitude = ((geometry["location"] as Dictionary)["lng"] as NSNumber).doubleValue
        self.fetchedAddressLatitude = ((geometry["location"] as Dictionary)["lat"] as NSNumber).doubleValue

        completionHandler(status: status, success: true)
    }
    else {
        completionHandler(status: status, success: false)
    }
}
The above is actually the “heart” of the method. Notice that the key names used above were taken from the JSON data example I gave you previously and that you can find in the Google Geocoding API documentation too.
Lastly, there’s one more case we have to cove; whether a nil address has been given as an argument to the method:
else {
    completionHandler(status: "No valid address.", success: false)
}
This time we provide a custom message in the status parameter.
Here’s the whole method in one piece:
func geocodeAddress(address: String!, withCompletionHandler completionHandler: ((status: String, success: Bool) -> Void)) {
    if let lookupAddress = address {
        var geocodeURLString = baseURLGeocode + "address=" + lookupAddress
        geocodeURLString = geocodeURLString.stringByAddingPercentEscapesUsingEncoding(NSUTF8StringEncoding)!

        let geocodeURL = NSURL(string: geocodeURLString)

        dispatch_async(dispatch_get_main_queue(), { () -> Void in
            let geocodingResultsData = NSData(contentsOfURL: geocodeURL!)

            var error: NSError?
            let dictionary: Dictionary = NSJSONSerialization.JSONObjectWithData(geocodingResultsData!, options: NSJSONReadingOptions.MutableContainers, error: &error) as Dictionary

            if (error != nil) {
                println(error)
                completionHandler(status: "", success: false)
            }
            else {
                // Get the response status.
                let status = dictionary["status"] as String

                if status == "OK" {
                    let allResults = dictionary["results"] as Array>
                    self.lookupAddressResults = allResults[0]

                    // Keep the most important values.
                    self.fetchedFormattedAddress = self.lookupAddressResults["formatted_address"] as String
                    let geometry = self.lookupAddressResults["geometry"] as Dictionary
                    self.fetchedAddressLongitude = ((geometry["location"] as Dictionary)["lng"] as NSNumber).doubleValue
                    self.fetchedAddressLatitude = ((geometry["location"] as Dictionary)["lat"] as NSNumber).doubleValue

                    completionHandler(status: status, success: true)
                }
                else {
                    completionHandler(status: status, success: false)
                }
            }
        })
    }
    else {
        completionHandler(status: "No valid address.", success: false)
    }
}
Time to use the above method, so let’s return to the ViewController.swift file. Initially, let’s declare and initialize an object of the MapTasks class:
var mapTasks = MapTasks()
Now, let’s navigate to the findAddress(_:) IBAction method. This one is called every time the left button in the toolbar is tapped. In it, we’ll create an alert controller with a textfield, asking from the user to type an address in. We’ll provide two action buttons, one for initiating the address searching and one to dismiss the controller. When the first button gets tapped, we’ll call the method we created previously and then we’ll handle the completion handler results. Let’s see all that in code:
@IBAction func findAddress(sender: AnyObject) {
    let addressAlert = UIAlertController(title: "Address Finder", message: "Type the address you want to find:", preferredStyle: UIAlertControllerStyle.Alert)

    addressAlert.addTextFieldWithConfigurationHandler { (textField) -> Void in
        textField.placeholder = "Address?"
    }

    let findAction = UIAlertAction(title: "Find Address", style: UIAlertActionStyle.Default) { (alertAction) -> Void in
        let address = (addressAlert.textFields![0] as UITextField).text as String

        self.mapTasks.geocodeAddress(address, withCompletionHandler: { (status, success) -> Void in

        })

    }

    let closeAction = UIAlertAction(title: "Close", style: UIAlertActionStyle.Cancel) { (alertAction) -> Void in

    }

    addressAlert.addAction(findAction)
    addressAlert.addAction(closeAction)

    presentViewController(addressAlert, animated: true, completion: nil)
}
In the closure body now, we have to handle the results. If the success flag is false then we’ll display the status on the console. Even more, if the status equals to “ZERO_RESULTS” value, we’ll display another alert controller telling the user that the address wasn’t found (see the status codes in the Google Documentation). On the other hand, if everything is okay, we’ll center the map to the new location:
@IBAction func findAddress(sender: AnyObject) {
    ...
        self.mapTasks.geocodeAddress(address, withCompletionHandler: { (status, success) -> Void in
            if !success {
                println(status)

                if status == "ZERO_RESULTS" {
                    self.showAlertWithMessage("The location could not be found.")
                }
            }
            else {
                let coordinate = CLLocationCoordinate2D(latitude: self.mapTasks.fetchedAddressLatitude, longitude: self.mapTasks.fetchedAddressLongitude)
                self.viewMap.camera = GMSCameraPosition.cameraWithTarget(coordinate, zoom: 14.0)
            }
        })
    ...
}
The showAlertWithMessage(_:) is another custom method used only to display an alert controller with the given message. It clearly consists of a reusable piece of code:
func showAlertWithMessage(message: String) {
    let alertController = UIAlertController(title: "GMapsDemo", message: message, preferredStyle: UIAlertControllerStyle.Alert)

    let closeAction = UIAlertAction(title: "Close", style: UIAlertActionStyle.Cancel) { (alertAction) -> Void in

    }

    alertController.addAction(closeAction)

    presentViewController(alertController, animated: true, completion: nil)
}
We’re ready. Test the app once again, and this time type an address to point to the map. If you write it correctly the map will center to this location.

Adding a Marker
Adding a marker on the map is a really easy task, as doing so it only takes two lines of code. However, there are various properties that can be configured so a marker can be customized according to your needs or preferences. In the Google Maps SDK a marker is an object of the GMSMarker class. When initializing such an object, you must specify the longitude and latitude expressed as a CLLocationCoordinate2D type. In the previous section we created such an object with the following line:
let coordinate = CLLocationCoordinate2D(latitude: self.mapTasks.fetchedAddressLatitude, longitude: self.mapTasks.fetchedAddressLongitude)
Once the marker object has been initialized and the maps SDK knows where to place it, it’s then necessary to specify the map object to which the marker will be added to.
Let’s see how all these are done in code, but first let’s declare a marker property so we hold a strong reference to it. Go to the beginning of the ViewController class and add the following:
var locationMarker: GMSMarker!
Now let’s define the following method. We are going to call it every time a custom address is spotted to the map, so we point to it.
func setupLocationMarker(coordinate: CLLocationCoordinate2D) {

}
The required coordinate object will be provided to the method as an argument. Let’s initialize the marker:
func setuplocationMarker(coordinate: CLLocationCoordinate2D) {
    locationMarker = GMSMarker(position: coordinate)
    locationMarker.map = viewMap
}
Let’s go back to the findAddress(_:) IBAction method and let’s add one more line so the above gets called when a custom location is found and the map is centered to it:
@IBAction func findAddress(sender: AnyObject) {
    ...
        self.mapTasks.geocodeAddress(address, withCompletionHandler: { (status, success) -> Void in
            ...
            else {
                let coordinate = CLLocationCoordinate2D(latitude: self.mapTasks.fetchedAddressLatitude, longitude: self.mapTasks.fetchedAddressLongitude)
                self.viewMap.camera = GMSCameraPosition.cameraWithTarget(coordinate, zoom: 14.0)

                self.setupLocationMarker(coordinate)
            }
        })
    ...
}
Run the app once again, and type a custom address. Now, a marker will point right into the new location.
As I said in the beginning of this part, a marker has various properties that can be used so to achieve some level of customization. For example, you can specify the color of the marker, some text to be displayed when it’s tapped, or even change its opacity. Let’s extend the above method by configuring some of those properties:
func setuplocationMarker(coordinate: CLLocationCoordinate2D) {
    ...

    locationMarker.title = mapTasks.fetchedFormattedAddress
    locationMarker.appearAnimation = kGMSMarkerAnimationPop
    locationMarker.icon = GMSMarker.markerImageWithColor(UIColor.blueColor())
    locationMarker.opacity = 0.75
}
By using the title property the formatted address from the mapTasks object will be displayed above the marker when it gets tapped. The appearAnimation specifies whether the marker will be displayed in an animated fashion, and the value we assign to it is the only option the maps SDK provides. Regarding the marker’s color, as you see it can’t be changed directly; instead we need to access its icon property and provide the desired color as an image, but how it’s handled next is something that the GMSMarker class does; we don’t really care about it. Finally, we also change the opacity of the marker. The above lines will result to a bit transparent blue marker that will be presented animated to the map.
When rotating a map or changing the camera position with gestures, a marker remains always still. However it’s possible to alter this behavior by indicating to the SDK that you want it to be flat, and therefore allow the marker to be moved in accordance to the performed gestures.
Besides that, it’s also possible to add some extra text to the placeholder that appears when tapping on the marker. That extra text must be assigned to the snippet property of the marker.
Here are the last two mentioned things in code:
func setuplocationMarker(coordinate: CLLocationCoordinate2D) {
    ...

    locationMarker.flat = true
    locationMarker.snippet = "The best place on earth."
}
You can see the effects of all the modified properties if you run the app once again.
Before we move to the next part, there’s one more detail I have to say about. As I mentioned earlier, the marker we set up in the above method will be added to the map every time a new custom address is looked up. However, this isn’t going to work properly unless we remove the marker (if already exists) first, and then add it again. So, all we have to do is to go to the beginning of the method and add the next condition:
func setuplocationMarker(coordinate: CLLocationCoordinate2D) {
    if locationMarker != nil {
        locationMarker.map = nil
    }

    ...
}
The properties presented above are not the only ones existing in the Google Maps SDK. I encourage you to take a look in the official documentation as well. You’ll definitely find useful stuff to read.

Drawing a Route
Besides the Geocode API, Google provides other web services as well that can be used in combination to the Maps SDK. One of them is the Directions API, which can help us create a route on the map. A route is actually a line connecting two places, and besides the origin and the destination points it can also contain intermediate locations, also called waypoints.
The way we make requests to the Directions API is pretty much similar to the requests made to the Geocode API. That means that we have to provide the web service with some required parameter values, and then to process the returned data which, once again, can be either in JSON or in XML format. I think that now is the best time to take a look to the Directions API documentation, and especially to the sample responses section, where you can find a nice example of a JSON response.
Before we proceed to the implementation it’s important to understand some basic stuff regarding routes, and the data that is returned from the API back to us. In here I’ll just highlight some aspects, but you can always refer to the official documentation for more information. So first of all, a single response from the Directions API can give us more than one possible routes for going from point A to point B (in this sample app we’ll use just the first route returned, we’ll ignore all the rest). Each route is composed by legs, where a leg is just a part of the journey described in the Directions API response. A simple route without any waypoints (locations between origin and destination) has only one leg, but as new waypoints are added to the route, the legs are increased accordingly.
Now, each leg is composed by steps, where a step is a direction unit, meaning an instruction regarding the direction the route should follow. A step contains useful data about itself, like for example the distance that covers, the duration of the journey in this step, the start and end locations of it, and the points needed so it can be drawn on the map. There is more, but I intentionally mention just that, so you keep them on your mind as we move along.
Further than legs and steps, a route description contains other useful data as well. A piece of this data is the one marked as “overview_polyline” in the sample response presented in the Google documentation website, and it contains the points a map needs to know about how to draw the entire route (a polyline is the set of lines needed to create a path on the map). In this demo app we are going to use that, but I must warn you in advance that this route overview is not accurate; it’s an approximation to the real route. For relatively short distances containing a few legs, it seems to be working well, however there are cases that the drawn route based on the points of this overview polyline misses turns or roads. Actually, the more the legs and the steps are, the less accurate the overview polyline is. The solution to that problem is to make loops so to access and get the polyline points of each step for each leg, and then draw the route line by line based on those points. However, we won’t apply that solution here, as we’ll end up with an app quite complicated, and we must keep it simple so everything is easy to be understood. We’ll stick to the overview polyline so you see how it’s used, and then you’ll be able to do any changes and improvements in the code on your own.
Let’s do some coding now, and let’s go to the MapTasks.swift file. Initially, we have to declare the following properties to the class:
let baseURLDirections = "https://maps.googleapis.com/maps/api/directions/json?"

var selectedRoute: Dictionary!

var overviewPolyline: Dictionary!

var originCoordinate: CLLocationCoordinate2D!

var destinationCoordinate: CLLocationCoordinate2D!

var originAddress: String!

var destinationAddress: String!
Let’s see the above properties what they’re for:
- To the selectedRoute we’ll store the first route (among the total number of routes) that will be returned from the Directions API. It’s a dictionary, which contains other dictionaries and arrays.
- To the overviewPolyline property we’ll hold the overview polyline dictionary, which contains just another dictionary with the points of the lines that should be drawn.
- Both the originCoordinate and the destinationCoordinate are CLLocationCoordinate2D objects that represent the longitude and latitude of the origin and the destination locations respectively.
- The originAddress and the destinationAddress are going to hold the origin and destination addresses as string values and as they’re contained in the APIs response.
Having all the above declared, we can go and define the following method:
func getDirections(origin: String!, destination: String!, waypoints: Array!, travelMode: AnyObject!, completionHandler: ((status: String, success: Bool) -> Void)) {

}
Besides the origin and destination locations (expressed as addresses), the above method also accepts and array with the waypoints (the intermediate points in a route), and the travel mode of the journey that will be drawn on the map. With the travel mode, we’ll be able to define whether we want directions for driving, walking, or bicycling. At the end, we have the (already known) completion handler that we’ll call when we’ll have data to use on the map.
At the moment we won’t bother with the waypoints and the travel mode, we’ll just use the origin and destination addresses. As I already said previously, you’re going to see several similarities with the Geocode API, at least in the beginning. So, first of all we have to compose the request URL string using those two addresses and then convert it to a NSURL object:
func getDirections(origin: String!, destination: String!, waypoints: Array!, travelMode: AnyObject!, completionHandler: ((status: String, success: Bool) -> Void)) {
    if let originLocation = origin {
        if let destinationLocation = destination {
            var directionsURLString = baseURLDirections + "origin=" + originLocation + "&destination=" + destinationLocation
            directionsURLString = directionsURLString.stringByAddingPercentEscapesUsingEncoding(NSUTF8StringEncoding)!
            let directionsURL = NSURL(string: directionsURLString)
        }
        else {
            completionHandler(status: "Destination is nil.", success: false)
        }
    }
    else {
        completionHandler(status: "Origin is nil", success: false)
    }
}
Notice that in case the origin or the destination address is nil, we use the completion handler in the respective else case indicating that getting directions failed, and at the same time we pass a custom message.
The next step is to ask the Directions API for directions by using the URL we created right above. As we said, the returned data will be in JSON format, and our whole work will take place asynchronously. In the snippet that follows, at first we get the JSON data and then we convert it to a dictionary. Also, we cover the case where an error might have occurred:
dispatch_async(dispatch_get_main_queue(), { () -> Void in
    let directionsData = NSData(contentsOfURL: directionsURL!)

    var error: NSError?
    let dictionary: Dictionary = NSJSONSerialization.JSONObjectWithData(directionsData!, options: NSJSONReadingOptions.MutableContainers, error: &error) as Dictionary

    if (error != nil) {
        println(error)
        completionHandler(status: "", success: false)
    }
    else {

    }
})
The above has nothing new or difficult. The interesting part is the code that we’re adding in the else case right next:
let status = dictionary["status"] as String

if status == "OK" {
    self.selectedRoute = (dictionary["routes"] as Array>)[0]
    self.overviewPolyline = self.selectedRoute["overview_polyline"] as Dictionary

    let legs = self.selectedRoute["legs"] as Array>

    let startLocationDictionary = legs[0]["start_location"] as Dictionary
    self.originCoordinate = CLLocationCoordinate2DMake(startLocationDictionary["lat"] as Double, startLocationDictionary["lng"] as Double)

    let endLocationDictionary = legs[legs.count - 1]["end_location"] as Dictionary
    self.destinationCoordinate = CLLocationCoordinate2DMake(endLocationDictionary["lat"] as Double, endLocationDictionary["lng"] as Double)

    self.originAddress = legs[0]["start_address"] as String
    self.destinationAddress = legs[legs.count - 1]["end_address"] as String

    self.calculateTotalDistanceAndDuration()

    completionHandler(status: status, success: true)
}
else {
    completionHandler(status: status, success: false)
}
Let’s go through that code for a while. First of all, we get the response status, and obviously we proceed if only it has the “OK” value. In that case, the first thing we do is to hold the first found route (if there are more will be ignored just for the sake of the tutorial’s simplicity) to the selectedRoute dictionary. Using this dictionary, we access directly the polyline overview, so we get the points needed to draw the route (even approximately). Then, in the legs array that is declared locally we store all the legs of the route, because we’ll need them for getting some data regarding the start and end locations. Notice how we access the coordinate for both the origin and the destination, and also how we get their names as they’re returned in the response. Note that for the start location we use the first leg of the route, while for the end location we use the last leg of the route (legs.count – 1).
Right before we call the completion handler, we make a call to a custom method that you see for first time here, the calculateTotalDistanceAndDuration(). We’ll see it in just a while, and as you assume it will help us to calculate the journey’s distance and travel duration.
At this point, let me give you the method we just implemented in one piece:
func getDirections(origin: String!, destination: String!, waypoints: Array!, travelMode: AnyObject!, completionHandler: ((status: String, success: Bool) -> Void)) {
    if let originLocation = origin {
        if let destinationLocation = destination {
            var directionsURLString = baseURLDirections + "origin=" + originLocation + "&destination=" + destinationLocation

            directionsURLString = directionsURLString.stringByAddingPercentEscapesUsingEncoding(NSUTF8StringEncoding)!

            let directionsURL = NSURL(string: directionsURLString)

            dispatch_async(dispatch_get_main_queue(), { () -> Void in
                let directionsData = NSData(contentsOfURL: directionsURL!)

                var error: NSError?
                let dictionary: Dictionary = NSJSONSerialization.JSONObjectWithData(directionsData!, options: NSJSONReadingOptions.MutableContainers, error: &error) as Dictionary

                if (error != nil) {
                    println(error)
                    completionHandler(status: "", success: false)
                }
                else {
                    let status = dictionary["status"] as String

                    if status == "OK" {
                        self.selectedRoute = (dictionary["routes"] as Array>)[0]
                        self.overviewPolyline = self.selectedRoute["overview_polyline"] as Dictionary

                        let legs = self.selectedRoute["legs"] as Array>

                        let startLocationDictionary = legs[0]["start_location"] as Dictionary
                        self.originCoordinate = CLLocationCoordinate2DMake(startLocationDictionary["lat"] as Double, startLocationDictionary["lng"] as Double)

                        let endLocationDictionary = legs[legs.count - 1]["end_location"] as Dictionary
                        self.destinationCoordinate = CLLocationCoordinate2DMake(endLocationDictionary["lat"] as Double, endLocationDictionary["lng"] as Double)

                        self.originAddress = legs[0]["start_address"] as String
                        self.destinationAddress = legs[legs.count - 1]["end_address"] as String

                        self.calculateTotalDistanceAndDuration()

                        completionHandler(status: status, success: true)
                    }
                    else {
                        completionHandler(status: status, success: false)
                    }
                }
            })
        }
        else {
            completionHandler(status: "Destination is nil.", success: false)
        }
    }
    else {
        completionHandler(status: "Origin is nil", success: false)
    }
}
Now, right before we implement the new custom method to calculate the distance and duration, we need to declare at the top of the class the following properties:
var totalDistanceInMeters: UInt = 0

var totalDistance: String!

var totalDurationInSeconds: UInt = 0

var totalDuration: String!
Let’s implement the new method now. Unfortunately there’s not straight way to calculate the distance and the duration of the route; instead we must go through all legs and add them one by one. The distance is calculated in meters, and the duration in seconds. In the next implementation you’ll notice that after we’ve calculated the respective summaries, we convert the distance in Kilometers and the duration in Days, Hours, Minutes and Seconds. Here we go:
func calculateTotalDistanceAndDuration() {
    let legs = self.selectedRoute["legs"] as Array>

    totalDistanceInMeters = 0
    totalDurationInSeconds = 0

    for leg in legs {
        totalDistanceInMeters += (leg["distance"] as Dictionary)["value"] as UInt
        totalDurationInSeconds += (leg["duration"] as Dictionary)["value"] as UInt
    }


    let distanceInKilometers: Double = Double(totalDistanceInMeters / 1000)
    totalDistance = "Total Distance: \(distanceInKilometers) Km"


    let mins = totalDurationInSeconds / 60
    let hours = mins / 60
    let days = hours / 24
    let remainingHours = hours % 24
    let remainingMins = mins % 60
    let remainingSecs = totalDurationInSeconds % 60

    totalDuration = "Duration: \(days) d, \(remainingHours) h, \(remainingMins) mins, \(remainingSecs) secs"
}
Let’s head back to the ViewController class, and for starters let’s declare the next properties:
var originMarker: GMSMarker!

var destinationMarker: GMSMarker!

var routePolyline: GMSPolyline!
The first two markers will indicate the origin and destination locations, and the routePolyline is the line that will represent the route.
In the createRoute(_:) IBAction method now, we’ll present an alert controller with two textfields. In the first one, the use will type in the origin location, and in the second the destination. By accepting to create the route, we’ll make a call to the Directions API and based on the results we’ll get back, we’ll design the route and we’ll add the markers.
@IBAction func createRoute(sender: AnyObject) {
    let addressAlert = UIAlertController(title: "Create Route", message: "Connect locations with a route:", preferredStyle: UIAlertControllerStyle.Alert)

    addressAlert.addTextFieldWithConfigurationHandler { (textField) -> Void in
        textField.placeholder = "Origin?"
    }

    addressAlert.addTextFieldWithConfigurationHandler { (textField) -> Void in
        textField.placeholder = "Destination?"
    }


    let createRouteAction = UIAlertAction(title: "Create Route", style: UIAlertActionStyle.Default) { (alertAction) -> Void in
        let origin = (addressAlert.textFields![0] as UITextField).text as String
        let destination = (addressAlert.textFields![1] as UITextField).text as String

        self.mapTasks.getDirections(origin, destination: destination, waypoints: nil, travelMode: nil, completionHandler: { (status, success) -> Void in
            if success {
                self.configureMapAndMarkersForRoute()
                self.drawRoute()
                self.displayRouteInfo()
            }
            else {
                println(status)
            }
        })
    }

    let closeAction = UIAlertAction(title: "Close", style: UIAlertActionStyle.Cancel) { (alertAction) -> Void in

    }

    addressAlert.addAction(createRouteAction)
    addressAlert.addAction(closeAction)

    presentViewController(addressAlert, animated: true, completion: nil)
}
As you notice, if the directions request is successful we call three new custom methods. By their names is easy to guess their purpose, therefore let’s implement them one by one.
In the configureMapAndMarkersForRoute() method we’ll perform three distinct tasks:
- We’ll center the map to the beginning of the route.
- We’ll add a marker to the origin point.
- We’ll add a marker to the destination point.
func configureMapAndMarkersForRoute() {
viewMap.camera = GMSCameraPosition.cameraWithTarget(mapTasks.originCoordinate, zoom: 9.0)originMarker = GMSMarker(position: self.mapTasks.originCoordinate) originMarker.map = self.viewMap originMarker.icon = GMSMarker.markerImageWithColor(UIColor.greenColor()) originMarker.title = self.mapTasks.originAddress destinationMarker = GMSMarker(position: self.mapTasks.destinationCoordinate) destinationMarker.map = self.viewMap destinationMarker.icon = GMSMarker.markerImageWithColor(UIColor.redColor()) destinationMarker.title = self.mapTasks.destinationAddress
}
Note that we set different colors to the markers. Further than that, there’s no something new here.
In the drawRoute() method we are going to draw the route lines on the map. Just notice how easy it’s to create the route using the GMSPath and GMSPolyline classes, as well as the route points we acquired in the MapTasks class:
func drawRoute() {
    let route = mapTasks.overviewPolyline["points"] as String

    let path: GMSPath = GMSPath(fromEncodedPath: route)
    routePolyline = GMSPolyline(path: path)
    routePolyline.map = viewMap
}
At the end of the above snippet, we necessarily have to set the map to the routePolyline property.
The displayRouteInfo() method is pretty simple. We just display to the label at the bottom side of the screen the calculated distance and location:
func displayRouteInfo() {
    lblInfo.text = mapTasks.totalDistance + "\n" + mapTasks.totalDuration
}
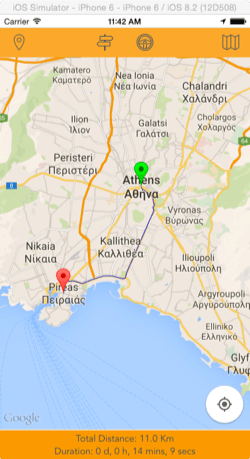
That’s all! We’ve gone through many new things, but once you get the meaning of them, it’s easy to manage everything. You can test the app once again now. Specify an origin and a destination location, and let the route be created. I just have to repeat that the overview polyline is not as accurate as you would expect in some cases, so if it’s not good for you, consider to implement the solution I described earlier; go through all steps of all legs, gather the points of all steps, and draw them one by one on the map.
Adding Waypoints to a Route
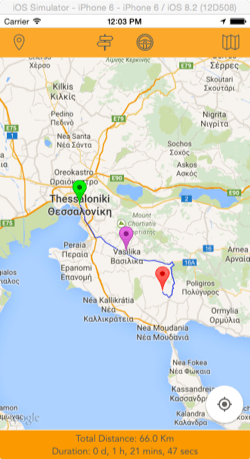
Waypoints are locations between the origin and the destination point of a route, and are actually part of the route. So far, we managed to create a route with the start and end points, but nothing between them. Now, we’re about to add that feature too. So, we’ll make the app a bit more interesting, and this time instead of using an alert controller to type in an address as a waypoint of the route, we’ll just tap on the map and the route will be re-calculated. Once that happens, a new marker will be placed on the map, pointing to the tapped location.
With that in mind, the first thing we need here is to declare and initialize two new arrays in the class:
var markersArray: Array = []

var waypointsArray: Array = []
The first one will hold all the markers pointing to waypoints. The second one, we’ll hold the waypoints formed as string objects.
Moving forward now, in order to handle the taps on the map and get the exact tapped location, we need to use a delegate method of the GMSMapViewDelegate protocol (existing in the Google Maps SDK). Before we implement it though, we have to adopt that protocol:
class ViewController: UIViewController, CLLocationManagerDelegate, GMSMapViewDelegate {
    ...
}
Also, we must make the ViewController class the delegate of the map view. In the viewDidLoad add the next simple line:
override func viewDidLoad() {
    ...
    viewMap.delegate = self
}
Let’ s see the delegate method I said about now, and then we’ll discuss about it:
func mapView(mapView: GMSMapView!, didTapAtCoordinate coordinate: CLLocationCoordinate2D) {
    if let polyline = routePolyline {
        let positionString = String(format: "%f", coordinate.latitude) + "," + String(format: "%f", coordinate.longitude)
        waypointsArray.append(positionString)

        recreateRoute()
    }
}
The first important details here is to make sure that there’s a route so we can add waypoints. That’s easy to check, as we just have to make sure that the polyline of the route isn’t nil. In that case, we compose a string that contains the longitude and latitude of the tapped location simply by using the parameter coordinate. Make sure that no space characters exist in the string, otherwise the request to the Directions API will fail. Once the string describing the location is ready, we append it to the waypointsArray and we make a call to a brand new custom method, the recreateRoute() (which obviously will re-create the route).
Before we re-draw the route with the new waypoint contained in it, we must clear the existing one. So, instead of implementing the recreateRoute() method, initially we’ll create a new one, named clearRoute(). Let’s see it:
func clearRoute() {
    originMarker.map = nil
    destinationMarker.map = nil
    routePolyline.map = nil

    originMarker = nil
    destinationMarker = nil
    routePolyline = nil

    if markersArray.count > 0 {
        for marker in markersArray {
            marker.map = nil
        }

        markersArray.removeAll(keepCapacity: false)
    }
}
As you can see, every object that is part of the drawn route becomes nil and removed from the map. Note that we even make nil the map property of the markers that exist in the markersArray (we haven’t written the code that adds markers to it yet, but still we can do that).
Now, we can implement the recreateRoute():
func recreateRoute() {
    if let polyline = routePolyline {
        clearRoute()

        mapTasks.getDirections(mapTasks.originAddress, destination: mapTasks.destinationAddress, waypoints: waypointsArray, travelMode: nil, completionHandler: { (status, success) -> Void in

            if success {
                self.configureMapAndMarkersForRoute()
                self.drawRoute()
                self.displayRouteInfo()
            }
            else {
                println(status)
            }
        })
    }
}
First of all, we make sure that there’s a route so we clear it. Then we make the request to the Directions API, and this time note that in the parameters we specify the waypointsArray as well. If everything is okay, we call the same methods we called in the previous part, so the route to be drawn.
The most of our work here is now ready, but still we have a couple of tasks to do. The first one is to pay a visit to the configureMapAndMarkersForRoute() method, and make it capable of adding the waypoint markers too. Let’s see the required addition:
func configureMapAndMarkersForRoute() {
    ...

    if waypointsArray.count > 0 {
        for waypoint in waypointsArray {
            let lat: Double = (waypoint.componentsSeparatedByString(",")[0] as NSString).doubleValue
            let lng: Double = (waypoint.componentsSeparatedByString(",")[1] as NSString).doubleValue

            let marker = GMSMarker(position: CLLocationCoordinate2DMake(lat, lng))
            marker.map = viewMap
            marker.icon = GMSMarker.markerImageWithColor(UIColor.purpleColor())

            markersArray.append(marker)
        }
    }
}
Notice how we break each waypoint string to its components, and then we convert the longitude and latitude in double values, so we can use them in the new marker initialization. Once each marker matching to a waypoint has been configured, we append it to the markersArray array.
The second task remaining to be done, is to update the getDirections(…) method in the MapTasks.swift file. In the beginning of the method, it’s mandatory to update the directionsURLString string, so we include the desired waypoints in the request that will be done. Note that besides than passing the waypoints, we also specify one more parameter to the query, asking for optimization of the route when using the waypoints:
func getDirections(origin: String!, destination: String!, waypoints: Array!, travelMode: AnyObject!, completionHandler: ((status: String, success: Bool) -> Void)) {
    if let originLocation = origin {
        if let destinationLocation = destination {
            var directionsURLString = baseURLDirections + "origin=" + originLocation + "&destination=" + destinationLocation

            if let routeWaypoints = waypoints {
                directionsURLString += "&waypoints=optimize:true"

                for waypoint in routeWaypoints {
                    directionsURLString += "|" + waypoint
                }
            }

            ...

        }
        ...
    }
    ...
}
Now you can go ahead and try once again the app. After you’ve created a route, tap on any point around it so the tapped location to be included to the route as a waypoint.
Travel Modes
By default when creating a route, the driving mode is used by the Directions API. As I already said, the following are the supported travel modes by the Google Maps SDK in iOS:
- Driving mode
- Walking mode
- Bicycling mode
Changing the travel mode is an interesting matter, and it would be a great feature for this demo app too, therefore let’s go for it in this part. The first thing we’ll do is to create an enum that will contain all the supported travel modes. In the ViewController.swift file, go to the top of the file, before the class opening, and add the next lines:
enum TravelModes: Int {
    case driving
    case walking
    case bicycling
}
Inside the class now, let’s declare the default travel mode:
var travelMode = TravelModes.driving
In order to change the travel mode, we’ll use the changeTravelMode(_:) IBAction method. In it, we’ll create a new action sheet providing to the user all the possible options, and depending on the choice that is made we’ll set the travel mode accordingly. Let’s see that in code:
@IBAction func changeTravelMode(sender: AnyObject) {
    let actionSheet = UIAlertController(title: "Travel Mode", message: "Select travel mode:", preferredStyle: UIAlertControllerStyle.ActionSheet)

    let drivingModeAction = UIAlertAction(title: "Driving", style: UIAlertActionStyle.Default) { (alertAction) -> Void in
        self.travelMode = TravelModes.driving
        self.recreateRoute()
    }

    let walkingModeAction = UIAlertAction(title: "Walking", style: UIAlertActionStyle.Default) { (alertAction) -> Void in
        self.travelMode = TravelModes.walking
        self.recreateRoute()
    }

    let bicyclingModeAction = UIAlertAction(title: "Bicycling", style: UIAlertActionStyle.Default) { (alertAction) -> Void in
        self.travelMode = TravelModes.bicycling
        self.recreateRoute()
    }

    let closeAction = UIAlertAction(title: "Close", style: UIAlertActionStyle.Cancel) { (alertAction) -> Void in

    }

    actionSheet.addAction(drivingModeAction)
    actionSheet.addAction(walkingModeAction)
    actionSheet.addAction(bicyclingModeAction)
    actionSheet.addAction(closeAction)

    presentViewController(actionSheet, animated: true, completion: nil)
}
As you notice, in each action we set the respective travel mode and we call the recreateRoute() method we implemented in the previous part. Of course, we don’t do anything like that in the close action that is used to simply dismiss the action sheet.
All the above won’t have any effect at all, because the recreateRoute() method needs to be updated. In the current implementation, and while calling the getDirections(…) method of the MapTasks class, we don’t provide the travel mode as an argument; instead we just set the nil value. So, let’s fix this:
func recreateRoute() {
    if let polyline = routePolyline {
        ...

        mapTasks.getDirections(mapTasks.originAddress, destination: mapTasks.destinationAddress, waypoints: waypointsArray, travelMode: travelMode, completionHandler: { (status, success) -> Void in

            ...
        })
    }
}
The only change here is the travelMode argument. Now, we need to update the getDirections(…) method too, so it takes under consideration the travel mode we set. So, go to the MapTasks.swift file, and make the next additions:
func getDirections(origin: String!, destination: String!, waypoints: Array!, travelMode: TravelModes!, completionHandler: ((status: String, success: Bool) -> Void)) {
    if let originLocation = origin {
        if let destinationLocation = destination {
            var directionsURLString = baseURLDirections + "origin=" + originLocation + "&destination=" + destinationLocation

            ...

            if let travel = travelMode {
                var travelModeString = ""

                switch travelMode.rawValue {
                case TravelModes.walking.rawValue:
                    travelModeString = "walking"

                case TravelModes.bicycling.rawValue:
                    travelModeString = "bicycling"

                default:
                    travelModeString = "driving"
                }


                directionsURLString += "&mode=" + travelModeString
            }

            ...

        }
        ...
    }
    ...
}
Note that further than adding the if let travel = travelMode{ … } statement, we also have to change the travelMode parameter type from AnyObject! to TravelModes! (the enum type we created earlier).
Now we’re good enough to test for one more time the app. Go to change the travel mode, and notice how the route info gets changed, especially the duration of the journey.
Final Touches
At this point our demo app is almost ready. I’m saying almost, because there are a couple of details that should be added to our code, so we make it work as good as possible.
The first thing we must do, is to clear the route if exists, right before creating a new one. So, in the createRoute(_:) method, and inside the createRouteAction block, we need to check if there’s an existing route, and then to clear it:
@IBAction func createRoute(sender: AnyObject) {
    ...

    let createRouteAction = UIAlertAction(title: "Create Route", style: UIAlertActionStyle.Default) { (alertAction) -> Void in
        if let polyline = self.routePolyline {
            self.clearRoute()
            self.waypointsArray.removeAll(keepCapacity: false)
        }

        ...
    }

    ...
}
Note that except for just clearing the route, we also remove all objects from the waypointsArray. There’s no point to keep any existing waypoints since we’re about to create a new route.
The second thing is to specify the travel mode as an argument in this IBAction method again, because right now we just set the nil as the respective parameter’s value:
@IBAction func createRoute(sender: AnyObject) {
    ...

    let createRouteAction = UIAlertAction(title: "Create Route", style: UIAlertActionStyle.Default) { (alertAction) -> Void in
        ...

        self.mapTasks.getDirections(origin, destination: destination, waypoints: nil, travelMode: self.travelMode, completionHandler: { (status, success) -> Void in
            ...
    }

    ...
}
After having performed the above two tasks, we can say that our demo app is finally ready!
Summary
In the parts of this tutorial we managed to go through the most important tasks that a developer can perform when working with maps, and in this case, with the Google Maps SDK for iOS. What you’ve read in all the previous sections can put you on the right track if you want to deal with Google maps, and definitely you now have a starting point to work with. Undoubtably there are a lot more details regarding the Google Maps SDK that were impossible to be covered in this (just one) tutorial. However, now that you know the basics and the most important aspects of the SDK, you can dive in the Google documentation and search for any extra information you might need. Surely working with maps is an interesting topic, and no matter any difficulties that may arise, at the end it is still good material to work with. Anyway, if you’re currently working or if you’re planning to work with the Google Maps SDK, I hope you find the information provided in this post useful. Having it as a guide, nothing stops you from jumping right into it and taking full advantage of all the given APIs!
For your reference, you can refer to the complete Xcode project here. As always, leave me comment and share your thought about the tutorial.
Icons copyright: icons8


