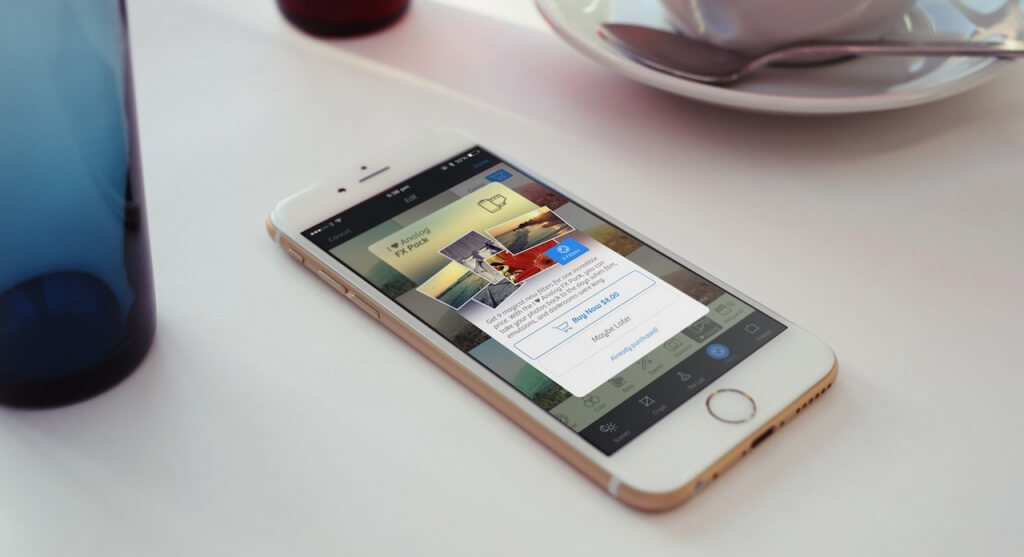
Many applications today provide the option to get extra content and features by making purchases through them. This technique, known as In-App Purchases, has become a fashion during the last few years, and it has proven to be quite profitable and efficient. Undoubtably, we all have downloaded apps from App Store that gave us the option to get additional material by purchasing it through them.
It’s an undeniable fact that the most of the developers’ (and Apple’s of course) revenue the last couple of years is based on the In-App Purchases. And if we think a bit about it, why not? In-App Purchases (or in short IAP) consist of a great tool for developers, and of a nice option for users. With it, both sides can be happy; developers can sell their apps for free in the App Store with a few features enabled so they attract more users to try them, and integrate IAP for unlocking additional content after having purchased it. Users, on the other hand, can buy only the content or features they are interested in, without having to pay for parts of the app they don’t want to use. And as it has been proved, this strategy has increased the income for almost all developers that use IAP.
So, as you assume, in this tutorial I’m planning to show you how to integrate In-App Purchases in your apps. As you’ll see, doing so it’s not difficult, and the steps you have to follow are pretty much always the same. In short, here’s what it takes in order to integrate In-App Purchases into an iOS app:
- Perform some basic project configuration in Xcode.
- Create In-App Purchase product records in the iTunes Connect portal.
- Add specific code to get the IAP product info from Apple and perform payments.
Of course, we are going to see each one of the above steps in details in the following parts. However, before we do that, let me underline a few facts and concepts you should be aware of in advance. In the above list, I used the term “product“, and that wasn’t random. This term is also used by Apple when you deal with IAP, and additionally it represents what you sell inside your app. Every In-App Purchase product falls to one of the following categories, depending always on the app’s nature and the kind of the purchase:
- Consumable: This kind of product can be purchased multiple times, and not just once. For example, in a game a consumable product can be a number of extra lives for the main hero. Consumable products unlock app features just for a small period of time, and they don’t have permanent effect.
- Non-Consumable: This category is the exact opposite to the previous one, and as you understand the purchase of a non-consumable product is made just once. For example, buying extra fonts for a text-editing app must be done just one time, and the extra fonts must be available from there on and forever.
- Renewable Subscriptions: You can guess based on its name what this product kind is for. With this, the purchase must be renewed from time to time (the interval can be specified in the iTunes Connect), and it’s suitable in cases you sell a service that requires a subscription.
- Non-Renewable Subscriptions: On the contrary to the previous case, a non-renewable subscription lasts one time only and expires. It’s useful in cases the provided service doesn’t require a new subscription, and it’s going to end after a period of time.
Besides all the above, you should always keep in mind the proper way to test In-App Purchases while you are still in the development stage. That means that you should never user a real Apple ID and never pay with real money for the services or products you’re still building. Thankfully, you can work in a sandboxed mode by creating and using test users in the iTunes Connect platform throughout the development period. That way you can perform extensive testings on your In-App Purchases without paying even a cent.
Lastly, get prepared to test the demo app of this tutorial (and every app of yours that will integrate IAP) in a real device. You can’t make purchases using the Simulator, even though you can get the IAP product details and display them in the app.
For additional assistance and resources after you’ve finished reading this tutorial, the official documentation from Apple is the path you should definitely take, and I encourage you to do so. Due to the limitations that the tutorial imposes, there will be a few aspects that we won’t be able to cover here (I’ll say more right before the end of the tutorial), so don’t skip the original documentation.
Demo App Overview
Let’s see now what we are going to deal with in the demo application of this tutorial. Initially, you should download the starter project and use it as the intro point of your implementation. This project is a very simple drawing app, where you can perform free drawing by dragging the finger around on the screen. The app will provide six colors to use in total: Red, yellow, green, blue, black and gray. However, only the first two colors will be available for free. The remaining four colors will become available once an In-App Purchase is made.
To be more precise, the rest four colors will be grouped in two color collections, and that’s what we’re going to “sell” inside the app: A color collection that contains the green and blue, and a color collection that contains the black and gray. You can find such apps in the App Store, but our version is going to be way more simple.
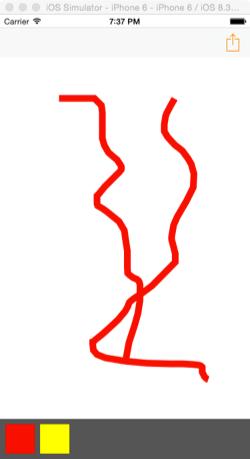
Based on what I said in the introduction, you would expect our IAP products (the color collections) to belong to non-consumable category. That’s right, but here we won’t use that kind of products. For the sake of the tutorial and in order to be able to test multiple times the In-App Purchase process, the color collection products that we’ll create will belong to consumable category. That means that every time the app will be launched the extra colors must be purchased again (and again) in order to become available, even if they’ve been bought the last time you ran the app. But keep it in mind; we do that only for demo reasons. If you’re about to build a similar app, your products should definitely be non-consumable, meaning that should be purchased just once.
One of the developer’s tasks when using IAP into an app, is to create a special view controller that will be used to make the purchases. This view controller doesn’t have a default format, and obviously must fit to the look and feel of the rest app. Also, this view controller can contain any controls that indicate clearly and simplify the purchase process. For this reason, you will find in the starter project a view controller named IAPurchaseViewController. In this one, we’ll add all the required code that enables the purchase and unlocking of the extra features of our app.
Besides that, you will also find another class named CanvasView. This is a UIView subclass, and it contains all the code that adds the drawing capability to the demo app.
As it always happens with the starter projects, you’ll find some code already existing in it. I advise you to take a look at it, and also look at the scenes existing in the storyboard. This will help you to get familiarized with it before we start working on it.
In the next parts of the tutorial we’ll see all the main and required steps that will make In-App Purchases possible. That means that we’ll begin by doing some configuration in Xcode, then we’ll pay a visit to the iTunes Connect portal to create the products we’ll sell through our app, and lastly we’ll write all the necessary code. It’s important to highlight the fact that you won’t be able to proceed if you don’t have a developer account, as this is the only way to access the iTunes Connect portal and enable In-App Purchases.
Project Configuration in Xcode
Right before we write the first line of code to any application that integrates In-App Purchases, there are certain steps needed to be done in Xcode. We have to make sure that all the required frameworks will be added to the project and that the necessary configuration will be done for us by Xcode. As you’ll see, things are simple, as in total we have to do to distinct tasks:
- To enable IAP in our project.
- To set a valid iOS developer account (what Xcode names Team).
Starting from the second objective, open the starter project in Xcode, and once it gets launched click to the project target in the Project Navigator. Then, in the General tab and inside the Identity section, click to the Team dropdown control and select your developer account, just as shown below:

In case you haven’t added your developer account to Xcode yet and you can’t find it in the above control, then follow these steps:
- Open the Xcode > Preferences… menu.
- Click to the Accounts tab.
- Click to the small plus button to the bottom-left side and select the Add Apple ID… option.
- To the modal window that appears enter your Apple ID and password, and then click Add.
At the end, your developer account should appear as figured in the next screenshot:
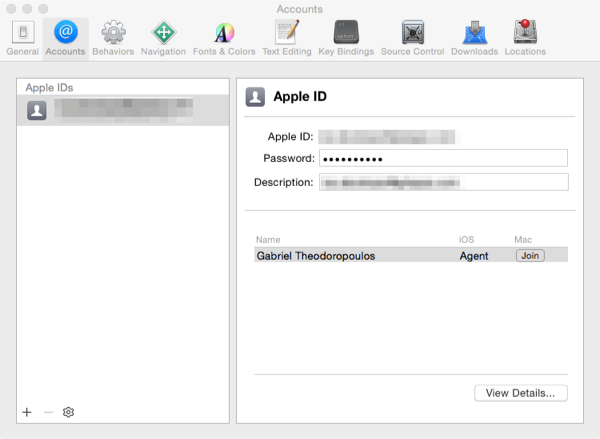
Now you can follow the procedure described right above, and set a valid Team value for the project.
Next, let’s enable the IAP to our application. While having the project target already selected to the Project Navigator panel, this time click to the Capabilities tab. In capabilities list, locate the In-App Purchase and switch it on:
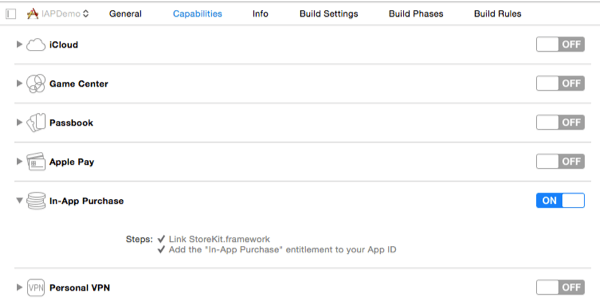
Just so you know before we proceed, the two steps we did in this part were necessary so we have a new AppID for our project, and a valid account connected to it. Both are necessary for what is coming next.
Test Users
We are about to leave Xcode just for a while, and use a browser so we do some work to the iTunes Connect portal. So, use this link to be navigated there, provide your credentials to sign in and then keep reading.
The first thing we’ll do here is to create one (or more if you want) test user. Using a test user later during the app testing we will ensure that we are making all purchases on a sandboxed environment with virtual money, so we don’t have to pay in real while we are still developing. Notice that you should always use test user in such cases; it would be totally pointless not to be able to test if your app is properly working, and it would be really bad to use real money just to test again and again until you get to the point you want. So, keep in mind: Create and use test users.
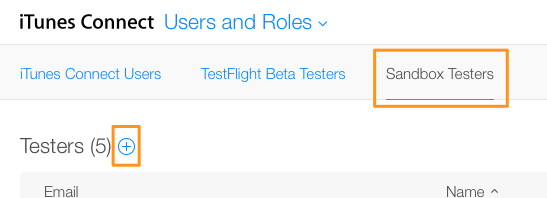
Let’s see the process now. Once you get connected to the iTunes Connect platform, click to the Users and Roles link so you go to the proper area where you’ll configure the test user. In the new page, there are three links to the top:
- iTunes Connect Users
- TestFlight Beta Testers
- Sandbox Testers
Click to the third link (Sandbox Testers) so you can handle the test users. In case you had added test users in the past, then you’ll see them listed here.
Let’s create a new test user now. In the top-left side of the browser, and next to the Testers title, there’s a blue plus button:
Click on that button, and you’ll be taken to a new page where you have to enter all the test user’s data. Make sure to fill in all the fields otherwise you won’t be able to save the user. The email doesn’t have to be a real one, but keep in mind that you cannot use an email address that has already been used. Once you enter all missing values, save the user and you’ll return to the previous page.
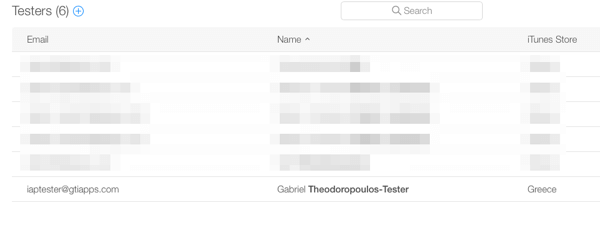
At this point, you should be able to see the new test user listed (among others if they exist), so our work at this part is over.
A New App Record
What we’ll do in this part it’s required so we are able to use the In-App Purchases in our app. As you guess based on what I’ve already said, here we are going to create a new app record that we’ll connect to our application using the AppID we created previously, and then we’ll do some IAP-related configuration.
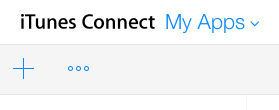
In the iTunes Connect platform, and assuming that you’re still in the users’ page, click to the Users and Roles link that you’ll find to the top-left side (right next to the iTunes Connect title), and from the popup options click to the My Apps link. This action will take you in the app records page, where you can find any apps you might have already developed and sold to the App Store.
In the top-left side there’s a big plus button, which you need to click and select the New iOS App option so you create a new app record.
In the modal window that appears, fill in carefully all the info regarding the new app. Please select a unique name for the app, and don’t try to use something common like IAPDemo because it’s already taken (note that the next screenshot was taken before I get notified that this app name was already existed, so I had to pick another one me too). For the sake of the tutorial, I named the app IAPDemo-Appcoda, but as you can’t use that, feel free to select any name you like.
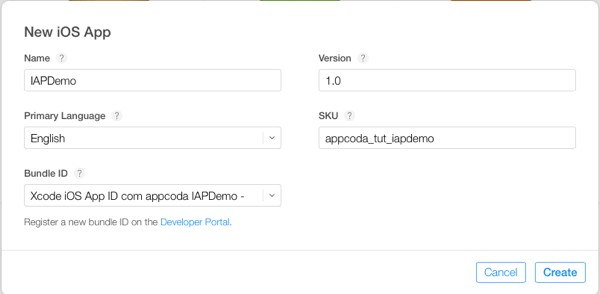
Besides the name, there’s one other important detail you should take care of: This is the Bundle ID of the app. From the dropdown menu, make sure to select the correct AppID that matches to the project you’re creating (com.appcoda.IAPDemo). That way you’ll connect this new app record to the under-development demo app.
Finally, set a primary language for the app, set a version number (it’s really pointless the version number you’ll be setting here as we’re talking for a demo project), and set the SKU value for the app (a unique string).
Once you get finished, click to the Create button and you’ll be navigated to the details of the app. Among the provided links, you’ll find one named In-App Purchases. Click it because we are going to create two new IAP records and eventually to have products to buy.

As I’ve already explained, we want to be able to buy new color collections through our app, therefore the records we’ll add here will contain relevant information. Also, I’ve already said that in a real application of such kind the products should be non-consumable, but for the sake of our demo we’ll make them consumable.
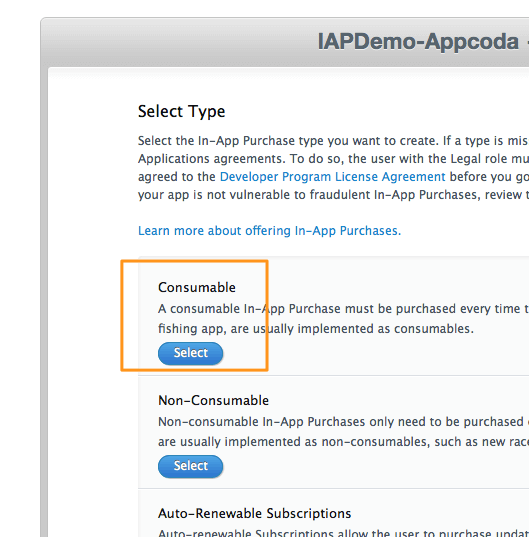
Let’s keep going by clicking to the Create New button existing to the top-left corner. The first thing we have to do, is to select the proper type for the new In-App Purchase we’ll create. For our purpose, click to the Select button in the Consumable section:
Now we have to specify the IAP details. In the Reference Name field set a string value that you’ll use as a reference inside the iTunes Connect portal (both in the app record and Sales, if this app was ever about to be sold). In the product ID, type a unique string that will prompt (or remind you) the current IAP record. Here’s an example:
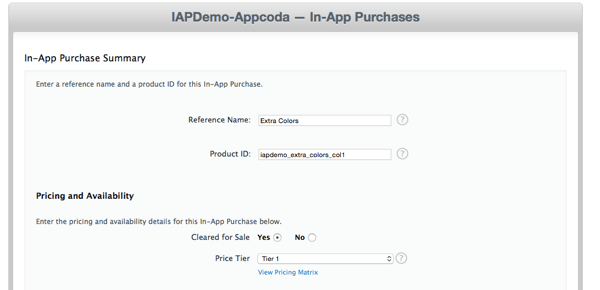
Next, select a price tier, and scroll down to set the additional IAP data. There’s one more mandatory step you have to do, and that is to set a title and a description for the language you prefer by clicking to the Add Language button. Select the language, set the value “Extra Colors Collection 1” as the title, and the value “Extra colors for drawing (Green and Blue). as the description (without the quotes in both cases of course). Save the language, and then save the IAP record.

Repeat the above process once again so you add one more IAP product, and this time set the following title and description respectively:
- Extra Colors Collection 2
- Extra colors for drawing (Black and Gray).
At the end, you should be seeing the following two records:
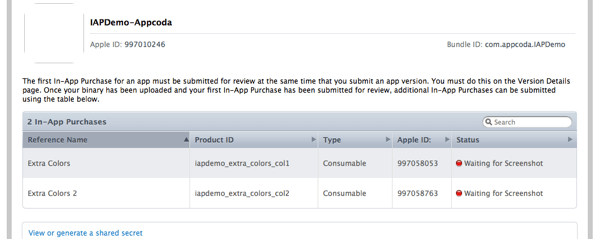
Note that for real applications you should provide images and notes to the Review Board so you help them understand your IAP product and review your app even faster.
Our work in the iTunes Connect platform is now over. Make sure to note down the two product IDs, because we’ll need them in a while in the code. Right now, we have a new app record linked to our demo app, and two IAP products that we’ll be able to virtually purchase in a while.
Getting Our Product Info
According to what I mentioned earlier, creating and displaying a view controller through which the purchases will be done is one of the developer duties. In the starter project you downloaded, you can find such a view controller named IAPurchaseViewController. In this one, we’ll add all the missing code and logic regarding the In-App Purchase product fetching, and the actual purchasing of them. But as this is the heart of our tutorial, let’s see everything in the proper way, step by step.
So, in this part we’ll get the IAP details for the two records we created earlier in the iTunes Connect portal, and we’ll display them to a tableview that already exists in the IAPurchaseViewController view controller. We had created two hypothetic extra color collections for our app; by purchasing the first one, the green and blue colors will be unlocked, and purchasing the second color collection, the black and grey colors will also become available.
Let’s get going by writing some code now. Initially, open the IAPurchaseViewController.swift file by clicking on it in the Project Navigator panel. At the top of the file, right under the import UIKit line, add this one:
import StoreKit
The above library will enable us to use some classes and protocols needed for implementing In-App Purchases.
Next, inside the class, let’s declare and initialize at the same time the following couple arrays:
var productIDs: Array = []

var productsArray: Array = []
In the productIDs array we are going to add the product ID values we set earlier to the two IAP records we created in the iTunes Connect platform. As you understand, the contents of this array will be used by the StoreKit framework for fetching the data we’re looking for from the Apple’s servers.
The productsArray on the other hand will be used after matching records have been found and retrieved. As you can see, each item of this array has to be a SKProduct object, meaning an instance of the class that describes an IAP product in programming terms in iOS SDK (see details here).
Besides the above two declarations, go to the class header line, and adopt the SKProductsRequestDelegate protocol as shown next:
class IAPurchaceViewController: UIViewController, UITableViewDelegate, UITableViewDataSource, SKProductsRequestDelegate
By adding the above protocol Xcode will show an error, but don’t worry about that. It’s because the implementation of a delegate method is still missing, and that we’ll add in a while.
Now, let’s add the contents to the productIDs array. In the viewDidLoad method add the following two lines:
override func viewDidLoad() {
    ...

    productIDs.append("iapdemo_extra_colors_col1")
    productIDs.append("iapdemo_extra_colors_col2")
}
Note that above you see the product ID values that I set in my own IAP records in iTunes Connect. If you haven’t used the above values, then replace them with the correct IDs that you’ve set, otherwise In-App Purchases won’t work when you test the app.
Our next step is to make a request and get the product info we want. In programming words, that means that we’re going to use for first time a class we haven’t seen here yet, named SKProductRequest. All the request part will take place in a new custom method we’ll create, where we’ll initialize an object of that class, we’ll provide it with the product IDs (the productIDs array) and we’ll fire the request. We’ll handle the response later in a delegate method, but for now, let’s focus to the request only. Right next I give you a new custom method named requestProductInfo(), where we’re performing what I just described:
func requestProductInfo() {
    if SKPaymentQueue.canMakePayments() {
        let productIdentifiers = NSSet(array: productIDs)
        let productRequest = SKProductsRequest(productIdentifiers: productIdentifiers as! Set)

        productRequest.delegate = self
        productRequest.start()
    }
    else {
        println("Cannot perform In App Purchases.")
    }
}
Some more details now: As you see, it’s necessary to ensure that payments can be really made from the device that runs the app, so we proceed if only that condition is true. The SKPaymentQueue shown above is a class belonging to the StoreKit framework, and takes charge of the actual transaction that take place once a product is chosen to be purchased. We are going to use it more in the next part; now we are just needing it to verify the payment capability of the device.
Next, we make use of the SKProductsRequest class, and we initialise the productRequest object by providing a NSSet object containing the productIDs contents. The exact way of using it might not be looking so straightforward, but still, it remains simple.
Eventually, and after having initialised the productRequest object, we set our class as its delegate (so we can be able to handle the response), and we trigger the request. Note that in case the device is unable to perform payments we just display a message to the console, but of course that’s something that you should definitely avoid in real cases.
The above method has to be called, and we’ll do so in the viewDidLoad method:
override func viewDidLoad() {
    ...

    requestProductInfo()
}
Now, let’s handle the response of Apple in the above request. Previously, we adopted the SKProductRequestDelegate protocol, and now we are about to implement the following delegate method of it:
func productsRequest(request: SKProductsRequest!, didReceiveResponse response: SKProductsResponse!) {

}
The response parameter value contains a very important property named products. It is an array, and each single item of it is a SKProduct object, containing the desired info for every IAP product we’ve created in the iTunes Connect. What we’ll do in the above method is quite simple: Once we make sure that the response actually contains product objects, we’ll add each one of them to the productsArray array we declared and initialised previously, and then we’ll reload the tableview data (the place where the product info will be displayed). Here we go:
func productsRequest(request: SKProductsRequest!, didReceiveResponse response: SKProductsResponse!) {
    if response.products.count != 0 {
        for product in response.products {
            productsArray.append(product as! SKProduct)
        }

        tblProducts.reloadData()
    }
    else {
        println("There are no products.")
    }
}
The above is straightforward enough, and we could say that our work has finished in this method. However what we did above would be more correct if we would have added the next lines as well:
func productsRequest(request: SKProductsRequest!, didReceiveResponse response: SKProductsResponse!) {
    ...

    if response.invalidProductIdentifiers.count != 0 {
        println(response.invalidProductIdentifiers.description)
    }
}
As you probably assume by the invalidProductIdentifiers property name, it’s possible invalid product IDs to exist for which there are no results to be returned. This case is more possible to happen in a real app, where you create and remove IAP products from time to time, and your app asks for product IDs that do not exist any longer. Of course, in this demo app this is not going to happen, unless you go and manually delete an IAP product. It’s needless to say that you should handle any invalid products more gracefully, and not just printing messages to the console (which won’t be seen by anyone after all) in real applications.
There’s one final thing we have to do now; to properly update the tableview methods, so the fetched product information to be possible to be displayed.
Initially, let’s fix the easy ones:
func numberOfSectionsInTableView(tableView: UITableView) -> Int {
    return 1
}


func tableView(tableView: UITableView, numberOfRowsInSection section: Int) -> Int {
    return productsArray.count
}


func tableView(tableView: UITableView, heightForRowAtIndexPath indexPath: NSIndexPath) -> CGFloat {
    return 80.0
}
The only real interesting thing above is that we “tell” the tableview to display as many rows as the product objects contained in the productsArray array.
Now, let’s display each IAP product information:
func tableView(tableView: UITableView, cellForRowAtIndexPath indexPath: NSIndexPath) -> UITableViewCell {
    let cell = tableView.dequeueReusableCellWithIdentifier("idCellProduct", forIndexPath: indexPath) as! UITableViewCell

    let product = productsArray[indexPath.row]
    cell.textLabel?.text = product.localizedTitle
    cell.detailTextLabel?.text = product.localizedDescription

    return cell
}
To make things simple, initially we store the product object matching to each row to a local variable named product. Then, we access the localizedTitle and localizedDescription properties of it and we assign their values to the text label and the detail text label of the cell respectively. And we’re done!
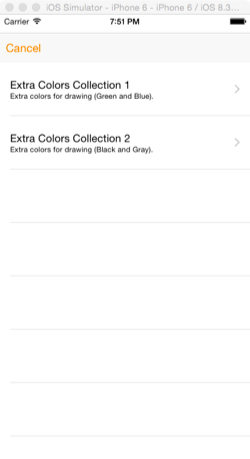
At this point, you can test the app and try for first time an In-App Purchase feature. As no payments are going to be made yet, you can run the app in the Simulator if you want (otherwise do it straight to a device). Once the IAPurchaseViewController gets loaded, give it a few seconds until it fetches the IAP records from the Apple’s servers. For the sake of the simplicity I avoided to add an activity indicator (or something else similar to that), so just wait. If you followed each step in every part until here properly, then you should face no problems at all.
The next screenshot illustrates the extra color collections that can be purchased through the app as fetched from Apple:
Purchasing Products
Once the In-App Purchase products have been listed successfully to the tableview, implementing the option to purchase any of them is the next step that has to be done. All we have to do is to provide a Buy button (or something similar) to the user, which when is tapped will trigger the purchase process. For this, we are going to meet a few new things regarding the StoreKit class and the purchasing process.
As this is a demo application, we are not looking for a fancy way to display the Buy button to the screen. So, an easy approach would be to display an action sheet (alert controller) each time a cell (matching to an IAP product) gets tapped. Obviously, this action sheet will contain two options only: Buy and Cancel.
Let’s keep writing our missing code by declaring two new properties to the IAPurchaseViewController class. Go to the top of it where you can find all the already declared variables, and add the next two:
var selectedProductIndex: Int!

var transactionInProgress = false
In the selectedProductIndex we will keep the index of the row that gets tapped, so we can access the respective SKProduct object in the productsArray array and finally purchase it. The transactionInProgress flag will become true when a transaction (a purchase process) is about to start, so we prevent another purchase to be initiated until the first transaction is over. This is not mandatory to be done; you can just skip using that flag, but as this is a demo application I prefer we’re able to do just one purchase each time.
Now, let’s implement the following tableview delegate method:
func tableView(tableView: UITableView, didSelectRowAtIndexPath indexPath: NSIndexPath) {
    selectedProductIndex = indexPath.row
    showActions()
    tableView.cellForRowAtIndexPath(indexPath)?.selected = false
}
Initially, we hold the index of the tapped row to the selectedProductIndex property, as I said we would. Next, we call the soon-to-make showActions() custom method which will display the action sheet and finally we deselect the tapped cell.
The showActions() method has to be defined, and now it is the time to do that:
func showActions() {
    if transactionInProgress {
        return
    }

    let actionSheetController = UIAlertController(title: "IAPDemo", message: "What do you want to do?", preferredStyle: UIAlertControllerStyle.ActionSheet)

    let buyAction = UIAlertAction(title: "Buy", style: UIAlertActionStyle.Default) { (action) -> Void in

    }

    let cancelAction = UIAlertAction(title: "Cancel", style: UIAlertActionStyle.Cancel) { (action) -> Void in

    }

    actionSheetController.addAction(buyAction)
    actionSheetController.addAction(cancelAction)

    presentViewController(actionSheetController, animated: true, completion: nil)
}
Notice that in the beginning of the method we check if another transaction is already in progress. In that case, we just return from the function without letting the following code be executed. Besides that, the rest is simple and definitely not something you see for first time. For now, nothing will happen if you try to run it, because there’s missing code from the buyAction action.
Right before we initiate a purchase, it’s necessary to add the IAPurchaseViewController class as an observer for the transactions that are going to take place. By doing so, not only we’ll be able to trigger a transaction, but also to get notified about its progress and whether is successfully finished, so eventually we unlock the extra features of the app. So, based on that, go to the header of the class and add the next protocol:
class IAPurchaceViewController: UIViewController, UITableViewDelegate, UITableViewDataSource, SKProductsRequestDelegate, SKPaymentTransactionObserver
Then, in the viewDidLoad method let this class observe for the transactions:
override func viewDidLoad() {
    ...

    SKPaymentQueue.defaultQueue().addTransactionObserver(self)
}
Now we can go back to the buyAction alert action and fire the payment for the selected product. In the following snippet, I present you the action part only, as we’ve seen the rest pieces of the showActions() method. Here it is:
let buyAction = UIAlertAction(title: "Buy", style: UIAlertActionStyle.Default) { (action) -> Void in
    let payment = SKPayment(product: self.productsArray[self.selectedProductIndex] as SKProduct)
    SKPaymentQueue.defaultQueue().addPayment(payment)
    self.transactionInProgress = true
}
There are two important steps here: The first one is the initialization of a SKPayment object using the SKProduct object matching to the tapped row. Now you can see where and how the selectedProductIndex property is used. The second step is the transaction initiation by adding the payment object to the payment queue. By doing that, the transaction will start being processed on the background, and the SKPaymentTransactionObserver will keep us informed about the various stages it will go through by calling the following delegate method:
func paymentQueue(queue: SKPaymentQueue!, updatedTransactions transactions: [AnyObject]!) {
    for transaction in transactions as! [SKPaymentTransaction] {
        switch transaction.transactionState {
        case SKPaymentTransactionState.Purchased:
            println("Transaction completed successfully.")
            SKPaymentQueue.defaultQueue().finishTransaction(transaction)
            transactionInProgress = false
            delegate.didBuyColorsCollection(selectedProductIndex)


        case SKPaymentTransactionState.Failed:
            println("Transaction Failed");
            SKPaymentQueue.defaultQueue().finishTransaction(transaction)
            transactionInProgress = false

        default:
            println(transaction.transactionState.rawValue)
        }
    }
}
A transaction process involves more states than those two shown above, and you can access them using the SKPaymentTransactionState enum value. However, here we’re interested only in the final states of the transaction: Whether the product has been purchased or whether the transaction has failed. For demo reasons only, in the default case we print to the console the raw value matching to each state that the transaction goes through.
As you notice in the above code, there are some common actions we perform in both cases:
- We print to the console a message regarding the transaction outcome (this is optional and it’s not needed in real applications).
- We finish the transaction by calling the finishTransaction(_:) method (this is important, and you should never omit it).
- We turn the transactionInProgress flag to false again, so we can initiate a new purchase later on.
However, the important here is that upon a successful transaction we make the following call:
delegate.didBuyColorsCollection(selectedProductIndex)
The above will lead to the unlocking of the proper locked features of the app. As you understand, I’m giving you in advance a delegate method of a protocol we haven’t implemented yet, but we’ll do so right next.
Unlocking App Features
Once a transaction has successfully finished, and after the user pays for the extra features of the app, we have to make those features available to be used. In a real application such the one we’re developing now, an In-App Purchase should normally lead to a permanent unlocking of the locked features, however just for testing reasons this won’t happen in this app. On the contrary, each time the app is launched, the extra colors the app supports will be locked until they get bought again.
Focusing now on how we’ll unlock them, you just saw that we’ll use the delegate pattern to notify the ViewController class that a new specific color collection has been bought, so it must become available to the users. We’ve already made a call to a delegate method that doesn’t exist yet, so now we’ll add all the missing pieces.
In the IAPurchaseViewController class, go to the top of it before its header line, and add the next protocol:
protocol IAPurchaceViewControllerDelegate {

    func didBuyColorsCollection(collectionIndex: Int)

}
As you see, this new protocol contains just one method (the one we have already called), named didBuyColorsCollection(_:). It accepts just one parameter, the index of the selected color collection that we want to reveal.
Inside the class body now, declare the following delegate property:
var delegate: IAPurchaceViewControllerDelegate!
And with that, the IAPurchaseViewController class is ready! There’s nothing else we have to do here, so let’s head to the ViewController.swift file to make that class the delegate of this one.
In the ViewController class, initially go to its header and adopt the above protocol so we can call the delegate method later:
class ViewController: UIViewController, IAPurchaceViewControllerDelegate
The next step is to set the ViewController class as the delegate of the IAPurchaseViewController. As a segue has been set between the two classes in the Interface Builder, this can be done in the prepareForSegue(…) method that’s been called right before the segue is performed. This method does not exist in the ViewController class, so we are going to add it now:
override func prepareForSegue(segue: UIStoryboardSegue, sender: AnyObject?) {
    if segue.identifier == "idSegueIAP" {
        let iapViewController = segue.destinationViewController as! IAPurchaceViewController
        iapViewController.delegate = self
    }
}
At first we access the IAPurchaseViewController instance through the destinationViewController property of the segue object, and then we make this class its delegate. Nothing difficult.
Now, we can implement the delegate method and unlock the proper colors, depending on the color collection that has been bought:
func didBuyColorsCollection(collectionIndex: Int) {
    if collectionIndex == 0 {
        btnGreen.hidden = false
        btnBlue.hidden = false
    }
    else {
        btnBlack.hidden = false
        btnGray.hidden = false
    }
}
The ViewController class is now ready too!
Now, all we have to do is to test the In-App Purchases, but remember to do that in a real device. Right before you run the app, go in the Settings app, and in the iTunes and App Store setting logout from your account in case you’re currently logged in. This way, you’ll be able to use the test user you created previously, and of course, you won’t pay real money to something that doesn’t really exist.
When you run the app, let the color collections to be retrieved from Apple’s servers, and then click to any of them to buy it. Assuming that you’ve signed out from your actual account, you’ll be asked to sign in first:
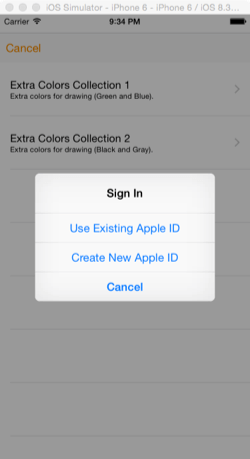
Tap on the Use Existing Apple ID button, and then enter the credentials of your test user. Once you sign in, a confirmation alert will be displayed, asking you for one last time if you’re sure you want to buy the selected product. You’ll notice that there’s an extra line of text in the bottom indicating that you’re working in sandbox mode (if you don’t see that, then you don’t use the test user and you should not continue).
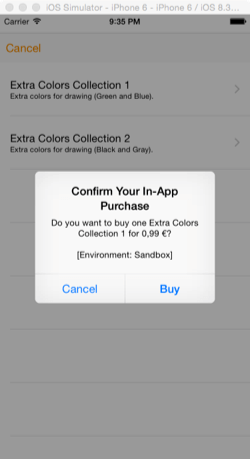
Wait for a while and when the transaction is over, a new alert controller will let you know that the purchase is over, so you can go back to the ViewController and see the extra colors existing there.
Note that it usually takes a few seconds for the transaction to be completed, so don’t dismiss the purchases view controller. In real apps let your users know that the purchase is in progress, but that’s not something we do here. Also, don’t forget to take a look in the console (in Xcode), so you see the messages appearing there too. In case the transaction fails, there’s the place where you’ll see that.
Some Quick Notes
Our demo application works fine and it’s what you’ll need in most of the cases where you’ll integrate In-App Purchases in your own applications. However it has a great disadvantage that could not be avoided, as this is just a tutorial application. As you noticed, we explicitly set the product ID values we want to sell through IAP in the IAPurchaseViewController class, inside the viewDidLoad method:
productIDs.append("iapdemo_extra_colors_col1")
productIDs.append("iapdemo_extra_colors_col2")
This approach isn’t flexible at all, because it will cause problems if you decide at some point to add new products or remove existing ones. If you follow that way, then you have to release a new app update every time you change your IAP products, and this consists of a really bad strategy.
What you should actually do, is to keep in your own server a list of all the provided IAP product IDs that you sell at any given time, and make your app ask for that list every time that gets launched. Then, use that fetched list to ask for the product information and display it in your app, instead of doing that explicitly just like we did in this example. In that fashion, you don’t have to update your app when you add or remove IAP products, and you’ll be as much flexible as you can.
Besides that, there’s one more point I’d like to mention, but it has to do mostly with non-consumable products (here we created consumable ones). After an In-App Purchase has successfully finished, you have to ask for a receipt from the transaction and keep it in both inside the app and your server. By doing so, each time the app gets launched will check the existing receipts and it will know what features have been already bought, so to unlock them. This is necessary to do in non-consumable products that users will buy just once, but totally unnecessary in consumable products that users will keep buying all the time.
You can find details for both the above matters in the official Apple documentation, and that’s exactly I’m prompting you to do.
Summary
One more iOS tutorial comes to its end, and what you’ve read in all the previous parts is all you need to deal with In-App Purchases. Always keep in mind that IAP consist of a good way to increase your income from your apps, and it’s not difficult to integrate it. If you are up to use In-App Purchases in your app, then you should consider the couple of facts I highlighted in the last part. In any case, what you have learnt is good enough to take you up to the end of the road, but all the finishing details are left to you. By following the proper strategy, you can boost your sales up to the maximum point, and at the same time keep your users happy as they buy only what they want. So, balance the pros and cons, and go for the In-App Purchases!
For reference, you can download the Xcode project here.
What do you think about this tutorial? Leave me comment and share your thoughts. If you find it useful, simply click one of the below buttons to share it with your friends.


