iOS 7 brings along new rules and new Human Interface Guidelines (HIG) that should be followed by all developers. One of those guidelines regarding the all brand-new look and feel, highlights the fact that an application’s interface should not compete with the content, nor distracting users from it, but supporting it in the best possible way. This fact is called deference and, along with some more new HI guidelines, makes clear that Apple with iOS 7 focuses on the content and on the way it’s presented. This is more apparent if we consider the flatten, simple and uncluttered UI, full of white space that makes more room for the content to be displayed. Thankfully, Apple supports developers in their effort to give prominence to their app content, and to text content especially, by introducing a new tool, named Text Kit.
Text Kit is part of the UIKit framework, and it consists of a collection of classes that enable developers to manage text and all of its attributes, as well as to display it in various ways, using new great methods and with a little effort. Indeed, prior to Text Kit and iOS 7, advanced text manipulation was really hard to be performed. In the need of modifying text details, such as font or layout attributes, one had to deal with Core Text, a powerful framework, yet hard to work with. Further than that, only UIWebView views were able to display formatted text. Things became better in iOS 6 with attributed strings, where UITextView views could also display rich text, but yet getting into advanced handling still remained a tricky task.

It’s crucial to take a quick look at the structure of the Text Kit in order to fully understand how everything works in code. So, presenting everything in simple terms, Text Kit is composed by three primary classes:
- The Text Storage class (NSTextStorage)
- The Layout Manager class (NSLayoutManager)
- The Text Container class (NSTextContainer)
Here is what each one of those classes is responsible for:
The NSTextStorage class is in charge for storing all text attribute-related information, such as font or paragraph information. It worths to mention, especially for those developers who have worked with attributed strings, that the NSTextStorage class is a subclass of the NSMutableAttributedString class, and that’s why is responsible for keeping all text attributes. Besides that, its role also lies to making sure that all the edited text attribute data will remain consistent throughout all management and editing operations that may be performed.
The NSLayoutManager class, as its name implies, manages the way the text data stored to a NSTextStorage object is going to be displayed in a view. Its job is to handle and support any view object that text can be displayed in it, and perform any required conversions of Unicode characters to glyphs in order each character to properly appear on-screen. An object of this class is notified by the NSTextStorage for any modifications been made to text and its attributes, so every change immediately gets reflected in the corresponding view.
The NSTextContainer class actually specifies the view where the text will appear to and it handles information regarding this view (such as its frame or shape). However, a quite important characteristic of this class is the ability to keep an array of Bezier paths, which define areas that should be excluded from the allowed region where text will appear. This gives Text Kit the unique possibility to let text flow around images or other non-text objects and make developers able to display text in great or demanding manners.
Further than all the above, it worths saying that except for the UIWebView that is based on the WebKit framework, the rest-related view objects (UITextView, UITextField, UILabel) are totally based on the Text Kit, which in turn relies on the Core Text and Core Graphics frameworks, something that didn’t happen in prior iOS versions.
Text Kit is a set of classes with a big number of methods which make it quite powerful and with numerous features. It’s impossible to describe all Text Kit characteristics just in one tutorial, so in here we will focus in those features that someone may mostly use.
- Dynamic Type and text styles
- Exclusion paths
- Use of Text Storage for managing rich text
All the above will be discussed in details along the way. For the time being, a quick, necessary introduction to the Text Kit library was just made, which enables us to move forward.
Demo App Overview
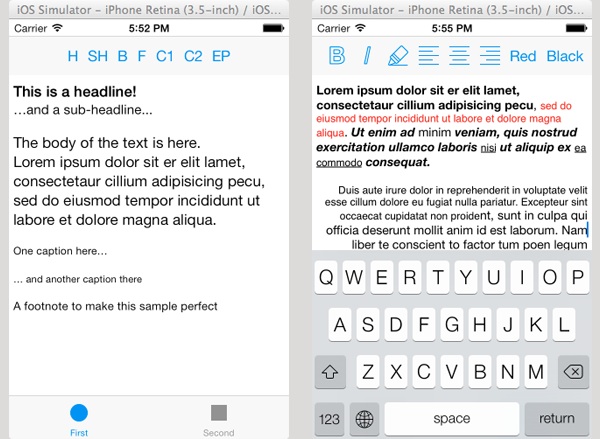
In this tutorial we are going to create a sample application that will demonstrate the three features mentioned above. As there are many different topics we will work with, the application is going to be a Tabbed one, in order to best serve our needs. Right next I present a sample of the application while running, in its initial state and without any text changes been made yet.

Text Kit Demo App
A few words on how the sample app is going to work now. Both view controllers behind each tab are going to consist of two views:
- A UIToolbar containing various bar button items that will be used to demonstrate various Text Kit operations.
- A UITextView with sample text for our experiments.
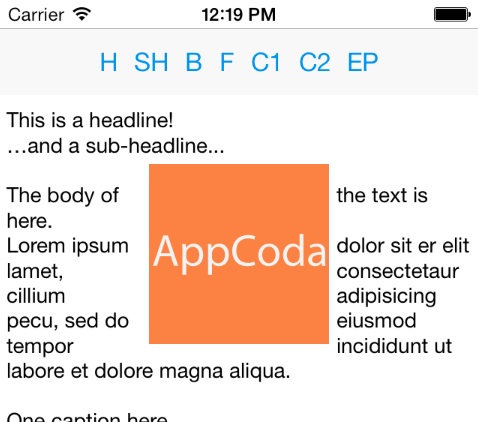
Speaking more particularly now, in the first view controller we are going to implement and demonstrate both the Dynamic Type and the Exclusion Paths features. All the bar button items of the toolbar, except for the last one, are used to change the text style of the text view (more about text styles in a while, during implementation). The last bar button item will be used to either add or remove an image (UIImageView) to the view, so simply by using an exclusion path force text to flow around the image and not to be overlapped by it.
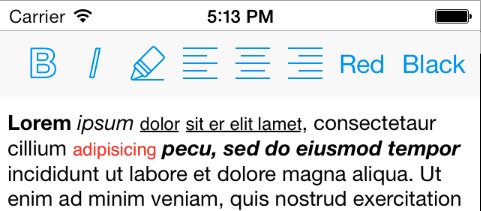
Regarding the second view controller, I guess that the respective figure above speaks for itself. As you may have understood, this is a mini RTF editor. On the text of the text view the following formatting will be possible to be applied:
- Bold and Italic
- Underline
- Color change (red and black)
- Paragraph alignment (left, center, right)
So, having presented the demo application and how it’s going to work, let’s do some real work and let’s see some cool Text Kit features in action!
Creating Demo App Project
Launch Xcode and while being in the Welcome screen, select to create a new project from the left-hand side of it:

Create a New Xcode Project
Under the iOS section, make sure you select the Application category. Then, select the Tabbed Application as the template for our project and click on Next.

Select Xcode Template
Right next, specify a name for the project. I named it TextKitDemo, so go ahead and add it at the Product Name field. Also, in the Devices drop down menu, make sure that the selected options is the iPhone value. Click on the Next button to proceed.

Setting project options
In this final window of the guide, select a place to store your project. Once you do that, click on the Create button and you’re ready.
Setting Up the User Interface
Let’s begin by setting up the interface for the first view controller being behind the first tab. Open the Main.storyboard file and let Interface Builder to show on-screen. Here is the initial interface that you should see right now:
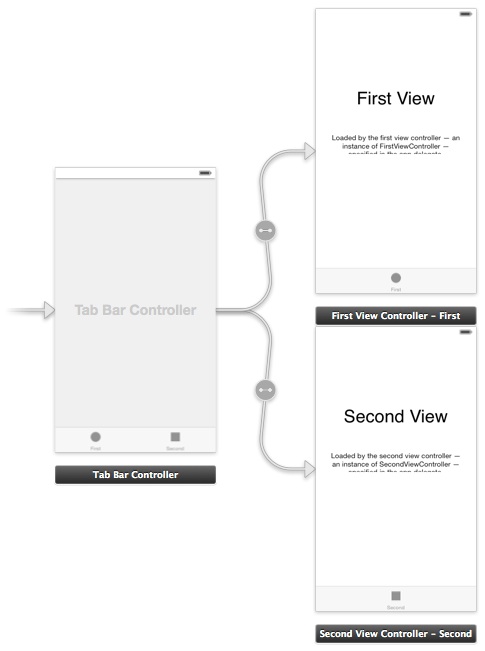
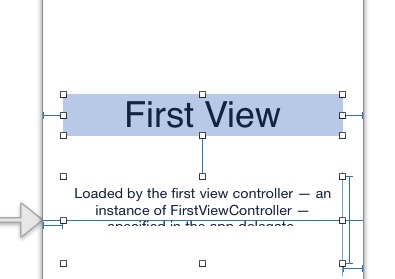
Go to the First View Controller scene and delete both UILabel views existing on it:
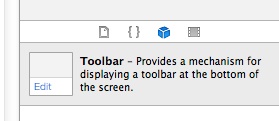
Next, through the Utilities Pane, locate a UIToolbar view inside the Object Library and add it to the scene.
Set its frame as follows: X=0, Y=20, Width=320, Height=44.
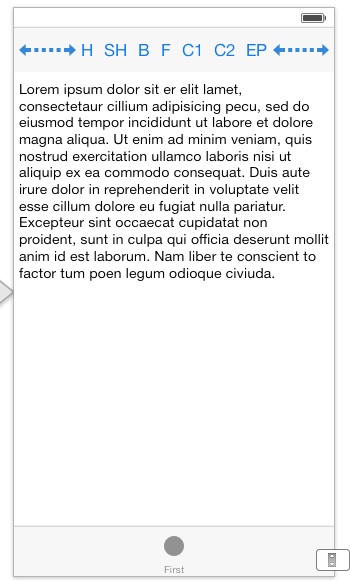
Once you position it to the right place, go and grab 6 more bar button items and add them to the bar. You should have 7 item in total. Starting from the left and moving to the right, set their titles as it’s shown here:
H, SH, B, F, C1, C2, EP
I will explain later those weird titles. Apart from the above, go and add two Flexible Space Bar Button Items and place them at the far left and the far right sides of the toolbar respectively. For now, if your toolbar looks like the following, then you are just fine:

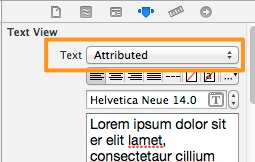
Go back to the Object Library, and this time get a UITextView object. Place it on the scene and make sure to let it occupy the remaining available space. For now, let it be with the default Lorem Ipsum text. However, in the Attributes Inspector, in the Text View section, select the Attributed value in the Text drop down menu. Here is how your scene should look like:
Head now to the FirstViewController.h file. Let’s declare an IBOutlet property that we’ll connect with the text view. Add the next line:
@property (weak, nonatomic) IBOutlet UITextView *textView;
Also, we want our bar button items to perform actions, so now it’s the best time to declare those IBAction methods and connect them later:
- (IBAction)applyHeadlineStyle:(id)sender;
- (IBAction)applySubHeadlineStyle:(id)sender;
- (IBAction)applyBodyStyle:(id)sender;
- (IBAction)applyFootnoteStyle:(id)sender;
- (IBAction)applyCaption1Style:(id)sender;
- (IBAction)applyCaption2Style:(id)sender;
- (IBAction)toggleImage:(id)sender;
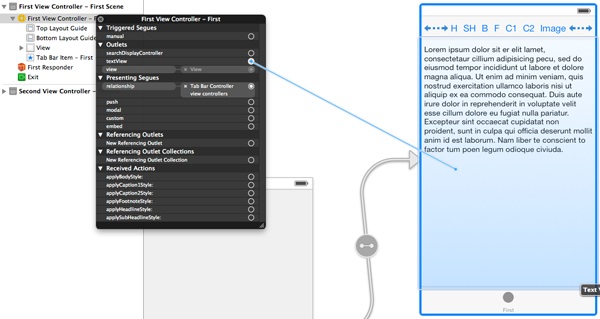
Let’s make the necessary connections now. Open once again the Main.storyboard file. Ctrl-Click or Right-Click on the First View Controller object, under the First View Controller – First Scene section, inside the Document Outline pane. In the window that pops up, the IBOutlet property and the IBAction methods we declared are listed among some other options. Locate the textView IBOutlet property, and click on the circle on the right side and drag and drop the text view, just as it’s demonstrated in the following image:
Repeat the exact same steps, and connect the IBAction methods to the bar button items. Connect the first method to the first item, the second method to the second item, and so on. The IBAction methods were declared in the same order that the bar button items are.
Dynamic Type and Text Styles
Let’s do now some discussion and explain what the dynamic type is, before we proceed to implementation. In iOS 7, Apple introduces Text Styles, which actually describe default font styles that are used in order to line up text inside text containers with user preferences. These styles are six, and they represent the most important text styles that can be found in a text content. Here they are:
- UIFontTextStyleHeadline
- UIFontTextStyleSubheadline
- UIFontTextStyleBody
- UIFontTextStyleFootnote
- UIFontTextStyleCaption1
- UIFontTextStyleCaption2
Beginning from the first one, those styles describe:
- Heading fonts
- Sub-Heading fonts
- Body fonts
- Footnote fonts
- Standard caption fonts
- Alternate caption fonts
The way, or in other words the mechanism that apply these styles to a text of a text container (such as a text view), is called Dynamic Type. Applications that adopt it have always their text displayed according to the user preferences. To make the latter more clear, if you open either in your device or in Simulator the Settings app, in the General section there is a setting named Text Size. When you go there, the next screen appears:
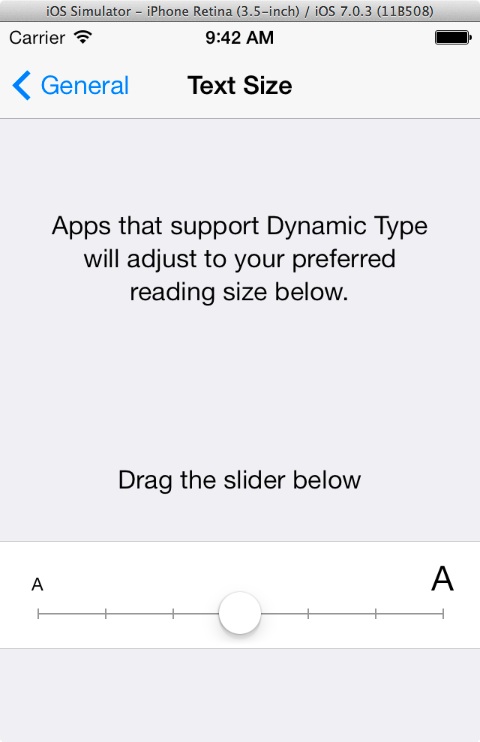
Users set their desired font size here, and beginning from iOS 7, they expect to see their preference working to all applications they use.
Generally, regarding the Dynamic Type feature, keep in mind that when you adopt it in your applications, then the system is responsible for displaying your text content in the best possible way and according to user settings. That means that the same text won’t be shown in the same way to all devices, as it will automatically be adjusted by the system to meet user requirements.
Let’s go now to see everything in action, where all will become pretty clear.
Dynamic Type in Action
Testing the Dynamic Type for first time is really easy and fast, as we just have to implement the IBAction methods that we declared and connected to the bar button items earlier and see all text styles applied to our text view’s text. Before doing so, I’ll just say that we are going to use a new method existing on Text Kit, named preferredFontForTextStyle:. This method returns a UIFont object, which contains the font set to the text container scaled to the appropriate size according to the applied style and user settings.
Right next follows the implementation of the IBAction methods. Note that the font returned by the preferredFontForTextStyle: is set directly to the text view.
- (IBAction)applyHeadlineStyle:(id)sender {
    [_textView setFont:[UIFont preferredFontForTextStyle:UIFontTextStyleHeadline]];
}

- (IBAction)applySubHeadlineStyle:(id)sender {
    [_textView setFont:[UIFont preferredFontForTextStyle:UIFontTextStyleSubheadline]];
}

- (IBAction)applyBodyStyle:(id)sender {
    [_textView setFont:[UIFont preferredFontForTextStyle:UIFontTextStyleBody]];
}

- (IBAction)applyFootnoteStyle:(id)sender {
    [_textView setFont:[UIFont preferredFontForTextStyle:UIFontTextStyleFootnote]];
}

- (IBAction)applyCaption1Style:(id)sender {
    [_textView setFont:[UIFont preferredFontForTextStyle:UIFontTextStyleCaption1]];
}

- (IBAction)applyCaption2Style:(id)sender {
    [_textView setFont:[UIFont preferredFontForTextStyle:UIFontTextStyleCaption2]];
}
If you run the app now, you’ll find out that simply by tapping (or clicking on the Simulator) on each bar button item except for the last one, the text style inside the text view gets changed. Pretty good!
Let’s see now a problem that is not immediately obvious, how it’s caused and how we’ll resolve it. Open the Settings app > General > Text Size and change the text size. Then close the settings app and go back to our demo application (important: don’t re-run the app through Xcode, just launch it). The text size inside the text view should have been changed too in accordance to your settings. However, this didn’t happen and of course, in a real app this would lead to a pretty bad user experience, as users expect to see any setting they apply affecting their applications at once.
Thankfully, we can overcome this problem easily, using a notification the system sends when a text size change occurs. This notification is the UIContentSizeCategoryDidChangeNotification, and our duty is to make our application observe for this one and take the necessary actions once it arrives. Go to the viewDidLoad method and add the next code fragment:
- (void)viewDidLoad
{
    [super viewDidLoad];

    [[NSNotificationCenter defaultCenter] addObserver:self
                                             selector:@selector(textSizeChangedWithNotification:)
                                                 name:UIContentSizeCategoryDidChangeNotification
                                               object:nil];
}
The textSizeChangedWithNotification: method that will be called if such a notification arrives, is a custom private method that we’ll implement right now. But firstly, let’s declare it by going in the private section of the interface and by adding the following line:
@interface FirstViewController ()

-(void)textSizeChangedWithNotification:(NSNotification *)notification;

@end
Before we proceed to the implementation of the method, let’s think for a second what we want to take place in it. As this method will be called only after a text size changing notification, the best way to reflect the changes would be to set once again the text on the text view, so it gets redrawn with the new size. Okay, but here we have six different text styles, so what style will be used while setting the text again?
The best solution is to use a private NSString object, which will keep the current style once it’s set. So, while still being in the private section, add the next line too:
@interface FirstViewController ()
...

@property (nonatomic, strong) NSString *styleApplied;

@end
Now, go in each one IBAction method and assign to the styleApplied string the equivalent style, just like it’s shown right next:
- (IBAction)applyHeadlineStyle:(id)sender {
    [_textView setFont:[UIFont preferredFontForTextStyle:UIFontTextStyleHeadline]];
    _styleApplied = UIFontTextStyleHeadline;
}

// Set the text style to the styleApplied string for each IBAction method.
After you have finished doing all that, we are ready to implement the textSizeChangedWithNotification: method, with just one simple line in it:
-(void)textSizeChangedWithNotification:(NSNotification *)notification{
    [_textView setFont:[UIFont preferredFontForTextStyle:_styleApplied]];
}
Now go and change once again the text size inside the Settings app and re-launch our application. You’ll notice that the text view’s text perfectly gets changed too.
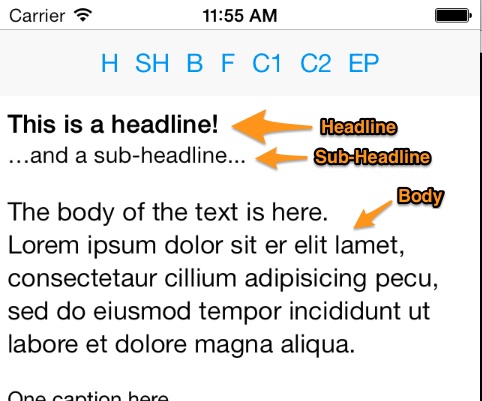
So far, so good, but simply changing the style of the whole text in a text view is not that impressive, right? It would be really cool and useful if we could modify our code, so we could set different styles to different text parts of the text view. So, for starters, let’s change the text in the text view so it’s easier to watch all different styles that will be applied. Go to the Main.storyboard file, select the text view and replace its default text with the next one:
This is a headline!
…and a sub-headline…
The body of the text is here.
Lorem ipsum dolor sit er elit lamet, consectetaur cillium adipisicing pecu, sed do eiusmod tempor incididunt ut labore et dolore magna aliqua.
One caption here…
… and another caption there
A footnote to make this sample perfect
In order to apply a style to a specific text fragment, it should be selected first. Then, when tapping on any bar button item to set the respective style, the changing will take effect only in the selected region. However, this time we cannot set the font style directly to the text view, as this would affect its entire contents and not only the desired range. Therefore, we will access directly the Text Storage object of the text view. Remember that this is the responsible class for storing any text and font attributes regarding the text of a text container.
Because we want to do the same job for every text style (locate the selected text and apply the style in it), we will create a private method to write the necessary code just once, and not six times. Then we will update the IBAction methods and we will make them call this private method, specifying each one its respective style. Let’s begin by declaring the private method in the private section of the interface, inside the FirstViewController.m file:
@interface FirstViewController ()
...

-(void)applyStyletoSelection:(NSString *)style;

@end
Let’s go straight ahead to its implementation and we’ll discuss it later.
-(void)applyStyletoSelection:(NSString *)style{
    // 1. Get the range of the selected text.
    NSRange range = [_textView selectedRange];

    // 2. Create a new font with the selected text style.
    UIFont *styledFont = [UIFont preferredFontForTextStyle:style];

    // 3. Begin editing the text storage.
    [_textView.textStorage beginEditing];

    // 4. Create a dictionary with the new font as the value and the NSFontAttributeName property as a key.
    NSDictionary *dict = @{NSFontAttributeName : styledFont};

    // 5. Set the new attributes to the text storage object of the selected text.
    [_textView.textStorage setAttributes:dict range:range];

    // 6. Notify that we end editing the text storage.
    [_textView.textStorage endEditing];
}
At first, we get the range of the selected text as shown above. Next, we create a new font, applying the text style and then we dive into Text Kit. Using the beginEditing method we perform the first step required to update the text storage, telling it that we are planning to make changes. A new attribute in the text storage object is set using the setAttributes:range: method, where the first parameter expects a NSDictionary with all the font or text attributes we want to get changed. That’s why we created the dictionary object at the exact previous step. Finally, after the new text storage attribute has been set, we call the endEditing method to finalize all changes.
In order for the above method to be called every time that a bar button is tapped, we need to modify all of the IBAction methods. Here they are:
- (IBAction)applyHeadlineStyle:(id)sender {
    [self applyStyletoSelection:UIFontTextStyleHeadline];
}

- (IBAction)applySubHeadlineStyle:(id)sender {
    [self applyStyletoSelection:UIFontTextStyleSubheadline];
}

- (IBAction)applyBodyStyle:(id)sender {
    [self applyStyletoSelection:UIFontTextStyleBody];
}

- (IBAction)applyFootnoteStyle:(id)sender {
    [self applyStyletoSelection:UIFontTextStyleFootnote];
}

- (IBAction)applyCaption1Style:(id)sender {
    [self applyStyletoSelection:UIFontTextStyleCaption1];
}

- (IBAction)applyCaption2Style:(id)sender {
    [self applyStyletoSelection:UIFontTextStyleCaption2];
}
You may test the app now. You’ll notice that if you select a portion of the text and then tap on a text style bar button item, the change will affect only the selected region.
Exclusion Paths
At the beginning of this tutorial I presented the classes that compose Text Kit, and I said that one of them is the Text Container class. One great feature of it is that it can store an array of UIBezierPaths and force text to flow around these paths, and because they are excluded from the text draw region, they are called Exclusion Paths.
An exclusion path is actually describing an area that text should flow around it. The text container class can accept one or more bezier paths, or none if no text flow should occur. It’s not hard to manage to create such an effect, as long as you provide at least one path to the text container object of the text view. Let’s see how it works.
Go to the Main.storyboard file and add a UIImageView object on the First View Controller scene. Set its frame values to the next ones: X=100, Y=110, Width=120, Height=120. If you have downloaded the project images, then set the Sample.png as its image. Your scene should look like this:
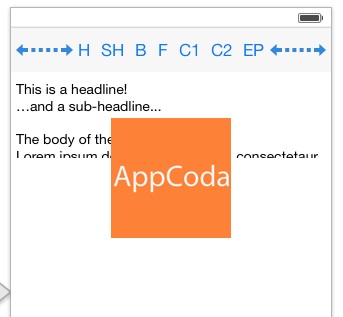
Initially the image view should not be shown on the screen, but when the last bar button item is tapped, which will work as a toggle button, the image view will appear and disappear sequentially, and our text will either flow or not around it. So, go to the FirstViewController.m file, and in the viewDidLoad: method, add the next line:
- (void)viewDidLoad
{
    ...

    [_imageView setHidden:YES];
}
Let’s implement now the toggleImage: IBAction method. At first, get the implementation, next we’ll discuss about it:
- (IBAction)toggleImage:(id)sender{
    if ([_imageView isHidden]) {
        CGRect convertedFrame = [_textView convertRect:_imageView.frame fromView:self.view];
        [[_textView textContainer] setExclusionPaths:@[[UIBezierPath bezierPathWithRect:convertedFrame]]];
    }
    else{
        [[_textView textContainer] setExclusionPaths:nil];
    }

    [_imageView setHidden:![_imageView isHidden]];
}
I don’t think it’s hard to understand it, but let me point a few things out. At first, we check if the image view is hidden or not. If it’s hidden (which is the initial state), then we have to set the exclusion path to the text container object of the text view so the text flows around the image view, and of course to make the image view visible. This line…
CGRect convertedFrame = [_textView convertRect:_imageView.frame fromView:self.view];
… is used to convert the image view coordinates from the self.view view to the text view’s, so both the image view and the floating text exist on the same area. Next, using the bezierPathWithRect: class method of the UIBezierPath class, we get the bezier path created by the frame specified by its parameter, and in our case is the frame (converted to text view’s coordinates) of the image view. We add this bezier path to a NSArray and we finally set the exclusion path. Note that in the else case, we set the exclusion path to nil, because we don’t want our text to flow when the image view is not there.
So, go give it a try and see how the text is redrawn around the image view. The next figure shows this exact behavior:
A RTF Editor
Up to now we have seen two very important aspects of Text Kit, how to adopt Dynamic Type and how to use Exclusion Paths so our text flows around a non-text object. Text Kit features are too many to be presented in just one tutorial, however we could dive a little bit more in by creating a mini RTF (rich text format) editor.
Before we begin working on it, let’s say a few more things about it. First of all, our editor will consist of two subviews: A toolbar at the top of the screen that will provide all various options for making a rich text, and a text view that will cover the rest of the available area and it will contain the edited text. Apart from setting various text attributes, we will also see how we can access the paragraph style and change its alignment (left, center, right). The following figure demonstrates the final result:
Let’s start working on it.
Editor Interface Setup
Our first task is to setup the interface of the view controller in Interface Builder. Click on the Main.storyboard file to let it show its contents, and go straight ahead to the Second View Controller scene. For starters, delete the two default labels existing in it.
Next, through the Utilities Pane, get a UIToolbar object from the Object Library and add it to the scene. Set its frame as follows: X=0, Y=20, Width=320, Height=44.
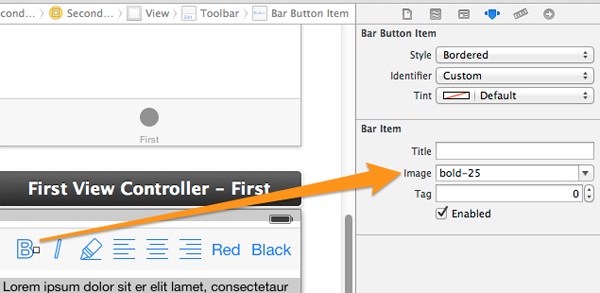
Make sure to add in the toolbar seven more bar button items, so you have eight of them in total. If you have downloaded the project images (and if you have added them to the project of course), you can set them to the bar button items. Starting from the very left one and moving to the right, set the next images:
- bold-25
- italic-25
- border_color-25
- align_left-25
- align_center-25
- align_right-25
To the last two bar button items, just set the titles: Red and Black as they won’t have any specific image.
Even though I am pretty confident that all readers know how to set a bar button item’s title or image, it might be better to make a quick reference. So, after having selected an item, make sure that the Utilities Pane is appeared, and then go to the Attributes Inspector, where under the Bar Item section you will find the Title and Image fields.
Your toolbar should be now ready. You also have to add a text view, which you will also need to drag and drop from the Object Library of the Utilities Pane. Once you add it, be sure that (by having the text view selected at the same time) in the Attributes Inspector, in the Text View section, the value Attributed is selected in the Text drop down menu.
Regarding the text itself, either leave the default “Lorem Ipsum” as it is, or set any text you like. I am going to leave it as-is.
So far we are going perfect, but we need an IBOutlet property for the text view so we can access it programmatically, and a few IBAction methods that will trigger all actions we want to be done by our bar button items. Let’s declare all these now.
Click on the SecondViewController.h file, and declare the next IBOutlet property regarding the text view and all IBAction methods, as shown below. The method names clearly indicate their purpose:
@property (weak, nonatomic) IBOutlet UITextView *textView;

- (IBAction)makeBold:(id)sender;
- (IBAction)makeItalic:(id)sender;
- (IBAction)underlineText:(id)sender;
- (IBAction)alignTextLeft:(id)sender;
- (IBAction)centerText:(id)sender;
- (IBAction)alignTextRight:(id)sender;
- (IBAction)makeTextColorRed:(id)sender;
- (IBAction)makeTextColorBlack:(id)sender;
While we were setting the interface of the first view controller up, I demonstrated how to connect an IBOutlet method, as well as IBAction methods, to the views of the scene. Follow the same steps, and connect the textView property to the text view of the Second View Controller scene. Do the same for all IBAction methods. Once you finish making connections, the interface is ready, so we are ready to move straight ahead to code.
Bold and Italic Text
Let’s begin doing some programming work by implementing the makeBold: IBAction method. As you will soon see, it’s not hard to make text attribute modifications, but pay special attention as we are going to use some new hot tools.
The logic we are going to follow in order to make a selected text bold (and later to un-bold it), is simple: First, we’ll get the range of the selected text, and for this range we will access the text attributes. We will get its font and we’ll change it so it uses the bold version of it. Finally, we will set the new font attributes to the selected text and we are done.
In order to do all the above, we are going to use a new class in iOS 7, named UIFontDescriptor. This class is super-useful, as it describes a font along with all of its attributes, but most importantly it allows to directly modify them and eventually create a new font. All font attributes are represented in the form of a dictionary (key/value pair), while a great number of key string constants exist to describe each single attribute. You’ll see this class in action right next, but before we proceed I strongly suggest to go and read more about it in Apple Documentation. It’s out of my scope to make a theoretical discussion about it, so I’m going to use it just as a tool.
Let’s write some code now. Get the next fragment and we’ll discuss it later:
- (IBAction)makeBold:(id)sender {
    NSRange selectedRange = [_textView selectedRange];

    NSDictionary *currentAttributesDict = [_textView.textStorage attributesAtIndex:selectedRange.location
                                                                    effectiveRange:nil];

    UIFont *currentFont = [currentAttributesDict objectForKey:NSFontAttributeName];

    UIFontDescriptor *fontDescriptor = [currentFont fontDescriptor];
}
Here is what this code does: First of all, we get the range of the selected text by using the selectedRange: method of the text view. Next, we get all attributes regarding the selected text from the text storage object of the text view, and we “extract” the current font from these attributes right after. Finally, we keep an instance of the font descriptor (UIFontDescriptor class) for the current object, so we can access all font attributes.
Now we are in position to modify the font properties and turn it to bold. Let’s see how:
- (IBAction)makeBold:(id)sender {
    ...

    UIFontDescriptor *changedFontDescriptor = [fontDescriptor fontDescriptorWithSymbolicTraits:UIFontDescriptorTraitBold];

    UIFont *updatedFont = [UIFont fontWithDescriptor:changedFontDescriptor size:0.0];
}
We create a new font descriptor object by using the fontDescriptorWithSymbolicTraits: method. This method, returns a new descriptor based on an existing one (just right as we are doing here), but after having specified some new features for the font, called symbolic traits (more about it just in a while). Using the new font descriptor, we create a new font named updatedFont as shown above. The 0.0 size value indicates that the new font will keep the same size as before.
A symbolic trait is actually a font property that describes some style of it, and it’s an unsigned, 32-bit integer value. Here is a list of all traits, taken directly from Apple:
typedef enum : uint32_t {
   /* Typeface info (lower 16 bits of UIFontDescriptorSymbolicTraits) */
   UIFontDescriptorTraitItalic = 1u << 0,
   UIFontDescriptorTraitBold = 1u << 1,
   UIFontDescriptorTraitExpanded = 1u << 5,
   UIFontDescriptorTraitCondensed = 1u << 6,
   UIFontDescriptorTraitMonoSpace = 1u << 10,
   UIFontDescriptorTraitVertical = 1u << 11,
   UIFontDescriptorTraitUIOptimized = 1u << 12,
   UIFontDescriptorTraitTightLeading = 1u << 15,
   UIFontDescriptorTraitLooseLeading = 1u << 16,

   /* Font appearance info (upper 16 bits of UIFontDescriptorSymbolicTraits */
   UIFontDescriptorClassMask = 0xF0000000,

   UIFontDescriptorClassUnknown = 0u << 28,
   UIFontDescriptorClassOldStyleSerifs = 1u << 28,
   UIFontDescriptorClassTransitionalSerifs = 2u << 28,
   UIFontDescriptorClassModernSerifs = 3u << 28,
   UIFontDescriptorClassClarendonSerifs = 4u << 28,
   UIFontDescriptorClassSlabSerifs = 5u << 28,
   UIFontDescriptorClassFreeformSerifs = 7u << 28,
   UIFontDescriptorClassSansSerif = 8u << 28,
   UIFontDescriptorClassOrnamentals = 9u << 28,
   UIFontDescriptorClassScripts = 10u << 28,
   UIFontDescriptorClassSymbolic = 12u << 28
} UIFontDescriptorSymbolicTraits;
After having said all these, we are almost ready to have it finished. We need to set the new font to the text storage object of the text view, just right it's shown below. Watch out the use of the dictionary object:
- (IBAction)makeBold:(id)sender {
    ...

    NSDictionary *dict = @{NSFontAttributeName: updatedFont};

    [_textView.textStorage beginEditing];
    [_textView.textStorage setAttributes:dict range:selectedRange];
    [_textView.textStorage endEditing];
}
If you run the app now and select some text in the second view controller, then by tapping on the Bold bar button item the text becomes bold. Great right? And with too little effort!
Let's return in our code now. This implementation does what we want, but just in the halfway. If you ran the app, then you surely noticed that once the selected text becomes bold, it cannot be reversed to normal, and that's a situation that we want to change.
Begin by locating this line:
UIFontDescriptor *changedFontDescriptor = [fontDescriptor fontDescriptorWithSymbolicTraits:UIFontDescriptorTraitBold];
Replace it with the following code fragment:
    ...

    NSString *fontNameAttribute = [[fontDescriptor fontAttributes] objectForKey:UIFontDescriptorNameAttribute];
    UIFontDescriptor *changedFontDescriptor;

    if ([fontNameAttribute rangeOfString:@"Bold"].location == NSNotFound) {
        changedFontDescriptor = [fontDescriptor fontDescriptorWithSymbolicTraits:UIFontDescriptorTraitBold];
    }
    else{

    }

    ...
There is no direct way that let us know if a font is bold or not. The only way to find this out is to see if the "Bold" keyword exists in the font name string as a substring. That's exactly what is being done in the code above. If it's not found, then we create the new font descriptor with the bold trait specified.
However, doing the opposite thing and removing the bold styling is a little bit more tricky, as there is no trait value just like the UIFontDescriptorTraitBold that turns a font to normal. We need to find a way so the bold value just to be removed from the symbolic traits of the font, and that is to perform an AND (&) bitwise operation between the current traits and the complement of the bold trait, so as the new trait that will come out won't contain the bold one. So, go ahead and add the next snippet in the else case:
uint32_t existingTraitsWithoutTrait = [fontDescriptor symbolicTraits] & ~UIFontDescriptorTraitBold;
changedFontDescriptor = [fontDescriptor fontDescriptorWithSymbolicTraits:existingTraitsWithoutTrait];
Note that the Not (or Complement) bitwise operator is the ~ symbol. The ! is logical operator, and I'm telling that just to avoid any possible confusion.
If you test it now, you'll see that by tapping sequentially on the Bold bar button item, the selected text will toggle its weight.
Well, we are almost touching perfection, and I'm telling almost, because there is one small problem not apparent yet, but that needs to be fixed. When looking at the last line of code presented above, you understand that the changedFontDescriptor object describes a font with all of its attributes, except for the bold style, and that means that if the selected text was both bold and italic, then just the italic styling remains intact. A question arises here, and that is what happens to other applied traits when setting the bold trait? For instance, what if a text is already italic and we set the bold trait with the next command we used earlier?
changedFontDescriptor = [fontDescriptor fontDescriptorWithSymbolicTraits:UIFontDescriptorTraitBold];
What is actually happening is that this line removes all other stylistic traits, and it just applies the bold one. If you want to see that with your own eyes, then implement the makeItalic: IBAction method by adding the same code we added to the makeBold:, just remember to replace any references to bold with the respective values regarding the italic styling.
The point is that if you have made a selected text region italic, then if you try to do it bold as well, the italic formatting no more applies. How can we overcome this? Simply by doing the exact opposing thing from what we did in the else previously. Locate this line:
changedFontDescriptor = [fontDescriptor fontDescriptorWithSymbolicTraits:UIFontDescriptorTraitBold];
and replace it with these two:
uint32_t existingTraitsWithNewTrait = [fontDescriptor symbolicTraits] | UIFontDescriptorTraitBold;
changedFontDescriptor = [fontDescriptor fontDescriptorWithSymbolicTraits:existingTraitsWithNewTrait];
That resolves the previous problem and our IBAction method is now perfect.
A nice programming technique is to create methods for writing repeating code, and that's something we'll do right next, as the makeItalic: method will work just like the makeBold: one. Go to the private section of the interface and declare the next method:
-(void)addOrRemoveFontTraitWithName:(NSString *)traitName andValue:(uint32_t)traitValue;
This method will accept two parameters, the only ones that change depending on the style we want to apply or remove: The trait name (such as "Bold" or "Italic") and the trait value (such as UIFontDescriptorTraitBold or UIFontDescriptorTraitItalic). Let's go to implement it, simply by adding all the code of the makeBold: method. The next code fragment displays the method completed, with any bold specific points replaced by the parameter values:
-(void)addOrRemoveFontTraitWithName:(NSString *)traitName andValue:(uint32_t)traitValue{
    NSRange selectedRange = [_textView selectedRange];

    NSDictionary *currentAttributesDict = [_textView.textStorage attributesAtIndex:selectedRange.location
                                                                    effectiveRange:nil];

    UIFont *currentFont = [currentAttributesDict objectForKey:NSFontAttributeName];

    UIFontDescriptor *fontDescriptor = [currentFont fontDescriptor];

    NSString *fontNameAttribute = [[fontDescriptor fontAttributes] objectForKey:UIFontDescriptorNameAttribute];
    UIFontDescriptor *changedFontDescriptor;

    if ([fontNameAttribute rangeOfString:traitName].location == NSNotFound) {
        uint32_t existingTraitsWithNewTrait = [fontDescriptor symbolicTraits] | traitValue;
        changedFontDescriptor = [fontDescriptor fontDescriptorWithSymbolicTraits:existingTraitsWithNewTrait];
    }
    else{
        uint32_t existingTraitsWithoutTrait = [fontDescriptor symbolicTraits] & ~traitValue;
        changedFontDescriptor = [fontDescriptor fontDescriptorWithSymbolicTraits:existingTraitsWithoutTrait];
    }

    UIFont *updatedFont = [UIFont fontWithDescriptor:changedFontDescriptor size:0.0];

    NSDictionary *dict = @{NSFontAttributeName: updatedFont};

    [_textView.textStorage beginEditing];
    [_textView.textStorage setAttributes:dict range:selectedRange];
    [_textView.textStorage endEditing];
}
One thing has only been left, to call the method:
- (IBAction)makeBold:(id)sender {
    [self addOrRemoveFontTraitWithName:@"Bold" andValue:UIFontDescriptorTraitBold];
}

- (IBAction)makeItalic:(id)sender {
    [self addOrRemoveFontTraitWithName:@"Italic" andValue:UIFontDescriptorTraitItalic];
}
Underline Text
Underlying text is not that complex as making font bold or italic. What we actually have to do, is to check if the NSUnderlineStyleAttributeName attribute exists in the list of attributes of the selected text or not, and then to set the line thickness accordingly. The underlineText: IBAction method is not hard to be implemented, and it's given below:
- (IBAction)underlineText:(id)sender {
    NSRange selectedRange = [_textView selectedRange];

    NSDictionary *currentAttributesDict = [_textView.textStorage attributesAtIndex:selectedRange.location
                                                                    effectiveRange:nil];

    NSDictionary *dict;

    if ([currentAttributesDict objectForKey:NSUnderlineStyleAttributeName] == nil ||
        [[currentAttributesDict objectForKey:NSUnderlineStyleAttributeName] intValue] == 0) {

        dict = @{NSUnderlineStyleAttributeName: [NSNumber numberWithInt:1]};

    }
    else{
        dict = @{NSUnderlineStyleAttributeName: [NSNumber numberWithInt:0]};
    }

    [_textView.textStorage beginEditing];
    [_textView.textStorage setAttributes:dict range:selectedRange];
    [_textView.textStorage endEditing];
}
This feature has now been added to our superb RTF editor, so go and give it and try if you want!
Setting Paragraph Alignment
What we have seen until now regards text properties, but we still haven't tried to change any paragraph attributes. As you will finally see, working with paragraphs has nothing more difficult than what we have done already. For the purposes of this tutorial, we'll implement the three IBAction methods alignTextLeft:, centerText: and alignTextRight: that we have already declared and connected to the appropriate bar button items. However, prior doing so, let's create a private method in which we'll write code common to all these three IBAction methods.
Navigate yourself at the private section of the interface, and declare the following method:
@interface SecondViewController ()
...

-(void)setParagraphAlignment:(NSTextAlignment)newAlignment;

@end
The method will accept just one parameter, the desired alignment. Let's go to its implementation now. As you will see in the next code snippet, we create a new, mutable paragraph style object (NSMutableParagraphStyle) that will be used to set the new text alignment, as the current paragraph style attribute is immutable. This new mutable paragraph style will be assigned to the text storage object of the text view. I think that the code speaks for itself, so here it is:
-(void)setParagraphAlignment:(NSTextAlignment)newAlignment{
    NSRange selectedRange = [_textView selectedRange];

    NSMutableParagraphStyle *newParagraphStyle = [[NSMutableParagraphStyle alloc] init];
    [newParagraphStyle setAlignment:newAlignment];

    NSDictionary *dict = @{NSParagraphStyleAttributeName: newParagraphStyle};
    [_textView.textStorage beginEditing];
    [_textView.textStorage setAttributes:dict range:selectedRange];
    [_textView.textStorage endEditing];

}
After this implementation, setting a paragraph's alignment is as simple as the code that follows. All three IBAction methods that do this job are given together:
- (IBAction)alignTextLeft:(id)sender {
    [self setParagraphAlignment:NSTextAlignmentLeft];
}

- (IBAction)centerText:(id)sender {
    [self setParagraphAlignment:NSTextAlignmentCenter];
}

- (IBAction)alignTextRight:(id)sender {
    [self setParagraphAlignment:NSTextAlignmentRight];
}
Setting Text Foreground Color
Until now we have gained a great level of experience in doing some working with the text storage object, therefore setting the foreground color of the selected text will look like a piece of cake. The job we have to do here is similar to the one we did for underlying text, and that means that we simply have to check in the attributes of the selected text if a foreground color has been set, and if so, to check if it matches to the color we want to apply. If it doesn't match, then we just have to set the desired fore color to the text storage object and that's all. Here is the implementation for the makeTextColorRed: IBAction method:
- (IBAction)makeTextColorRed:(id)sender {
    NSRange selectedRange = [_textView selectedRange];

    NSDictionary *currentAttributesDict = [_textView.textStorage attributesAtIndex:selectedRange.location
                                                                    effectiveRange:nil];

    if ([currentAttributesDict objectForKey:NSForegroundColorAttributeName] == nil ||
        [currentAttributesDict objectForKey:NSForegroundColorAttributeName] != [UIColor redColor]) {

        NSDictionary *dict = @{NSForegroundColorAttributeName: [UIColor redColor]};
        [_textView.textStorage beginEditing];
        [_textView.textStorage setAttributes:dict range:selectedRange];
        [_textView.textStorage endEditing];
    }
}
Similarly we can implement the makeTextColorBlack: IBAction method:
- (IBAction)makeTextColorBlack:(id)sender {
    NSRange selectedRange = [_textView selectedRange];

    NSDictionary *currentAttributesDict = [_textView.textStorage attributesAtIndex:selectedRange.location
                                                                    effectiveRange:nil];

    if ([currentAttributesDict objectForKey:NSForegroundColorAttributeName] == nil ||
        [currentAttributesDict objectForKey:NSForegroundColorAttributeName] != [UIColor blackColor]) {

        NSDictionary *dict = @{NSForegroundColorAttributeName: [UIColor blackColor]};
        [_textView.textStorage beginEditing];
        [_textView.textStorage setAttributes:dict range:selectedRange];
        [_textView.textStorage endEditing];
    }
}
Compile and Test the Final App
If you haven't done so in any of the previous steps, then this is the best time to compile and test the sample application, either in a real device, or in the Simulator. Play around while applying various text styles in the first view controller, and see how text flows around the sample image when the exclusion path is set. Also, use the second view controller and format the text, combining features and attributes.
The next figure displays the outcome of this tutorial.
Summary
Text Kit is a powerful tool, as it's based on other powerful classes and frameworks. What we've seen in this tutorial only demonstrates the most important aspects of it, but someone who wants to use it even more needs to do further study on Apple documentation. Text Kit makes it really easy for developers to work with text and text containers, as well as all of their properties. Further than that, new and rich-featured apps can be can now be created with less effort to be required. If you haven't previously worked with text or Text Kit specifically, I hope this tutorial works as a guide and it provides useful tips and ideas that can be applied to your own applications.
For your complete reference, you can download the Xcode project from here.
The copyright for all bar button images items belongs to: icons8.com


