

Hello readers! iOS 8 is at the gates, as only a few weeks remain until the official release of the updated version of the operating system, and along with it, the release of the Swift programming language. So, as you understand, we are preparing to enter into a new era of the iOS SDK, where new wonderful technologies waiting for us to explore them! However, here at Appcoda we decided to dedicate one more tutorial to the existing SDK, using the Objective-C language. My next tutorials will focus on new iOS 8 technologies, and we’ll use the Swift language. Regarding this one, there were many candidate topics to write for, but ultimately the chosen one is about the Gesture Recognizers. So, let’s see a few things about them.
A gesture recognizer is actually an object of the abstract class UIGestureRecognizer. Such an object is related to a view, and monitors for predefined gestures made on that view. Going one level deeper, I would say that gestures are actually touches and movements of one or more fingers that happen on a specific area of the screen, where a view of interest exists there. In the early versions of iOS SDK, gestures recognizers were not provided to developers, so implementing such ways of interaction required a lot of manual work. Thankfully, Apple wrapped up all that manual work and gave it to developers as a single tool, and that way working with gestures became a really easy part of the iOS programming.
The UIGestureRecognizer class as an abstract one, it can’t be used directly. There are specific subclasses of it that are provided for usage, and each one of them deals with a specific kind of gesture. Let’s go through them for a while and let’s see what the respective gestures are for:
- UITapGestureRecognizer: This class regards the tap gestures made on a view. It can be used to handle single or multiple taps, either with one or more fingers. Tapping is one of the most usual gestures that users make.
- UISwipeGestureRecognizer: Another important gesture is the swipe, and this class exists just for it. Swiping happens when dragging a finger towards a direction (right, left, top and down). A characteristic example of the swipe gesture exists on the Photos app, where we use our fingers to slide from one photo to another.
- UIPanGestureRecognizer: The pan gesture is actually a drag gesture. It’s used when it’s needed to drag views from one point to another.
- UIPinchGestureRecognizer: When you view photos on the Photos app and you use your two fingers to zoom in or out to a photo, then you perform a pinch gesture. As you understand, pinching requires two fingers. An object of this class is usually handy to change the transform of a view, and more specifically its scale. Using pinch gestures for example, you can implement zoom in and out to photos on your own apps.
- UIRotationGestureRecognizer: In accordance to the previous gesture, rotation is used to rotate a view using two fingers.
- UILongPressGestureRecognizer: An object of that class monitors for long press gestures happening on a view. The pressing must last long enough in order to be detected, and the finger or fingers should not move a lot around the pressed point otherwise the gesture fails.
- UIScreenEdgePanGestureRecognizer: This one is similar to the swipe gesture, but with a great difference: The finger movement should always begin from an edge of the screen.
All gesture objects perform an action once a valid gesture is detected. This is either an IBAction method in case the gesture is added through Interface Builder, or a private or public method in case of programmatic implementation. When an action method is called after a gesture has happened, the gesture object always sends itself in case additional info is required when handling the gesture. It’s not necessary to declare the action methods in order to contain the gesture object to their signatures, but personally I recommend you to do so as a better programming practice. For example, both of the following method signatures are valid:
-(void)handleMyTapGesture;
-(void)handleMyTapGestureWithGestureRecognizer:(UITapGestureRecognizer *)gestureRecognizer;
In the second case, the gestureRecognizer argument can provide you with extra info you might need, such as the view that the gesture took place on. In my examples in this tutorial, I’ll use the second method signature when declaring methods for handling gestures.
Looking now from the point of views, a view can contain more than one gesture recognizers. For instance, you can add both pinch and rotation gesture recognizers to an imageview, so you can zoom in/out and rotate the presented image. However, just one gesture at a given time can occur. Gesture recognizers that are related to a view are added to an array of that view, so you can access them as you would do for any object to a normal array. I guess though that you will rarely need to access a gesture recogniser object in such way.
As you will see next to this tutorial, working with gesture recognizers is easy enough, and it consists of a pretty awesome way to provide interaction to your app without using the traditional subviews for performing actions (such as buttons). Before we continue, I should mention that we are going to focus our attention to the first five gesture recognizer classes, while for the last two we’ll just say a couple of words about each one of them. That’s because they have great similarities to other classes, so it would be pointless to discuss about the same stuff twice. Furthermore, I said previously that the gesture recognizers can be added in two ways to views: Either using the Interface Builder, or programmatically. In here I am going to follow the second path, and do everything in code. If you want to read more theoretical stuff about gesture recognizers, then feel free to pay a visit to the official documentation provided by Apple.
Demo App Overview
The way that we are going to work in this tutorial is straightforward enough. First of all, we will create a tabbed application, which will contain five tabs. Each tab will match to a single view controller, and each view controller will be used to demonstrate a new gesture recognizer. Furthermore, we will create five view controller classes to implement the necessary code for every gesture recognizer that we will meet.
The gesture recognizers that we are going to work with are in the following order:
- Tap gesture recognizer
- Swipe gesture recognizer
- Pan gesture recognizer
- Pinch gesture recognizer
- Rotation gesture recognizer
For each one of them, we are going to create one or more test views, and then we will implement the necessary code that will make the respective gestures properly work. So, I could say that the demo application of this tutorial will be parted by many small examples, where each one of them targets for the study of a single gesture recognizer.
App Creation and Setup
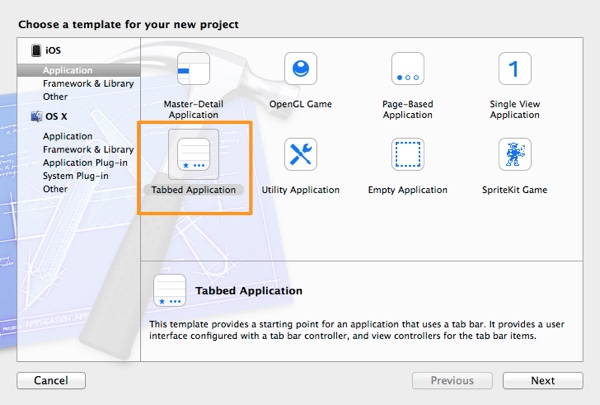
Let’s begin by creating a new project in Xcode. Launch it, and in the first step of the guide select the Tabbed Application as the template for your project.
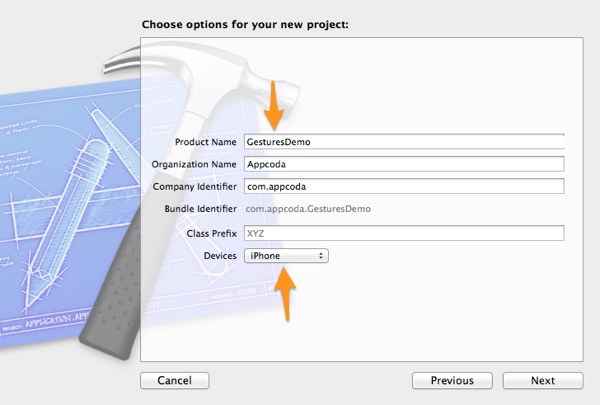
Next, set the GesturesDemo as the name of the project, and make sure that the iPhone is the selected device.
Get finished with the guide by selecting a directory to store the project, and you are ready.
Now that the project has been prepared, let’s setup our interface so we can start working with the gesture recognizers at once later. Click on the Main.storyboard file, and let the Interface Builder appear. As you notice, there are two view controllers connected to the tab bar controller already, so we need to add three more. From the Object Library, drag and drop three new View Controller objects to the IB canvas.
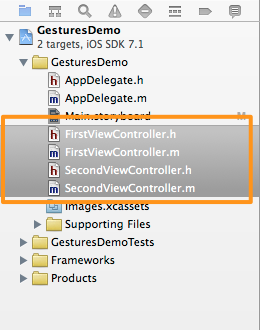
Before we connect the view controllers to the tab bar, we must create the necessary view controller classes. Begin by selecting the FirstViewController and SecondViewController classes (both the .h and .m files) on the Project Navigator, and then hit the Delete key on your keyboard. We are not going to use these files, we will create new classes for the gesture recognizers that we’ll work with.
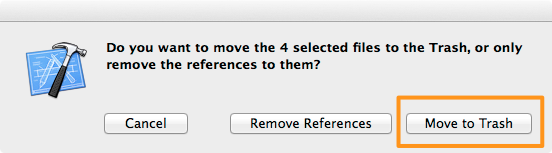
In the confirmation dialog box that shows up, click on the Move to Trash button.
Next, start adding the new classes to the project. The procedure that will be presented right next should be repeated five times in total, until all the necessary classes to have been added to the project. Let’s see everything in details for the first one:
Open the File > New > File… menu, and select to create a new Objective-C class in the guide that appears.
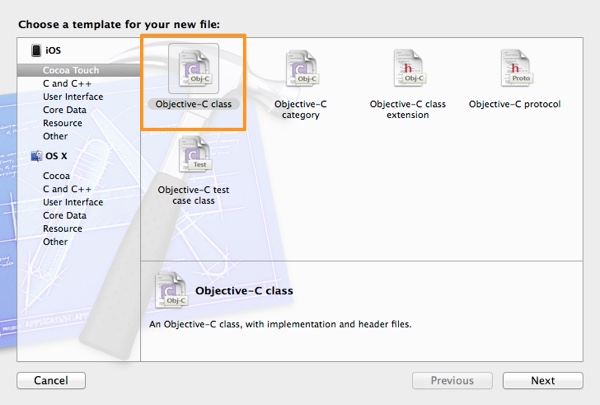
Move to the next step, and in the Subclass of field, make sure that the set value is the UIViewController one. If not, then do it now. Next, name the new class by setting the TapViewController value in the Class field.
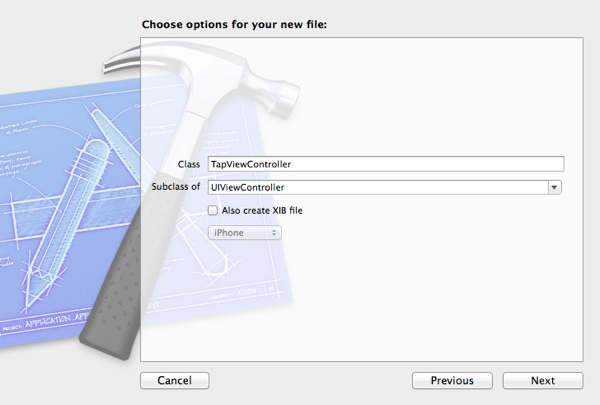
Proceed and in the last step click on the Create button to get finished with the guide and let Xcode create and add the new class to the project.
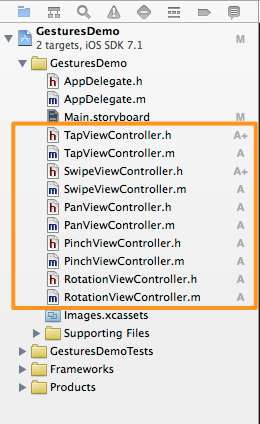
For the next view controllers that you will create, set the following class names:
- SwipeViewController
- PanViewController
- PinchViewController
- RotationViewController
After you have added all of them, here’s how your Project Navigator should look like:
Now we can return to Interface Builder. Firstly, make sure that the Utilities pane is on, because you will need it. Next, select the first view controller scene (let’s start from top to bottom), and show the Identity Inspector in the Utilities pane. In there, in the Class field of the Custom Class section, set the name of the first class you added to the project, the *TapViewController:
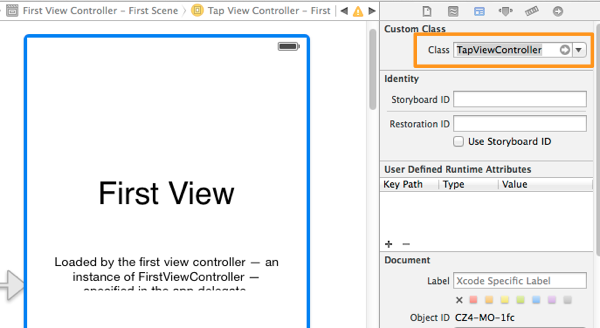
Repeat the above step until you set all the custom classes to the remaining view controllers.
Our next move is to connect all the view controllers to the tab bar controller. This is can be done very easily, if you select the tab bar controller and then you open the Connections Inspector to the Utilities pane. In the Triggered Segues section, click on the circle on the right of the view controllers option and drag on top of every not connected view controller, and proceed by connecting them one by one.
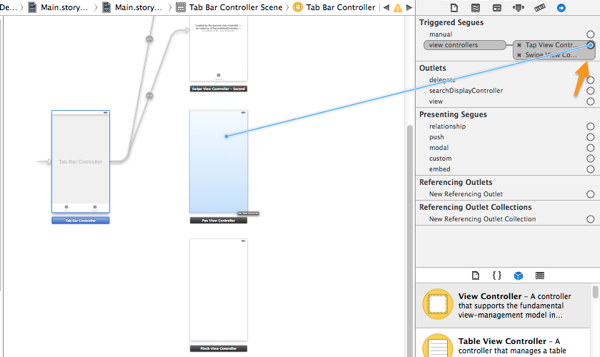
Once all the connections have been made, you can set the titles of the bar button items of the view controllers. Starting from the top to bottom once again, select the tab bar item and then open the Attributes Inspector in the Utilities pane. In there, set the proper tab bar title for each view controller, and set the first as the image to all view controllers.
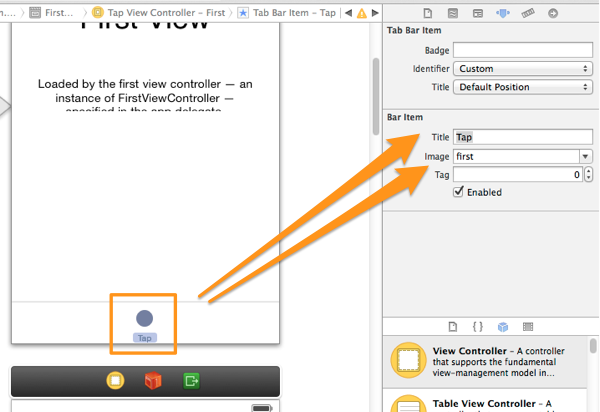
The tab bar item titles are in order:
- Tap
- Swipe
- Pan
- Pinch
- Rotation
Finally, remove the existing content from the first two pre-made view controllers.
Everything is ready now. Optionally, you can add a label as a title to each view controller. If you would like to do that too, then drag a UILabel object to each view controller and set the following attributes:
- Frame: X=20, Y=40, Width=280, Height=40
- Font: System Bold, 20pt
- Alignment: Center
The texts of the labels should be (following the same order as before):
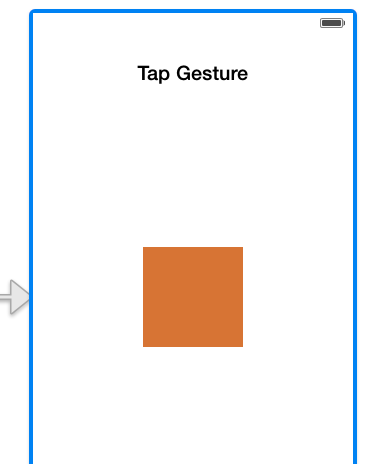
- Tap Gesture
- Swipe Gesture
- Pan Gesture
- Pinch Gesture
- Rotation Gesture
Now that we have setup the base that we’ll work on, we can dive directly in the heart of our topic. However, we’ll return several times here in Interface Builder with an aim to create the needed test views for each gesture recognizer.

Tap Gesture Recognizer
We begin the real exploration of our today’s topic with the tap gesture recognizer, as you assume from the title of this section. In the previous part, you added all the needed view controllers to the project and you connected them with the tab bar controller. Now in this part, we are going to add a view object (UIView) to the Tap view controller scene, which we will use as a test view in order to do our work in code.
At first, make sure that you have the Interface Builder still on by clicking on the Main.storyboard file in the Project Navigator. Next, bring the Tap view controller scene right in front of you, and then grab an UIView object from the Object Library and drag it to the scene’s view. Set the following properties to that view:
- Frame: X=110, Y=234, Width=100, Height=100
- Background Color: R=215, G=116, B=52 (or any other color you like)
Now that the view is in place, we must create an IBOutlet property and connect it with the view. Open the TapViewController.h file and declare the following property:
@interface TapViewController : UIViewController

@property (weak, nonatomic) IBOutlet UIView *testView;

@end
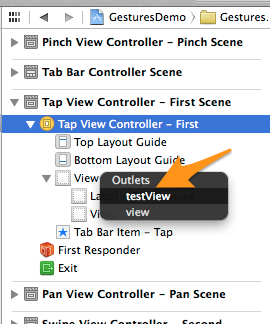
Back on the Main.storyboard file again, go to the Document Outline pane, and Ctrl-Drag from the Tap view controller scene object to the view, as shown below:
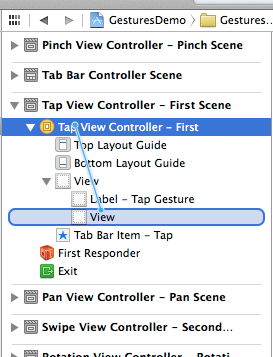
In the black popup window, just select the testView property, and you are all set.
Note: We are going to use the above procedure for adding test view objects and for connecting them with IBOutlet properties to the upcoming chapters as well. However, I’m not going to get into much detail again, so if you need you may return back here to follow the steps that were just described.
Now, open the TapViewController.m file. The first thing we must do, is to create an object of the UITapGestureRecognizer class, which we’ll then add to the testView view. Actually, we will create two objects of that class, one for testing single taps, and one for testing double taps. Our work will take place initially to the viewDidLoad method, so let’s get started with the first one.
The next code segment clearly displays how we initialize a gesture recognizer object:
UITapGestureRecognizer *singleTapGestureRecognizer = [[UITapGestureRecognizer alloc] initWithTarget:self action:@selector(handleSingleTapGesture:)];
Using that way, you can initialize any object of the gesture recognizer subclasses, as long as you replace the name of the class. As you see, we specify a target and an action. The action in this case is a private method that we are about to create in a few seconds.
To assign the above gesture recognizer to our test view, here’s what we should write:
[self.testView addGestureRecognizer:singleTapGestureRecognizer];
The addGestureRecognizer: method is the one and standard way of adding a gesture recognizer object to a view.
Go now to the private section of the interface, and declare the private method we set to the gesture recognizer as follows:
@interface TapViewController ()

-(void)handleSingleTapGesture:(UITapGestureRecognizer *)tapGestureRecognizer;

@end
As I said in the introduction, the gesture recognizer object passes itself to the selector method, and by using this method signature we can use it later in the implementation. We could omit the parameter, but that’s something that I am intentionally going to avoid to the whole tutorial.
Let’s move forward to the method’s definition now. What are we going to do there? Well, nothing hard especially. We will just double the width of the test view when we tap on it once, and we will revert the original width value upon the second tap (an so on). Let’s see it:
-(void)handleSingleTapGesture:(UITapGestureRecognizer *)tapGestureRecognizer{
    CGFloat newWidth = 100.0;
    if (self.testView.frame.size.width == 100.0) {
        newWidth = 200.0;
    }

    CGPoint currentCenter = self.testView.center;

    self.testView.frame = CGRectMake(self.testView.frame.origin.x, self.testView.frame.origin.y, newWidth, self.testView.frame.size.height);
    self.testView.center = currentCenter;
}
The implementation is really simple. At first we check if the initial width of the view is equal to 100.0 points, and if so we make it 200.0, otherwise we keep the initial assigned value (100.0). Next, we keep to a CGPoint structure variable the current center point, we change the width of the view and we center it again.
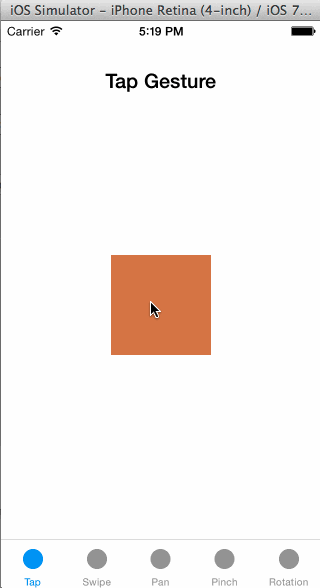
It’s now time to try out the tap gesture. Run the app, and once it gets launched to either the Simulator or a device, make sure that you are on the first tab. Tap on the view once, and its size will change. Tap once again, and watch it going back to its original state. Simple and cool?

Let’s go back to our work again. As I have already said, a tap gesture can be performed with one or more fingers, and the gesture could require one or more taps. So, let’s see one more example, where this time we will “tell” to the gesture recognizer object that we want two taps to happen, and that two fingers are required in order to perform the predefined action. In the viewDidLoad method, add the next lines:
- (void)viewDidLoad
{
    ...

    UITapGestureRecognizer *doubleTapGestureRecognizer = [[UITapGestureRecognizer alloc] initWithTarget:self action:@selector(handleDoubleTapGesture:)];
    doubleTapGestureRecognizer.numberOfTapsRequired = 2;
    doubleTapGestureRecognizer.numberOfTouchesRequired = 2;
    [self.testView addGestureRecognizer:doubleTapGestureRecognizer];
}
Here we initialize a new tap gesture recognizer object, and we specify another action method that we’ll implement in a while. The new thing here though is the use of the two properties that allow us to set the number of the required taps and touches (or in other words, the number of fingers). Finally, we add the recognizer object to the testView view.
Note that our test view now contains two gesture recognizer objects.
Now, let’s get finished with the remaining tasks. Go to the private interface section and declare the new private method:
@interface TapViewController ()

...

-(void)handleDoubleTapGesture:(UITapGestureRecognizer *)tapGestureRecognizer;

@end
In its definition, we will change both the width and height of the view by doubling its size. We will follow the same logic as before:
-(void)handleDoubleTapGesture:(UITapGestureRecognizer *)tapGestureRecognizer{
    CGSize newSize = CGSizeMake(100.0, 100.0);
    if (self.testView.frame.size.width == 100.0) {
        newSize.width = 200.0;
        newSize.height = 200.0;
    }

    CGPoint currentCenter = self.testView.center;

    self.testView.frame = CGRectMake(self.testView.frame.origin.x, self.testView.frame.origin.y, newSize.width, newSize.height);
    self.testView.center = currentCenter;
}
Run the app once again. This time, double-tap and use two fingers, otherwise the gesture will fail. Also, try both of the gesture recognizers we created here:
What you have seen in this part of the tutorial, is more or less the way you work with all the gesture recognizers, even though each one of them has something special about it. For now, we have successfully managed to implement and use tap gestures, and that’s quite important!
Swipe Gesture Recognizer
Another quite common and cool gesture recognizer is the swipe. Swiping can be done towards any of the four basic directions (right, left, top, bottom) but not in a diagonal way. The UISwipeGestureRecongnizer class provides a method that allows us to specify the direction, and if none is set, then the right direction is used by default. A swipe gesture recognizer object can monitor and trigger actions for one direction only. That means that if you want a view in your application to support swiping towards two or more directions, then you must create two or more gesture recognizer objects respectively. Beyond all that, note that the action that’s been triggered by the swipe movement starts right after the swiping is over (when the finger actually stops sliding).
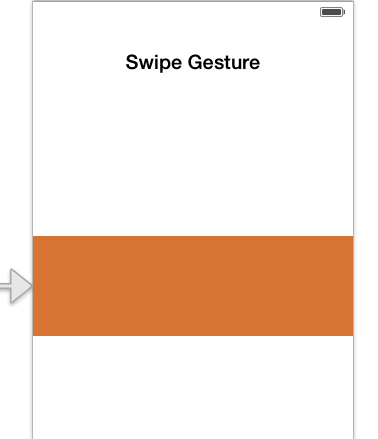
In this part we are going to work with the SwipeViewController class that we previously added to the project. In the respective scene in the Interface Builder, we are going to add three view (UIView) objects. The width of all three views will be equal to the screen’s width. The first view will be placed on-screen, while the other two views will be placed at the left and the right side of the first view, and obviously will be out of the visible area. Our goal is to make these views move horizontally using swipe gestures, and to let the hidden views to be revealed by sliding either left or right.
Let’s see everything step by step, and let’s start by opening the Main.storyboard file. Go to the Swipe view controller scene and add the next three view objects by defining at the same time the frame and background color properties:
First View
- Frame: X=0, Y=234, Width=320, Height=100
- Background Color: R=215, G=116, B=52
Second View
- Frame: X=320, Y=234, Width=320, Height=100
- Background Color: Black Color
Third View
- Frame: X=-320, Y=234, Width=320, Height=100
- Background Color: R=0, G=128, B=0
Next, create the following IBOutlet properties to the SwipeViewController.h file:
@interface SwipeViewController : UIViewController

@property (weak, nonatomic) IBOutlet UIView *viewOrange;

@property (weak, nonatomic) IBOutlet UIView *viewBlack;

@property (weak, nonatomic) IBOutlet UIView *viewGreen;

@end
After having done so, go back to the Swipe view controller scene, and make the proper connections. Obviously, the viewOrange property matches to the first view, the viewBlack property matches to the second view, and the viewGreen property matches to the third view.
Now, let’s head to the SwipeViewController.m file, and let’s start creating the gesture recognizers we need one by one. Go to the viewDidLoad method, and initialize such an object for the first view (the one in the middle being in the visible area of the screen). Let’s see that:
- (void)viewDidLoad
{
    [super viewDidLoad];
    // Do any additional setup after loading the view.

    UISwipeGestureRecognizer *swipeRightOrange = [[UISwipeGestureRecognizer alloc] initWithTarget:self action:@selector(slideToRightWithGestureRecognizer:)];
    swipeRightOrange.direction = UISwipeGestureRecognizerDirectionRight;

}
What we have done with this segment is quite clear: Upon the object initialization we specify the action method that should be called when the swiping will occur, and then we set the direction of the swipe gesture towards right.
Now, let’s create one more gesture recognizer object that will enable us to swipe towards left:
- (void)viewDidLoad
{
    ...

    UISwipeGestureRecognizer *swipeLeftOrange = [[UISwipeGestureRecognizer alloc] initWithTarget:self action:@selector(slideToLeftWithGestureRecognizer:)];
    swipeLeftOrange.direction = UISwipeGestureRecognizerDirectionLeft;
}
Easy, right? What we have only left to do, is to add both of these gesture recognizers to the viewOrange view exactly as shown below:
- (void)viewDidLoad
{
    ...

    [self.viewOrange addGestureRecognizer:swipeRightOrange];
    [self.viewOrange addGestureRecognizer:swipeLeftOrange];
}
The action methods we set to the recognizers above, should perform one simple thing: To slide all views either towards left or towards right, so when a view leaves the visible area of the screen, another one to be appeared. Let’s declare them first and we’ll do the implementation next. In the private interface section add the next lines:
@interface SwipeViewController ()

-(void)slideToRightWithGestureRecognizer:(UISwipeGestureRecognizer *)gestureRecognizer;

-(void)slideToLeftWithGestureRecognizer:(UISwipeGestureRecognizer *)gestureRecognizer;

@end
Let’s see the implementation of the first method straight away:
-(void)slideToRightWithGestureRecognizer:(UISwipeGestureRecognizer *)gestureRecognizer{
    [UIView animateWithDuration:0.5 animations:^{
        self.viewOrange.frame = CGRectOffset(self.viewOrange.frame, 320.0, 0.0);
        self.viewBlack.frame = CGRectOffset(self.viewBlack.frame, 320.0, 0.0);
        self.viewGreen.frame = CGRectOffset(self.viewGreen.frame, 320.0, 0.0);
    }];
}
As you notice, when we swipe towards right, we want the X origin point of each view to be increased by 320.0 pixels and manage that way to move our views to the right. We make this movement look natural simply by wrapping everything into an animation block. Notice also that the movement speed depends on the animation duration, so if you want a slower the slide effect you should increase the animation duration, while if you need them to move faster, then just decrease the duration.
The second action method is going to be similar to this one, with one difference only: The offset on the X axis will be a negative number (equal of course to 320.0 pixels), so the views move to the left. Let’s see this implementation as well:
-(void)slideToLeftWithGestureRecognizer:(UISwipeGestureRecognizer *)gestureRecognizer{
    [UIView animateWithDuration:0.5 animations:^{
        self.viewOrange.frame = CGRectOffset(self.viewOrange.frame, -320.0, 0.0);
        self.viewBlack.frame = CGRectOffset(self.viewBlack.frame, -320.0, 0.0);
        self.viewGreen.frame = CGRectOffset(self.viewGreen.frame, -320.0, 0.0);
    }];
}
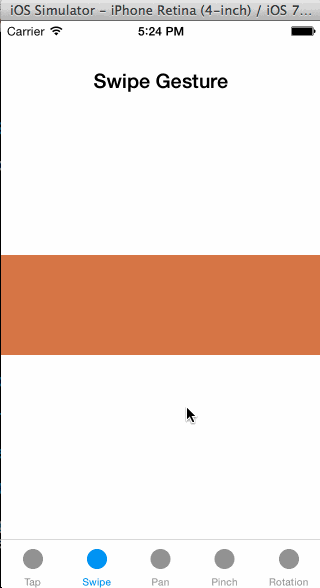
Run the app once again, and this time show the contents of the second tab. Swipe towards right or left, and watch the views slide in and out using an animated fashion. However, when a new view appears on-screen, you’ll notice that no swipe gesture works any more. Why that happens?
The answer is simple and lies in the fact that we haven’t created and added swipe gesture recognizers to the other two views. So, why don’t we do that now, and then see if it works?
Go back to the viewDidLoad method, and start by adding the next segment:
- (void)viewDidLoad
{
    ...

    UISwipeGestureRecognizer *swipeRightBlack = [[UISwipeGestureRecognizer alloc] initWithTarget:self action:@selector(slideToRightWithGestureRecognizer:)];
    swipeRightBlack.direction = UISwipeGestureRecognizerDirectionRight;
    [self.viewBlack addGestureRecognizer:swipeRightBlack];
}
With these commands, we created a new swipe gesture recognizer for a gesture towards right for the black coloured view, and we used the already implemented slideToRightWithGestureRecognizer : as the action method.
Let’s do the same for the green coloured view, but this time we must set the left direction:
- (void)viewDidLoad
{
    ...

    UISwipeGestureRecognizer *swipeLeftGreen = [[UISwipeGestureRecognizer alloc] initWithTarget:self action:@selector(slideToLeftWithGestureRecognizer:)];
    swipeLeftGreen.direction = UISwipeGestureRecognizerDirectionLeft;
    [self.viewGreen addGestureRecognizer:swipeLeftGreen];
}
Okay, let’s give it another try. This time, everything works great!
Keep in mind that for every swipe gesture you want to support, you must create a new gesture recognizer object. Creating just one object and adding it to more than one view isn’t going to work. If you really want a proof of that, simply go to the viewDidLoad method and add the swipeRightOrange and the swipeLeftOrange gesture recognizers to the other two views respectively. Run the app again, and then swipe your finger (or using the mouse on Simulator) just like before. Unfortunately, this time nothing will work, so set everything back to its original state.
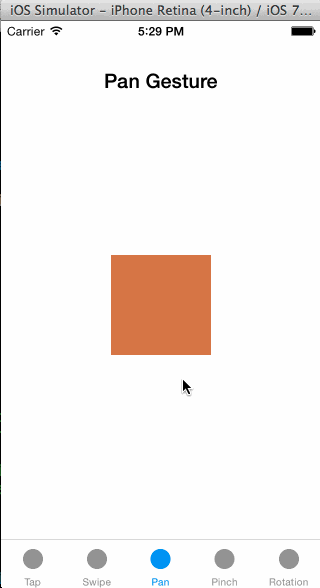
Pan Gesture Recognizer
In the last two sections we saw two important gesture recognizers that can give great interaction to your apps. We will continue here by studying another gesture recognizer, the pan or in other words drag. This gesture is handy when you want to allow your users to drag views around the screen. In this part, except for implementing the necessary code that will enable our app to support the pan gesture, we will meet a special method of the UIPanGestureRecognizer class, named velocityInView:. This method returns a CGPoint value, and informs us about how many points per second the dragged view travels in both the horizontal and vertical axis while dragging. This information could be useful in some cases, so we will see how to access it.
Just like before, we’ll start by adding a test view to the Interface Builder. Go to the Main.storyboard file, and then drag a view (UIView) object to the Pan view controller scene. Set the next two attributes of it:
- Frame: X=110, Y=234, Width=100, Height=100
- Background Color: R=215, G=116, B=52 (or any other color you like)
Next, go to the PanViewController.h file and declare an IBOutlet property that you’ll later connect to that view:
@interface PanViewController : UIViewController

@property (weak, nonatomic) IBOutlet UIView *testView;

@end
Return to the Main.storyboard file, and connect the IBOutlet property to the view.
Once you have finished working with the Interface Builder, click on the PanViewController.m file in the Project Navigator. The first step we should do, is to create a pan gesture recognizer and add it to our test view. There’s nothing difficult in this case, so let’s see it:
- (void)viewDidLoad
{
    ...

    UIPanGestureRecognizer *panGestureRecognizer = [[UIPanGestureRecognizer alloc] initWithTarget:self action:@selector(moveViewWithGestureRecognizer:)];
    [self.testView addGestureRecognizer:panGestureRecognizer];
}
Now, let’s declare and implement the method we set as the action that should be taken when the pan gesture will happen. In the private interface section, add this:
@interface PanViewController ()

-(void)moveViewWithGestureRecognizer:(UIPanGestureRecognizer *)panGestureRecognizer;

@end
As I have already said, what we want to do here is to drag the test view while we move our finger on the screen. The easiest approach to that would be to update the center point of the view as long as the panning occurs. Let’s see how that is translated into code:
-(void)moveViewWithGestureRecognizer:(UIPanGestureRecognizer *)panGestureRecognizer{
    CGPoint touchLocation = [panGestureRecognizer locationInView:self.view];

    self.testView.center = touchLocation;

}
Every gesture recognizer contains a method named locationInView:. This method returns a CGPoint value representing the point of the view that the user touched. In our case, by calling this method we manage to get the touched point during dragging, and to make our app aware of the finger’s movement. So, what we only need is to set that touch location as the value for the center point of the test view, and that’s exactly we perform using the second command above.
Run the app now and place your finger or the mouse pointer on the test view. Then start dragging around and notice how the view follows the movement you make.
The approach I presented above is simple for the sake of the tutorial. In a real application, you might want to enrich the movement of the view by adding acceleration or deceleration when you start or stop dragging, or anything else you need. It’s up to you to apply the proper logic in the action method you implement.
At the beginning of this section, I said that there is a special method of the UIPanGestureRecognizer class named velocityInView:. Up to this point we totally ignored it, but now we’ll see how we can access it and get the data it provides. For the sake of the demo, return to the Interface Builder by clicking on the Main.storyboard file. Locate the Pan view controller scene, and add two labels with the following attributes:
Label #1
- Frame: X=20, Y=445, Width=280, Height=21
- Text: Nothing (empty)
- Font size: 14pt
Label #2
- Frame: X=20, Y=479, Width=280, Height=21
- Text: Nothing (empty)
- Font size: 14pt
As you may suspect, we are going to use these two labels to display the velocity in the horizontal and vertical axis respectively. But before we do so, we must create and connect two IBOutlet properties to these labels. So, open the PanViewController.h file and add the next two lines:
@interface PanViewController : UIViewController

...

@property (weak, nonatomic) IBOutlet UILabel *horizontalVelocityLabel;

@property (weak, nonatomic) IBOutlet UILabel *verticalVelocityLabel;

@end
Go back to the Interface Builder, and perform the appropriate connections.
Now, open the PanViewController.m file, and go to our private action method named moveViewWithGestureRecognizer:. We will add some code here that will enable us to get the velocity of the drag as a CGPoint value, and then we will extract the velocity on each axis out of this one. Remember that the velocity is expressed in points per second. Let’s see the method:
-(void)moveViewWithGestureRecognizer:(UIPanGestureRecognizer *)panGestureRecognizer{
    ...

    CGPoint velocity = [panGestureRecognizer velocityInView:self.view];

    self.horizontalVelocityLabel.text = [NSString stringWithFormat:@"Horizontal Velocity: %.2f points/sec", velocity.x];
    self.verticalVelocityLabel.text = [NSString stringWithFormat:@"Vertical Velocity: %.2f points/sec", velocity.y];

}
The value returned by the velocityInView: method is stored to a CGPoint structure. Then by simply accessing the X and Y properties of that structure, we manage to get the horizontal and vertical velocity. To keep things simple here, we just display these values, but in a real application the velocity would be useful if only you would perform calculations based on it.
By running the app again you can see how “fast” the test view is moved around the screen while you drag it.
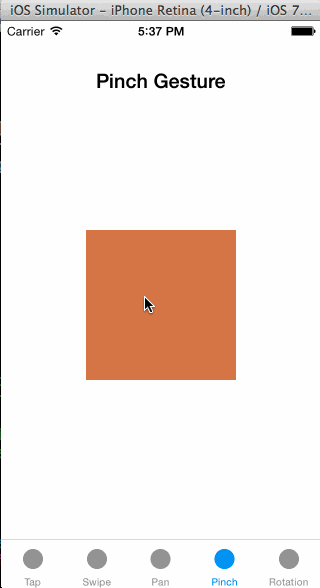
Pinch Gesture Recognizer
The pinch gesture is useful for changing the transform of a view by scaling it up or down. The most characteristic example of that gesture can be found in the Photos app, where you pinch to zoom in and out. Here we won’t add an image view with an image in it, we’ll just use a simple view. However, what we’ll do here apply to all views (including image views) in which you want to change their scale value. The great difference that the pinch gesture has compared to the previous gesture recognizers, is the fact that it requires two fingers to be used in order to perform the gesture.
As we did in the previous sections, we will begin by adding a test view to the Interface Builder. On the Project Navigator, click on the Main.storyboard file and then locate the Pinch view controller scene. Next, from the Object Library drag a view object (UIView) to the canvas, and set the next attributes:
- Frame: X=85, Y=209, Width=150, Height=150
- Background Color: R=215, G=116, B=52 (or any other color you like)
Now open the PinchViewController.h file, and declare an IBOutlet property:
@interface PinchViewController : UIViewController

@property (weak, nonatomic) IBOutlet UIView *testView;

@end
Finally, in the Interface Builder connect that property to the test view you just added.
Similarly to the previous cases, we’ll begin the implementation in the viewDidLoad method in the PinchViewController.m file. What we only have to do is to initialize a pinch gesture recognizer object, and then add it to the test view:
- (void)viewDidLoad
{
    ...

    UIPinchGestureRecognizer *pinchGestureRecognizer = [[UIPinchGestureRecognizer alloc] initWithTarget:self action:@selector(handlePinchWithGestureRecognizer:)];
    [self.testView addGestureRecognizer:pinchGestureRecognizer];
}
Now, we must declare the handlePinchWithGestureRecognizer: method, and then define it. First, go to the private class section:
@interface PinchViewController ()

-(void)handlePinchWithGestureRecognizer:(UIPinchGestureRecognizer *)pinchGestureRecognizer;

@end
According to what I said in the beginning of this part, we will modify the transform of the test view by changing the scale value. That action will result in a zoom in/out effect, and as you’ll see, it’s just a matter of a single line:
-(void)handlePinchWithGestureRecognizer:(UIPinchGestureRecognizer *)pinchGestureRecognizer{
    self.testView.transform = CGAffineTransformScale(self.testView.transform, pinchGestureRecognizer.scale, pinchGestureRecognizer.scale);

}
In this example we know which is the view that the pinch gesture was applied to (the testView view), so we access it directly. However, there will be times that you will need to access the pinched view in a more generic way. In that case, you can avoid the direct usage of the the view that was pinched as shown above, if you simply use the view property of the pinchGestureRecognizer parameter object. This property is actually the view that the pinch gesture happened to. Therefore, the above command could be written as follows too:
pinchGestureRecognizer.view.transform = CGAffineTransformScale(pinchGestureRecognizer.view.transform, pinchGestureRecognizer.scale, pinchGestureRecognizer.scale);
Now we are almost ready to test it. I’m saying almost, before we need to add one more command that it’s not obvious at the beginning, but you understand that you need it after having tested the above at least once. So, complete the above method by adding this:
-(void)handlePinchWithGestureRecognizer:(UIPinchGestureRecognizer *)pinchGestureRecognizer{
    ...

    pinchGestureRecognizer.scale = 1.0;
}
It’s necessary to reset the scale value of the pinch gesture recognizer object, otherwise the result won’t be the expected one; the scaling will look chaotic. With this simple line, we manage to achieve a smoother behaviour.
Now you can run the app and test the pinch gesture. Act as you do to photos when zooming in and out, and see how our test view reacts to your movements.
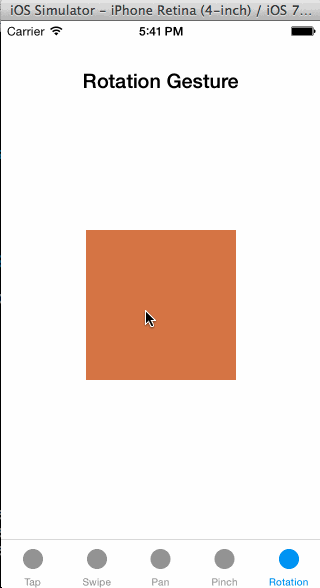
Rotation Gesture Recognizer
The rotation gesture recognizer has great similarities to the pinch gesture recognizer, as it requires two fingers in order for the gesture to be successful, and it changes the transform of the view that is applied to by modifying its rotation. Usually, the rotation gesture is used in combination to other gestures, but not only.
In this part we are going to perform almost the same steps we did in the pinch gesture recognizer section. Therefore, open the Interface Builder, and go to the Rotation view controller scene. From the Object Library, drag and drop a view to the canvas with the following attributes:
- Frame: X=85, Y=209, Width=150, Height=150
- Background Color: R=215, G=116, B=52 (or any other color you like)
Next, in the RotationViewController.h file declare the following IBOutlet property…
@interface RotationViewController : UIViewController

@property (weak, nonatomic) IBOutlet UIView *testView;

@end
… and then return to the Interface Builder to connect it to the view.
Going to the RotationViewController.m file now, head to the viewDidLoad directly. As we did to all the previous parts, our coding work will start at this point. Here, we will just create a new rotation gesture recognizer object and we will add it to the test view.
- (void)viewDidLoad
{
    ...

    UIRotationGestureRecognizer *rotationGestureRecognizer = [[UIRotationGestureRecognizer alloc] initWithTarget:self action:@selector(handleRotationWithGestureRecognizer:)];
    [self.testView addGestureRecognizer:rotationGestureRecognizer];
}
As always, our next step is to declare the private method:
@interface RotationViewController ()

-(void)handleRotationWithGestureRecognizer:(UIRotationGestureRecognizer *)rotationGestureRecognizer;

@end
Finally, let’s implement it. Here, we will use the CGAffineTransformRotate method to change the rotate value of the transform of the test view. As you will see in the next code, the rotation property of the rotationGestureRecognizer gets its initial value so as to avoid unexpected behaviour.
-(void)handleRotationWithGestureRecognizer:(UIRotationGestureRecognizer *)rotationGestureRecognizer{
    self.testView.transform = CGAffineTransformRotate(self.testView.transform, rotationGestureRecognizer.rotation);

    rotationGestureRecognizer.rotation = 0.0;
}
Run the app now, and make sure to select the last tab of the tab bar controller. Then use two fingers to rotate the view to either a clockwise or counter-clockwise direction.
Other Gesture Recognizers
Beyond the gesture recognizers we met in the previous parts of the tutorial, there are two more that I’m going to just mention. We won’t see their details for two reasons: They are used more rarely and have similarities to gesture recognizers that we have already seen. So, let’s go through them shortly.
The first one is the long press gesture recognizer, and the respective class is the UILongPressGestureRecognizer*. As its name suggests, an object of that class monitors for press on a view that lasts for a some period, and not as long as a tap lasts. This class contains three important properties:
- minimumPressDuration: With this one, you specify the minimum time period that should elapse until the gesture to be considered valid.
- numberOfTouchesRequired: By using this property, you specify how many fingers are required for the gesture. Usually just one finger is fine, but it’s up to you to decide.
- allowableMovement: This property defines an area that the fingers should move during pressing. When using that gesture, the fingers must remain as stable and steady to the touch point as possible, otherwise the gesture fails.
So, if you want to use that gesture recognizer, always keep in mind that you must set valid values to the above properties.
The second gesture recognizer that I will just mention, is the screen edge pan gesture recognizer. The UIScreenEdgePanGestureRecognizer class is new in iOS 7, and it works just like the swipe gesture recognizer, with one great difference though: The finger movement should begin near the edge of the screen. An example of this one can be found in the Safari app, where you can move your finger from the left edge of the screen towards right to go to the previous page. Also, navigation controller supports this gesture recognizer by default. There’s one special property that should be set before this gesture recognizer is used, named edges. Using it, you must specify the edge from which the gesture should begin.
Summary
When there is a lack of experience in working with gesture recognizers, then it’s possible to look intimidating to many developers. However, as you have seen in this tutorial, this is more than a 100% false. Dealing with gesture recognizers is more than easy and quite straightforward. When used in applications, they attach a more advanced level of user interaction and user experience ultimately. Each example of this tutorial has been really simple, but that’s what exactly what you need to know even when developing larger applications. Anyway, if you are new to all this, or if you have been feeling uncomfortable with gesture recognizers, then I really hope to have helped you to understand them. Don’t be scared to add gestures to your apps, and of course, experiment as much as possible. Lastly, use the comments area to share your thoughts with us, or just… make a gesture!
For your reference, you can download the complete Xcode project from here.


