Update: If you’re using Xcode 5, please check out the new tutorial about UITableView.
Is it fun to create the Hello World app? In this tutorial, we’ll work on something more complex and build a simple app using Table View. If you haven’t read the previous tutorial about the iOS programming basic, check it out first before moving on.
First, what’s a Table View in iPhone app? Table View is one of the common UI elements in iOS apps. Most apps, in some ways, make use of Table View to display list of data. The best example is the built-in Phone app. Your contacts are displayed in a Table View. Another example is the Mail app. It uses Table View to display your mail boxes and emails. Not only designed for showing textual data, Table View allows you to present the data in the form of images. The built-in Video and YouTube app are great examples for the usage.
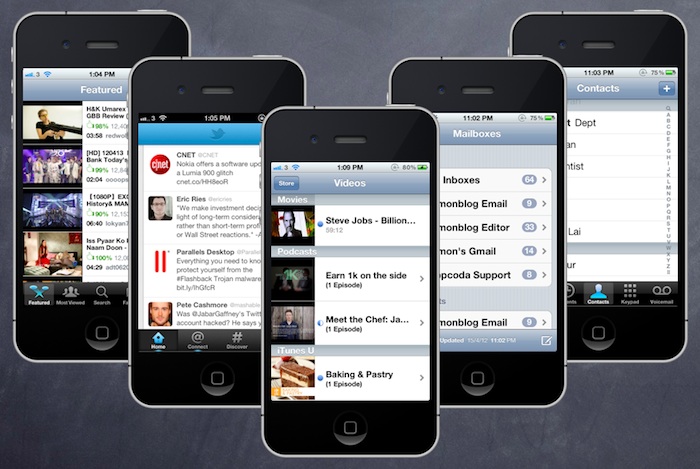
Sample Apps Using Table View
Create SimpleTable Project
With an idea of table view, let’s get our hands dirty and create a simple app. Don’t just glance through the article if you’re serious about learning iOS programming. Open your Xcode and code! This is the best way to study programming.
Once launched Xcode, create a new project for “Single View application”.

Xcode Project Template Selection
Click “Next” to continue. Again, fill in all the required options for the Xcode project:
- Product Name: SimpleTable – This is the name of your app.
- Company Identifier: com.appcoda – It’s actually the domain name written the other way round. If you have a domain, you can use your own domain name. Otherwise, you may use mine or just fill in “edu.self”.
- Class Prefix: SimpleTable – Xcode uses the class prefix to name the class automatically. In future, you may choose your own prefix or even leave it blank. But for this tutorial, let’s keep it simple and use “SimpleTable”.
- Device Family: iPhone – Just use “iPhone” for this project.
- Use Storyboards: [unchecked] – Do not select this option. We do not need Storyboards for this simple project.
- Use Automatic Reference Counting: [checked] – By default, this should be enabled. Just leave it as it is.
- Include Unit Tests: [unchecked] – Leave this box unchecked. For now, you do not need the unit test class.
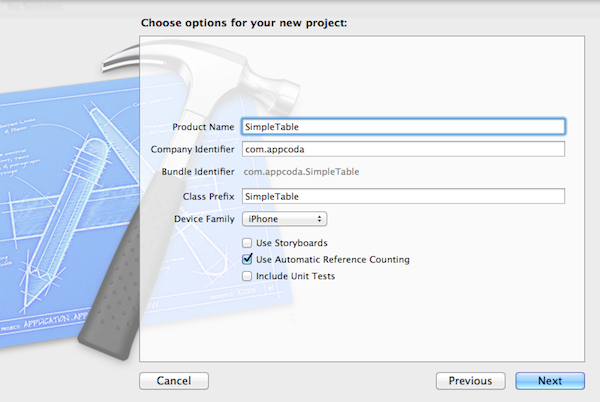
SimpleTable Project Options
Click “Next” to continue. Xcode then asks you where you saves the “SimpleTable” project. Pick any folder (e.g. Desktop) to save your project. As before, deselect the option for Source Control. Click “Create” to continue.

Pick a Folder to Save Your Project
As you confirm, Xcode automatically creates the “SimpleTable” project based on the options you’ve provided. The resulting screen looks like this:
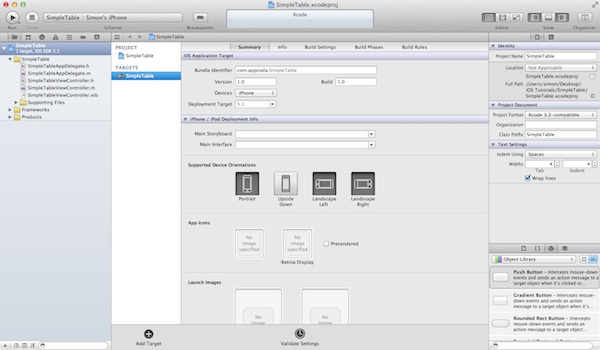
Main Screen of SimpleTable Project
Designing the View
First, we’ll create the user interface and add the table view. Select “SimpleTableViewController.xib” to switch to the Interface Builder.
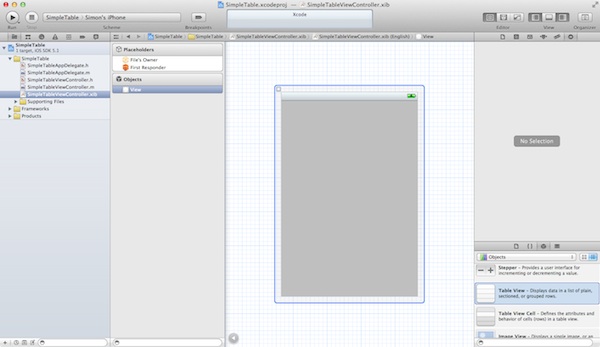
Interface Builder for SimpleTable Project
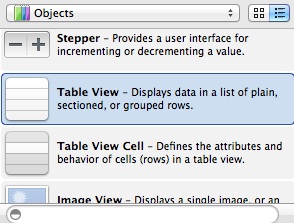
In the Object Library, select the “Table View” object and drag it into the view.
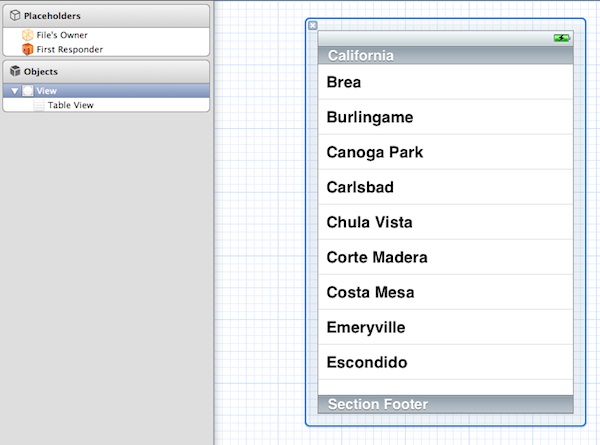
Your screen should look like below after inserting the “Table View”.
Run Your App for the First Time
Before moving on, try to run your app using the Simulator. Click the “Run” button to build your app and test it.

The Simulator screen will look like this:
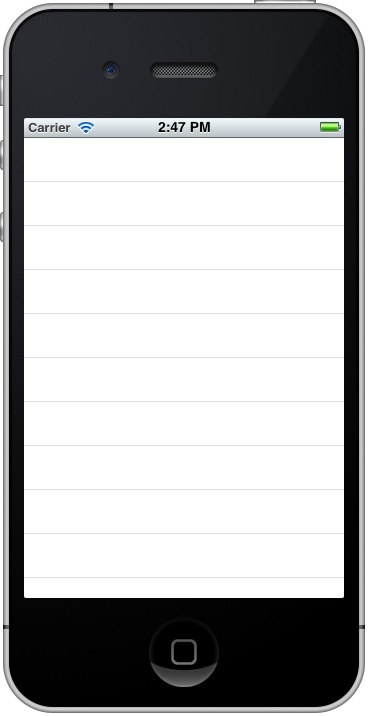
Easy, right? You already designed the Table View in your app. For now, however, it doesn’t contain any data. Next up, we’ll write some code to add the table data.
Adding Table Data
Go back to the Project Navigator and select “SimpleTableViewController.h”. Append “<UITableViewDelegate, UITableViewDataSource>” after “UIViewController”. Your code should look like below:
#import

@interface SimpleTableViewController : UIViewController

@end
The “UITableViewDelegate” and “UITableViewDataSource” are known as protocol in Objective-C. Basically, in order to display data in Table View, we have to conform to the requirements defined in the protocols and implement all the mandatory methods.
UITableViewDelegate and UITableViewDataSource
Earlier, we’ve added the “UITableViewDelegate” and “UITableViewDataSource” protocols in the header file. It may be confusing. What’re they?
The UITableView, the actual class behind the Table View, is designed to be flexible to handle various types of data. You may display a list of countries or contact names. Or like this example, we’ll use the table view to present a list of recipes. So how do you tell UITableView the list of data to display? UITableViewDataSource is the answer. It’s the link between your data and the table view. The UITableViewDataSource protocol declares two required methods (tableView:cellForRowAtIndexPath and tableView:numberOfRowsInSection) that you have to implement. Through implementing these methods, you tell Table View how many rows to display and the data in each row.
UITableViewDelegate, on the other hand, deals with the appearance of the UITableView. Optional methods of the protocols let you manage the height of a table row, configure section headings and footers, re-order table cells, etc. We do not change any of these methods in this example. Let’s leave them for the next tutorial.
Next, select “SimpleTableViewController.m” and define an instance variable for holding the table data.
@implementation SimpleTableViewController
{
    NSArray *tableData;
}
In the “viewDidLoad” method, add the following code to initialize the “tableData” array. We initialize an array with a list of recipes.
- (void)viewDidLoad
{
    [super viewDidLoad];
	// Initialize table data
    tableData = [NSArray arrayWithObjects:@"Egg Benedict", @"Mushroom Risotto", @"Full Breakfast", @"Hamburger", @"Ham and Egg Sandwich", @"Creme Brelee", @"White Chocolate Donut", @"Starbucks Coffee", @"Vegetable Curry", @"Instant Noodle with Egg", @"Noodle with BBQ Pork", @"Japanese Noodle with Pork", @"Green Tea", @"Thai Shrimp Cake", @"Angry Birds Cake", @"Ham and Cheese Panini", nil];
}
What is an array?
An array is a fundamental data structure in computer programming. You can think of an array as a collection of data elements. Consider the tableData array in the above code, it represents a collection of textual elements. You may visualize the array like this:

Each of the array elements is identified or accessed by an index. An array with 10 elements will have indices from 0 to 9. That means, tableData[0] returns the first element of the “tableData” array.
In Objective C, NSArray is the class for creating and managing array. You can use NSArray to create static array for which the size is fixed. If you need a dynamic array, use NSMutableArray instead.
NSArray offers a set of factory methods to create an array object. In our code, we use “arrayWithObjects” to instantiate a NSArray object and preload it with the specific elements (e.g. Hamburger).
You can also use other built-in methods to query and manage the array. Later, we’ll invoke the “count” method to query the number of data elements in the array. To learn more about the usage of NSArray, you can always refer to Apple’s official document.
Finally, we have to add two datasource methods: “tableView:numberOfRowsInSection” and “tableView:cellForRowAtIndexPath”. These two methods are part of the UITableViewDataSource protocol. It’s mandatory to implement the methods when configuring a UITableView. The first method is used to inform the table view how many rows are in the section. So let’s add the below code. The “count” method simply returns the number of items in the “tableData” array.
- (NSInteger)tableView:(UITableView *)tableView numberOfRowsInSection:(NSInteger)section
{
    return [tableData count];
}
Next, we implement the other required methods.
- (UITableViewCell *)tableView:(UITableView *)tableView cellForRowAtIndexPath:(NSIndexPath *)indexPath
{
    static NSString *simpleTableIdentifier = @"SimpleTableItem";

    UITableViewCell *cell = [tableView dequeueReusableCellWithIdentifier:simpleTableIdentifier];

    if (cell == nil) {
        cell = [[UITableViewCell alloc] initWithStyle:UITableViewCellStyleDefault reuseIdentifier:simpleTableIdentifier];
    }

    cell.textLabel.text = [tableData objectAtIndex:indexPath.row];
    return cell;
}
The “cellForRowAtIndexPath” is called every time when a table row is displayed. The below illustration will give you a better understanding about how UITableView and UITableDataSource work.
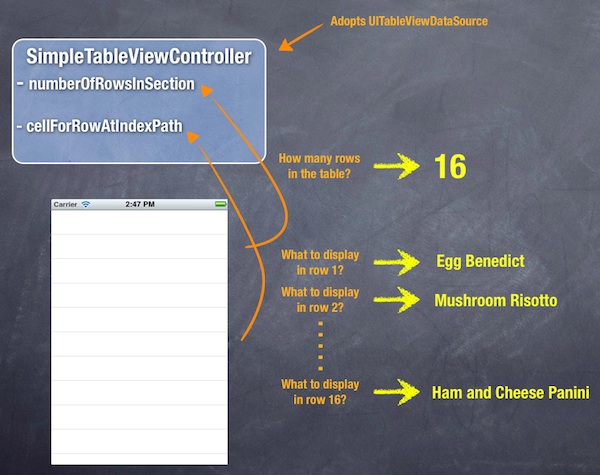
How UITableView and UITableDataSource Work Together
Okay, let’s hit the “Run” button and try out your final app! If you’ve written the code correctly, the Simulator should run your app like this:

Why is it still blank? We’ve already written the code for generating the table data and implemented the required methods. But why the Table View isn’t shown up as expected?
There is still one thing left.
Connecting the DataSource and Delegate
Like the “Hello World” button in the first tutorial, we have to establish the connection between the Table View and the two methods we just created.
Go back to the “SimpleTableViewController.xib”. Press and hold the Control key on your keyboard, select the Table View and drag to the “File’s Owner”. Your screen should look like this:
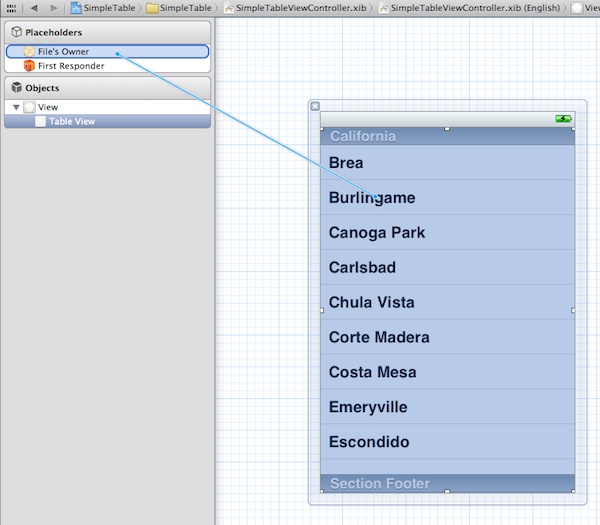
Connecting Table View with its Datasource and Delegate
Release both buttons and a pop-up shows both “dataSource” & “delegate”. Select “dataSource” to make a connection between the Table View and its data source. Repeat the above steps and make a connection with the delegate.
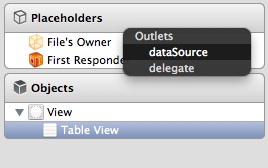
Connect dataSource and delegate
That’s it. To ensure the connections are linked properly, you can select the Table View again. In the upper part of the Utility area, you can reveal the existing connections in the “Connection Inspector” (i.e. the rightmost tab).
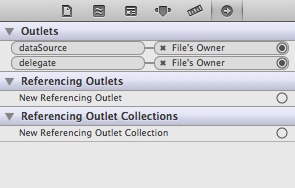
Show the Connections Inspector
Test Your App
Finally, it’s ready to test your app. Simply hit the “Run” button and let the Simulator load your app:
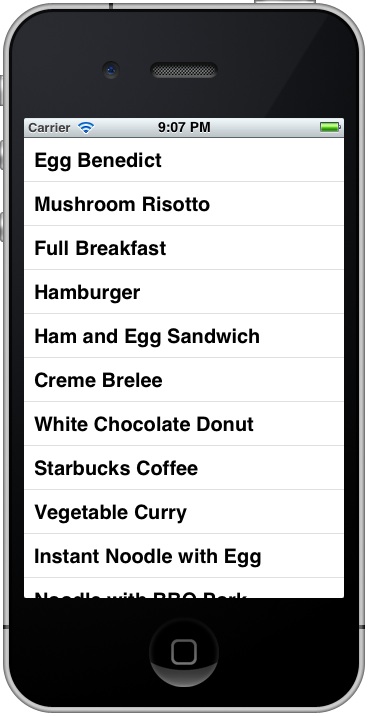
Add Thumbnail to Your Table View
The table view is too plain, right? What about adding an image to each row? The iOS SDK makes it extremely easy to do this. You just need to add a line of code for inserting a thumbnail for each row.
First, download this sample image. Alternatively, you can use your own image but make sure you name it “creme_brulee.jpg”. In Project Navigator, right-click the “SimplyTable” folder and select “Add Files to SimpleTable…”.
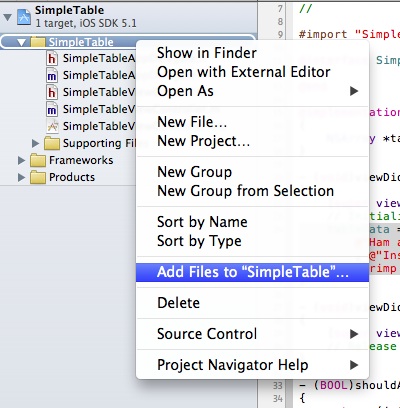
Add Image to Your Project
Select the image file and check “Copy items to destination group’s folder” checkbox. Click “OK” to add the file.
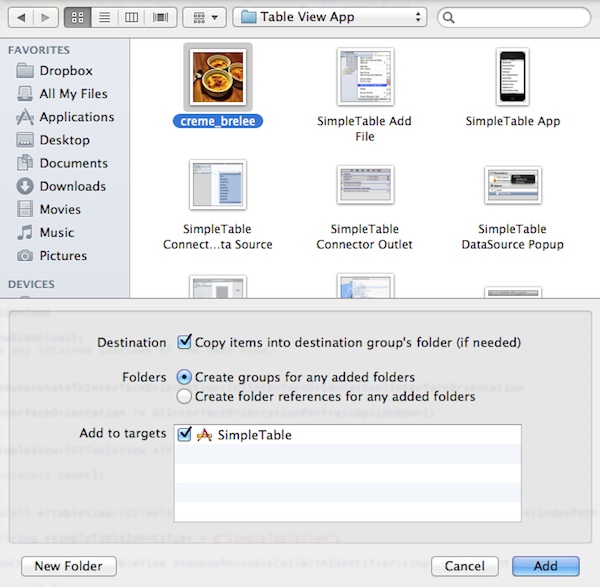
Pick your image file and add to the project
Now edit the “SimpleTableViewController.m” and add the following line of code in “tableView:cellForRowAtIndexPath” method:
cell.imageView.image = [UIImage imageNamed:@"creme_brelee.jpg"];
Your code should look like this after editing:

Pick your image file and add to the project
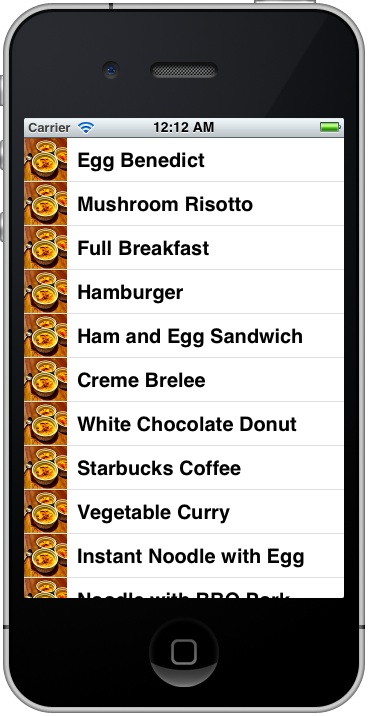
The line of code loads the image and saves in the image area of the table cell. Now, hit the “Run” button again and your SimpleTable app should display the image in each row:
What’s Coming Next?
It’s simple to create a table view, right? The Table View is one of the most commonly used elements in iOS programming. If you’ve followed the tutorial and build the app, you should have a basic idea about how to create the table view. I try to keep everything simple in this tutorial. In reality, the table data will not be specified directly in the code. Usually, it’s loaded from file, database or somewhere else.
In the next tutorial, we’ll take a look at how you can further customize the table cell. As always, leave me comment and share your thought about the tutorial.
Update #1: The next tutorial is ready. Check it out!
Update #2: You can now download the full source code from here.<


