

Editor’s note: This week let’s talk about localization. In brief, localization is a process to adapt a product to a particular language. Not all iPhone users can read or write English. If you just release your app in English, it may be ignored by user from other parts of the world. In this tutorial, Ziad will go through the localization process with you. You’ll see how easy you can localize an app and make it available in multiple languages by using the built-in function of Xcode and iOS API.
Update: If you’re using Xcode 6, please check out the updated localisation tutorial.
Enter the iOS localization tutorial.
The iOS devices including iPhone and iPad are available globally. Obviously, iOS users are from different countries and speak different languages. To deliver a great user experience, you may want to make your app available in multiple languages. The process of adapting an app to support a particular language is usually known as localization.
Xcode has the built-in support of localization. So it’s fairly easy for developer to internationalize an app through the localization feature and some API calls.
Some people think of localization as the same process of translation. That’s partially correct. Translating static or visible text is just part of the localization process. Localization involves other elements such as images, graphics and sound. You’ll also need to handle the different display format of numeric values, as well as, date and time.
In this tutorial, we’ll show you the step-by-step on how to localize the storyboard file, strings, images and app name. As usual, we’ll demonstrate the process by building a simple app and make it available in French.
Localization Overview
We are going to create a small application called “Book Store”, which will displays the details of a book with a cover image, title, author and description. The original app is in English. We’ll localize the app together and make it available in French. So at the end of the tutorial, you’ll have an app that supports two localizations: English and French.
To make the app available in French, we’ll demonstrate how to localize:
- the text in the storyboards
- the cover image
- the dynamic message displayed by code
- the name of the app as displayed in home screen
For those of you who don’t know how an app selects a localization, it refers to the language settings of iOS (General > International > Language). An app uses this preference as the key for accessing the localized resources for the requested language.
Getting Started
It’s time to set up the project by creating a new project based on the Single View Application iOS app template. In the project options, you’ll need to check the storyboard and Automatic Reference Counting Boxes. This app will provide only iPhone Views, so choose iPhone for the device family and save the project. Open the Storyboard, design the user interface as shown below:

Storyboards of BookStore
The focus of this tutorial is on Localization. So to save you time from setting up the project, you can download this project template to start with. The template already pre-built the user interface.
Tip: If you have no idea about how to work with storyboard, check out our tutorials in the free iOS course.
Localizing the Storyboard
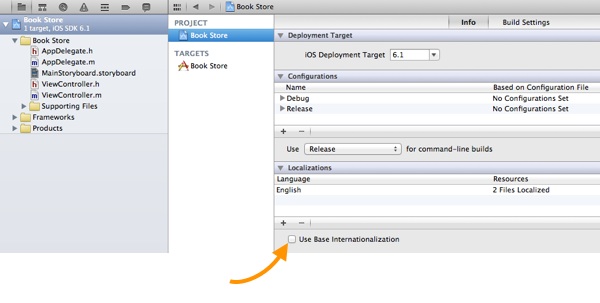
Now, let’s start to localize the project. In Xcode, click on Book Store in the project navigator and select the Info tab of the project. Look for the localizations section in the Info tab. Apparently, it shows a single localization: English. Check the “Use Base Internalization” checkbox.
You’ll then be prompted to select the storyboard to use for the base internationalization.
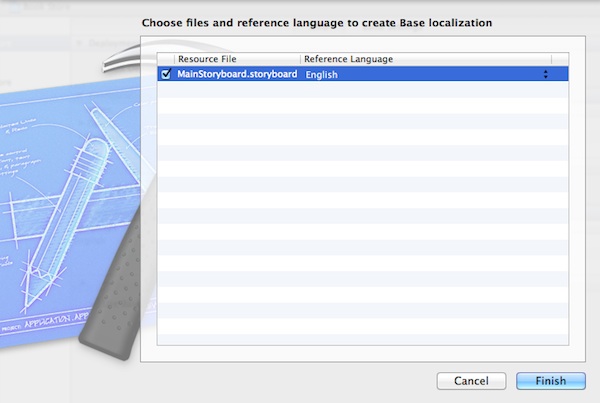
Make sure that MainStoryboard.storyboard is selected and that the reference language is English. Click the Finish button.
What we just did is to create a base storyboard. The concept of base internationalization was first introduced in Xcode 4.5. An app has just one set of storyboards that is localized to the default language. These storyboards is known as the base internationalization. Later when we create a localization, Xcode automatically generates a strings file containing all the text in the base storyboard.
Before Xcode 4.5, there is no such concept of base internationalization. Xcode replicates the whole set of storyboards for each localization. Say, your app is localized into 5 languages. Xcode generates 5 sets of storyboards for localization purpose. There is a major drawback for this localization process. When you need to add a new UI element in the storyboards, you’ll need to add the same element for each localization. That’s a tedious process. This is the reason why Apple introduced base internationalization in Xcode 4.5.
With the base storyboard configured, it’s now ready to add a localization for French. First, select the view controller in Storyboard. Then switch back to the project info. Click the + button at the bottom of the Localizations section and choose French from the popup list.
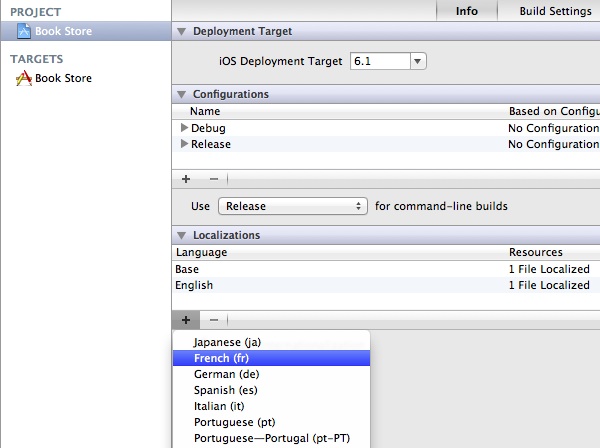
Adding a new localization
Next, you’ll be asked to choose the resource files and language for creating the French localization. You can refer to the below screenshot for the selected options. Leave all the files checked and click Finish.

Once done, you should notice in the project navigator that there is now a triangle symbol next to the MainStoryboard.storyboard. Expand it and you’ll find both the base storyboard and a strings file of the storyboard in French.
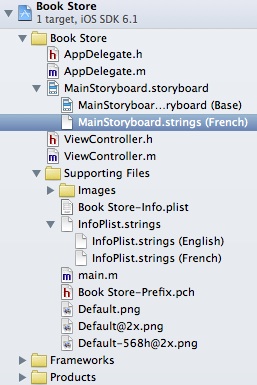
Select the french strings file (i.e. MainStoryboard.strings (French)) and you should find a list of strings in key/value pairs:
/* Class = "IBUILabel"; text = "Stephane Mallat"; ObjectID = "0N3-up-Ts6"; */
"0N3-up-Ts6.text" = "Stephane Mallat";

/* Class = "IBUINavigationItem"; title = "Book Store"; ObjectID = "9EY-vY-nyh"; */
"9EY-vY-nyh.title" = "Book Store";

/* Class = "IBUILabel"; text = "This book is intended to serve as an invaluable reference for anyone concerned with the application of wavelets to signal processing. It has evolved from material used to teach \"wavelet signal processing\" courses in electrical engineering departments at Massachusetts Institute of Technology and Tel Aviv University, as well as applied mathematics departments at the Courant Institute of New York University and École Polytechnique in Paris. "; ObjectID = "gkh-KY-W1e"; */
"gkh-KY-W1e.text" = "This book is intended to serve as an invaluable reference for anyone concerned with the application of wavelets to signal processing. It has evolved from material used to teach \"wavelet signal processing\" courses in electrical engineering departments at Massachusetts Institute of Technology and Tel Aviv University, as well as applied mathematics departments at the Courant Institute of New York University and École Polytechnique in Paris. ";

/* Class = "IBUIButton"; normalTitle = "Buy"; ObjectID = "jul-3l-6x7"; */
"jul-3l-6x7.normalTitle" = "Buy";

/* Class = "IBUILabel"; text = "A Wavelet Tour of Signal Processing"; ObjectID = "xi7-zh-v4N"; */
"xi7-zh-v4N.text" = "A Wavelet Tour of Signal Processing";
When we add a new localization, Xcode scans through the base storyboard, extracts those textual items to be localized and put them into the strings file. As you can see above, the visible strings of storyboards such as label, title of the navigation bar and button title are put into the strings file. All entries are in key/value pairs. The first part of key is the object ID of the UI item. You can find the object ID of the UI object under Identity Inspector. For instance, the object ID of the Buy button is shown here:

With the strings file generated, your job is to translate all the values into French. The contents of the MainStoryboard.strings file for the French localization will look like this:
/* Class = "IBUILabel"; text = "Stephane Mallat"; ObjectID = "0N3-up-Ts6"; */
"0N3-up-Ts6.text" = "Stephane Mallat";

/* Class = "IBUINavigationItem"; title = "Book Store"; ObjectID = "9EY-vY-nyh"; */
"9EY-vY-nyh.title" = "Librairie";

/* Class = "IBUILabel"; text = "This book is intended to serve as an invaluable reference for anyone concerned with the application of wavelets to signal processing. It has evolved from material used to teach \"wavelet signal processing\" courses in electrical engineering departments at Massachusetts Institute of Technology and Tel Aviv University, as well as applied mathematics departments at the Courant Institute of New York University and École Polytechnique in Paris. "; ObjectID = "gkh-KY-W1e"; */
"gkh-KY-W1e.text" = "Comprimer, restaurer et analyser un signal met en jeu des outils mathématiques sophistiqués, allant bien au-delà de la transformée de Fourier. Cet ouvrage mène le lecteur des bases du traitement du signal jusqu'aux résultats les plus récents, en jouant sur l'interaction entre les applications, le calcul numérique et les mathématiques. Il est conçu pour des élèves de maîtrise, de DEA ou de doctorat ainsi que pour des ingénieurs ou scientifiques qui analysent des données numériques.";

/* Class = "IBUIButton"; normalTitle = "Buy"; ObjectID = "jul-3l-6x7"; */
"jul-3l-6x7.normalTitle" = "Acheter";

/* Class = "IBUILabel"; text = "A Wavelet Tour of Signal Processing"; ObjectID = "xi7-zh-v4N"; */
"xi7-zh-v4N.text" = "Une exploration des signaux en ondelettes";
Localizing Image
It’s very easy to localize image using Xcode. As a demo, we will localize the cover image. Select the “cover.jpeg” in the project navigator. Next, bring up the file inspector, and locate the localization section, in which you’ll see a button named “Localize…”. Click the button and you’ll be prompted for confirmation. Choose English and click the “Localize” button to confirm.
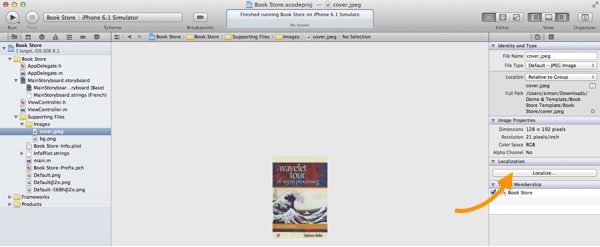
Localizing Cover Image
After that, you’ll see the French option in the localization section. Select the “French” localization and you’ll find two versions of cover.jpeg.
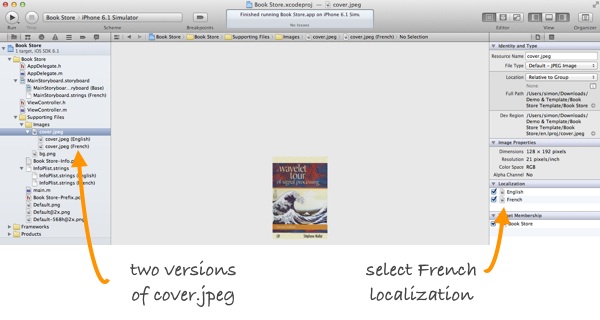
Adding French Localization for Image
Switch back to the finder and local the project directory. You’ll find two folders: en.lproj and fr.lproj. Both folders are automatically generated by Xcode for localization. The en.lproj folder stores resource files for English localization, while fr.lproj folder is for French localization. If you look into both folders, each one contains the cover.jpeg file. Download the French version of the cover image from here (or use whatever image you like). Copy the cover image just downloaded and replace the one in fr.lproj folder.
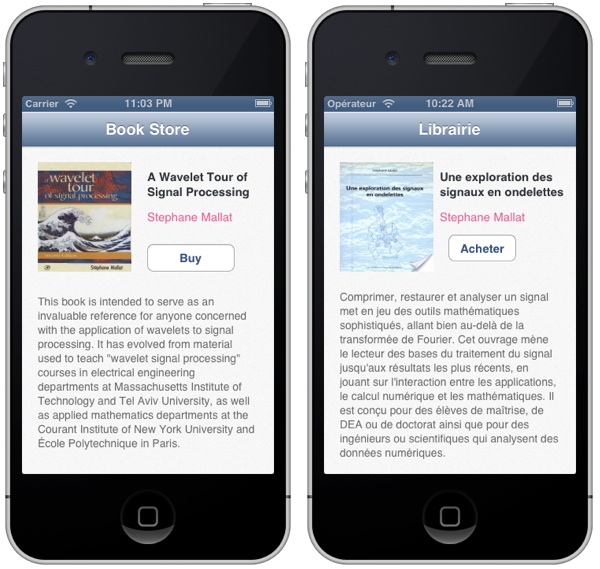
Now it’s time to test out the app. If you’ve got everything right, here are what you’ll see in English and French.
Localizing Dynamic Strings
So far we just demonstrated the localization of static items. But in many places in applications, you create NSString instances dynamically or display string literals to the user. These strings will also need to be localized in a localized application.
To demo how to localize text displayed by code, I’ve added a few lines of code for the “Buy” action:
- (IBAction)buy:(id)sender
{
    [[[UIAlertView alloc] initWithTitle:@"Confirmation"
                                message:NSLocalizedString(@"BOOK_PURCHASE", @"Message")
                               delegate:nil
                      cancelButtonTitle:@"OK"
                      otherButtonTitles:nil] show];
}
The code is simple. It just shows up an alert displaying the “Thanks for Your Purchase!” message. But instead of using a hardcoded message, we use the NSLocalizedString macro to get the string. The NSLocalizedString macro fetches a localized string from the Localizable.strings file for the current localization. It takes two arguments: a key and a comment. At runtime, the macro returns the value for the key in the localization that corresponds to the user’s preferred language. The comment is for your own reference only.
If you run the app and tap the Buy button, you’ll only see an alert view with “BOOK_PURCHASE” message as we haven’t created the Localizable.strings file. This is the default file for storing localized strings that are used by code.
Now let’s create the Localizable.strings file. In the project navigator, create a new file under the Supporting Files folder. Select the Strings file template and click the Next button.
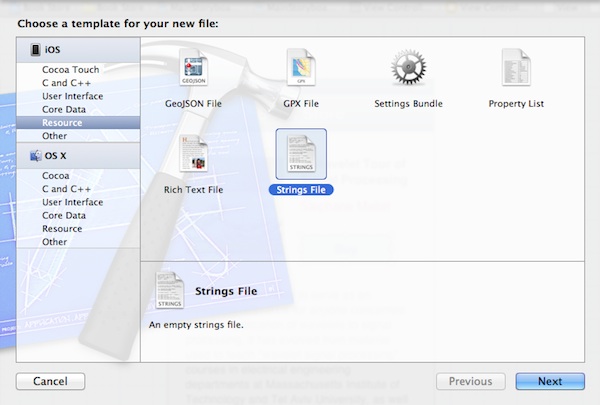
When prompted, save the file as Localizable.strings. Next, we’ll use the similar procedures to localize the file. Select the Localizable.strings and click the “Localize…” button in the File Inspector.
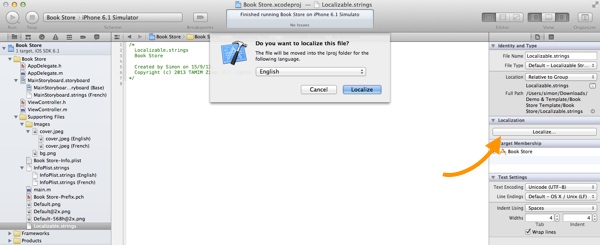
When the confirmation dialog appears, make sure that English is selected and then click the Localize button. Next, select the French checkbox to add a Localizable.strings file to the French localization. If you’ve got everything correct, you should have two version of Localizable.strings file.
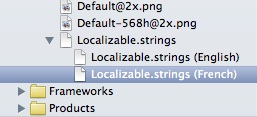
Localizable.strings File in English and French
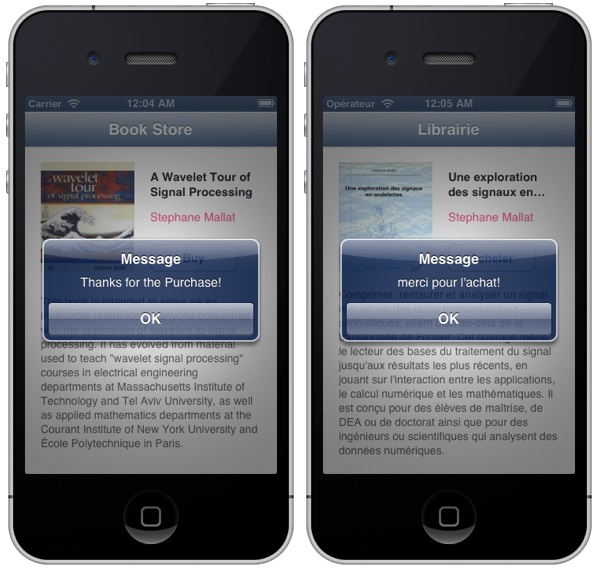
Put the following message in the English version of Localizable.strings file:
"BOOK_PURCHASE" = "Thanks for the Purchase!";
Translate the message and put it in the French version of Localizable.strings file:
"BOOK_PURCHASE" = "merci pour l'achat!";
You’re done. Compile and run the app again. Depending on the language setting, you should get different alert message when tapping the Buy button.
Localizing the App Name
In some cases, you may also want to localize the app name. When we create the French localization, Xcode already generates the French version of InfoPlist.strings. You can put key/value pairs in the InfoPlist.string file to override the values stored in Info.plist file.
So to display a different app name in the French version, simply add the following string in the InfoPlist.string (French) file:
"CFBundleDisplayName" = "Librairie";
This will change the name of app as appeared on the springboard. Compile and run the app again to test it out.
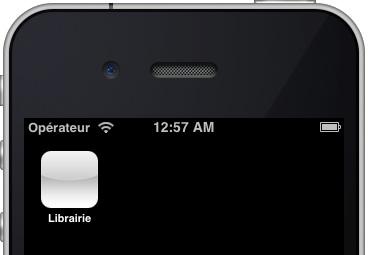
App Name in French
Summary
In this tutorial, we covered the localization process in iOS programming. Now you should have a basic idea of localizing an iPhone app.
For your complete reference, you can download the source code of the Xcode project from here. Please remember that the project should be run on Xcode 4.6 or up.
As always, please leave us comment and share your thought about the tutorial.


