Editor’s note: This week, we work with Chris Ching from Code With Chris to give you an introduction to iBeacons in iOS 7. Not only you’ll learn what iBeacon is, Chris will show you how to use iBeacons in your apps.
Surely you’ve heard of the nifty new feature in iOS 7 that lets your app gather location contextual information indoors where it can’t use GPS? If you haven’t, not to fear because we’re going to show you what it is and how you can use it in this article!
Beacon works over Bluetooth Low Energy (BLE) technology in your iPhone and as the name implies, it’s incredibly battery efficient. Going hand in hand with being low energy, it also has a short range of approximately 150 feet.
Real World Applications
The impact of having location sensitive information while indoors is already turning into real world applications. For example, Macy’s already has a pilot program underway where it has planted several beacons in different departments around the store. When a user passes by one of these departments and the companion app on their phone picks up the broadcast, it’ll open the app and display contextual information like promos, featured products and deals. Take a look at this short video to see iBeacons in action!
http://www.youtube.com/watch?v=3QFrZjvp2E0
Our Demo
Similar to the Macy’s pilot program app, the sample app we’re building here today will demonstrate how to detect and handle a broadcast from a beacon. However, in order to have a beacon to handle, we have to first create another app to act as the beacon which will do nothing except broadcast a signal. By the end of the article, we’ll have two apps representing both sides of the communication.
Setup: The Broadcasting App
What exactly does the beacon broadcast? Well it’s a UUID that looks something like this:
C293726B-63BF-420A-9D79-92C71F67536A
The beacon will continually broadcast this UUID and the receiver app will detect beacons with this same UUID.
Let’s get started by creating a new Single View Application in Xcode.
![]()
Click next and give the project a name and you can put “AppCoda” as the company and “com.appcoda” as the bundle identifier:
![]()
Next let’s add the images for the button that will start the broadcasting.
Go to your image asset library (images.xcassets) and in the asset listing, right click and select “New Image Set”.
![]()
Then rename the image set to “BroadcastButton”. When you select this image set, you’ll see that there are spots for you to add a 2x image and a 1x image.
![]()
Save these two button images onto your file system and then drag “[email protected]” into the 2x spot and “BroadcastBtn.png” into the 1x spot.


![]()
In Main.storyboard, we’re going to add a UIButton element so drag one onto your view from the Objects pane in the lower right hand corner.
![]()
Select the button in the storyboard and go into the attributes inspector to get rid of the title and change the image to the image set that we added.
![]()
Position your button in the middle of the view and your view should look like this
![]()
Now let’s add a UILabel element to the view so that we know when the app is broadcasting. Drag a UILabel element from the Objects pane onto your view.
Then go into the attributes and size inspector and change it to center alignment and width 200. Center it in your view and you should get something like this
![]()
Next, we’ll expose the UILabel to our ViewController object by hooking it up to an IBOutlet property. Let’s open up Assistant Editor (you can do so with the assistant editor button in the upper right corner of the Xcode interface).
Make sure that you’re looking at ViewController.h in the right pane and then hold “control” and click and drag a line from the UILabel to a space between the “@interface” and “@end” lines in the .h file.
When you release your mouse, you’ll see a pop up dialog. Give the property a name of “statusLabel”.
![]()
Your ViewController.h file will look like this:
@interface ViewController : UIViewController

@property (strong, nonatomic) IBOutlet UILabel *statusLabel;

@end
Now let’s connect the broadcast button to a IBAction method handler. Stay in Assistant Editor but change the right pane to ViewController.m. Hold “control” and click and drag a line from the UIButton to a space between the “@implementation” and “@end” lines in the .m file. In the pop up dialog, give the method the name “buttonClicked”
![]()
Your ViewController.m file will have this method at the end now:
- (IBAction)buttonClicked:(id)sender {
}
Adding Required Frameworks
Before we can actually broadcast anything over Bluetooth, we need to add the appropriate frameworks to our project.
Go to your project settings and scroll to the bottom. Click the “+” button under “Linked Frameworks and Libraries” to add CoreBluetooth.framework and CoreLocation.framework.
![]()
![]()
Creating a UUID
Open up Launchpad on your Mac (or just go to the Applications folder) and open the Terminal app. In Launchpad, it may be in a folder called “Other” and the icon looks like this:
![]()
Once opened, you’ll have a window where you can type in “uuidgen” and it will output a UUID for you to use! Copy the generated UUID because we’re going to be broadcasting that!
Beacon Broadcasting
In ViewController.h let’s import the frameworks which we added earlier.
#import
#import
Next, let’s add 3 more properties that we’ll be using to broadcast. So in total, you’ll have 4 properties in your ViewController.h file.
@property (weak, nonatomic) IBOutlet UILabel *statusLabel;
@property (strong, nonatomic) CLBeaconRegion *myBeaconRegion;
@property (strong, nonatomic) NSDictionary *myBeaconData;
@property (strong, nonatomic) CBPeripheralManager *peripheralManager;
One more thing we have to do here is have the ViewController class conform to the “CBPeripheralManagerDelegate” protocol and we do that by adding this to the class declaration:
@interface ViewController : UIViewController
Ok, now we’re done in the .h file, let’s go into the .m file.
In the viewDidLoad method, add the following code (substitute the UUID for the one you generated).
- (void)viewDidLoad
{
    [super viewDidLoad];
    // Do any additional setup after loading the view, typically from a nib.

    // Create a NSUUID object
    NSUUID *uuid = [[NSUUID alloc] initWithUUIDString:@"A77A1B68-49A7-4DBF-914C-760D07FBB87B"];

    // Initialize the Beacon Region
    self.myBeaconRegion = [[CLBeaconRegion alloc] initWithProximityUUID:uuid
                                                                  major:1
                                                                  minor:1
                                                             identifier:@"com.appcoda.testregion"];
}
In the code above, we’re creating a new NSUUID object by passing in the UUID that we want to broadcast.
Then we’re setting up a CLBeaconRegion and initializing it with that UUID, a major and minor number and an identifier.
The major and minor numbers are for you to identify your beacons if you have a whole bunch of them inside your location. In the Macy’s example above, each department may have a specific major number which identifies a group of beacons and inside that department, each beacon may have a specific minor number. So with both the major and minor, you’ll be able to identify exactly which beacon has been picked up.
Finally, the identifier is a unique id for that region.
In the buttonClicked method that we set up earlier, let’s add this code:
- (IBAction)buttonClicked:(id)sender {

    // Get the beacon data to advertise
    self.myBeaconData = [self.myBeaconRegion peripheralDataWithMeasuredPower:nil];

    // Start the peripheral manager
    self.peripheralManager = [[CBPeripheralManager alloc] initWithDelegate:self
                                                                     queue:nil
                                                                   options:nil];
}
In the code above, we’re calling the method “peripheralDataWithMeasuredPower:” method of the beacon region which will give us the beacon data that we will later use to broadcast.
The second line starts the peripheral manager and will start to monitor updates to the status of Bluetooth.
Now we have to handle the status update method to detect when Bluetooth is on and off. So add this delegate method which is required because our ViewController class conforms to the “CBPeripheralManagerDelegate” protocol.
-(void)peripheralManagerDidUpdateState:(CBPeripheralManager*)peripheral
{
    if (peripheral.state == CBPeripheralManagerStatePoweredOn)
    {
        // Bluetooth is on

        // Update our status label
        self.statusLabel.text = @"Broadcasting...";

        // Start broadcasting
        [self.peripheralManager startAdvertising:self.myBeaconData];
    }
    else if (peripheral.state == CBPeripheralManagerStatePoweredOff)
    {
        // Update our status label
        self.statusLabel.text = @"Stopped";

        // Bluetooth isn't on. Stop broadcasting
        [self.peripheralManager stopAdvertising];
    }
    else if (peripheral.state == CBPeripheralManagerStateUnsupported)
    {
        self.statusLabel.text = @"Unsupported";
    }
}
The method above gets triggered whenever there is a change in the Bluetooth peripheral status. So in the method, we check what the current status is. If it’s on, we’ll update our label and call the “startAdvertising” method and pass it our beacon data to broadcast. Conversely, if the status is off, then we’ll stop advertising.
Now when you deploy the app to your device, turn on bluetooth and tap the button, it’ll be broadcasting your UUID! Let’s create the receiver app to detect and handle the broadcast!
Note: You won’t be able to broadcast via the simulator because it can’t use bluetooth. You’ll need to be enrolled in the Apple Developer program in order to be able to put this app on an actual device which supports BLE (iPhone 4S and up, iPad mini and iPad 3 and up)
![]()
Detecting Beacon Proximity
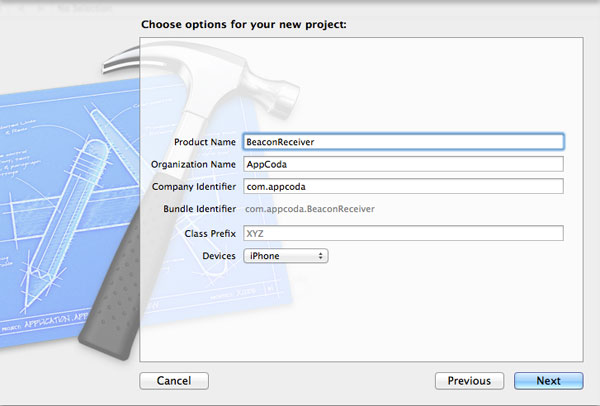
Let’s set up another Single View Application and this time, call it “BeaconReceiver”.

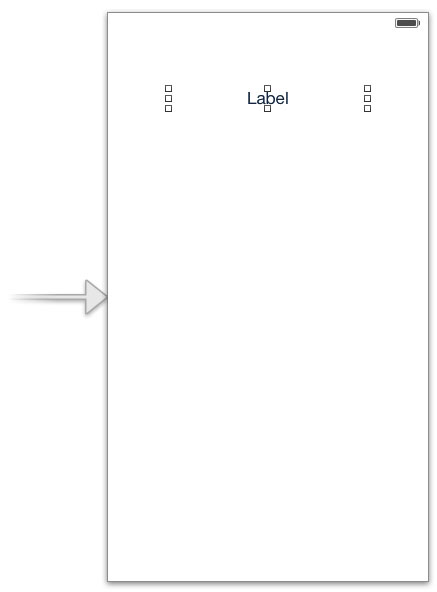
Go into the Main.storyboard and let’s keep it simple and add a single UILabel to the view that we’ll use to update the status when a beacon is detected. Drag a UILabel element from the Objects pane onto your view. Then click the UILabel and go into the attributes inspector to change the alignment to Center Align and change the width to 200.
You’ll end up with this:

Adding the CoreLocation Framework
The core location framework has been updated to support beacon detection and we need to add it to our project. Go to your project properties and click the “+” icon under “Linked Libraries and Frameworks”. Add CoreLocation.framework

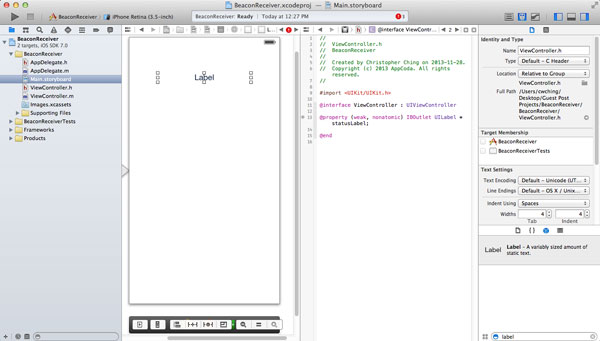
Now just like we did before, let’s expose the UILabel as an IBOutlet property. Open up Assistant Editor and make sure ViewController.h is on the right hand pane. Then hold down “control” and click the UILabel and drag a line over to the right pane in between “@interface” and “@end”. When you let go, a pop up dialog will show up and you can name the property “statusLabel”.

@interface ViewController : UIViewController

@property (weak, nonatomic) IBOutlet UILabel *statusLabel;

@end
Finally, go into ViewController.h and import the framework at the top and modify the class declaration to conform to the CLLocationManagerDelegate protocol because the protocol contains a delegate method that will let us know of newly detected beacons.
#import
#import

@interface ViewController : UIViewController

@property (weak, nonatomic) IBOutlet UILabel *statusLabel;

@end
Detecting Beacons
We need to add two properties. One to keep track of the beacon region we’re trying to detect and the other to hold the location manager which will give us updates on beacons found so add this code to ViewController.h:
@interface ViewController : UIViewController

@property (strong, nonatomic) CLBeaconRegion *myBeaconRegion;
@property (strong, nonatomic) CLLocationManager *locationManager;
@property (weak, nonatomic) IBOutlet UILabel *statusLabel;

@end
Now go into ViewController.m and in the “viewDidLoad” method, we’re going to initialize our locationManager and set ourselves as the delegate for it. We’re also going to start monitoring for the desired beacon so have that UUID handy!
- (void)viewDidLoad
{
    [super viewDidLoad];
    // Do any additional setup after loading the view, typically from a nib.

    // Initialize location manager and set ourselves as the delegate
    self.locationManager = [[CLLocationManager alloc] init];
    self.locationManager.delegate = self;

    // Create a NSUUID with the same UUID as the broadcasting beacon
    NSUUID *uuid = [[NSUUID alloc] initWithUUIDString:@"A77A1B68-49A7-4DBF-914C-760D07FBB87B"];

    // Setup a new region with that UUID and same identifier as the broadcasting beacon
    self.myBeaconRegion = [[CLBeaconRegion alloc] initWithProximityUUID:uuid
                                                             identifier:@"com.appcoda.testregion"];

    // Tell location manager to start monitoring for the beacon region
    [self.locationManager startMonitoringForRegion:self.myBeaconRegion];
}
Ok a lot is going on in the code above so let’s take it line by line.
In Line 7 and 8, we’re initializing locationManager to a new instance of CLLocationManager and then setting ourselves as its delegate so we can be notified of updates.
In line 11, we’re setting up a NSUUID object with the same UUID as the one that’s being broadcasted by the app we created earlier.
In line 14, we’re setting up the beacon region by passing in the UUID we want to look for as well as the region identifier of the region that’s being broadcasted.
And finally in line 18, we’re passing the region into the location manager to monitor for us.
Next we’re going to need to implement some delegate methods that will be called when the region is detected.
First add these methods to your ViewController.m:
- (void)locationManager:(CLLocationManager*)manager didEnterRegion:(CLRegion*)region
{
    [self.locationManager startRangingBeaconsInRegion:self.beaconRegion];
}

-(void)locationManager:(CLLocationManager*)manager didExitRegion:(CLRegion*)region
{
    [self.locationManager stopRangingBeaconsInRegion:self.beaconRegion];
    self.beaconFoundLabel.text = @"No";
}
The code above implements two methods that get triggered when the device enters a region or leaves a region. When a region is entered, we tell locationManager to start looking for beacons in the region.
Now implement this method below
-(void)locationManager:(CLLocationManager*)manager
       didRangeBeacons:(NSArray*)beacons
              inRegion:(CLBeaconRegion*)region
{
    // Beacon found!
    self.statusLabel.text = @"Beacon found!";

    CLBeacon *foundBeacon = [beacons firstObject];

    // You can retrieve the beacon data from its properties
    //NSString *uuid = foundBeacon.proximityUUID.UUIDString;
    //NSString *major = [NSString stringWithFormat:@"%@", foundBeacon.major];
    //NSString *minor = [NSString stringWithFormat:@"%@", foundBeacon.minor];
}
This method will get fired when one or more beacons are detected. In the code above you can see how we could get the UUID, major and minor data from the beacon. Furthermore, although we don’t implement it above, you can loop through the beacons array and determine which one is the closest by checking the proximity property of the beacon.
Running The Demo
If you’ve got two devices and you’ve paid to enrol in the Apple iOS Developer program, you can test the communication out. Launch the beacon app and tap the “Broadcast” button and wait for the “Broadcasting…” message to appear.
Launch the receiver app and carry it far away from the broadcasting beacon and then walk towards it to simulate entering the region.
![]()
Summary
If you don’t have multiple devices, you can still build some cool applications by buying BLE beacons and placing them around your house. Estimote makes such beacons and you get three for $99.
So I hope you can see how powerful and applicable iBeacons are and I hope this demo has sparked your imagination for some real world possibilities too! For your complete reference, you can download the Xcode project of the demo app from here.
I’d love to hear your thoughts in the comments below and if you learned something new, please use the social buttons to share this with your friends and colleagues!
This post is contributed by Chris Ching from Code With Chris. Chris has taught iOS programming to many beginners through his site and YouTube channel and has recently launched a video course: How To Create An App.


