

First, what’s JSON? JSON (short for JavaScript Object Notation) is a text-based, lightweight, and easy way for storing and exchanging data. It’s commonly used for representing structural data and data interchange in client-server applications, serving as an alternative to XML. A lot of the web services we use every day have JSON-based APIs. Most of the iOS apps, including Twitter, Facebook, and Flickr send data to their backend web services in JSON format.
As an example, here is a JSON representation of a sample Movie object:
{
    "title": "The Amazing Spider-man",
    "release_date": "03/07/2012",
    "director": "Marc Webb",
    "cast": [
        {
            "name": "Andrew Garfield",
            "character": "Peter Parker"
        },
        {
            "name": "Emma Stone",
            "character": "Gwen Stacy"
        },
        {
            "name": "Rhys Ifans",
            "character": "Dr. Curt Connors"
        }
    ]
}
As you can see, JSON formatted data is more human-readable and easier to parse than XML. I’ll not go into the details of JSON. This is not the purpose of this chapter. If you want to learn more about the technology, I recommend you to check out the JSON Guide at http://www.json.org/.
Since the release of iOS 5, the iOS SDK has already made it easy for developers to fetch and parse JSON data. It comes with a handy class called NSJSONSerialization, which can automatically convert JSON formatted data to objects. Later in this chapter, I will show you how to use the API to parse some sample JSON formatted data, returned by a web service. Once you understand how it works, it is fairly easy to build an app by integrating with other free/paid web services.
Since the release of Swift 4, Apple introduced the Codable protocol to simplify the whole JSON archival and serialization process. We will also look into this new feature and see how we can apply it in JSON parsing.
JSON Demo App
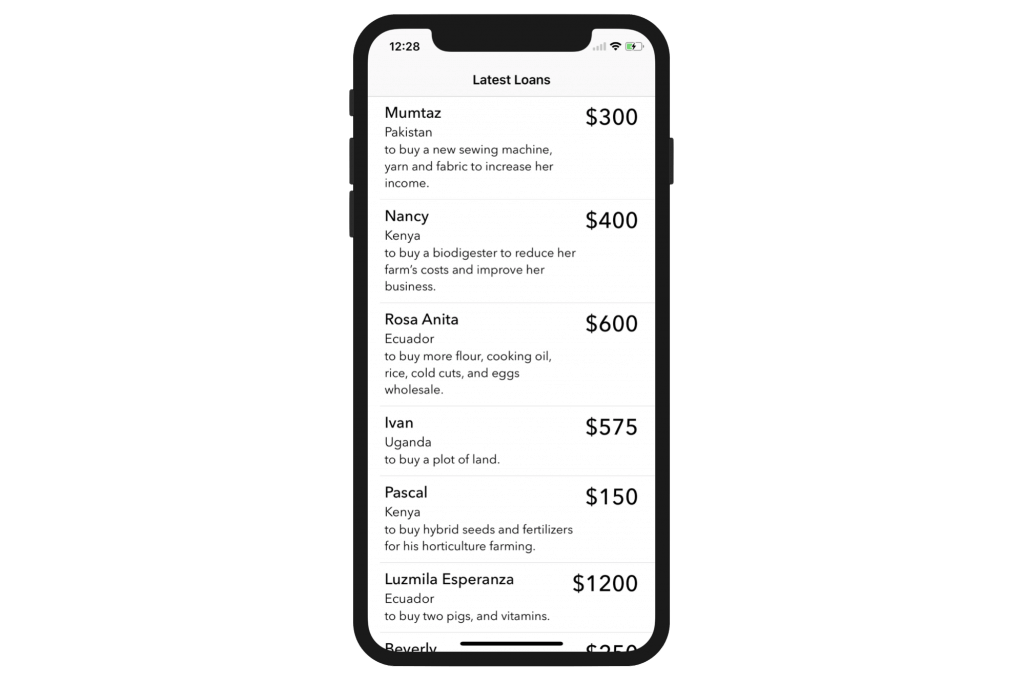
As usual, we’ll create a demo app. Let’s call it KivaLoan. The reason why we name the app KivaLoan is that we will utilize a JSON-based API provided by Kiva.org. If you haven’t heard of Kiva, it is a non-profit organization with a mission to connect people through lending to alleviate poverty. It lets individuals lend as little as $25 to help create opportunities around the world. Kiva provides free web-based APIs for developers to access their data. For our demo app, we’ll call up the following Kiva API to retrieve the most recent fundraising loans and display them in a table view:
https://api.kivaws.org/v1/loans/newest.json
However, you’ll have to take note if you use NSAllowsArbitraryLoads in your apps. In iOS 10, Apple further enforces ATS for all iOS apps. By January 2017, all iOS apps should be ATS-compliant. In other words, if your app connects to external any web services, the connection must be over HTTPS. If your app can’t fulfil this requirement, Apple will not allow it to be released on the App Store.
The returned data of the above API is in JSON format. Here is a sample result:
loans: (
        {
        activity = Retail;
        "basket_amount" = 0;
        "bonus_credit_eligibility" = 0;
        "borrower_count" = 1;
        description =         {
            languages =             (
                fr,
                en
            );
        };
        "funded_amount" = 0;
        id = 734117;
        image =         {
            id = 1641389;
            "template_id" = 1;
        };
        "lender_count" = 0;
        "loan_amount" = 750;
        location =         {
            country = Senegal;
            "country_code" = SN;
            geo =             {
                level = country;
                pairs = "14 -14";
                type = point;
            };
        };
        name = "Mar\U00e8me";
        "partner_id" = 108;
        "planned_expiration_date" = "2016-08-05T09:20:02Z";
        "posted_date" = "2016-07-06T09:20:02Z";
        sector = Retail;
        status = fundraising;
        use = "to buy fabric to resell";
    },
....
....
)
You will learn how to use the NSJSONSerialization class to convert the JSON formatted data into objects. It’s unbelievably simple. You’ll see what I mean in a while.
To keep you focused on learning the JSON implementation, you can first download the project template from http://www.appcoda.com/resources/swift5/KivaLoanStarter.zip. I have already created the skeleton of the app for you. It is a simple table-based app that displays a list of loans provided by Kiva.org. The project template includes a pre-built storyboard and custom classes for the table view controller and prototype cell. If you run the template, it should result in an empty table app.
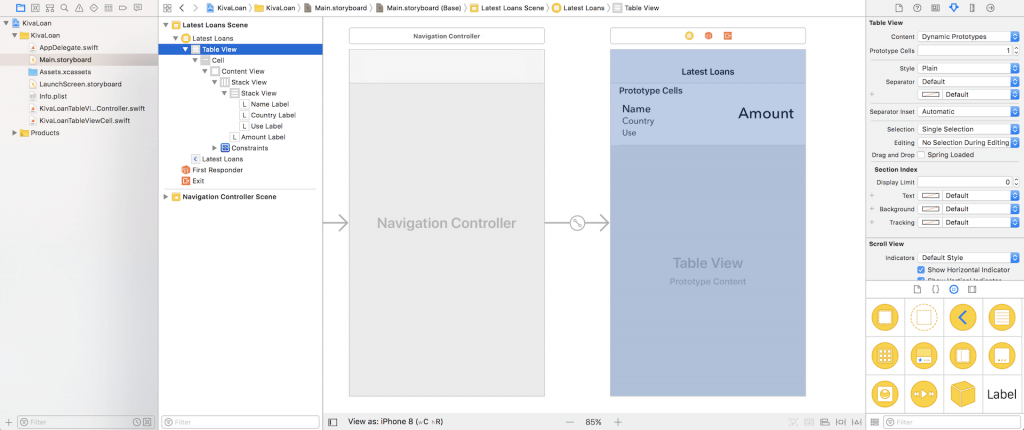
Creating JSON Data Model
We will first create a class to model a loan. It’s not required for loading JSON but the best practice is to create a separate class (or structure) for storing the data model. The Loan class represents the loan information in the KivaLoan app and is used to store the loan information returned by Kiva.org. To keep things simple, we won’t use all the returned data of a loan. Instead, the app will just display the following fields of a loan:
- Name of the loan applicant
name = "Mar\U00e8me";- Country of the loan applicant
location =         {
            country = Senegal;
            "country_code" = SN;
            geo =             {
                level = country;
                pairs = "14 -14";
                type = point;
            };
};- How the loan will be used
use = "to buy fabric to resell";- Amount
"loan_amount" = 750;These fields are good enough for filling up the labels in the table view. Now create a new class file using the Swift File template. Name it Loan.swift and declare the Loan structure like this:
struct Loan {

    var name: String = ""
    var country: String = ""
    var use: String = ""
    var amount: Int = 0

}
JSON supports a few basic data types including number, String, Boolean, Array, and Objects (an associated array with key and value pairs).
For the loan fields, the loan amount is stored as a numeric value in the JSON-formatted data. This is why we declared the amount property with the type Int. For the rest of the fields, they are declared with the type String.
Fetching Loans with the Kiva API
As I mentioned earlier, the Kiva API is free to use. No registration is required. You may point your browser to the following URL and you’ll get the latest fundraising loans in JSON format.
https://api.kivaws.org/v1/loans/newest.jsonOkay, let’s see how we can call up the Kiva API and parse the returned data. First, open KivaLoanTableViewController.swift and declare two variables at the very beginning:
private let kivaLoanURL = "https://api.kivaws.org/v1/loans/newest.json"
private var loans = [Loan]()
We just defined the URL of the Kiva API, and declare the loans variable for storing an array of Loan objects. Next, insert the following methods in the same file:
func getLatestLoans() {
    guard let loanUrl = URL(string: kivaLoanURL) else {
        return
    }

    let request = URLRequest(url: loanUrl)
    let task = URLSession.shared.dataTask(with: request, completionHandler: { (data, response, error) -> Void in

        if let error = error {
            print(error)
            return
        }

        // Parse JSON data
        if let data = data {
            self.loans = self.parseJsonData(data: data)

            // Reload table view
            OperationQueue.main.addOperation({
                self.tableView.reloadData()
            })
        }
    })

    task.resume()
}

func parseJsonData(data: Data) -> [Loan] {

    var loans = [Loan]()

    do {
        let jsonResult = try JSONSerialization.jsonObject(with: data, options: JSONSerialization.ReadingOptions.mutableContainers) as? NSDictionary

        // Parse JSON data
        let jsonLoans = jsonResult?["loans"] as! [AnyObject]
        for jsonLoan in jsonLoans {
            let loan = Loan()
            loan.name = jsonLoan["name"] as! String
            loan.amount = jsonLoan["loan_amount"] as! Int
            loan.use = jsonLoan["use"] as! String
            let location = jsonLoan["location"] as! [String:AnyObject]
            loan.country = location["country"] as! String
            loans.append(loan)
        }

    } catch {
        print(error)
    }

    return loans
}
These two methods form the core part of the app. Both methods work collaboratively to call the Kiva API, retrieve the latest loans in JSON format and translate the JSON-formatted data into an array of Loan objects. Let’s go through them in detail.
In the getLatestLoans method, we first instantiate the URL structure with the URL of the Kiva Loan API. The initialization returns us an optional. This is why we use the guard keyword to see if the optional has a value. If not, we simply return and skip all the code in the method.
Next, we create a URLSession with the load URL. The URLSession class provides APIs for dealing with online content over HTTP and HTTPS. The shared session is good enough for making simple HTTP/HTTPS requests. In case you have to support your own networking protocol, URLSession also provides you an option to create a custom session.
One great thing of URLSession is that you can add a series of session tasks to handle the loading of data, as well as uploading and downloading files and data fetching from servers (e.g. JSON data fetching).
With sessions, you can schedule three types of tasks: data tasks (URLSessionDataTask) for retrieving data to memory, download tasks (URLSessionDownloadTask) for downloading a file to disk, and upload tasks (URLSessionUploadTask) for uploading a file from disk. Here we use the data task to retrieve contents from Kiva.org. To add a data task to the session, we call the dataTask method with the specific URL request. After you add the task, the session will not take any action. You have to call the resume method (i.e. task.resume()) to initiate the data task.
Like most networking APIs, the URLSession API is asynchronous. Once the request completes, it returns the data (as well as errors) by calling the completion handler.
In the completion handler, immediately after the data is returned, we check for an error. If no error is found, we invoke the parseJsonData method.
The data returned is in JSON format. We create a helper method called parseJsonData for converting the given JSON-formatted data into an array of Loan objects. The Foundation framework provides the JSONSerialization class, which is capable of converting JSON to Foundation objects and converting Foundation objects to JSON. In the code snippet, we call the jsonObject method with the given JSON data to perform the conversion.
When converting JSON formatted data to objects, the top-level item is usually converted to a Dictionary or an Array. In this case, the top level of the returned data of the Kiva API is converted to a dictionary. You can access the array of loans using the key loans.
How do you know what key to use?
You can either refer to the API documentation or test the JSON data using a JSON browser (e.g. http://jsonviewer.stack.hu). If you’ve loaded the Kiva API into the JSON browser, here is an excerpt from the result:
{
  "paging": {
    "page": 1,
    "total": 5297,
    "page_size": 20,
    "pages": 265
  },
  "loans": [
    {
      "id": 794429,
      "name": "Joel",
      "description": {
        "languages": [
          "es",
          "en"
        ]
      },
      "status": "fundraising",
      "funded_amount": 0,
      "basket_amount": 0,
      "image": {
        "id": 1729143,
        "template_id": 1
      },
      "activity": "Home Appliances",
      "sector": "Personal Use",
      "use": "To buy home appliances.",
      "location": {
        "country_code": "PE",
        "country": "Peru",
        "town": "Ica",
        "geo": {
          "level": "country",
          "pairs": "-10 -76",
          "type": "point"
        }
      },
      "partner_id": 139,
      "posted_date": "2015-11-20T08:50:02Z",
      "planned_expiration_date": "2016-01-04T08:50:02Z",
      "loan_amount": 400,
      "borrower_count": 1,
      "lender_count": 0,
      "bonus_credit_eligibility": true,
      "tags": [

      ]
    },
    {
      "id": 797222,
      "name": "Lucy",
      "description": {
        "languages": [
          "en"
        ]
      },
      "status": "fundraising",
      "funded_amount": 0,
      "basket_amount": 0,
      "image": {
        "id": 1732818,
        "template_id": 1
      },
      "activity": "Farm Supplies",
      "sector": "Agriculture",
      "use": "To purchase a biogas system for clean cooking",
      "location": {
        "country_code": "KE",
        "country": "Kenya",
        "town": "Gatitu",
        "geo": {
          "level": "country",
          "pairs": "1 38",
          "type": "point"
        }
      },
      "partner_id": 436,
      "posted_date": "2016-11-20T08:50:02Z",
      "planned_expiration_date": "2016-01-04T08:50:02Z",
      "loan_amount": 800,
      "borrower_count": 1,
      "lender_count": 0,
      "bonus_credit_eligibility": false,
      "tags": [

      ]
    },

     ...
As you can see from the above code, paging and loans are two of the top-level items. Once the JSONSerialization class converts the JSON data, the result (i.e. jsonResult) is returned as a Dictionary with the top-level items as keys. This is why we can use the key loans to access the array of loans. Here is the line of code for your reference:
let jsonLoans = jsonResult?["loans"] as! [AnyObject]With the array of loans (i.e. jsonLoans) returned, we loop through the array. Each of the array items (i.e. jsonLoan) is converted into a dictionary. In the loop, we extract the loan data from each of the dictionaries and save them in a Loan object. Again, you can find the keys (highlighted in yellow) by studying the JSON result. The value of a particular result is stored as AnyObject. AnyObject is used because a JSON value could be a String, Double, Boolean, Array, Dictionary or null. This is why you have to downcast the value to a specific type such as String and Int. Lastly, we put the loan object into the loans array, which is the return value of the method.
for jsonLoan in jsonLoans {
    var loan = Loan()

    loan.name = jsonLoan["name"] as! String
    loan.amount = jsonLoan["loan_amount"] as! Int
    loan.use = jsonLoan["use"] as! String
    let location = jsonLoan["location"] as! [String: AnyObject]
    loan.country = location["country"] as! String

    loans.append(loan)
}
After the JSON data is parsed and the array of loans is returned, we call the reloadData method to reload the table. You may wonder why we need to call OperationQueue.main.addOperation and execute the data reload in the main thread.
The block of code in the completion handler of the data task is executed in a background thread. If you call the reloadData method in the background thread, the data reload will not happen immediately. To ensure a responsive GUI update, this operation should be performed in the main thread. This is why we call the OperationQueue.main.addOperation method and request to run the reloadData method in the main queue.
OperationQueue.main.addOperation({
    self.tableView.reloadData()
})
Quick note: You can also use dispatch_async function to execute a block of code in the main thread. But according to Apple, it is recommended to use OperationQueue over dispatch_async. As a general rule, Apple recommends using the highest-level APIs rather than dropping down to the low-level ones.
Displaying Loans in A Table View
With the loans array in place, the last thing we need to do is to display the data in the table view. Update the following methods in KivaLoanTableViewController.swift:
override func numberOfSections(in tableView: UITableView) -> Int {
    // Return the number of sections
    return 1
}

override func tableView(_ tableView: UITableView, numberOfRowsInSection section: Int) -> Int {
    // Return the number of rows
    return loans.count
}

override func tableView(_ tableView: UITableView, cellForRowAt indexPath: IndexPath) -> UITableViewCell {
    let cell = tableView.dequeueReusableCell(withIdentifier: "Cell", for: indexPath) as! KivaLoanTableViewCell

    // Configure the cell...
    cell.nameLabel.text = loans[indexPath.row].name
    cell.countryLabel.text = loans[indexPath.row].country
    cell.useLabel.text = loans[indexPath.row].use
    cell.amountLabel.text = "$\(loans[indexPath.row].amount)"

    return cell
}
The above code is pretty straightforward if you are familiar with the implementation of UITableView. In the tableView(_:cellForRowAt:) method, we retrieve the loan information from the loans array and populate them in the custom table cell. One thing to take note of is the code below:
"$\(loans[indexPath.row].amount)"In some cases, you may want to create a string by adding both string (e.g. $) and integer (e.g. loans[indexPath.row].amount) together. Swift provides a powerful way to create these kinds of strings, known as string interpolation. You can make use of it by using the above syntax.
Lastly, insert the following line of code in the viewDidLoad method to start fetching the loan data:
getLatestLoans()Compile and Run the App
Now it’s time to test the app. Compile and run it in the simulator. Once launched, the app will pull the latest loans from Kiva.org and display them in the table view.
For reference, you can download the complete Xcode project from http://www.appcoda.com/resources/swift5/KivaLoan.zip.
Introducing Codable
Since the release of Swift 4, Apple introduced a new way to encode and decode JSON data using Codable. We will rewrite the JSON decoding part of the demo app using this new approach.
Before we jump right into the modification, let me give you a basic walkthrough of Codable. If you look into the documentation of Codable, it is just a type alias of a protocol composition:
typealias Codable = Decodable & EncodableDecodable and Encodable are the two actual protocols you need to work with. However, for convenience’s sake, we usually refer to this type alias for handling JSON encoding and decoding.
First, what’s the advantage of using Codable over the traditional approach for encoding/decoding JSON? If you go back to the previous section and read the code again, you will notice that we had to manually parse the JSON data, convert it into dictionaries and create the Loan objects.
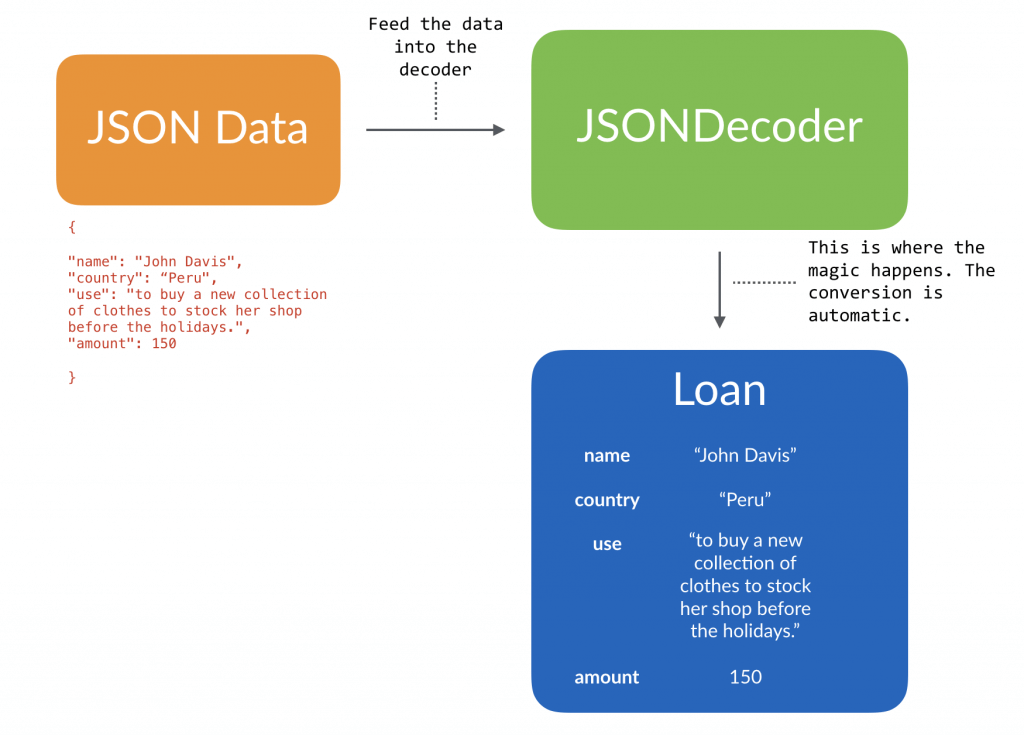
Codable simplifies the whole process by offering developers a different way to decode (or encode) JSON. As long as your type conforms to the Codable protocol, together with the new JSONDecoder, you will be able to decode the JSON data into your specified instances. The below figure illustrates the decoding of a sample loan data into an instance of Loan using JSONDecoder.
Decoding JSON
To give you a better idea about how Codable works, let’s start a Playground project and write some code. Once you have created your Playground project, declare the following json variable:
let json = """
{

"name": "John Davis",
"country": "Peru",
"use": "to buy a new collection of clothes to stock her shop before the holidays.",
"amount": 150

}
"""
We will first start with the basics. Here we define a very simple JSON data with 4 items. The value of the first three items are of the type String and the last one is of the type Int. As a side note, if this is the first time you see the pair of triple quotes ("""), this syntax was introduced in Swift 4 for declaring strings with multi-lines.
Next, declare the Loan structure like this:
struct Loan: Codable {
    var name: String
    var country: String
    var use: String
    var amount: Int
}
This Loan structure is very similar to the one we defined in the previous section, except that it adopts the Codable protocol. You should also note that the property names match those of the JSON data.
Now, let’s see the magic!
Continue to insert the following code in your Playground file:
let decoder = JSONDecoder()

if let jsonData = json.data(using: .utf8) {

    do {
        let loan = try decoder.decode(Loan.self, from: jsonData)
        print(loan)

    } catch {
        print(error)
    }
}
In the code above, we instantiate an instance of JSONDecoder and then convert the JSON string we defined earlier into Data. The magic happens in this line of code:
let loan = try decoder.decode(Loan.self, from: jsonData)You just need to call the decode method of the decoder with the JSON data and specify the type of the value to decode (i.e. Loan.self). The decoder will automatically parse the JSON data and convert them into a Loan object.
If you’ve done it correctly, you should see this line in the console:
Loan(name: "John Davis", country: "Peru", use: "to buy a new collection of clothes to stock her shop before the holidays.", amount: 150)Cool, right?
JSONDecoder automatically decodes the JSON data and stores the decoded value in the corresponding property of the specified type (here, it is Loan).
Working with Custom Property Names
Earlier, I showed you the simplest example of JSON decoding. However, the decoding process is not always so straightforward. Now, let’s take a look another example.
Sometimes, the property name of your type and the key of the JSON data are not exactly matched. How can you perform the decoding?
Let’s say, we define the json variable like this:
let json = """
{

"name": "John Davis",
"country": "Peru",
"use": "to buy a new collection of clothes to stock her shop before the holidays.",
"loan_amount": 150

}
"""
In the JSON data, the key of the loan amount is changed from amount to loan_amount. How can we decode the data without changing the property name amount of Loan?
Now, update the Loan structure like this:
struct Loan: Codable {
    var name: String
    var country: String
    var use: String
    var amount: Int

    enum CodingKeys: String, CodingKey {
        case name
        case country
        case use
        case amount = "loan_amount"
    }
}
To define the mapping between the key and the property name, you are required to declare an enum called CodingKeys that has a rawValue of type String and conforms to the CodingKey protocol. In the enum, you define all the property names of your model and their corresponding key in the JSON data. Say, the case amount is defined to map to the key loan_amount. If both the property name and the key of the JSON data are the same, you can omit the assignment.
If you’ve changed the code correctly, you should be able to decode the updated JSON data with the following message found in the console:
Loan(name: "John Davis", country: "Peru", use: "to buy a new collection of clothes to stock her shop before the holidays.", amount: 150)Working with Nested JSON Objects
The JSON data that we have worked on so far has only one level. In reality, the JSON data is usually more complex with multiple levels. Now let’s see how we can decode nested JSON objects.
First, update the json variable like this:
let json = """
{

"name": "John Davis",
"location": {
"country": "Peru",
},
"use": "to buy a new collection of clothes to stock her shop before the holidays.",
"loan_amount": 150

}
"""
We’ve made a minor change to the data by introducing the location key that has a nested JSON object with the nested key country. How can we decode this type of JSON data and retrieve the value of country from the nested object?
Now, modify the Loan structure like this:
struct Loan: Codable {
    var name: String
    var country: String
    var use: String
    var amount: Int

    enum CodingKeys: String, CodingKey {
        case name
        case country = "location"
        case use
        case amount = "loan_amount"
    }

    enum LocationKeys: String, CodingKey {
        case country
    }

    init(from decoder: Decoder) throws {
        let values = try decoder.container(keyedBy: CodingKeys.self)

        name = try values.decode(String.self, forKey: .name)

        let location = try values.nestedContainer(keyedBy: LocationKeys.self, forKey: .country)
        country = try location.decode(String.self, forKey: .country)

        use = try values.decode(String.self, forKey: .use)
        amount = try values.decode(Int.self, forKey: .amount)

    }
}
Similar to what we have done earlier, we have to define an enum CodingKeys. For the case country, we specify to map to the key location. To handle the nested JSON object, we need to define an additional enumeration. In the code above, we name it LocationKeys and declare the case country that matches the key country of the nested object.
Since it is not a direct mapping, we need to implement the initializer of the Decodable protocol to handle the decoding of all properties. In the init method, we first invoke the container method of the decoder with CodingKeys.self to retrieve the data related to the specified coding keys, which are name, location, use and amount.
To decode a specific value, we call the decode method with the specific key (e.g. .name) and the associated type (e.g. String.self). The decoding of the name, use and amount is pretty straightforward. For the country property, the decoding is a little bit tricky. We have to call the nestedContainer method with LocationKeys.self to retrieve the nested JSON object. From the values returned, we further decode the value of country.
That is how you decode JSON data with nested objects. If you’ve followed me correctly, you should see the following message in the console:
Loan(name: "John Davis", country: "Peru", use: "to buy a new collection of clothes to stock her shop before the holidays.", amount: 150)Working with Arrays
In the JSON data returned from Kiva API, it usually comes with more than one loan. Multiple loans are structured in the form of an array. Now, let’s see how to decode an array of JSON objects using Codable.
First, modify the json variable like this:
let json = """

[{
"name": "John Davis",
"location": {
"country": "Paraguay",
},
"use": "to buy a new collection of clothes to stock her shop before the holidays.",
"loan_amount": 150
},
{
"name": "Las Margaritas Group",
"location": {
"country": "Colombia",
},
"use": "to purchase coal in large quantities for resale.",
"loan_amount": 200
}]

"""
To decode the above array into an array of Loan object, all you need to use is to modify the following line of code from:
let loan = try decoder.decode(Loan.self, from: jsonData)to:
let loans = try decoder.decode([Loan].self, from: jsonData)As you can see, you just need to specify [Loan].self when decoding the JSON data.
Now that the JSON data is fully utilized, but sometimes you may want to ignore some key/value pairs. Let’s say, we update the json variable like this:
let json = """
{
"paging": {
"page": 1,
"total": 6083,
"page_size": 20,
"pages": 305
},
"loans":
[{
"name": "John Davis",
"location": {
"country": "Paraguay",
},
"use": "to buy a new collection of clothes to stock her shop before the holidays.",
"loan_amount": 150
},
{
"name": "Las Margaritas Group",
"location": {
"country": "Colombia",
},
"use": "to purchase coal in large quantities for resale.",
"loan_amount": 200
}]
}
"""
This JSON data comes with two top-level objects : paging and loans. Apparently, we are only interested in the data related to loans. In this case, how can you decode the array of loans?
To do that, declare another struct named LoanDataStore that also adopts Codable:
struct LoanDataStore: Codable {
    var loans: [Loan]
}
This LoanDataStore only has a loans property that matches the key loans of the JSON data.
Now modify the following line of code from:
let loans = try decoder.decode([Loan].self, from: jsonData)to:
let loanDataStore = try decoder.decode(LoanDataStore.self, from: jsonData)The decoder will automatically decode the loans JSON objects and store them into the loans array of LoanDataStore. You can add the following lines of code to verify the content of the array:
for loan in loanDataStore.loans {
    print(loan)
}
The console should have an output like this:
Loan(name: "John Davis", country: "Paraguay", use: "to buy a new collection of clothes to stock her shop before the holidays.", amount: 150)
Loan(name: "Las Margaritas Group", country: "Colombia", use: "to purchase coal in large quantities for resale.", amount: 200)
Using Codable in the KivaLoan App
Now that I believe you have some ideas about how to decode JSON using Codable, let’s go back to the KivaLoan project and modify it to use Codable.
Open Loan.swift and replace it with the following code:
import Foundation

struct Loan: Codable {

    var name: String = ""
    var country: String = ""
    var use: String = ""
    var amount: Int = 0

    enum CodingKeys: String, CodingKey {
        case name
        case country = "location"
        case use
        case amount = "loan_amount"
    }

    enum LocationKeys: String, CodingKey {
        case country
    }

    init(from decoder: Decoder) throws {
        let values = try decoder.container(keyedBy: CodingKeys.self)

        name = try values.decode(String.self, forKey: .name)

        let location = try values.nestedContainer(keyedBy: LocationKeys.self, forKey: .country)
        country = try location.decode(String.self, forKey: .country)

        use = try values.decode(String.self, forKey: .use)
        amount = try values.decode(Int.self, forKey: .amount)

    }
}


struct LoanDataStore: Codable {
    var loans: [Loan]
}
The code above is exactly the same as the one we developed earlier. The LoanDataStore is designed to store an array of loans.
Next, replace the parseJsonData method of the KivaLoanTableViewController class with the following code:
func parseJsonData(data: Data) -> [Loan] {

    var loans = [Loan]()

    let decoder = JSONDecoder()

    do {
        let loanDataStore = try decoder.decode(LoanDataStore.self, from: data)
        loans = loanDataStore.loans

    } catch {
        print(error)
    }

    return loans
}
Here, we just use the JSONDecoder to decode the JSON data instead of JSONSerialization. I will not go into the code because it is the same as we have just worked on in the Playground project.
Now you’re ready to hit the Run button and test the app in the simulator. Everything should be the same as before. Under the hood, the app now makes use of Codable in Swift 5 to decode JSON.


