

This is a guest tutorial by Rumiya Murtazina. Some time ago, we’ve discussed with you how to integrate your iOS app with Parse and demonstrate how to build an Instagram-like app using the service. Not only can you use Parse to save data, the service provides a PFUser class to manage your app’s user information. In this tutorial, Rumiya will show you how to build a simple login app and walk you through the procedures to store user credentials in Parse cloud.
Enter Rumiya’s tutorial.
Parse is a third party “cloud app solution” that is platform independent. You can learn more about it here. This intermediate programming tutorial will show you how to incorporate Parse into a Swift project and store user login details in Parse cloud storage.
Getting Started
I’ve prepared a project template that includes the Storyboard and View controller classes. You will find the Login, Sign Up, Reset Password and Home scenes already designed.
Running the project should present you with a simple user profile home screen. Before we begin, take a few minutes to familiarize yourself with the project template.
Adding the Parse Framework
First, login to your Parse account or sign up for a free account. Go to your Dashboard and click “Create a new App”. Name your app “ParseDemo” and click “Create”.
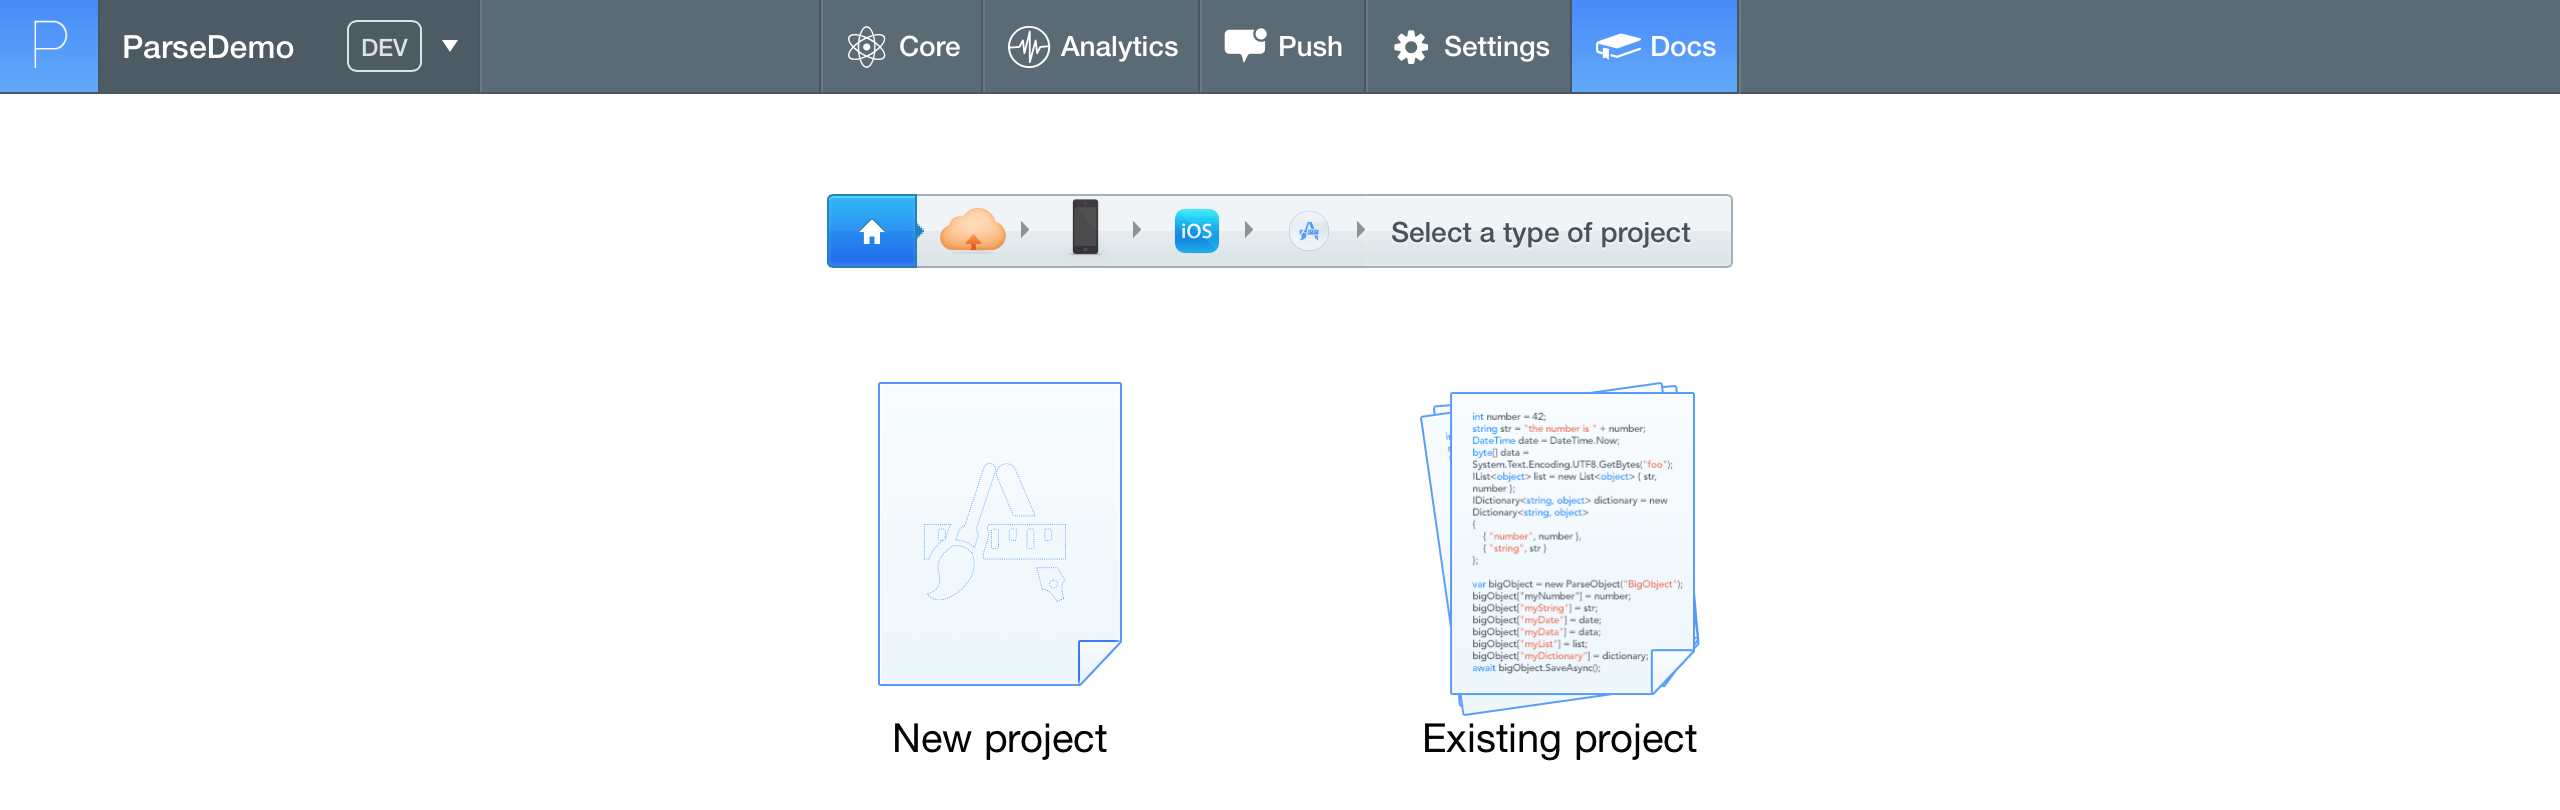
Next, at the bottom of the widget, select “Quickstart Guide”. In the successive screens choose the following options: Data > Mobile > iOS > Swift — Existing Project.
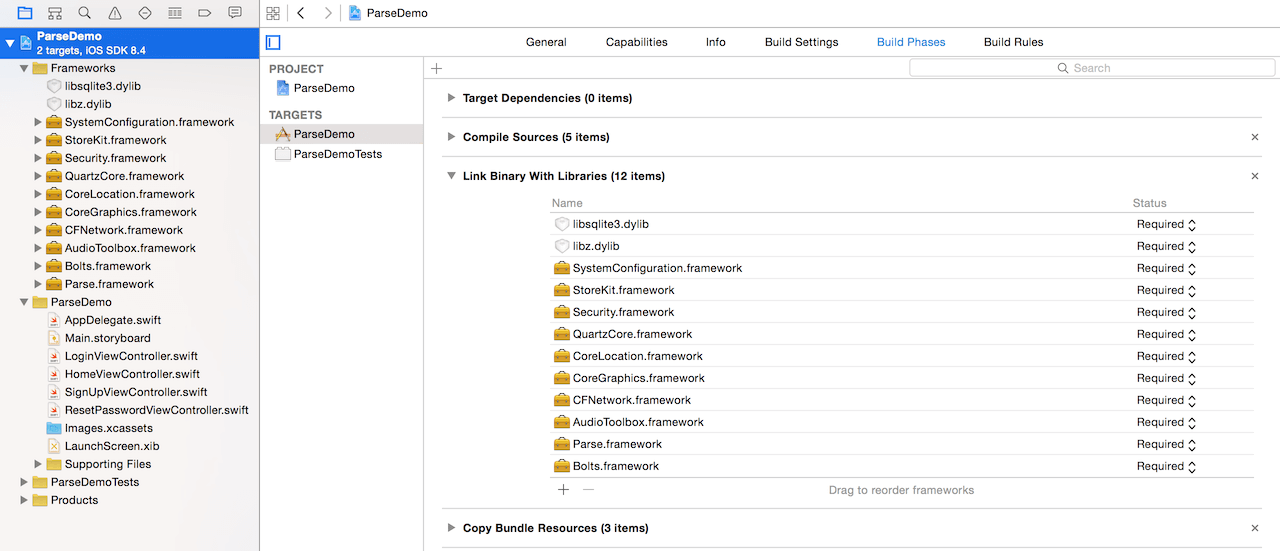
Now you should be ready to follow the “Install the SDK” steps. Add the Parse framework and the listed libraries to your app’s Frameworks group.
We need to initialize Parse. This is done by importing the Parse and Bolts frameworks and updating the AppDelegate.swift file with the QuickStart generated code like this:
func application(application: UIApplication, didFinishLaunchingWithOptions launchOptions: [NSObject: AnyObject]?) -> Bool {

    Parse.enableLocalDatastore()

    // Initialize Parse.
    Parse.setApplicationId("OzyfQlVF5pHLA0OmRHB0RKsfXpdWwGWJ1mYgDTI6", clientKey: "f7Jw2X4XzSW0whm2aDtYl7wdIYn5hZVvHuPJ72zu")

    // [Optional] Track statistics around application opens.
    PFAnalytics.trackAppOpenedWithLaunchOptions(launchOptions)

    return true
}
Please remember to replace the application ID and client key to yours. You can find these keys under the Settings tab of your Parse dashboard.
Make sure to import Parse at the top of each of the following classes:
- LoginViewController.swift
- HomeViewController.swift
- SignUpViewController.swift
- ResetPasswordViewController.swift
Now, compile and run. Your iOS app should be running with no errors in Xcode.
Displaying the Login Screen
An app user has to login or sign up before navigating to the user’s profile home screen. If the current visitor is not logged in, we need to bring up the login screen.
In the HomeViewController.swift file insert the following method to instantiate the Login View Controller with the Storyboard Id “Login”:
override func viewWillAppear(animated: Bool) {
    if (PFUser.currentUser() == nil) {
        dispatch_async(dispatch_get_main_queue(), { () -> Void in

            let viewController:UIViewController = UIStoryboard(name: "Main", bundle: nil).instantiateViewControllerWithIdentifier("Login") as! UIViewController
            self.presentViewController(viewController, animated: true, completion: nil)
        })
    }
}
Compile and run the project. Launching the app should bring up the login screen. We don’t have any registered users yet. We need to be able to navigate to the sign up screen to register a user.
Sign Up
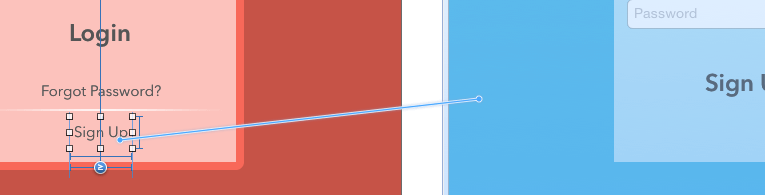
To display the Sign Up screen got to the Storyboard, select the Sign Up button of the Login View Controller. Control-drag from the selected button to the Sign Up View Controller. When prompted, select the “present modally” option under selection segue.
In SignUpViewController.swift declare the following outlet variables for the email, username and password text fields:
@IBOutlet weak var emailField: UITextField!
@IBOutlet weak var usernameField: UITextField!
@IBOutlet weak var passwordField: UITextField!
Next, insert the following code to create the action method:
@IBAction func signUpAction(sender: AnyObject) {

    var username = self.usernameField.text
    var password = self.passwordField.text
    var email = self.emailField.text
    var finalEmail = email.stringByTrimmingCharactersInSet(NSCharacterSet.whitespaceCharacterSet())

    // Validate the text fields
    if count(username) < 5 {
        var alert = UIAlertView(title: "Invalid", message: "Username must be greater than 5 characters", delegate: self, cancelButtonTitle: "OK")
        alert.show()

    } else if count(password) < 8 {
        var alert = UIAlertView(title: "Invalid", message: "Password must be greater than 8 characters", delegate: self, cancelButtonTitle: "OK")
        alert.show()

    } else if count(email) < 8 {
        var alert = UIAlertView(title: "Invalid", message: "Please enter a valid email address", delegate: self, cancelButtonTitle: "OK")
        alert.show()

    } else {
        // Run a spinner to show a task in progress
        var spinner: UIActivityIndicatorView = UIActivityIndicatorView(frame: CGRectMake(0, 0, 150, 150)) as UIActivityIndicatorView
        spinner.startAnimating()

        var newUser = PFUser()

        newUser.username = username
        newUser.password = password
        newUser.email = finalEmail

        // Sign up the user asynchronously
        newUser.signUpInBackgroundWithBlock({ (succeed, error) -> Void in

            // Stop the spinner
            spinner.stopAnimating()
            if ((error) != nil) {
                var alert = UIAlertView(title: "Error", message: "\(error)", delegate: self, cancelButtonTitle: "OK")
                alert.show()

            } else {
                var alert = UIAlertView(title: "Success", message: "Signed Up", delegate: self, cancelButtonTitle: "OK")
                alert.show()
                dispatch_async(dispatch_get_main_queue(), { () -> Void in
                    let viewController:UIViewController = UIStoryboard(name: "Main", bundle: nil).instantiateViewControllerWithIdentifier("Home") as! UIViewController
                    self.presentViewController(viewController, animated: true, completion: nil)
                })
            }
        })
    }
}
This action method is triggered when a user taps the Sign Up button. It perform a simple validation of the text fields values. If the validation is successful, the action method calls the signUpInBackgroundWithBlock Parse method. The signUpInBackgroundWithBlock method may take some time to finish because it is executed asynchronously. The spinner shows the task is in progress. Once the task is completed, a message will inform the user if the registration was successful or not. If the registration is successful, the user will be logged in and navigated to the home screen.
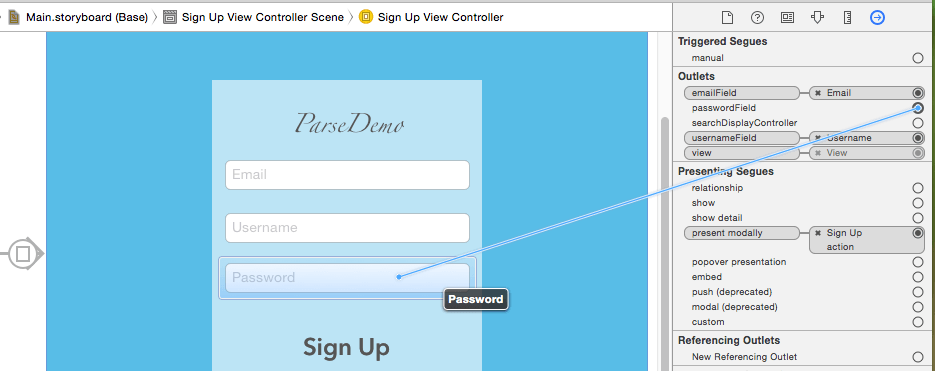
Now, go back to the Storyboard and select the Sign Up View Controller. In the Connection Inspector connect each of the outlet variables to the corresponding text fields.
Next, select the Sign Up button. In the Connection Inspector connect the Touch Up Inside event with the Sign Up button. When prompted, select signUpAction: option.

In order to dismiss the sign up screen we need to define an unwind segue. Go to LoginViewController.swift, and insert this unwind action:
@IBAction func unwindToLogInScreen(segue:UIStoryboardSegue) {
}
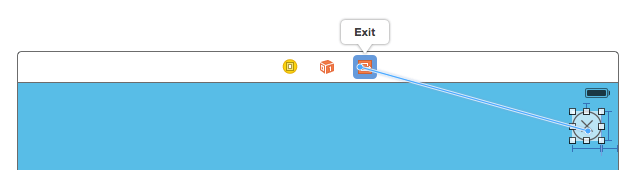
In the Storyboard, select the Sign Up View Controller and control-drag from the close button to the exit icon. When prompted, select the “unwindToHome:” option under action segue.
Compile and run. Now you should be able to register a user.
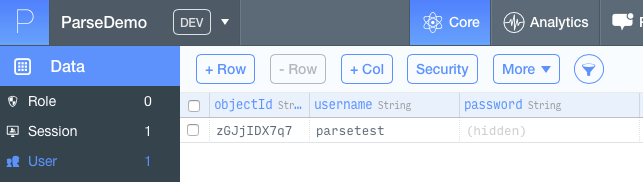
Go to your Parse account, select Core for your ParseDemo app. Select the User section to see the first registered user:
Login and Log out
Now let’s move onto the implementation of login and logout. In LoginViewController.swift declare the following outlet variables for the username and password text fields:
@IBOutlet weak var usernameField: UITextField!
@IBOutlet weak var passwordField: UITextField!
Next, insert the following action method:
@IBAction func loginAction(sender: AnyObject) {
    var username = self.usernameField.text
    var password = self.passwordField.text

    // Validate the text fields
    if count(username) < 5 {
        var alert = UIAlertView(title: "Invalid", message: "Username must be greater than 5 characters", delegate: self, cancelButtonTitle: "OK")
        alert.show()

    } else if count(password) < 8 {
        var alert = UIAlertView(title: "Invalid", message: "Password must be greater than 8 characters", delegate: self, cancelButtonTitle: "OK")
        alert.show()

    } else {
        // Run a spinner to show a task in progress
        var spinner: UIActivityIndicatorView = UIActivityIndicatorView(frame: CGRectMake(0, 0, 150, 150)) as UIActivityIndicatorView
        spinner.startAnimating()

        // Send a request to login
        PFUser.logInWithUsernameInBackground(username, password: password, block: { (user, error) -> Void in

            // Stop the spinner
            spinner.stopAnimating()

            if ((user) != nil) {
                var alert = UIAlertView(title: "Success", message: "Logged In", delegate: self, cancelButtonTitle: "OK")
                alert.show()

                dispatch_async(dispatch_get_main_queue(), { () -> Void in
                    let viewController:UIViewController = UIStoryboard(name: "Main", bundle: nil).instantiateViewControllerWithIdentifier("Home") as! UIViewController
                    self.presentViewController(viewController, animated: true, completion: nil)
                })

            } else {
                var alert = UIAlertView(title: "Error", message: "\(error)", delegate: self, cancelButtonTitle: "OK")
                alert.show()
            }
        })
    }
}
The above code is triggered when a user taps the Login button. It’s similar to the one we implemented in the SignUpViewController.swift. Except, instead of calling the signUpInBackgroundWithBlock method, we call logInWithUsernameInBackground to pass the entered username and password to Parse. If the login is successful the Home View Controller with the Storyboard Id “Home” will be instantiated.
Now, in the Storyboard, connect the Login View Controller outlet variables to the corresponding text fields. Select the Login button. In the Connection Inspector connect the Touch Up Inside event with the Login button. When prompted, select “loginAction:” option.
For a user to be able to log out, we need to implement the logOutAction action method in HomeViewController.swift:
@IBAction func logOutAction(sender: AnyObject){

    // Send a request to log out a user
    PFUser.logOut()

    dispatch_async(dispatch_get_main_queue(), { () -> Void in
        let viewController:UIViewController = UIStoryboard(name: "Main", bundle: nil).instantiateViewControllerWithIdentifier("Login") as! UIViewController
        self.presentViewController(viewController, animated: true, completion: nil)
    })

}
The code calls the logOut Parse method and instantiates the Login scene.
In the Storyboard select the Logout button. In the Connection Inspector connect the Touch Up Inside event with the Login button. When prompted, select “logOutAction:” option.
There is one more thing to do before we test this part. The following steps are for replacing the text “user name” with the actual username (think about that for a minute). Let’s declare an outlet variable for the Username label in the HomeViewController.swift file:
@IBOutlet weak var userNameLabel: UILabel!
Update the viewDidLoad method with the following code:
override func viewDidLoad() {
    super.viewDidLoad()

    // Show the current visitor's username
    if let pUserName = PFUser.currentUser()?["username"] as? String {
        self.userNameLabel.text = "@" + pUserName
    }
}
Go back to the Storyboard and connect the userNameLabel outlet variable to the corresponding User Name label in the Home View Controller.
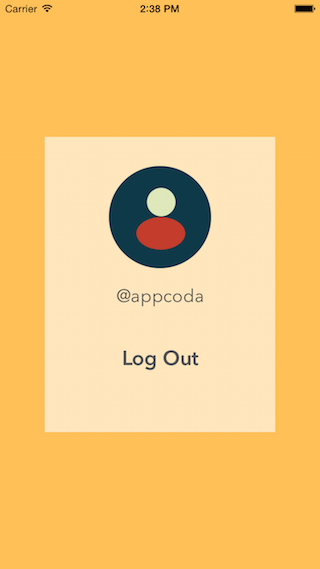
Compile and run. The home screen will show the current username.
Reset Password
In ResetPasswordViewController.swift declare the outlet variable for the Email text field:
@IBOutlet weak var emailField: UITextField!
Next, insert the following action method:
@IBAction func passwordReset(sender: AnyObject) {
    var email = self.emailField.text
    var finalEmail = email.stringByTrimmingCharactersInSet(NSCharacterSet.whitespaceCharacterSet())

    // Send a request to reset a password
    PFUser.requestPasswordResetForEmailInBackground(finalEmail)

    var alert = UIAlertController (title: "Password Reset", message: "An email containing information on how to reset your password has been sent to " + finalEmail + ".", preferredStyle: UIAlertControllerStyle.Alert)
    alert.addAction(UIAlertAction(title: "Ok", style: UIAlertActionStyle.Default, handler: nil))
    self.presentViewController(alert, animated: true, completion: nil)
}
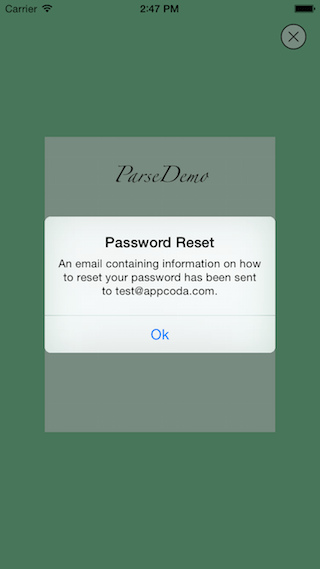
Here we just call the requestPasswordResetForEmailInBackground method with the specified email to reset the password. The password reset will then be handled by Parse. If the email is valid, an email will be sent to that address with instructions on how to reset their password.
The process of setting the ResetPasswordViewController in the Storyboard should be familiar to you by now. Set up a segue from the login screen, connect the outlet variable with the text field, and the action method with the button. Don’t forget to unwind the close button.
And there you have it! For your reference, you can download the complete Xcode project here. Just remember to update AppDelegate.swift with your Parse application keys.
Don’t stop here, there is so much more to do. Try figuring out how to validate the email text field properly. The user doesn’t have a profile picture. Implement a feature to upload and save a profile picture. Add an option to login with Facebook.
As you can see Parse does a lot of the heavy lifting for you, leaving you to concentrate on making a beautiful and useful application. Play around with it and happy coding!
This tutorial is contributed by Rumiya. Rumiya is an independent iOS developer. Over her career she has worn many hats from IT technical support, to Visual FoxPro database ninja (that’s a really old hat), to web developer. She’s recently fallen in love with Swift after finishing Appcoda’s book. Rumiya firmly believes that the best way to improve her programming chops is to learn a new topic and write a tutorial about it. She chronicles her app developing adventures at abearablecode.com. Rumiya’s non-coding activities include painting, drawing, photography and blogging about a wide variety of tasty projects at elegantpantry.me.


