Welcome to another macOS programming tutorial! In the previous post we made our introductory steps on macOS programming world as we discussed about fundamental concepts. In this tutorial, we are going to explore and unveil new interesting things that would be necessary to anyone who wants to make their way to macOS development.
So, if you have gone through the previous post, then you already know that the main focus was on window controllers and windows, panels, loading and presenting additional windows, and more. However, there is one thing that was not discussed at all (intentionally), and that is the dark theme that was first presented on macOS Mojave (10.14), and what actions a developer has to do so an app works properly in both dark and light content. Dark theme gives a great look-and-feel to macOS which all developers and single users have undoubtedly loved. But despite its nice appearance, it inevitably puts developers into additional efforts in order to provide images, colors and other assets for both dark and light modes. The first goal here is to see how to provide different sets of assets so an app can work well in both modes.
Besides that, I am going to show you how to create a preferences window. That window that many apps provide for making settings and configurations. See for example the Xcode > Preferences or Safari > Preferences window and you will understand what I am talking about. Of course, our preferences window here is going to be extremely simple, but you will get some really valuable lessons on how to deal with preferences in general. A few important steps and considerations hide behind the making of preferences, and you will get to know them.
Finally, we will have the chance to meet new Cocoa controls and we will learn how to override default appearance, such as changing the background color of a view; it might sound simple, but it’s not as straightforward as it is in iOS.
All the above will be presented by going through the steps of making a new simple application.
About The App
So, our demo app today that will be our vessel on new macOS programming explorations is a Body Mass Index (BMI) calculator:
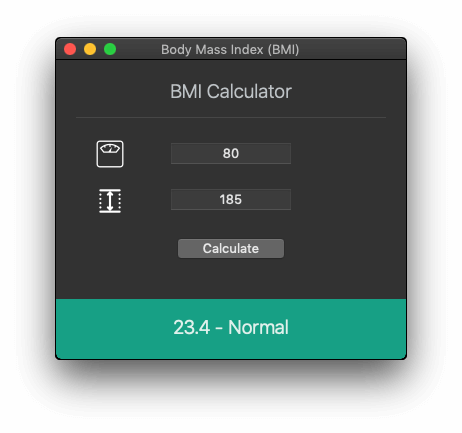
Body Mass Index (BMI) is an indicator about a person’s weight with respect to his or her height. BMI value increases when the body fat increases too, while it has a lower value when the body fat is decreased.
BMI is calculated using the following formula:
BMI = Weight in Kilograms / Square(Height in Meters)
Normal BMI values are between 18.5 and 24.9. Values less than 18.5 indicate an underweight person, and values over 24.9 indicate an overweight or obese person. Here is how weight status is categorized based on the BMI value:
- BMI < 18.5: Underweight
- 18.5 <= BMI <= 24.9: Normal
- 25 <= BMI <= 29.9: Overweight
- BMI > 30.0: Obese
With the above said about BMI, let’s focus on our app again. It will provide us with text fields to enter weight and height values, and it will calculate the BMI value. The results won’t be just a textual representation of the final score, but also a graphical update to the UI that will be in accordance to the BMI value.
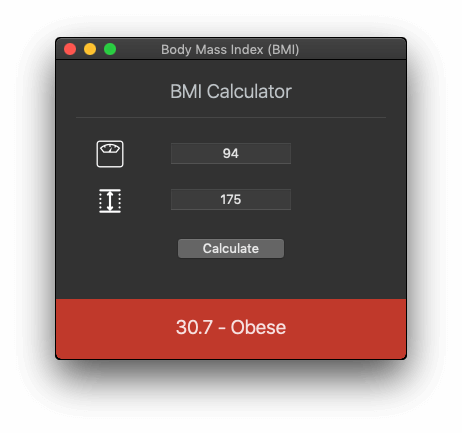
To make things more interesting and therefore have the chance to discuss about more programming topics, the app will be capable of accepting values in two different measurement systems:
- Metric, where weight is measured in Kilograms (Kg) and height in centimetres (cm).
- Imperial, where weight is measured in Pounds and height in feet and inches.
The UI of the app will be updated according to the measurement system we choose:
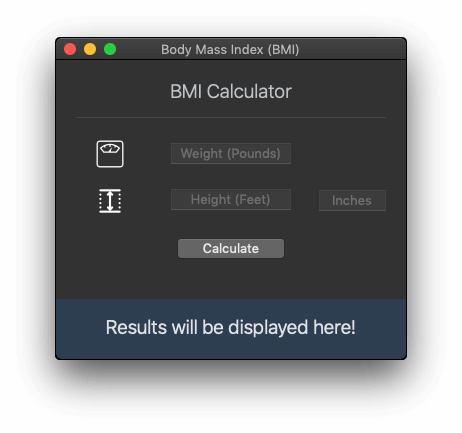
That choice will take place in a Preferences window that we will create just for that. Actually, we will grab the chance to learn how to make a Preferences window based on our need to switch between measurement systems. We will keep things simple, as we will have just radio buttons that will let us change the current measurement systems, but what we will go through is more than enough to demonstrate the entire process of making Preferences.
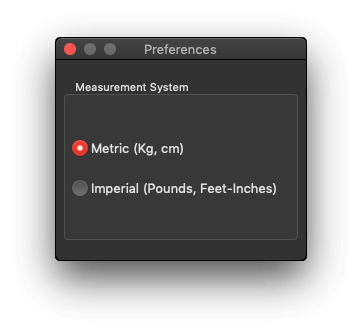
There is a starter package for you to download, where besides the Xcode project you will also find a folder with a few images that we will need to add later to the project. Once you download it, open the Xcode project and navigate yourself around. You will find out that most of the UI has been made already, but not all; we will make together part of it, and no logic is implemented as well. Also, you will find a few colors already existing in the Assets catalog, but we’ll talk later about these.
Preparing Assets For Dark Theme
Let’s get started by opening the Main.storyboard file. You can find here the main window of the BMI calculator app mostly done, but not entirely. What is actually missing is to specify assets that will be in accordance to the selected visual appearance (dark or light theme on macOS).
At first, what we are going to change is the text color of the “BMI Calculator” label. That label has its default color at the moment, but we are going to change that and apply a custom color that will vary between dark and light appearance. The same we will do for the images in the two image views to the left side of text fields. To make that specific, what we want to achieve is to have:
- Light text color and light tinted images in dark mode.
- Dark text color and dark tinted images in light mode.
The good news is that we don’t have to switch from light to dark and and from dark to light assets manually; macOS will do that for us! Our only obligation is to provide assets for both themes.
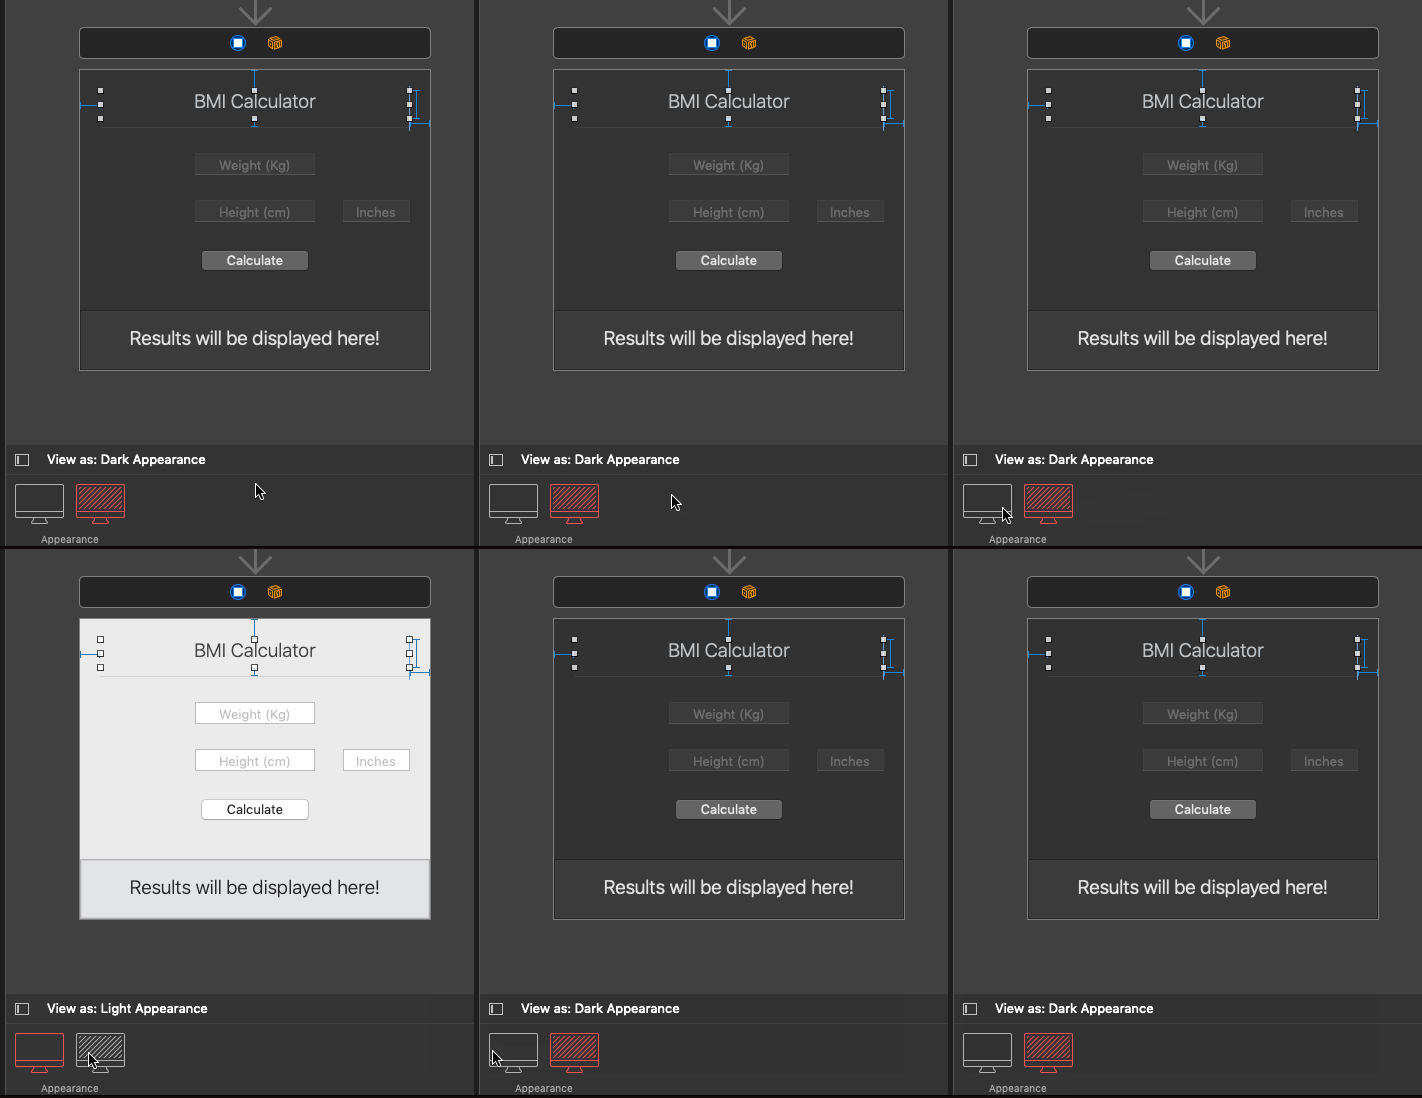
Before we get to that, take a look at the layout bar in Interface Builder at the bottom side of Xcode window. You will find a View as: button. By clicking on it a panel is showing up with two appearance options: Light and dark. When selecting any, the interface in canvas is updated accordingly and we can see instantly how our UI looks like on each theme! At the same time, the View as: button describes in text the selected appearance.
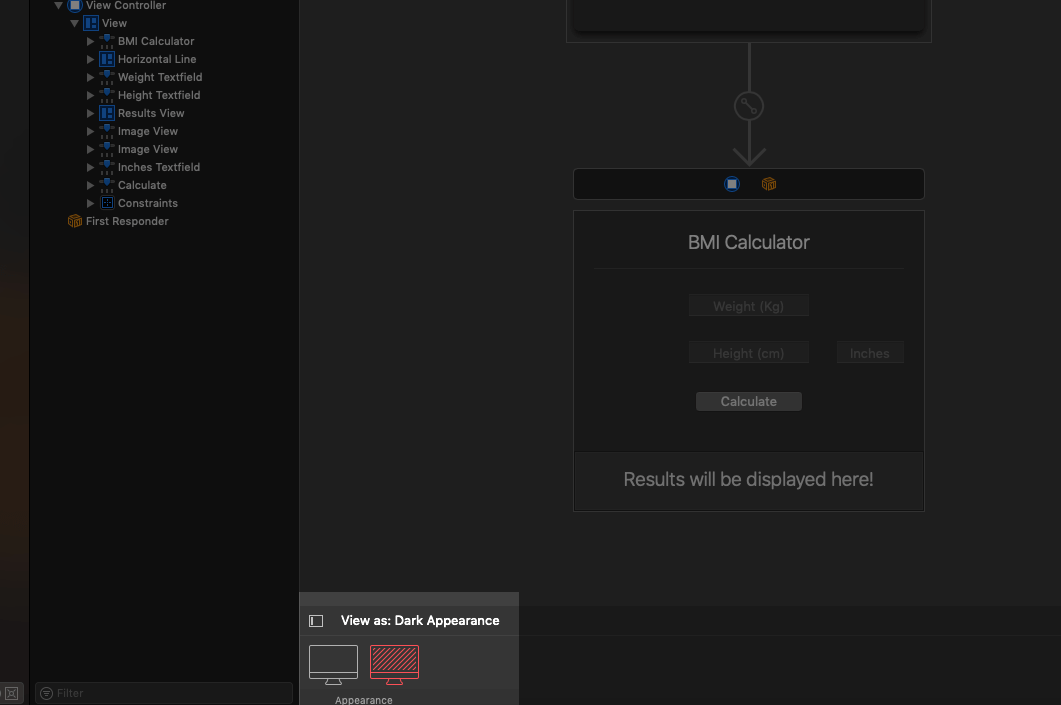
That small action is not just useful to see the UI variations with one click only, but it helps a lot to verify that all necessary assets have been provided to Xcode in order to support both visual themes.
Creating A Color Asset
Let’s see now how to set a custom color to the title label that will adapt to theme changes. Open the Assets catalog by clicking to the Assets.xcassets in Xcode. This is the place where normally all assets about an app are being added. Then:
- Click on the Plus (+) button at the bottom side of the left panel.
- Select New Color Set from the context menu that appears.
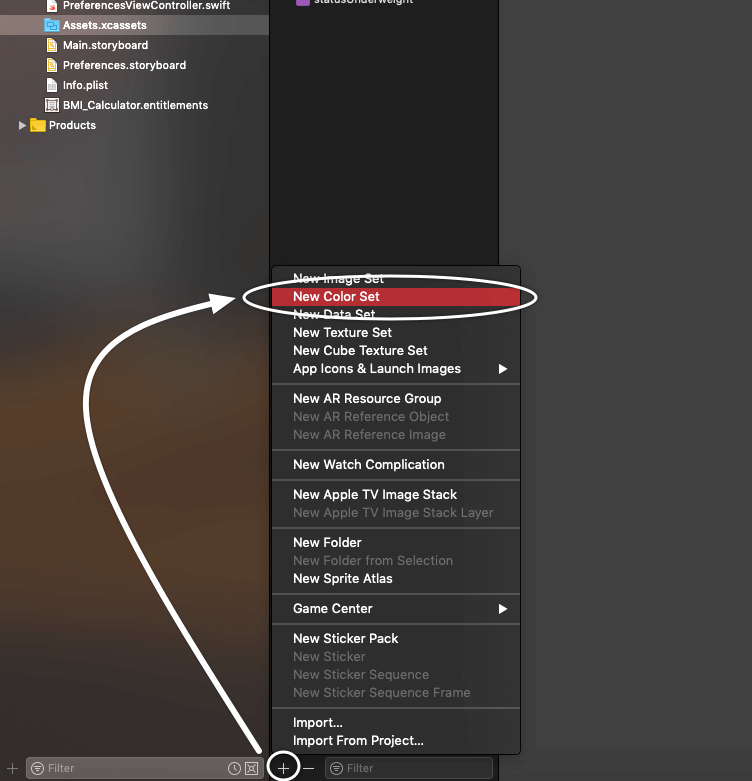
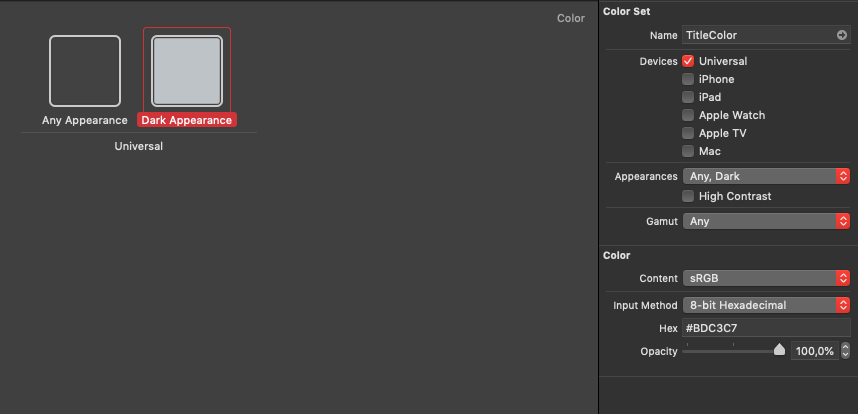
A new color asset will be created and added to the assets catalog. Open the Attributes Inspector in the inspectors panel, and change its name to TitleColor (alternatively, double-click to the color object in the assets lists to rename). A little down there is a popup menu called Appearances. Open it and you will find three options (common for all kind of assets):
- None: This is the preselected value. The asset will apply to all themes and macOS versions.
- Any, Dark: The asset is duplicated so you can provide variations for the dark mode.
- Any, Light, Dark: Set variations for any macOS version, and for light and dark modes specifically as well. The last two will be applied in Mojave and newer systems only, while universal assets will work on any macOS system.
By selecting any of the last two options above, you see that the asset is duplicated or multiplied so you can provide all the different versions for each mode. In our demo here, select the Any, Dark option.
Click to the Any Appearance color now, and you will see more options (color specific options) appearing in the Attributes inspector. This is the place where we can set color variations for each visual theme. If you explore a bit, you will find that provided options allow to select a different color profile (default is sRGB), to use a predefined macOS system color, or to set a custom color in multiple ways: As floating-point numbers (0.0 – 1.0), as 8-bit (0-255) values, or as hexadecimal values. Alternatively, you can use the sliders to specify the color. An additional slider lets you control the opacity (alpha value) of the color.
For our example here, leave the sRGB as the color profile, and switch to hexadecimal color representation. In the Hex textfield set the value: #424242. This is going to be the color for the light mode, as well as for older macOS systems. In a similar way, click to the Dark Appearance variation and set the #BDC3C7 value as the text color for the title label in the dark theme.
Time to apply and preview that color. Open the Main.storyboard file and click on the “BMI Calculator” label. In the Attributes inspector click to open the Text Color popup menu. In the context menu that will appear, you will find various sections that include the recently used colors, system colors, and a couple more. Right before the system colors you will see a new section called Named Colors. You will find the new color named TitleColor being there! Select it.
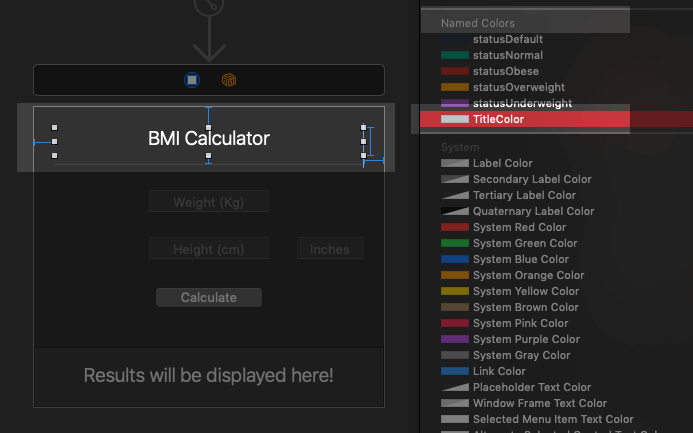
The label’s text color is changed according to the theme you have set in your system.
Down to the layout bar again, click to the View as: button to open the appearances options. Switch between light and dark appearance and see how the text color is being updated as well! Text color gets the proper value as we defined it in the assets catalog!
Providing Image assets
At the left side of each textfield there are image views which will display images that represent the weight and height accordingly (a scale and a height measurement image). At the time being though, no images are being displayed.
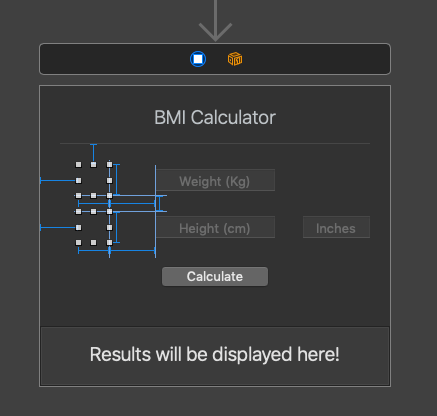
Along with the starter project you downloaded, there is a folder called “Images” that contains light and dark tinted versions of the images we will use to our project (at 1x and 2x versions as well).
Click to Assets.xcassets to open the Assets catalog in Xcode again. Add a new image set:
- Click on the Plus (+) button at the bottom side of the left panel.
- Select New Image Set from the context menu that appears.
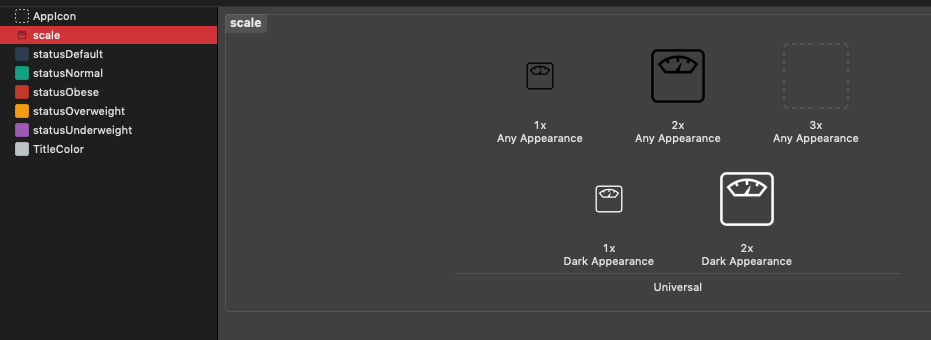
In the Attributes inspector, rename the image set to scale (in the Name textfield). Then open the Appearances popup and select the Any, Dark option. New image slots will be created for the image set.
In Finder, find the downloaded images. Drag and drop the scale_black.png to the 1x Any Appearance slot in Xcode, and the [email protected] to the 2x Any Appearance slot. Then do the same for the light images. Drag and drop the scale_white.png to 1x Dark Appearance and the [email protected] to the 2x Dark Appearance slot respectively. At the end you should be having something similar to this:
All variations of the first image have now been added. We have to do the exact same steps for the second image.
Once again, click to the Plus button to create a new image asset. In the Attributes inspector change its name to height, and in the Appearances popup menu select the Any, Dark option. Once the additional slots have been presented, switch to Finder and start drag and dropping the height images as follows:
- The height_black.png to 1x Any Appearance slot.
- The [email protected] to 2x Any Appearance slot.
- The height_white.png to 1x Dark Appearance slot.
- The [email protected] to 2x Dark Appearance slot.
Let’s use these images now. Go back to Main.storyboard file, and select the image view to the left side of the weight text field. In the Attributes inspector go to the Image drop down menu, and either search for the image named scale, or just type it and press Return on the keyboard. The scale image will appear in the image view.
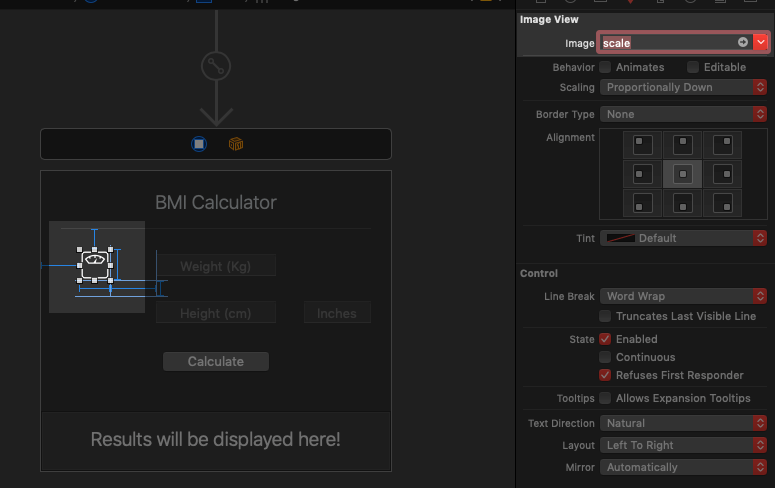
Do the same for the second image view. This time look for the height image.
In the layout bar again, switch between appearances and see that the displayed images in the image views are being updated depending on the selected appearance. For light appearance you see dark images, for dark appearance you see light images!
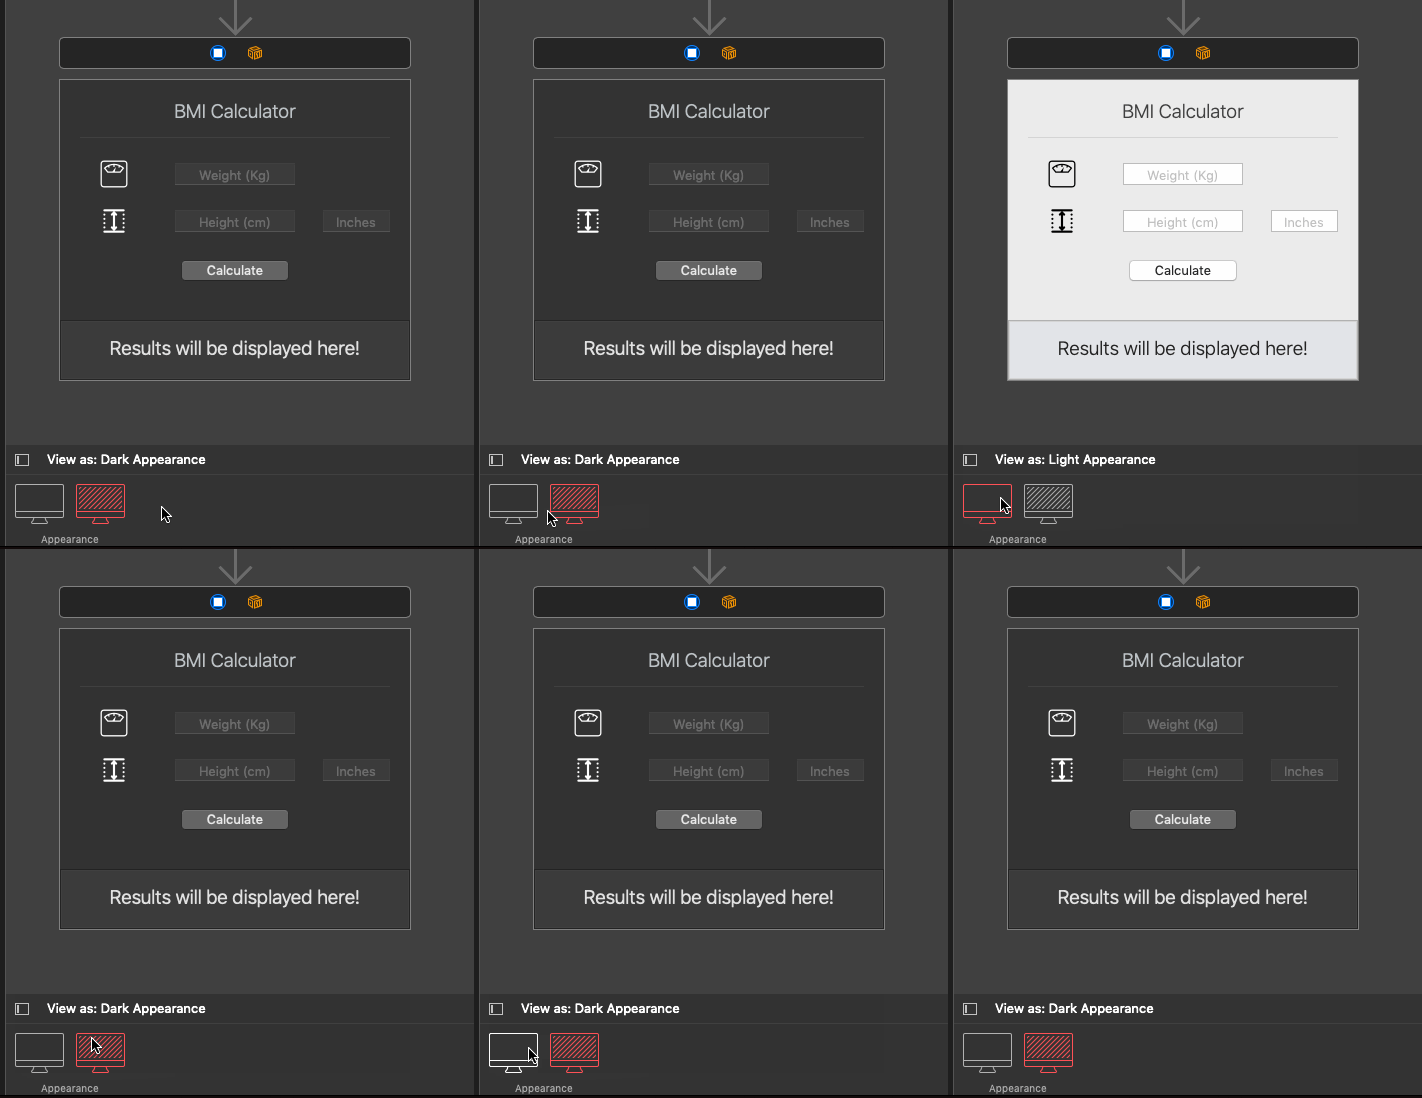
Two Measurement Systems
While describing the app of this tutorial previously, I said that the app will provide support for two measurement systems, metric and imperial. That’s going to make the app easier to be used by people who know the one, but not the other system and they don’t want to make conversions so they can calculate their BMI.
We will start coding a little bit now, and defining the supported measurement systems is what we will first do. Initially, to represent programmatically each system and to make it easy to determine the one that user has selected to use, we will define an enum with the two systems as its cases. In the starter project there is a file named Structures.swift and it’s currently empty. Open it and add the following:
enum MeasurementSystem {
    case metric
    case imperial
}
Now that we know how we will refer to the the measurement systems in programming level, we will create a struct that will act pretty much as the model of the app, as its purpose is to keep and manipulate data. Given the fact that the app will be representing weight and height in two different measurement systems, we need to have properties for kilograms, pounds, cm, feet and inches. In addition, we also need functions that will convert values from one measurement unit to another.
So, while we are still in the Structures.swift file, let’s start defining the following struct that will let us do the above:
struct WHData {

    var weightInKg: Double = 0.0
    var weightInPounds: Double = 0.0
    var heightInCM: Double = 0.0
    var heightInInches: Double = 0.0
    var feet: Double = 0.0
    var inches: Double = 0.0

}
Declared properties represent the data that users will type in the text fields. All of them are Double values so calculations can be made correctly (displaying them is a different matter). One thing that might look strange to you is the last three properties, which will probably make you wonder why we need the heightInInches property while we have feet and inches? The reason is just for doing calculations properly and converting between inches and cm easily. heightInInches will hold the total inches resulting by summing up the inches and the feet converted to inches previously.
Next, let’s create a couple of functions. The first one will calculate the values for weightInKg and heightInCM based on the values from the imperial system:
struct WHData {
    // ...

    mutating func calculateForMetricSystem() {
        weightInKg = weightInPounds * 0.45359237
        heightInCM = heightInInches * 2.54
    }
}
Quite easy function, there’s nothing to discuss here.
The second function will do the exact opposite thing and it will calculate the imperial values (pounds, feet, inches) based on the metric values:
struct WHData {
    // ...

    mutating func calculateForImperialSystem() {
        weightInPounds = weightInKg * 2.20462262
        heightInInches = heightInCM * 0.393700787
        feet = floor(heightInInches / 12)
        inches = heightInInches.truncatingRemainder(dividingBy: 12)
    }
}
The use of heightInInches property is made clear above. Height expressed in centimetres is first converted to inches and stored to heightInInches. From that value then we calculate the feet and the remaining inches. The last two are the values that will be displayed to the text fields.
Now that the MeasurementSystem enum exists to represent the available measurement systems, and we have the WHData struct as well that will hold the actual values and can make conversions, we must tell the app what the default measurement system is going to be. Remember that through the Preferences window that we’ll create later, users will be able to change that. However, we need to set an initial system as the app’s UI will depend on that.
The storage solution for the preferences in our app is going to be the User Defaults dictionary that it’s accessible programmatically through the UserDefaults class. What we are going to do is to check for the existence of a custom key in the User Defaults that will indicate the preferred measurement system every time the app starts. Obviously the first time the app will run that key won’t be found in the User Defaults and we will create it. In subsequent launches of the app the key will exist and no overwrite will happen.
We will do all that in the AppDelegate.swift file. Go to applicationDidFinishLaunching(_:) method and update it as shown next:
func applicationDidFinishLaunching(_ aNotification: Notification) {

    if UserDefaults.standard.value(forKey: "measurementSystem") == nil {
        UserDefaults.standard.setValue("metric", forKey: "measurementSystem")
    }

}
The custom key is named measurementSystem. If that key does not exist in the User Defaults, then we add it along with the metric as the default measurement system.
If you are curious enough and you want to know where exactly User Defaults file is stored for macOS apps, do the following:
- Run the app after having done all steps described above so User Defaults file to be created.
- Open Finder.
- Press Command + Shift + G on keyboard.
- Paste the following:
/Users/YOUR_USERNAME/Library/Containers/com.appcoda.BMI-Calculator/Data/Library/Preferences
Replace YOUR_USERNAME with the username of your account on macOS. For example, for me the above looks like:
/Users/gabriel/Library/Containers/com.appcoda.BMI-Calculator/Data/Library/Preferences
You will find a file named com.appcoda.BMI-Calculator.plist in that folder. This is the User Defaults file.
Setting Up The UI
The user interface of our app depends on the preferred measurement system, as we have two text fields appearing for the metric system, but three for the imperial. And not just that; placeholder text in text fields is updated according to the selected measurement system. So, UI has to be treated programmatically so it displays the proper controls and their properties correctly.
To get going, open ViewController.swift file and go to the beginning of the class. Add the following property that will represent the currently selected measurement system:
var measurementSystem: MeasurementSystem = .metric
Even though the metric system has been set as the default one right above, we won’t stick to that. We will read the settings stored in User Defaults. The above default value will be proved useful if only User Defaults do not contain a preferred measurement system for some reason.
Also, declare and initialize the following WHData property as well:
var whData = WHData()
Define the following method now that reads the preferences from User Defaults:
func getPreferences() {
    if let preferredSystem = UserDefaults.standard.value(forKey: "measurementSystem") as? String {
        measurementSystem = (preferredSystem == "metric") ? .metric : .imperial
    }
}
That method is doing one simple thing; it tries to get the value for the “measurementSystem” key from User Defaults. If the key exists, it assigns the proper value to the measurementSystem property depending on the stored value.
We will call the getPreferences() method right before the UI gets shown:
override func viewWillAppear() {
    super.viewWillAppear()

    getPreferences()
}
Before we update text fields according to the preferred measurement system, let’s set a custom background color to the view that shows the BMI calculation results (resultsView). This view will get various colors depending on the results, but it would be nice to have a result-independent, initial custom background color before any calculation is made.
We will start defining a new method called setupUI(). The first thing we’ll do is to change the background color of the resultsView:
func setupUI() {
    resultsView.wantsLayer = true
    resultsView.layer?.backgroundColor = NSColor(named: NSColor.Name(stringLiteral: "statusDefault"))?.cgColor
}
Consider the above as a standard technique!
Background color in NSView objects is set by changing the background color of the view’s layer. No backgroundColor property is available from NSView, on contrary to what happens with UIView in iOS that contains such a property.
By default, a NSView object (such as the resultView here) has no layer, and since we want to change the layer’s background color, we must tell the system to create one for our view first. This is done by setting true to wantsLayer property of the view object.
In the second line we set the layer’s background color. At first a NSColor object is initialized using the named color existing in Assets catalog, and then it’s being casted to a CGColor value (layers expect CGColor values).
If you want to see the results of the above two lines, call setupUI() method in viewWillAppear():
override func viewWillAppear() {
    // ...

    setupUI()
}
Then run the app:
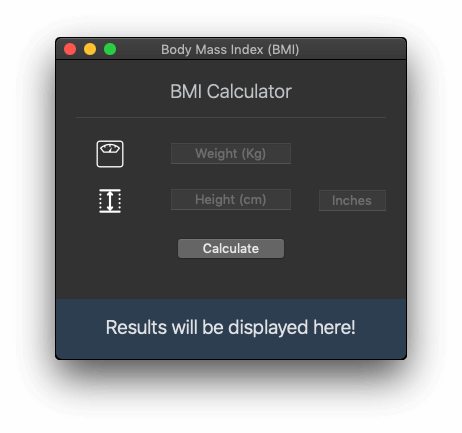
Time to configure our text fields in a new method that we’ll call updateTextfields(). It’s necessary to create a new method for that purpose instead of just keep adding code to setupUI(), as we won’t use it just for making the initial UI setup; we’ll also use it when we’ll update the preferences as well (that’s for later though).
The rules that will apply to the textfields; if the selected measurement system is metric, then:
- We’ll indicate “Kg” and “cm” in weight and height placeholders respectively.
- We’ll hide the
inchesTextfieldthat shows and allows to edit inches. - We’ll set the weight actual value to the
weightTextfieldif it’s greater than zero, but without decimal digits. - We’ll set the height actual value to the
heightTextfieldif it’s greater than zero, no decimal numbers here too.
Let’s see all that in code:
func updateTextfields() {
    if measurementSystem == .metric {
        weightTextfield.placeholderString = "Weight (Kg)"
        heightTextfield.placeholderString = "Height (cm)"
        inchesTextfield.isHidden = true

        if whData.weightInKg > 0.0 {
            weightTextfield.stringValue = String(format: "%.0f", whData.weightInKg)
        }
        if whData.heightInCM > 0.0 {
            heightTextfield.stringValue = String(format: "%.0f", whData.heightInCM)
        }

    } else {

    }
}
Similar rules apply when imperial is the selected measurement system. In this case, the inches textfield will be visible, while weightTextfield and heightTextfield will indicate pounds and feet respectively. Note that when the heightInInches is greater than zero (meaning that there’s height value to show), then we set values to both heightTextfield and inchesTextfield as they represent height in feet and inches respectively. Remember that heightTextfield keeps the total height in feet.
func updateTextfields() {
    if measurementSystem == .metric {
        // ...
    } else {
        weightTextfield.placeholderString = "Weight (Pounds)"
        heightTextfield.placeholderString = "Height (Feet)"
        inchesTextfield.isHidden = false

        if whData.weightInPounds > 0.0 {
            weightTextfield.stringValue = String(format: "%.0f", whData.weightInPounds)
        }
        if whData.heightInInches > 0.0 {
            heightTextfield.stringValue = String(format: "%.0f", whData.feet)
            inchesTextfield.stringValue = String(format: "%.2f", whData.inches)
        }

    }
}
updateTextfields() must be called in the setupUI() method:
func setupUI() {
    // ...

    updateTextfields()
}
Handling User Input
Now that the app can configure its UI when it’s launched based on the user’s preferred measurement system, our next step is to handle the values users enter in text fields. What I mean by saying that is to convert text from text fields to Double values and assign them to WHData struct’s properties. For this purpose we must implement a method from NSTextFieldDelegate protocol that will be called when the user has finished editing a text field.
In ViewController.swift file, go after the closing of the ViewController class and add the following extension:
extension ViewController: NSTextFieldDelegate {

}
The delegate method that we will implement so we are notified when a text field has finished being edited is this:
extension ViewController: NSTextFieldDelegate {
    func control(_ control: NSControl, textShouldEndEditing fieldEditor: NSText) -> Bool {

    }
}
According to the official docs: “Invoked when the insertion point tries to leave a cell of the control that has been edited.”
Here is how we’ll proceed:
- At first, we’ll cast the
controlobject fromNSControlto aNSTextField, so we can know the edited text field. - Then we’ll go through two cases, one for the metric measurement system and one for the imperial, so we know which properties we should update in the
WHDatastruct. - For each case, we’ll check which was the text field that was edited.
- We’ll convert the text of the text field into a Double value, and we’ll assign it to the matching property of the
WHDatastruct.
Right next is the implementation of the delegate method. Even though it’s a bit long, it’s quite straightforward:
extension ViewController: NSTextFieldDelegate {
    func control(_ control: NSControl, textShouldEndEditing fieldEditor: NSText) -> Bool {
        if let textField = control as? NSTextField {
            if measurementSystem == .metric {

                if textField == weightTextfield {
                    if let weight = Double(weightTextfield.stringValue) {
                        whData.weightInKg = weight
                    } else {
                        whData.weightInKg = 0.0
                    }
                } else if textField == heightTextfield {
                    if let height = Double(heightTextfield.stringValue) {
                        whData.heightInCM = height
                    } else {
                        whData.heightInCM = 0.0
                    }
                }

            } else {

                if textField == weightTextfield {
                    if let weight = Double(weightTextfield.stringValue) {
                        whData.weightInPounds = weight
                    } else {
                        whData.weightInPounds = 0.0
                    }
                } else if textField == heightTextfield {
                    if let height = Double(heightTextfield.stringValue) {
                        whData.feet = height
                        whData.heightInInches = height * 12.0

                        if whData.inches != 0.0 {
                            whData.heightInInches += whData.inches
                        }

                    } else {
                        if whData.feet != 0.0 {
                            whData.heightInInches -= whData.feet * 12
                        }
                        whData.feet = 0.0
                    }
                } else {
                    if let inches = Double(inchesTextfield.stringValue) {
                        whData.inches = inches
                        whData.heightInInches += inches
                    } else {
                        if whData.inches != 0.0 {
                            whData.heightInInches -= whData.inches
                        }
                        whData.inches = 0.0
                    }
                }

            }
        }

        return true
    }
}
A few things to notice here:
- First, the method returns
trueto allow to end the editing of the text field. - In case the text field’s text cannot be converted to a Double value, then we set 0.0 to the matching
WHDataproperty. This covers the case where users select and delete the entire text and the respective value should become zero. - In case of the imperial measurement system, watch out all calculation that is being made for keeping
heightInInchesvalue correct. When feet or inches values are changed, theheightInInchesmust be changed accordingly.
The implementation of the above method will do nothing on its own. We must set ViewController as the delegate of our three text fields. Go to the setupUI() method and add the next three lines:
func setupUI() {
    // ...

    weightTextfield.delegate = self
    heightTextfield.delegate = self
    inchesTextfield.delegate = self
}
The results of handling the user input will be shown in the next part, where we’ll calculate the BMI based on the entered values. Before we go there though, it’s a small issue that we have to address first.
The above delegate method will be called every time Return or Tab is pressed on keyboard, or the focus is gained by another text field. However, if we just type a value to a text field without doing any of those actions, the value entered in the text field won’t be assigned to its matching property in WHData struct. So, we have to find a way that text fields will be validated somehow before we use WHData values to calculate BMI or switch from one measurement system to another through the Preferences window later on.
The solution to that is shown to the next method that we must implement in ViewController class. As you will notice, all we do is to make window the first responder, and that’s an action that will force any text field that was not validated yet, to do it at the moment that method is called.
func validateTextfields() {
    if let window = view.window {
        window.makeFirstResponder(window)
    }
}
With the above method, all it takes is to call it at any time it is necessary to make sure that WHData struct contains the most recent valued entered to text fields.
Calculating BMI
Now that user entered values to text fields can be stored to WHData properties, let’s make it possible to calculate the BMI based on the given weight and height and then show the results. Obviously, no BMI can be calculated if no weight or height has been entered, or if height is zero. To referesh our memory, BMI is calculated based on the following formula:
BMI = Weight in Kilograms / Square(Height in Meters)
Let’s go to the calculateBMI(_:) IBAction method now that is already defined in the starter project and is being called every time the Calculate button is clicked. The first thing we need to do is to make sure that both weight and height text fields have values, otherwise no calculation can be made. When the metric is the current measurement system, then we care only about the weightTextfield and heightTextfield text fields. If imperial is the selected one, then we also need to consider the value of the inchesTextfield text field as well.
We’ll start by declaring the following two local variables:
@IBAction func calculateBMI(_ sender: Any) {
    var allValuesExist = false
    var bmi: Double?

}
allValuesExist is the flag that will indicate whether all text fields have values. bmi will hold the result of the BMI calculation in a while.
Before we check for text field values, remember that there might be a text field with a value that has been typed in it, but it’s not validated yet. So, our next step is to call the validateTextfields() method that we implemented previously and overcome this (continue adding code to the calculateBMI(_:) IBAction method):
validateTextfields()
Now let’s see if all text fields have values:
if weightTextfield.stringValue.count > 0 && heightTextfield.stringValue.count > 0 {
    if measurementSystem == .imperial {
        if inchesTextfield.stringValue.count > 0 {
            allValuesExist = true
        }
    } else {
        allValuesExist = true
    }
}
Obviously, we are going to proceed if only allValuesExist turns true after the above conditions. In that case we’ll do two things:
- We’ll check if the currently selected measurement system is the imperial. If so, we’ll call the
calculateForMetricSystem()function of theWHDatastruct to calculate weight in kilograms and height in centimetres, otherwise we can’t calculate BMI. - We will make sure that
heightInCMproperty of theWHDatashared instance is not zero (we don’t want to divide by zero), and then we’ll calculate the BMI value.
Let’s see all these:
if allValuesExist {
    if measurementSystem == .imperial {
        whData.calculateForMetricSystem()
    }

    if whData.heightInCM != 0.0 {
        bmi = whData.weightInKg / pow(whData.heightInCM / 100.0, 2)
    }
}
Note that in the pow() mathematical function we use right above, we divide the height in centimetres by 100 so as to convert it to meters.
If all text fields have valid values, BMI has been calculated at this point. Let’s present it:
if let bmi = bmi {
    presentResults(forBMI: bmi)
}
presentResults(forBMI:) is a method we’ll define right next. Before that, here is the calculateBMI(_:) IBAction method in one piece:
@IBAction func calculateBMI(_ sender: Any) {
    var allValuesExist = false
    var bmi: Double?

    validateTextfields()

    if weightTextfield.stringValue.count > 0 && heightTextfield.stringValue.count > 0 {
        if measurementSystem == .imperial {
            if inchesTextfield.stringValue.count > 0 {
                allValuesExist = true
            }
        } else {
            allValuesExist = true
        }
    }

    if allValuesExist {
        if measurementSystem == .imperial {
            whData.calculateForMetricSystem()
        }

        if whData.heightInCM != 0.0 {
            bmi = whData.weightInKg / pow(whData.heightInCM / 100.0, 2)
        }

    }

    if let bmi = bmi {
        presentResults(forBMI: bmi)
    }
}
Let’s implement the presentResults(forBMI:) method now that will present BMI results in two ways:
- A textual indication along with the calculated BMI value.
- A specific background color to the
resultsViewview.
Both textual indication and background color will vary depending on the BMI value. There are four categories that should be covered:
- Underweight (BMI < 18.5)
- Normal (BMI >= 18.5 && BMI <= 24.9)
- Overweight (BMI > 24.9 && BMI <= 29.9)
- Obese (BMI > 29.9)
Here is the method implemented:
func presentResults(forBMI bmi: Double) {
    let bmiString = String(format: "%.1f", bmi)
    var color: NSColor?

    if bmi < 18.5 {
        resultsLabel.stringValue = "\(bmiString) - Underweight"
        color = NSColor(named: NSColor.Name(stringLiteral: "statusUnderweight"))
    } else if bmi <= 24.9 {
        resultsLabel.stringValue = "\(bmiString) - Normal"
        color = NSColor(named: NSColor.Name(stringLiteral: "statusNormal"))
    } else if bmi <= 29.9 {
        resultsLabel.stringValue = "\(bmiString) - Overweight"
        color = NSColor(named: NSColor.Name(stringLiteral: "statusOverweight"))
    } else {
        resultsLabel.stringValue = "\(bmiString) - Obese"
        color = NSColor(named: NSColor.Name(stringLiteral: "statusObese"))
    }

    if let color = color {
        resultsView.layer?.backgroundColor = color.cgColor
    }
}
It’s noteworthy that when converting BMI value to string, we limit the displayed decimals digits to one only.
The app can now calculate BMI and show the results. Run it and see how it works!
The Preferences Window
It’s about time to see how we can create a Preferences window through which we can make settings about the app. As we’ve said already, the only settings we are going to provide in our demo application is the option to change measurement system, but it’s good enough to show the entire workflow.
In the previous tutorial on macOS programming, I demonstrated how to load a new window controller existing in the Main.storyboard file programmatically, and then show its window. Now, we’ll grab the chance we are given with the Preferences window (and its window controller), and we’ll see how to load a window controller and present its window when it resides in a different storyboard file.
For your convenience, and for saving some time as well, you will find two files regarding Preferences in the starter Xcode project:
- Preferences.storyboard: An additional storyboard that contains the window controller with the window and the attached view controller that we’ll use to show Preferences.
- PreferencesViewController.swift: A new view controller where we’ll implement the Preferences-related logic.
No configuration has been done to the UI in the Preferences.storyboard file, nor any code has been added to PreferencesViewController except for a couple of IBOutlet properties. So, let’s start doing so.
At first, open the Preferences.storyboard file, and select the Window Controller object. Then, open the Attributes inspector and click to enable the Is Initial Controller check box. This will add an arrow to the left side of the window, pointing to it.
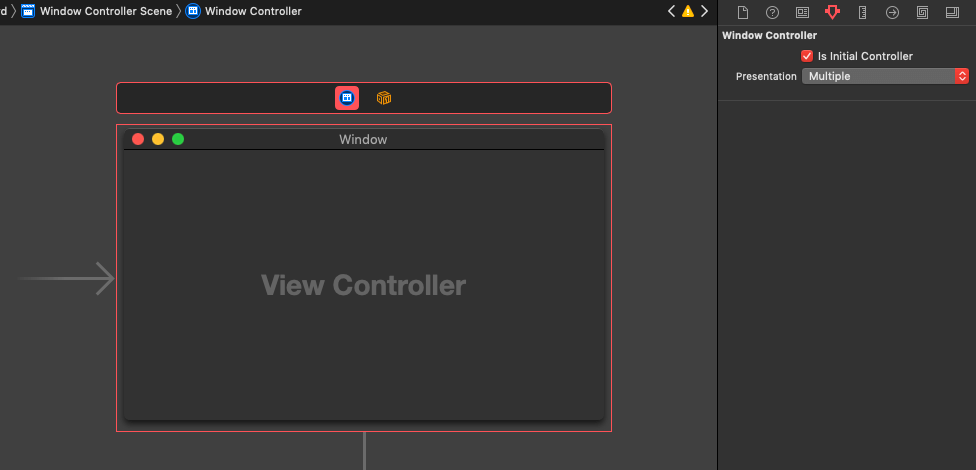
Next, click on the window and once again go to Attributes inspector. Perform the following changes:
- Set the title Preferences to the window.
- Uncheck the Minimize check box
- Uncheck the Resize check box.
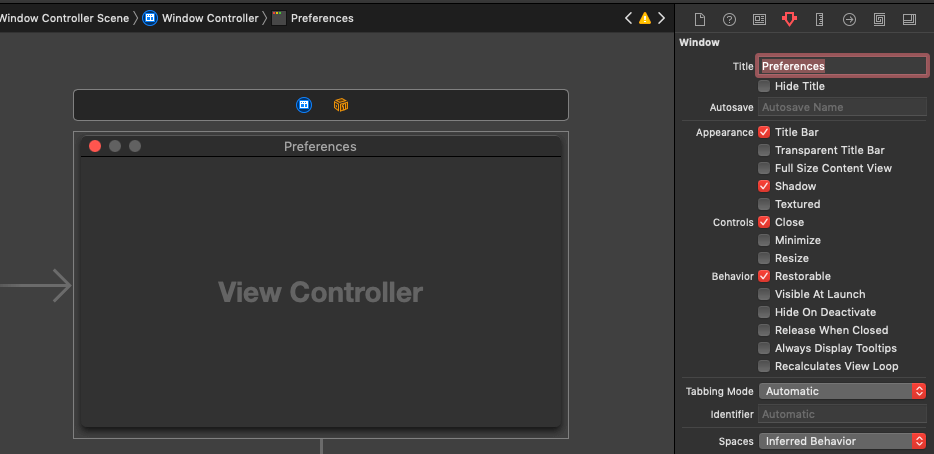
With the window still being selected, open the Size inspector. Change Content Size to 250×200. Also, click to check both Minimum Content Size and Maximum Content Size check boxes with aim to prevent our Preferences window from being resized. Then, go to Initial Position section and change Proportional Horizontal and Proportional Vertical to Center Horizontally and Center Vertically respectively.
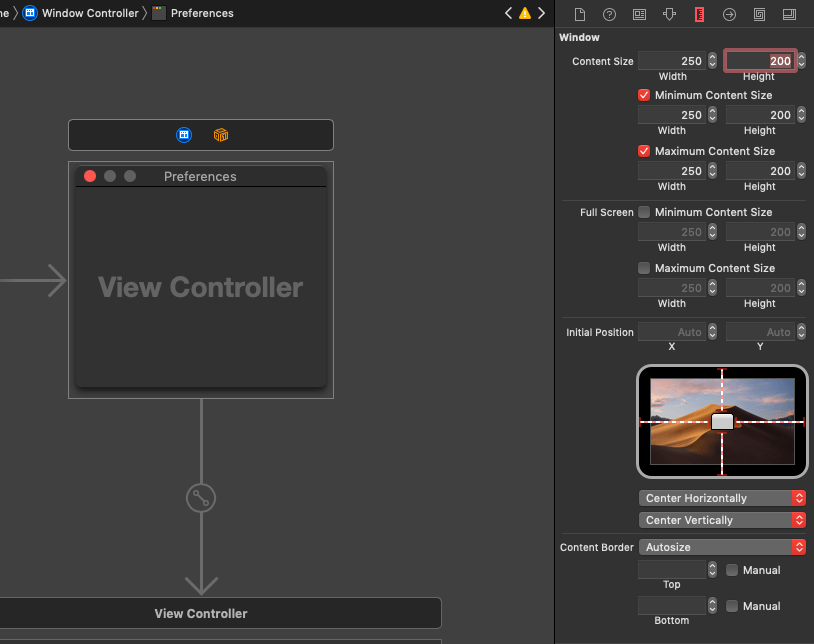
Change the size of the view controller as well. Click to the view of the view controller, then open Sizes inspector and change size to 250×200.
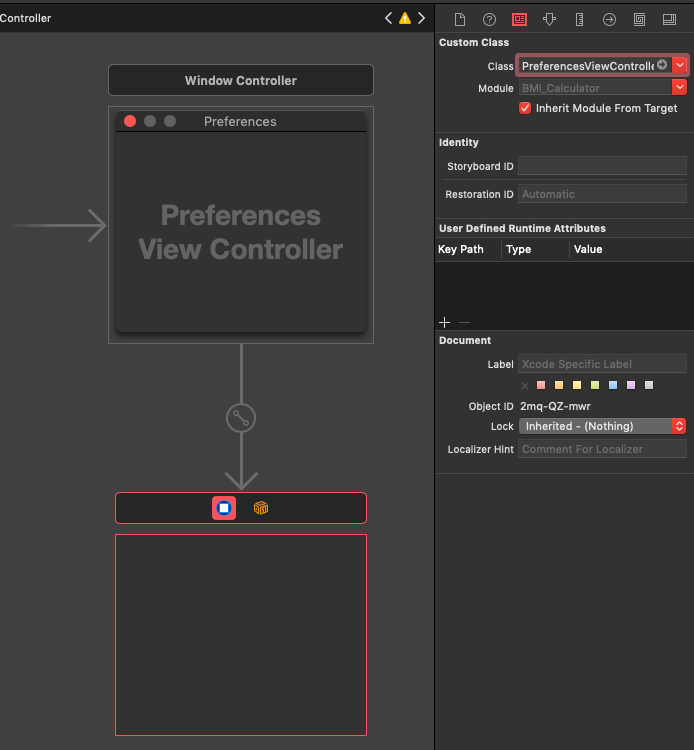
Finally, select the View Controller object, open the Identity inspector, and in the Custom Class section set PreferencesViewController as the value to the Class field.
At the end, your storyboard content should look like similar to this:
Let’s add three visual controls to the view of the view controller now. Open the Objects Library and type Box in the search field. Drag and drop a Box object to the view. Set the following constraints:
- Top: 20
- Leading: 8
- Trailing: 8
- Height: 160
Also, double click to its title and change it to: Measurement System.
Open Objects Library again, and search for a radio button. Drag and drop one into the box you previously added.
Next, select the radio you just dragged, and press Command + D on your keyboard to duplicate it. Then select the first one only and set the following constraints:
- Top: 45
- Leading: 8
- Trailing: 8
- Bottom: 24
Select the second radio and set these constraints:
- Leading: 8
- Trailing: 8
- Bottom: 45
Select the first radio button and open the Attributes inspector. Change its title to: Metric (Kg, cm) and set its State to On. You will see the radio button being selected.
Then select the second radio button and change its title to: Imperial (Pounds, Feet-Inches). Leave state to its original value (Off).
In the PreferencesViewController there are two IBOutlet properties waiting to be connected to the two radio buttons we just added. Select the Preferences View Controller object and open the Connections inspector. Connect the metricRadio outlet to the first radio button, and the imperialRadio to the second.
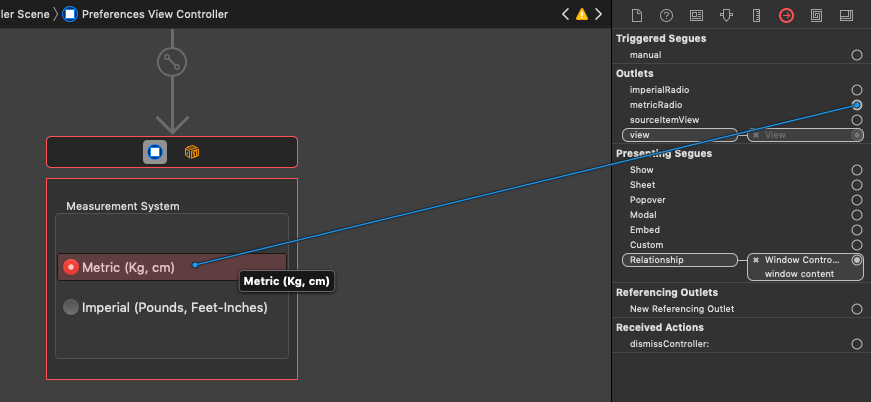
The UI for the Preferences window is ready. Let’s go to present it!
Presenting Preferences
Preference window will be shown through the menu BMI Calculator > Preferences…, or by pressing Cmd + , on the keyboard. However, if you run the app and you try to open that menu, you’ll see that it’s grayed out and no action can be taken. The reason for that is because “Preferences…” menu item on Main storyboard has not been connected to any action yet!
Without getting to details about menus at this point (we’ll talk about menus in a future post), menu actions that are general to the app are usually defined in the AppDelegate. To make that specific, open AppDelegate.swift file and add the following IBAction method:
@IBAction func showPreferences(_ sender: Any) {

}
We will add the body of the method in a while. At the moment, open Main.storyboard file where we’ll connect the Preferences menu item to that IBAction method.
Make sure that the Document Outline is visible, and go to the Application Scene. Start expanding items until you see the Preferences… menu item being listed in the outline (alternatively, click to open BMI Calculator menu in the canvas). Once you spot it, select it and Ctrl + Drag to the App Delegate object down to the Application Scene tree.
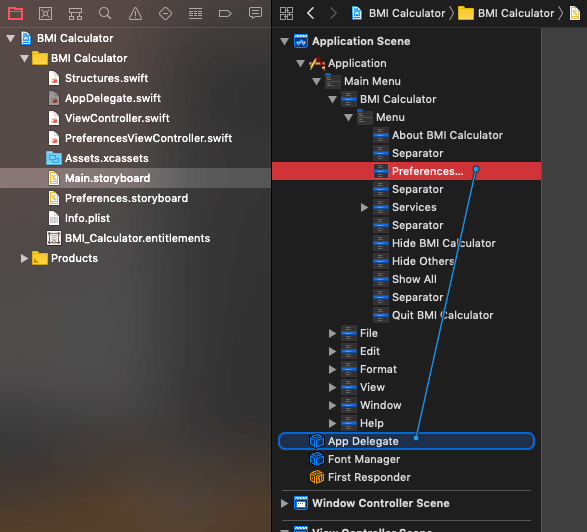
A small context menu will appear titled Received Actions, and right below you’ll see the showPreferences(_:) IBAction method we previously defined. Click to select it.

If you run the app now you’ll find out that the Preferences menu is not grayed out anymore! It has been connected to an actual action. Nothing happens yet however, since there is no logic implemented in the showPreferences(_:) method.
Back to AppDelegate.swift file, go to the beginning of the AppDelegate class and declare the following property:
class AppDelegate: NSObject, NSApplicationDelegate {

    var preferencesWindowController: NSWindowController?

    // ...
}
We’ll be keeping the preferences window controller to that property after we instantiate it. Head to the showPreferences(_:) IBAction method where we’ll load it from the Preferences storyboard:
@IBAction func showPreferences(_ sender: Any) {
    if preferencesWindowController == nil {
        let storyboardName = NSStoryboard.Name(stringLiteral: "Preferences")
        let storyboard = NSStoryboard(name: storyboardName, bundle: nil)

        if let windowController = storyboard.instantiateInitialController() as? NSWindowController {
            preferencesWindowController = windowController
        }
    }
}
Note that we load from the storyboard file if only the preferencesWindowController property is nil. Once we check that, we proceed by initializing a NSStoryboard object, and then we instantiate the window controller as demonstrated above. Keep in mind that instantiateInitialController() can return a nil value, so unwrapping the result is mandatory to avoid potential crashes. If unwrapping the window controller is successful, we assign it to the preferencesWindowController property.
The above does not show the window even though the window controller is loaded, so let’s make one more addition to the method:
@IBAction func showPreferences(_ sender: Any) {
    // ...

    if let windowController = preferencesWindowController {
        windowController.showWindow(nil)
    }
}
Go to run the app again. Preferences window will show up!

Loading Preferences
What we all expect when we open the Preferences window on any macOS app is to see all settings we had previously done. Our demo application should not be an exception to that rule, therefore the first thing we’ll do when the Preferences window opens and the PreferencesViewController is being presented is to load the saved measurement system setting from User Defaults.
To start, and before we load any data from User Defaults, let’s declare the following property in the PreferencesViewController (PreferencesViewController.swift file):
var selectedRadio: NSButton?
The purpose of its existence is to keep track of the selected radio button. You will understand why in a while.
In the viewDidLoad() method, let’s give it its initial value:
override func viewDidLoad() {
    super.viewDidLoad()

    selectedRadio = metricRadio
}
That value we just assigned to selectedRadio also works as a safety in case data cannot be loaded from User Defaults, and therefore the app is unable to determine the by default selected radio button.
Now, let’s load from User Defaults. We will create a new method for that:
func loadSettings() {
    if let preferredSystem = UserDefaults.standard.value(forKey: "measurementSystem") as? String {
        if  preferredSystem == "metric" {
            metricRadio.state = .on
            selectedRadio = metricRadio
        } else {
            imperialRadio.state = .on
            selectedRadio = imperialRadio
        }
    }
}
See that after having loaded the preferred measurement system from User Defaults successfully, we enable the proper radio button (state gets the on value). In addition, we assign the proper radio button to selectedRadio property.
Go now to the viewDidLoad() method and call the above:
override func viewDidLoad() {
    // ...

    loadSettings()
}
From now on, the last saved settings will be displayed when the Preferences window opens.
Saving Preferences
If you have run the app to see how Preferences work so far, then you have noticed that radio buttons do not work as expected. Normally, when selecting the Metric radio button the Imperial should be deactivated, and when selecting the Imperial the Metric button should be deactivated. This is not happening though yet, so the question is, how do we group radio buttons together so when selecting one the others go off?
The answer is simple, and it’s not lying on any special property of the radio buttons. All we have to do is to connect them to the same IBAction method!
In the PreferencesViewController define the following IBAction method:
@IBAction func changeMeasurementSystem(_ sender: Any) {

}
Open Preferences.storyboard file now, and select the Preferences View Controller object in the respective scene. Open the Attributes inspector and connect that IBAction method to both radio buttons.
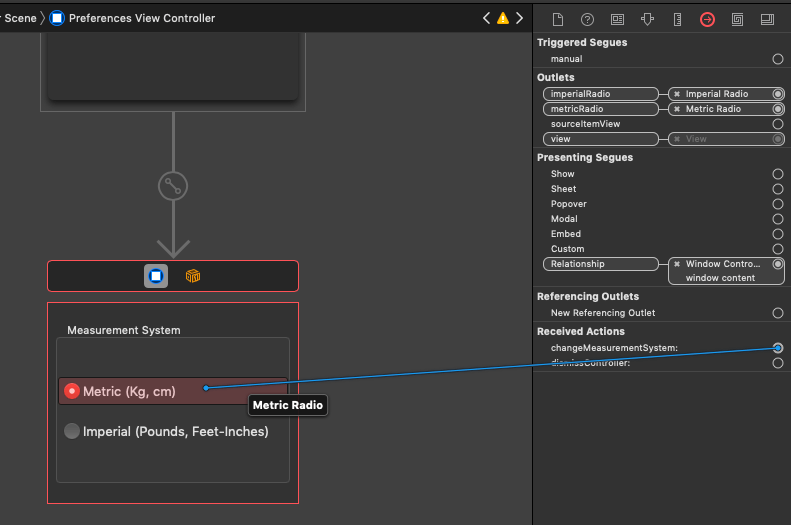
Running the app now will show to you that radio buttons behave properly and as expected!
Back to the PreferencesViewController.swift file and straight into the point. You might have noticed that we didn’t add any Save button that will make any changes be stored to User Defaults. That’s because we will be saving every time we select a radio button. Moreover, when a radio button that was not already selected becomes active, it will be assigned to the selectedRadio property. Let’s see the implementation of the method:
@IBAction func changeMeasurementSystem(_ sender: Any) {
    if let radio = sender as? NSButton, let selectedRadio = selectedRadio {
        if radio != selectedRadio {
            if radio == metricRadio {
                UserDefaults.standard.setValue("metric", forKey: "measurementSystem")
            } else {
                UserDefaults.standard.setValue("imperial", forKey: "measurementSystem")
            }

            self.selectedRadio = radio
        }
    }
}
Notice that we don’t do anything if the radio button that was clicked is already selected (if radio != selectedRadio condition). Other than that, the above code is simple, and it’s what we need for saving our preferenes to User Defaults.
Run the app now, and change your measurement system selection. To verify that your preferences have been updated indeed, stop and relaunch the app. The UI of the app should be updated in accordance to the selected system.
However, updating the preferences and relaunching the app so they take effect is not so convenient, is it?
Updating UI In Realtime
For best user experience, any changes made by users on the Preferences window of your app should be immediately reflected to the app’s interface (whenever possible). That way not only users can start using the changes, but they visually verify that their preferences have been respected.
This is what exactly we have to do here as well. We need the UI in the main window of our app to be updated according to the measurement system selected in Preferences (the proper text fields to become visible along with correct placeholders and values) and the proper properties to be used in the WHData struct.
The simplest and fastest way to achieve that, is to use notifications. We will post a notification when changing the selected measurement system in Preferences, and we’ll receive it in the ViewController class. Then we’ll update whatever has to be updated accordingly.
Right next you see the changeMeasurementSystem(_:) IBAction method we implemented in the previous part, but updated with the notification posting. Notice that in both cases we post the same notification (didChangeMeasurementSystem), and we pass the selected measurement system string value as the object of the notification.
Note: Do not rely on the fact that changes are stored in User Defaults. You cannot know whether User Defaults will synchronize them in time so you read them back in the ViewController class.
@IBAction func changeMeasurementSystem(_ sender: Any) {
    if let radio = sender as? NSButton, let selectedRadio = selectedRadio {
        if radio != selectedRadio {
            if radio == metricRadio {
                UserDefaults.standard.setValue("metric", forKey: "measurementSystem")

                NotificationCenter.default.post(name: NSNotification.Name(rawValue: "didChangeMeasurementSystem"), object: "metric")

            } else {
                UserDefaults.standard.setValue("imperial", forKey: "measurementSystem")

                NotificationCenter.default.post(name: NSNotification.Name(rawValue: "didChangeMeasurementSystem"), object: "imperial")

            }

            self.selectedRadio = radio
        }
    }
}
Let’s open now the ViewController.swift file, and let’s go straight to the viewDidLoad() method. In it we must observe for the notification we posted right above.
override func viewDidLoad() {
    super.viewDidLoad()


    NotificationCenter.default.addObserver(self, selector: #selector(handleDidChangeMeasurementSystem(notification:)), name: NSNotification.Name(rawValue: "didChangeMeasurementSystem"), object: nil)

}
With the above line we make ViewController listen to the didChangeMeasurementSystem notification, and we instruct it to use the handleDidChangeMeasurementSystem(notification:) method as the action when the notification is received.
Right next you see the handleDidChangeMeasurementSystem(notification:) method implemented:
@objc func handleDidChangeMeasurementSystem(notification: Notification) {
    if let system = notification.object as? String {
        validateTextfields()

        if system == "metric" {
            measurementSystem = .metric
            whData.calculateForMetricSystem()
        } else {
            measurementSystem = .imperial
            whData.calculateForImperialSystem()
        }

        updateTextfields()
    }
}
Here’s what we do in the above implementation:
- At first, we make sure that the notification object is not nil, as it carries the information about which measurement system was selected in Preferences.
- Then, we call the
validateTextfields()method. Since we are about to convert from one system to the other, we must make sure that no text field has been left unvalidated and all values entered to text fields will be taken into account. - Depending on the selected system value, we update the
measurementSystemproperty and we call either thecalculateForMetricSystem()or thecalculateForImperialSystem()function of theWHDatastruct to calculate the values for the new measurement system we are using. - Finally, we call
updateTextfields()to update the visible text fields, and the values (or placeholders) displayed in them.
One last thing to add to the ViewController class before we get finished:
deinit {
    NotificationCenter.default.removeObserver(self)
}
Run the app again and change your Preferences. This time you will see the UI being updated according to the selected measurement system.
Summary
Through the previous parts of this macOS tutorial we had the chance to discuss about new interesting concepts regarding macOS programming, such as how to deal with dark and light appearances and assets that work in both, how to instantiate a window controller that resides in a storyboard other than Main, how to work with radio buttons, text field delegates, and more. We also focused on how to create a Preferences window where users can update settings regarding the app, and how you should handle them so they are reflected instantly when possible to the UI. In our demo app we used User Defaults as the means to save settings made in Preferences, but don’t be limited by that. You are encouraged to use any storage system you find most suitable for your apps, as long as you follow the rules that ensure a normal user experience. I leave you with that, and I hope you enjoyed our today topic. Take care!
For reference, you can download the full project on GitHub.


