

Welcome to a new macOS programming tutorial which I believe you will find quite interesting! Today we are going to talk about one of the most common Cocoa controls found in macOS applications: Table views.
A table view in macOS can present collections of data spread in rows and columns. Unlike iOS where the concept of a column practically does not exist, table views on macOS can have as many columns as you want. Also, although there are a few similarities on managing table views between iOS and macOS, you’ll find out there are more concepts to deal with here, a more complex structure, but more possibilities as well. Even though working with table views on macOS might look hard at first, at the end it tends to be one of the most straightforward topics one can deal with.
A single tutorial cannot be enough to cover all aspects of table views, however by leaving today you’ll have all the necessary knowledge that will enable you to integrate table views in your projects. And as always, you are encouraged to keep digging and experimenting more and more beyond what you’ll read here.
Without any further delay, let’s have a quick look at what we are going to work with today, and then straight ahead on getting our hands dirty.
About The Demo App
As it usually happens, we need a demo application to work on and we won’t start one from scratch. Instead, there is a starter project to download and open in Xcode. The demo app today is a list of fake users along with payment and purchased items information. More specifically, the table view that we will integrate into the project will display:
- A record ID value.
- An avatar image.
- A username.
- Credit card number.
- Credit card type.
- Paid amount.
- Kinds of purchased items.
Here’s a sample of what we’ll manage to create in the following parts:
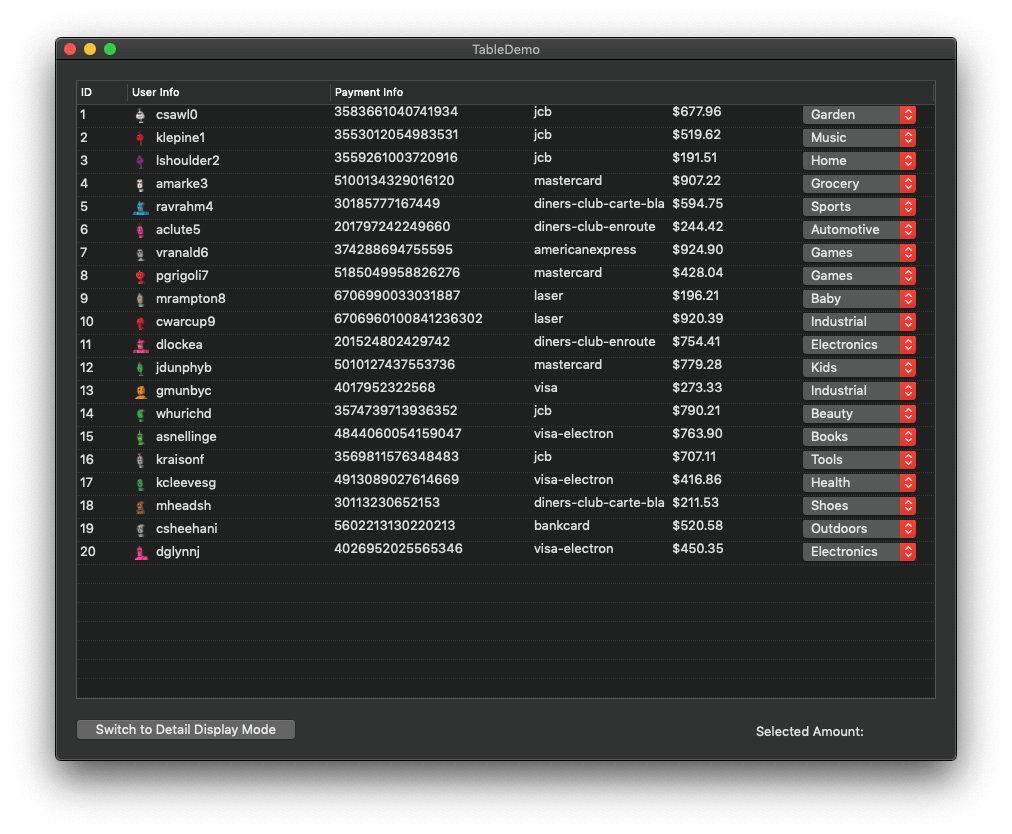
As said, data is fake and generated at Mockaroo, a website to create mock data of any kind for testing apps. Robot avatars were delivered by Robohash.org. Special thanks to both for making possible the generation of data used in this tutorial.
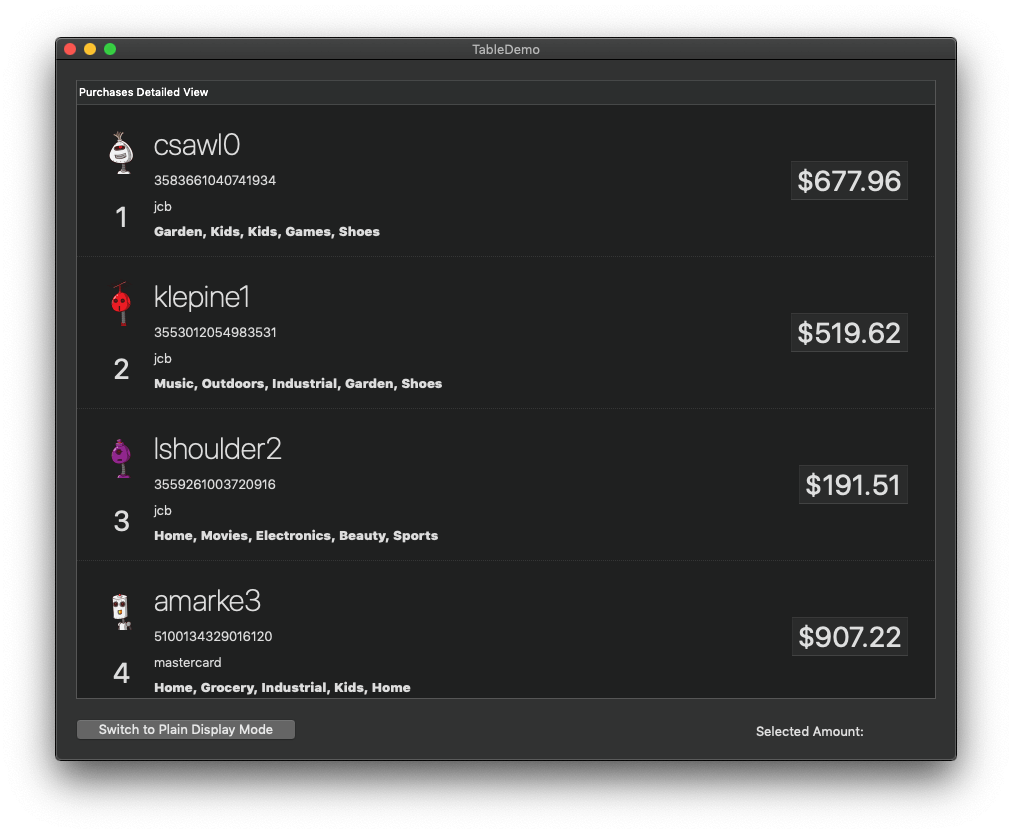
Apart from learning how to create columns and cells to populate data as shown above, we will also see how to use custom views instead of the default cell views. By doing so, we’ll manage to have two display modes in our app: Plain and detail. When we’ll make it possible to switch to detail display mode, data on the table view will be presented like so:
In addition to all the above, we’ll also see:
- How to handle single and double click on rows.
- How to present and handle row actions, the buttons that appear when a row is swiped to left or right.
- How to do various tasks in code, such as creating or removing columns on the fly, how to disallow row selection, and more.
- How to sort displayed data when clicking on a column.
The demo project is based on the MVVM design pattern. PurchasesModel.swift file contains the model of the app, which is parted by a few simple structs:
struct Purchases: Codable {
    var id: Int?
    var userInfo: UserInfo?
    var paymentInfo: PaymentInfo?
}


struct UserInfo: Codable {
    var id: Int?
    var username: String?
}


struct PaymentInfo: Codable {
    var creditCard: String?
    var creditCardType: String?
    var amount: String?
    var purchaseTypes: [String]?
}
Sample data can be found on the MOCK_DATA.json file. It is JSON data that contains 20 sample records. That JSON encoded data is being decoded to objects in the ViewModel class (see loadDummyData() method) which in turn are stored to the purchases array, a collection of Purchases objects. purchases property in the ViewModel class is going to be the datasource for the table view.
In addition to the sample data, avatars used for the fake users can be also found in the starter project under the Avatars group.
ViewModel class in the ViewModel.swift file stands between the ViewController class that represents the View part of the MVVM, and the model. Whatever we are going to need from the ViewModel class is already implemented, so we will be using it as is in the ViewController. This is the place where we’ll write any code presented in the following parts, but we’ll also spend time in the Main.storyboard file too.
As I mentioned already above, one of the topics we’ll discuss today regards how to use custom views instead of cells for displaying data to table views. The custom view that we’ll use for this purpose in this demo app is already implemented, and it can be found in the PurchasesDetailView.swift and PurchasesDetailView.xib pair of files.
Finally, a few non-important stuff have been implemented in the ViewController class. We’ll keep adding code there until the end of this tutorial.
Take your time to walk yourself through the starter project, and keep reading here when you’re done. We’ll start by seeing a few general facts about table views.
The Anatomy Of A Table View At A Glance
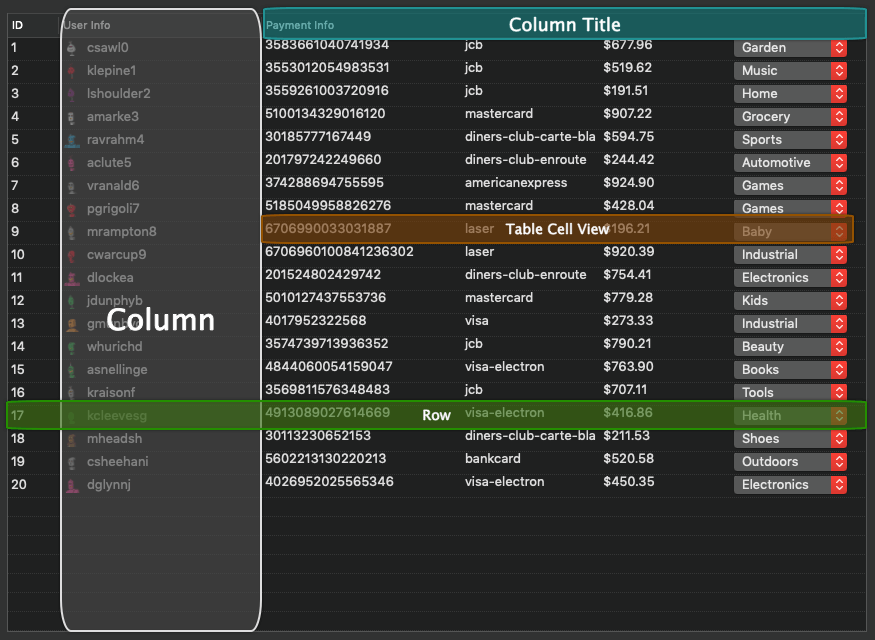
Before we start doing some actual work, let’s have a quick look at the anatomy of a table view. Even though a table view on macOS allows for great flexibility in presenting collections of data and in using any custom UI, its structure is a bit complex and surely not what a new-comer would expect to meet. So, let’s make things simple at first.
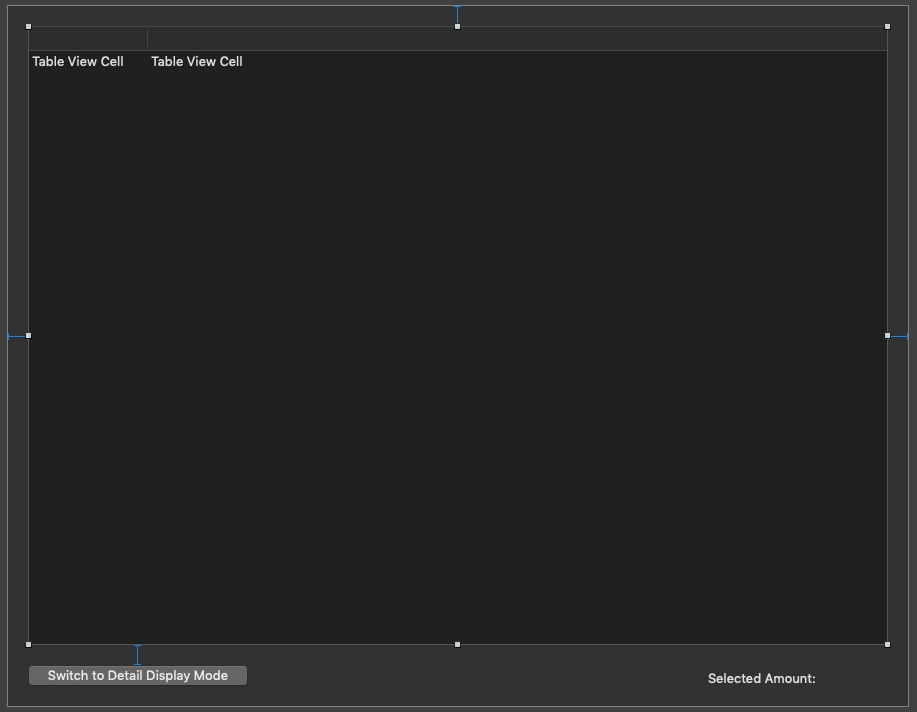
The following figure is based on the table view that we will implement in this demo app:
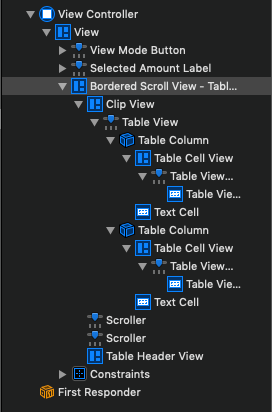
And this is its structure as presented in the Document Outline:
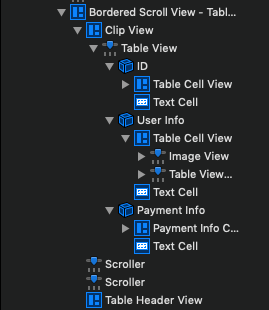
The “base” view of a table view is a scroll view, which has as a subview a clip view. The purpose of such an object is to “clip a document to a scroll view’s frame” (according to Apple’s official documentation). Table view is a subview of the clip view.
A table view can have one or more columns (also called header views), which can have optionally a title, they can be visible or not, resizable and capable of sorting their contents. Also, in case of multiple columns, reordering them can be an option too.
A column usually contains at least one table cell view, a subclass of the NSView class. Even though cell views can be customized to contain any UI controls required, a text field is what by default cell views contain when columns are added to a table view in Interface Builder. There are other predefined cell views which can be found in the Objects Library, with the most common one being a cell view with an image view and a text field.
Table cell views provide default outlet properties for the text field and the image view. To add more controls to the cell, or extra text fields and image views, a subclass of the NSTableCellView class must be created containing the outlet (IBOutlet) properties that should be connected to those controls. This is something that we’ll do later in this tutorial, so more details will come soon.
For full flexibility, custom views (NSView views) can be used in place of cells. More about that later too, as that’s another topic coming next.
Finally, data is displayed in rows as you can see in the first picture above. Accessing rows as objects (NSTableRowView objects) is possible through code.
So, to summarize, a table view structure has the following hierarchy:
Scroll View > Clip View > Table View > Column(s) > Table Cell View(s) > UI Control(s)
For further reading and deeper understanding, I recommend to see how this Apple doc describes a table view.
Adding A Table View
The first thing we will do in the starter project is to add a table view and set it up. Open the Main.storyboard file and go to the View Controller scene where you will find only a button and a label. To add a new table view:
- Open the Objects Library and search for the “tableview” term.
- From the shown results, drag and drop a Table View object to the view controller’s interface.
To properly place it in the view controller’s view, make sure that the table view (the container scroll view actually) is selected, and then set its constraints: Top, Leading, Trailing, Bottom: 20.
At the end, you should have something like that:
To see the hierarchy of objects that make up a table view in real for first time, open the Document Outline and expand all the inner items starting from the “Bordered Scroll View – Table View” item.
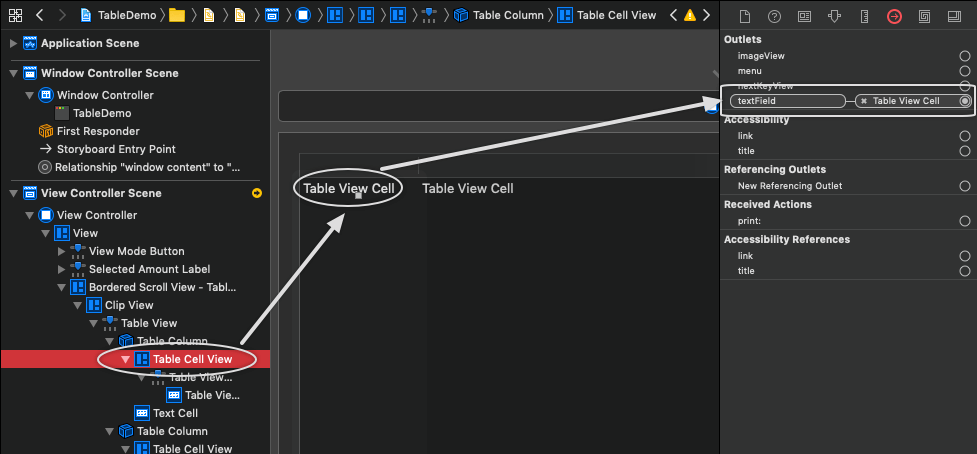
As you can see, a brand new table view has two columns by default. Each column has a table cell view with a text field already existing in it. Both text fields in the two columns are automatically connected to the default outlet property provided by the table cell view. Open the Connections Inspector to see that:
To change the number of the available columns, as well as to configure numerous other options, select the table view object and then open the Attributes Inspector.
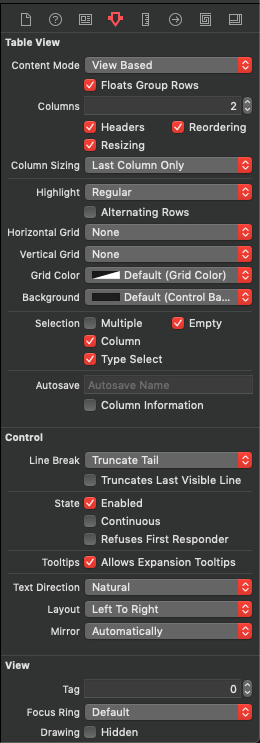
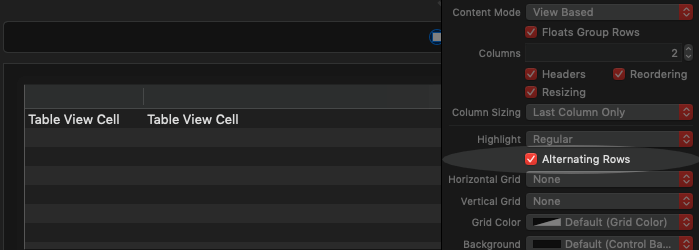
The first thing that can be changed here is the content mode of the table view, which actually specifies whether its content should be cell or view based. We will keep the default “View Based” option. Right next, there is a text field with a stepper on its right, where the number of columns can be modified. Default that value is 2, but change it to see what happens if you want.
Next, depending on the requirements of the app you are building, you can specify whether you want to have column headers visible or not, if you want to allow reordering of the columns, even if you want to allow resizing. Additional options about resizing can be set, such as resizing the last column only (the by default option), first column only, all, and more.
In the following fields you can set other preferences regarding the appearance of the table view. One field that you might find interesting is the Alternating Rows check box. If you enable that, subsequent rows on the table view will have different colors.
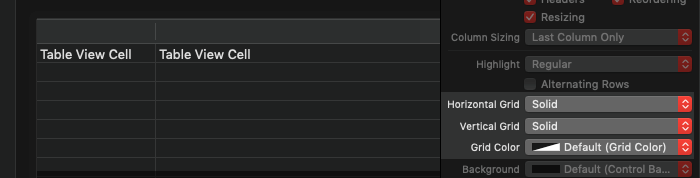
Using the Horizontal Grid and Vertical Grid popups you can also display horizontal and vertical grid lines to the table view respectively, making clear visual separation of the cells. Lines can be solid or dashed, but the default option is “None”, meaning no grid lines at all. Line colors can be changed in the popups that follow, where you can either leave the default colors, or set the custom ones you want.
After that, you can make selection-related configuration. For example, you might want to allow multiple rows to be selected, or an entire column.
The above consist of the most important and common options that you will probably need to configure when working with table views on macOS. Feel free to go deeper and experiment with more settings that they were not presented above. There is, however, one more thing that I would like to highlight here, and it has to do with the background color of the table view.
In case you want to set a custom background color to the table view, you will do so using the Background popup in the Attributes Inspector. Keep always in mind though that table view is not a top-level object; it’s a subview of the clip view, and the clip view is a subview of the scroll view. So, always make sure that both the scroll view and the clip view have no solid background colors. Otherwise the color you set as a background for the table view will not be visible.
Setting Up The Table View
With all the above being said, make the following settings to the table view of our demo app through the Attributes Inspector:
- Change the number of columns to 3.
- Uncheck the Reordering and Resizing check boxes.
- Allow dashed horizontal grid lines.
- Enable Multiple selection check box.
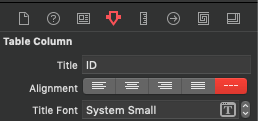
Now, select the first table column in the Document Outline, and In the Attributes Inspector set the text “ID” as its title.
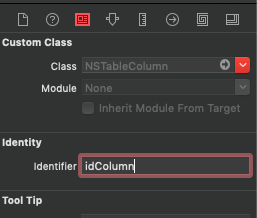
With the column still selected, open the Identity Inspector, and set the “idColumn” as the value to the Identifier field.
Lastly, set its width value to 48 in the Size Inspector.
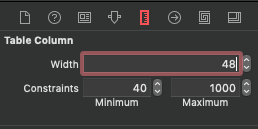
Repeat the above steps for the other two columns. For the second column, set the following values:
- Column title: “User Info” (without the quotes)
- Identity: “userInfoColumn”
- Size: 200
Regarding the third column:
- Column title: “Payment Info” (without the quotes)
- Identity: “paymentInfoColumn”
- Size: 600
As you see, part of the configuration we make is to set the Identifier values for each column. These identifiers are extremely important and necessary as they are used to distinguish columns programmatically, and you will see how they are being used in the next part of the post.
As you’ve seen so far, a table cell view has a text field as a subview by default. That’s suitable to present values in the “ID” column, but it’s not good for the second column where we’ll be presenting avatars and usernames (“User Info” column). In that case we need to replace the default cell view with another one, also built-in table cell view that will contain a text field and an image view. Here’s the series of step required to do that:
- Select the cell view in the second column, and hit the Delete button on your keyboard to delete it.
- Open the Objects Library and search for the “tablecellview” term.
- Select the Image & Text Table Cell View object and drag and drop it under the second column. That should be the only cell view for that column.
- Optionally, open the Connections Inspector to see that the text field and the image view that this cell contains are already connected to the default outlet properties.
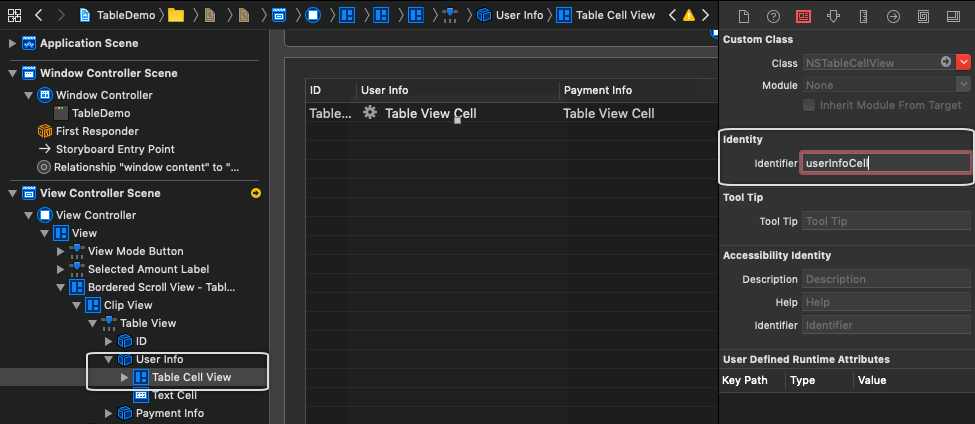
With the new table cell view being in place, select it and then go to the Identifier Inspector to set an identifier value as we did right before with columns. Set “userInfoCell” as the Identifier value.
After that, do the same for the cell view for the first column. Set the “idCell” text as the Identifier value.

Regarding the table cell view of the third column, set the “paymentInfoCell” text as its Identifier.
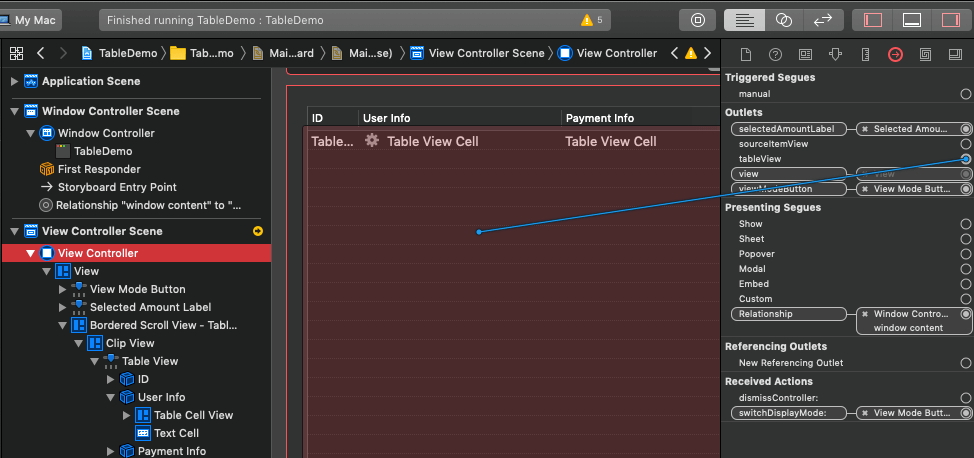
Lastly, we must connect our table view to an IBOutlet property called tableView which has been declared already in the ViewController class. Select the View Controller object in the Document Outline, and open the Connections Inspector. Drag the tableView outlet straight to the table view.
Presenting Data
Let’s switch to the ViewController.swift file now and let’s start writing some code. In this part we are going to see how default table cell views can be used for displaying data to the table view. This approach consists of the easiest, and most probably the most common way to populate data to a table view.
The first thing we need to do is to set the ViewController class as the delegate and datasource of the table view. Go to the viewDidLoad() method and add the next two lines:
override func viewDidLoad() {
    super.viewDidLoad()

    tableView.delegate = self
    tableView.dataSource = self
}
Xcode will show a couple of error messages, but don’t bother about that. We’ll fix everything in a minute.
The datasource for our table view is going to be the purchases collection in the ViewModel class. purchases is a collection of Purchases objects, where each object contains fake data that contain usernames, credit card and payment details regarding fake purchases.
We will use the purchases collection for the first time by implementing a datasource method that returns the number of rows in the table view. We will do that to an extension of the ViewController class. Go after the class closing and add the following:
extension ViewController: NSTableViewDataSource {

}
Inside the extension body let’s define the datasource method shown next:
extension ViewController: NSTableViewDataSource {
    func numberOfRows(in tableView: NSTableView) -> Int {
        return viewModel.purchases.count
    }
}
In the numberOfRows(in:) datasource method we return the number of items in the purchases collection. Now, let’s create another extension where the ViewController class will conform to the NSTableViewDelegate:
extension ViewController: NSTableViewDelegate {

}
By adding the second extension no more errors are appearing in Xcode.
The delegate method that you will be using the most when you’ll be working with table views is the one defined right next:
extension ViewController: NSTableViewDelegate {
    func tableView(_ tableView: NSTableView, viewFor tableColumn: NSTableColumn?, row: Int) -> NSView? {

    }
}
This method is responsible for loading and managing view-based cells, and it’s also the place where we will add the necessary code to present data to the cell views in our table view. We will start by assigning a Purchases object into a local variable for easy access, and also by returning nil as the default value of the method.
func tableView(_ tableView: NSTableView, viewFor tableColumn: NSTableColumn?, row: Int) -> NSView? {
    let currentPurchase = viewModel.purchases[row]

    return nil
}
Next, we are going to distinguish columns by using their identifier values we set earlier in the storyboard file. Here’s an important tip: An identifier value in code is not a String value, but a NSUserInterfaceItemIdentifier object. Using such an object to check the identifier of a column is easy as it’s shown next:
func tableView(_ tableView: NSTableView, viewFor tableColumn: NSTableColumn?, row: Int) -> NSView? {
    let currentPurchase = viewModel.purchases[row]

    if tableColumn?.identifier == NSUserInterfaceItemIdentifier(rawValue: "idColumn") {

    } else if tableColumn?.identifier == NSUserInterfaceItemIdentifier(rawValue: "userInfoColumn") {

    } else {

    }

    return nil
}
tableColumn parameter value represents a table view column object. Its identifier property is what we compare to the NSUserInterfaceItemIdentifier object and we eventually manage to distinguish each column. The else case above represents the third column, and we’ll deal with it in the next part of the post.
Our next move is to load the table cell view for each column and assign the proper data. We’ll handle the case of the cell view in the first column initially. Let’s see the code:
if tableColumn?.identifier == NSUserInterfaceItemIdentifier(rawValue: "idColumn") {

    let cellIdentifier = NSUserInterfaceItemIdentifier(rawValue: "idCell")
    guard let cellView = tableView.makeView(withIdentifier: cellIdentifier, owner: self) as? NSTableCellView else { return nil }
    cellView.textField?.integerValue = currentPurchase.id ?? 0
    return cellView

} else if tableColumn?.identifier == NSUserInterfaceItemIdentifier(rawValue: "userInfoColumn") {

} else {

}
The key player in these new four lines is the makeView(withIdentifier:owner:) method, as it’s the one that creates a view based on the cell view that has an identifier value matching to the one we provide. In the above case, “idCell” is the identifier of the cell view in the first column. Note that the returned value by that method is a NSView? object, so casting to NSTableCellView is necessary, as well as using a guard statement (or if let if you prefer) to make sure that there’s an actual cell view returned.
The rest is straightforward, as we just assign the ID value of the current Purchases object to the default text field of the cell view, which we eventually return. The cellView object that is being returned will either have a value, or it will be nil if makeView(withIdentifier:owner:) returns nil for some reason (for example, we specified a wrong identifier).
Time to take care of the User Info column contents. We will follow the exact same steps as shown above, but now we will refer to the cell using the “userInfoCell” identifier. This time an image view exists in addition to the text field in the table cell view.
let cellIdentifier = NSUserInterfaceItemIdentifier(rawValue: "userInfoCell")
guard let cellView = tableView.makeView(withIdentifier: cellIdentifier, owner: self) as? NSTableCellView else { return nil }
cellView.textField?.stringValue = currentPurchase.userInfo?.username ?? ""

if let avatarData = viewModel.getAvatarData(forUserWithID: currentPurchase.userInfo?.id) {
    cellView.imageView?.image = NSImage(data: avatarData)
}

return cellView
In the text field we assign the username of the fake person, and in the image view the avatar. No image is set as an avatar if getAvatarData(forUserWithID:) method returns nil instead of an actual Data object. You can find getAvatarData(forUserWithID:) implemented in the ViewModel.swift file.
Right next you are given with the implementation of the tableView(_:viewFor:row:) delegate method as it’s been formed so far. We’ll keep adding code in this method in the upcoming parts too:
func tableView(_ tableView: NSTableView, viewFor tableColumn: NSTableColumn?, row: Int) -> NSView? {
    let currentPurchase = viewModel.purchases[row]

    if tableColumn?.identifier == NSUserInterfaceItemIdentifier(rawValue: "idColumn") {

        let cellIdentifier = NSUserInterfaceItemIdentifier(rawValue: "idCell")
        guard let cellView = tableView.makeView(withIdentifier: cellIdentifier, owner: self) as? NSTableCellView else { return nil }
        cellView.textField?.integerValue = currentPurchase.id ?? 0
        return cellView

    } else if tableColumn?.identifier == NSUserInterfaceItemIdentifier(rawValue: "userInfoColumn") {

        let cellIdentifier = NSUserInterfaceItemIdentifier(rawValue: "userInfoCell")
        guard let cellView = tableView.makeView(withIdentifier: cellIdentifier, owner: self) as? NSTableCellView else { return nil }
        cellView.textField?.stringValue = currentPurchase.userInfo?.username ?? ""

        if let avatarData = viewModel.getAvatarData(forUserWithID: currentPurchase.userInfo?.id) {
            cellView.imageView?.image = NSImage(data: avatarData)
        }

        return cellView


    } else {

    }

    return nil
}
We are just a step away from running the app for first time and seeing the fake data displayed on the table view. The last action we have to take is to reload the table view data, and we will do so in the viewWillAppear() method:
override func viewWillAppear() {
super.viewWillAppear()
tableView.reloadData()
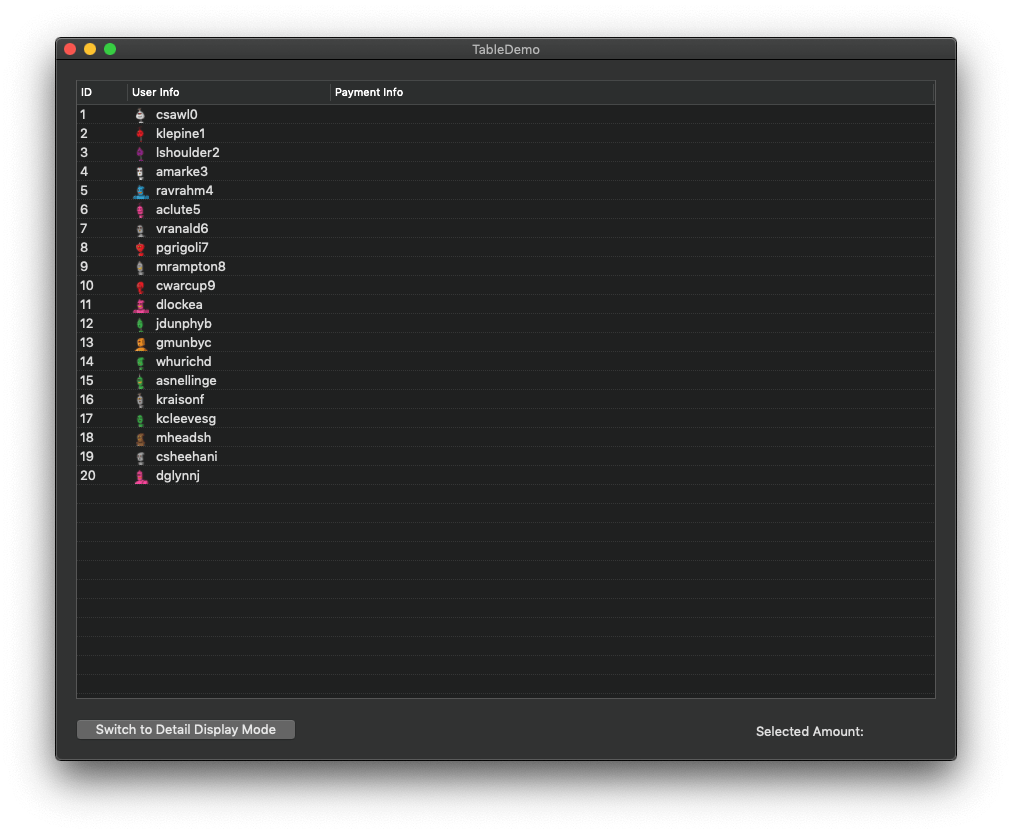
}Run the app now, you should see this:
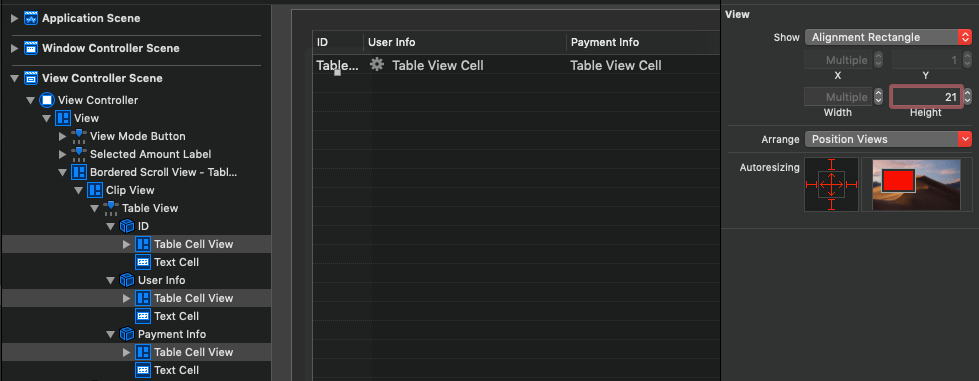
Changing Row Height
If you’ve been programming in iOS, then most probably you can guess how row height can be altered. By default, each row has a height of 17px. To change that you need to implement the following delegate method and provide a new height as a CGFloat value:
extension ViewController: NSTableViewDelegate {
    ...


    func tableView(_ tableView: NSTableView, heightOfRow row: Int) -> CGFloat {
        return 21.0
    }
}
Most times you will want to make respective changes in the storyboard file too, so UI design output matches to the runtime visual results. To do that, select each table cell view under each column, and change their heights through the Size Inspector to a value similar to the one you set in code. In case you set a high height value, then it’ll be necessary to resize each UI control accordingly so it fits to that height. This is not important here, as the new height we set is close to the original one.
Subclassing Table Cell View
Displaying data as shown in the previous part is not always the case; chances are that you will need more controls or customized UI on a table cell view. Default controls provided by cells might not be enough, neither the respective outlet properties. In such cases there is one solution, to create your custom table cell view class with all outlet properties and action methods required to support the custom UI of a cell view.
This is what exactly we are going to see here by subclassing the NSTableCellView class. To start, go back to the Main.storyboard file and in the third column of the table view. The following data is going to be presented in it:
- Credit card number
- Credit card type
- Purchases amount
- List of purchases
For the first three kind of data we are going to use labels (non-editable text fields), but for the purchases list we will use a popup button. Let’s start building the UI on the cell view of the table view, where we already have a text field (the default one). From the Objects Library, add two (additional) text fields and one popup button to the cell:
Starting from the first text field and going to the popup button, set their frames in the Size Inspector as described:
- First text field: 2, 7, 192, 17
- Second text field (label): 202, 7, 130, 17
- Third text field (label): 340, 7, 122, 17
- Popup button: 470, 2, 115, 21
You should now have this layout:

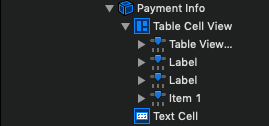
Now we will leave Interface Builder for a while as it’s time to subclass the NSTableCellView class. In the starter project there is a file named PaymentInfoCellView.swift file, currently being empty. Open it, and start by defining a new class:
class PaymentInfoCellView: NSTableCellView {

}
The one and only action we have to take here is to declare IBOutlet properties that will be connected to the controls we just added above:
class PaymentInfoCellView: NSTableCellView {

    @IBOutlet weak var creditCardTypeLabel: NSTextField?
    @IBOutlet weak var amountLabel: NSTextField?
    @IBOutlet weak var purchasesPopup: NSPopUpButton?

}
Notice that we don’t declare an IBOutlet property for the text field that will present the credit card number data. We could have done it, but it’s not necessary as NSTableCellView already provides an outlet property for a text field. Why not use it?
A class such the above one is also the place where any IBAction methods should be implemented for reacting to user actions. We don’t need to do that here though, so the above is all we have. Keep in mind that in case you implement IBAction methods and you need to send data to ViewController or any other class, then using delegation pattern or notifications for doing that would be a good option.
Back to the Main.storyboard file again. Let’s spot and select the cell view of the third column. Then, show the Identity Inspector, and set the PaymentInfoCellView as the custom class of the cell:
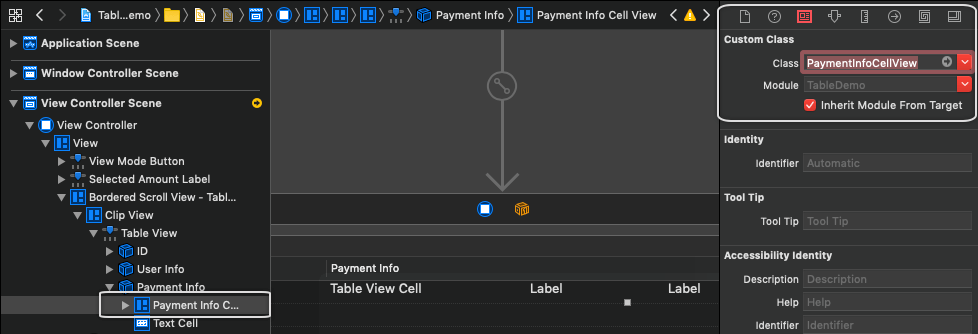
Keep the cell view selected, and then open the Connections Inspector. You will see all IBOutlet properties we declared in the PaymentInfoCellView class. Make the connections according to this:
textFieldoutlet to the first text field.creditCardTypeLabeloutlet to the second text field.amountLabeloutlet to the third text field.purchasesPopupoutlet to the popup button.
Once you finish making the connections, go to the ViewController.swift file, in the tableView(_:viewFor:row:) delegate method. We have the if statement to distinguish columns, and the else case is still missing implementation. Now we are in a position to add it, so start by making the cell view:
let cellIdentifier = NSUserInterfaceItemIdentifier(rawValue: "paymentInfoCell")
guard let cellView = tableView.makeView(withIdentifier: cellIdentifier, owner: self) as? PaymentInfoCellView else { return nil }
Notice that we are casting the view created by the makeView(withIdentifier:owner:) method to a PaymentInfoCellView type this time, instead of NSTableCellView. Through the cellView object now we can access all custom IBOutlet properties and populate data to the matching UI controls:
...

cellView.textField?.stringValue = currentPurchase.paymentInfo?.creditCard ?? ""
cellView.creditCardTypeLabel?.stringValue = currentPurchase.paymentInfo?.creditCardType ?? ""
cellView.amountLabel?.stringValue = currentPurchase.paymentInfo?.amount ?? ""

cellView.purchasesPopup?.removeAllItems()
cellView.purchasesPopup?.addItems(withTitles: currentPurchase.paymentInfo?.purchaseTypes ?? [])

return cellView
Regarding the popup button, note that it’s necessary first to remove the default items it contains prior to setting the new values.
At this point, you can delete the return nil line at the end of the method, as we return a value from each case of the condition now. The entire method at this point is this:
func tableView(_ tableView: NSTableView, viewFor tableColumn: NSTableColumn?, row: Int) -> NSView? {
    let currentPurchase = viewModel.purchases[row]

    if tableColumn?.identifier == NSUserInterfaceItemIdentifier(rawValue: "idColumn") {

        let cellIdentifier = NSUserInterfaceItemIdentifier(rawValue: "idCell")
        guard let cellView = tableView.makeView(withIdentifier: cellIdentifier, owner: self) as? NSTableCellView else { return nil }
        cellView.textField?.integerValue = currentPurchase.id ?? 0
        return cellView

    } else if tableColumn?.identifier == NSUserInterfaceItemIdentifier(rawValue: "userInfoColumn") {

        let cellIdentifier = NSUserInterfaceItemIdentifier(rawValue: "userInfoCell")
        guard let cellView = tableView.makeView(withIdentifier: cellIdentifier, owner: self) as? NSTableCellView else { return nil }
        cellView.textField?.stringValue = currentPurchase.userInfo?.username ?? ""

        if let avatarData = viewModel.getAvatarData(forUserWithID: currentPurchase.userInfo?.id) {
            cellView.imageView?.image = NSImage(data: avatarData)
        }

        return cellView


    } else {

        let cellIdentifier = NSUserInterfaceItemIdentifier(rawValue: "paymentInfoCell")
        guard let cellView = tableView.makeView(withIdentifier: cellIdentifier, owner: self) as? PaymentInfoCellView else { return nil }

        cellView.textField?.stringValue = currentPurchase.paymentInfo?.creditCard ?? ""
        cellView.creditCardTypeLabel?.stringValue = currentPurchase.paymentInfo?.creditCardType ?? ""
        cellView.amountLabel?.stringValue = currentPurchase.paymentInfo?.amount ?? ""

        cellView.purchasesPopup?.removeAllItems()
        cellView.purchasesPopup?.addItems(withTitles: currentPurchase.paymentInfo?.purchaseTypes ?? [])

        return cellView
    }
}
Run the app now; third column displays data too!

Using Custom Views
The two approaches presented in the previous two parts of the tutorial on how to display data on a table view can cover the majority of use cases. Subclassing NSTableCellView is the most common way to go, while you have the cell’s UI controls laid out on the storyboard file. However, it might be more interesting or necessary sometimes to create custom views and design the cell’s UI in a separate XIB file.
In the starter project there is a pair of files, named PurchasesDetailView.swift and PurchasesDetailView.xib. Both files regard the implementation of a custom view which offers an alternative way to present data on each row of the table view. XIB file contains the UI designed in Interface Builder, and the contents of that XIB file are being loaded by the PurchasesDetailView class which also declares the IBOutlet properties that UI controls connect to. That custom view is ready to be used.
PurchasesDetailView adopts the LoadableView protocol to load the contents of the XIB file. That protocol has been discussed on this previous tutorial where I presented how to deal with custom views and other interesting stuff, so take a look to find out more.We will make the demo app capable of switching layout between the cells we currently have and the PurchasesDetailView custom view. We will achieve that when the button titled “Switch to Detail Display Mode” is clicked. The first thing we have to consider is the number of columns, as we currently have three of them, but when the custom view is used we will need just one. Of course, the opposite should happen when the button is clicked again to leave the detailed view mode and go back to displaying the current cells.
To achieve all that we are going to meet something new; how to remove and add table columns programmatically.
Switching Display Mode
Go to the switchDisplayMode(_:) IBAction method in the ViewController.swift file and add the following content:
@IBAction func switchDisplayMode(_ sender: Any) {
    viewModel.switchDisplayMode()

    if viewModel.displayMode == .detail {

    } else {

    }

    tableView.reloadData()
}
viewModel object contains a property called displayMode, a DisplayMode value. DisplayMode is an enumeration with two values: plain and detail and its purpose is to indicate whether the plain (current cells) or detailed (custom view) layout should be used to present data. The default value is plain.
switchDisplayMode() method shown above (implemented in the ViewModel class) switches between plain and detailed view, that’s why it’s the first step in the above method.
Next, we use an if statement to determine whether the current display mode is set to plain or detail. At the end we reload the table view, otherwise no visual changes will occur.
Focusing now on the if body, the first things we’ll do is to remove all current columns from the table view:
for column in tableView.tableColumns.reversed() {
    tableView.removeTableColumn(column)
}
tableColumns is a property in the tableView object. removeTableColumn is provided by the NSTableView class, and allows to remove existing columns.
Now, let’s create one new column programmatically:
let column = NSTableColumn(identifier: NSUserInterfaceItemIdentifier(rawValue: "detailsColumn"))
column.width = tableView.frame.size.width
column.title = "Purchases Detailed View"
Notice that we make the column’s width equal to the width of the table view. Upon initialization we specify its identifier value, and at the end we give it a title too.
The new column must be appended to the table view:
tableView.addTableColumn(column)That’s it, we managed to delete all previous columns and create a new one within a few lines of code.
Before we see the implementation of the else clause, let’s add one more line that will change the button’s title as necessary:
viewModeButton?.title = "Switch to Plain Display Mode"Good! Now, let’s see what should happen in the else case. Here the columns and cells we currently have should be displayed again, so the new column that was created from the code above must be removed from the table view:
tableView.removeTableColumn(tableView.tableColumns[0])The original columns can now be brought back to the table view:
for column in originalColumns {
    tableView.addTableColumn(column)
}
originalColumns is an array that holds the original columns of the table view. It’s already declared as a property in the ViewController class.
Lastly, update the button’s title accordingly:
viewModeButton?.title = "Switch to Detail Display Mode"And the switchDisplayMode(_:) IBAction method is now ready:
@IBAction func switchDisplayMode(_ sender: Any) {
    viewModel.switchDisplayMode()

    if viewModel.displayMode == .detail {
        for column in tableView.tableColumns.reversed() {
            tableView.removeTableColumn(column)
        }

        let column = NSTableColumn(identifier: NSUserInterfaceItemIdentifier(rawValue: "detailsColumn"))
        column.width = tableView.frame.size.width
        column.title = "Purchases Detailed View"
        tableView.addTableColumn(column)

        viewModeButton?.title = "Switch to Plain Display Mode"

    } else {
        tableView.removeTableColumn(tableView.tableColumns[0])

        for column in originalColumns {
            tableView.addTableColumn(column)
        }

        viewModeButton?.title = "Switch to Detail Display Mode"
    }

    tableView.reloadData()
}
One more thing: Go to the viewDidLoad() method and add the next line:
override func viewDidLoad() {
    ...

    originalColumns = tableView.tableColumns
}
That line is the one that stores the original columns to the originalColumns array.
Matching Display Mode And Content
Let’s jump into the tableView(_:viewFor:row:) table view delegate method now, where we will start with a big change. Select everything in the method’s body after the line:
let currentPurchase = viewModel.purchases[row]Then cut it, and type the following:
if viewModel.displayMode == .plain {

} else {

}
In the if body paste the code you had previously cut. This is the case where the original columns and cells should be displayed to the table view. Next, go to the else case body. Using the custom view is simple as that:
let view = PurchasesDetailView()
view.usernameLabel.stringValue = currentPurchase.userInfo?.username ?? ""
view.idLabel.integerValue = currentPurchase.id ?? 0

if let avatarData = viewModel.getAvatarData(forUserWithID: currentPurchase.userInfo?.id) {
    view.avatarImageView.image = NSImage(data: avatarData)
}

view.creditCardNumberLabel.stringValue = currentPurchase.paymentInfo?.creditCard ?? ""
view.creditCardTypeLabel.stringValue = currentPurchase.paymentInfo?.creditCardType ?? ""
view.amountLabel.stringValue = currentPurchase.paymentInfo?.amount ?? ""
view.purchasesLabel.stringValue = currentPurchase.paymentInfo?.purchaseTypes?.joined(separator: ", ") ?? ""

return view
Since we have one column only in the detailed display mode, there’s no need to explicitly check its identifier as we did for the columns in the plain display mode. The fact that the tableView(_:viewFor:row:) delegate method returns a NSView object make is feasible to initialize a custom view object, to configure it and return it as shown above.
The row height must be updated also when the display mode gets changed:
func tableView(_ tableView: NSTableView, heightOfRow row: Int) -> CGFloat {
    if viewModel.displayMode == .plain {
        return 21.0
    } else {
        return 150.0
    }
}
Time to try out all the above! Run the app now and use the button to switch between display modes:
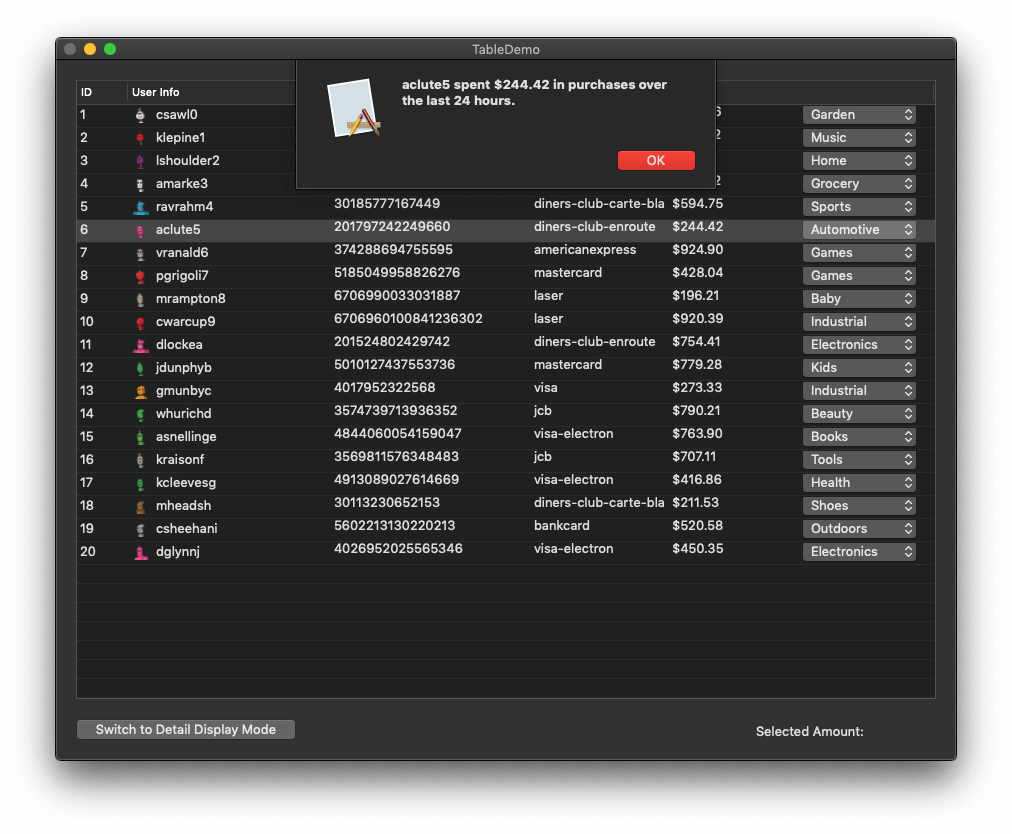
Handling Double Click
It’s quite common for users to double click on rows expecting for a certain action to be triggered by doing that. Knowing how to handle double clicks is important, as that enables developers to provide an expected by the users app behaviour and experience. One might would expect to see a table view delegate method that gets called when double clicking occurs, however this is not the case here.
NSTableView class contains a property called doubleAction. This property is a selector and a target method must be assigned to it, so whenever a double click action happens that method to be called. Obviously, that target method is the place where the double click related logic should be implemented.
To make everything clear let’s handle double click actions made in the table view of the demo app. We will add a few lines of code that will present an alert dialog displaying the username and the amount spent regarding the purchase information matching to the double-clicked row.
To start, go to the viewDidLoad() method and add the following line:
override func viewDidLoad() {
    ...

    tableView.doubleAction = #selector(handleDoubleClick)
}
With the above we are saying to our app that it should call the handleDoubleClick() method every time a user double clicks on our table view. The next step is to define that method as shown next:
@objc func handleDoubleClick() {

}
Since the above is a target method to the doubleAction selector it’s marked with the @objc keyword.
Getting the clicked row is easy:
@objc func handleDoubleClick() {
    let clickedRow = tableView.clickedRow

}
An important piece of information: doubleAction selector gets called when a double click action occurs in both a row and a column. When double click occurs on a column, the clickedRow property above has the -1 value. If its value is greater than or equal to 0 then double click took place on a row.
At this point remember that the purchases array in the viewModel class is the datasource of the table view, so a row matches to an item in the collection. Therefore getting the Purchases object matching to the double clicked row as a simple as that:
let purchase = viewModel.purchases[clickedRow]We can now use the purchase object and present the alert:
showAlert(forPurchase: purchase)showAlert(forPurchase:) method is already implemented in the ViewController class.
Here’s the handleDoubleClick() method at this point:
@objc func handleDoubleClick() {
    let clickedRow = tableView.clickedRow

    if clickedRow >= 0 {
        let purchase = viewModel.purchases[clickedRow]
        showAlert(forPurchase: purchase)
    }
}
Accessing Row Contents
The above consists of the most simple way to acces the proper Purchases object and use it for getting the needed data for the alert. Now we’ll do the same, but in favour of the educational purposes of the tutorial we’ll follow a bit more complex and indirect way to achieve that. Through that process we’ll have the chance to meet more table view methods and APIs.
First off, let’s clarify what the goal is here: We will get the “ID” value from the text field in the table cell view of the first column in the double-clicked row, and based on that we will find the Purchases object that contains the data we want to show on the alert. As you understand, my purpose here is to show how to access columns and table cell views through the clicked row object.
Our app supports two different display modes (plain and detail), so we must handle double click actions for each mode separately:
if viewModel.displayMode == .plain {

} else {

}
Let’s start with the “plain” mode and let’s review the steps:
Once we make sure that clickedRow shows the index of a clicked row, we will then get that row as a NSTableRowView object:
let row = tableView.rowView(atRow: clickedRow, makeIfNecessary: false)rowView(atRow:makeIfNecessary:) method returns a NSTableRowView object which represents the clicked (or selected) row programmatically. If no row view object can be created, then nil is being returned. However, if that method returns an actual value, then we can use the view(atColumn:) method of the NSTableRowView class as shown below and access any column we want:
let cellView = row.view(atColumn: 0) as? NSTableCellViewIn our case we want the first column at index 0, as it contains the table cell view with the text field containing the ID value.
If cellView above is not nil, then we can easily get the ID we are looking for through its text field control:
let id = cellView.textField?.integerValueThen, we can use that id value to get the Purchases object from the viewModel object:
let purchase = viewModel.getPurchase(withID: id)getPurchase(withID:) method is already implemented in the ViewModel class, and it returns the Purchases object that contains all the information we need.
Since almost all the above steps can return nil values, we can gather them all in one big guard statement as shown next:
guard clickedRow >= 0,
    let row = tableView.rowView(atRow: clickedRow, makeIfNecessary: false),
    let cellView = row.view(atColumn: 0) as? NSTableCellView,
    let id = cellView.textField?.integerValue,
    let purchase = viewModel.getPurchase(withID: id)
    else { return }
}
Finally, all we have left to do is to present the alert with the proper message using the showAlert(forPurchase:) method:
showAlert(forPurchase: purchase)To have the same results in the detail display mode, similar to above, yet simpler actions must be made as well. Initial steps remain the same, but this time we will cast the first column (the only column in detail display mode) to a PurchasesDetailView object. The actual ID value will be taken from the idLabel text field of the view, which will be used to get the Purchases object:
guard clickedRow >= 0,
    let row = tableView.rowView(atRow: clickedRow, makeIfNecessary: false),
    let view = row.view(atColumn: 0) as? PurchasesDetailView,
    let purchase = viewModel.getPurchase(withID: view.idLabel.integerValue)
    else { return }

showAlert(forPurchase: purchase)
Here’s the entire method implementation. Notice that the original solution has been commented out:
@objc func handleDoubleClick() {
    let clickedRow = tableView.clickedRow

    /*
    if clickedRow >= 0 {
        let purchase = viewModel.purchases[clickedRow]
        showAlert(forPurchase: purchase)
    }
    */

    if viewModel.displayMode == .plain {
        guard clickedRow >= 0,
            let row = tableView.rowView(atRow: clickedRow, makeIfNecessary: false),
            let cellView = row.view(atColumn: 0) as? NSTableCellView,
            let id = cellView.textField?.integerValue,
            let purchase = viewModel.getPurchase(withID: id)
            else { return }

        showAlert(forPurchase: purchase)
    } else {
        guard clickedRow >= 0,
            let row = tableView.rowView(atRow: clickedRow, makeIfNecessary: false),
            let view = row.view(atColumn: 0) as? PurchasesDetailView,
            let purchase = viewModel.getPurchase(withID: view.idLabel.integerValue)
            else { return }

        showAlert(forPurchase: purchase)
    }
}
Once again I underline the fact that the solution presented here is not the indicated one as the original solution remains the best approach. However, I used it as the means to discuss about more table view APIs, such as the rowView(atRow:makeIfNecessary:) and view(atColumn:) methods.
Run the app now and double click on any row. The username and the spent amount will be shown to an alert similar to that:
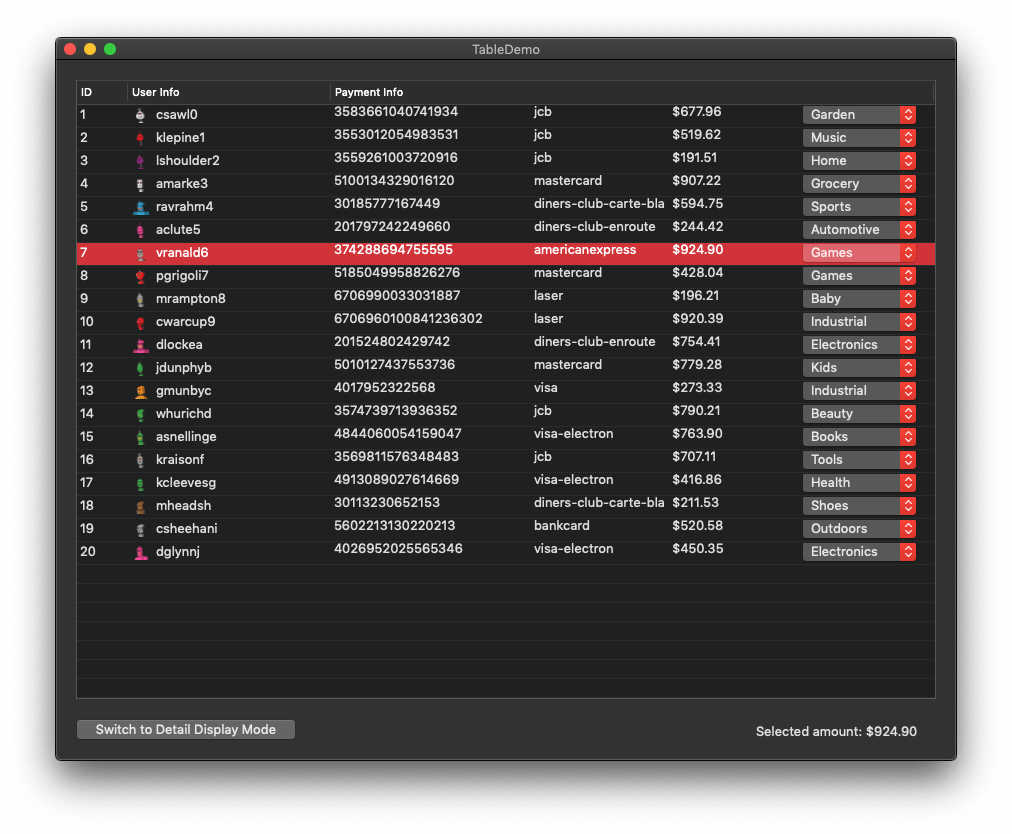
Handling Single Selections
Being able to know when a single row has been selected is equally important to knowing when and where a double click action has occurred. Initiating additional actions based on the single selection is once again part of the experience users expect to find to a macOS app, so in this part we are focusing on this exactly: How to handle single row selections.
For the sake of the example we are going to make our demo application capable of displaying the amount shown on a selected row to the selectedAmountLabel label which exists to the bottom right side of the window. There is no real value in doing that, it’s perfect though for training purposes.
This time there is a table view delegate method that we can use and be notified when a row is being selected. But on the contrary to the most of the delegate methods, this one contains a notification object as a parameter value:
func tableViewSelectionDidChange(_ notification: Notification) {

}
This method is called every time a row is being selected on the table view. As a hint, keep in mind that the object property of the notification (notification.object) brings along the table view where the selected row belongs to. This is useful in cases where you are managing more than one table views in your view controller. Here we have one table view only, and we access it through the tableView IBOutlet property. We won’t use the notification’s object.
The first thing we have to do in the body of this method is to get the index of the selected row. In the previous part we met the clickedRow property of the table view. Now we will meet another one, the selectedRow:
func tableViewSelectionDidChange(_ notification: Notification) {
    let selectedRow = tableView.selectedRow

}
If no row is selected, then this property has the -1 value. If, however, multiple rows are selected, then it returns the index of the last row.
To check whether multiple rows are selected or not, there is another available property to use named selectedRowIndexes. It returns an IndexSet with the index values of all selected rows. Since it’s a set we can use the count property and determine how many rows are selected. For example, the following will be executed if only one row is selected:
if tableView.selectedRowIndexes.count == 1 {
    // Do something...
}selectedRowIndexes property is meaningless in case you have not enabled multiple row selection in your table view. The number of selected rows will always be 1.Back to our demo app, let’s write down the conditions that will allow to get the amount when a single row is being selected:
if selectedRow >= 0 && tableView.selectedRowIndexes.count == 1 {

}
Getting the amount we need is simple after that:
if let amount = viewModel.purchases[selectedRow].paymentInfo?.amount {
    selectedAmountLabel?.stringValue = "Selected amount: \(amount)"
}
Here is the method as a single piece:
func tableViewSelectionDidChange(_ notification: Notification) {
    let selectedRow = tableView.selectedRow

    if selectedRow >= 0 && tableView.selectedRowIndexes.count == 1 {
        if let amount = viewModel.purchases[selectedRow].paymentInfo?.amount {
            selectedAmountLabel?.stringValue = "Selected amount: \(amount)"
        }
    }
}
Run the app now, and select any row to see the amount of the selected row also displayed to the bottom right side label:
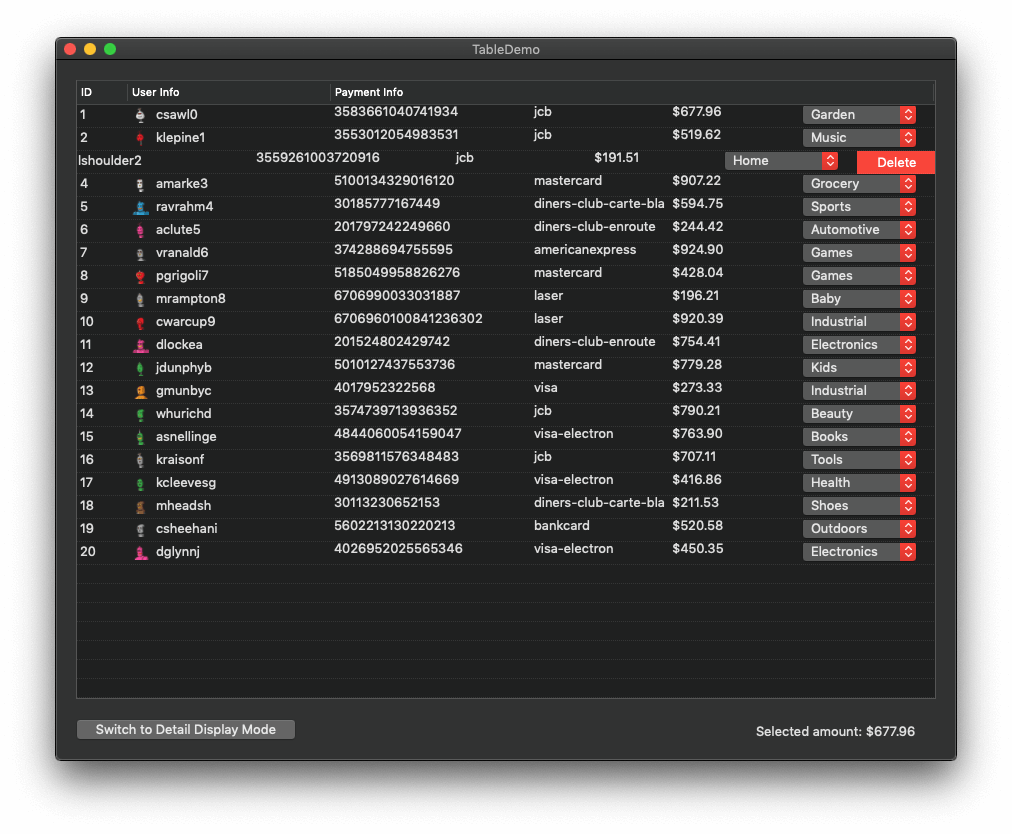
Handling Row Actions
Row actions are those buttons displayed on the left or right side of a row when that row is swiped towards the opposite direction. Best example is the Mail application where by swiping on the right we can mark a message as read or unread, and by swiping to the left we can delete it, flag it, etc.
Presenting such buttons in our own table view is easy, as all it takes is to implement a delegate method. In it, we can return different row action buttons for each edge of the row (leading, trailing).
To make it specific, let’s implement this scenario: When swiping to right, we’ll display a button on the leading edge that will let us print the data presented in the selected row. Of course, no real printing will take place. We will just show a message on the console. When swiping to left, we’ll show an action on the trailing edge that will let us delete a row. The equivalent Purchases object will be removed from the purchases array in the ViewModel class as well.
Let’s get started by defining the following table view delegate method:
func tableView(_ tableView: NSTableView, rowActionsForRow row: Int, edge: NSTableView.RowActionEdge) -> [NSTableViewRowAction] {

}
An array of NSTableViewRowAction items must be returned by this method. Since we want different actions on each edge, we’ll return two different arrays.
The first step now is to distinguish the edge:
if edge == .leading {

} else {

}
The leading edge represents the left side of the row, and it’s revealed when the row is being swiped to the right. Let’s create the row action for that edge:
let printAction = NSTableViewRowAction(style: .regular, title: "Print") { (action, index) in
    print("Now printing...")
}
In the closure body we add the code that should be implemented when that action button gets clicked. In our case, just printing the above message on the console is good enough. Notice that the printAction above has been given the “regular” style, and by default regular actions have a blue background color. We can change it as simply as that:
printAction.backgroundColor = NSColor.grayIn a similar fashion you can add more row actions if you want. Regardless if it’s just one or more actions, an array is what it should be returned:
return [printAction]Now, let’s create and return the delete action that will let us remove the selected row:
let deleteAction = NSTableViewRowAction(style: .destructive, title: "Delete") { (action, index) in
    self.viewModel.removePurchase(atIndex: row)
    self.tableView.reloadData()
}

return [deleteAction]
We mark this action as a destructive one, and the action button’s background color will be red. Also, in this case we perform real actions since we remove the selected Purchases object using the removePurchase(atIndex:) method (implemented in the ViewModel class) and then we reload the table view to update the displayed rows based on the datasource (purchases array in ViewModel).
Our new delegate method is ready:
func tableView(_ tableView: NSTableView, rowActionsForRow row: Int, edge: NSTableView.RowActionEdge) -> [NSTableViewRowAction] {

    if edge == .leading {
        let printAction = NSTableViewRowAction(style: .regular, title: "Print") { (action, index) in
            print("Now printing...")
        }
        printAction.backgroundColor = NSColor.gray
        return [printAction]

    } else {
        let deleteAction = NSTableViewRowAction(style: .destructive, title: "Delete") { (action, index) in
            self.viewModel.removePurchase(atIndex: row)
            self.tableView.reloadData()
        }

        return [deleteAction]
    }
}
Note that the above will work in both display modes we support. Run the app now and swipe any row in both directions to see and use the row actions:
Allow & Disallow Selecting Rows
Most of our actions on the table view so far are based on the fact that we can select rows, but this is not always desirable. You might need to present data on a table view but to prevent row selection. To achieve that you need to implement the following table view delegate method:
func tableView(_ tableView: NSTableView, shouldSelectRow row: Int) -> Bool {

}
If you return true, then row selection is allowed. If you return false, users won’t be able to select rows.
If you want to try it out, just return false and run the app:
func tableView(_ tableView: NSTableView, shouldSelectRow row: Int) -> Bool {
    return false
}
You will see that no row can be selected. Be cautious however: Single row click might gets “disabled” that way, but double click is still working.
Make sure you return true from the above method when you finish testing it.
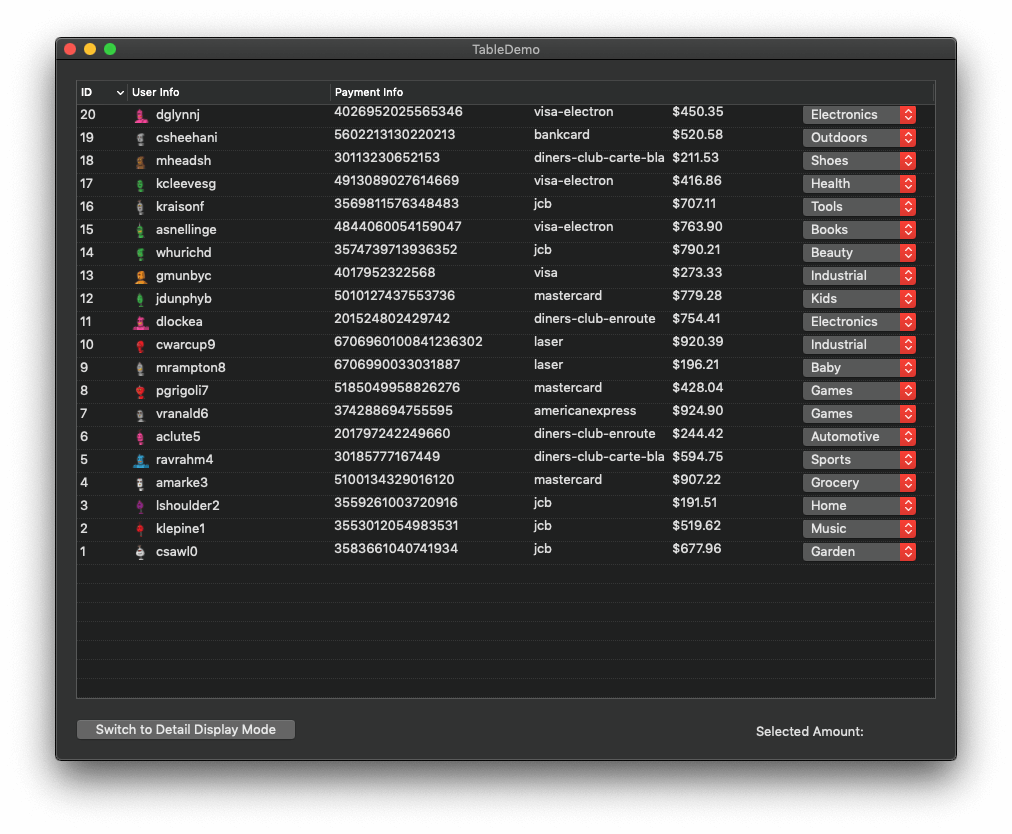
Sorting Displayed Data
A feature that we often meet in macOS applications which contain table views is the ability to sort the displayed data when clicking on a column title. This behaviour is useful if only it makes sense for your app to allow data sorting, so it’s not something that should be done no matter what.
In the demo app of this tutorial we have several columns that we can use to sort data. However, we’ll keep things simple and short, and we’ll allow sorting only when the ID column is clicked (in plain display mode). If you desire, you can modify later the app and support sorting through other columns as well.
So, to get started, in the ViewController class add the following method definition:
func setSortDescriptor() {

}
Two things are going to happen in it: First, we will initialize a NSSortDescriptor object to describe the order (ascending, descending) and the name of the property where we’ll base the sorting on. Second, we’ll assign that sort descriptor object to the first column of the table view (ID column).
func setSortDescriptor() {
    let idDescriptor = NSSortDescriptor(key: "id", ascending: true)
    tableView.tableColumns[0].sortDescriptorPrototype = idDescriptor
}
The idDescriptor sort descriptor is assigned to the sortDescriptorPrototype property of the table column. Notice the index 0 that indicates the first column of the table view.
Now let’s call this method. Right before the closing of the viewDidLoad() method add this:
override func viewDidLoad() {
    ...

    setSortDescriptor()
}
The above however are not enough to make sorting work. We need to implement a table view datasource method:
func tableView(_ tableView: NSTableView, sortDescriptorsDidChange oldDescriptors: [NSSortDescriptor]) {

}
This is where we will apply the logic to sort data. The most important thing we’ll do is to get the sort order from the descriptor and sort the data accordingly. After that, we just need to reload the table view:
func tableView(_ tableView: NSTableView, sortDescriptorsDidChange oldDescriptors: [NSSortDescriptor]) {
    guard let sortDescriptor = tableView.sortDescriptors.first else { return }
    viewModel.sortPurchases(ascending: sortDescriptor.ascending)
    tableView.reloadData()
}
sortPurchases(ascending:) method is already implemented in the ViewModel class. We pass as an argument the sort order from the sort descriptor (sortDescriptor.ascending property).
Feel free to modify all the above and support more sort descriptors. If you run the app now and you click on the ID column you will see the displayed data being sorted, while a visual indication on the column shows the sort order.
Summary
All topics and concepts we met in this macOS tutorial today consist of the most vital and fundamental knowledge on table views that all new macOS developers should have. Through the demo application and a few simple examples we focused on the most important and most common aspects that come up when working with table views. I encourage you to keep exploring on this topic, and find more interesting delegate and datasource methods among all those being available that were not discussed here. Thanks for reading and I hope you liked this post. See you soon with another interesting topic coming next!
For reference, you can download the full Xcode project on GitHub.


