

Hello readers! I’d like to start today by saying that this is a macOS programming tutorial that I wanted to write for a long time now. Not only because it’s extremely interesting, but also because we are going to meet a different kind of applications that one can build for the macOS operating system. However, most of the previous tutorials about macOS programming had to come first because some prior knowledge is required, but eventually here we are! We are just about to learn how to create status bar apps, or in other words, apps that live on the macOS top bar right next to the clock and other system or third-party applications that we all use and interact with on a daily basis.
The first and most important element that differentiates status bar apps from normal apps is the fact that they show an icon or a title to the status bar, so users can have quick access to the app features by just clicking on it. Actually, such an app displays a special object called status item which contains a button, and that button contains either the title or the icon.
When a status item is clicked, two things usually happen:
- A list of options is presented as a dropdown menu so users can choose what to do. The displayed options are always app-specific and depend exclusively on the app features. It’s possible to also have custom views among the menu items; that way users can find what they’re looking for instantly just by clicking on the app’s status item.
- A popover window is being displayed with an arrow pointing to the app’s item in the status bar. This popover contains one or more view controllers and it’s suitable for dealing with user input while still being in the status bar app mode and without having presented an actual window.
A more rare scenario is just to present the app’s main window when clicking on the status item, just like it would be presented on a normal launch. Even though that’s not such a common case, it consist of an option to let users have the app’s window appear right in front of them just by clicking on an icon in the top bar.
Most of the times status bar app features and functionalities are accessible without presenting a window by default. Actually, this is what makes status bar apps meaningful and usually this is what users expect to find; to use app features fast without dealing with windows. However, this doesn’t mean that windows and view controllers cannot or should not be displayed at all! On the contrary, any window necessary can be presented to provide additional options, actions, comfort and flexibility to users. But always keep in mind that users expect to find key features or important information right when clicking on a status bar app’s item. For example, in a status bar app that shows weather information is perfectly fine to let users configure preferences in a separate window, but the temperature or other vital weather information cannot be “hidden” behind a menu option that will bring up another window which in turn will contain the weather details; it has to be there right when the app icon (or title) gets clicked.
In this tutorial we’ll focus on the first two cases by going through two different demo applications and you’ll learn how to create status bar apps that work in one or the other way; by showing up menu options with a custom view or by presenting a popover. We will discuss about the necessary configuration that turns a casual app into a status bar app, we’ll see best practices and how-to, and generally almost everything you will need to know when you’ll start making your own status bar macOS apps.
The Status Bar App to Build
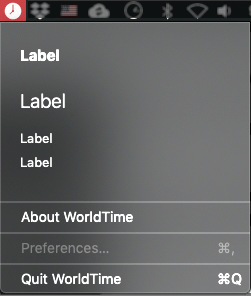
The first demo application we are going to work with in this tutorial is called WorldTime and you can find it in this starter pack. What we aim to achieve with it is to start from a normal macOS app, and to convert it to a status bar app. When its status item will be clicked, it will present a menu with a few options (About window, Preferences and Quit), and a custom view with date and time information for a specific timezone.
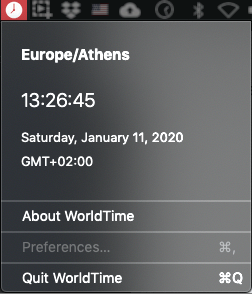
In addition, we’ll make it possible to change the preferred timezone through a Preferences window. We’ll use the User Defaults as the means to save (and to read from subsequently) the user selected timezone. This sample application contains all the necessary information that one would need in order to create similar applications which display a menu and potentially a custom view. Note though that this kind of status bar apps is not appropriate for dealing with user input; if that’s your purpose, then you should read how to create status bar apps that display popovers later on in this tutorial.
Getting Started
Assuming that you have downloaded the starter pack, unzip and open the WorldTime project in Xcode so you can follow along here. You’ll find some preparation already been done, with significant parts of code already been implemented. Actually, what you will find already done is two custom views, but we’ll talk about them in the following parts. There are missing parts more relevant to our cause here, and we’ll be adding them step by step. At this point you are free to run the demo application if you want before we get started; you’ll see only the main window of the app showing app with no content, and there will be no indication of the app in the status bar.
The first and maybe the most crucial step is to perform all those necessary actions that will make the application run as a status bar app. The series of actions described next can be done in any order, but the way we’ll go helps understanding the entire process easier.
The Status Item
As I already mentioned in the introduction of this post, the icon or the title of an app that is displayed in the status bar belongs to a button contained in a special object called status bar item. This object is an instance of the NSStatusItem class and any app that wants to run as a status bar app must initialize and configure such an object. The most obvious place to have this initialization code is the AppDelegate class since this is the starting point for every application, and indeed we’ll do so in this example. However, filling the AppDelegate with code other than the app delegate methods is not a good idea because it’s easy to end up with an unreasonably big and confusing app delegate file. For that reason, I’ll show you a better approach in the next example where we’ll learn how to show a popover; an approach that employs a standalone file and a class. For now and for the educational purposes of this tutorial, using the AppDelegate is absolutely acceptable.
So, open the AppDelegate.swift file and declare the following property at the top of the class:
var statusItem: NSStatusItem?Now, override the awakeFromNib() method and add the following content:
override func awakeFromNib() {
    super.awakeFromNib()

    statusItem = NSStatusBar.system.statusItem(withLength: NSStatusItem.variableLength)
    statusItem?.button?.title = "WorldTime"
}
The awakeFromNib() will be called because we have a storyboard file where the UI is loaded from. In case you want a code-only solution, then all code existing in the awakeFromNib() should go to the applicationDidFinishLaunching(_:) method.
As you can see above, at first we are initializing a NSStatusItem object. What’s interesting here is the initializer’s argument which defines the length of the status bar item. The variableLength value used above allows the item to expand as much as needed so it can fully display its title or icon. Alternatively, there is also the squareLength value which defines a square area for the item’s icon or title. With this option though the item’s title that is defined in the second line (“WorldTime”) would appear truncated and only the first letters fitting to the square’s length would be visible.
Our work here is not finished yet; we will revisit awakeFromNib() a couple more times to add additional code. It’s important though that the first step is now done.
Updating The Info.plist File
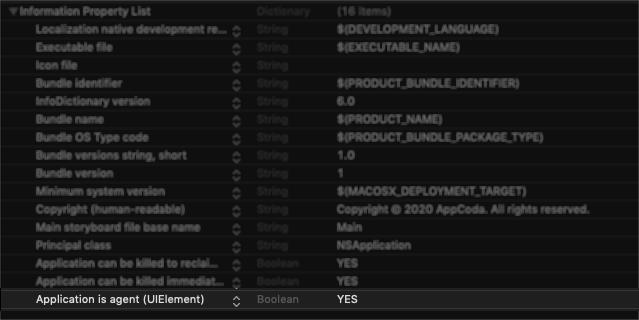
A status bar app is also called an agent app, and initializing a NSStatusItem object as shown above is not enough to let the app know that we want it to be an agent app. A new entry must be done to the Info.plist file in order to accomplish that, so select to open it in the Project navigator.
With the Info.plist file in front of you, select the last row of the file, and then go to the Editor > Add Item menu, or simply click on the small plus button straight on the row. In the new entry that will be added, set the Application is agent (UIElement) as the key, and YES as the value:
Don’t forget to press Cmd+S to save the changes you just made. At this point you can run the app again. Look at the status bar where you’ll find our app’s status item showing up for first time!

Of course, nothing happens when you click on it and the app’s window is still there. But don’t worry, there is still some road ahead of us until the app is properly configured.
Removing The App’s Window
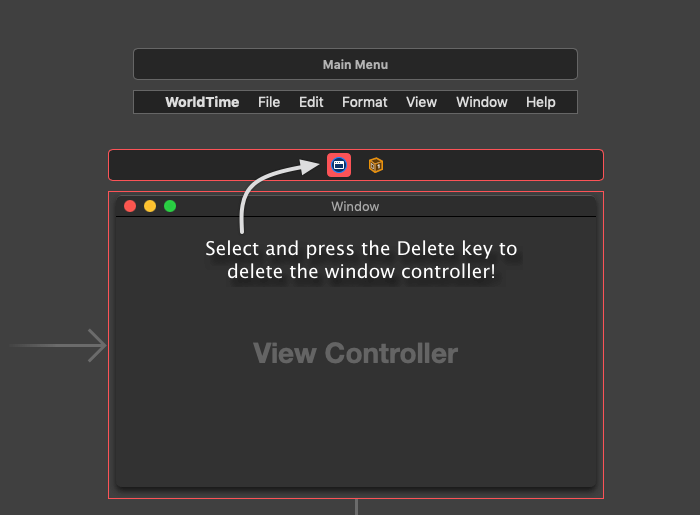
Time to get rid of the app’s window so open the Main.storyboard file. You will find in the storyboard the main menu of the app (we’ll deal with it right next), the window controller and the default view controller that’s connected to the window controller. This is the default configuration made by Xcode when creating a new macOS application.
To avoid having the window appearing when the app is launched, select the window controller and press the Delete key on your keyboard. Make sure to delete the window controller only and not the view controller; we’ll need it later.
Run the app again; the app’s window won’t be presented any more and that’s great! Our app starts to look like a status bar app even though it does nothing at all yet.
Dealing With The Main Menu
Even though the app’s window is not being presented any more since there’s no window controller, there is also another thing we don’t want to keep when making an agent app. That is the main menu. The easy solution is to delete it in the storyboard just like we did with the window controller.
However that’s not totally desirable here and let me explain why. Our goal is to make a status bar app which presents a menu with options, as well as a custom view with time and date information when the app’s status item gets clicked. So, we need a menu no matter what. If we delete the main menu entirely then we’ll have to create one from scratch either in storyboard, or programmatically in the AppDelegate class. Why, in that case, not to delete the menu items we don’t really need from the main menu, and keep only the first menu item (titled “WorldTime”) which we can customize according to our needs? In addition, we’ll get a few functionalities for free, such as quitting the application or showing the About window. Small details, but they can help to save some time. I have to repeat though that it’s not wrong to totally delete the main menu and create another one from scratch.
Note: You are advised to read this previous post on how to work with menus on macOS apps if you haven’t done so. It will help you feel more comfortable with menus here.
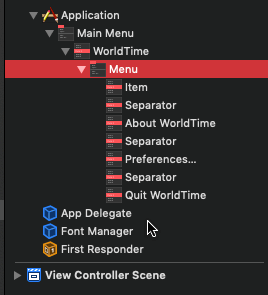
Following the approach of not deleting the main menu entirely, open the Document Outline, expand the Main Menu object and:
- Select the File menu item.
- Press and hold the Shift key.
- Click on the Help menu item so all items from File to Help are being selected.
- Press Delete on the keyboard.
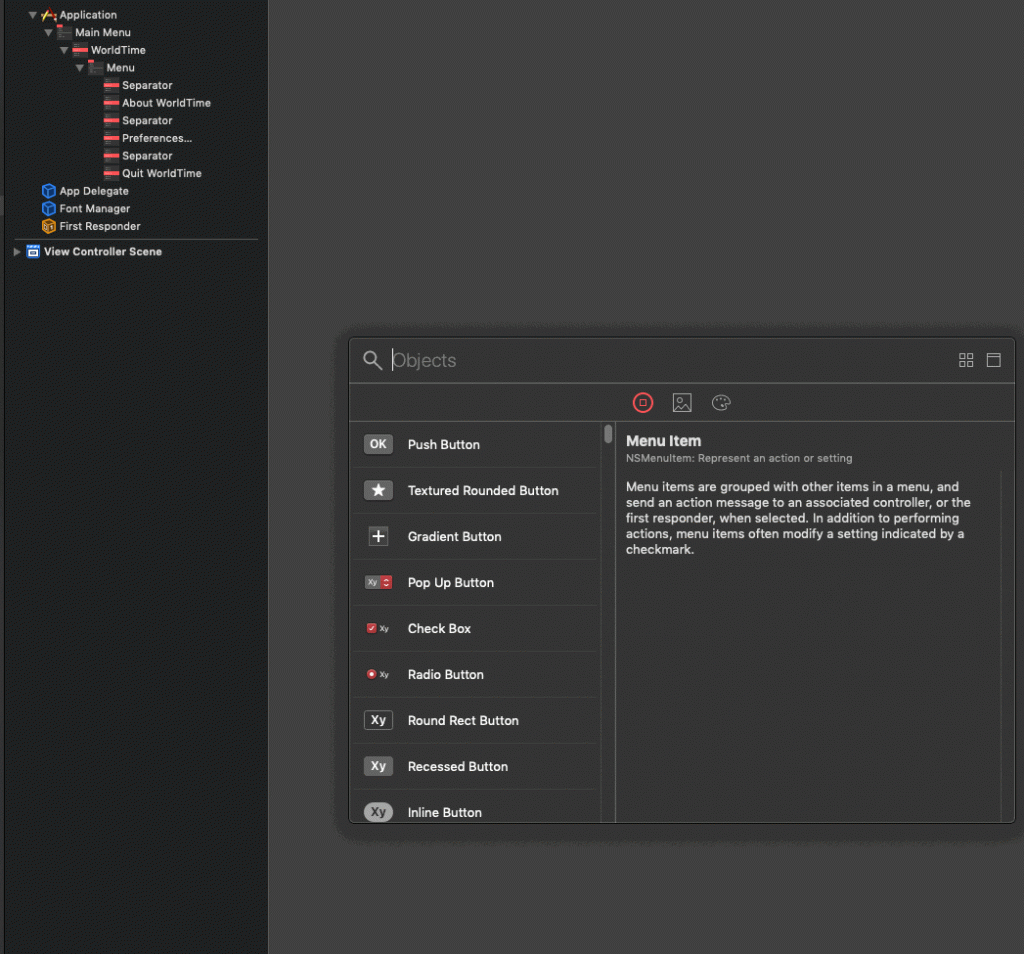
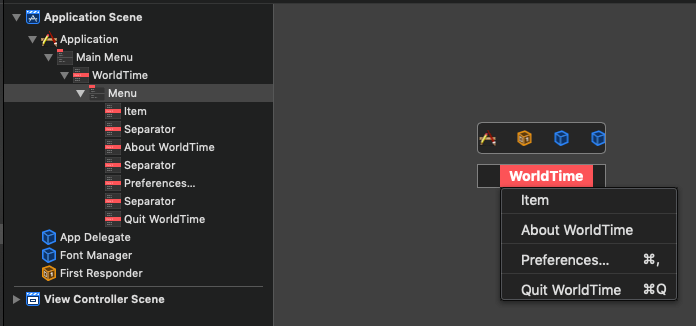
Now, click on the remaining “WorldTime” menu item to expand it. Delete all sub-items, but make sure to keep the following with separators between them:
- About WorldTime
- Preferences…
- Quit WorldTime
In Xcode’s toolbar, click on the plus button to open the objects Library. Search for the “menu” term. From the listed objects, drag and drop a menu item object as the first item in the WorldTime menu.
If you did not keep enough menu separators while deleting unnecessary items, repeat the above steps and drag and drop a menu separator between the menu item you just added and the About WorldTime option. In the end, you should have the following menu:
Connecting The Menu And The Status Item
At this point we have a menu pretty much ready to be used. Now, we have to connect it to the status item that we created earlier in the AppDelegate class.
Switch for a moment to the AppDelegate.swift file. Go to the top of the class and declare the next two IBOutlet properties:
@IBOutlet weak var menu: NSMenu?
@IBOutlet weak var firstMenuItem: NSMenuItem?
Back to the Main.storyboard file again where we need to connect the WorldItem menu and the new menu item we added previously to the IBOutlet properties we just declared. Follow these steps:
- Select the App Delegate object in the Document Outline.
- Press and hold the Ctrl key.
- Drag and drop to the Main Menu object.
- In the small popup window, select the menu outlet property to make the connection.
Repeat the same process but this time target to the Item menu item:
- Select the App Delegate object in the Document Outline.
- Press and hold the Ctrl key.
- Drag and drop to the Item menu item.
- In the small popup window, select the firstMenuItem outlet property.
Now we can programmatically access both the main menu and its first item. For now forget about the first menu item, we’ll deal with it in a while. We’ll focus on the main menu only.
Open the AppDelegate.swift file again where we’ll set the main menu of the app as the menu that should appear when the status item is clicked. Go to the awakeFromNib() method and add the next lines:
override func awakeFromNib() {
    ...

    if let menu = menu {
        statusItem?.menu = menu
    }
}
What we do here is to assign the menu property which is connected to the main menu to the menu property of the statusItem object. This is all we need in order to specify which menu the status item should display when opened. In case you create your own menus either in the storyboard file or programmatically, this is where you will eventually end up; to assign your menu to the menu property of the status item object.
Now run the app again. You will see that when you click on the WorldTime item in the status bar the menu will show up! In addition, the About and Quit menu items will be working. Congratulations!
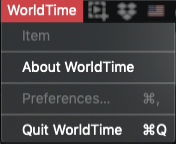
You might find bothering the fact that the first menu item just says “Item”, or that the Preferences option is grayed out. Don’t worry about them. Pretty soon we will replace the “Item” menu item with a custom view that will show date and time information for a time zone, and a bit later we will create a Preferences window which will be connected to the respective menu item so it won’t be disabled any longer.
Replacing The Item’s Title With An Image
Currently our app’s status item displays the “WorldTime” title, but it doesn’t look so great and it’s definitely not in harmony with the rest of the status bar items. So, let’s replace that title with an image and make our app look even cooler!
If you open the Assets catalog you will find an image named “clock”. This is the image we’ll use with our status item. The image’s size is 18x18px and 36x36px at 1x and 2x respectively.
In the AppDelegate go to the awakeFromNib() method and comment out or delete this line:
// Comment out the next line.
// statusItem?.button?.title = "WorldTime"
Then add the next three lines:
let itemImage = NSImage(named: "clock")
itemImage?.isTemplate = true
statusItem?.button?.image = itemImage
At first we load the image from the assets catalog to the itemImage object. By setting isTemplate to true we make sure that this image is used as a template and the system will handle it appropriately so it looks like any other icon in the status bar. In case you’re using a coloured image then note that this setting will remove its colour, so omit it if you want to keep your icons as they originally are. In the end, we assign the image object to the image property of the item’s button.
Run again the app and you’ll see that our status item is using the image we just set instead of the title we previously had.

The Custom View
So far so good since we managed to convert our macOS app to an agent app with a status bar item that’s using an image and displays a menu. However there’s no real functionality yet, so let’s prepare the custom view that will be showing time and date information about a selected time zone.
This custom view is the DateTimeView which can be found implemented in the DateTimeView.swift file. You will also find its counterpart, the DateTimeView.xib that contains the user interface (UI) of the view. Actually, the user interface is quite simple as it is parted by a bunch of labels which are already connected to the respective IBOutlet properties in the DateTimeView class.
Before we continue to the implementation of our demo app, let’s focus a bit on the DateTimeView class and on a few key points regarding its functionality. Let’s start from the init(frame:) initializer, which loads the user interface from the XIB file using the load(fromNIBNamed:) method. That method is defined in the LoadableView protocol and has a default implementation in the protocol’s extension in the LoadableView.swift file. The LoadableView protocol contains two methods: One for loading the contents of a XIB file and one that adds a view as a subview to another by setting the necessary layout constraints as well (we’re going to use it later).
LoadableView protocol has been presented on a previous tutorial. Take a look at it to find out more as well as how to create custom views and use Cocoa controls on macOS.The heart of this class is the showDateAndTimeInfo() method which uses a date formatter object in order to convert the current date, time and timezone to string values that are populated to the matching labels. What’s interesting here is that the displayed date and time information regards a timezone identifier that the user will be able to select through the Preferences window (we will create it later). That preferred timezone ID is read from the User Preferences and is stored to the preferredTimezoneID property. If no such data exists in the User Preferences (because the app is being used for first time and the user has not selected a preferred timezone identifier), then the preferredTimezoneID remains nil and the current timezone is used to display data for.
knownTimeZoneIdentifiers property of the TimeZone class. You’ll see that this property is used later when we’ll be preparing the Preferences window. Find out more here.The showDateAndTimeInfo() method is not called by the initializer method mentioned previously, but it is invoked from a timer initialized in another method called startTimer(). That timer works repeatedly every one second whenever the DateTimeView becomes visible, so the displayed time indication is being refreshed in real time. The timer stops in the stopTimer() method.
With these few words in mind about the DateTimeView class, there are two things that need to be done. The first one is to initialize an instance of this class and display it in the place of the “Item” menu item. The second is to call the startTimer() and stopTimer() methods when the app’s menu is opening and closing respectively.
Displaying The Custom View
It might sounds like a tricky task to display the DateTimeView view to the status item’s menu, but as you’ll see here is really easy actually. Open the AppDelegate.swift file and go to the top of the class. There, declare the following property:
var dateTimeView: DateTimeView?The dateTimeView property will keep an instance of the DateTimeView class. It has to be a class property because we’ll need access to that instance in more than one methods.
Now, go to the awakeFromNib() method again. Add the following lines to the end:
override func awakeFromNib() {
    ...

    if let item = firstMenuItem {
        dateTimeView = DateTimeView(frame: NSRect(x: 0.0, y: 0.0, width: 250.0, height: 170.0))
        item.view = dateTimeView
    }
}
At first we initialize a DateTimeView instance providing the desired size for it (250x170px). The initialized instance is assigned to the dateTimeView property. The last line is the one that makes the view appear in the first menu item; we just assign the custom view instance to the view property that the menu item has.
Run the app and click to open the app’s status item. The custom view will appear as the first item of the menu!
However no real values are displayed in it. Why? Because the startTimer() method in the DateTimeView was never called and the date and time values were never populated to the matching labels. Let’s fix that.
Starting And Stopping The Timer
As I explained earlier, the startTimer() method initializes and fires a timer which runs every one second, and on each repetition it’s calling the showDateAndTimeInfo() method of the DateTimeView. The showDateAndTimeInfo() is the one that reads the current date, and it creates and populates the values to the proper labels.
What we want is to make the timer run every time the view is appearing, or in other words to start it when the app status item’s menu is opening. Respectively, when the menu is closing we want the timer to stop from running.
There are delegate methods that we can use in order to know when the menu is opening and closing. It’s necessary though to set the AppDelegate class as the menu’s delegate first. To do so, find the following condition in the awakeFromNib() method:
if let menu = menu {
    statusItem?.menu = menu
}
Inside the if let statement add the following line which enables the AppDelegate to receive messages from the item’s menu delegate:
if let menu = menu {
    statusItem?.menu = menu

    // Add this line...
    menu.delegate = self
}
Now, go after the AppDelegate‘s closing (a couple of lines after its closing curly bracket), and add this extension:
extension AppDelegate: NSMenuDelegate {

}
The first delegate method that we’ll implement here is called when the menu is about to open:
func menuWillOpen(_ menu: NSMenu) {

}
In it we’ll call the startTimer() method through the DateTimeView instance that we keep in the dateTimeView property:
func menuWillOpen(_ menu: NSMenu) {
    dateTimeView?.startTimer()
}
The other delegate method we need to call is shown right below. In accordance to what we just did, we will call the stopTimer() method in it so the timer that is running to be stopped when the menu gets closed.
func menuDidClose(_ menu: NSMenu) {
    dateTimeView?.stopTimer()
}
Here’s the extension as one piece:
extension AppDelegate: NSMenuDelegate {
    func menuWillOpen(_ menu: NSMenu) {
        dateTimeView?.startTimer()
    }


    func menuDidClose(_ menu: NSMenu) {
        dateTimeView?.stopTimer()
    }
}
If you run the app again now you will see that instead of the default label titles there are the actual date and time values! Great!
What you see is the date and time matching to your local timezone. Right next we’ll focus on displaying the preferences window where we’ll make it possible to choose another timezone identifier, and therefore display the date and time details for any selected timezone.
Presenting Preferences
The preferences that our status bar app will present are going to exist in a standalone window that will appear on the screen every time the respective option is selected. The preferences functionality and the user interface already exist in the starter WorldTime project, and you can find them in the PreferencesView.swift and PreferencesView.xib respectively. Similarly to the DateTimeView we met previously, PreferencesView is a view object too and it also conforms to the custom LoadableView protocol in order to load the user interface from the XIB file.
Preferences view is composed by a popup button and two push buttons:
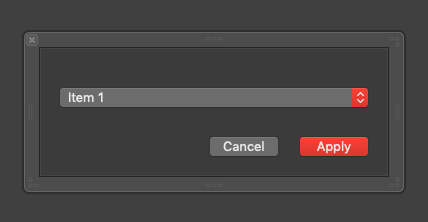
The popup button is populated with all the available timezone identifiers that are taken as a collection of String values using the knownTimeZoneIdentifiers class property of the TimeZone class. You can find this in the PreferencesView.swift file in the populateTimezoneIDs() method.
The two push buttons are used to save the selected timezone identifier, and to cancel setting a preference. When the Apply button is clicked, the selected preference is saved to the User Preferences dictionary of the app. Even though I’m not a fan of the User Preferences dictionary, using it is just fine for the purposes of this tutorial.
What you might find interesting as a general knowledge on macOS programming and beyond the status bar apps is how the preferences window is being dismissed. Take a look at the dismissPreferences(_:) IBAction method; there’s just one line:
self.window?.performClose(self)Keep the above as a quick technique to dismiss windows programmatically. self refers to the view object, so if you use the above in a view controller and not in a view subclass make sure to replace self with the view property of the view controller:
// Replace "self" with "view" when using the above in view controller subclasses.
view.window?.performClose(self)
Generally speaking, keep in mind that you can access the window object of a view controller through its view property as shown above.
Preparing The Preferences View Controller
Having said the above, it’s about time to make use of the PreferencesView and eventually present the Preferences window. Let’s start from the Main.storyboard file, where, if you remember, we had deleted the default window controller but not the view controller object. We kept it because we’re going to use it now.
Select the View Controller object (the one with circular blue and white icon) either in the Document Outline, or in the canvas directly, and then open the Identity inspector. In the Storyboard ID field set the preferencesID value. We do that so we can refer to the view controller programmatically and load it from the storyboard. We’ll use the storyboard ID in a while.
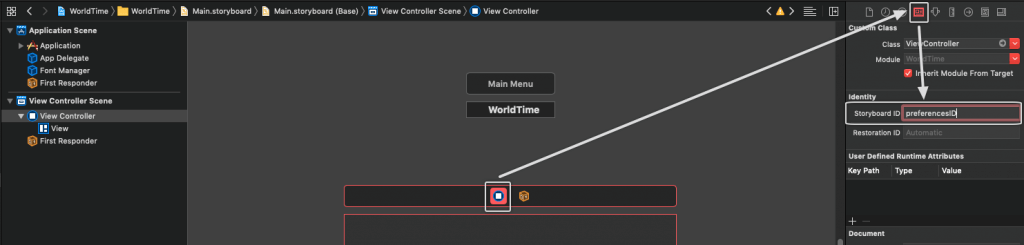
Then show the Attributes inspector and set the Select Timezone as the value of the Title field. This is what the Preferences window will display as its title.
Finally, click to the view controller’s view and then show the Size inspector. Set the view’s width and height to 350px and 130px respectively.
Open the ViewController.swift file now. There are two things to do here: The first one is to load and add the PreferencesView as a subview to the view controller’s view. The second is to perform some configuration to the window that will contain the view controller so it is always displayed centered and it disables the resize and minimize buttons.
Starting from the latter, it’s quite probable that the following lines are going to be proved useful to you in other applications as well, so keep them too as a general knowledge on macOS programming. Here’s what they do in order of appearance:
- Disable the resize button of the window.
- Disable the minimize button of the window.
- Force the window to center itself on the screen.
Copy and paste the following in the ViewController class:
override func viewWillAppear() {
    super.viewWillAppear()

    view.window?.styleMask.remove(.resizable)
    view.window?.styleMask.remove(.miniaturizable)
    view.window?.center()
}center() method: “The window is placed exactly in the center horizontally and somewhat above center vertically”. Find out more here.Notice that we’re overriding the viewWillAppear() method in order to perform any UI tasks; at that point it’s certain that the view has been initialized and any configuration to it or its window will actually apply. Besides that, see once again that we access the window object through the view property of the view controller.
Let’s initialize and add the PreferenceView now. Add the next lines to the viewWillAppear() method:
override func viewWillAppear() {
    ...

    let preferencesView = PreferencesView(frame: self.view.bounds)
    preferencesView.add(toView: self.view)
}
At first we initialize the PreferencesView by making its frame equal to the view controller’s view bounds. Then we add it to the view as a subview. The add(toView:) method is part of the LoadableView protocol, so open the respective file to see its implementation. Not only it adds a view as a subview to the one given as an argument, but it also sets the necessary layout constraints.
That’s all we had to do in the ViewController class, since the PreferencesView class is already implemented. Let’s go now to the most interesting part, how to show the Preferences window from our app’s status item’s menu.
Presenting The Preferences View Controller
Open the AppDelegate.swift file and in the AppDelegate class add the following IBAction method definition:
@IBAction func showPreferences(_ sender: Any) {

}
Now, head to the Main.storyboard file where we’ll connect the Preferences menu option to the above method. In the Document Outline, click to select the Preferences… menu item. Then, by having the Ctrl key pressed, drag and drop towards the Delegate object. In the small black window that shows up, select the showPreferences: option.
Back in the AppDelegate.swift file again and in the showPreferences(_:) IBAction method specifically, the first thing we need to do is to load the ViewController from the storyboard. This is where we’re going to use the storyboard ID that we specified earlier. The way to instantiate a view controller from a XIB file programmatically is shown right next; it’s a technique we have already seen in previous macOS tutorials too:
@IBAction func showPreferences(_ sender: Any) {
    let storyboard = NSStoryboard(name: "Main", bundle: nil)
    guard let vc = storyboard.instantiateController(withIdentifier: .init(stringLiteral: "preferencesID")) as? ViewController else { return }
}
With the view controller instance available we need to create a window that will “host” it. Once we do so, we can display it. Here it is:
@IBAction func showPreferences(_ sender: Any) {
    ...

    let window = NSWindow(contentViewController: vc)
    window.makeKeyAndOrderFront(nil)
}
The first line above creates a new NSWindow instance and sets the instantiated view controller as its content view controller. There are other initializers that can be used in order to initialize a window object, but in this case this is the most convenient one.
The second line not only presents the window, but it makes it the primary window (the system gives the focus to it) and it orders it in front, meaning above all other windows on screen. The few bits of configuration we previously did in the viewWillAppear() method of the ViewController class will apply to the window instance we just created.
So, that’s it! Now you know how to present a view controller from a status bar app. Run the demo app and click on the Preferences menu option. If you followed step by step up until here, then you’ll see the Preferences window and you will be able to select a different timezone.

The next part of the tutorial focuses on how to create a status bar app that displays a popover instead of a menu, and it shows a better configuration and implementation approach which doesn’t add unnecessary content to the App Delegate (apart maybe from a single property). If what you learnt so far covers you, then it’s okay to stop reading here. On the other hand, if you’re still hungry to know more, then just keep reading!
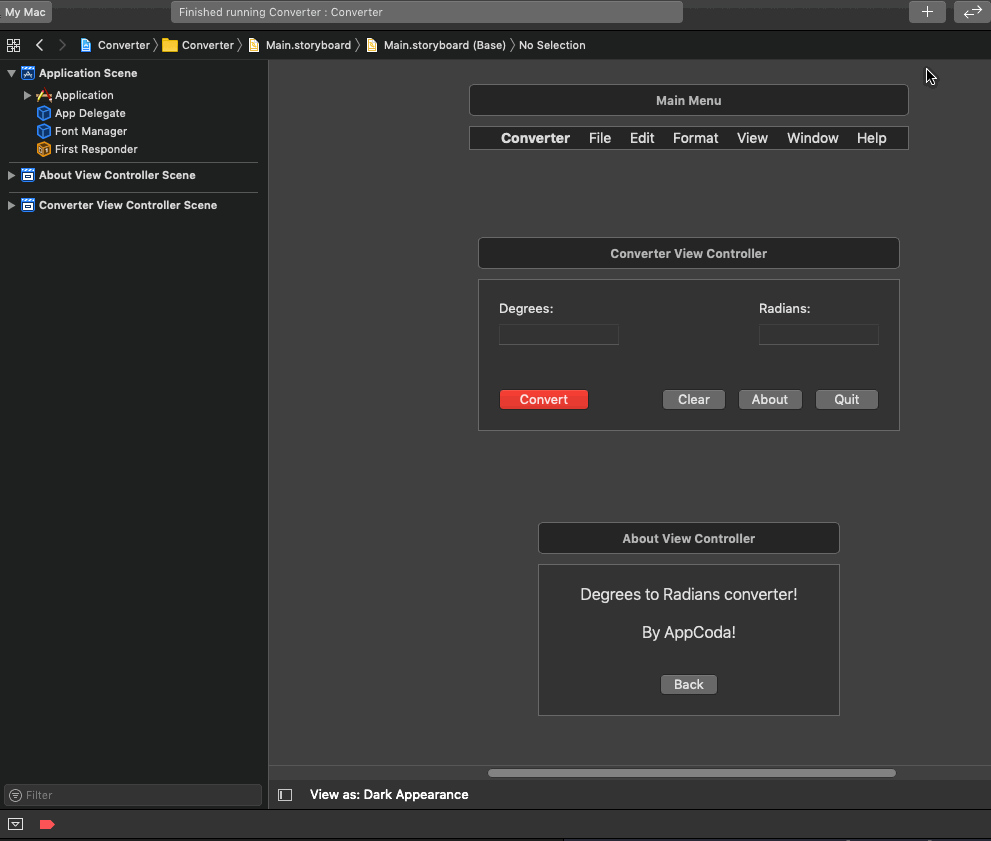
The Converter Demo App
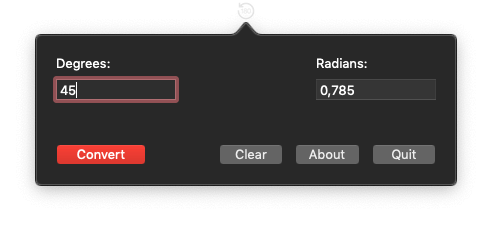
The second app that we’ll work on to demonstrate how to create a status bar app that uses a popover is called Converter. Its purpose is to convert degrees to radians or radians to degrees. You can see how it looks like in the following image:
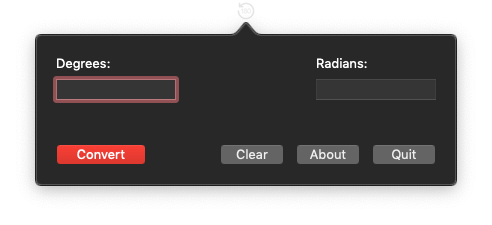
As you can see, it contains two text fields for entering the degrees and radians values and four buttons. Starting from left to right, the Convert button triggers the actual conversion. Note that if the degrees text field has a value, then this is what is being converted. If degrees is empty but the radians text field has a value, then this is what is converted into degrees.
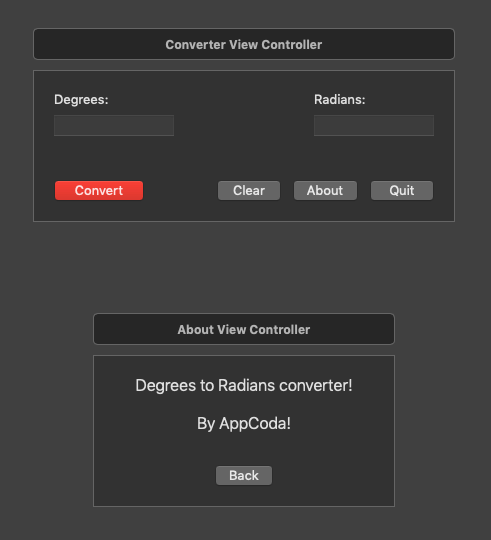
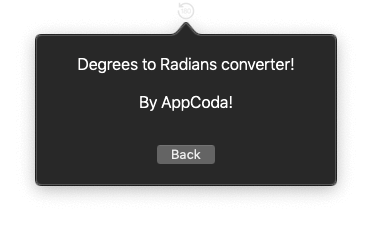
Next, it’s the Clear button which simply clears the text fields from any values. Most interesting is the third button called About, which displays a custom About view controller contained in the popover:

Finally, the Quit button is obviously there for… quitting the application.
An additional goal apart from just preparing the app so it displays the popover when the status item gets clicked, is to also see how to change the content view controller of the popover. That’s why the About view controller exists for.
Start Preparing The Converter App
To begin, download the Converter starter project and unzip it. Once you do so, open it in Xcode. The majority of the implementation regarding the view controllers that we will present has already been done. What’s left out of it is any functionality that has to do with the popover.
The two view controllers that we will use are the ConverterViewController and the AboutViewController, and the respective files contain their implementations. Notice that the default ViewController.swift file that Xcode creates on any new project does not exist because we don’t need it, so it’s already been deleted. Already created you will also find the user interfaces in the Main.storyboard file.
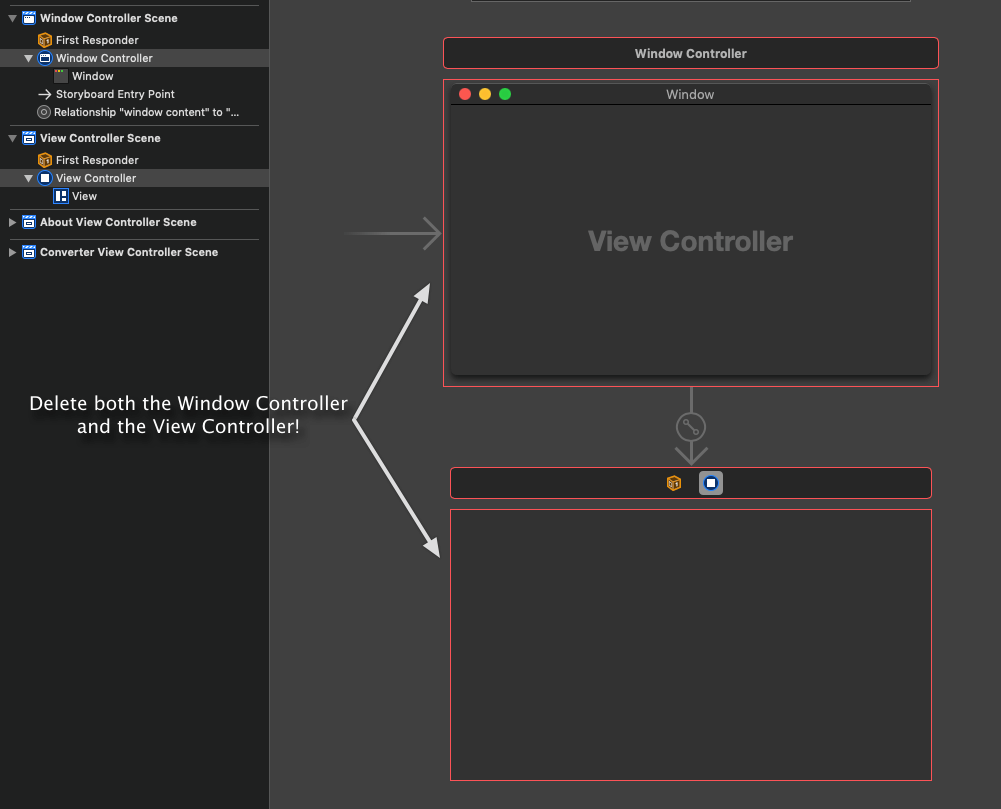
You will find the first actions we will make here familiar, as we’ve already seen them in the WorldTime demo application. Open the Main.storyboard file and delete both the window controller and the view controller that’s connected to it.
Regarding the main menu you have to options: Either to entirely delete it, or to leave it as is because it’s not going to appear anyway. As a hint, when you have controls like our text fields where you want to provide system default functionalities using keyboard shortcuts (ex. Undo, Copy, Paste, and so on), then it’s recommended to keep the main menu, or at least the Edit menu, because you’ll get them all for free. If you choose to delete, then you will have to implement the keyboard shortcut actions you want to provide.
Open now the Info.plist file where we’ll add the necessary entry that will mark our app as an agent app. This is also what makes the main menu from not being displayed at all. Select the last row in the file, and go to the Editor > Add Item menu, or click on the small plus button shown on the row. Set the Application is agent (UIElement) as the key, and YES as the value to the new entry. Save your file by pressing Cmd+S.
There’s nothing new in our steps so far, because the above are necessary actions for any status bar application. Now, given that we won’t display a menu but a popover when the status item gets clicked, it’s about time to start exploring new things.
The Status Item Manager Class
Previously in the WorldTime demo application we used the AppDelegate class in order to initialize and configure the status item, as well as to handle all actions and delegate methods. But as I’ve said quite a few times already, this is not going to be the case here. We are going to keep the AppDelegate empty, and our entire work regarding the status item will take place in a separate class which we’ll call StatusItemManager.
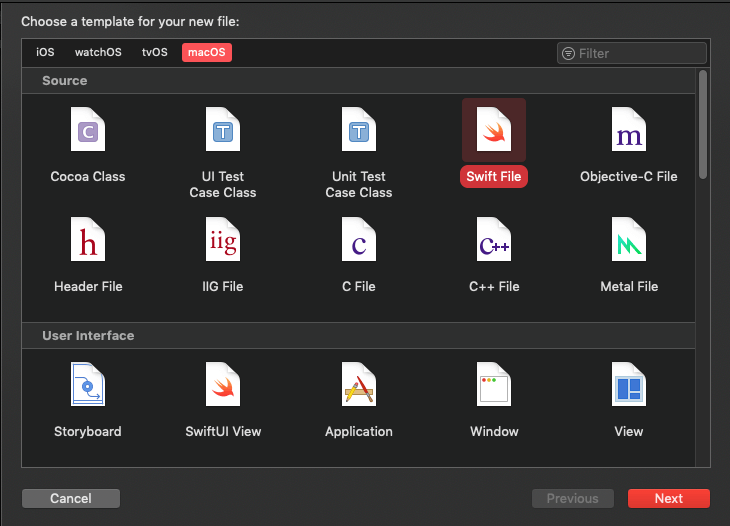
In order to do that, we need a new file. Open the File > New > File… menu option in Xcode, or simply press Cmd+N to start creating a new file. Make sure to select macOS and the Swift File as the template:
Name the new file StatusItemManager and get finished with its creation. Once you have it in front of you in Xcode replace this line:
import Foundationwith this:
import CocoaThat’s necessary so we can have access to Cocoa controls, such as the view controllers that our app will be displaying. Now, define the following class and make it a subclass of the NSObject:
class StatusItemManager: NSObject {

}
Creating The Popover And The Status Item
With the StatusItemManager class ready to be implemented, add the following three properties:
var statusItem: NSStatusItem?

var popover: NSPopover?

var converterVC: ConverterViewController?
The first one is the status item object which we are going to initialize and configure right next. The second property is the popover which we’ll also initialize here. Finally, the third property will keep the ConverterViewController instance once it’s loaded from the storyboard. We’ll deal with it in a while.
Let’s implement now the following method which initializes the status item and sets an image to its button (you’ll find the “degrees” image in the Assets catalog):
fileprivate func initStatusItem() {
    statusItem = NSStatusBar.system.statusItem(withLength: NSStatusItem.variableLength)
    let itemImage = NSImage(named: "degrees")
    itemImage?.isTemplate = true
    statusItem?.button?.image = itemImage
}
What we just did is something we had also done in the AppDelegate class in the WorldTime demo app. However, this is not enough. We must specifically “tell” to item object what it should do when it is clicked, or in other words to specify a method that should be called when users click on it. There was no need to do so in the WorldTime app because we had assigned a menu to the item, and displaying that menu was the default, automatic action defined by the system.
So, complete the method implementation with the following two lines:
fileprivate func initStatusItem() {
    ...

    statusItem?.button?.target = self
    statusItem?.button?.action = #selector(showConverterVC)
}
The first line sets the instance of the StatusItemManager class as the object where the target method will be found in. The second line specifies the action method that should be called when the status item is clicked. This is the showConverterVC method which doesn’t exist yet. At the moment, let’s just define it and we’ll implement it in a while:
@objc fileprivate func showConverterVC() {

}
The initStatusItem() method is now complete. It initializes the status item object, it sets the image that will be displayed in the status bar, and it specifies the method to call when it’s clicked. Now, let’s initialize the popover object in a new method:
fileprivate func initPopover() {
    popover = NSPopover()
}
Along with the popover initialization, we should also specify when it should become hidden, or to rephrase that, to specify its behavior. Most of the times the desirable behavior is to hide the popover when users click anywhere outside of it. This is what we want for the demo application here as well, and in order to achieve that we need one more line in the above method:
fileprivate func initPopover() {
    popover = NSPopover()

    // Specify the popover's behavior.
    popover?.behavior = .transient
}
The transient value makes the popover to close when users click anywhere else on the screen but not on the popover’s area. If you want to keep the popover visible and make it disappear only through some action in your app, then you can use the applicationDefined value.
behavior property of the popover here and here. If you use the applicationDefined value as the popover’s behavior, don’t forget to manually close it when users perform a relevant action by calling the close() method through the popover property.Initializing The StatusItemManager
I’ll show you two ways to initialize an object of the StatusItemManager class; programmatically and using the storyboard file. I will start with the programmatic approach, and for that we’ll need to implement the following initializer in our class:
override init() {
    super.init()

    initStatusItem()
    initPopover()
}
As you can see, we call the two methods we implemented right above in order to initialize the status item and the popover.
Now, switch to the AppDelegate.swift file and declare the following property in the AppDelegate class:
var statusItemManager: StatusItemManager!In the applicationDidFinishLaunching(_:) method initialize it:
func applicationDidFinishLaunching(_ aNotification: Notification) {
    statusItemManager = StatusItemManager()
}
It’s important to declare the statusItemManager as a class property because we will need to access it out of the AppDelegate as you will see later. If you run the app at this point you’ll see only the status item’s image, but nothing will happen when you’ll tap on it; remember that the action method called showConverterVC() is defined but not implemented yet.
In order to apply the second approach for initializing a StatusItemManager object you have to comment out or delete the additions we just made to the AppDelegate class. Instead of them, declare the following IBoutlet property only (we are still in the AppDelegate.swift file):
@IBOutlet weak var statusItemManager: StatusItemManager!Now open the Main.storyboard file and in the Document Outline expand the Application Scene object.
Then:
- Click on the Plus button in Xcode’s toolbar to open the objects library.
- Type the word “object” to search for an object.
- Select the row titled “Object” with the blue cube in it.
- Drag and drop it in the list of objects under the Application Scene, below the First Responder.
With the new object selected, open the Identity inspector and set the StatusItemManager as the value of the Class field under the Custom Class section.
Every time the app will run from now on this object will be a StatusItemManager instance. On top of that, we marked the StatusItemManager class as a NSObject subclass exactly just for that; to manage to set the StatusItemManager custom type as the object’s type. Objects in Interface Builder have to inherit from the NSObject class.
There’s one last step to do in the storyboard and that is to connect the new object to the statusItemManager IBOutlet property of the AppDelegate. That’s necessary so we can access it programmatically later.
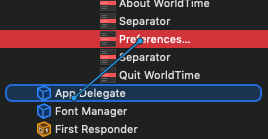
Select the AppDelegate object and by pressing the Ctrl key, drag and drop to the StatusItemManager object. In the small popup window that will appear, select the statusItemManager outlet.
Finally, go back to the StatusItemManager.swift file. It’s required to override the awakeFromNib() which will be called by the object we just added to the storyboard. This is the place where we’ll call the two methods that initialize the status item and the popover:
override func awakeFromNib() {
    super.awakeFromNib()

    initStatusItem()
    initPopover()
}
Presenting The Converter View Controller
Just a few moments earlier we defined the showConverterVC() method in the statusItemManager class, and we set it as the action method that will be called every time the status item of the app is clicked. There are three things that we want to achieve in this method:
- To instantiate a
ConverterViewControllerobject and assign it in theconverterVCproperty in case this hasn’t happened already. - To set the converter view controller as the content view controller of the popover.
- To show the popover.
We’ll start by making sure that the following are not nil:
@objc func showConverterVC() {
    guard let popover = popover, let button = statusItem?.button else { return }
}
The above ensures that the method execution won’t continue if for any reason the popover or the status item button have not been initialized. You’ll understand pretty soon why we need the item’s button.
Next, we’ll check if the value of the converterVC property is nil or not. Obviously, this property is going to be nil before the first time the popover will show up because there is no instance of the converter view controller. However, in subsequent appearances of the popover there’s no reason to instantiate again and again new objects of the same view controller; that’s why we’ll keep it in the converterVC property.
@objc func showConverterVC() {
    ...

    if converterVC == nil {
        let storyboard = NSStoryboard(name: "Main", bundle: nil)
        guard let vc = storyboard.instantiateController(withIdentifier: .init(stringLiteral: "converterID")) as? ConverterViewController else { return }
        converterVC = vc
    }
}
We have already seen the above technique for instantiating a view controller from the storyboard while we were making the WorldTime demo application, and we met it in previous tutorials too. Once we load and initialize an instance of the ConverterViewController class from the storyboard, we assign it in the converterVC property. An additional reason we keep the view controller in that property is the About view controller that our app will also display; we will allow users to return to the point that they had left off when the About view controller appeared.
The next step is to assign the converter view controller as the content view controller of the popover:
@objc func showConverterVC() {
    ...

    popover.contentViewController = converterVC
}
Finally, let’s show the popover:
@objc func showConverterVC() {
    ...

    popover.show(relativeTo: button.bounds, of: button, preferredEdge: .minY)
}
You can see that this method requires a frame and a view to be provided in order to display the popover properly, as well as the edge of the view that the popover will point to. We want the popover to point to our item (more specifically to the bottom side of the item’s button), that’s why we provide the button as the anchor view. The minY edge means the side with the lowest Y value, which in macOS is the bottom side.
The showConverterVC() method is now complete. Run the app and click to the status item; you’ll see the popover showing up for the first time and presenting the converter view controller. You are ready to make real conversions!
Presenting The About View Controller
All the previous discussion about the Converter demo application is all you need to know in case you’re planning to show only one view controller in the popover. However, there will be cases where you’ll want to present more than one view controllers to the popover, and this is what we’re going to see in this part.
Note: In case you want to present view controllers in standalone windows and not in the popover, then see how we did it in the WorldTime app. The same technique to load the view controller, create a window and present it with the view controller applies in status bar apps with popovers too.
So, our goal here is to change the content view controller of the popover and to show the custom About view controller. To get started, we need to add a new method in the StatusItemManager class which will load and initialize an AboutViewController instance from the storyboard. That instance will be set as the content view controller of the popover.
What I just said does not include anything new; we have already seen all necessary steps. Here’s the new method:
func showAbout() {
    guard let popover = popover else { return }

    let storyboard = NSStoryboard(name: "Main", bundle: nil)
    guard let vc = storyboard.instantiateController(withIdentifier: .init(stringLiteral: "aboutID")) as? AboutViewController else { return }

    popover.contentViewController = vc
}
At first we make sure that the popover has been initialized otherwise there’s no reason to proceed. Then, we instantiate an AboutViewController object and finally we assign it to the contentViewController property of the popover.
This method has to be called somehow. We want to present the AboutViewController when the About button is clicked in the ConverterViewController, so open the ConverterViewController.swift file and go to the showAbout(_:) IBAction method.
Currently that method is empty, but the missing logic is what we’re just about to add. What we want to do here is pretty simple: We need to access the running instance of the StatusItemManager and call the showAbout() method we implemented there. But how will we do that?
If you remember, the AppDelegate class contains the statusItemManager property, either this is a normal class property or an IBOutlet property. It doesn’t really matter how you chose to initialize the StatusItemManager instance (see the Initializing The StatusItemManager part), as long as the AppDelegate contains that property.
Having that in mind, we’ll first access the app delegate, and then through it we’ll access the statusItemManager which we’ll eventually use to call the showAbout() method. In the showAbout(_:) IBAction method now of the ConverterViewController add the following:
@IBAction func showAbout(_ sender: Any) {
    guard let appDelegate = NSApplication.shared.delegate as? AppDelegate, let itemManager = appDelegate.statusItemManager else { return }
    itemManager.showAbout()
}
Accessing the app delegate instance of the app is done using this:
NSApplication.shared.delegate as? AppDelegateThis produces an optional value, so using the guard statement (or an if let statement alternatively) is pretty much mandatory so we are safe. Also, the statusItemManager is an optional value too, so the:
let itemManager = appDelegate.statusItemManagerstatement ensures that the property we want to use is not nil.
By having unwrapped the statusItemManager property to the itemManager constant, we call the showAbout() of the StatusItemManager class and therefore present the About view controller.
Run the app now and click on the About button; you will see the About view controller appears in the popover. Moreover, the popover will adapt to the view controller’s view size which is smaller than the converter’s view:
Dismissing The About VC And Returning To Converter
Even though we successfully managed to present the About view controller, we cannot return to the converter because the Back button doesn’t work yet. There are some missing pieces that will allow us to dismiss this view controller and show the previous one again.
Go to the StatusItemManager.swift file where we’ll add the following method:
func hideAbout() {
    guard let popover = popover else { return }
    popover.contentViewController?.dismiss(nil)
    showConverterVC()
}
Once we make the necessary check that the popover is not nil by unwrapping it in the guard statement, we dismiss its content view controller; that is the About view controller. Then, we call the showConverterVC() method which will assign the previously loaded instance of the ConverterViewController to the popover’s content and it will eventually present it again.
Open the AboutViewController.swift file now and head to the dismissAbout(_:) IBAction method. Similarly to what we previously did, we’ll first access the app delegate instance of the app, and through it we’ll use the statusItemManager property in order to call the hideAbout() method. Update the IBAction method as shown next:
@IBAction func dismissAbout(_ sender: Any) {
    guard let appDelegate = NSApplication.shared.delegate as? AppDelegate, let itemManager = appDelegate.statusItemManager else { return }
    itemManager.hideAbout()
}
If you run the app now the Back button in the About view controller will be perfectly working!
A Small Visual Improvement
The Converter status bar app is ready, but still there’s a small improvement we can make on it. If you start switching between the Converter and the About view controllers, you’ll see that the transition from one to another is not quite pleasant to the eye. The popover is resizing and the contained controls in the view controllers are moving accordingly while each view controller is still visible, and that leaves us with a bad taste and the feeling that a harsh action is happening.
We can make this smoother by doing something really simple: To hide the view of the view controller that’s about to disappear, before it gets disappeared.
Let’s start with the showAbout() method in the StatusItemManager.swift file. Right after the guard statement and before the other method contents add the following line:
func showAbout() {
    guard let popover = popover else { return }

    // Add this line to hide the Converter view before the popover gets resized.
    popover.contentViewController?.view.isHidden = true

    ...
}
Next, in the hideAbout() method and once again right after the guard statement, add the exact same command which will make the About view to become hidden before it gets dismissed and the popover gets resized:
func hideAbout() {
    guard let popover = popover else { return }

    // Add this line.
    popover.contentViewController?.view.isHidden = true

    ...
}
Finally, don’t forget to make the Converter’s view visible again at the end of the same method:
func hideAbout() {
    ...

    popover.contentViewController?.view.isHidden = false
}
This line will be executed after the popover will have presented the converter view controller again.
Run one more time and you will see that switching between the view controllers is smoother and not any more hard to the eye.
Conclusion
Coming to the end of this post finally, I hope you found the two sample applications and the today topic interesting and attractive. Even though this ended up being a long tutorial, what you read here is what you need to make status bar apps of any of the two kinds discussed.
Before you start creating such an app, first consider what you want to provide to your users. If you only aim to present just options, or options combined with some sort of informational views (aka custom views that do not require user input) then choose the menu-style app. Otherwise go for the popover solution, especially if you require user input. In any case, the most successful apps combine elements of both, as well as other knowledge on macOS programming.
If you haven’t read the previous tutorials on the macOS programming series then I recommend you to do so, there are lots of interesting stuff to learn. And with that I leave you; take your time to read and play with your own status bar apps, and brainstorm for your next awesome macOS project. Who knows? It might be a status bar app!
For reference, you can find the complete projects here and here.
Credits: Icons by Icons8


