If you’re our long time follower, you know we’ve gone pretty far. By now, you should be able to build an iPhone app with tab bar, navigation controller and table view using Storyboard. One request on the top of my list, however, is to enhance the detail view of the Recipe app. Many readers mentioned the original detail view is too plain. How can we display more information including an image? That shouldn’t be difficult if you understand the materials and I intentionally left out that part for you at the time I wrote the tutorial. 🙂
Did you manage to create your own detail view for the Recipe app? Anyway, we’ll revisit it and show you how to improve the detail screen. But before that, I have to introduce you the basics of Object Oriented Programming. In the next tutorial, we’ll build on top of what we learn in this tutorial and enhance the detail view screen.
Don’t be scared by the term “Object Oriented Programming” or OOP in short. It’s not a new kind of programming language but a programming concept/technique. I intentionally left out the OOP concept when I first began writing the iOS programming tutorials. I want to keep thing simple and show you (even without any programming background) how to create an app. I don’t want to scare you away with technical term. However, I think it’s time to cover the concept. If you’re still around reading this article, I believe you’re determined to learn iOS programming and you want to take your app to the next level.
Okay, let’s get started.
Object Oriented Programming – Some Theory
Objective-C is known as an Object Oriented Programming (OOP) language. OOP is a way of constructing software application composed of objects. In other words, most of the code you’ve written in the app in some ways deal with objects of some kind. UIViewController, UIButton, UINavigationController and UITableView are some of the objects come with the iOS SDK. Not only you’ve used the built-in objects in your iOS app, you’ve created some objects of your own such as RecipeDetailViewController and SimpleTableCell.
So why OOP? One important reason is that we want to decompose a complex software into smaller pieces (or building block) which are easier to develop and manage. Here, the smaller pieces are the objects. Each object has its own responsibility and objects coordinate with each other in order to make the software work. That’s the basic concept of OOP.
Take the Hello World app as an example. The UIViewController object is responsible for the view of the app and as a placeholder for the Hello World button. The UIButton (i.e. Hello World button) object is responsible to display a standard iOS button on screen and listen to any touch events. The UIAlertView object, on the other hand, is responsible to display the alert message to user. Most importantly, all these objects work together to create the Hello World app.
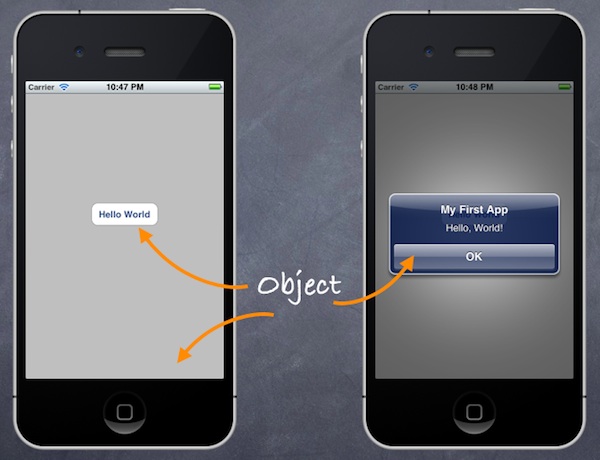
Sample Objects in Hello World App
In Object Oriented Programming, an object shares two characteristics: properties and functionalities. Let’s consider a real world object – Car. A car has its own color, model, top speed, manufacturer, etc. These are the properties of a car. In terms of functionalities, a car should provide basic functions such as accelerate, brake, steering, etc.
If we go back to the iOS world, let’s take a look at the properties and functionalities of the UIButton object in Hello World app:
- Properties – Background, size, color and font are examples of the UIButton properties
- Functionalities – When the button is tapped, it recognizes the tap event and displays an alert message on screen. So “showMessage” is the function of the button.
In our tutorials, you always come across the term “method”. In Objective-C, we create methods to provide the functionalities of an object. Usually a method corresponds to a particular function of an object.
Class, Object and Instance
Other than method and object, you may come across terms like instance and class in OOP. Let me give a brief explanation.
A class is a blueprint or prototype for creating objects. Basically, a class consists of properties and methods. Let’s say we want to define a Course class. A Course class contains properties such as name, course code and max. number of students. This class represents the blueprint of a Course. We can use it to create different courses like iOS Programming course with course code IPC101, Cooking course with course code CC101, etc. Here, the “iOS Programming course” and “Cooking course” are known as the objects of the Course class. Sometimes, we also refer them as instances of the Course class. To keep it simple, you can consider instance as another word for object.
Revisit the Customize Table Cell Tutorial
So why do we cover OOP today? There is no better way to learn programming than showing you an example. Let’s revisit the “Customize Table Cell” tutorial.
In the viewDidLoad method of Table Cell tutorial, we created three arrays to store different types of data: recipe name, thumbnail of the recipe and the preparation time. If you understand the OOP concept, these data can be characterized as the properties of recipe.
- (void)viewDidLoad
{
    [super viewDidLoad];
	// Initialize table data
    tableData = [NSArray arrayWithObjects:@"Egg Benedict", @"Mushroom Risotto", @"Full Breakfast", @"Hamburger", @"Ham and Egg Sandwich", @"Creme Brelee", @"White Chocolate Donut", @"Starbucks Coffee", @"Vegetable Curry", @"Instant Noodle with Egg", @"Noodle with BBQ Pork", @"Japanese Noodle with Pork", @"Green Tea", @"Thai Shrimp Cake", @"Angry Birds Cake", @"Ham and Cheese Panini", nil];

    // Initialize thumbnails
    thumbnails = [NSArray arrayWithObjects:@"egg_benedict.jpg", @"mushroom_risotto.jpg", @"full_breakfast.jpg", @"hamburger.jpg", @"ham_and_egg_sandwich.jpg", @"creme_brelee.jpg", @"white_chocolate_donut.jpg", @"starbucks_coffee.jpg", @"vegetable_curry.jpg", @"instant_noodle_with_egg.jpg", @"noodle_with_bbq_pork.jpg", @"japanese_noodle_with_pork.jpg", @"green_tea.jpg", @"thai_shrimp_cake.jpg", @"angry_birds_cake.jpg", @"ham_and_cheese_panini.jpg", nil];

    // Initialize Preparation Time
    prepTime = [NSArray arrayWithObjects:@"30 min", @"30 min", @"20 min", @"30 min", @"10 min", @"1 hour", @"45 min", @"5 min", @"30 min", @"8 min", @"20 min", @"20 min", @"5 min", @"1.5 hour", @"4 hours", @"10 min", nil];
}
Considered that the name (i.e. tableData), thumbnail (i.e. recipe image) and preparation time (i.e. prepTime) are all related to a recipe, instead of storing these data in separate arrays, it’s better to create a Recipe class to model a recipe.
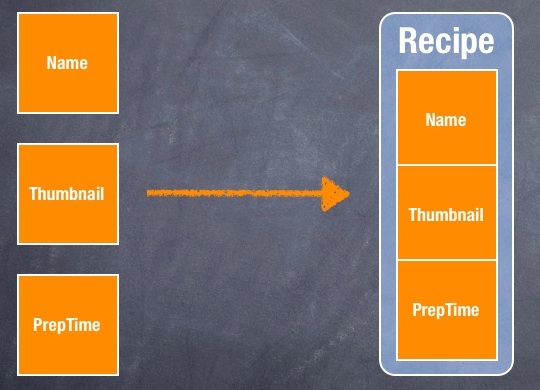
Recipe Class
We’ll revisit the “Customize Table Cell” project and convert it to use the new Recipe class. If you haven’t read the tutorial, check it out here. Or you can download the Xcode project to have a quick start.
Creating the Recipe Class
First, we’ll create the Recipe Class. Right click on SimpleTable folder and select “New File…”. Choose the “Objective-C class” template (under Cocoa Touch) and click “Next”. Name the class as “Recipe” and as a subclass of “NSObject”. Click “Next” and save the file in your Xcode project folder.
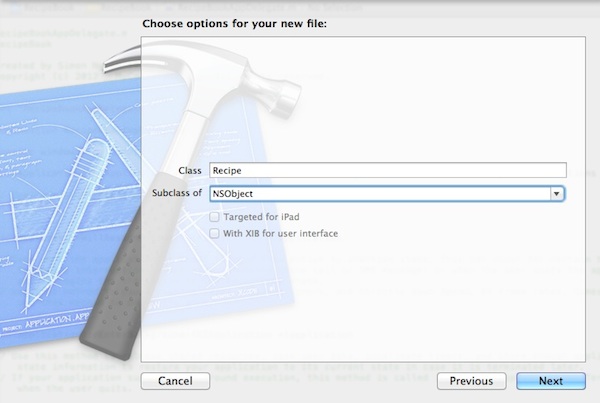
Create the Recipe Class with NSObject as subclass
Once completed, Xcode will create the Recipe.h and Recipe.m files. In the header file, add the properties of the Recipe class:
@interface Recipe : NSObject

@property (nonatomic, strong) NSString *name; // name of recipe
@property (nonatomic, strong) NSString *prepTime; // preparation time
@property (nonatomic, strong) NSString *imageFile; // image filename of recipe

@end
In the implementation file (i.e. Recipe.m), we add the @synthesis directive. The @synthesize directive tells the compiler to generate the setters and getters for accessing the properties we define in the header.
@implementation Recipe

@synthesize name;
@synthesize prepTime;
@synthesize imageFile;

@end
Now we’ve created a Recipe class with three properties. Later we’ll make use of it to instantiate different recipe objects. So how can we convert the arrays into an array of Recipe objects? The three data arrays can be depicted as follows:
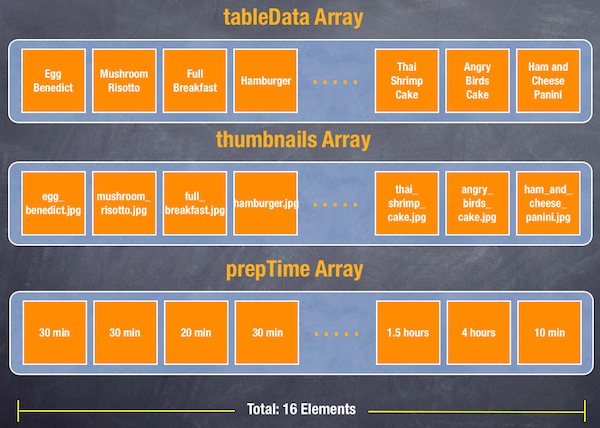
Three Arrays to Store Recipe Name, Thumbnail and Preparation Time
With the new Recipe class, we can turn the arrays into a single array of Recipe objects that each object stores the recipe data.
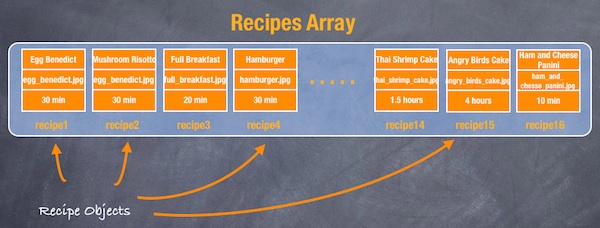
An Array of Recipe Objects
Initialize the Array of Recipe Objects
Back to the coding part. Instead of declaring three arrays (tableData, thumbnails, prepTime), we’ll declare a single variable for the array of recipe objects.
@implementation SimpleTableViewController
{
    NSArray *recipes;
}
In the viewDidLoad method of SimpleTableViewController.m, we initialize the Recipe objects (a total of 16 Recipe objects) and put them into the “recipes” array.
- (void)viewDidLoad
{
    [super viewDidLoad];

    Recipe *recipe1 = [Recipe new];
    recipe1.name = @"Egg Benedict";
    recipe1.prepTime = @"30 min";
    recipe1.imageFile = @"egg_benedict.jpg";

    Recipe *recipe2 = [Recipe new];
    recipe2.name = @"Mushroom Risotto";
    recipe2.prepTime = @"30 min";
    recipe2.imageFile = @"mushroom_risotto.jpg";

    Recipe *recipe3 = [Recipe new];
    recipe3.name = @"Full Breakfast";
    recipe3.prepTime = @"20 min";
    recipe3.imageFile = @"full_breakfast.jpg";

    Recipe *recipe4 = [Recipe new];
    recipe4.name = @"Hamburger";
    recipe4.prepTime = @"30 min";
    recipe4.imageFile = @"hamburger.jpg";

    Recipe *recipe5 = [Recipe new];
    recipe5.name = @"Ham and Egg Sandwich";
    recipe5.prepTime = @"10 min";
    recipe5.imageFile = @"ham_and_egg_sandwich.jpg";

    Recipe *recipe6 = [Recipe new];
    recipe6.name = @"Creme Brelee";
    recipe6.prepTime = @"1 hour";
    recipe6.imageFile = @"creme_brelee.jpg";

    Recipe *recipe7 = [Recipe new];
    recipe7.name = @"White Chocolate Donut";
    recipe7.prepTime = @"45 min";
    recipe7.imageFile = @"white_chocolate_donut.jpg";

    Recipe *recipe8 = [Recipe new];
    recipe8.name = @"Starbucks Coffee";
    recipe8.prepTime = @"5 min";
    recipe8.imageFile = @"starbucks_coffee.jpg";

    Recipe *recipe9 = [Recipe new];
    recipe9.name = @"Vegetable Curry";
    recipe9.prepTime = @"30 min";
    recipe9.imageFile = @"vegetable_curry.jpg";

    Recipe *recipe10 = [Recipe new];
    recipe10.name = @"Instant Noodle with Egg";
    recipe10.prepTime = @"8 min";
    recipe10.imageFile = @"instant_noodle_with_egg.jpg";

    Recipe *recipe11 = [Recipe new];
    recipe11.name = @"Noodle with BBQ Pork";
    recipe11.prepTime = @"20 min";
    recipe11.imageFile = @"noodle_with_bbq_pork.jpg";

    Recipe *recipe12 = [Recipe new];
    recipe12.name = @"Japanese Noodle with Pork";
    recipe12.prepTime = @"20 min";
    recipe12.imageFile = @"japanese_noodle_with_pork.jpg";

    Recipe *recipe13 = [Recipe new];
    recipe13.name = @"Green Tea";
    recipe13.prepTime = @"5 min";
    recipe13.imageFile = @"green_tea.jpg";

    Recipe *recipe14 = [Recipe new];
    recipe14.name = @"Thai Shrimp Cake";
    recipe14.prepTime = @"1.5 hours";
    recipe14.imageFile = @"thai_shrimp_cake.jpg";

    Recipe *recipe15 = [Recipe new];
    recipe15.name = @"Angry Birds Cake";
    recipe15.prepTime = @"4 hours";
    recipe15.imageFile = @"angry_birds_cake.jpg";

    Recipe *recipe16 = [Recipe new];
    recipe16.name = @"Ham and Cheese Panini";
    recipe16.prepTime = @"10 min";
    recipe16.imageFile = @"ham_and_cheese_panini.jpg";

    recipes = [NSArray arrayWithObjects:recipe1, recipe2, recipe3, recipe4, recipe5, recipe5, recipe6, recipe7, recipe8, recipe9, recipe10, recipe11, recipe12, recipe13, recipe14, recipe15, recipe16, nil];

}
In Objective C, we use the “new” method (which is actually a method provided by NSObjects) to instantiate an object. You have two ways to set the value of the property. In the above code, we use the dot-syntax to assign the value. For instance,
recipe1.name = @"Egg Benedict";
Alternatively, you can invoke the setName method using square bracket notation ([]). Here is the equivalent code:
[recipe1 setName:@"Egg Benedict"];
Both syntaxes perform exactly the same thing. But we’ll use the dot syntax throughout our tutorials.
Replacing TableData with Recipes Array
There are a few things we need to change in order to use the recipes array. For the numberOfRowsInSection method, we change “tableData” to “recipes”:
- (NSInteger)tableView:(UITableView *)tableView numberOfRowsInSection:(NSInteger)section
{
// DELETE THIS LINE   return [tableData count];
    return [recipes count];
}
For the “cellForRowAtIndexPath” method, we replace the “tableData”, “thumbnails” and “prepTime” with the Recipe array:
- (UITableViewCell *)tableView:(UITableView *)tableView cellForRowAtIndexPath:(NSIndexPath *)indexPath
{
    static NSString *simpleTableIdentifier = @"SimpleTableCell";

    SimpleTableCell *cell = (SimpleTableCell *)[tableView dequeueReusableCellWithIdentifier:simpleTableIdentifier];
    if (cell == nil)
    {
        NSArray *nib = [[NSBundle mainBundle] loadNibNamed:@"SimpleTableCell" owner:self options:nil];
        cell = [nib objectAtIndex:0];
    }

    /* DELETE THIS SECTION
    cell.nameLabel.text = [tableData objectAtIndex:indexPath.row];
    cell.thumbnailImageView.image = [UIImage imageNamed:[thumbnails objectAtIndex:indexPath.row]];
    cell.prepTimeLabel.text = [prepTime objectAtIndex:indexPath.row];
     */

    // Locate the current recipe object and assign the label, image & prepTime
    Recipe *recipe = [recipes objectAtIndex:indexPath.row];
    cell.nameLabel.text = recipe.name;
    cell.thumbnailImageView.image = [UIImage imageNamed:recipe.imageFile];
    cell.prepTimeLabel.text = recipe.prepTime;

    return cell;
}
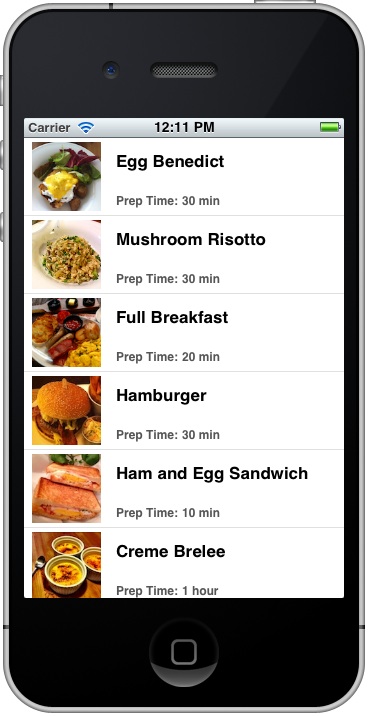
As you can see from the code, by changing the three data arrays into the Recipes array, the code is more readable and understandable. You can now run your app. The look & feel is exactly the same as what we’ve built in the “Custom Table Cell” tutorial. However, internally we beautify our code by creating our own Recipe object.
What’s Upcoming Next?
I hope you’re not bored by the tutorial. This is just the basic concept of OOP. It takes lots of practice and study to gain proficiency. Coming up in our next tutorial, I’ll show you how to improve the detail view screen base on what we’ve learnt so far. It’s going to be fun!


