Let’s talk about creating a list on steroids, i.e., a generic doubly linked list in Swift. For our purposes here, a list is a software receptacle that contains related data that we’re interested in inspecting, organizing, manipulating, etc. A doubly linked list stores a list of “nodes.” Each node contains data, knows about the preceding node in the list, and knows about the following node in the list.
We’ll talk about adding nodes to the list, removing nodes from the list, displaying information stored in nodes in the list, and traversing the list. I’ve used the term generic because you’ll see that I can store store pretty much every built-in or custom Swift type in my linked list, like Double, UINavigationController, Int, CGFloat, UIView, CGAffineTransform… You can even store a collection of instances of a custom class or struct in my list (see section “Storing custom types” below). Most importantly, I’ll show you how to move towards generic programming, also known as generics, parametric polymorphism, templates, or parameterized types, where, when possible, we can write code that applies to many types, and thus reduces code redundancy.
To achieve these lofty goals, I’ve concentrated my functionality into protocols and classes, taking advantage of both protocol-oriented programming principles (POP) and object-oriented programming principles (OOP). Click here for an introduction to POP. Since I’ve discussed POP so much already on AppCoda, I’m not going to keep making my case for it’s benefits yet again. Please check out my previous articles if you need a refresher.
The possibilities
I’ve written all the code shown in this tutorial in an Xcode playground available on GitHub. Please download this playground so you can follow along.
As a teaser, to get your interest up, let me show you for real how my generic doubly linked list can store and let you manipulate any Swift type — and even allow you to take advantage of OOP polymorphism. Watch as I create a linked list of class type UIControl, add instances of class types like UITextField, UIStepper, and UIButton, take advantage of the fact that all the latter types are descendents of UIControl, and manipulate those controls. Here’s a snippet of code from my playground:
do {

    // Instantiate various UIControls.
    let textField : UITextField = UITextField()
    let slider : UISlider = UISlider()
    let segmented : UISegmentedControl = UISegmentedControl()
    let stepper: UIStepper = UIStepper()
    let button: UIButton = UIButton()

    // Create a linked list of type UIControl.
    var uiControlList = LinkedList()

    // Append and insert various UIControl descendents as
    // nodes to linked list, giving each a meaningful tag.
    uiControlList.append(Node(with: textField, named: "text field"))
    uiControlList.append(Node(with: slider, named: "slider"))
    uiControlList.append(Node(with: segmented, named: "segmented"))
    uiControlList.insert(Node(with: button, named: "button"), after: "slider")
    uiControlList.append(Node(with: stepper, named: "stepper"))

    // Manipulate UIControl descendents using subscript.
    uiControlList["slider"]?.payload?.isEnabled = true
    uiControlList["stepper"]?.payload?.frame // "Show Result"
    uiControlList["text field"]?.payload?.textInputMode
    uiControlList["segmented"]?.payload?.setNeedsDisplay()

    // Print tags of all nodes in linked list
    // in their current ordering from "head" to
    // "tail."
    uiControlList.showAll()

}
Notice that I emphasized the word class in the previous discussion to highlight the fact that each Node in my uiControlList instance holds a reference to a UIControl, and therefore I can manipulate — mutate — each control in the list.
Here’s a screenshot showing how I inspected an instance of UIStepper using my playground’s “Show Result” button. Remember that I created an instance of UIStepper, added it to a Node in my linked list, and then accessed its frame property:
![]()
Since I’m using classes, ARC memory management is involved, and I included some code for memory management in my linked list protocol extension. Notice that my console output includes information from print statements I encoded to show the allocation and deallocation of memory for Node class instances stored in my list. I defined local scope to force explicit allocation and deallocation. Remember that when developing with classes, you do need to be mindful of memory management. Any time you use reference types (e.g., classes, closures), there is the possibility for memory leaks which can lead to apps crashing. My code is not leaking:
Allocating linked list
Allocating node tagged: [text field]
Appending [text field] to head
Allocating node tagged: [slider]
Appending [slider] to tail
Allocating node tagged: [segmented]
Appending [segmented] to tail
Allocating node tagged: [button]
Inserting [button]
Allocating node tagged: [stepper]
Appending [stepper] to tail

-------------------------
Printing list:

[text field]
[slider]
[button]
[segmented]
[stepper]
-------------------------

Deallocating node tagged: [segmented]
Deallocating node tagged: [button]
Deallocating node tagged: [slider]
Deallocating node tagged: [text field]
Deallocating node tagged: [stepper]
Deallocating linked list
We’ll see later on how we can make our code more type specific/safe, take advantage of OOP inheritance, and define a class UIControlList: LinkedList<UIControl>.
Storing custom types
Suppose you create a value type called Point in which you wish to use to store screen coordinates. Yes, you can store those in my linked list. Here’s the code:
struct Point {

    let x: Int
    let y: Int

}

do {

    var pointList = LinkedList()

    let point1 = Point(x: 1, y: 1)
    let point2 = Point(x: 2, y: 2)
    let point3 = Point(x: 3, y: 3)

    let node1 = Node(with: point1, named: "point1")
    let node2 = Node(with: point2, named: "point2")
    let node3 = Node(with: point3, named: "point3")

    pointList.append(node1)
    pointList.insert(node2, after: "point1")
    pointList.append(node3)

    pointList.showAllInReverse()

    pointList.delete(node1)

}
Here’s the console output from running the previous code snippet in my playground:
Allocating linked list
Allocating node tagged: [point1]
Allocating node tagged: [point2]
Allocating node tagged: [point3]
Appending [point1] to head
Appending [point2] to tail
Appending [point3] to tail

-------------------------
Printing list in reverse:

[point3]
[point2]
[point1]
-------------------------

Delete head [Optional("point1")] with followers
Deallocating node tagged: [point1]
Deallocating node tagged: [point2]
Deallocating node tagged: [point3]
Deallocating linked list
Notice that despite the fact that I only deleted one of the three original nodes that I added to pointList, all memory allocated for the nodes referencing the Point instances is freed.
Keep this in mind if using my LinkedList with value types, like my Point struct in LinkedList<Point>:
The most basic distinguishing feature of a value type is that copying — the effect of assignment, initialization, and argument passing — creates an independent instance with its own unique copy of its data…
Data structures
Successful programmers know about data structures. I’ve found that some developers take them for granted and, while they can use data structures, they don’t know much about those same structures. Examples include array, stack, queue, and heap. I showed you how to develop POP, fully-functional and generic stack and queue data structures here on AppCoda. Most applications would be useless without data. If you don’t know at least the basic internals of some of the most common data structures, you’re going to have trouble developing innovative code and, probably of most import, you won’t be a decent troubleshooter.
Theory: The linked list data structure
A doubly linked list (DLL) is an unsorted collection of related data — even a collection of other data structures. Some prefer to call a DLL a “sequence” of data elements. This data structure stores a list of “nodes.” Each node stores data (or a reference to data), a reference to the preceding node in the list, and a reference to the following node in the list. Since nodes are not sorted in any particular order and can be handled independently, doubly linked lists are very useful when managing large/many pieces of data.
Some examples of usage of linked lists include memory management of the heap, web browser history that allows you to navigate forward and backwards, and in implementations of queues and stacks.
A DLL is an ideal data structure to use when you don’t know how many pieces of data you want to store and you don’t care what order in which they’re stored (or ordering is less of a concern to you). Since order is irrelevant, adding (appending) and removing nodes can be as cheap as O(1) because of the list’s dynamic structure.
Inserting a node into the middle of the list can be as cheap as O(1) if you have a reference to a immediate neighbor node. The same goes for deleting from the middle of the list.
If you don’t know where a node is located in the DLL, then deleting it requires finding it first, which could be as expensive as O(n). The same goes for inserting a node at a particular position in the list.
A picture of a DLL with 4 nodes will help you to understand my previous paragraphs on theory. This image should give you an idea of why a DLL is often call a “sequence:”

The blue arrows should prove to you that this list is indeed linked as we can get from one node to the next both forwards and backwards, hence the term “doubly linked.”
There’s a lesson about performance buried in the previous paragraphs: If you want to try to keep your DLL operations at O(1), then keep a node around after inserting it so you’ll have its next and previous references (“pointers”). Similarly, if you’ve paid O(n) to find a node, keep a reference to it so you know about its neighbors.
The head.previous always points to nil. The tail.next always points to nil.
FYI: You can understand — visualize — a “simple” or “singly” linked list as the same structure in the preceding diagram without the previous property and thusly without its corresponding previous blue arrow.
The old debate
I’m not going to fall into the “arrays are better and faster than linked lists” or conversely, the “linked lists are faster and better than arrays” arguments. But I will discuss some of the background behind these arguments. I’ve been around computer science for 30 years and seen old assumptions cast aside by improvements and optimizations to memory management.
There’ve been many times when I encountered the design requirement to store hundreds of thousand up to millions of related items in memory. So the question of whether to use an array, maybe a dictionary, or a linked list was of paramount importance because of performance requirements and/or resource limitations.
It used to be a given that array elements were stored contiguously in memory and that array size had to be stated up front, before the array was used. I’m talking about back in the days of C language programming. It was also a given that inserting a new element into the middle of an array was a relatively expensive process, of O(n) complexity.
But now looking at the Swift Array documentation, I’ve found that sometimes array elements are stored contiguously in memory and sometimes not, depending on the circumstances. The documentation also implies that an operation like insertion or deletion may cost less than O(n) because of a smart array resizing strategy.
I’m still thinking about this. If you want to join the nightmare, follow this link, this one, or this one.
Doubly linked list implementation in Swift
Let’s build a DLL together in Swift. Remember that a DLL is a collection/sequence of nodes, so we’ll start by formally defining a Node. Then we’ll build an actual list using nodes, and go through each common linked list operation.
The node
As you’ve probably gleaned already from my previous diagram and discussion, the node is at the heart of a DLL. Let’s visualize my Node type:
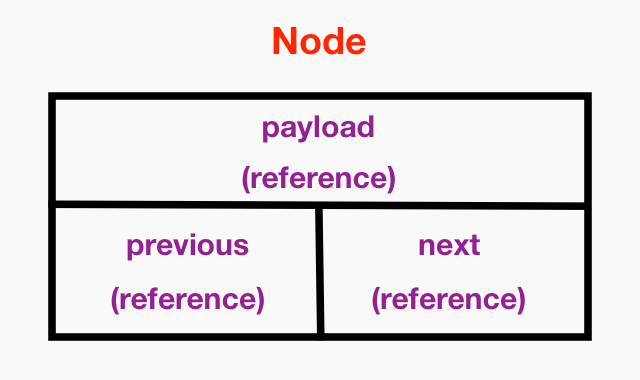
Remember that protocols offer reusability in that many other types can adopt them. I’ve created the following NodeProtocol because not only does my DLL depend on nodes, but so do many other data structures:
protocol NodeProtocol: class {

    associatedtype AnyType

    var tag: String? { get }
    var payload: AnyType? { get set }
    var next: Self? { get set }
    var previous: Self? { get set }

    init(with payload: AnyType, named tag: String)
}
We’ll discuss the class restriction on NodeProtocol very soon, but please bear with me. Remember that I’m making this DLL generic. From the Swift documentation on generics:
When defining a protocol, it’s sometimes useful to declare one or more associated types as part of the protocol’s definition. An associated type gives a placeholder name to a type that is used as part of the protocol. The actual type to use for that associated type isn’t specified until the protocol is adopted. Associated types are specified with the
associatedtypekeyword.
Here’s my generic node type Node<AnyType>:
final class Node: NodeProtocol {

    var tag: String?
    var payload: AnyType?
    var next: Node?
    var previous: Node?

    init(with payload: AnyType, named tag: String) {

        // Stores a reference when using classes;
        // stores a copy when using value types.
        self.payload = payload
        self.tag = tag

        print("Allocating node tagged: [\(tag)]")

    }

    deinit {
        print("Deallocating node tagged: [\(tag!)]")
    }
}
The AnyType between the angle brackets, as in Node<AnyType>, is a placeholder for some Swift built-in type or some custom type we define and fill in when actually declaring an instance of Node. This <AnyType> notation, plus the fact that Node has adopted NodeProtocol with an associatedtype, means we’ll be able to create Node instance’s whose payload is literally any type. It also means that the next and previous properties will be references to Node instances proximate to other Node instances in our DLL.
The tag property is an identifier I always use when building DLLs. It makes it easy for me to find and reference Node instances in my DLLs using meaningful names.
The init method includes a print showing Node memory allocation. The deinit method similarly uses print to show Node memory deallocation.
Why we need reference semantics
Let’s talk about why NodeProtocol is marked as class. The whole concept of a node in a DLL is antithetical to a value type. How could we build a list of Node instances if the their next and previous properties were values that contained only data? It wouldn’t even make sense.
In order for us to build a list of linked Node instances, we use reference semantics and reference types, i.e., classes. The next and previous properties of each Node object/instance must be references to other Node objects/instances.
Making the payload property of a Node into a reference (pointer) affords you flexibility and possibly some efficiency, especially if your list contains large payload items and/or a large number of payload items. You can create objects anywhere and add them as references to the linked list. Your list doesn’t actually store copies of data inside the list. It simply stores references to instances you’ve already created and are manipulating. If using classes, once there’s a reference to whatever type a payload instance points to, the underlying object is kept alive and not deallocated since the reference count to it was increased by one when making it part of a Node.
Here’s a visual representation of my DLL storing UIControl instances, as we saw example code for at the beginning of this tutorial:
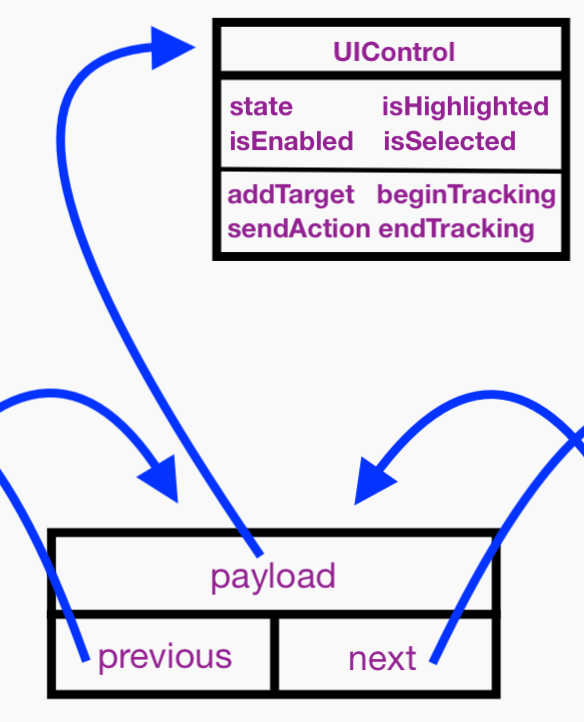
Remember that I showed you Apple’s definition of a value type at the start of this tutorial in the section entitled “The possibilities.” I want you to think about this carefully: The behavior of the Node type’s payload property is going to exhibit value semantics with value types and reference semantics with reference types. That might sound obvious, but please consider carefully.
Why my Node class is final
If I don’t mark my Node class as final, I get the following error messages:
Protocol 'NodeProtocol' requirement 'next' cannot be satisfied by a non-final class ('Node') because it uses 'Self' in a non-parameter, non-result type position

Protocol 'NodeProtocol' requirement 'previous' cannot be satisfied by a non-final class ('Node') because it uses 'Self' in a non-parameter, non-result type position
As best as I can understand it, the problem stems from the fact that I’m imposing a Self requirement in a protocol, where Self is used as a type in a declaration, which is then adopted by a class. In this specific case, I cannot impose a Self requirement via a protocol on classes that are not declared as final. Say I created a non-final class that conformed to a protocol with Self as a type requirement — call it ClassParent. If I could create a descendent of the non-final class, call it ClassChild, it would always interpret Self as its parent class, ClassParent, which would be completely incorrect, and would violate the parent’s Self requirement stemming from its protocol conformance.
In this case, Self literally means only the conforming class. Parenthetically, my type Node type already can provide linked list node functionality for any type, so what exactly would I gain by overriding the purpose of next and previous? What would subclassing my Node<AnyType> type mean, which already is generic, and where next and previous are defined in the NodeProtocol as instances of Self?
This is getting almost metaphysical, and is beyond the scope of this tutorial. If you want to pursue this topic, I’ve found some links you can study that provide explanations and workarounds for the “non-final class” class error here, here, and here.
Protocol-oriented linked list
To make my DLL portable, I defined almost all its functionality in a protocol and protocol extension. Let’s have a look and then talk about it. Note that we won’t look at the protocol extension’s contents until later:
protocol LinkedListProtocol {

    associatedtype AnyType

    var head: Node? { get set }
    var tail: Node? { get set }
    mutating func append(_ newNode: Node)
    mutating func insert(_ newNode: Node, after nodeWithTag: String)
    mutating func delete(_ node: Node)
    func showAll()
    func showAllInReverse()
    subscript(tag: String) -> Node? { get }
    func prepareForDealloc()

}

extension LinkedListProtocol {

    // THERE'S A BUNCH OF CODE HERE.

...

} // end extension LinkedListProtocol

class LinkedList : LinkedListProtocol {

    var head: Node?
    var tail: Node?

    init() {
        head = nil
        tail = head
        print("Allocating linked list")
    }

    deinit {
        prepareForDealloc()
        head = nil
        tail = nil
        print("Deallocating linked list")
    }

} // end class LinkedList
Again, the <AnyType> notation, as in LinkedList<AnyType>, plus the fact that LinkedList has adopted LinkedListProtocol with an associatedtype, means we’ll be able to create LinkedList instance’s that can store sequences of any type. Remember how I instantiated an instance of LinkedList<UIControl> at the beginning of this tutorial?
Notice that even though a DLL is unsorted, it still is a sequence of Node instances. That’s important to understand because, when we don’t know where we are in the list, we’ve got to be able to “travel” across the sequence of nodes in order to find a node.
Use case for explaining code
I wrote several rounds of code that exercises my DLL functionality in the protocol, protocol extension, and class we just reviewed. Note that all functionality for my DLL is expressed in the LinkedListProtocol extension. The following code will help us to discuss the extension’s methods:
do {

    print("in local scope")
    // declare a linked list of type UIView
    // and initialize it
    var linkedList = LinkedList()

    // create some nodes to be added to my list,
    // initializing each with a UIVIew and tag/name
    let node1 = Node(with: 1.0, named: "Double 1.0")
    let node2 = Node(with: 2.0, named: "Double 2.0")
    let node2_2 = Node(with: 2.2, named: "Double 2.2")
    let node3 = Node(with: 3.0, named: "Double 3.0")
    let node4 = Node(with: 4.0, named: "Double 4.0")
    let node5 = Node(with: 5.0, named: "Double 5.0")

    // add the nodes to my linked list
    linkedList.append(node1)
    linkedList.append(node2)
    linkedList.append(node3)
    linkedList.insert(node2_2, after: "Double 2.0")
    linkedList.append(node4)
    linkedList.append(node5)

    // test the subscript
    linkedList["Double 3.0"]?.tag
    // "Double 3.0"

    // print the list to console
    linkedList.showAll()

    // print the list to console in reverse
    linkedList.showAllInReverse()

    // delete nodes in random order
    linkedList.delete(node3)
    linkedList.delete(node1)
    linkedList.delete(node2_2)
    linkedList.delete(node4)
    linkedList.delete(node5)
    linkedList.delete(node2)

    // show empty list
    linkedList.showAll()

}
Here’s the playground console output corresponding to the code I just showed you:
in local scope
Allocating linked list
Allocating node tagged: [Double 1.0]
Allocating node tagged: [Double 2.0]
Allocating node tagged: [Double 2.2]
Allocating node tagged: [Double 3.0]
Allocating node tagged: [Double 4.0]
Allocating node tagged: [Double 5.0]
Appending [Double 1.0] to head
Appending [Double 2.0] to tail
Appending [Double 3.0] to tail
Inserting [Double 2.2]
Appending [Double 4.0] to tail
Appending [Double 5.0] to tail

-------------------------
Printing list:

[Double 1.0]
[Double 2.0]
[Double 2.2]
[Double 3.0]
[Double 4.0]
[Double 5.0]
-------------------------


-------------------------
Printing list in reverse:

[Double 5.0]
[Double 4.0]
[Double 3.0]
[Double 2.2]
[Double 2.0]
[Double 1.0]
-------------------------

Delete internal node: [Optional("Double 3.0")]
Delete head [Optional("Double 1.0")] with followers
Delete internal node: [Optional("Double 2.2")]
Delete internal node: [Optional("Double 4.0")]
Delete tail [Optional("Double 5.0")] with predecessors
Delete head [Optional("Double 2.0")]

-------------------------
Printing list:

-------------------------

Deallocating node tagged: [Double 5.0]
Deallocating node tagged: [Double 4.0]
Deallocating node tagged: [Double 3.0]
Deallocating node tagged: [Double 2.2]
Deallocating node tagged: [Double 2.0]
Deallocating node tagged: [Double 1.0]
Deallocating linked list
When using a DLL, always…
Remember to always think about a Node instance’s next and previous references when adding/deleting that node to/from the list and when traversing the list. What do we always say? “The head.previous always points to nil. The tail.next always points to nil.” Refer to my diagram of the DLL up above as many times as you need.
Initializing the DLL
Initially, a newly-instantiated LinkedList object has a head and tail that are both nil:
    init() {
        head = nil
        tail = head
        print("Allocating linked list")
    }
Adding — appending — a Node
The first time we add a Node to the DLL, it becomes the head. At this point, the head is the same as the tail. After appending the first Node, we subsequently add Node instances to the tail. This just makes common sense and is the prevailing convention. Appending is always cheap. It’s O(1):
...
extension LinkedListProtocol {

    mutating func append(_ newNode: Node) {

        if let tailNode = tail {

            print("Appending [\(newNode.tag!)] to tail")
            tailNode.next = newNode
            newNode.previous = tailNode

        }
        else {

            print("Appending [\(newNode.tag!)] to head")
            head = newNode

        } // end else

        tail = newNode

    } // end func append
...
Deleting a Node
I’ve only written code for deleting nodes if you already have a reference to a Node instance, which makes my delete method cheap at O(1). I could’ve gone on forever writing specialized methods like deleteAfter, deleteBefore, deleteAtIndex, etc., but I didn’t because the purpose here is to learn how a linked list works in general. Note that my code makes sure there are no strong references vis-a-vis next and previous properties of Node instances when that instance is removed from the list.
Here’s the deletion code and then we’ll discuss:
...
    mutating func delete(_ node: Node) {

        // Remove the head?
        if node.previous == nil {

            if let nodeAfterDeleted = node.next {

                print("Delete head [\(node.tag)] with followers")
                nodeAfterDeleted.previous = nil
                head?.next = nil
                head = nil
                head = nodeAfterDeleted

                node.next = nil
                node.previous = nil

            }
            else
            {

                print("Delete head [\(node.tag)]")
                head = nil
                tail = nil

                node.next = nil
                node.previous = nil

            }

        } // end remove head

        // Remove the tail?
        else if node.next == nil {

            if let deletedPreviousNode = node.previous {

                print("Delete tail [\(node.tag)] with predecessors")
                deletedPreviousNode.next = nil
                tail?.previous = nil
                tail = nil
                node.next = nil
                tail = deletedPreviousNode

                node.next = nil
                node.previous = nil

            }
            else {

                print("Delete tail [\(node.tag)]")
                head = nil
                tail = nil

                node.next = nil
                node.previous = nil

            }

        } // end remove tail

        // Remove node BETWEEN head and tail?
        else {

            if let deletedPreviousNode = node.previous,
                let deletedNextNode = node.next {

                node.next = nil
                node.previous = nil
                print("Delete internal node: [\(node.tag)]")

                deletedPreviousNode.next = deletedNextNode
                deletedNextNode.previous = deletedPreviousNode

            }

        } // end remove in-between node

    } // end func delete
...
Deleting the head
The head.previous always points to nil. Remember that and everything in the section entitled “When using a DLL, always…” and you’ll understand.
Deleting the tail
The tail.next always points to nil. Remember that and everything in the section entitled “When using a DLL, always…” and you’ll understand.
Deleting a node in the “middle” of the list
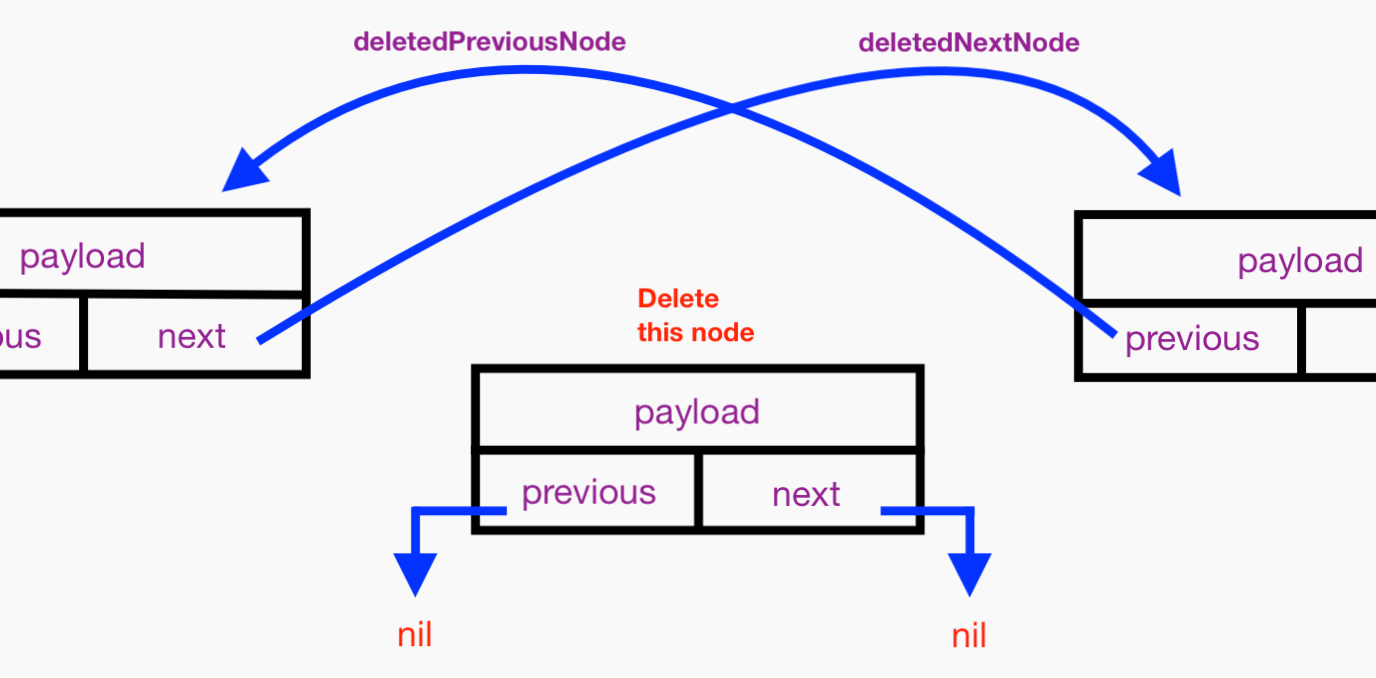
Say we want to delete some Node instance that is somewhere in the “middle” of our DLL. In other words, it has neighbors and is not the head or tail. Here’s the Node instance to delete:

Let’s save references to the Node instances that precede and follow the Node to be deleted. These are obtained from the previous and next properties of the Node to be deleted:

Let’s assign nil to the about-to-be-deleted node’s next and previous properties so they won’t hold strong references to neighboring Node instances and thus won’t interfere with their eventual ARC deallocation:

Finally, let’s take the deleted Node out of the sequence completely. We make its formerly preceding Node instance’s next property point to its formerly following Node. We make its formerly following Node instance’s previous property point to its formerly preceding Node. Here it is:
Inserting a Node
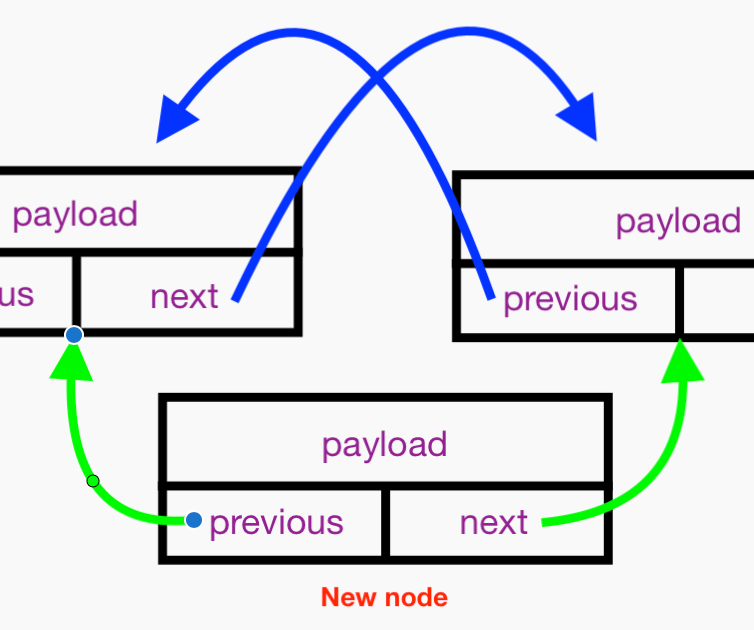
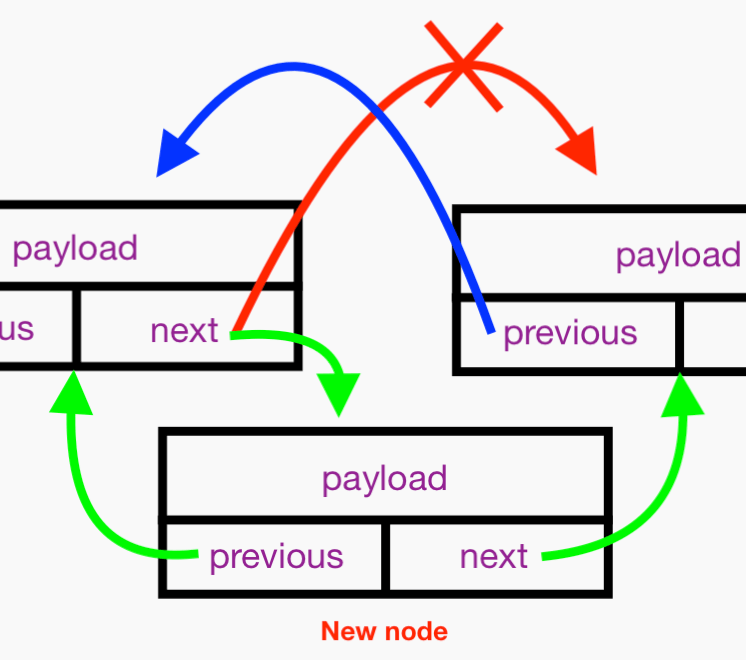
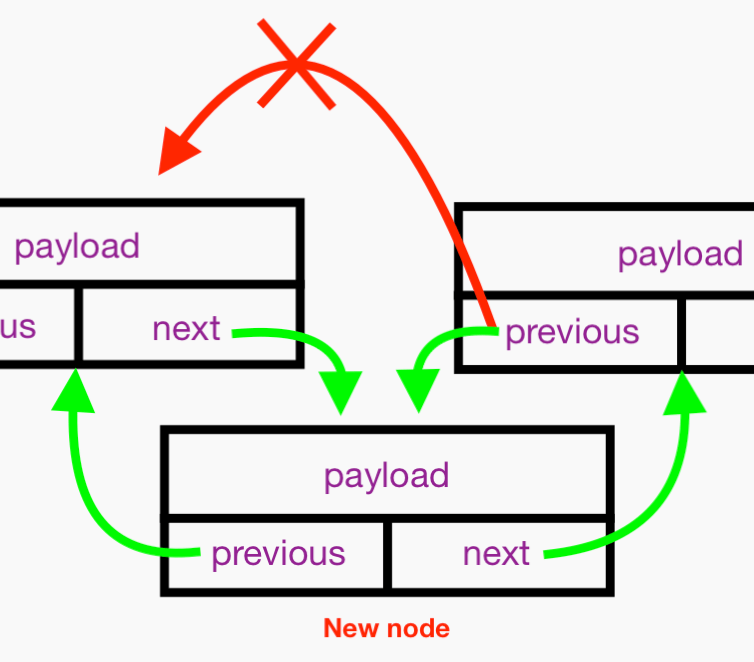
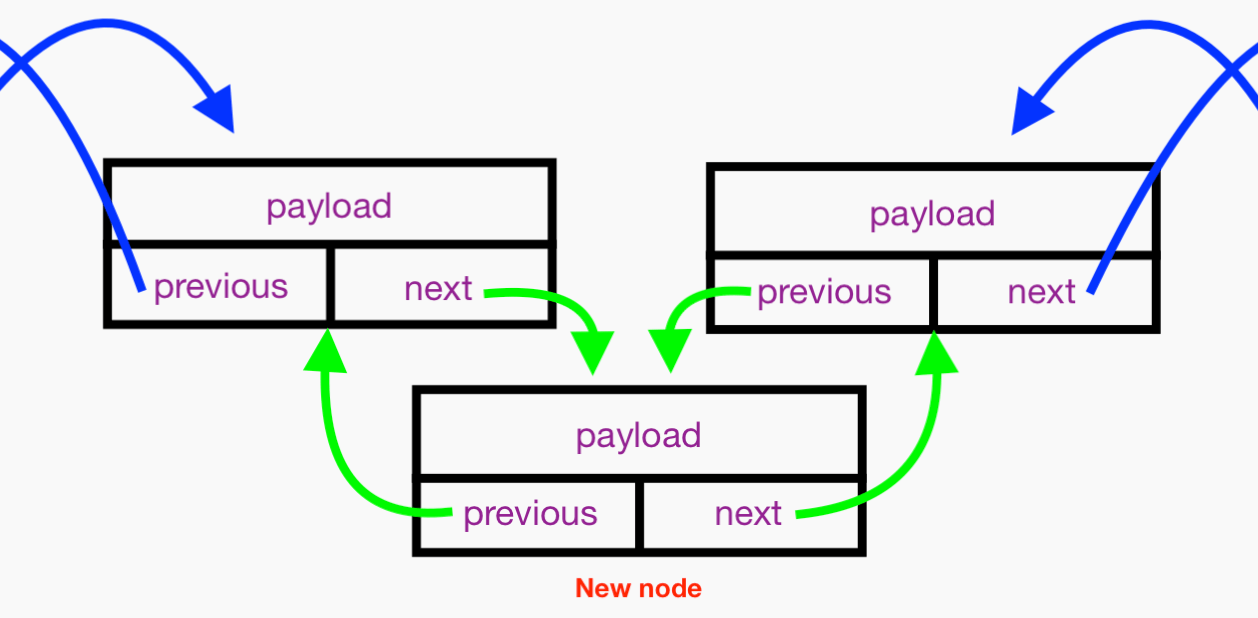
I’ve limited my DLL insertion functionality, not to be confused with appending, to inserting a Node immediately after a known and preexisting Node. First we use the traversal logic, covered in the next section, to find the Node with a given tag. This means my insertion cost can be up to O(n). We know that we’ll insert the new Node after the Node we found with tag. I’ll cover the case of inserting a new Node in the “middle” of the list and leave the single edge case, that of inserting right after head, for you to glean from all the other explanations and info shown herein.
This all boils down to 1) configuring the next and previous references of the new Node, 2) configuring the next reference of the new node’s preceding neighbor, and 3) configuring the previous reference of the new node’s following neighbor, like so:
This just shows the new node:
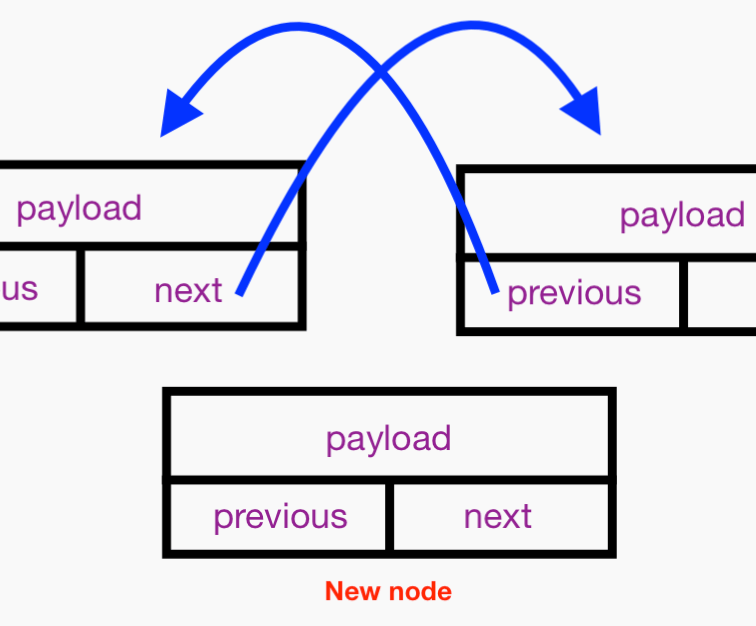
Here are steps 1, 2, and 3:
Finally, we have:
Here’s the insertion code:
...
    mutating func insert(_ newNode: Node, after nodeWithTag: String) {

        if head == nil {
            return
        }

        else {

            var currentNode = head

            while currentNode != nil {

                if nodeWithTag == currentNode?.tag {

                    // If the current node with matching tag is
                    // NOT the tail...
                    if currentNode?.next != nil {

                        // ... then insert new node "after"
                        // the current node.
                        let newNextNode = currentNode?.next
                        currentNode?.next = newNode
                        newNextNode?.previous = newNode
                        newNode.previous = currentNode
                        newNode.next = newNextNode
                        currentNode = nil
                        print("Inserting [\(newNode.tag!)]")

                    }
                    else { // Append to list with single head
                           // (which means tail = head).

                        append(newNode)
                        currentNode = nil

                    }

                } // end if nodeWithTag == currentNode?.tag

                else {
                    currentNode = currentNode?.next
                }

            } // end while

        } // end else

    } // end func insert
...
Traversing the list
We can traverse the list, going from the beginning to end, by following the trail mapped out by each Node instance’s next property, starting at the first Node in the list, known as the head. We use the tag property of each Node to identify it — i.e., traverse until we find a tag that matches a String that we used to create (initialize) a Node. We can similarly traverse (and search) our list, going from the end to beginning (in “reverse”), by following the trail mapped out by each Node instance’s previous property, starting at the last Node in the list, known as the tail.
Since traversal means potentially going through every node in the list, that means it is pricey at O(n). Study question: Since you’ve got both forward and reverse traversal, can you think of a way to optimize?
After reading the previous prose and looking at the blue arrows in my diagram of a DLL above, you should get the following code:
...
    func showAll() {

        print("\n-------------------------")
        print("Printing list:\n")

        var nextNode: Node?

        if let head = head {

            nextNode = head

            repeat {

                if let tag = nextNode?.tag {
                    print("[\(tag)]")
                }

                nextNode = nextNode?.next

            } while (nextNode != nil)

        } // end if let head = head

        print("-------------------------\n")

    } // end func showAll()

    func showAllInReverse()
    {

        print("\n-------------------------")
        print("Printing list in reverse:\n")

        var previousNode: Node?

        if let tail = tail {

            previousNode = tail

            repeat {

                if let tag = previousNode?.tag {
                    print("[\(tag)]")
                }

                previousNode = previousNode?.previous

            } while (previousNode != nil)
        }
        print("-------------------------\n")

    } // end func showAllInReverse()
...
List subscript
I’ve implemented a Swift subscript using the same logic discussed in the previous section entitled “Traversing the list”. Here, I’ve used the tag value of node, a String, as the subscript:
...
    subscript(tag: String) -> Node? {

        if head == nil {
            return nil
        }

        else {

            var currentNode = head

            while currentNode != nil {

                if tag == currentNode?.tag {
                    return currentNode
                }
                else {
                    currentNode = currentNode?.next
                }

            } // end while

            return nil

        } // end else

    } // end subscript
...
ARC memory deallocation for DLL
I hope you noticed my call to LinkedListProtocol extension method prepareForDealloc() in my LinkedList class’s deinit method:
...
    deinit {
        prepareForDealloc()
        head = nil
        tail = nil
        print("Deallocating linked list")
    }
...
ARC will only deallocate a class instance from memory if its reference count is zero. As long as there is 1 (one) or more reference(s) to that instance, its memory cannot be deallocated. Since so many references are being used in my DLL code, I wanted to prevent memory leaks.
My prepareForDealloc() method makes sure no Node instances in the DLL hold strong references to each other by starting at the tail, traversing the list in reverse, and setting each Node instance’s next and previous properties to nil:
...
    // Unlink all nodes so there are no
    // strong references to prevent
    // deallocation.
    func prepareForDealloc() {

        var currentNode: Node?

        if var tail = tail {

            currentNode = tail

            repeat {

                if let tag = currentNode?.tag {
                    //print("\(tag)")
                }

                tail = currentNode!
                currentNode = currentNode?.previous
                tail.previous = nil
                tail.next = nil

            } while (currentNode != nil) // nil is head

        } // end if var tail = tail

    } // end func showAllInReverse(

} // end extension LinkedListProtocol
...
Inheriting from my LinkedList class
I wanted to show you that you can specialize my LinkedList class by inheriting from it. In other words, you can create a subclass of LinkedList which is tied to any Swift built-in or custom type. You can use or override existing LinkedListProtocol extension functionality. Most importantly, you can add features that are specific to the type to which you bind the LinkedList subclass.
I rewrote the code shown at the beginning of this tutorial. Instead of simply declaring an instance of the LinkedList class typed for UIControl, which is still pretty powerful, I declared a class inheriting from LinkedList<UIControl>. Let’s look at the subclass first:
class UIControlList: LinkedList {

    func shouldEnable(_ yesOrNo: Bool) {

        if head == nil {
            return
        }

        else {

            var currentNode = head

            while currentNode != nil {

                currentNode?.payload?.isEnabled = yesOrNo
                currentNode = currentNode?.next

            }

        } // end else

    } // end func shouldEnable()

    func showAll() {

        print("\n-------------------------")
        print("Printing list:\n")

        var nextNode: Node?

        if let head = head {

            nextNode = head

            repeat {

                if let tag = nextNode?.tag {
                    print("[\(tag)]'s status is \(nextNode?.payload?.isEnabled)")
                }

                nextNode = nextNode?.next

            } while (nextNode != nil)

        } // end if let head = head

        print("-------------------------\n")

    } // end func showAll()

} // end class UIControlList
Here’s code that instantiates and uses the new UIControlList subclass:
do {

    // Instantiate various UIControls.
    let textField : UITextField = UITextField()
    let slider : UISlider = UISlider()
    let segmented : UISegmentedControl = UISegmentedControl()
    let stepper: UIStepper = UIStepper()
    let button: UIButton = UIButton()

    // Create a linked list of type UIControl.
    var uiControlList = UIControlList()

    // Append and insert various UIControl descendents as
    // nodes to linked list, giving each a meaningful tag.
    uiControlList.append(Node(with: textField, named: "text field"))
    uiControlList.append(Node(with: slider, named: "slider"))
    uiControlList.append(Node(with: segmented, named: "segmented"))
    uiControlList.insert(Node(with: button, named: "button"), after: "slider")
    uiControlList.append(Node(with: stepper, named: "stepper"))

    // Manipulate UIControl descendents using subscript.
    uiControlList["slider"]?.payload?.isEnabled = true
    uiControlList["stepper"]?.payload?.frame // "Show Result"
    uiControlList["text field"]?.payload?.textInputMode
    uiControlList["segmented"]?.payload?.setNeedsDisplay()

    // Use feature available to all UIControls.
    uiControlList.shouldEnable(true)

    // Print tags of all nodes in linked list
    // in their current ordering from "head" to
    // "tail."
    uiControlList.showAll()

}
Here’s playground console output from the immediately previous code snippet:
Allocating linked list
Allocating node tagged: [text field]
Appending [text field] to head
Allocating node tagged: [slider]
Appending [slider] to tail
Allocating node tagged: [segmented]
Appending [segmented] to tail
Allocating node tagged: [button]
Inserting [button]
Allocating node tagged: [stepper]
Appending [stepper] to tail

-------------------------
Printing list:

[text field]'s status is Optional(true)
[slider]'s status is Optional(true)
[button]'s status is Optional(true)
[segmented]'s status is Optional(true)
[stepper]'s status is Optional(true)
-------------------------

Deallocating node tagged: [segmented]
Deallocating node tagged: [button]
Deallocating node tagged: [slider]
Deallocating node tagged: [text field]
Deallocating node tagged: [stepper]
Deallocating linked list
Conclusion
The code in this tutorial should prove that you don’t have to be a 100%-only POP or a 100%-only OOP developer. The two technologies not only can coexist, but they complement each other. It behooves you to be a flexible and open minded developer. I’m so old 🙁 that I remember when OOP first debuted. There was so much resistance, but after several years went by, pretty much everyone jumped on the OOP bandwagon and, before we knew it, pretty much everything was in a class and/or class library. Recently, POP debuted and I feel like I’m reliving the past. Some developers want to drop everything and rewrite all their code using protocols. Others want argue that POP is worthless. After using POP for several years, my gut instinct tells me that POP is here to stay and is very useful, but in no way does it totally devalue OOP. Both technologies have their advantages and disadvantages.
My advice is that you should be flexible and open-minded to new ideas with the caveat that there will always be flash-in-the-pan fads that come and go quickly. With experience, learning, and schooling, you’ll learn to be able to tell the difference between fads and truly novel innovations.
The advent and adoption of OOP was a truly seminal event in programming history. So was the advent of POP. You should become fluent in both and use both.


