

“Push Notifications? Ohh, no!”. Yes, that’s the first thing that was coming to my mind when I was called to implement push notifications in an iOS app, and I’m pretty confident that it has been coming to yours as well. And not because it’s difficult to use push notifications, it’s just all that series of steps required prior to even be able to test a single push notification and cause eventually a huge confusion to almost all developers. But, let’s hold on a minute, and let’s take things from the beginning.
It’s quite often necessary to pull the user’s attention when an app is not running, and that’s possible to happen by using what we know as notifications. As an iOS developer, you know that iOS supports two types of notifications: Local and Push (or Remote). In the former case, notifications are registered and scheduled by the app itself, and they’re really easy to be implemented. Actually, you can find a couple of older tutorials about local notifications in this and this link.
Push notifications on the other hand are not scheduled by the app. They are triggered by another service (called provider), most often a web server, and they’re usually targeting to multiple devices simultaneously. With push notifications, app creators can send messages to users when necessary, either in random times or scheduled, and either with a customized (personalised) or a default message body. Here is a good resource for some general information about Apple Push Notifications.
Every single push notification that is sent from a provider to one or more target devices, follows a mandatory path. That is through the Apple Push Notification Servers, or simply APN servers. Those servers actually route push notifications to the proper devices, and messages are normally delivered within a few seconds by the time they’re sent by the provider. In simple words, the lifecycle of a remote notification can be summed up as shown next:
Provider >> APN servers >> Target Devices
I encourage you to pay a visit to the official documentation for useful details about the way push notifications work.
Several steps are required so as an app can accept push notifications. Those steps are divided in two general categories: The programming preparation, and the production of various certificates, provisioning profiles and more. The programming part is easy, as it consists of standard pieces of code that must be added to the project. The confusing is the second part, where a number of other actions are necessary to be taken in various places, such as the Mac OS Keychain Access app, the project, and the Apple Developer Member Center portal.
Besides all that, there are two kinds of remote notifications: Sandboxed that can be used in the development stage so it’s possible to test notifications, and Live that are meant to be used only in production stage. If you manage to successfully receive sandboxed notifications in your app and at the same time you have taken all the actions that were shortly mentioned above properly, then you can be sure that live push notifications will work too. Needless to say that Apple provides test servers for sending sandboxed notifications, and it’s not the production APNs for that purpose.
Our goal in this tutorial is quite simple: We are going to enable push notifications for a demo app, and we’ll make sure they work by sending a couple of them in sandbox mode. Hopefully, this tutorial will be your guide the next time that you’ll need to add push notifications to your app, but most importantly, it will take you out of any hassle and confusion resulting from the push notifications prerequisites.
About the Demo App
The first thing I always do right before I get into the point of each tutorial is to provide some information regarding the demo app that we are about to implement. Also, quite often I give you a starter project to begin with, but not this time.
All you have to do for the demo app of this tutorial, is to create a new iOS project in Xcode, and just stop there. There’s no need to add any content or other controls at all. That’s because we’re not meant to use it for testing an in-app functionality, but to only as a target for our push notifications.
Regarding the project name, feel free to set any value you wish. In my case, I titled it PNDemo.
So, at this point create a new iOS project and then, please keep going.
Important notice:
Before we get into the details of this tutorial’s concept, I must make clear that I make some assumptions about some certain conditions that should be met. So, I take as granted that:
- You have a paid Developer account, or you have at least access to such an account.
- You have at least one existing iOS Development Certificate in the Apple Developer Member Center portal. In the opposite case, take a look here. If you need to use a Code Signing Request (CSR) file, read the next part on how to generate it.
- You acknowledge that when saying “push notifications” in this text I refer to “Apple Push Notifications” only.
- You acknowledge that when saying “Apple Developer website” I mean the “Apple Developer Member Center portal”.
- You already have some knowledge what the payload of a notification is (content, badge, sound, any additional data), and what you can do with it. To refresh your memory about notifications take a look here.
Step 1: The Certificate Signing Request
Now that you have created the demo project, put it aside for a few minutes, and get ready for the first step in the whole preparation process. Here, we are going to produce a Certificate Signing Request (CSR) file that we’ll use later on to create a SSL certificate for push notifications.
For this step you’ll need the Keychain Access Mac app, so either use the Launchpad or the Spotlight search to find it and open it. If you’re new to Keychain Access, make sure you don’t delete any existing stuff accidentally.
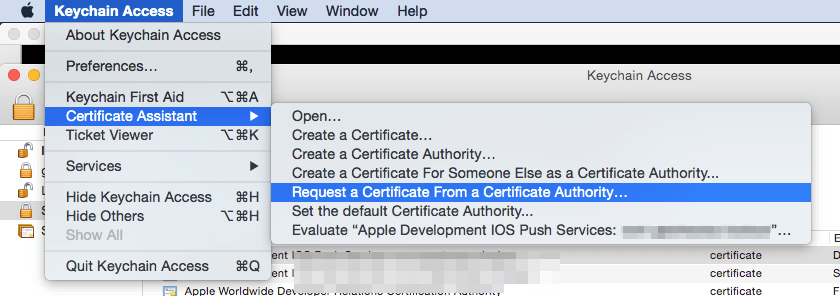
Once you get there, open the Keychain Access > Certificate Assistant > Request a Certificate From a Certificate Authority… menu, as shown next:
In the window that comes up, you need to mandatorily fill in the User Email Address and Common Name fields. Besides that, click to the Saved to disk option so you are able to save the CSR file to disk, and use it later in the Apple Developer website.
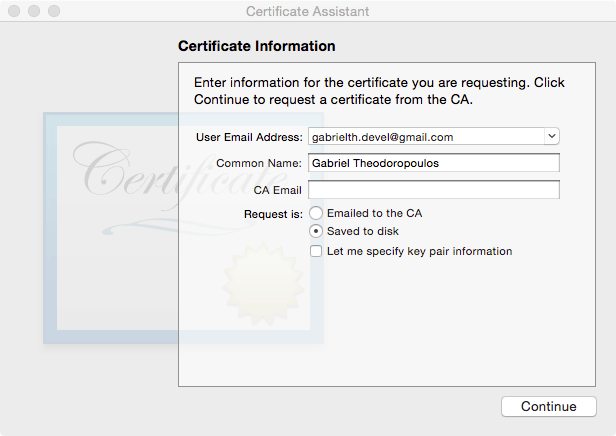
Click Continue and optionally choose a folder and a name for the CSR file right before you save it. I have created a folder to keep together all the files we’re about to produce in this tutorial (called PNDemo Files, I encourage you to do the same), and I’ve left the default file name for the CSR file.
Once you see a message saying that your certificate request has been created on disk, click Done and you’re… done. The certificate we just requested for and saved to disk will be used to sign other certificates in the Apple Developer website.
Step 2: Create an App ID
Our next step is to create a new App ID in the Apple Developer website. This App ID is going to uniquely identify our app amongst others, and it will help APN servers to properly route the notifications. Actually, as you’ll see next, we’ll connect the App ID to a couple of other things: To a new certificate for push notifications, and to a provisioning profile that will let us run the app on a test device.
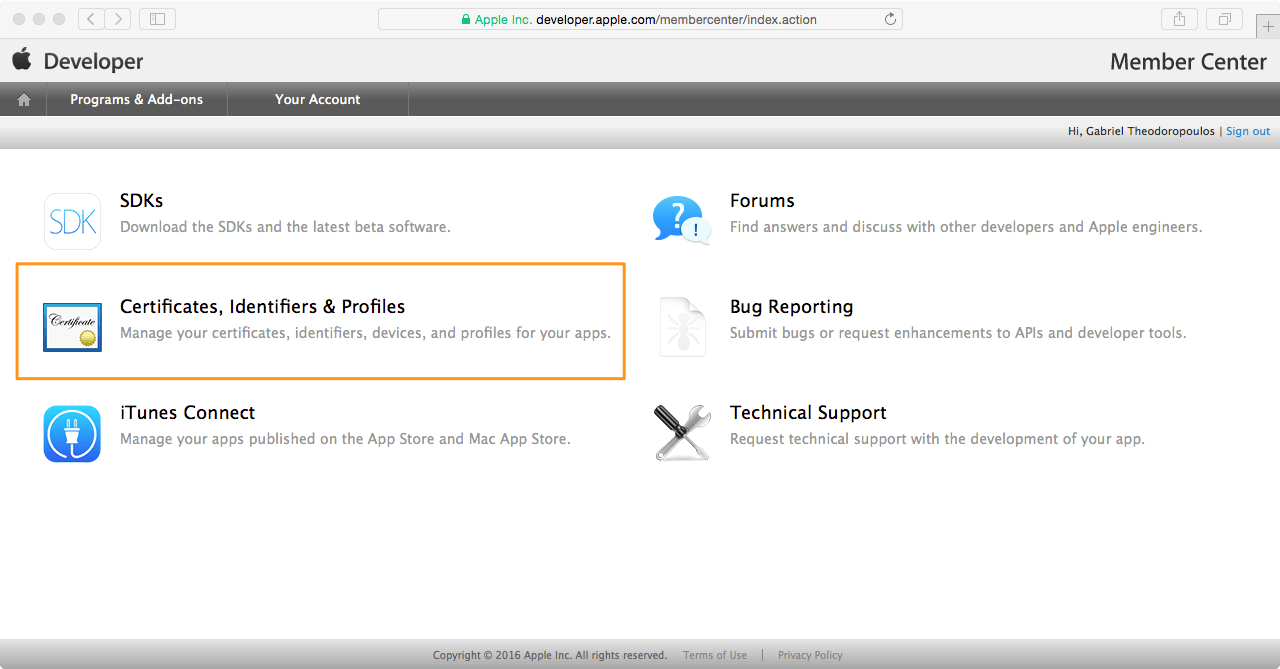
First things first, so begin by going to the Apple Developer Member Center. Provide your credentials, and get connected. Then, click to the Certificates, Identifiers & Profiles link, so you’re navigated to the proper page.
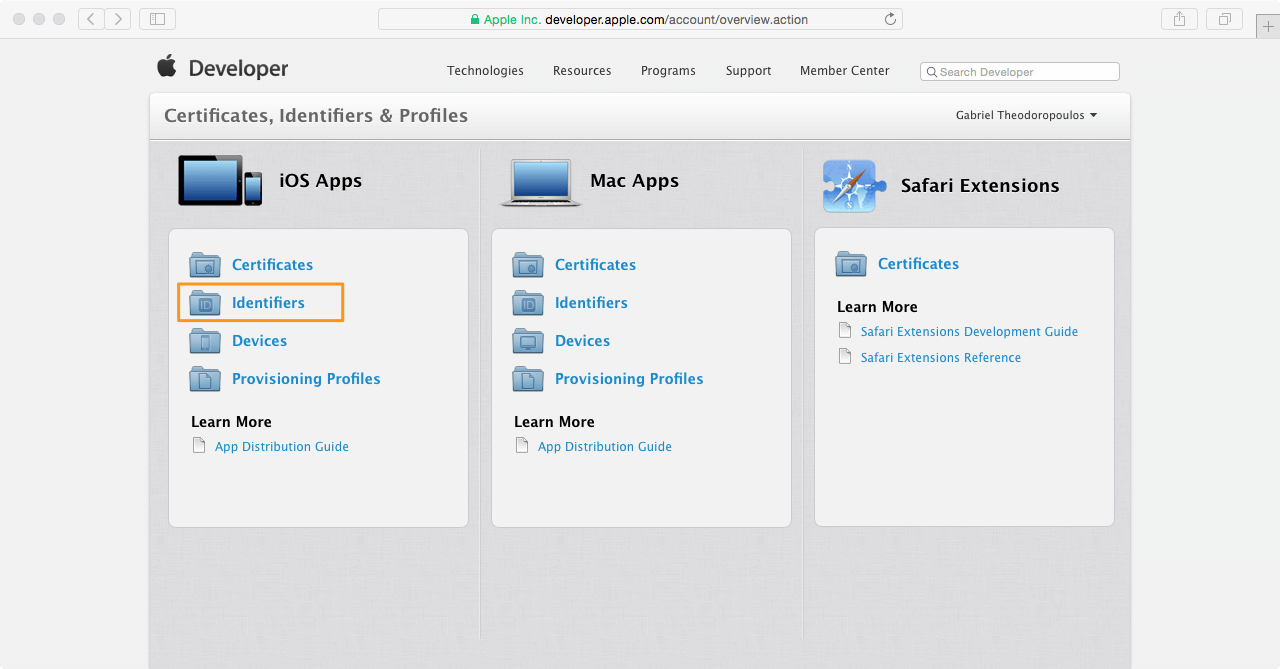
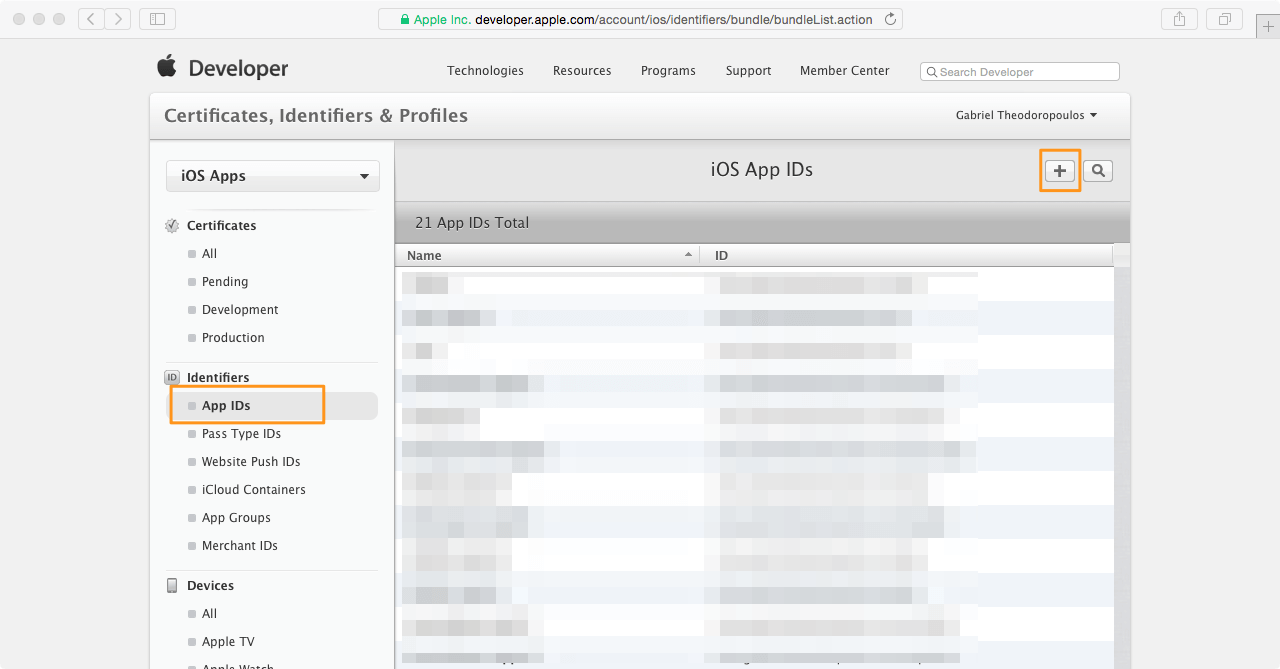
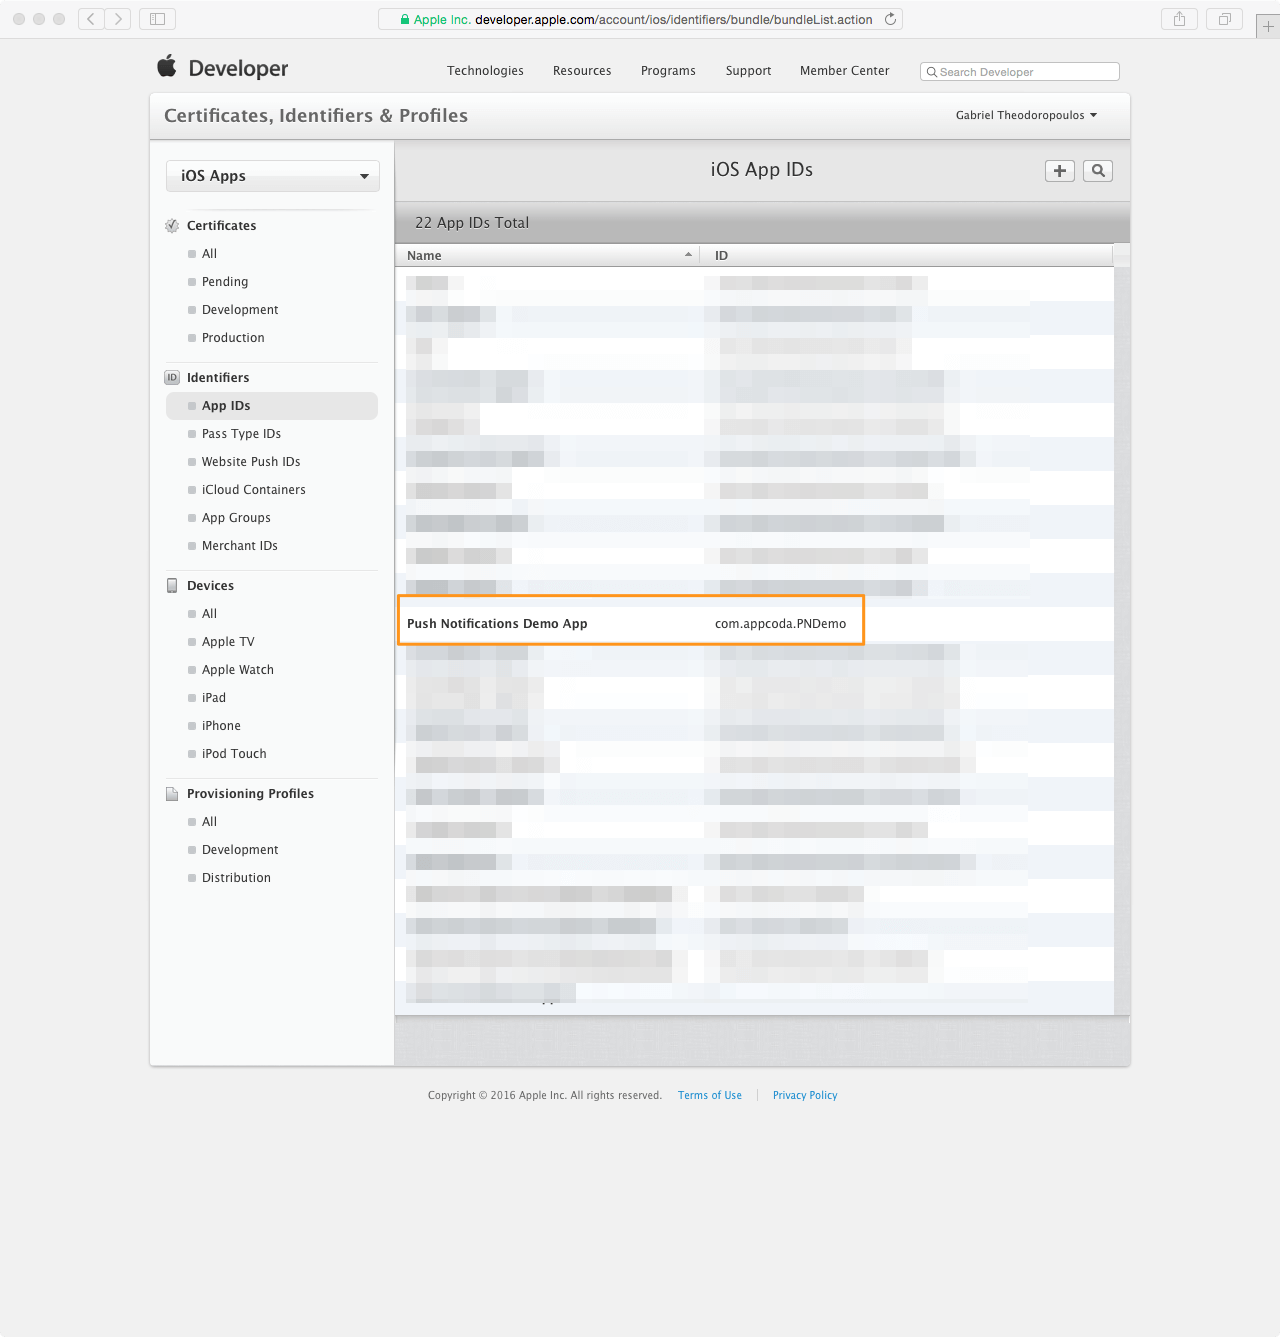
By landing to the new webpage, click to the Identifiers link under the iOS Apps section:
You’ll see that the App IDs option is pre-selected (in the Identifiers category to the left menu), and a list with all the existing App ID values is shown to the main window area. The new App ID that we’re about to create is going to be added to that list, but first, let’s click to the plus button existing in the top-right side:
It’s time now to configure a new App ID for our demo application. For starters, we need to fill in two fields:
- A description about the new App ID. In this sample it’s not really important what you will type here, but you’d better pick a good and precise description in real-world cases.
- The Bundle ID of the app. Just copy that value from your Xcode project, and paste it here.
As you can see, there’s also one more value between the above two. It’s the App ID Prefix, and usually you don’t really need to change the default value. However, don’t hesitate to do so if it’s necessary to pick a different prefix value. For the purpose of this tutorial, I just leave the default value.
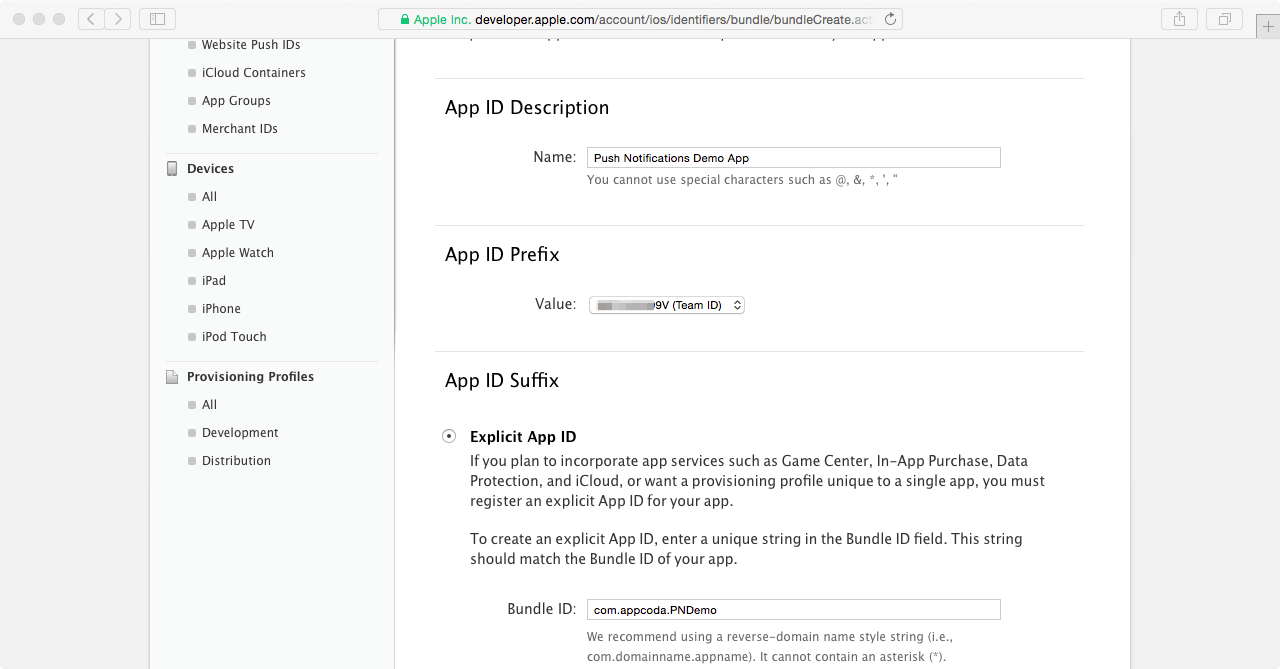
There’s an important detail you should keep in mind: Setting an explicit App ID is necessary when you’re about to enable push notifications, as the App ID must match to specific app Bundle ID. Using a wildcard App ID (an App ID ending with an asterisk *) is something that you’re not allowed to do in this case. Personally, I always find it way better to set an explicit App ID than using the wildcard, no matter what the features of the app are meant to be. Doing that, it’s also easy to distinguish each App ID when you see it listed in the IDs summary page.
After having set the above values, scroll down until you reach the App Services area. At the bottom of the provided services, you’ll find the Push Notifications option. Click to the checkbox to mark it as selected, and make sure twice that it is checked before you continue.
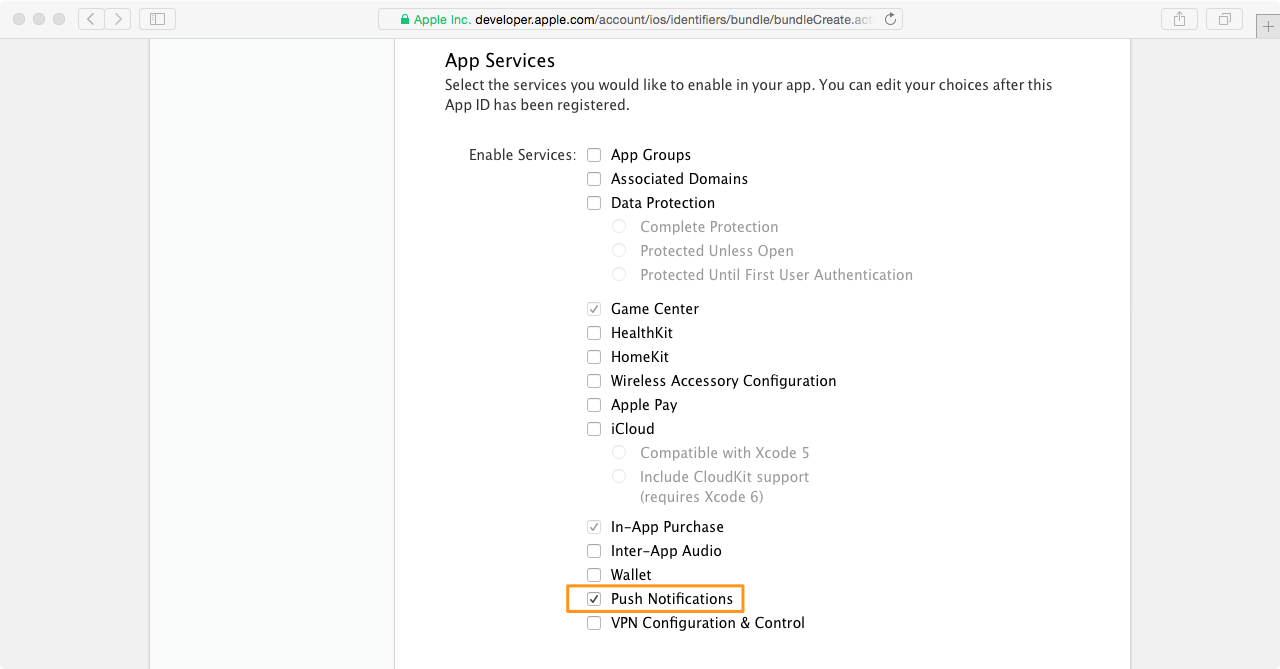
Next, click to the Continue button, and wait for a confirmation page to show up. Verify that everything is okay, and then click to the Submit button to get finished. If you feel that something is wrong, then you can go back and change any of the previously set values.
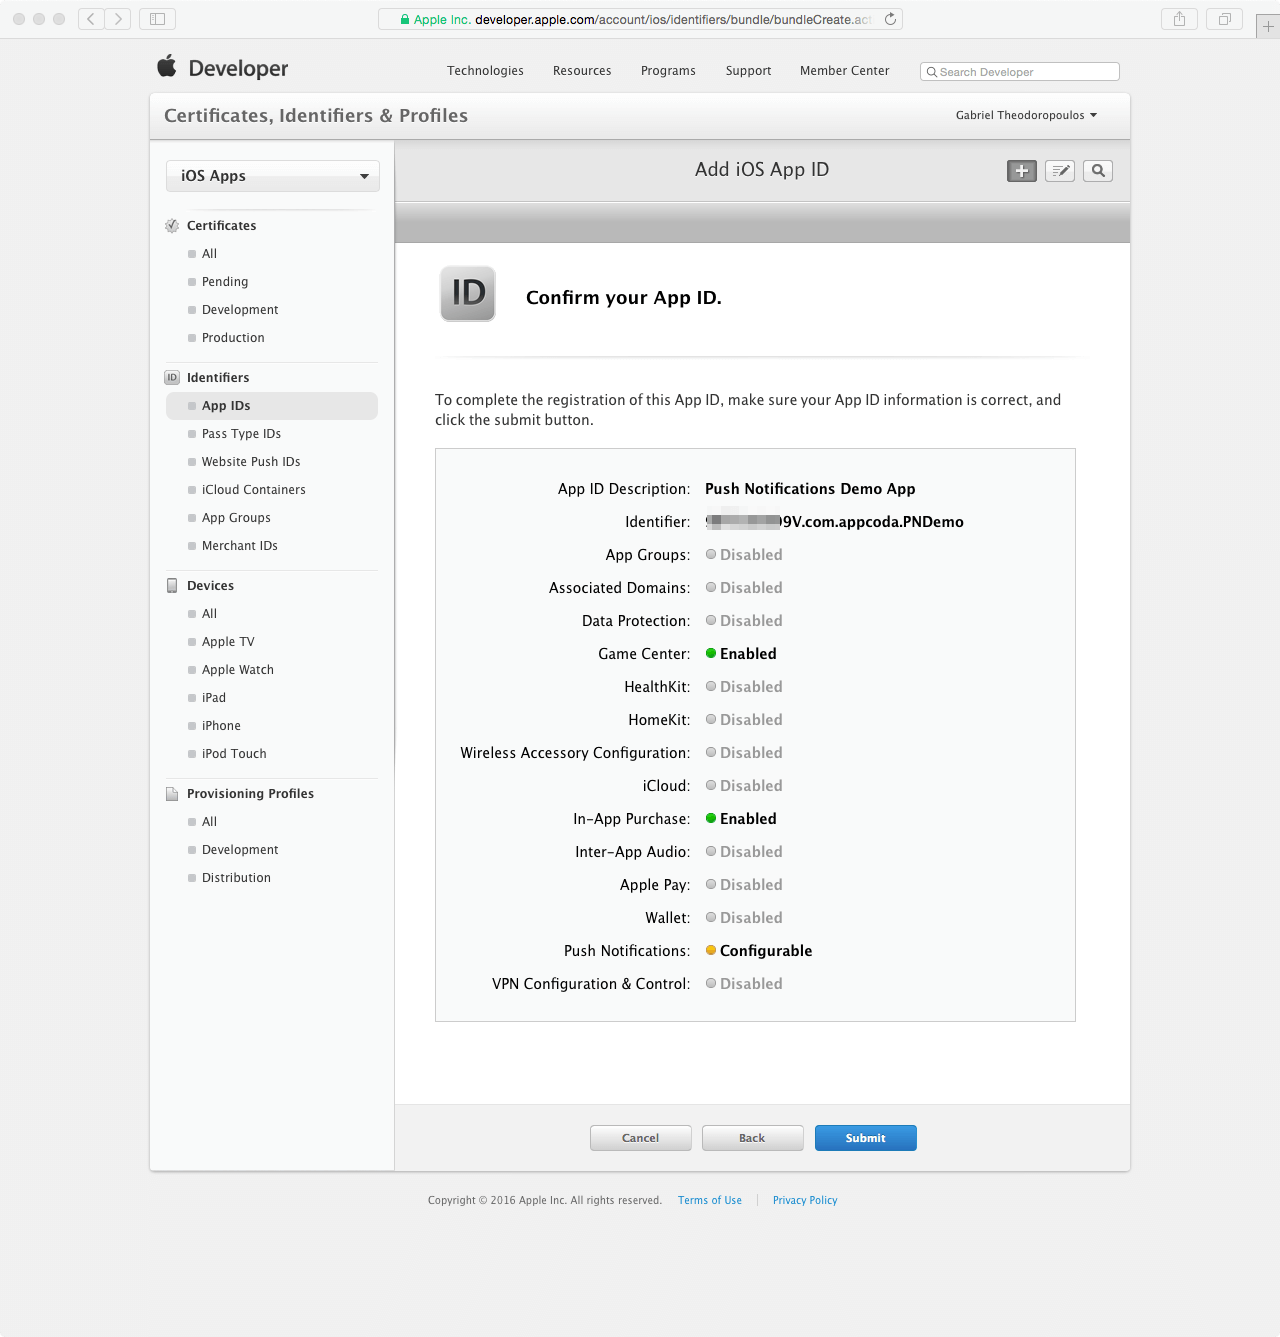
The last step here is to see the Registration Complete page. Just click to the Done button, and you’ll see the new App ID being listed to the App IDs collection.
Step 3: Configure the App ID for Push Notifications
You might have noticed in the previous part that the status for both Development and Distribution mode is not marked as Enabled but as Configurable, even though we checked (enabled) the Push Notifications service during the App ID creation. That means that we need to take some extra actions so we can manage to switch to the proper state.

Note that for the sake of the tutorial we’ll configure the push notifications for the Development mode only. As we are not going to test any push notifications in production stage, we won’t touch the Distribution mode at all. However, whatever you’ll see next applies for that case as well. In a real app you should definitely configure the Distribution mode, otherwise push notifications are not going to work when your app will go live to the App Store.
Let’s get going now by clicking to the newly created App ID in the list so it gets expanded. Right after all the displayed services there’s a button titled Edit. Click it to proceed.
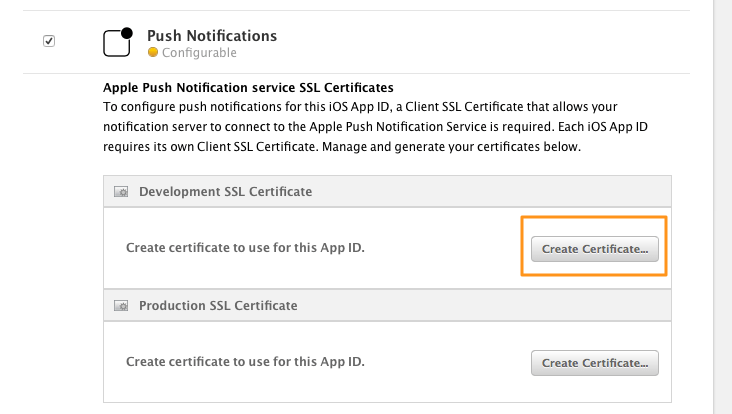
In the next step scroll down until you see the Push Notifications section. You’ll find two buttons there which you can use to create SSL Certificates for both the Development and Production stage. As we’re interested in the Development mode only, click to the first button as shown below:
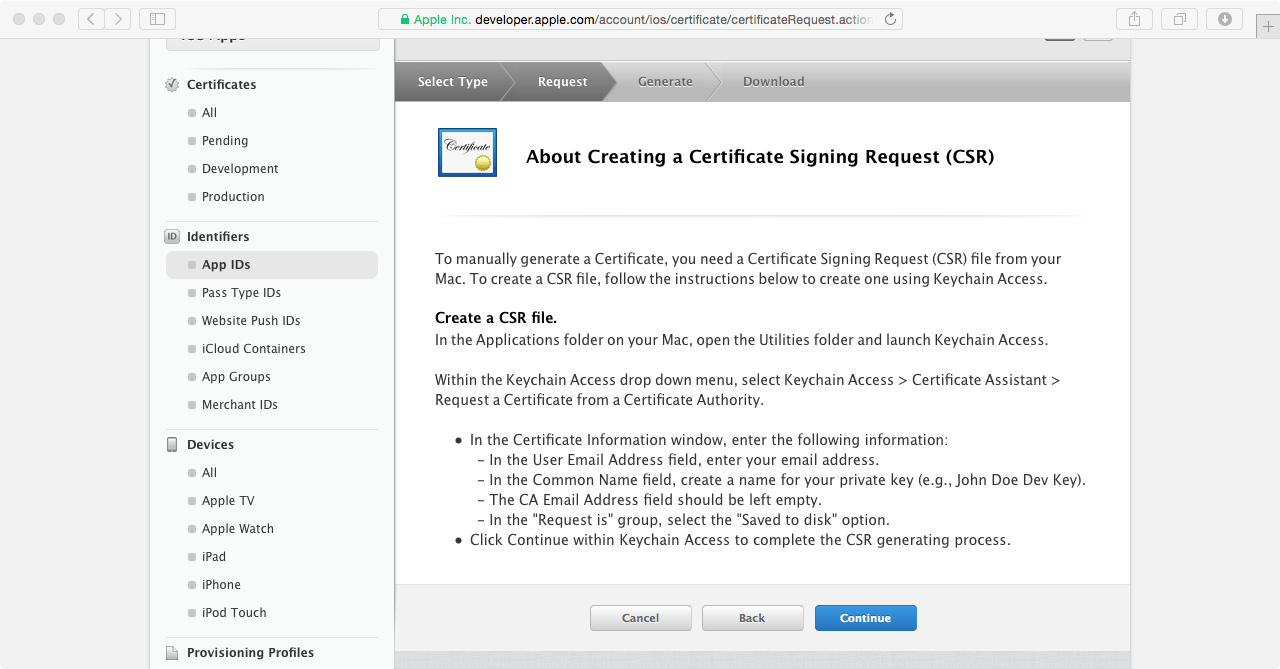
It’s about time now to make use of the Certificate Signing Request file we created through the Keychain Access app a couple of parts ago. So, let’s keep going with that process, and in the first step of the guide just click to the Continue button. Here you get just some instructions on how to generate the CSR, in case you haven’t done so already.
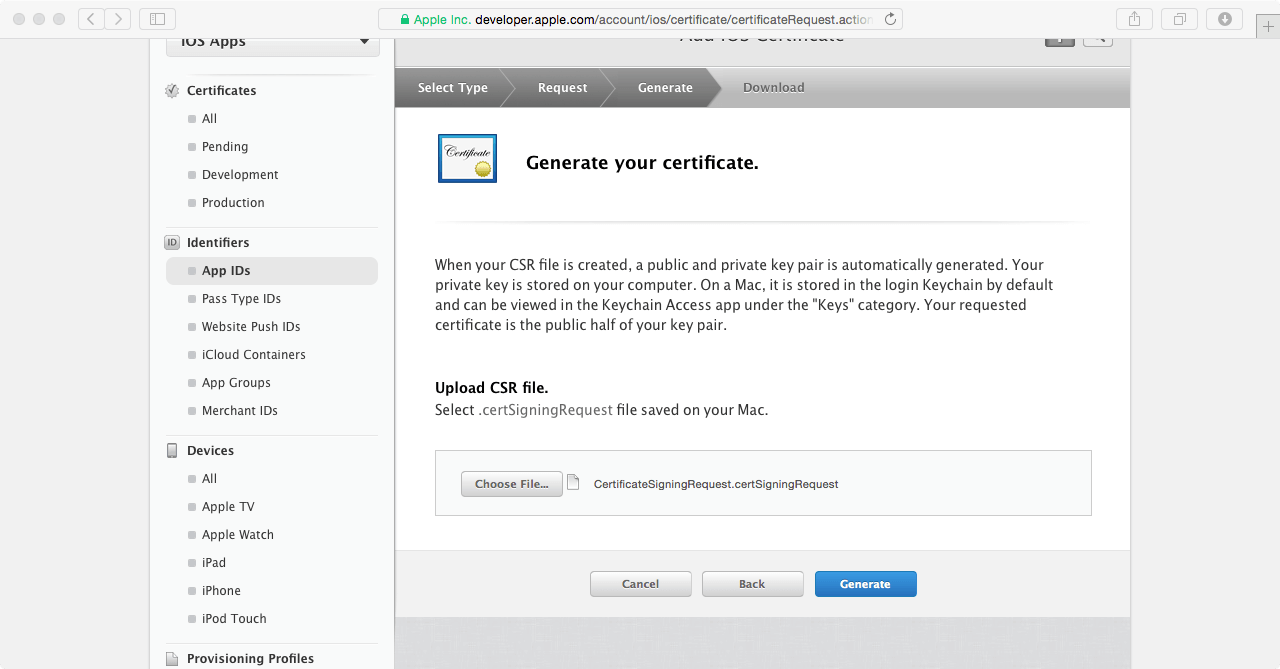
Next, click to the Choose File… button so you can search for the CSR file that you generated in the first step. If you hadn’t changed the default file name, then you’re looking for a file titled CertificateSigningRequest.certSigningRequest.
Finally, click to the Generate blue button that you can see in the following screenshot.
Great, you just created a new certificate that will enable you to send push notifications in development (sandbox) mode. Now, you must download it and add it to the keychain (the Keychain Access app on Mac), so proceed by clicking to the Download button.

The file you just downloaded is named aps_development.cer. Spot it in your Downloads folder and double click on it, so it’s added to the collection of certificates in the Keychain Access app.
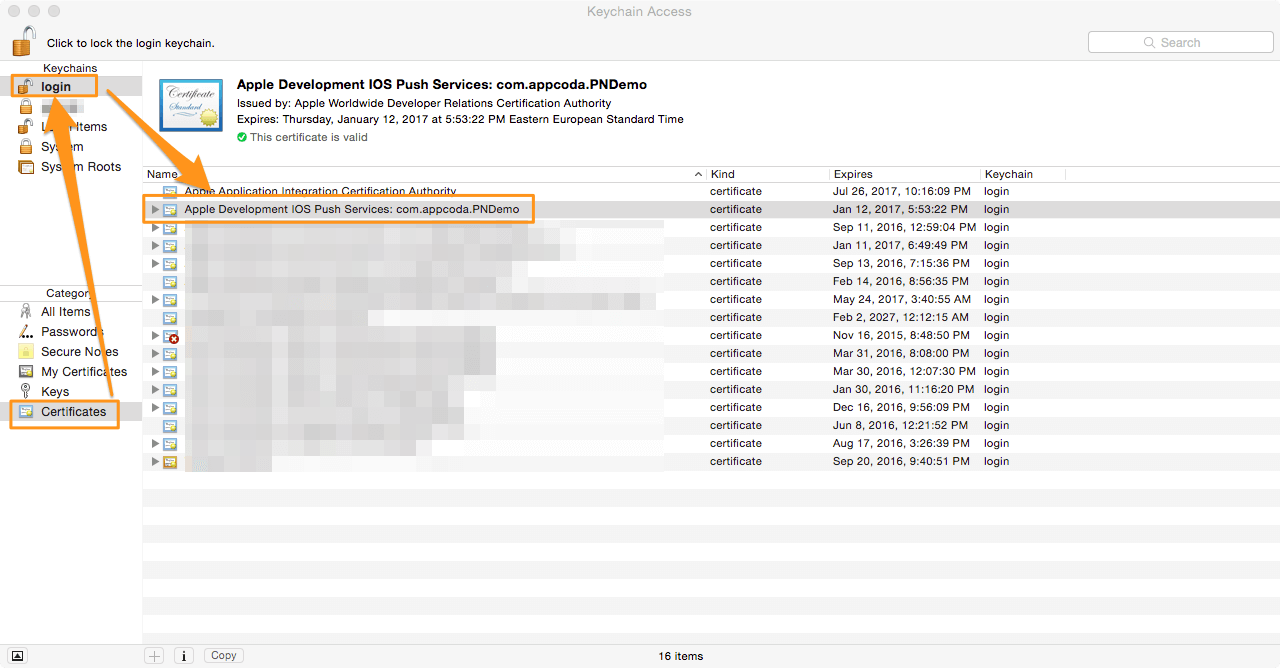
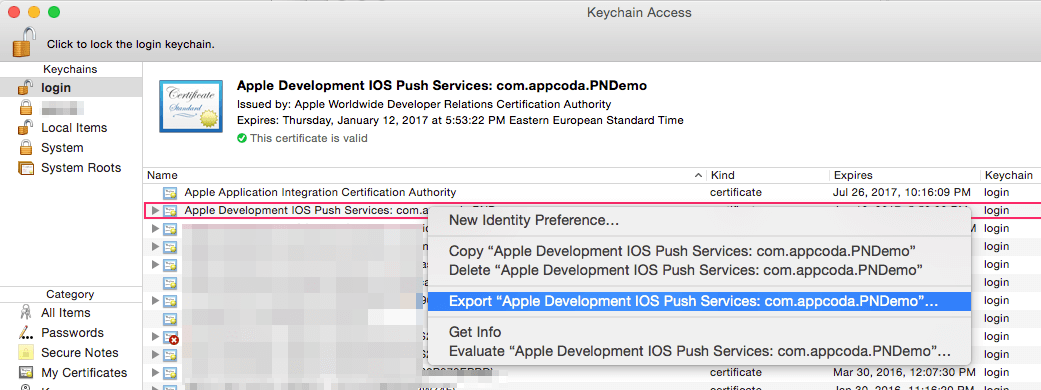
Once you locate the new certificate in the Keychain, right click on it, and then click to the Export “…” option.
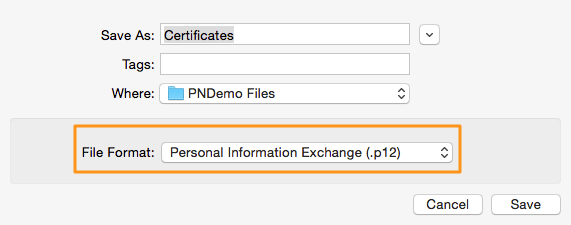
Make sure that the .p12 file format is selected before you click to the Save button.
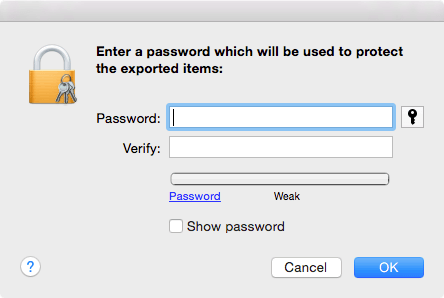
You can skip setting a password simply by clicking to the OK button in the next window. If you set one, make sure to remember it or write it somewhere, because the file becomes unusable if you forget it.
Note that in this tutorial we are not going to use the file you just exported. You are going to need it, however, in case you want to test push notifications from a server like Parse, where you have to provide the .p12 file before even sending your first notification. So for now just keep that file along with the rest. At this point it’s important to realise that knowing how to generate a .p12 file for development mode enables you to do the same for the production stage as well.
Step 4: Register Your Device
First of all, let me say that this step is useful for testing push notification only (in sandbox mode), and it’s not necessary for the production mode. Here we are going to register the device (or devices) that the app is going to be tested to in the Apple Developer website. If you have already done so in the past and your device is already listed there, then you can just skip this step.
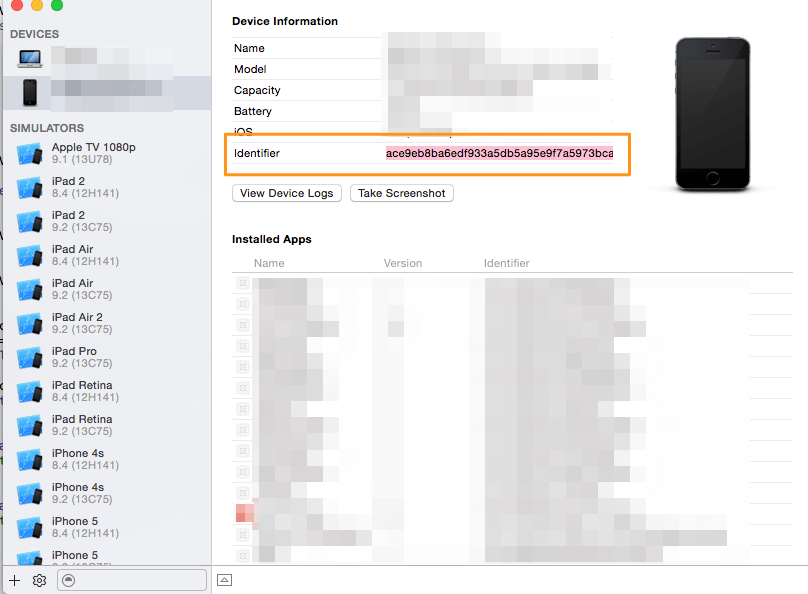
Supposing that you are going to add your device for first time here, what you have to initially do is to plug it to your Mac and then go to Xcode. Open the Window > Devices menu, so a new window with all devices and simulators to appear.
Continue by clicking to your device to the left, so you see its details on the main window area. You’ll notice that there is a field called Identifier, containing a long string with letters and digits as its value. Double click on that value, and then copy it.
Now go back to the Apple Developer website, and click to the All option under the Devices category. Any existing registered devices will be listed to the main window area. To add a new device, click to the button with the plus icon (+) to the top-right side.
In the new form that appears, first set a name for your device in the Name field (for example, Gabriel’s iPhone 6S, or My lovely iPad). Then, paste the device identifier you copied before in the UDID field, and you’re done.
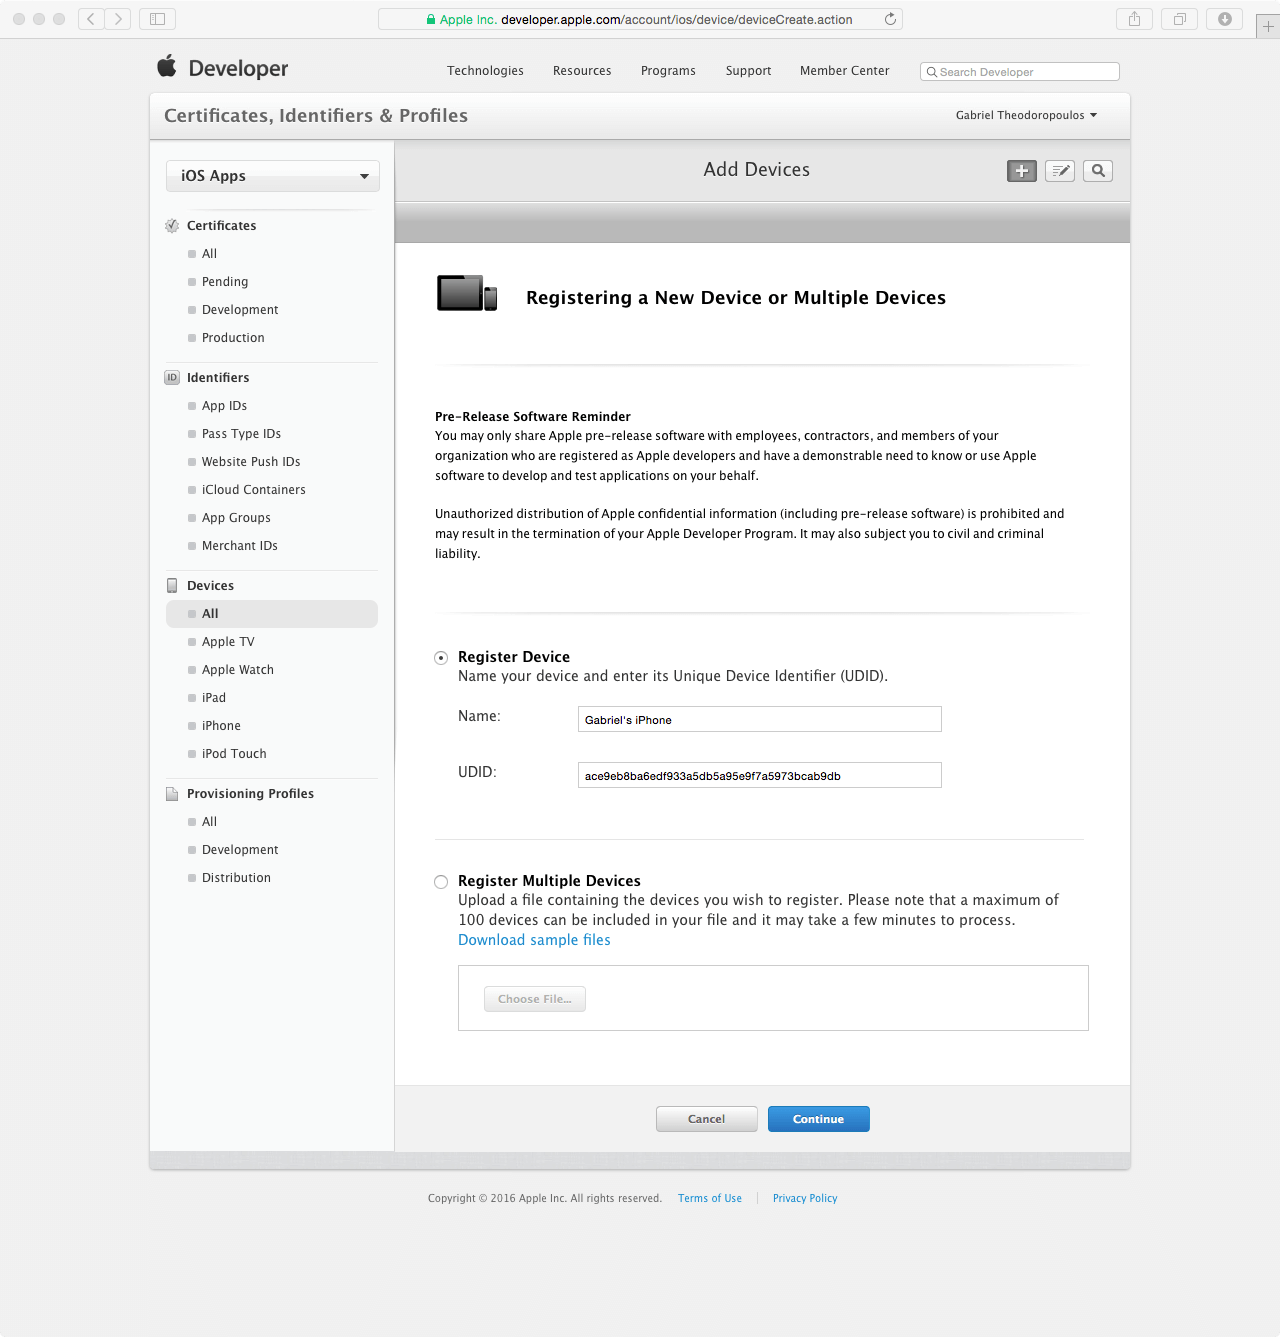
Click Continue, and in the next step make sure that the information you just provided is accurate. Once you are ready, click to the Register button to get finished with the guide.
You can verify that your device has been added indeed to the list with the registered devices simply by clicking once again to the All option in the Devices category. Go through all entries until you find the one with the name you just entered.
Step 5: Create a Provisioning Profile for Development
As a last job in the Apple Developer website, let’s create a provisioning profile for Development so we can code sign our app later on. Note that you have to create a Distribution provisioning profile and use it similarly to what you’ll learn here, prior to uploading your app to iTunesConnect either for use on TestFlight or on the App Store.
On the Apple Developer page, click to the Development link in the Provisioning Profiles category. Any existing profiles will be shown to the main window side, and in a few minutes our new one will be added there as well.
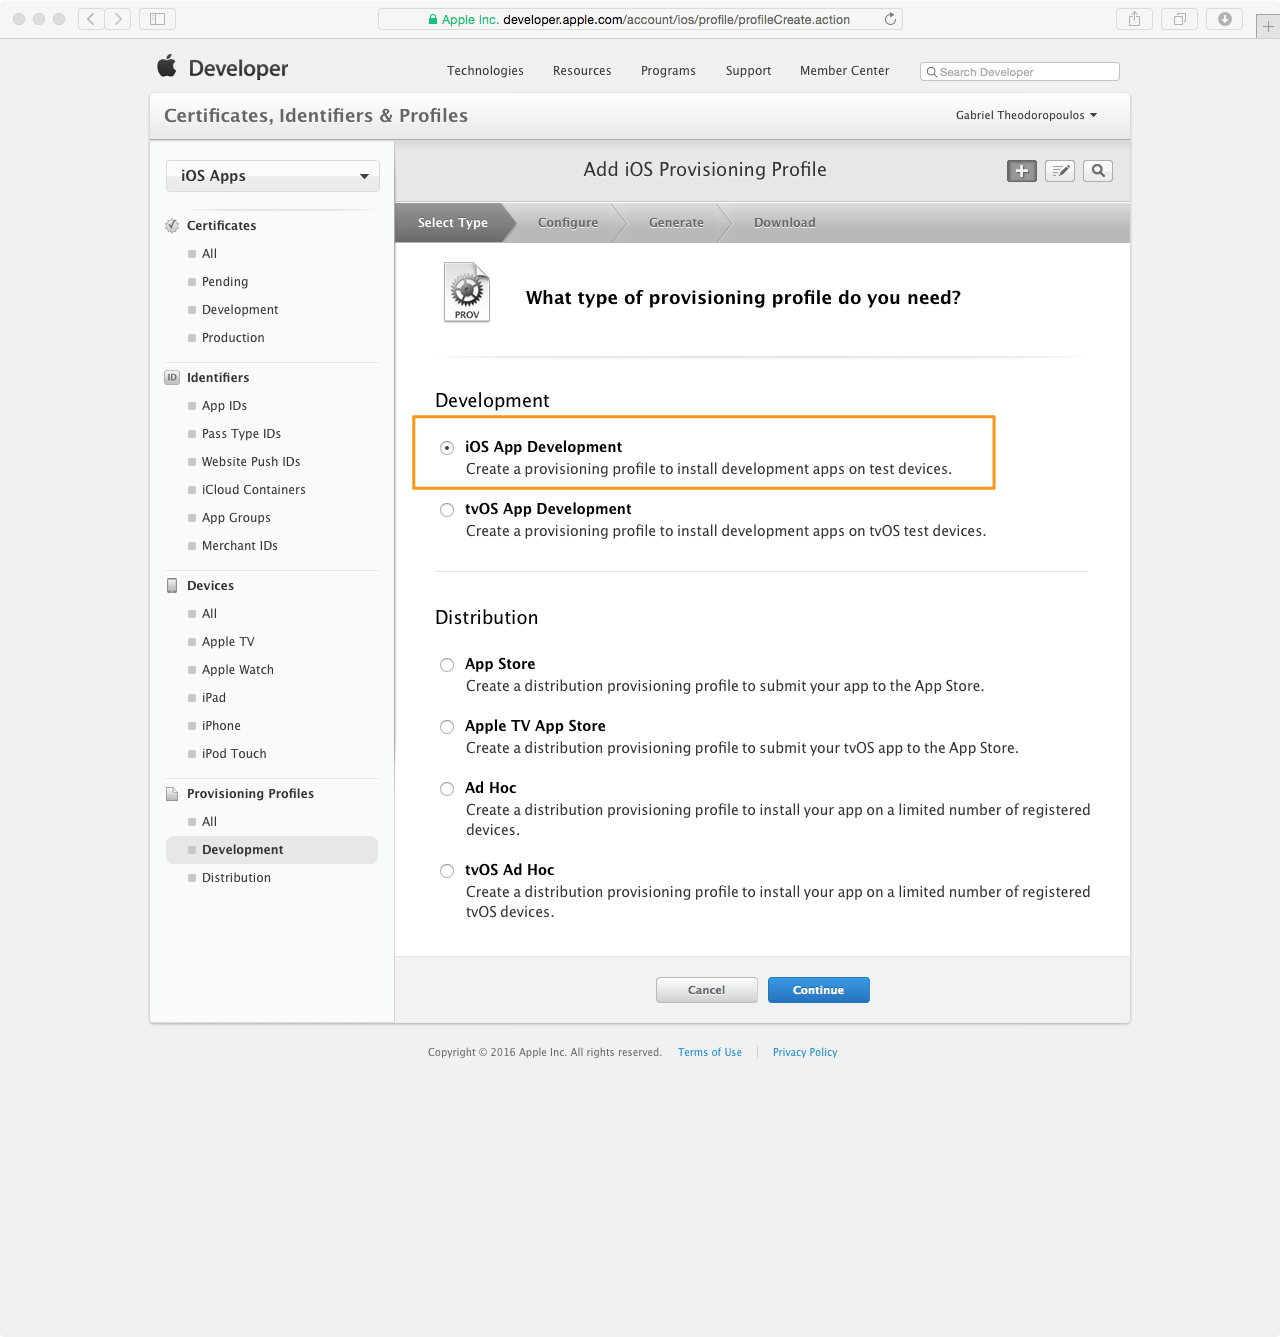
To create a new provisioning profile, click to the plus (+) button to the top-right side of the window. In the new form that appears, and for the sake of our example, select the iOS App Development option (the first one) by clicking on it. Note that you have to select an option from the second (lower) section (most probably the App Store) when you’ll be creating a provisioning profile for Distribution.
Anyway, once you select the proper option, use the Continue button to move to the next step.
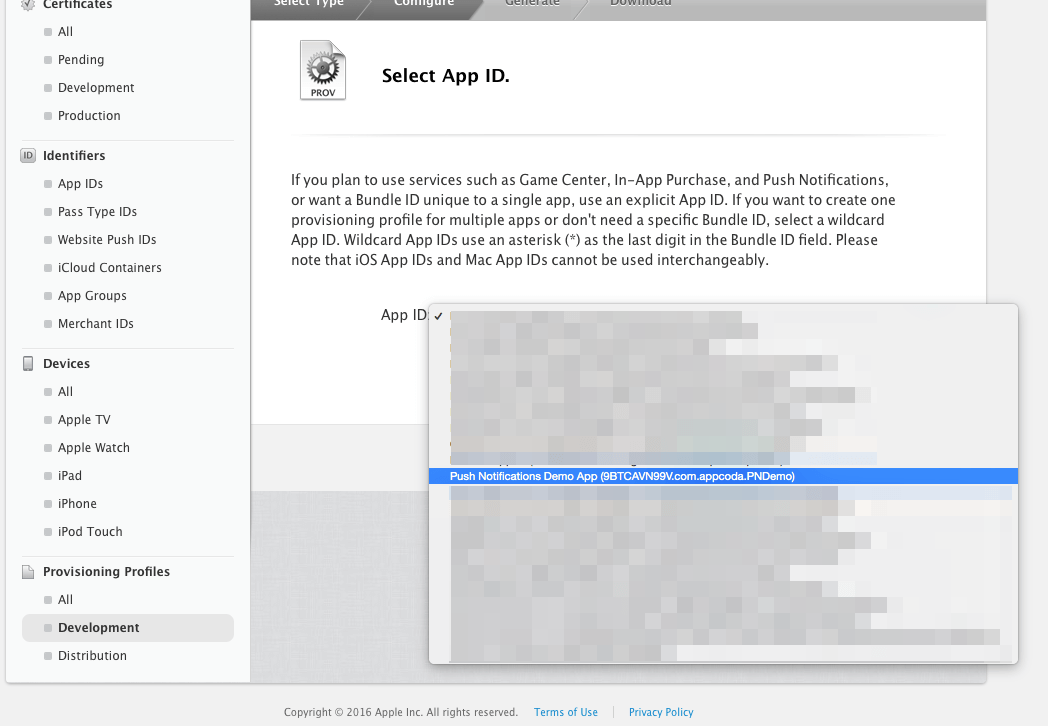
Now it’s time to connect the profile we’re creating to the App ID matching to our app. Locate and select the proper App ID value in the dropdown control and then move on.
Next, you must include your iOS Development certificate to the provisioning profile (supposing that you have at least one). If there are more than one certificates like it’s shown in the screenshot below and you are unsure which one you should select, then simply check the Select All checkbox and you are covered.

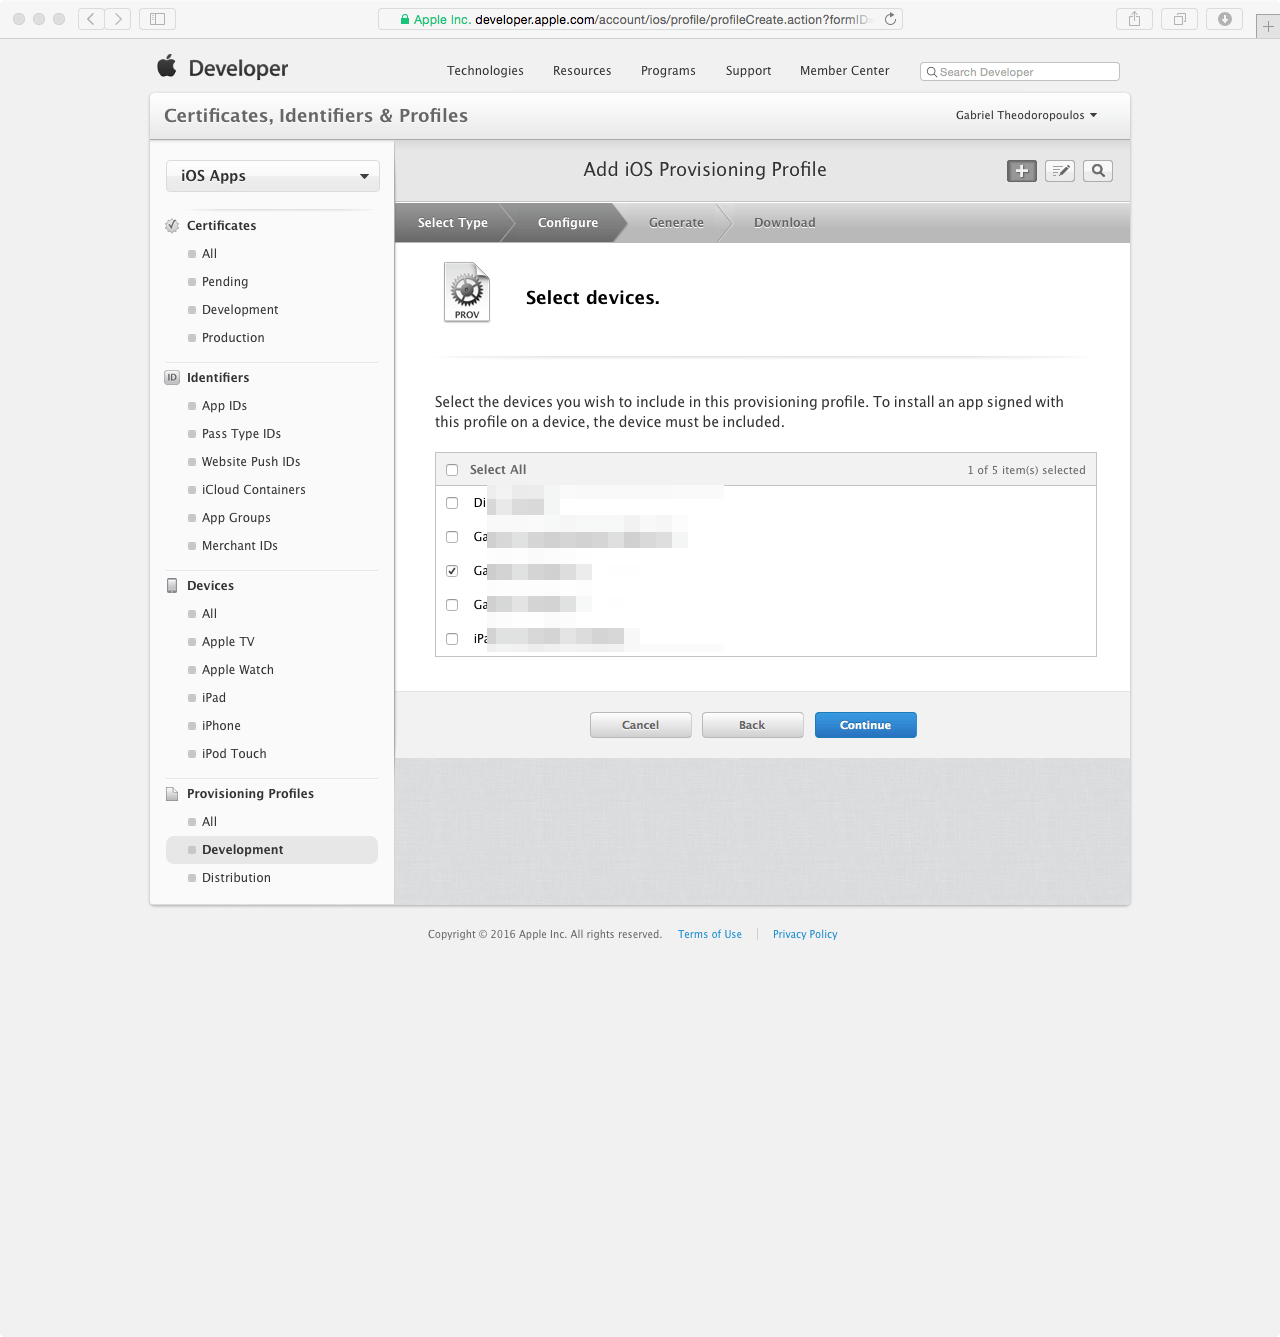
Continue, and get ready to select the device or devices that the app is going to be run to. Make sure that you won’t forget to select any devices which you want to test push notifications to. Once again, click Continue when you’re ready.
Lastly, give a name to your provisioning profile so you can distinguish it amongst others. I named it “PNDemo Development Profile“, but feel free to give any other name you desire.
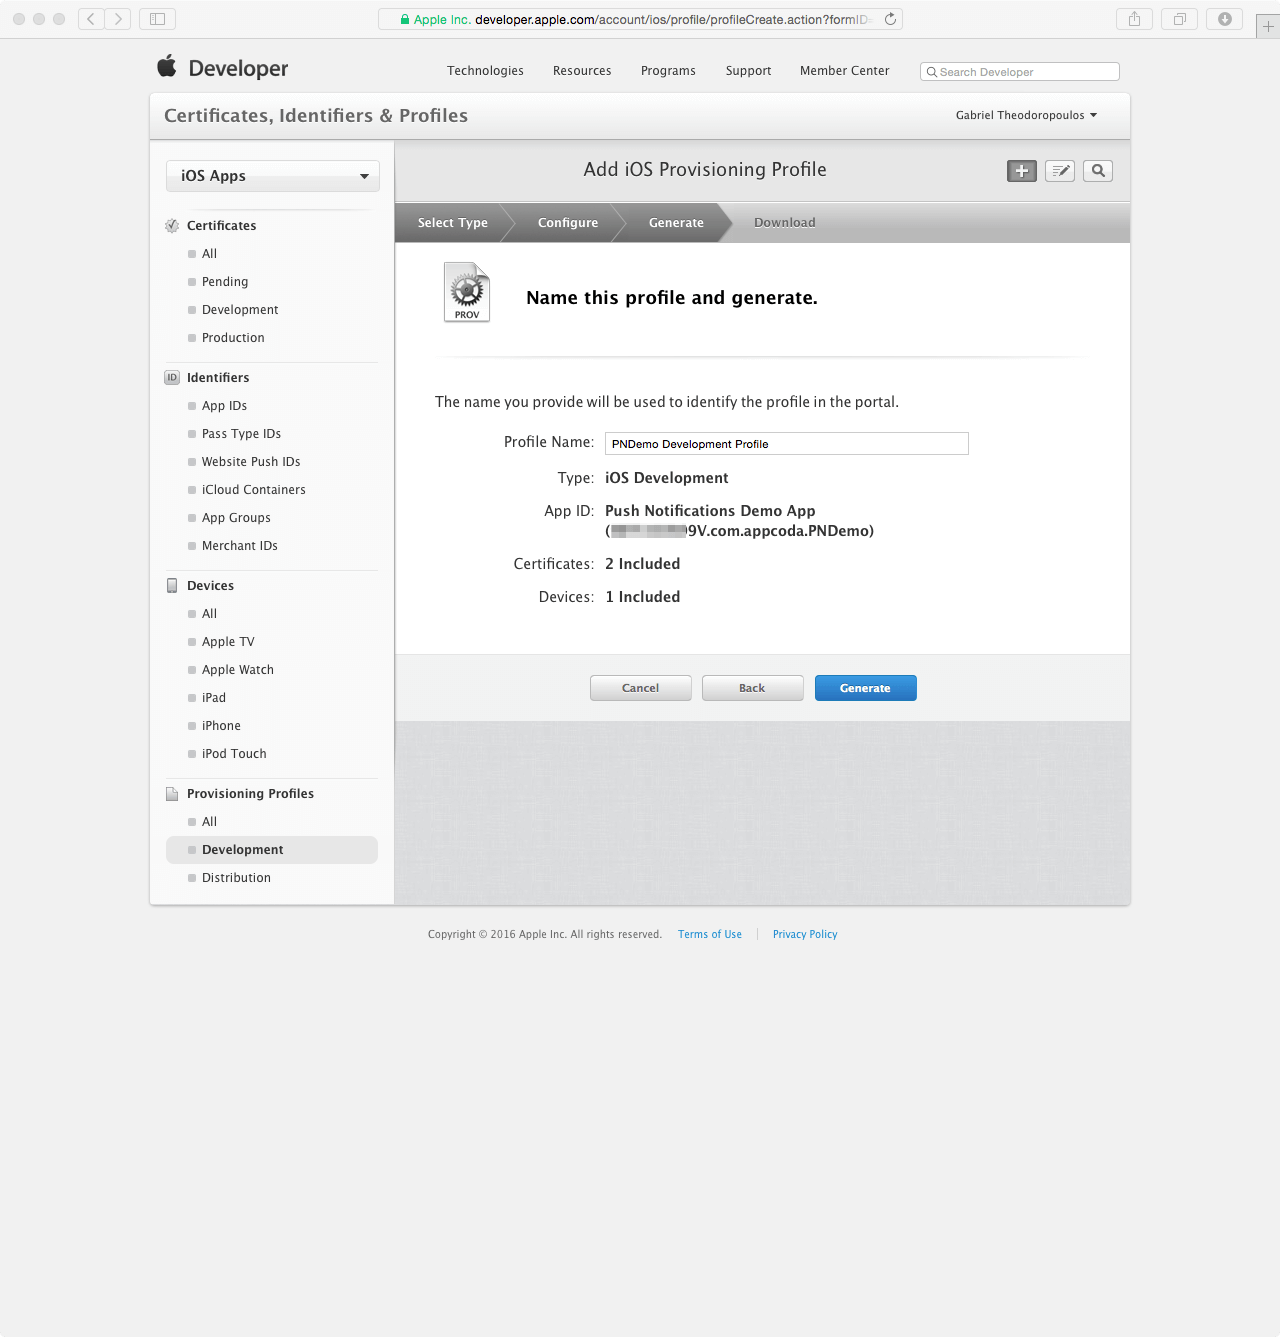
Click Generate and wait for the next screen. When the new profile gets ready, you’ll be able to download it as shown next:
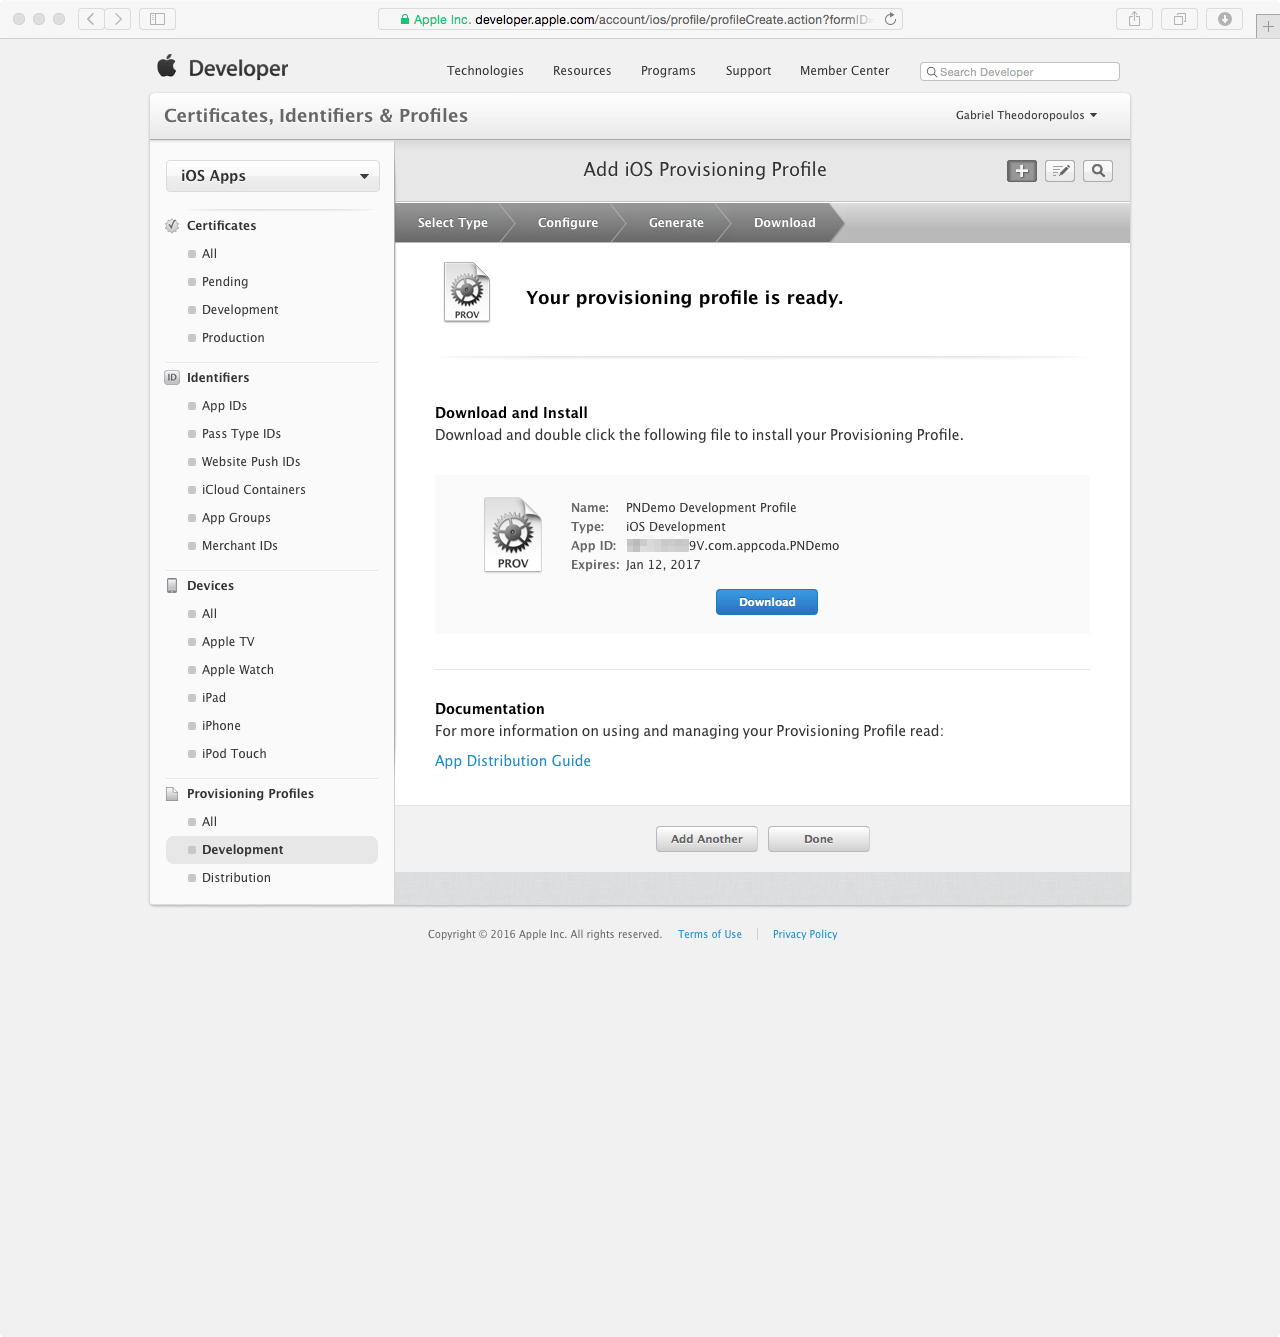
All you have to do now is to follow the instructions of the above image, and double click to the file you just downloaded so as to be installed. If you named it just like I did, then your file is called PNDemo_Development_Profile.mobileprovision.
Step 6: Configure the Project
Starting from this part, we’re going to abandon the Apple Developer website, and to focus on our project. We have two goals to achieve here:
- Initially, we must enable the Push Notifications capability in the project, so we can actually get notifications on any device. This step is basic, but trust me, even though it is a simple prerequisite, a lot of developers simply forget to turn a simple switch on and activate that capability.
- We’ll properly set the values for both code signing and provisioning profiles that must be used by the app. Please note that whatever we’re about to do regards only the Development mode, as we’re not dealing with the Production stage at all. However, everything is quite similar in both cases, so you can easily follow the same steps for the Distribution mode in a real app before it goes live.
So, bring the app in Xcode in front of you and select the project in the Project Navigator. Make sure that you are in the General tab. What you have to do is to go to the Team dropdown control, and select the proper team that will be used for provisioning.
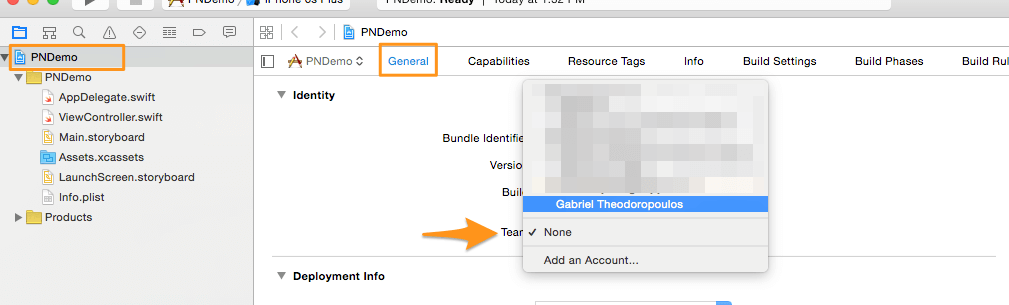
If you see no entries in the Team, then you must go to Xcode > Preferences… menu, in the Accounts tab and add a new Apple ID. Provide the Apple ID and password matching to your Developer account, and click to the Add button to get finished. Going into the details of this process is out of our scope, therefore if you are unsure on what you should do please take a look at this link for a step by step guide. After you have successfully added your Apple ID, close the Preferences window and return to General tab so you select the proper team value.
Next, click to the Capabilities tab and go to the Push Notifications section. All you have to do here is to just turn the switch on.
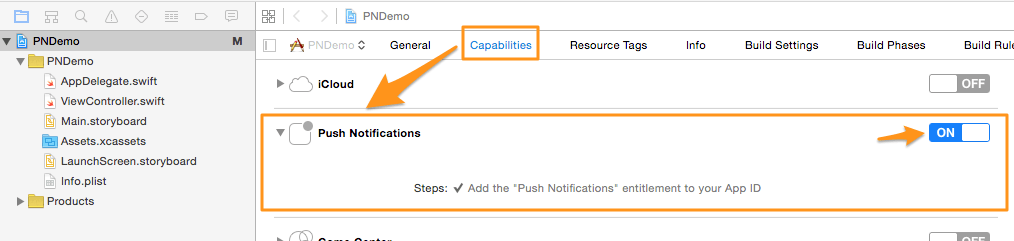
As the message in the above screenshot says, by enabling the Push Notifications capability the proper entitlement is automatically added to the Info.plist file.
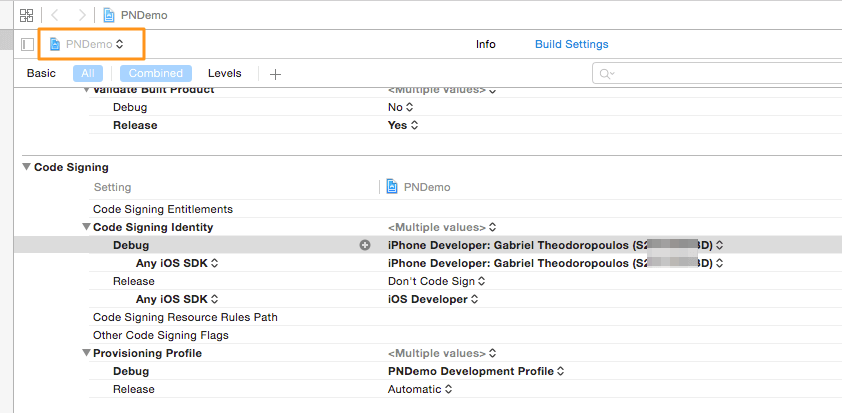
Now open the Build Settings tab, and locate the Code Signing section. Expand the Provisioning Profile entry, and in the row titled Debug click to the Automatic value so as to display a list with all the existing provisioning profiles in your Developer account. Select the one with the name matching to the profile you downloaded and installed in the previous step.
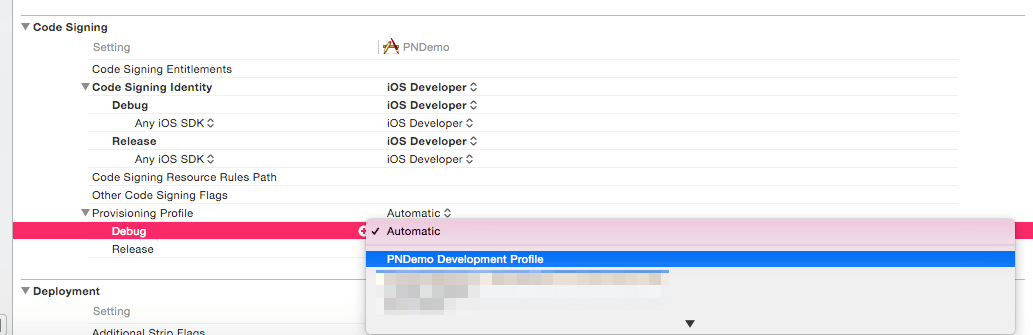
There is no need to set a provisioning profile in the Release row right now, as we haven’t created one for Distribution. However, you mandatorily have to do that in the same fashion when you create and download the proper provisioning profile from the Apple Developer website.
Right above the Provisioning Profile you will find the Code Signing Identity entry. Click to the arrow in the left side to expand it, if it’s not already expanded. Similarly to what we just did, click to the iOS Developer (or iPhone Developer) value in the Debug row, and select a proper identity as shown next:
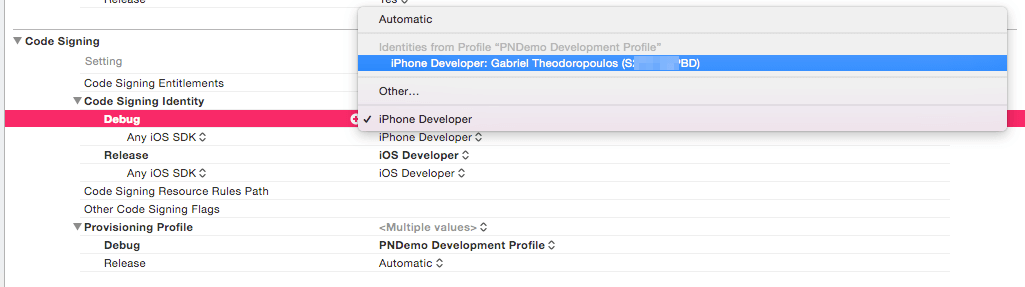
Do not forget that your identity matching to Distribution should be set in the Release row in a real app as well.
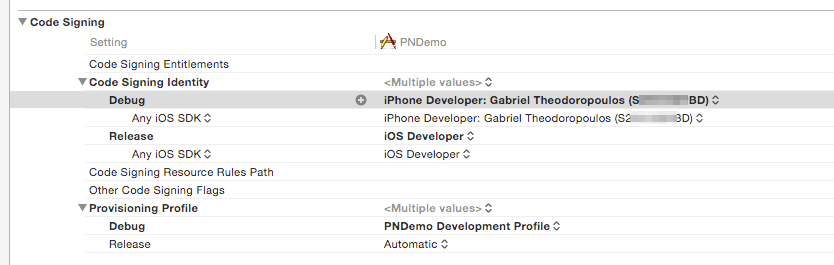
Now click to the Target to the left side of the General tab, and select the Project:
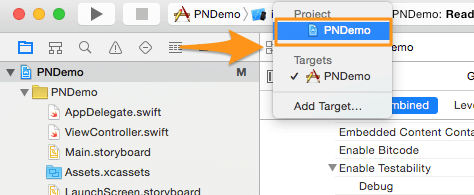
Go to the Code Signing section, and follow the exact same steps as above. First select the correct provisioning profile for the Debug mode, and then the proper Code Signing Identity.
Step 7: Register for Push Notifications
All the required configuration to the project has been done, so it’s time to write some lines of code. We are going to begin by making the app register itself to iOS for push notifications and to explicitly specify the notification types we desire (like for example badge, sound and alert message).
In a matter of fact, we are going to use all notification types mentioned, and that’s where we are going to start from. Open the AppDelegate.swift file, and go to the application(_:didFinishLaunchingWithOptions:) method. Add the two lines shown right above the return true command:
func application(application: UIApplication, didFinishLaunchingWithOptions launchOptions: [NSObject: AnyObject]?) -> Bool {
    // Override point for customization after application launch.

    let notificationTypes: UIUserNotificationType = [UIUserNotificationType.Alert, UIUserNotificationType.Badge, UIUserNotificationType.Sound]
    let pushNotificationSettings = UIUserNotificationSettings(forTypes: notificationTypes, categories: nil)

    return true
}
Initially, we specify the notification types we desire for our app, and then we create a UIUserNotificationSettings object that will be used to register for push notifications. If for any reason you don’t want to make use of all types shown in the above array, just remove the undesired ones.
Now let’s make those types known to the system, and let’s register for receiving push notifications:
func application(application: UIApplication, didFinishLaunchingWithOptions launchOptions: [NSObject: AnyObject]?) -> Bool {
    ...

    application.registerUserNotificationSettings(pushNotificationSettings)
    application.registerForRemoteNotifications()

    return true
}
Even though both of those lines are important, the last is the one that really makes possible push notification to be received. The four lines we added in total in this part are pretty much a standard piece of code, so you can use it almost as is in your projects. I’m saying almost, because you always have the possibility to change the notification types.
Step 8: The Delegate Methods
Registering for push notification is important, but it consists of the half programming work we have to do only. The other half regards the implementation of some useful delegate methods that make your app properly respond to received notifications. So let’s see them one by one.
The first delegate method we are going to implement is the application(_: didRegisterForRemoteNotificationsWithDeviceToken:). It is called when the app successfully manages to register itself for push notifications. In normal conditions, the second parameter is vital, as it contains a unique key for each device, called device token. In real-world applications, you should send the device token to the server that originally sends the push notifications. The server then (provider) uses it by sending it to Apple Push Notification servers along with any other necessary information, and that’s how APN servers know which the recipients of the notifications are.
The device token is in this form: < XXXX XXXX XXXX XXXX XXXX >. Usually you’ll be needing to format it prior to sending it to your server. For example, you might want to remove the “<" and ">” characters, or to remove the space characters between, but the final formatting that you will apply is strongly connected to the way the server handles the token. If you are planning to use as a provider a solution that also gives you a framework to integrate and handle push notifications (like Parse), then the framework guidelines will actually show you the kind of implementation you have to make.
Anyway, as we are not meant to use a real server in the scope of this tutorial, all the above is just information that you definitely need to know so you act appropriately in real conditions. For now, we are going to show the device token to the console only. We need to know it, so we can test push notifications in a while. Here’s our implementation:
func application(application: UIApplication, didRegisterForRemoteNotificationsWithDeviceToken deviceToken: NSData) {
    print("DEVICE TOKEN = \(deviceToken)")
}
Registering successfully for push notifications is not something that we can be sure of. There may be reasons that make that effort fail. Therefore, it’s important to implement the following method as well, so we handle situations like that:
func application(application: UIApplication, didFailToRegisterForRemoteNotificationsWithError error: NSError) {
    print(error)
}
The proper error handling is of course something that you have to do based on your app’s logic or requirements.
As you know, push notifications will appear on the device when the app is not in the foreground, however, it often happens notifications to be received while the app is running, and in that case you as a developer have to take the proper actions so to properly deal with them. In our demo, we will just show in the console the incoming information. In real apps however, this should definitely not be the approach you follow.
Here’s the respective delegate method:
func application(application: UIApplication, didReceiveRemoteNotification userInfo: [NSObject : AnyObject]) {
    print(userInfo)
}
Note that there are more delegate methods that you can use depending on what you have to make to your app, however it’s not our goal to see them here. For your reference, here is the link to the UIApplicationDelegate protocol documentation, where you can find more methods regarding the remote notifications. Considering that this post aims to guide you on how to get prepared for push notifications, the above three methods are good enough to get us covered.
Sending Push Notifications in Sandbox Mode
Testing push notifications was a hassle sometime ago, as the only way that had been available was either to write a command line script from scratch, or to find a ready script and change it according to the details of the app and the device. This solution still exists, but today there is a number of apps on the Mac App Store that have been designed for this job exactly. As you understand, this is the way that we are going to follow here.
The advantage when using a Mac app for sending test push notifications is that they provide a user interface for filling the necessary data in (such as device token or push notifications certificate), and they totally hide the “boring” programming part regarding the connection details to APN servers. Actually, in most of them you have to specify three things only:
- The device token of the target test device.
- The path to the push notifications certificate file.
- The payload of the push notification (message, badge number, and sound).
In this part I’m going to present two of those applications, but let me make clear that I make no advertisement or promotion of any kind at all. I consider to be simple tools that help me do my job easily and in less time both of the apps you’ll see next, and any other similar apps existing on the Mac App Store. So, based on that logic, let’s get started so we manage to eventually send our first push notification.
The first one is called APN Tester Free, and you can find it here. It’s a free app that you can download and test push notifications in no time at all.
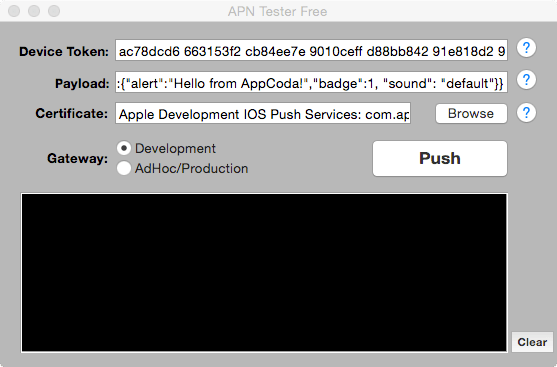
As you can see in the above image, you must necessarily paste the device token to the Device Token field (without the “<" and ">” characters). You can get the device token easily, as long as you run the demo app at least once and take a look at the console. What you should see is similar to that:

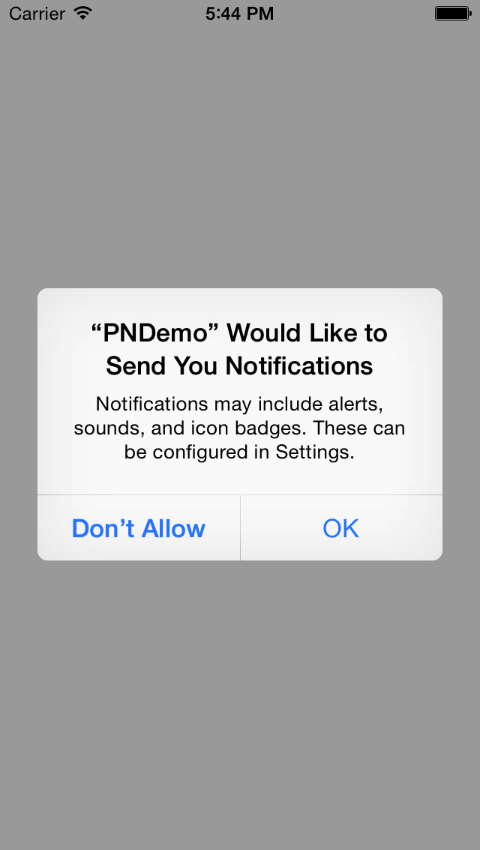
Note that the first time you run the app, you’ll be asked to allow remote notifications. Apparently, you have to allow them if you want to test them.
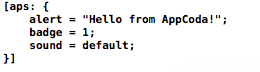
In the Payload field you specify the details of the push notification. If you want for example to receive a message, badge number and the default sound, here’s what you should write:
{"aps":{"alert":"Hello from AppCoda!","badge":1, "sound": "default"}}
For more information about the payload and all the possible values you can set, please visit the official documentation page.
To set the proper value to the Certificate field, you must use the Browse button and search for the push notifications certificate for development (if the Development is the selected option in the Gateway of course). Just to refresh your memory, this file is called aps_development.cer (unless you changed its name). So, browse for it, and you’ll see a message in the console saying that the .cer file has been loaded after you have imported it to the app.
You’re ready to send a push notification in sandbox mode when you set all the above. All you have to do is to click to the Push button. In the console of the app you’ll see messages regarding the sending of the push notification, and if something fails you’ll see it there too in red coloured characters.
In case you followed every part in this tutorial step by step and you haven’t missed something, then you’ll receive your first push notification.
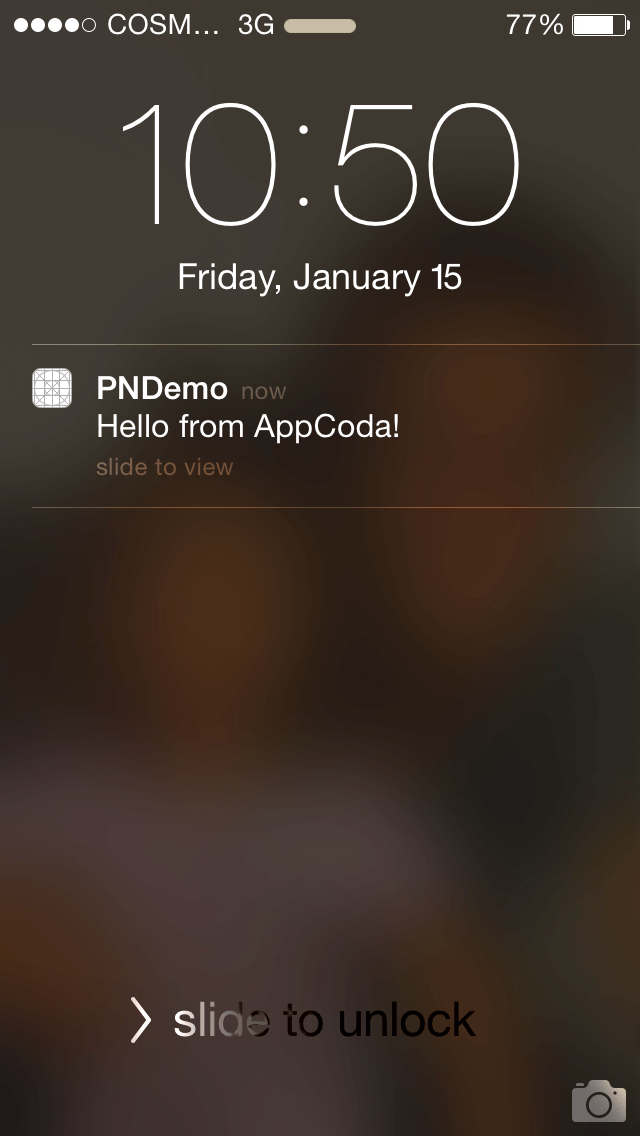
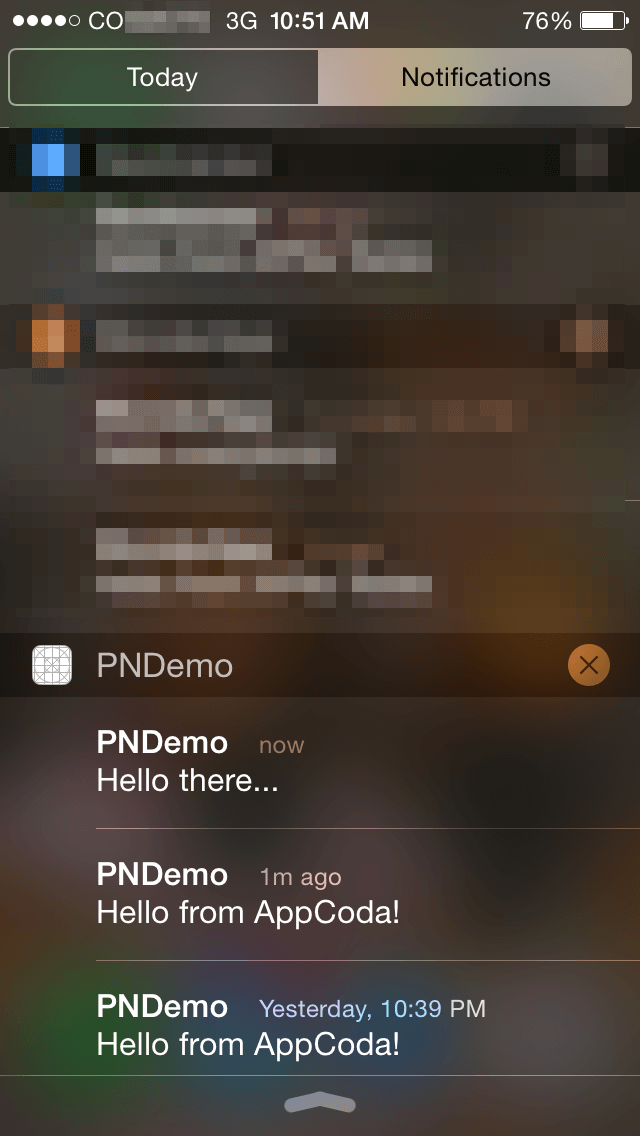
Don’t hesitate to send push notifications again and again, so you see how they appear when the device is locked, when you open the notifications center on the device, or even when the app is running. In the last case, you’ll see in the Xcode console something like that:
Also, play around by changing the badge number, or enabling and disabling the sound so you verify that everything is working as expected.
The second application that is being presented here as a tool called Easy APNs Provider, and you can find it here. This one is a free app too and it offers some extra options to play with and try more advanced aspects of push notifications (such as additional data).

To use it, begin from the Add tokens… buttons so you add the device token to the app. In the modal window that appears, paste the token in the first field, but make sure that you remove the “<" and ">” symbols, as well as the space characters. In any other case, the token won’t be accepted. Once you do it, click first to the Add button so you see the device token be listed to the bottom side of the window. Optionally, you can set a name for the device by clicking to the left side of the token in the list. At the end click to the Confirm button.
The next step is to browse for the aps_development.cer file again, and import it to the app. Use the 2. Choose Certificate file to do that, and after you’ve finished you’ll see the file’s name being shown next to the button.
Continue by making sure that in the dropdown control right below the selected value is: gateway.sandbox.push.apple.com, and then click to the 3. Connect to: button. You will see in the status that the app has been connected to the Apple Push Notification servers.
Now, you have to prepare the payload of the push notification. To the top-right side of the window select the option you’d like to test. For best demo reasons, you can select the Content, badge and sound option. Then fill in the fields in the form below with any values you desire for title, content, and badge. If you want to see the payload in raw mode (JSON mode), click to the Raw tab, otherwise stay with the form which is a lot easier to handle.
Finally, click to the 5. Send APN button to send the notification. Within a few seconds you’ll receive it in your device.
As I said to the beginning of this part, you are not obliged to use the above two tools only. Make a search to the Mac App Store and find other apps that will possibly serve your needs in a better way.
Summary
There were many steps that we went through in this tutorial, and many distinct actions we had to take. If you are reading this and you have successfully managed to send push notifications in sandbox mode, then you can be pretty much sure that live notifications will work as well. All you have to do is to follow the guidelines presented here but apply them for the Distribution mode, and add those missing parts that we didn’t deal at all with. For example, you have to create a SSL Certificate for distribution by editing your App ID, to create a new provisioning profile for Distribution, and of course to use those in the project’s Build Settings to properly code sign it. In any case, all I wish is you’ve been helped to clear your thoughts and your steps regarding push notifications and eventually make the job done faster. See you!


