RealityKit was a new framework introduced in 2019 to implement high-performance 3D simulation and rendering. We’ve explored ARKit development for 3D objects using SceneKit. In this tutorial, we will see how to build an interactive 3D AR app using RealityKit and Reality Composer, which was released alongside with RealityKit.
With Reality Composer, Apple is taking AR app development a step further, making it simpler for beginners to create an interactive AR experience without writing a line of code. You will understand what I mean after going through this tutorial.
Designing the AR Scene
We’ll start with Reality Composer to create the AR scene. The app is bundled inside Xcode, so you can launch it right away. Go up to the Xcode menu and choose Xcode > Open Developer Tool > Reality Composer to open the app.
Note: You are required to use Xcode 12 to follow this tutorial.
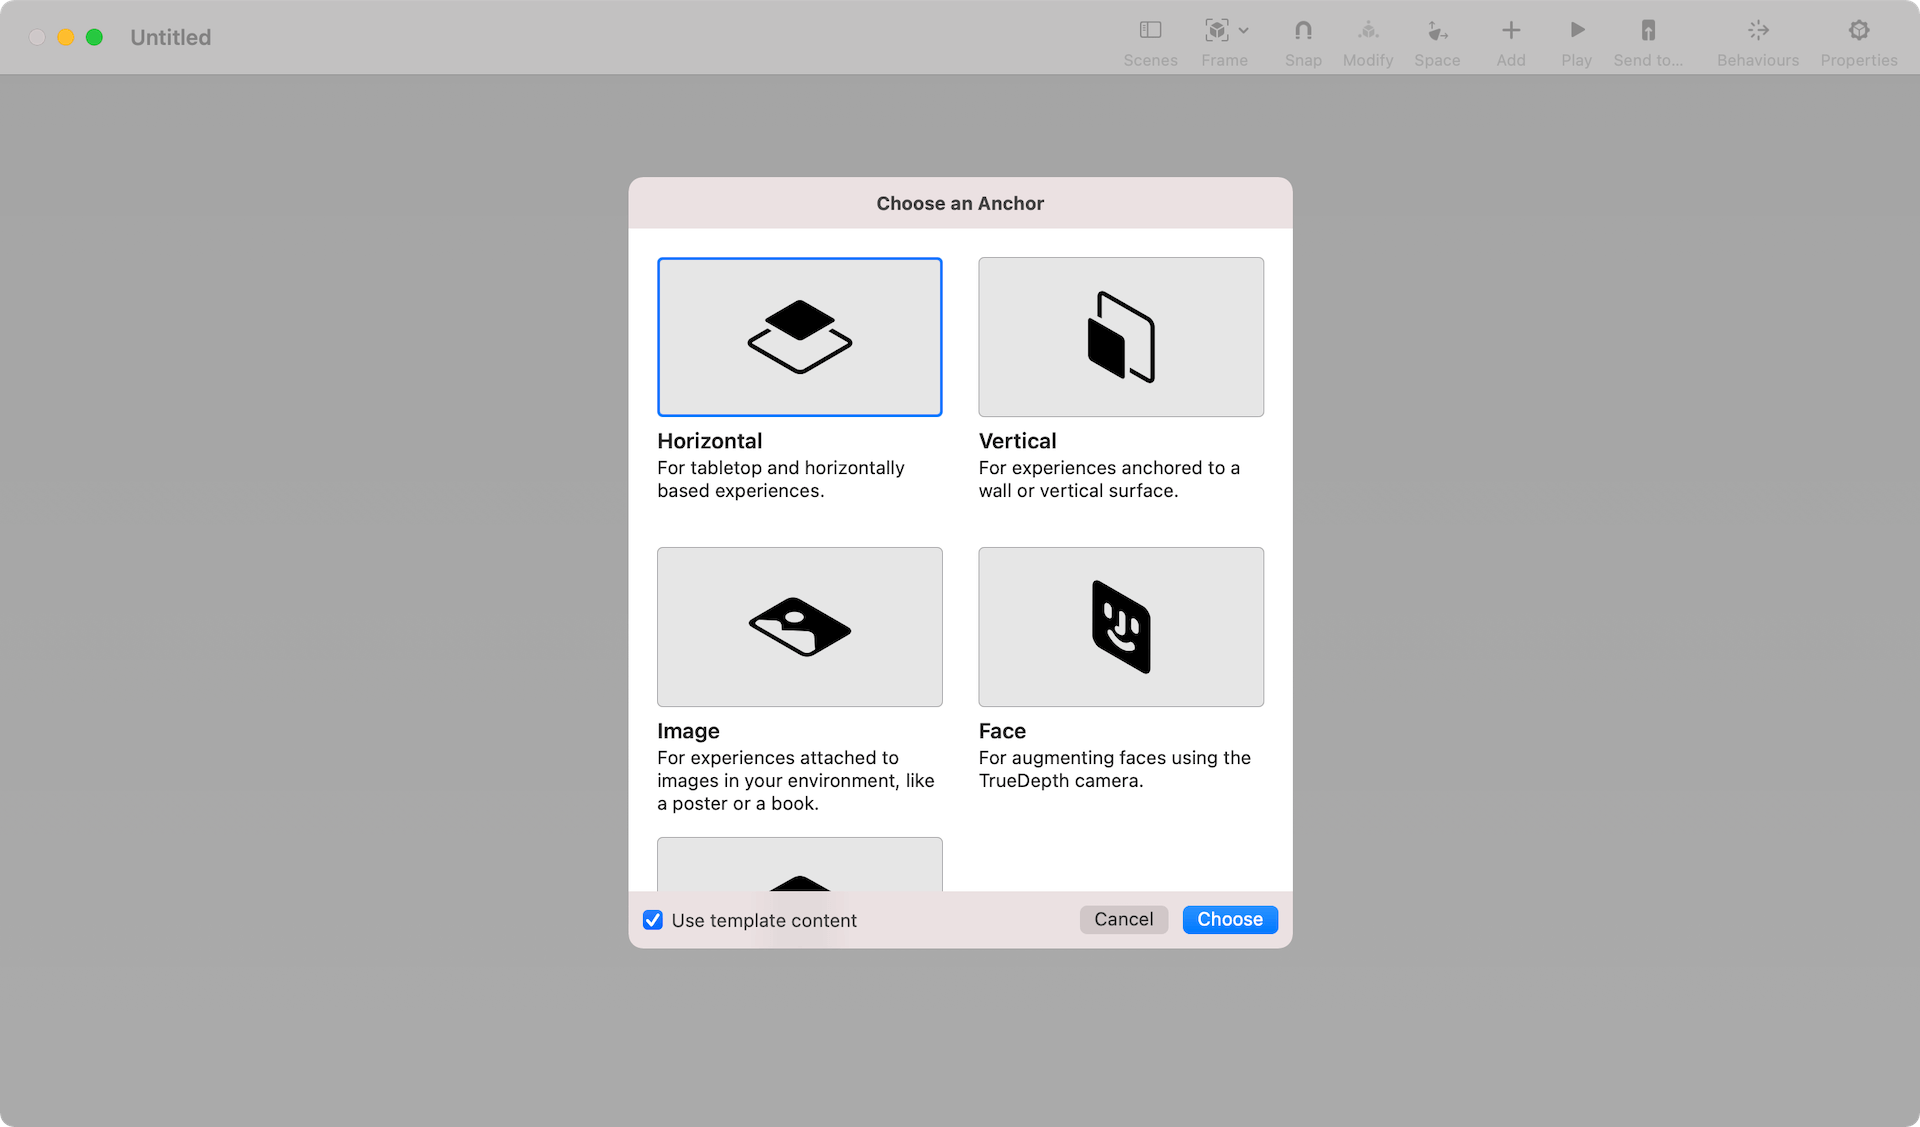
To create a new project, select New Document or click File > New in the menu. Next, choose an anchor for the scene. For our first RealityKit project, we will use Horizontal. Select Horizontal and click Choose to proceed.
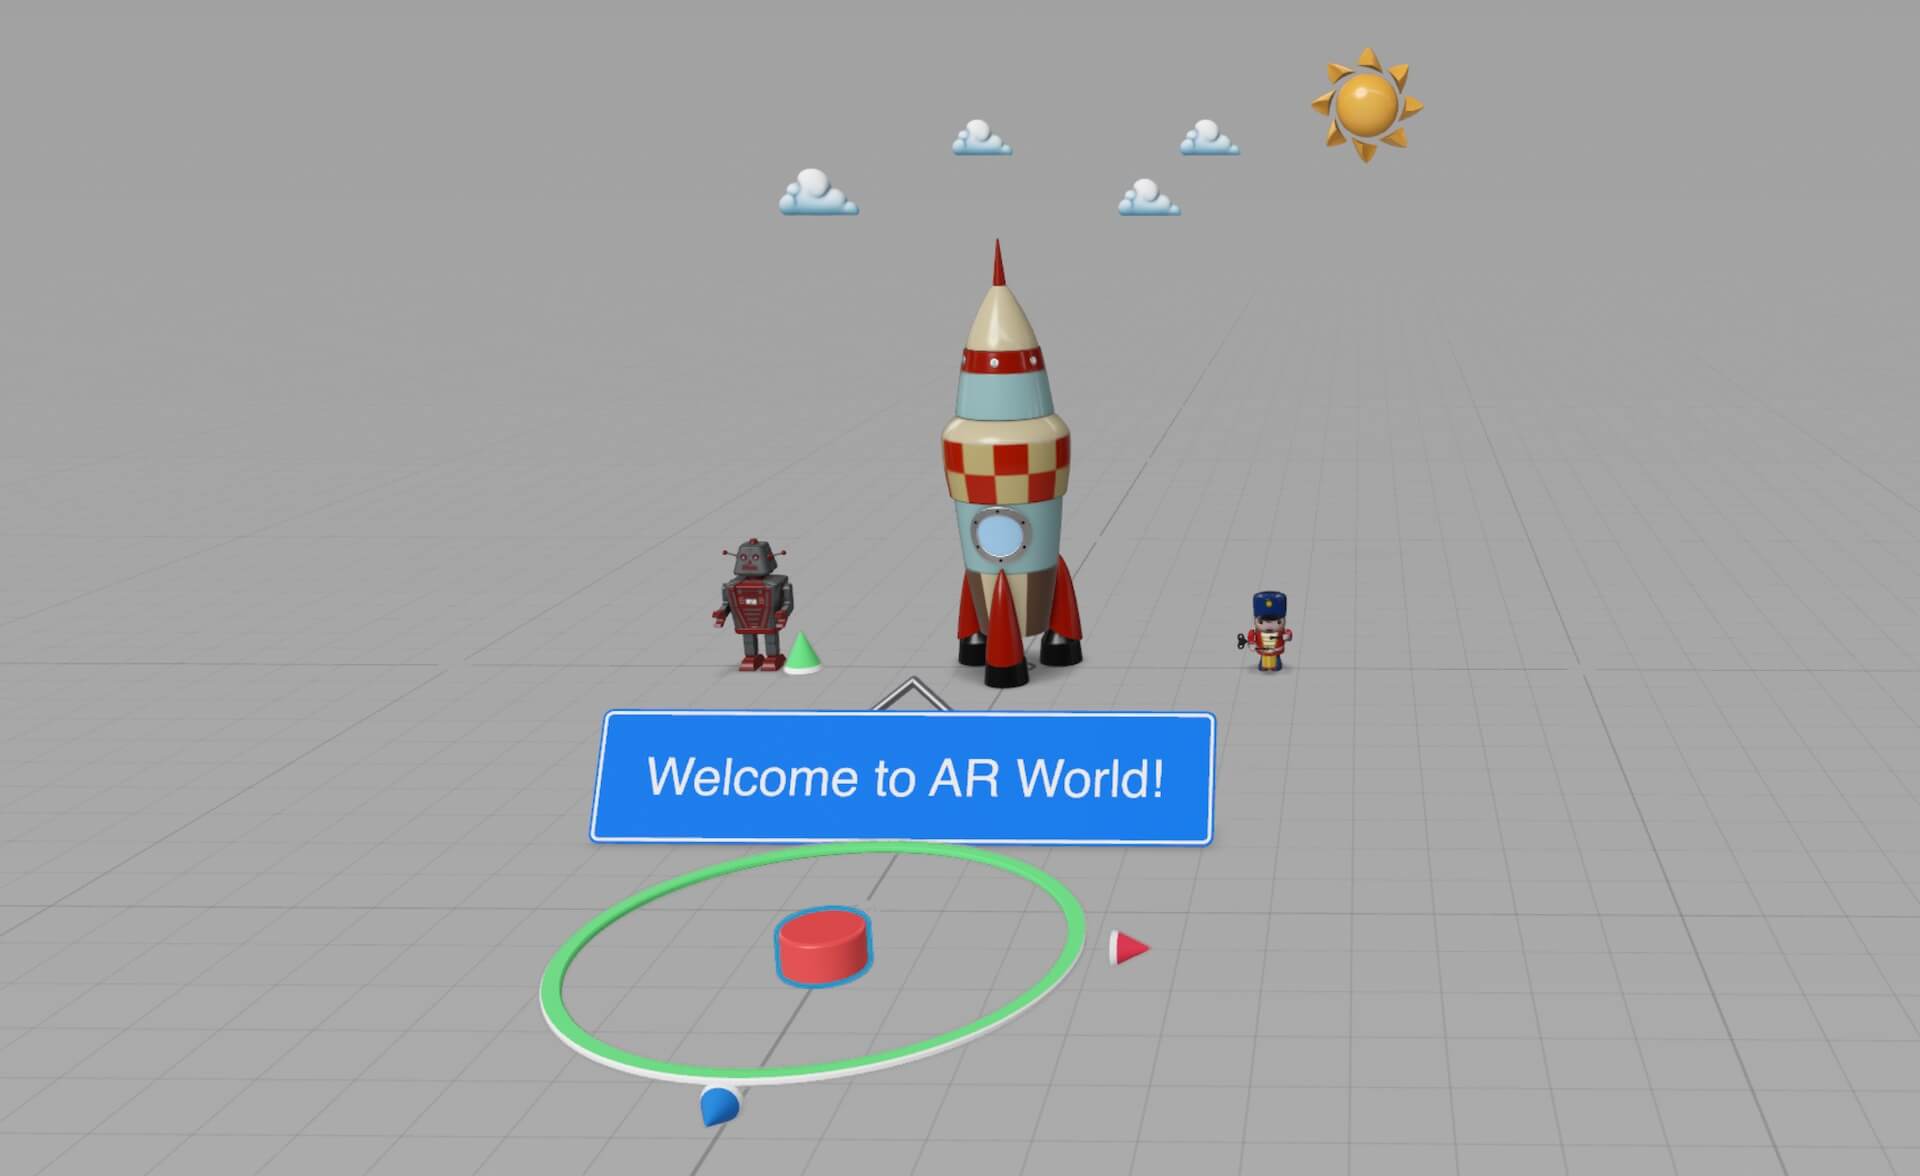
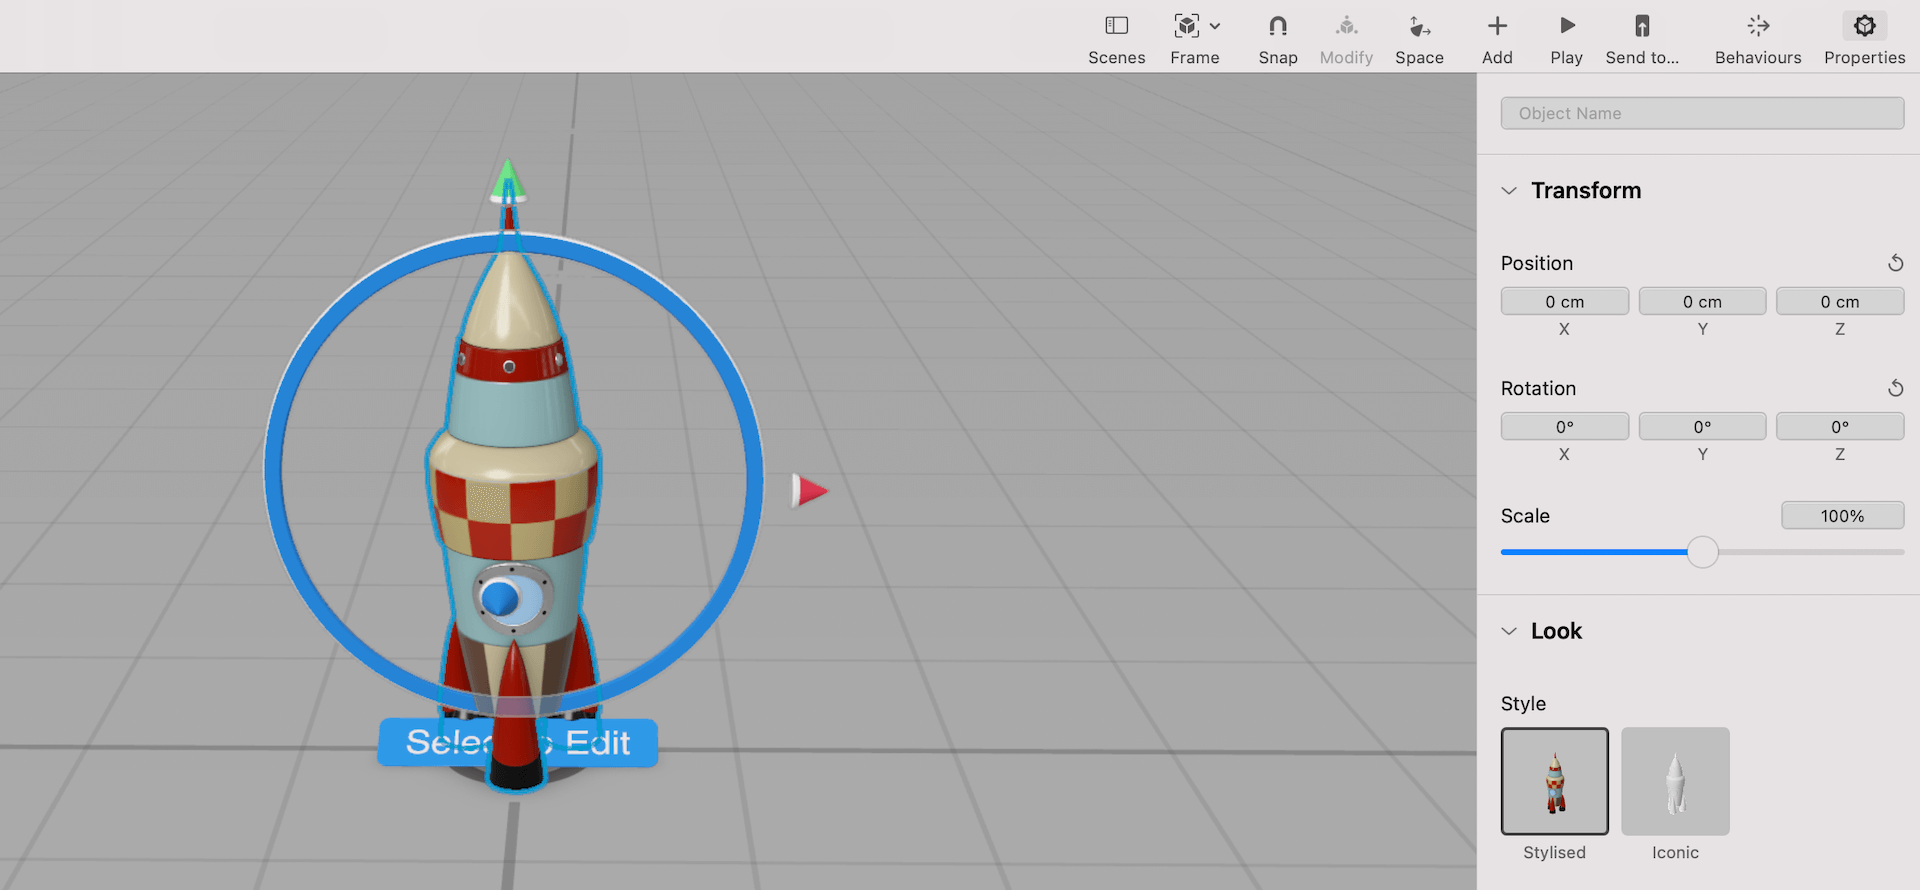
Once the project is created, you should see a box sitting over a horizontal plane. The box is generated by the template. You can either delete it or replace it with another virtual object.
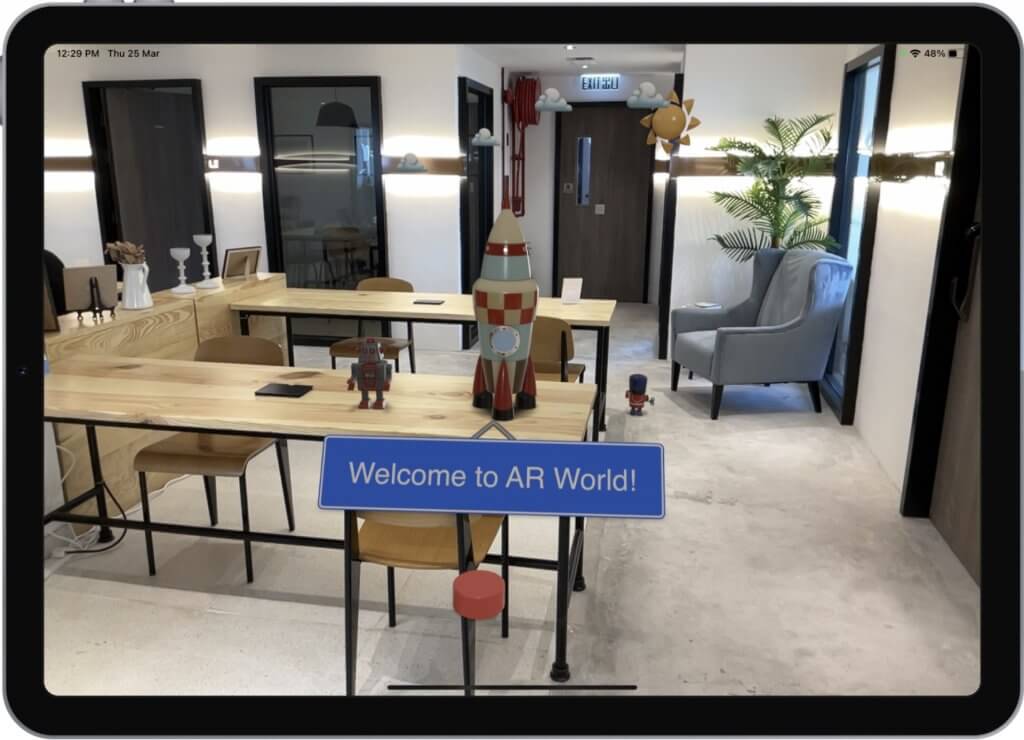
Let’s try the Replace feature. Right click on the box and the app will show you the content library. Scroll down and you’ll see a rocket ship under the Spacecraft category. Double click the rocket ship to select it.
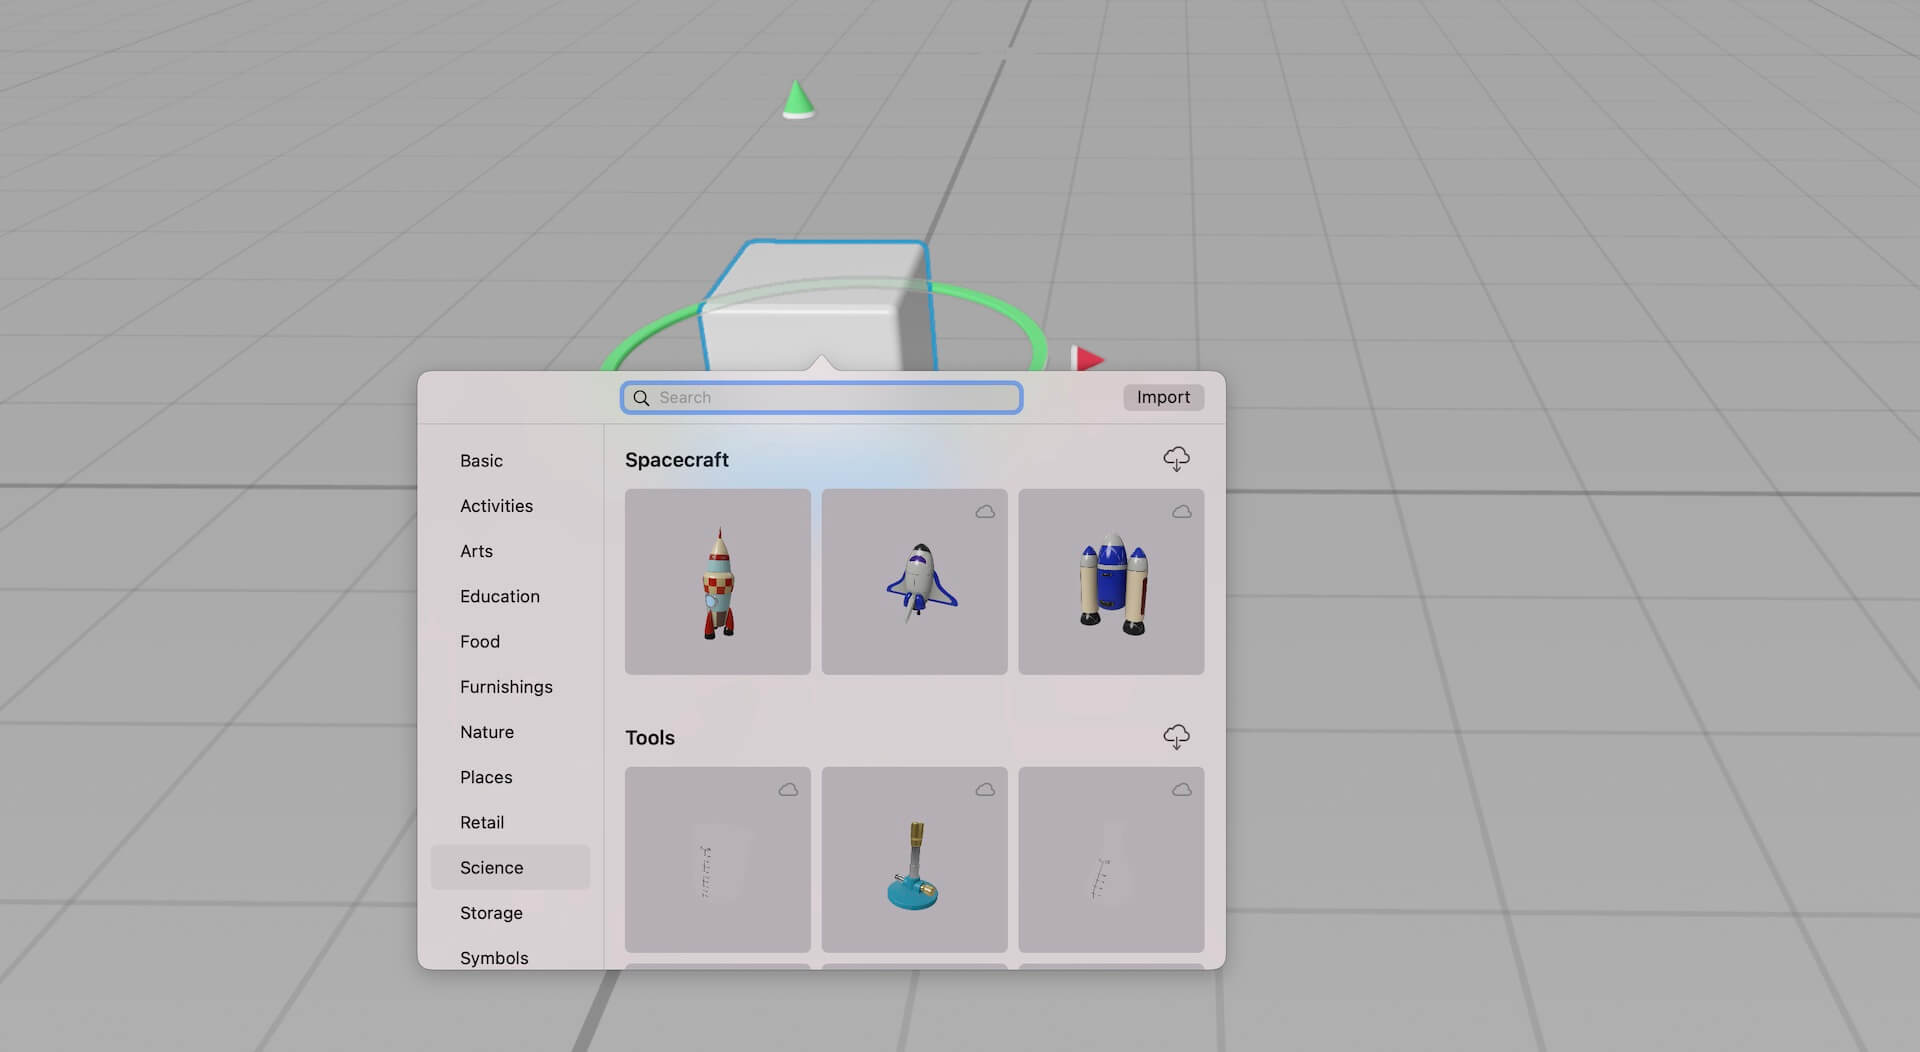
Note: If you can’t find the asset, you need to update your content library. Or simply replace it with other 3D objects.
To place the rocket ship at the original position, open the properties menu and click the Reset button next to Position to set all the values to zero.
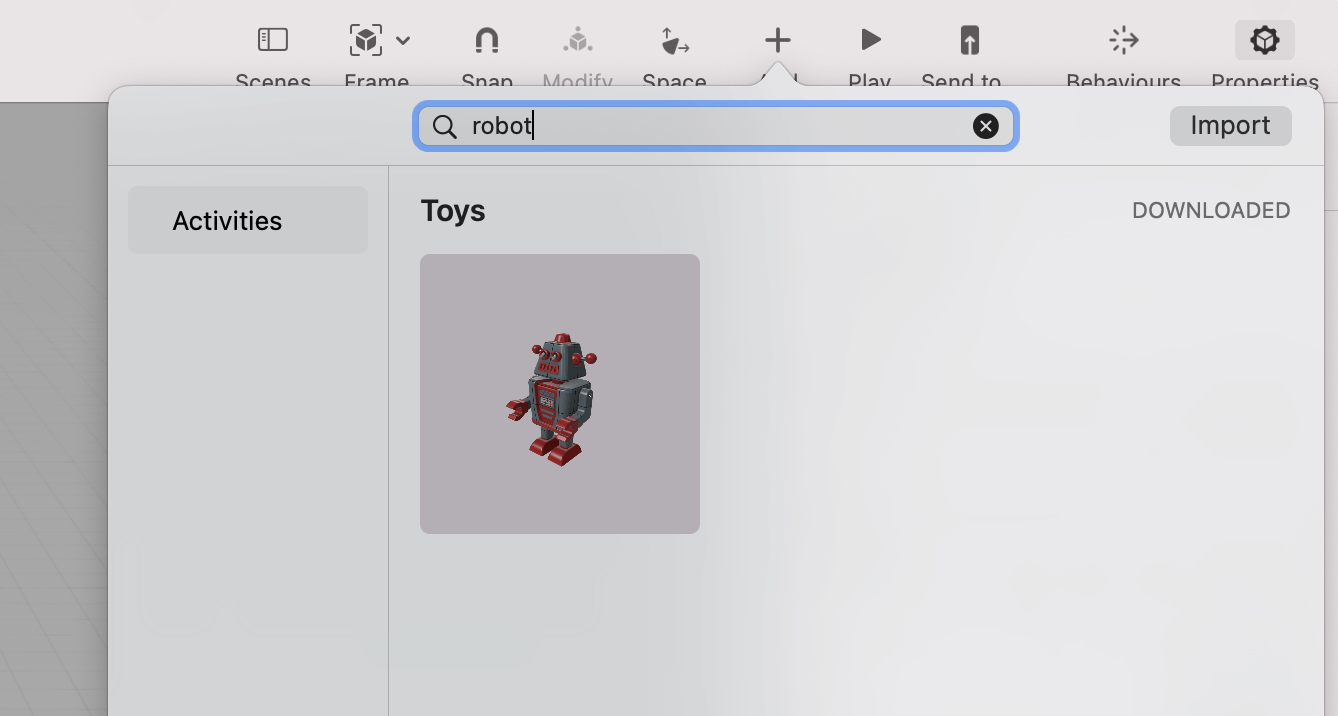
The default scale is set to 100%. To make the rocket ship a little bit bigger, you can change the scale to 300%. Next, let’s add a robot and place it next to the rocket ship. Click the Add button at the menu bar. Search for Robot.
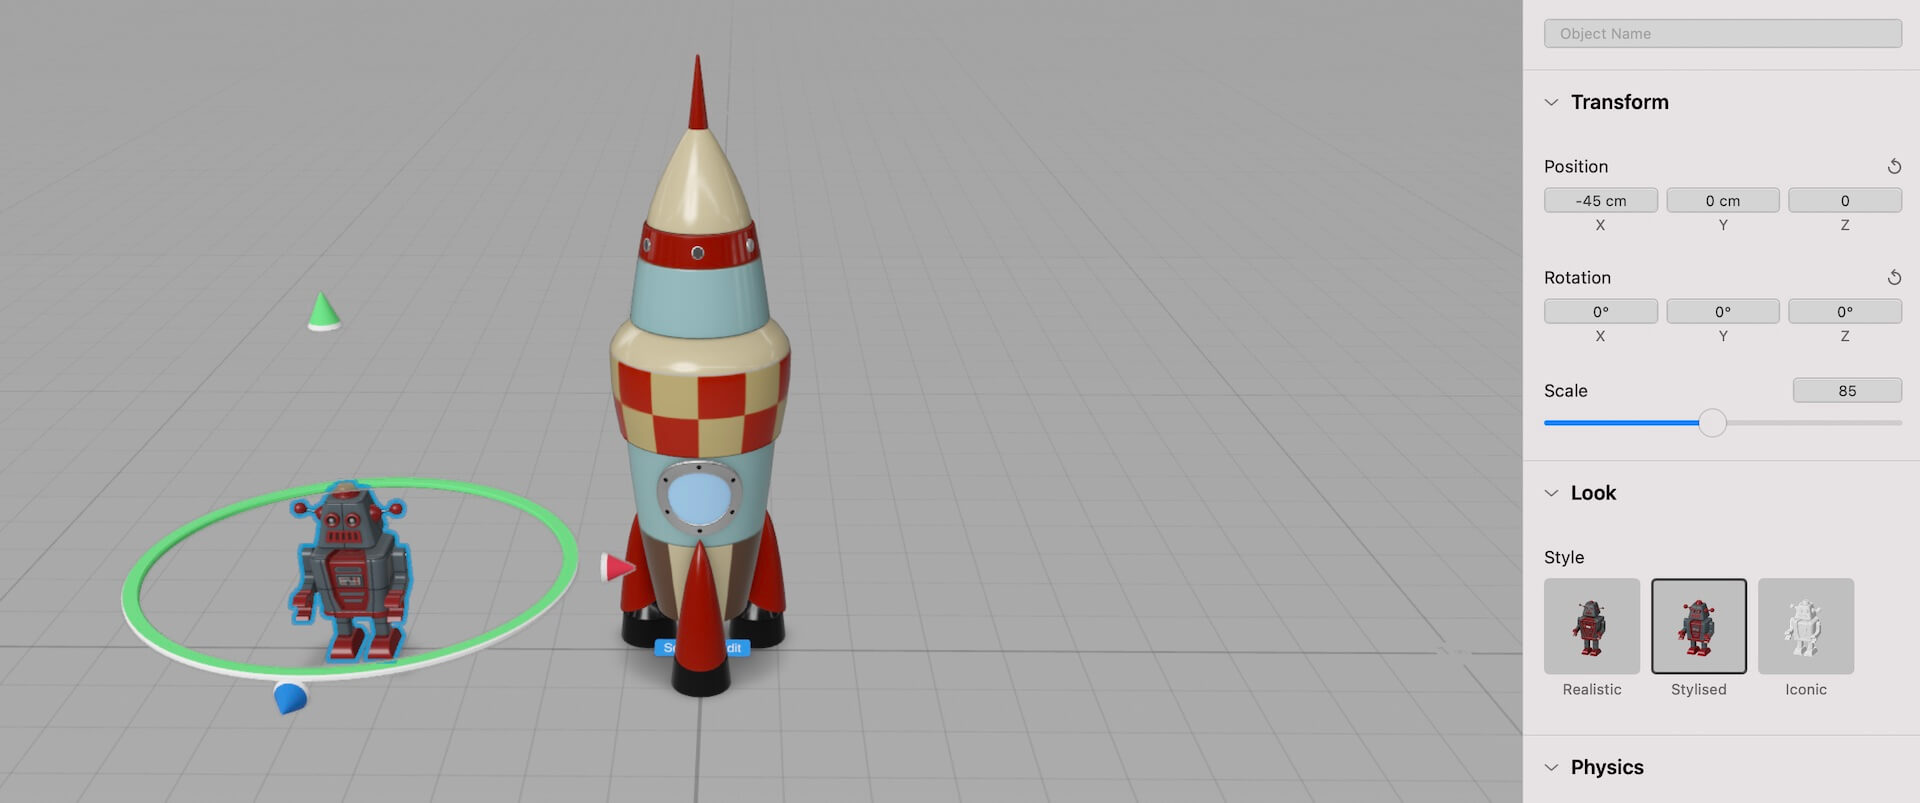
Drag the robot and place it to the left of the rocket ship. You can drag the red pointer to move the robot along the x-axis. Or you can simply set the position values like that shown below. Also, set the scale to 85% to make it a little bit smaller.
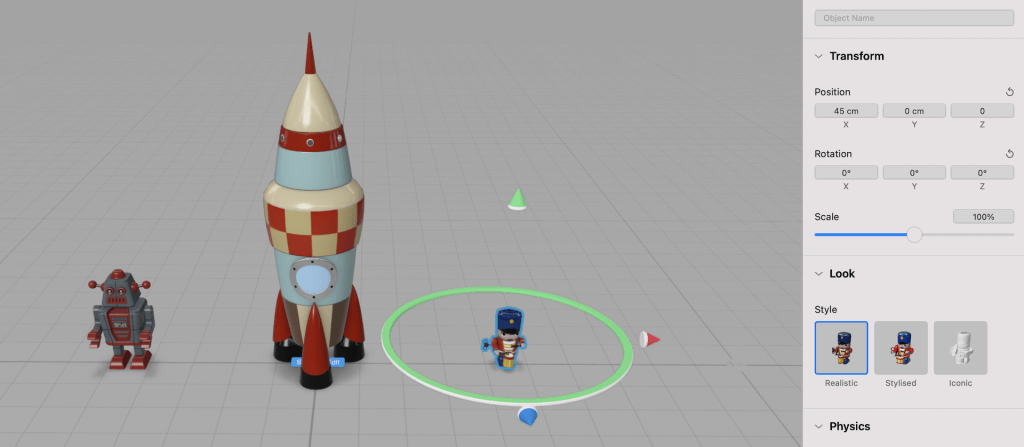
We will add another toy to the scene. Click the Add button again and scroll down to the toy section. Drag a toy and place it to the right of the rocket ship. You can refer to the figure below for the exact values of the position.
Continue to add 4 cloud objects to the scene. You can just place them somewhere above the rocket ship. In Reality Composer, you can duplicate an object by using copy & paste.
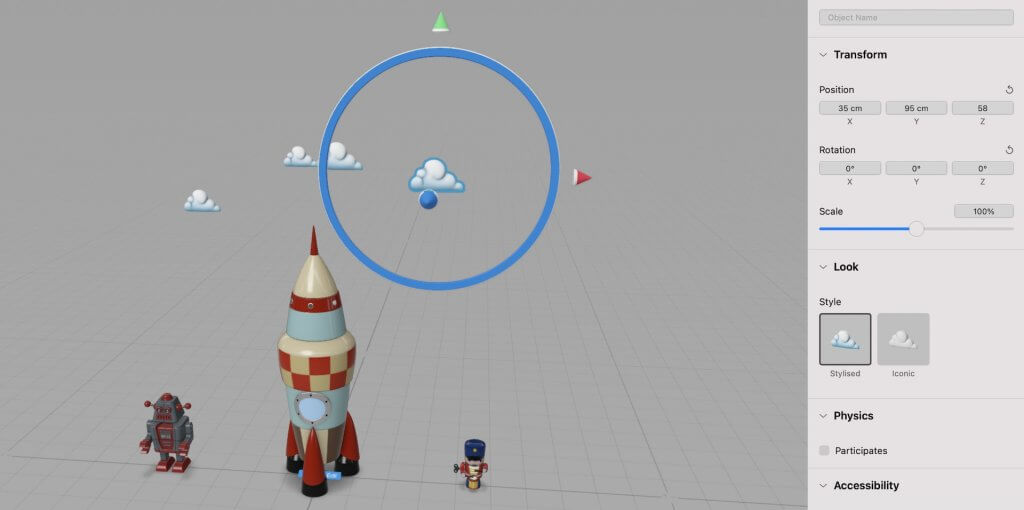
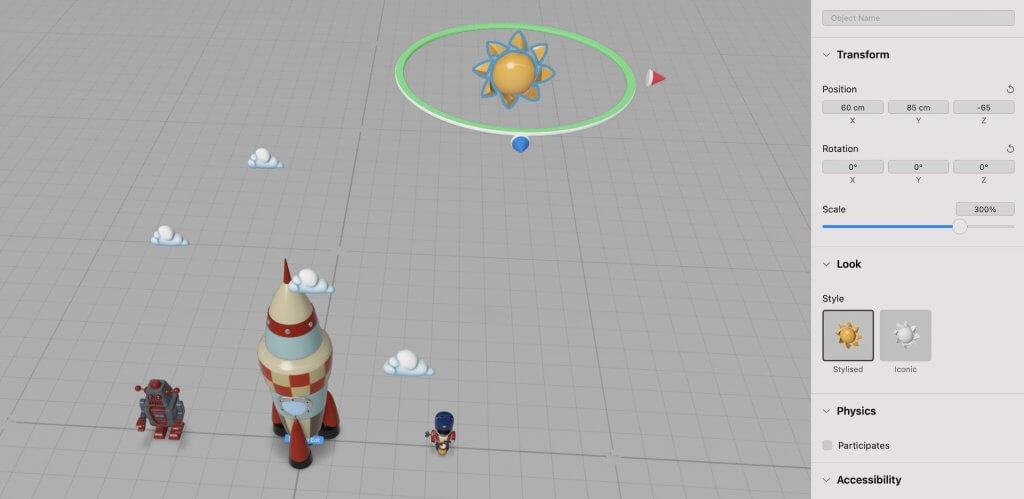
Let’s add a sun and place it right next to the clouds. The default size of the sun object is a bit small. You can scale it to 300%.
We’re almost done. Let’s add two more objects to the scene. Click the Add button and drag a hanging sign to the scene. You can place the sign in front of the rocket ship and change the text to Welcome to AR World (or whatever you like).
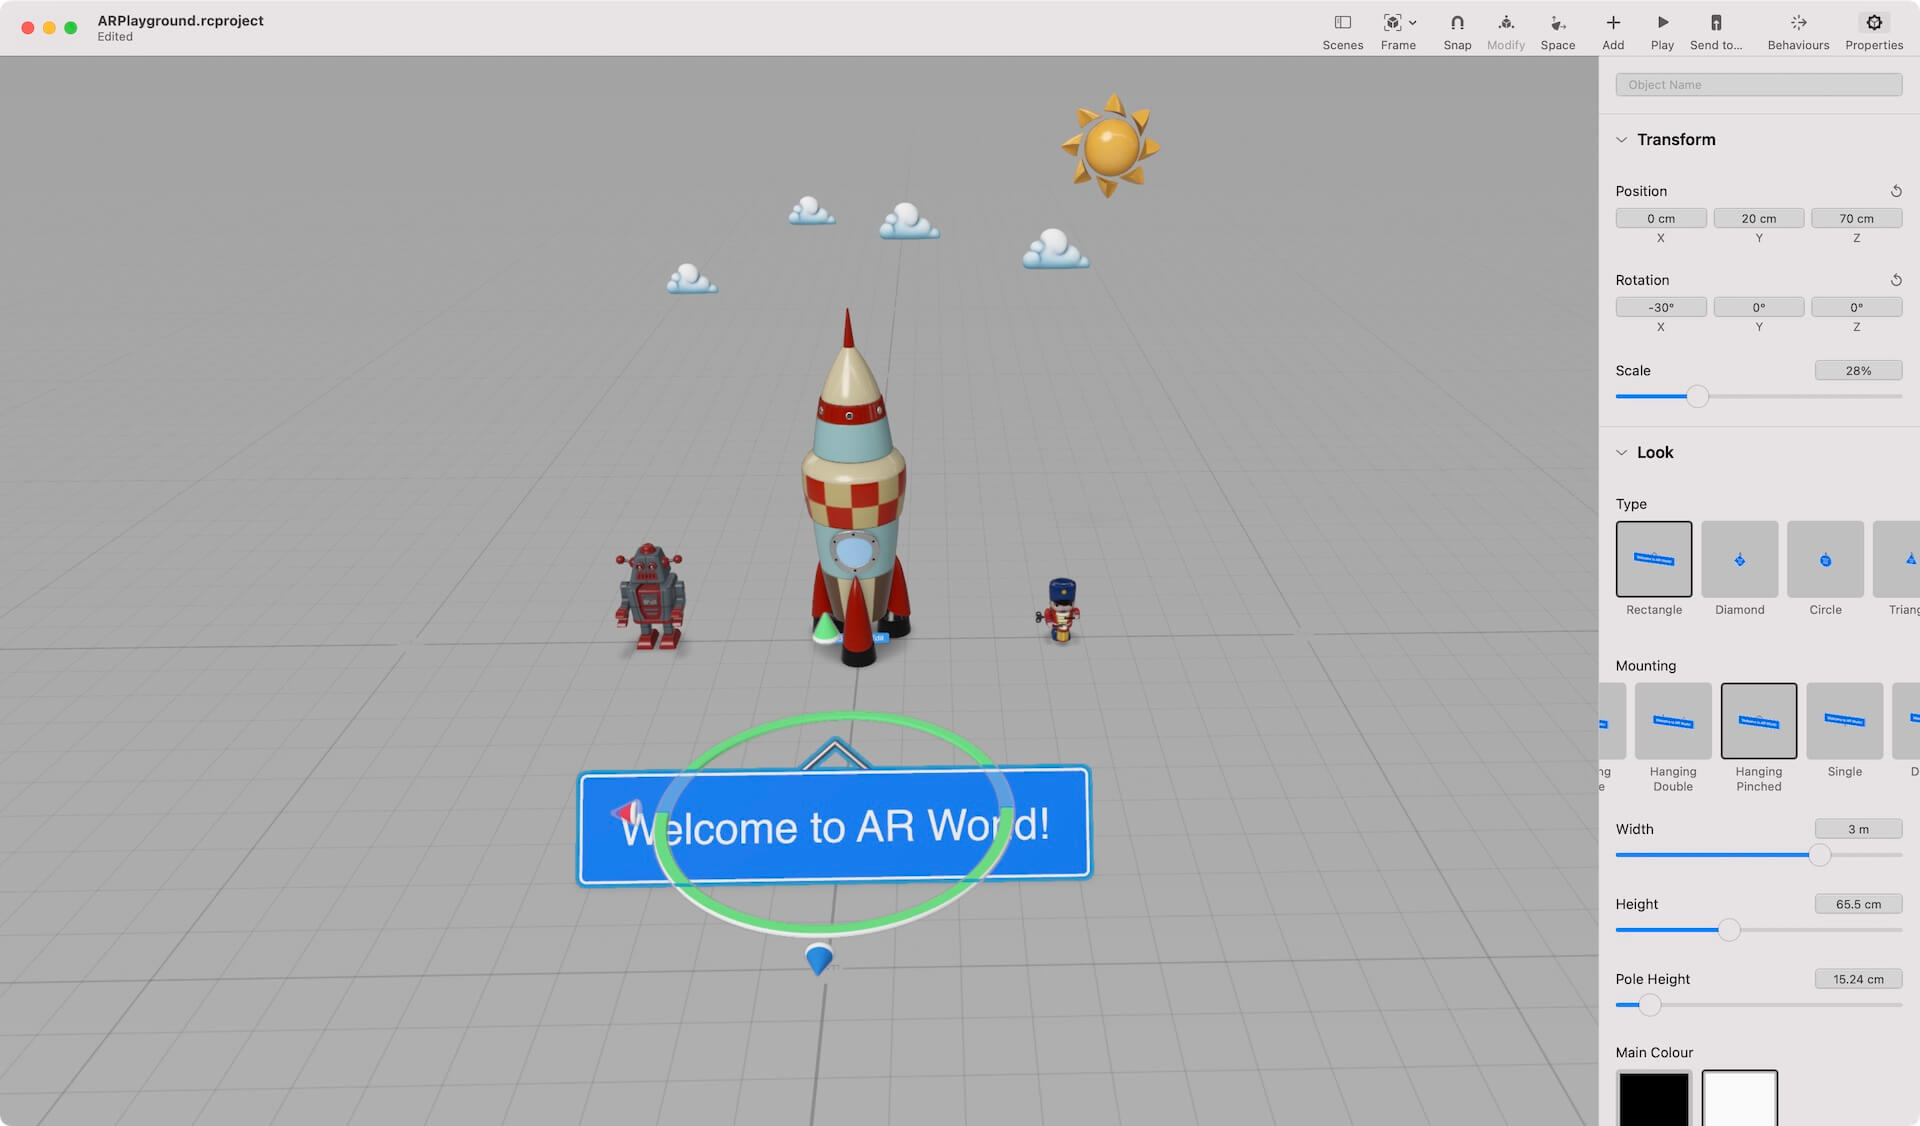
You can rotate the sign by changing the rotation values of x, y, and z axis. For this demo, I’ll set the value of x-axis to-30°. The original size of the sign is quite huge. Set the scale to 28% to make it smaller. I also change its width to 3m to make it wider.
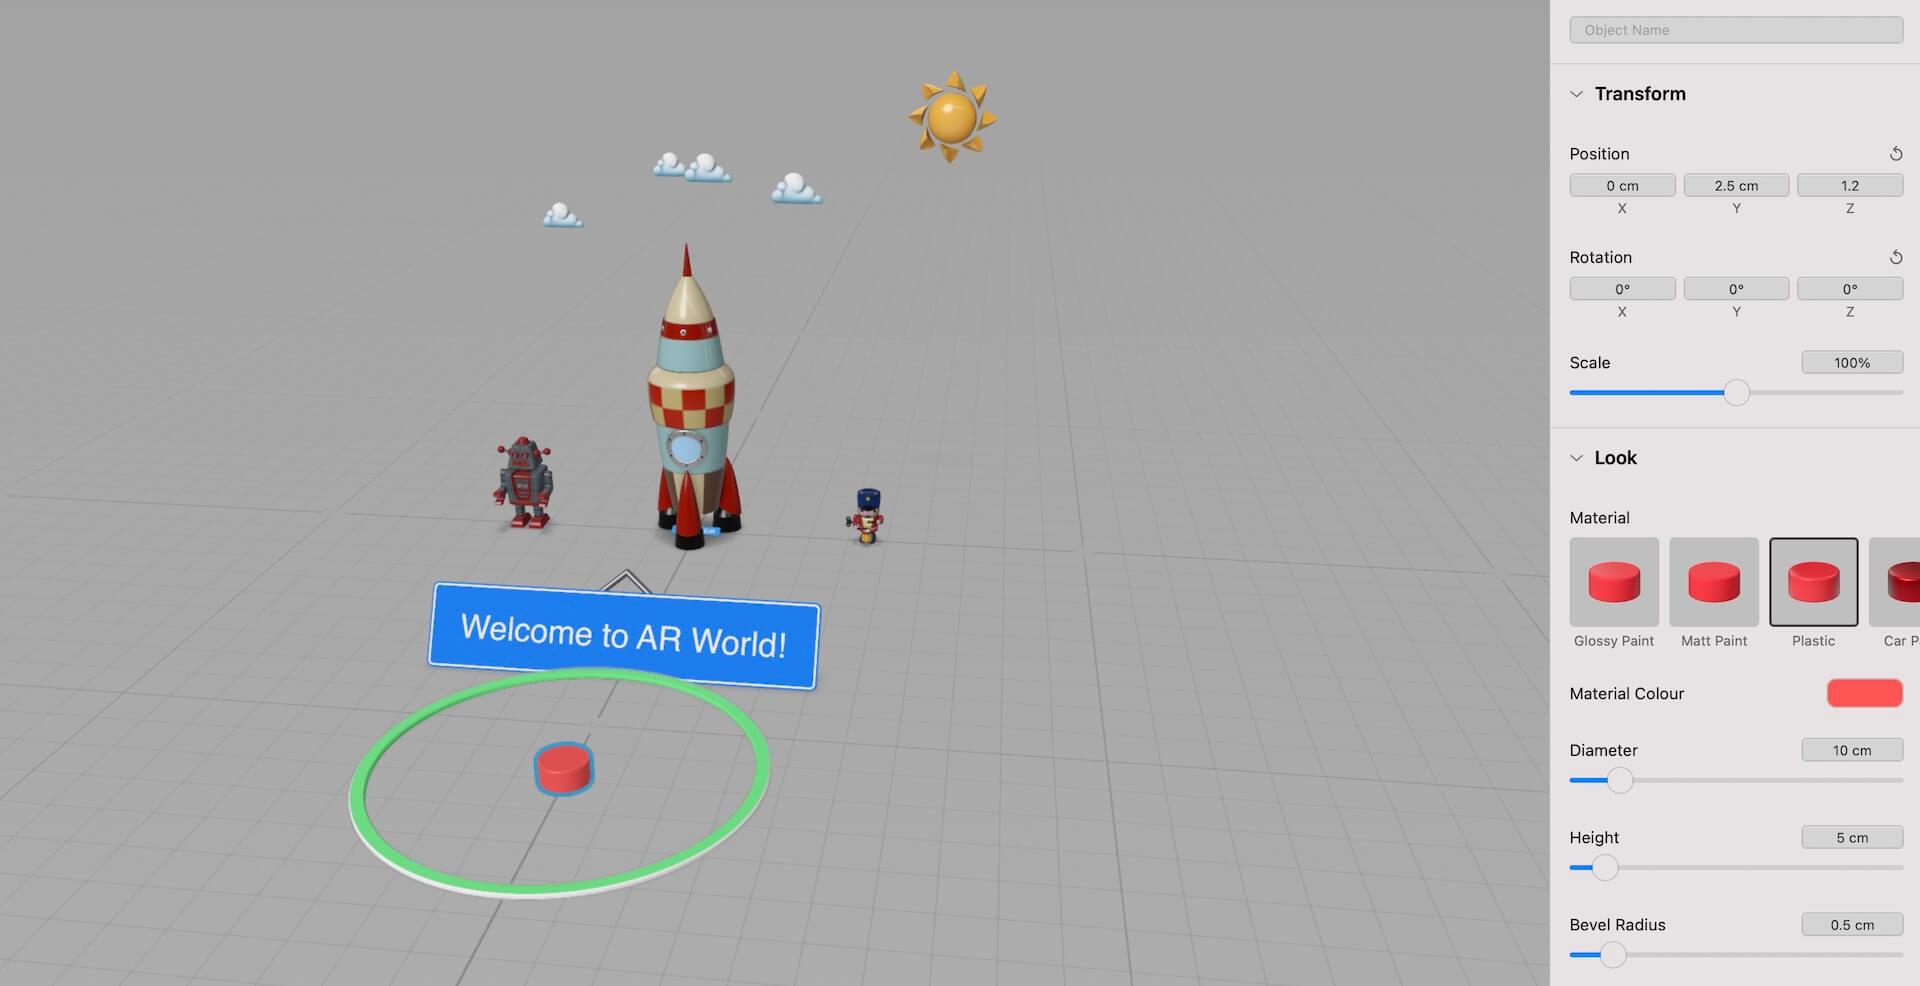
Next, add a Cylinder shape to the scene. We will edit its properties to create the red button. Set its material to plastic and material colour to red. Change its height to 5cm.
That’s it! You’ve designed the AR scene. Please save the project and name it ARPlayground.rcproject. If your iPad has Reality Composer installed, you can click the Send to… button and test the scene on iPad.
Adding Animations to the Objects
Now that you’ve designed your first 3D AR scene, wouldn’t it be great if you can add some animations? Reality Composer has made it very simple to animate virtual 3D objects. In the menu, select the Behaviours option.
By defining behaviours of the objects, you can create animations and let users interact with the objects. Let’s start with the basics by adding a rotation animation for the sun.
Reality Composer provides six behaviour presets such as Tap & Flip and Tap & Play Sound. These presets allow you to easily add some common forms of interactivity to your scenes. However, it’s better to learn how to define your own behaviours.
In the Behaviours pane, click the + button and choose to a Custom behaviour. The application will create a new behaviour with the default name Behaviour. You can always rename it to make it more descriptive.
Sun Spin
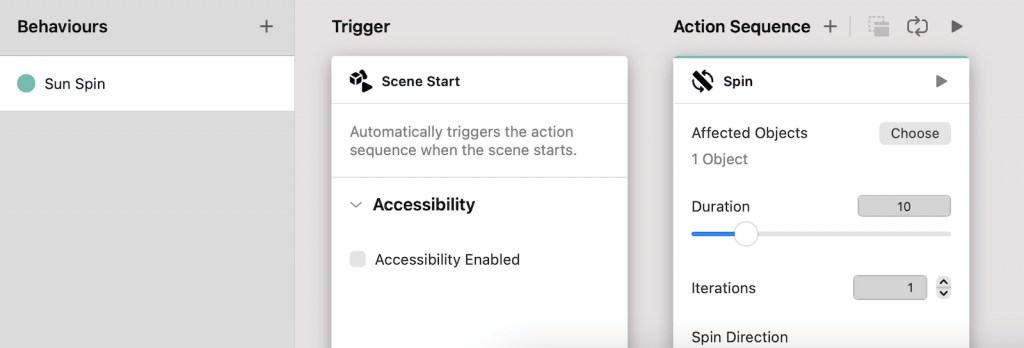
Right click Behaviour and choose rename to rename it. Set its new name to Sun Spin. Each behaviour is triggered by a certain event. Reality Composer has a number of built-in triggers for you to choose from. In this case, we want the sun to rotate when the scene is loaded. Therefore, click the Add a Trigger to this Behaviour button and choose Scene Start.
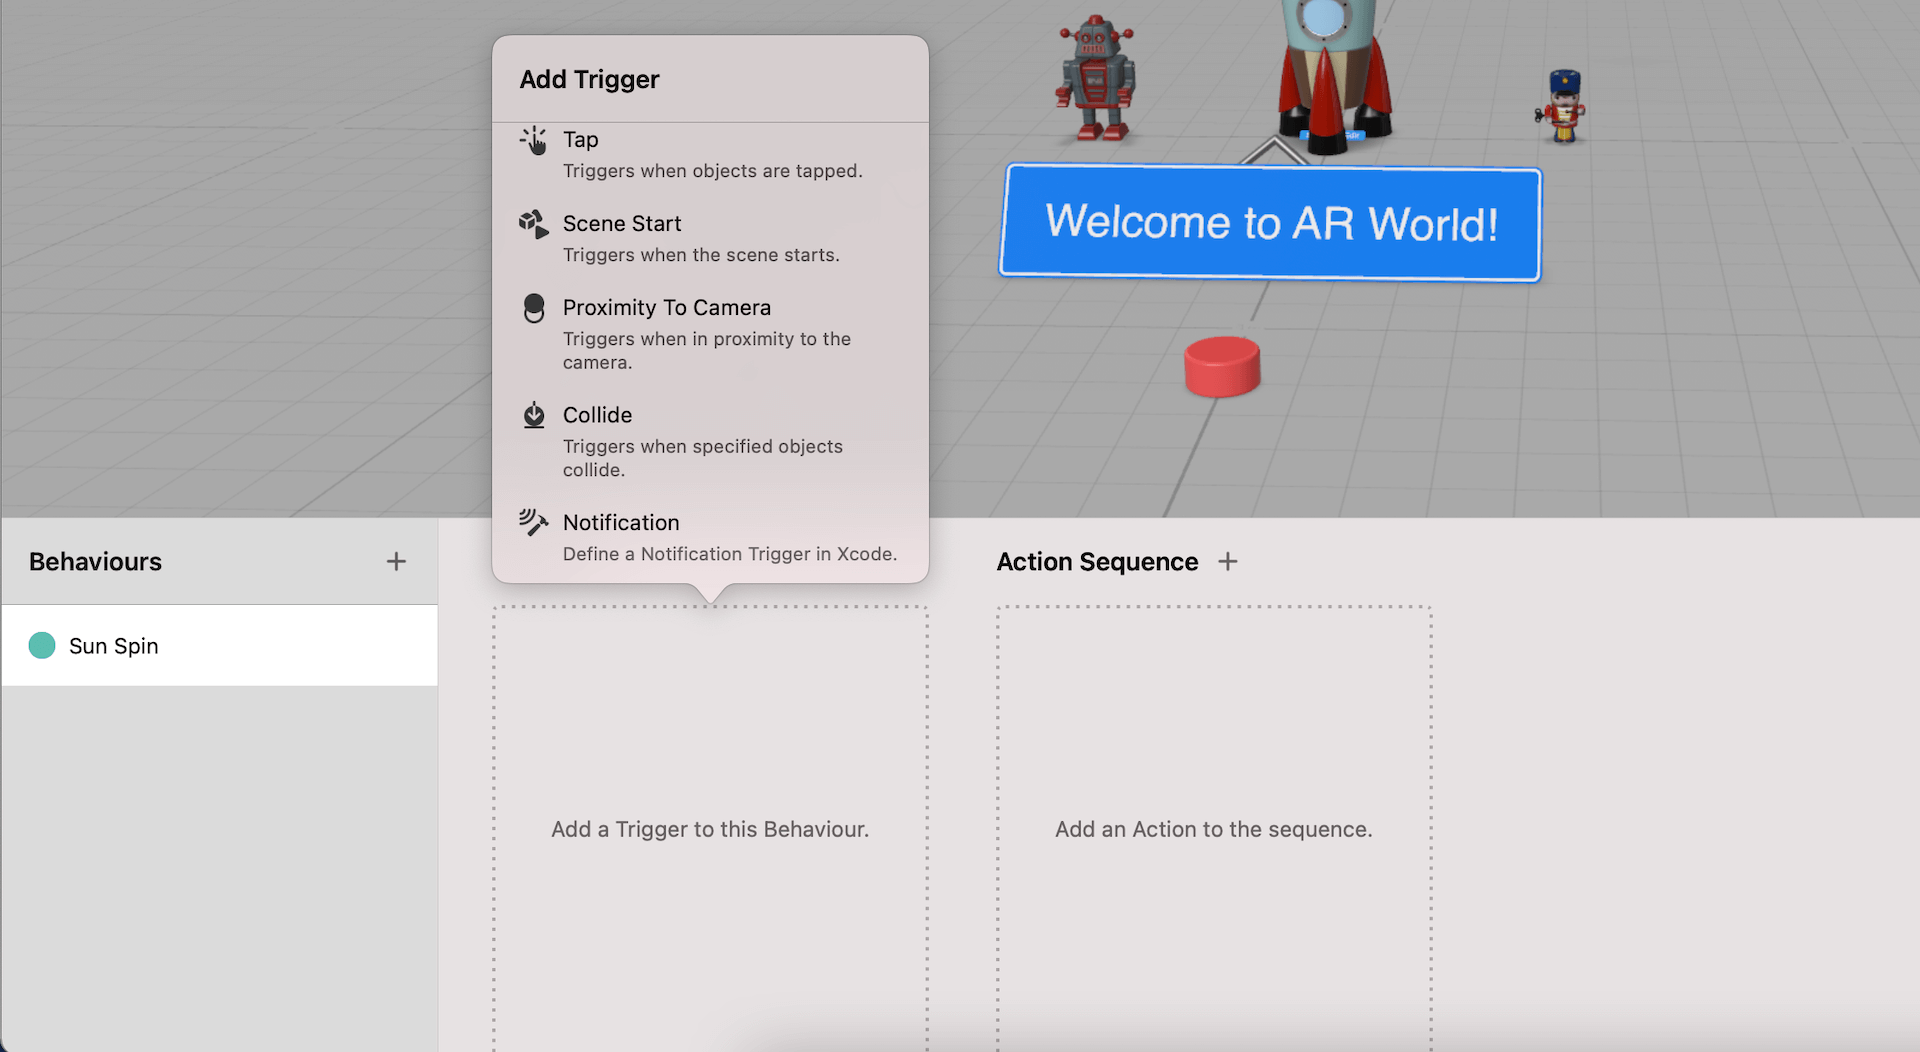
The action sequence defines what the objects should perform after receiving the trigger. Clicking the Add an Action to the sequence button will give you a set of actions to choose from. In this case, the Spin action is perfect for us. Once you selecte the action, you have to select the affected objects, which are the objects the action should apply to.
Select the sun object and click Done to confirm. Now you can click the Play button to preview the animation. If you prefer to spin slower, set the duration to 10 sec. By default, the animation ends after a rotation. For this demo, I want the sun to spin continuously. In this case, you can enable the Repeat option.
Intro
Next, let’s add some animations for the rocket ship and the toys. What I want to do is each of them will perform a certain type of animation when the scene is first loaded up.
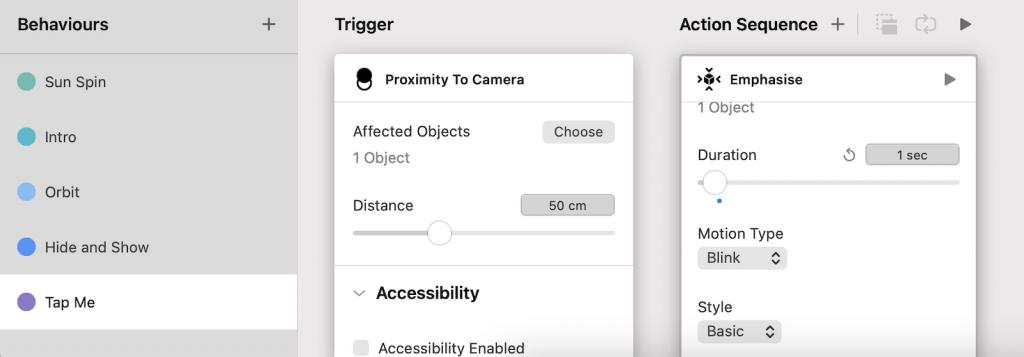
Click the + button again to add another custom behaviour. Rename the behaviour to Intro. Again, add a Scene Start trigger because the animation should be played when the scene is ready. Now click Add an action to add an Emphasise action for the rocket ship. Change the motion type to Bounce. This action type is used to some fancy animations to draw people’s attention.
You are allowed to add multiple actions in the same action sequence. Now click the + button right next to Action Sequence to add another Emphasise action for the robot. Set the motion type to Spin and the style to Wild.
Click the + button again to add the third Emphasise action. Set the affected object to the toy object. Set the motion type to Flip. Please make sure the action has only one affected object. Sometimes, you have to deselect those unaffected objects if they have been selected by default.
Next, add another action to rotate the toy by 180 degrees to prepare for the orbit action. Click the + button to add the Move, Rotate, Scale By action and choose the toy as the affected object. Set the values of position to all zeros. For the Rotation section, set y to -180°. Please note that Reality Composer will automatically change the x and z values of Rotation. You can click the Play button to test the rotation if it works or not.

Orbit
Next, we want to create another behaviour to have both toy objects to orbit around the rocket ship. Click the + button next to Behaviours and choose to add a custom behaviour. Rename the new behaviour to Orbit. Again, this orbit action is triggered when the scene is started. So, add a Scene Start trigger.
Since the Intro behaviour takes 4 seconds to complete, we have to wait for 4 seconds before starting the orbit. Click the + button of Action Sequence and add a Wait action. Set the duration to 4 seconds. Then add an Orbit action to the sequence.
Set the affected object to the robot and centre object to the rocket ship. The robot will then orbit around it. For the duration, set it to 6 seconds. Also, check the Align to Path option and set the Orbit Direction to Anticlockwise.
The same orbit action should be applied to the other toy object. You can repeat the procedures above to add another orbit action. Alternatively, you can right click the current Orbit action and select Duplicate. Then change the affected object to the other toy object.
By default, each of the action in the sequence is executed one by one. What we want is that both orbit actions should be performed at the same time. Drag the second orbit action over to the first orbit to merge them. Now both orbit actions are run in parallel. Cool, right?

Hide & Show
The next behaviour is for the banner sign and the red button. When the scene is first started, these two objects are hidden from the users. They will appear after the orbit action completes. Let’s see how this can be implemented.
Add another custom behaviour and name it Hide and Show. Again, this action sequence is triggered by Scene Start.
To hide the two objects, add a Hide action. Hold the command key to select the banner sign and the red button. Click Done to confirm the selection. Set the duration to 0 second to hide the objects instantly.
Next, add a Wait action to wait for 10 seconds. Then add a Show action for the banner sign object. Set the motion type to Move from Above such that the sign looks like to drop from the sky. Change the style to Wild and distance to 4m. You can hit the Play button to preview the animation.
Now create another Show action for the red button. Set the motion type to Move from Below and keep all other values intact. Again, we want to execute these two Show actions in parallel. Drag the second Show action over to the first one to merge them.

Tap Me
The last animation is going to apply to the red button. When you point the camera close to the button, it will play a blink animation to draw the user’s attention.
To do that, add another custom behaviour and name it Tap Me. This time, add the Proximity To Camera trigger. Set the affected object to the red button and distance to 50 cm. Next, add an Emphasise action and set the affected object to the red button. Change the motion type to Blink.
You can’t test this action on Mac. If you load the scene on iPad or iPhone, this action will be triggered when you get close to the red button.
Interacting with Users
Now that you’ve learned how to animate the virtual objects, let’s add some interactivity to them. When a user presses the red button, the app launches the rocket to the sky.
To do that, create another custom behaviour and name it Rocket Launch. The Tap trigger is used to detect a user’s touch in the AR space. Add the trigger and set the affected object to the red button.
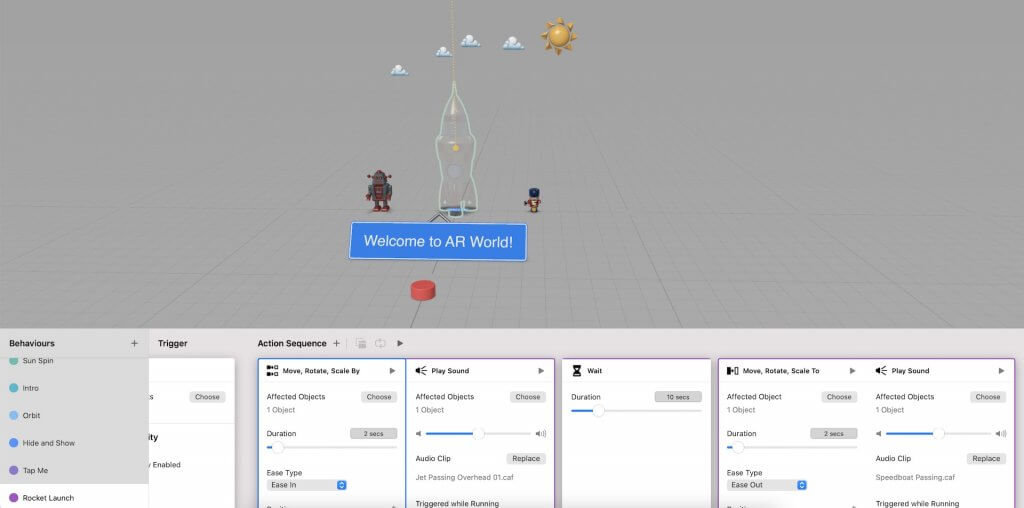
We’ll change the rocket ship’s position to simulate the launch. Add the Move, Rotate, Scale By action and set the affected object to the rocket ship. For the duration, change its value to 2 seconds. The Ease Type can be set to Ease In.
For the position, set the value of Y to 300 cm. And, the scale can be set to 20% such that the rocket ship looks smaller after it launches into the sky.
Reality Composer makes it very simple to play audio and sounds. In the action sequence, you can add a Play Sound action to play an audio clip when the rocket launches. Again, set the affected object to the rocket ship. Choose an audio clip you like. For me, I set the audio to Jet Passing Overhead 01.caf. Since the audio should be played alongside with the move action, drag the Play Sound action over to the move action to merge them.
The rocket will stay in the sky for 10 seconds. So, add a Wait action and set the duration to 10 seconds.
To bring the rocket back to its original position, add a Move, Rotate, Scale To action for the rocket ship. Set the duration to 2 seconds and use Ease Out for the Ease Type option. Set the position of x, y, and z values to zero. The rocket ship should be scaled back to its original size after landing. Therefore, set the scale to 300%.
Similarly, add another Play Sound action to pair with the move action. Set the affected object to the rocket. For the audio clip, I set it to Speedboat Passing.caf. Please make sure you merge the sound action with the move action.
You can now hit the Play button to preview the action sequence. If you want to test all the actions implemented in the scene, click the Play button in the menu bar.
Converting the Scene into an AR App
We’ve already designed the AR scene using Reality Composer. How can you turn this scene into an AR app?
Xcode automates the whole process and generates the required code for you. All you need to do is create a new Xcode project using the Augmented Reality app template and import the ARPlayground.rcproject file into the project. Sounds easy, right? Let’s see how it can done.
Switch over to Xcode and create a new project. Choose the Augmented Reality App template and name the project ARPlayground. For the Content Technology option, select RealityKit and choose SwiftUI for the Interface option. As a reminder, please use your own organization identifier.
By default, Xcode generates the Experience.rcproject file, which only contains a 3D box. We will replace this file with our own .rcproject file. Therefore, select Experience.rcproject and hit Delete to move it to trash.
Now drag the ARPlayground.rcproject file you just created to the project navigator. Xcode will automatically generate the code that you need to manipulate the scene and virtual objects.
Open ContentView.swift and scroll to the ARViewContainer struct. Replace the makeUIView(context:) function like this:
func makeUIView(context: Context) -> ARView {

    let arView = ARView(frame: .zero)

    let anchor = try! ARPlayground.loadScene()

    arView.scene.anchors.append(anchor)

    return arView
}
In the code above, you call the loadScene method to get the Reality Composer scene’s anchor. You then add the anchor to your AR view scene’s anchor collection.
That’s the code you need to turn your Reality Composer project into an AR app. It’s time to build the project and test it on a real iOS device.