

We are launching a new series of tutorials to answer some of the common questions. The questions can be simple ones from beginners and tough ones that require some works. One of the questions is:
I know how to create rounded corners of a view or button. But what if I just want to create a view with top/bottom rounded corners only? How can I do it in Swift?
Okay, let’s revisit how you create rounded corners for a view. Apple has made it very easy to create views with rounded corner. All you need to do is set the cornerRadius property of a view’s layer and set clipsToBounds to true. Here is the code snippet:
self.view.layer.cornerRadius = 20.0
self.view.clipToBounds = true
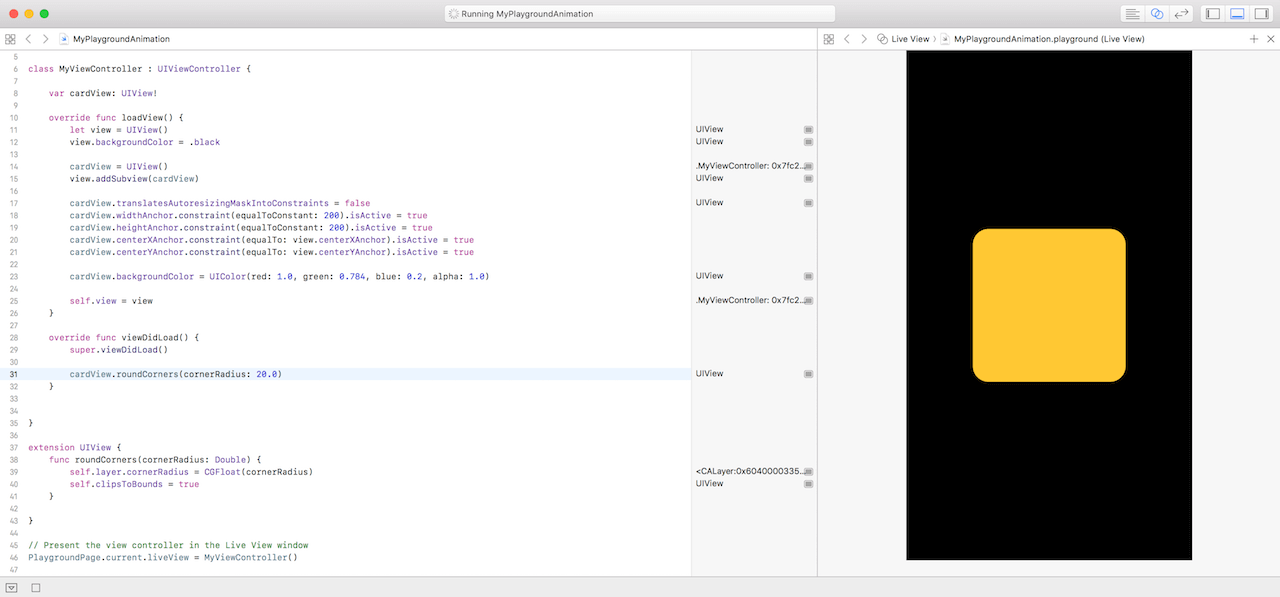
To visualize the implementation, you can create a Playgrounds project and fill in the code like this:
import UIKit
import PlaygroundSupport

class MyViewController : UIViewController {

    var cardView: UIView!

    override func loadView() {
        let view = UIView()
        view.backgroundColor = .black

        cardView = UIView()
        view.addSubview(cardView)

        cardView.translatesAutoresizingMaskIntoConstraints = false
        cardView.widthAnchor.constraint(equalToConstant: 200).isActive = true
        cardView.heightAnchor.constraint(equalToConstant: 200).isActive = true
        cardView.centerXAnchor.constraint(equalTo: view.centerXAnchor).isActive = true
        cardView.centerYAnchor.constraint(equalTo: view.centerYAnchor).isActive = true

        cardView.backgroundColor = UIColor(red: 1.0, green: 0.784, blue: 0.2, alpha: 1.0)

        self.view = view
    }

    override func viewDidLoad() {
        super.viewDidLoad()

        cardView.roundCorners(cornerRadius: 20.0)
    }


}

extension UIView {
    func roundCorners(cornerRadius: Double) {
        self.layer.cornerRadius = CGFloat(cornerRadius)
        self.clipsToBounds = true
    }

}

// Present the view controller in the Live View window
PlaygroundPage.current.liveView = MyViewController()
If you switch to the Assistant editor mode, you should see the view rendered like this. The view in yellow has rounded corners.
That’s pretty straightforward. All the corners are rounded. But what if you don’t want to round all the corners? Say, you just want to round the top corners.
Using maskedCorners on iOS 11
In iOS 11, Apple introduced a new property named maskedCorners for the Core Animation layer (CALayer). This property is of the type CACornerMask, which has 4 possible values:
layerMaxXMaxYCorner– lower right cornerlayerMaxXMinYCorner– top right cornerlayerMinXMaxYCorner– lower left cornerlayerMinXMinYCorner– top left corner
By default, the value of maskedCorners is set to display all the four corners. Now, let’s say you just want to round the top corners. You can set maskedCorners to the following:
self.view.layer.maskedCorners = [.layerMinXMinYCorner, .layerMaxXMinYCorner]
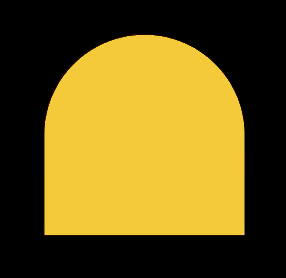
If you change the roundCorners method like below, you will only round the top corners of the view in yellow.
func roundCorners(cornerRadius: Double) {
    self.layer.cornerRadius = CGFloat(cornerRadius)
    self.clipsToBounds = true
    self.layer.maskedCorners = [.layerMinXMinYCorner, .layerMaxXMinYCorner]
}
Using Bezier Path on iOS 10 (or lower)
The catch of this approach is that it supports iOS 11 (or up) only. If your app needs to support lower version of iOS, you can’t use the maskedCorners property.
Here is an alternate solution. Instead of using maskedCorners, we use UIBezierPath to create a rounded rectangular path. The initialization of UIBezierPath allows us to specify the corners we want to round like this:
let path = UIBezierPath(roundedRect: view.bounds, byRoundingCorners: [.topLeft, .topRight], cornerRadii: CGSize(width: 10.0, height: 10.0))
With the path, we can create a shape layer as a mask. Update the roundCorners method like this:
func roundCorners(cornerRadius: Double) {
    let path = UIBezierPath(roundedRect: self.bounds, byRoundingCorners: [.topLeft, .topRight], cornerRadii: CGSize(width: cornerRadius, height: cornerRadius))
    let maskLayer = CAShapeLayer()
    maskLayer.frame = self.bounds
    maskLayer.path = path.cgPath
    self.layer.mask = maskLayer
}
We create a mask with top rounded corners and then set to the mask property of the view’s layer to mask the content. This is how we round a specific corner of a view or button on iOS 10 or lower.
But please take note that the rendering occurs after the view is appeared. Therefore, you have to call the roundCorners method in viewDidAppear() or viewDidLayoutSubviews():
override func viewDidLayoutSubviews() {
    cardView.roundCorners(cornerRadius: 20.0)
}
The result will look like this:

Animating Corners
Some readers also wondered how to animate the corners. You can use the UIView animation or the new UIViewPropertyAnimator to animate the changes.
For example, you want to animate the corners when a user taps the square view. You can first register the tap recognizer in viewDidLoad():
let tapRecognizer = UITapGestureRecognizer(target: self, action: #selector(animateCornerChange(recognizer:)))
cardView.addGestureRecognizer(tapRecognizer)
And then create the animateCornerChange method like this:
@objc func animateCornerChange(recognizer: UITapGestureRecognizer) {

    let targetRadius: CGFloat = (cardView.layer.cornerRadius == 0.0) ? 100.0 : 0.0
    UIViewPropertyAnimator(duration: 1.0, curve: .easeInOut) {
        self.cardView.layer.cornerRadius = targetRadius
        }.startAnimation()
}
In the code above, we use UIViewPropertyAnimator to create the animation. Alternatively, you can use the standard UIView animation to perform the change:
 UIView.animate(withDuration: 1.0, delay: 0.0, options: .curveEaseInOut, animations: {
     self.cardView.layer.cornerRadius = targetRadius
 }, completion: nil)
If you’ve updated the code in your Playground project, tapping the view will activate the animation.
That’s it for this tutorial. Stay tuned. We’ll have more articles to come. If you have any thoughts on this new series, please feel free to leave me comment below.


