Welcome to the first article of our App Marketing Series! If you do not know what this series is about and why we want to teach you app marketing, please read the previous article first. In this tutorial, we will start with Search Ads. You will learn what it is, how Search Ads helps promoting your app and how you can create an ad campaign to drive more downloads. For eligible developers, you are entitled to have US$100 credit for launching your first ad campaign. But you have to use it before October 31, 2017. This is one of the reasons why I want to talk about Search Ads. You only have two months left to try Search Ads for free. So let’s get started.
First things first, what’s Search Ads? Announced in 2016, Search Ads service provides a new way to increase your app exposure in App Store. Before Search Ads is introduced, it is very hard for solo developers to compete their app rankings with big studios or apps that were long ago published with large user bases. Even though we might have spent so much time on crafting a nicer app than the one which ranked on top, our app might still be hidden in shadow.
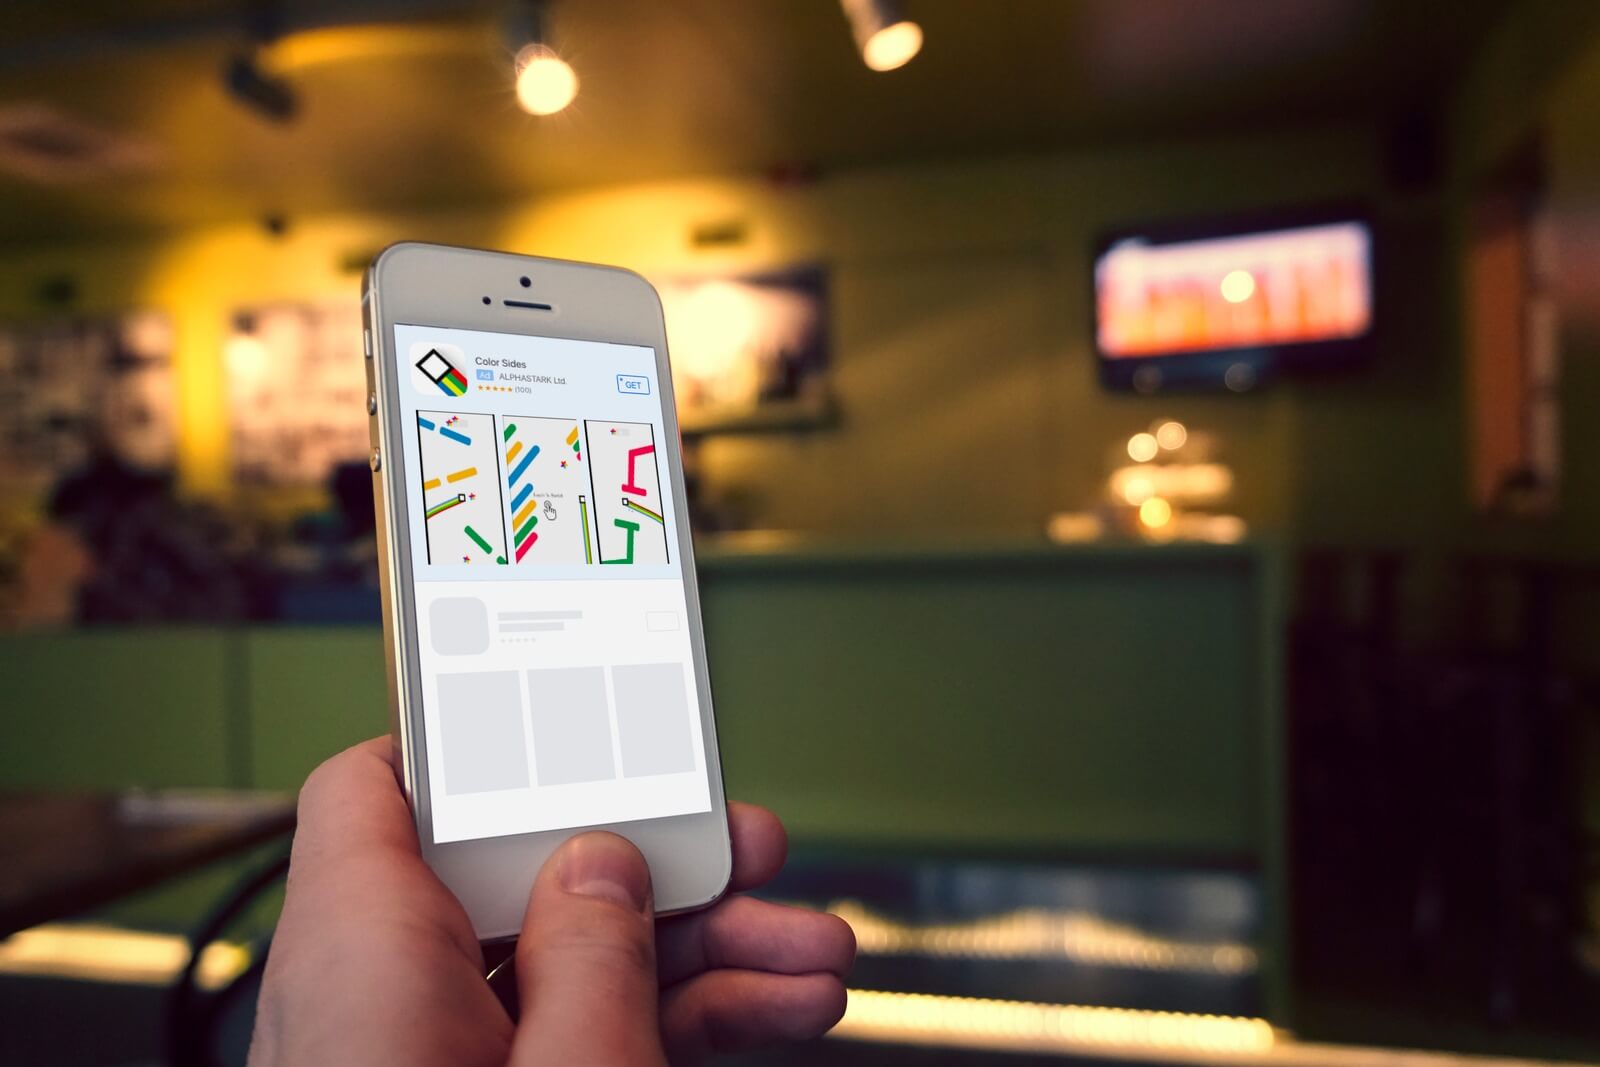
The reason why we do Search Ads is plain simple – We want to draw more traffic in order to attract more users download our apps. The more downloads you have, not only means your well crafted apps reach more people, you got a better chance to build a sustainable app business like those who have their apps ranked at top for years.
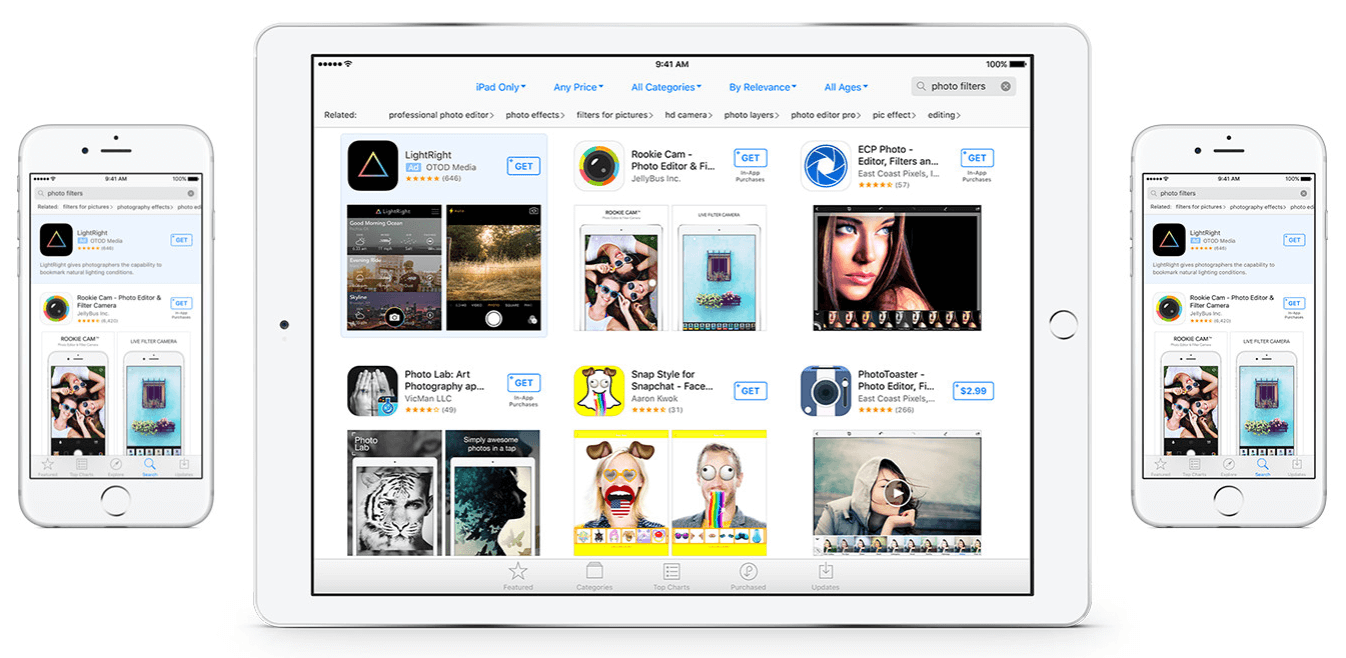
With more than 65% users discover apps through App Store search, it is a long awaited service that many app developers and publishers anticipated for years. Similar to Google ads, Search ads appears at the top of App Store search results. You pay only when a user taps on your ad.
Creating Your First Search Ad Campaign
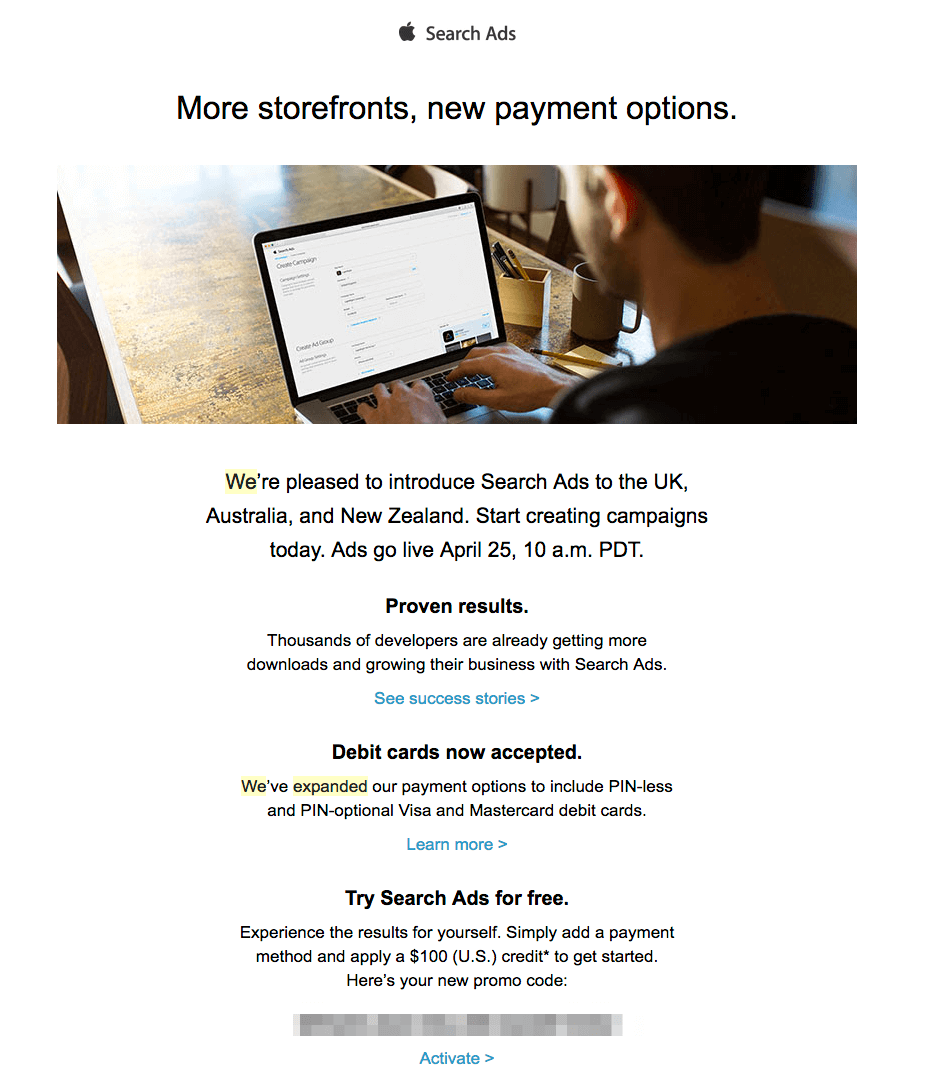
Before we get started, I assume you have an Apple ID and have an app published on the App Store. If you are already a paid Apple Developer, you probably have received an email with the promo code. I received mine when Apple announced to expand the service outside U.S. Take some time to dig out that email if you haven’t redeemed the promo code. You can use it later during the campaign configuration.
Now, if you have any apps on hand, I recommend you to take it out from shelve and follow the steps with me one by one to start our first Search Ads Campaign!
First, let’s go to https://searchads.apple.com
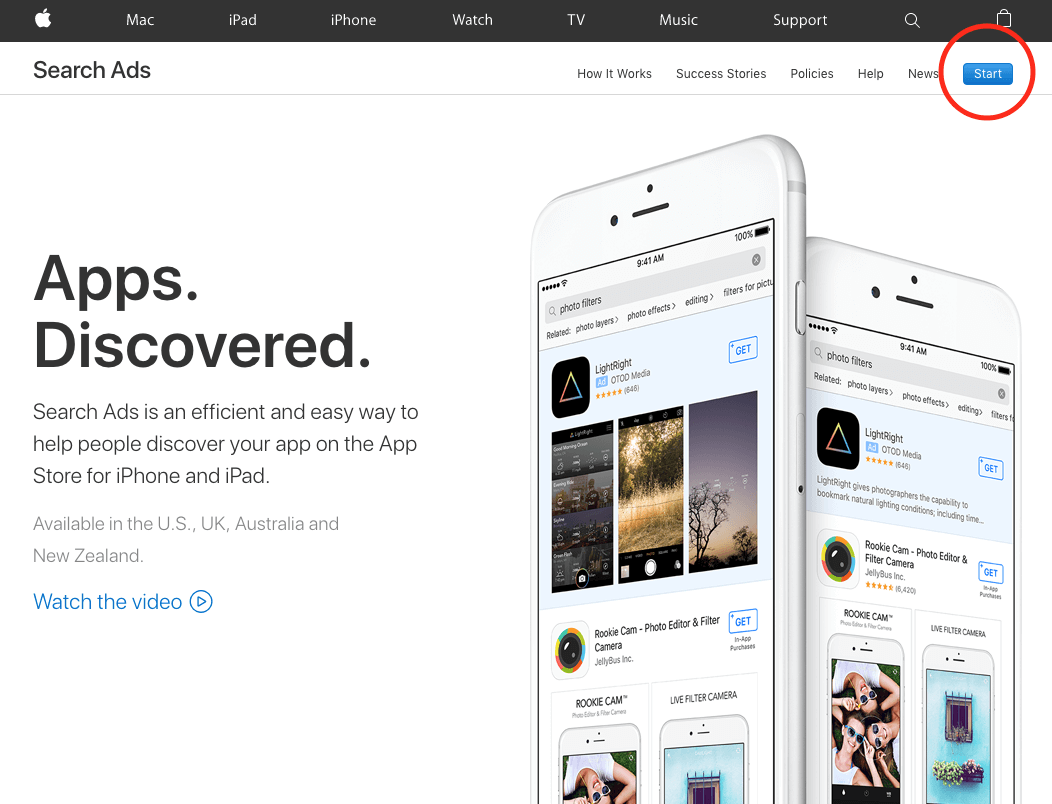
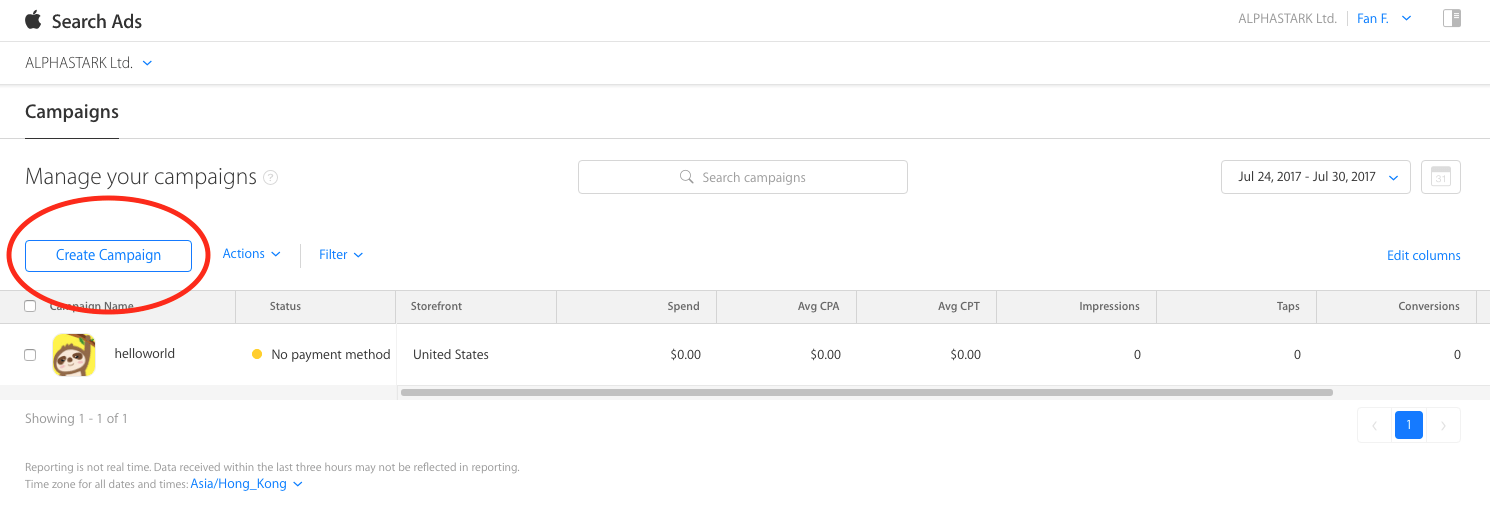
Follow the instruction to login with your Apple ID. When we logged in, we will see the page below. To start a new search ads, click “Create Campaign”.
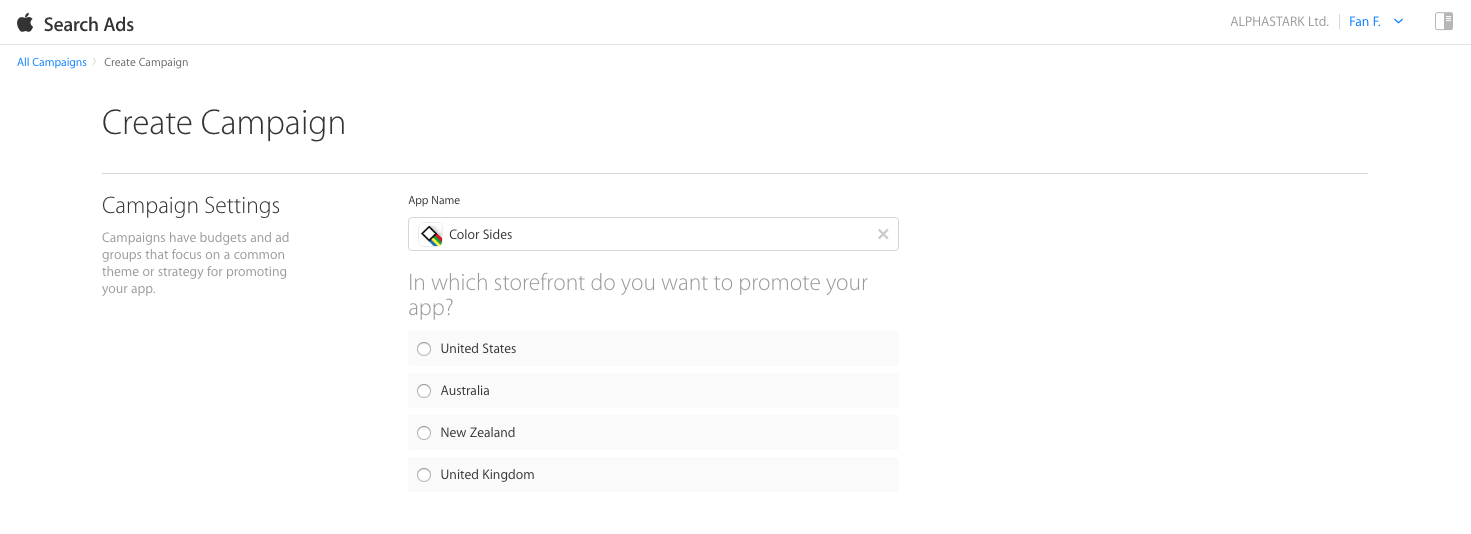
By clicking on the dialog box, we can choose the app for promotion from the dropdown menu:

At time of this writing, Search Ads is only available in 4 countries (U.S., U.K., Australia, and New Zealand), but Apple will definitely extend its reach to more countries over time. For now, pick one of the listed countries to get started:
After choosing one of the countries, we come down to the core part of Search Ads, including setting the overall marketing budget, daily maximum expenses, maximum cost per tap/click bidding, keywords selections and target audiences.
Working with Campaign Settings
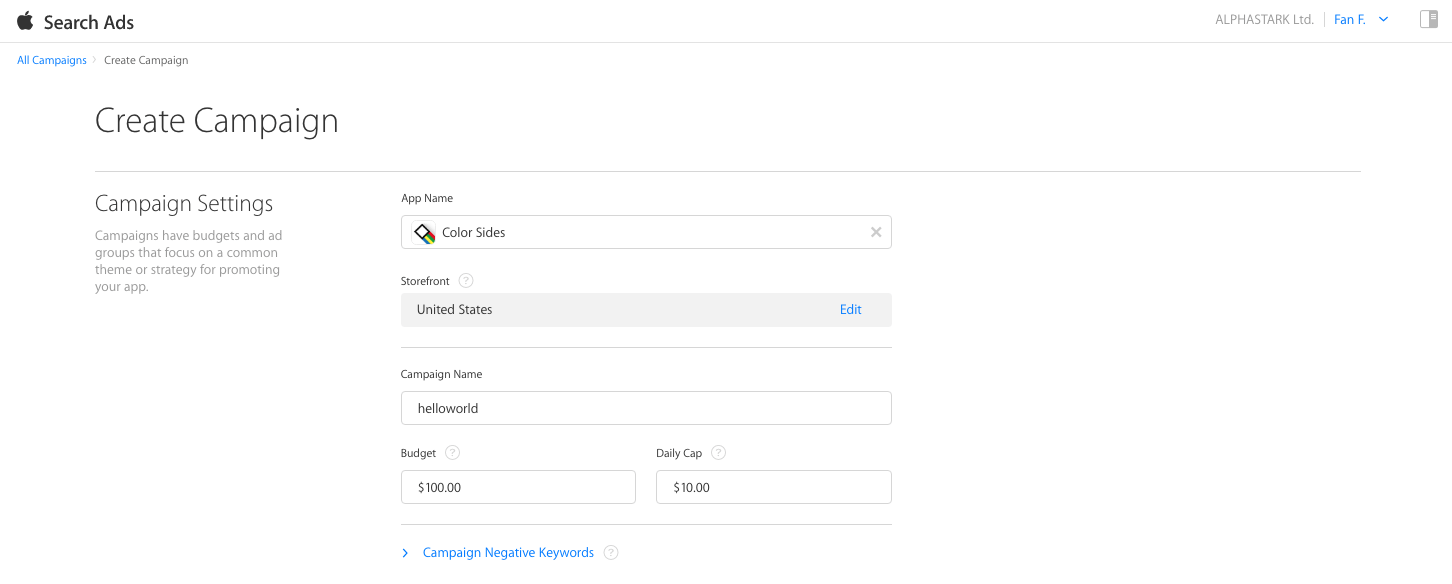
Let’s start with the Campaign Settings. In the Settings, name our campaign to whatever we like. In this first demo I name it “helloworld”. In the next field “Budget”, it is the overall campaign budget that we wish to pay for, which is up to our own budget. I set it to US$100 since I have received the US$100 promo code from Apple.
The box beside is “Daily Cap”, which is the daily maximum budget that we are willing to spend. I set it to US$10. In other words, the ad will run for 10 days, if the end date is not defined, so as to use up my whole campaign budget. For “Campaign Negative Keywords”, it is the keywords that we do not want our ad to be shown in across all Ad Groups under this Campaign. I leave it unchanged for this demonstration.
Setting Your Ad Group
The next section is for Ad Group configuration. In Ad Group Settings, name our Ad Group as we like. I simply set it to “myFirstAdGroup”. In the next box “Devices”, we can choose to promote either on iPhone or iPad, or both.
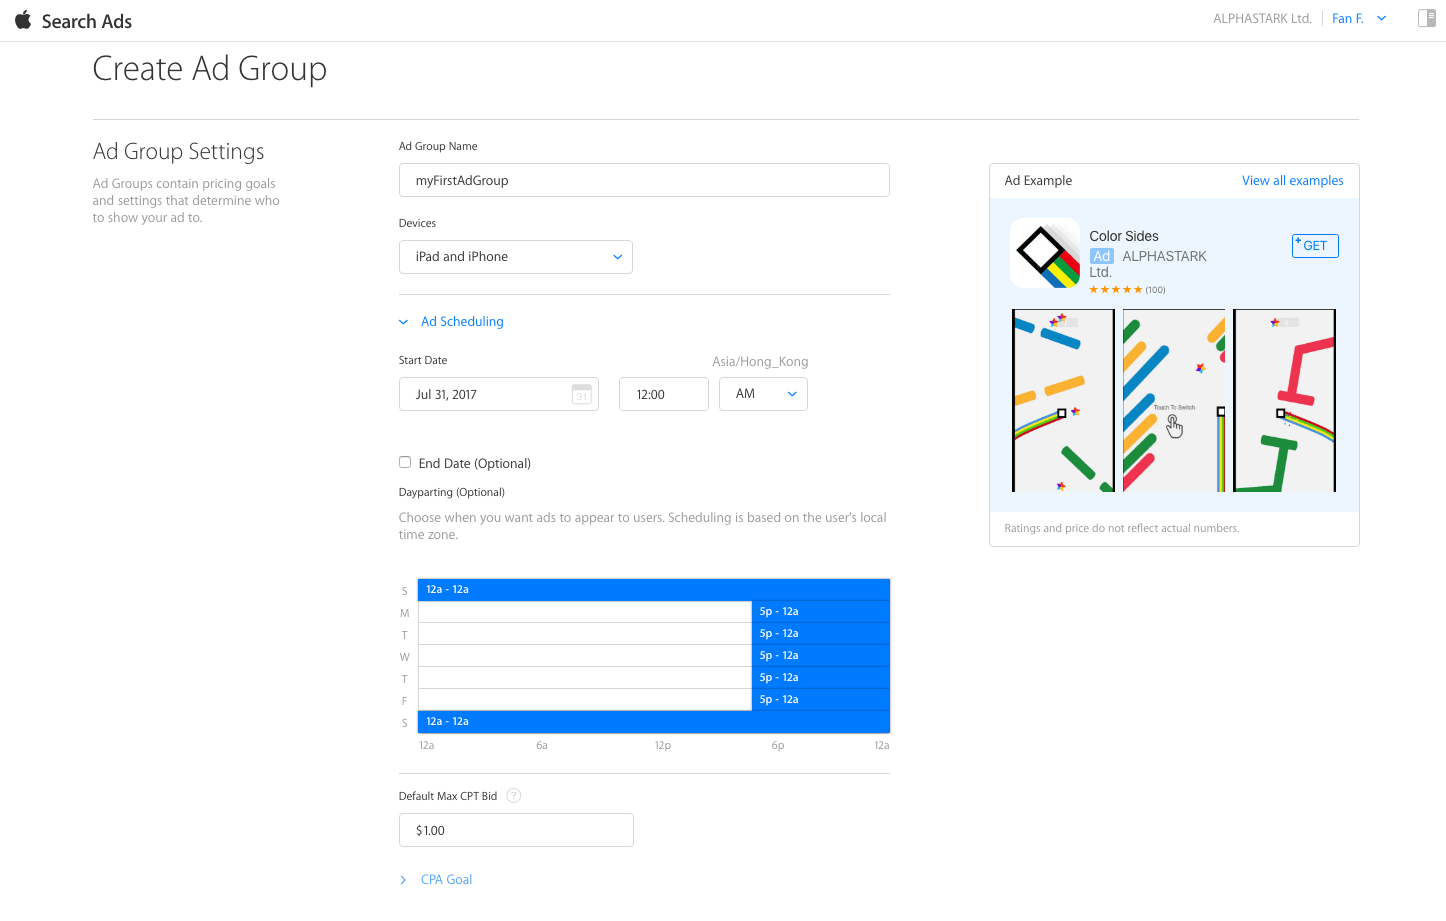
We do not need to start the campaign right away. We can use “Ad Scheduling” to schedule our ads. By clicking “Ad Scheduling”, we set the “Start Date”, the date when we start our marketing campaign. It is default to today, but feel free to set it to our preferred date. We can set the “End Date” of our campaign optionally. Let’s say, if we are launching a seasonal promotion such as X’mas discount or Valentine’s Day Favourite, we can ensure the campaign won’t be available after certain date and time by setting the end date.
For “Dayparting”, which is also optional, we can choose the exact time our ads appear to users based on their time zone. In this example, as I am promoting a fun game, I choose to promote it whole day during weekends but after work hours during weekdays.
For “Default Max CPT Bid”, we should set the maximum cost-per-tap (CPT) that we are willing to pay for. From my experience of marketing this app through Facebook, the lowest bid was around US$0.96 per app download, so my maximum CPT Bid is set to US$1. The CPT would increase over time due to the competition among mobile app publishers. I will fine tune my CPT Bid according to actual results during this campaign that you will learn more about it in the next article. Meanwhile, set it to a value that we can afford to spend.
The last option in this section is “CPA Goal”, which is also optional. Apple uses Cost-per-Acquisition goal as guidance to maximize our conversions, though it is not guaranteed. Note that we should set a realistic CPA goal, if the value is too low the app might missing some exposures to valuable users. My recommendation is to leave the box blank for the first campaign as to monitor the actual performance of this campaign, and fine tune the CPA goal value accordingly.
Search Match
Search Match is to automatically match our ad to relevant searches. By turning on this feature, Apple will prioritise our ads to people who are searching for apps like ours. Conversely, it will not show our ads to people who are not looking for the app.

Search Match is based on the metadata of your App Store listing, information about similar apps in the same genre, and other search data. Therefore, having a good name, description and keywords of our app will set it apart from competitions. It also establishes a fair playground for small studios or low-budget apps to be shown on the App Store, rather than being monopolised by big studios or heavy-budget apps which have enormous advertising budget to occupy all keywords in app searches.
Keywords
Keywords section allows us to choose the words that users search for our app. In “Recommended Keywords”, we can choose from the list of suggestions offered by Apple, or type a keyword (one word) in the search bar to let the system generate relative terms for us. Once we selected our preferred keyword (by clicking on the + icon), it will then added to “Ad Group Keywords”.
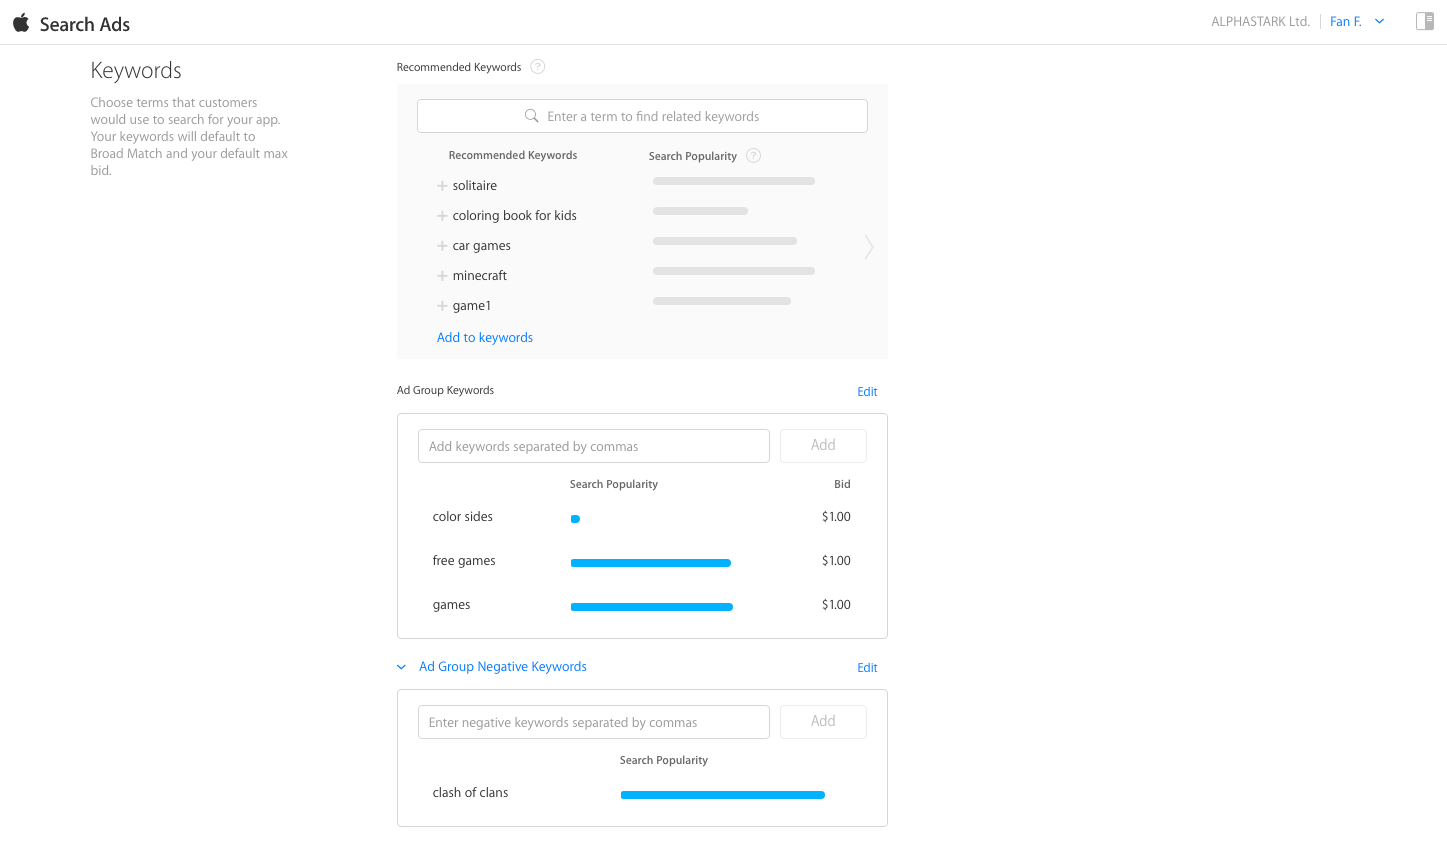
The “Ad Group Keywords” contains the selection of our preferred keywords. We can also add our desired keywords directly by typing them in the textbox. For each keyword, we will see its Search Popularity. Besides, we can edit the bid cost for each keyword, which is default to the max bid of our campaign.
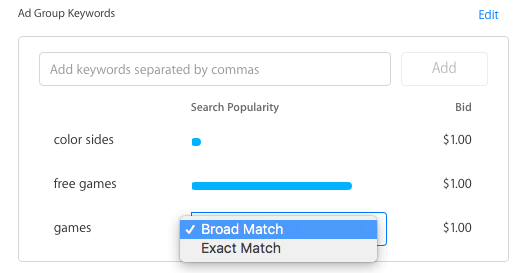
When you hover on the keywords under Ad Group Keywords, it will show a box that contains Broad Match. When we click on it, we will find two options.
- Broad Match – This is the default match type in Search Ads. Broad match ensures our ad runs on relevant close variants of a keyword, such as singular, plurals, misspellings, synonyms, related searches and phrases that include that term (fully or partially). For example, here we choose broad match of the keyword “games”, the app will also show up when customers search “arcade game”. Broad match is a smart way that Apple will automatically display our ad on relevant keywords.
- Exact Match – This allows us to gain absolute control over the keywords we choose. By choosing Exact Match for “free games”, the ad will only be displayed when users search the exact wordings, instead of any other relevant keywords like “free arcade games”. Obviously we will receive less ad impressions in this case since the search criteria is based on one single scope. However, the tap-through rate (or click-through rate) should be higher because we are targeting the users who precisely search for our app.
For “Ad Group Negative Keywords”, we define the search keywords that we do not want to show our ad. For example, I do not want my ad to show up when people search “clash of clans”.
Audience
The Audience section allows us to target a specific customer type and demographics of our audiences.
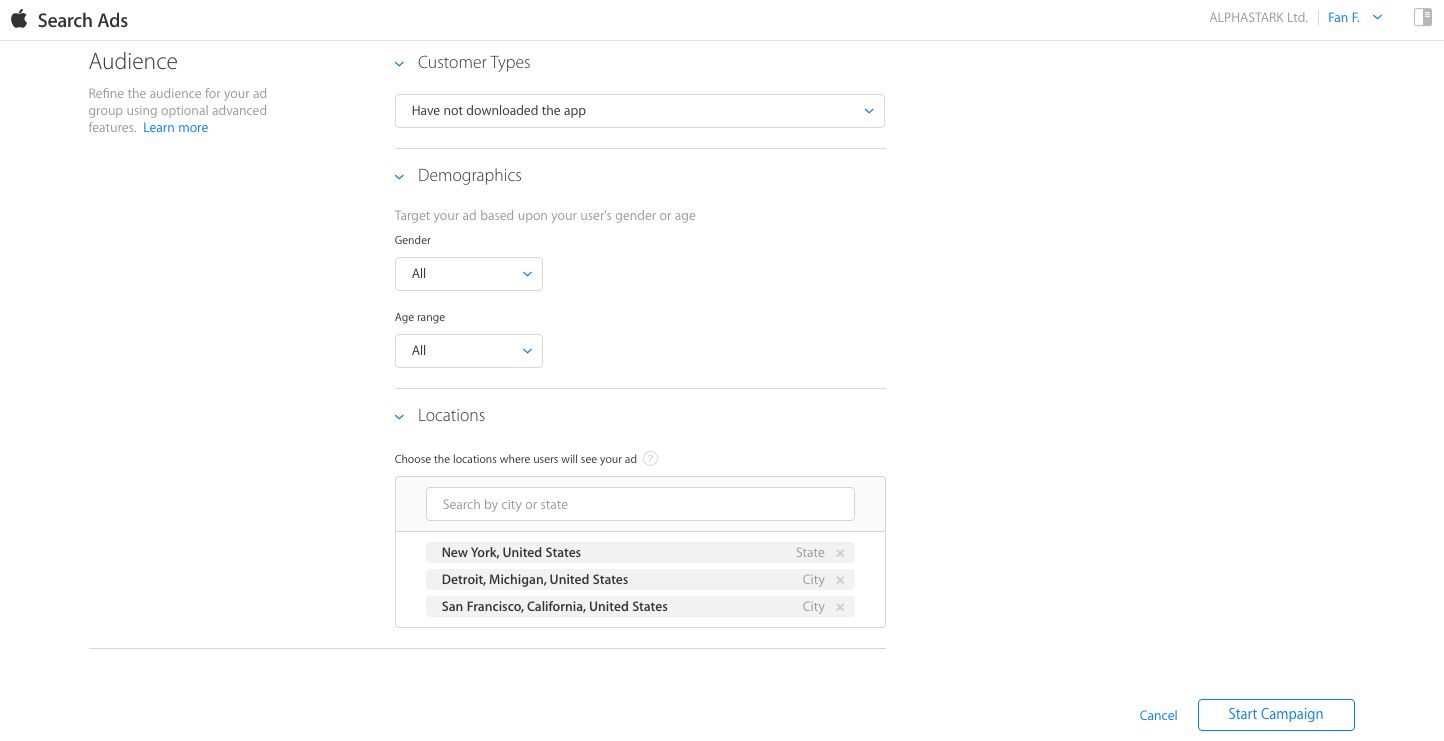
As you can see, there are 4 options for “Customer Types”, that we can expose our ad not only to new users, but also someone who have downloaded our other apps.

This is especially valuable for us to retarget existing customers through Search Ads other than displaying in-app Ads. Publishers/developers, who used to publish paid apps only, may find the “Have downloaded my other apps” feature particularly useful. They may want to refine their strategy of having at least one relevant free app to capture larger user bases, and use this feature to drive download of their paid apps. (So watch out for any of your favorite paid app publishers who are going to offer free apps soon!)
For “Demographics”, we can set gender and age range, ranged within 18–65+. We can also choose specific locations for our ad, which is utmost useful if we do not waste any dollars on region our app do not serve.
When we have completed all the above settings, click “Start Campaign” at the bottom right corner. If you are a first time user, the system will direct you to “Enter Account Payment Details” page. After filling in all payment details, you are about to start campaign. Hooooooray!
What’s Next
I am currently running a real campaign. I encourage you do it too. Next week, I will share to you my ad performance and fine tune the bid to improve exposure while refining goals.
If you enjoy this tutorial, please kindly share it to your friends who want to learn about Search Ads. What’s more, if you have already launched your first Search Ads campaign or any relevant campaigns, please do share your experiences with me by leaving a comment below. I really love to hear your experience.


