

At WWDC 2016, Apple introduced the Speech framework, a useful API for speech recognition. In fact, Speech Kit is the framework which Siri uses for speech recognition. There are a handful of speech recognition frameworks available today, but they are either very expensive or simply not as good. In this tutorial, I will show you how to create a Siri-like app for speech to text using Speech Kit.
Designing the App UI
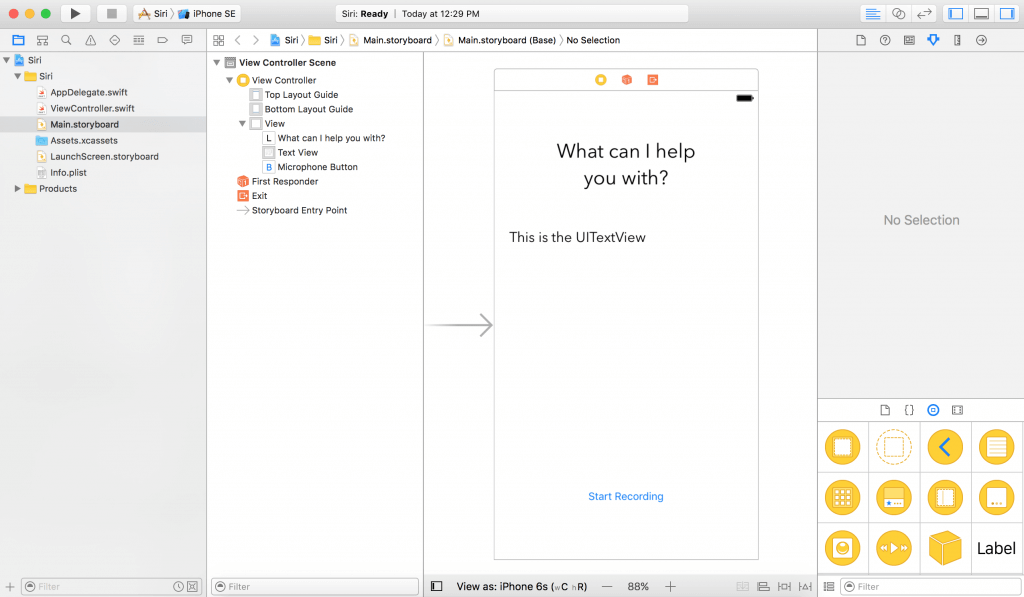
Let’s start by creating a new iOS Single View Application project with the name SpeechToTextDemo. Next, go to your Main.storyboard and add a UILabel, a UITextView, and a UIButton.
Your storyboard should look something like this:
Next you define outlet variable for the UITextView and the UIButton in ViewController.swift. In this demo, I set the name of UITextView as “textView”, and the name of the UIButton as “microphoneButton”. Also, create an empty action method which is triggered when the microphone button is tapped:
@IBAction func microphoneTapped(_ sender: AnyObject) {

}
If you don’t want to start from scratch, you can download the starter project and continue to follow the tutorial.
Using Speech Framework
To use the Speech framework, you have to first import it and adopt the SFSpeechRecognizerDelegate protocol. So let’s import the framework, and add its protocol to the ViewController class. Now your ViewController.swift should look like this:
import UIKit
import Speech

class ViewController: UIViewController, SFSpeechRecognizerDelegate {


    @IBOutlet weak var textView: UITextView!
    @IBOutlet weak var microphoneButton: UIButton!

    override func viewDidLoad() {
        super.viewDidLoad()

    }

    @IBAction func microphoneTapped(_ sender: AnyObject) {

    }

}
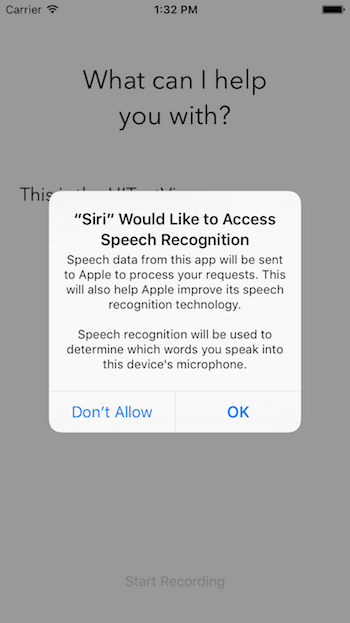
User Authorization
Before using the speech framework for speech recognition, you have to first ask for users’ permission because the recognition doesn’t happen just locally on the iOS device but Apple’s servers. All the voice data is transmitted to Apple’s backend for processing. Therefore, it is mandatory to get the user’s authorization.
Let’s authorize the speech recognizer in the viewDidLoad method. The user must allow the app to use the input audio and speech recognition. First, declare a speechRecognizer variable:
private let speechRecognizer = SFSpeechRecognizer(locale: Locale.init(identifier: "en-US")) //1
And update the the viewDidLoad method like this:
override func viewDidLoad() {
    super.viewDidLoad()

    microphoneButton.isEnabled = false  //2

    speechRecognizer.delegate = self  //3

    SFSpeechRecognizer.requestAuthorization { (authStatus) in  //4

        var isButtonEnabled = false

        switch authStatus {  //5
        case .authorized:
            isButtonEnabled = true

        case .denied:
            isButtonEnabled = false
            print("User denied access to speech recognition")

        case .restricted:
            isButtonEnabled = false
            print("Speech recognition restricted on this device")

        case .notDetermined:
            isButtonEnabled = false
            print("Speech recognition not yet authorized")
        }

        OperationQueue.main.addOperation() {
            self.microphoneButton.isEnabled = isButtonEnabled
        }
    }
}
- First, we create an
SFSpeechRecognizerinstance with a locale identifier ofen-USso the speech recognizer knows what language the user is speaking in. This is the object that handles speech recognition. - By default, we disable the microphone button until the speech recognizer is activated.
-
Then, set the speech recognizer delegate to
selfwhich in this case is ourViewController. -
After that, we must request the authorization of Speech Recognition by calling
SFSpeechRecognizer.requestAuthorization. -
Finally, check the status of the verification. If it’s authorized, enable the microphone button. If not, print the error message and disable the microphone button.
Now you might think that by running the app you would see an authorization alert, but you are mistaken. If you run, the app will crash. But why you may ask?
Providing the Authorization Messages
Apple requires all the authorizations to have a custom message from the app. In case of speech authorization, we must authorize two things:
- Microphone usage.
-
Speech Recognition.
To customize the messages, you must supply these custom messages through the info.plist file.
Let’s open our info.plist file’s source code. First, right click on info.plist. Then Open As > Source Code. Finally, copy the following XML code and insert them before the </dict> tag.
NSMicrophoneUsageDescription  Your microphone will be used to record your speech when you press the "Start Recording" button.

NSSpeechRecognitionUsageDescription  Speech recognition will be used to determine which words you speak into this device's microphone.
Now that you have added the two keys to info.plist:
NSMicrophoneUsageDescription– the custom message for authorization of your audio input. Note that Input Audio Authorization will only happen when the user clicks the microphone button.NSSpeechRecognitionUsageDescription– the custom message for speech recognition
Feel free to change the values of these records. Now hit the Run button, you should be able to compile and run the app without any errors.
Handling Speech Recognition
Now that we have implemented the user authorization, let’s move onto the implementation of speech recognition. We start by defining the following objects in your ViewController:
private var recognitionRequest: SFSpeechAudioBufferRecognitionRequest?
private var recognitionTask: SFSpeechRecognitionTask?
private let audioEngine = AVAudioEngine()
- This object handles the speech recognition requests. It provides an audio input to the speech recognizer.
-
The recognition task where it gives you the result of the recognition request. Having this object is handy as you can cancel or stop the task.
-
This is your audio engine. It is responsible for providing your audio input.
Next, let’s create a new function called startRecording().
func startRecording() {
if recognitionTask != nil {
recognitionTask?.cancel()
recognitionTask = nil
}
let audioSession = AVAudioSession.sharedInstance()
do {
try audioSession.setCategory(AVAudioSessionCategoryRecord)
try audioSession.setMode(AVAudioSessionModeMeasurement)
try audioSession.setActive(true, with: .notifyOthersOnDeactivation)
} catch {
print("audioSession properties weren't set because of an error.")
}
recognitionRequest = SFSpeechAudioBufferRecognitionRequest()
guard let inputNode = audioEngine.inputNode else {
fatalError("Audio engine has no input node")
}
guard let recognitionRequest = recognitionRequest else {
fatalError("Unable to create an SFSpeechAudioBufferRecognitionRequest object")
}
recognitionRequest.shouldReportPartialResults = true
recognitionTask = speechRecognizer.recognitionTask(with: recognitionRequest, resultHandler: { (result, error) in
var isFinal = false
if result != nil {
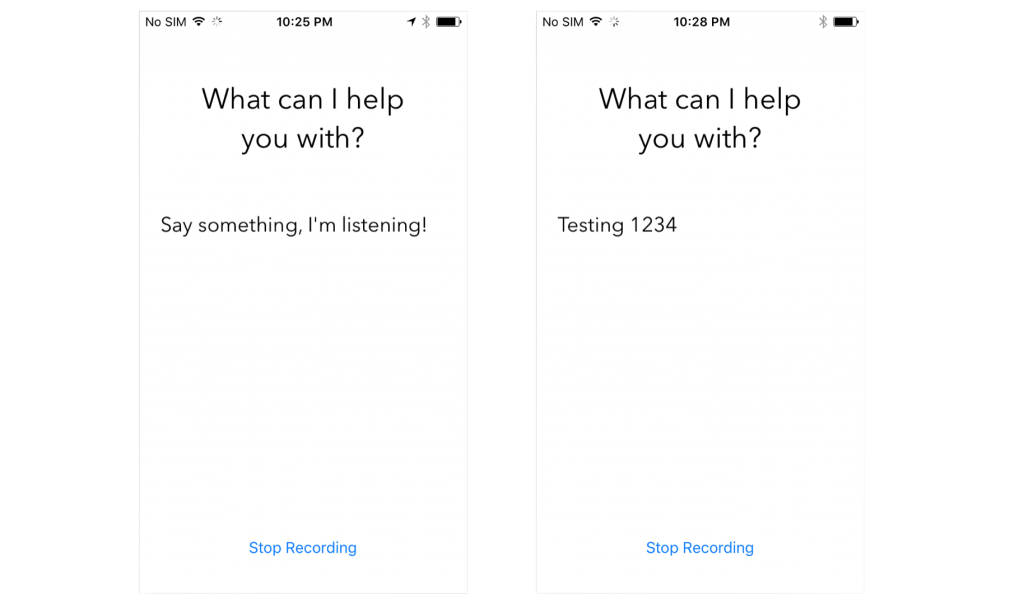
self.textView.text = result?.bestTranscription.formattedString
isFinal = (result?.isFinal)!
}
if error != nil || isFinal {
self.audioEngine.stop()
inputNode.removeTap(onBus: 0)
self.recognitionRequest = nil
self.recognitionTask = nil
self.microphoneButton.isEnabled = true
}
})
let recordingFormat = inputNode.outputFormat(forBus: 0)
inputNode.installTap(onBus: 0, bufferSize: 1024, format: recordingFormat) { (buffer, when) in
self.recognitionRequest?.append(buffer)
}
audioEngine.prepare()
do {
try audioEngine.start()
} catch {
print("audioEngine couldn't start because of an error.")
}
textView.text = "Say something, I'm listening!"
}
This function is called when the Start Recording button is tapped. Its main function is to start up the speech recognition and start listening to your microphone. Let’s go through the above code line by line:
- Line 3-6 – Check if
recognitionTaskis running. If so, cancel the task and the recognition. -
Line 8-15 – Create an
AVAudioSessionto prepare for the audio recording. Here we set the category of the session as recording, the mode as measurement, and activate it. Note that setting these properties may throw an exception, so you must put it in a try catch clause. -
Line 17 – Instantiate the
recognitionRequest. Here we create theSFSpeechAudioBufferRecognitionRequestobject. Later, we use it to pass our audio data to Apple’s servers. -
Line 19-21 – Check if the
audioEngine(your device) has an audio input for recording. If not, we report a fatal error. -
Line 23-25 – Check if the
recognitionRequestobject is instantiated and is notnil. -
Line 27 – Tell
recognitionRequestto report partial results of speech recognition as the user speaks. -
Line 29 – Start the recognition by calling the
recognitionTaskmethod of ourspeechRecognizer. This function has a completion handler. This completion handler will be called every time the recognition engine has received input, has refined its current recognition, or has been canceled or stopped, and will return a final transcript. -
Line 31 – Define a boolean to determine if the recognition is final.
-
Line 35 – If the
resultisn’tnil, set thetextView.textproperty as ourresult‘s best transcription. Then if the result is the final result, setisFinalto true. -
Line 39-47 – If there is no error or the result is final, stop the
audioEngine(audio input) and stop therecognitionRequestandrecognitionTask. At the same time, we enable the Start Recording button. -
Line 50-53 – Add an audio input to the
recognitionRequest. Note that it is ok to add the audio input after starting therecognitionTask. The Speech Framework will start recognizing as soon as an audio input has been added. -
Line 55 – Prepare and start the
audioEngine.
Triggering Speech Recognition
We need to make sure that speech recognition is available when creating a speech recognition task, so we have to add a delegate method to ViewController. If speech recognition is unavailable or changes its status, the microphoneButton.enable property should be set. For this scenario, we implement the availabilityDidChange method of the SFSpeechRecognizerDelegate protocol. Use the implementation as seen below.
func speechRecognizer(_ speechRecognizer: SFSpeechRecognizer, availabilityDidChange available: Bool) {
    if available {
        microphoneButton.isEnabled = true
    } else {
        microphoneButton.isEnabled = false
    }
}
This method will be called when the availability changes. If speech recognition is available, the record button will also be enabled.
The last thing we have to update the action method microphoneTapped(sender:):
@IBAction func microphoneTapped(_ sender: AnyObject) {
    if audioEngine.isRunning {
        audioEngine.stop()
        recognitionRequest?.endAudio()
        microphoneButton.isEnabled = false
        microphoneButton.setTitle("Start Recording", for: .normal)
    } else {
        startRecording()
        microphoneButton.setTitle("Stop Recording", for: .normal)
    }
}
In this function, we must check whether our audioEngine is running. If it is running, the app should stop the audioEngine, terminate the input audio to our recognitionRequest, disable our microphoneButton, and set the button’s title to “Start Recording”.
If the audioEngine is working, the app should call startRecording() and set the title of the title of the button to “Stop Recording”.
Great! You’re ready to test the app. Deploy the app to an iOS 10 device, and hit the “Start Recording” button. Go ahead and say something!
Notes:
- Apple limits recognition per device. The limit is not known, but you can contact Apple for more information.
-
Apple limits recognition per app.
-
If you routinely hit limits, make sure to contact Apple, they can probably resolve it.
-
Speech recognition uses a lot of power and data.
-
Speech recognition only lasts about a minute at a time.
Summing Up
In this tutorial, you learned how to take advantage of the incredible new speech APIs Apple has opened up to developers to recognize speech and transcribe it into text. The Speech framework uses the same speech recognition framework as Siri does. It is a relatively small API. However, it is powerful and empowers developers to create amazing things like getting the transcript of an audio file.
I recommend watching the WWDC 2016 session 509 for further information. I hope you enjoyed this article and had fun exploring this brand new API.
For your reference, you can access the full project on Github.


