

So, you are just about to get finished with the new super-app of yours, or the one that your boss or a customer have asked you to make, and you realize that there’s one more important requirement, to make it capable of posting content to Facebook or Twitter. You are a breath away from the deadline, and after having spent endless hours in implementation you find it too hard, or even objectively impossible, to stay in front of your computer several more hours in order to integrate the Facebook or Twitter SDK. So, what are you supposed to do? Maybe it’s time to start thinking of twenty or more different excuses that you will use when you’ll tell your boss or the customer that you are not going to deliver the app? Maybe it’s time to start sweating or feeling suffocated? Or, on the other hand, there’s a nice and easy way to add sharing capabilities to your application in no time at all?
Well, my dear readers, hoping that nobody will ever find himself or herself to that awful situation that I just described, it indeed exists a wonderful and quick solution to that problem. Actually, this solution has a name, and it’s called Social framework, embedded in the iOS SDK. It’s quite possible that many of you have already worked with it, however, I’d bet that there are also many developers that are not aware of that framework and how to use it in order to add sharing features to an app in just a few minutes! Literally!
As you all know, Apple has added the option to post to Facebook and to Twitter as a built-in functionality in iOS since a long time ago. Obviously, it’s good enough to do the basics, but definitely you need to use the proper SDKs if you want or need to add more advanced operations to your app. In this tutorial though this is not the case. We’ll focus on the first one, and to be precise, we’ll focus on how to use the built-in post capabilities that iOS supports straight into our own application. As we are about to see next, all we’ll do is just to use the Social framework so the default post view controller become available in our demo app, and all the rest will be left to be handled by iOS. We won’t deal at all with aspects like getting logged in, acquiring authentication tokens, creating custom views, etc. Putting it simply, we will grab a “black box”, we will assemble it along with the rest of the code, and we’re good to go.
Furthermore, there is one more special controller we’ll discuss about next, named UIActivityViewController. Maybe you haven’t heard of it, but you have definitely seen and used it:
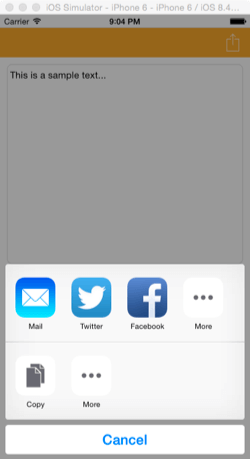
Using that controller not only you can use the built-in share options, but also you can use other features such as sending an e-mail, a SMS, printing, and other stuff. Actually, the presented options depend on the content you want to share, but still, it remains a nice tool at our disposal. Trust me, I don’t exaggerate if I tell you that it takes no more than two lines to integrate it to your app, and you’ll witness that in just a while.
So, if you are curious enough to see in action how all the above work, and if you’re already motivated to use them in your next applications, continue reading and get ready to discover simple, but yet great things. What I’m going to present you here is not new in iOS 8, but it deserves to be highlighted as it can offer great flexibility to all developers. Therefore, let’s get started.
A Quick Look at the Demo App
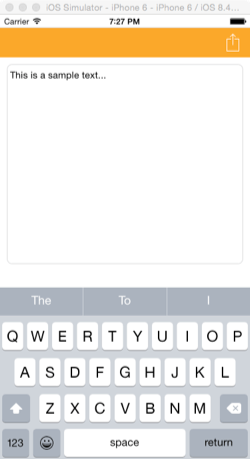
The demo application that we’ll create for the sake of this tutorial is going to be really simple. It will contain just one view controller (we’ll keep the default one that is automatically created by Xcode), and this view controller will have just two controls: A toolbar at the top with one bar button item, and a textview right below. It’s supposed to be a part of a note-taking app that provides a textview to write some text, and then post it to Facebook and Twitter. Here’s how it will look like:
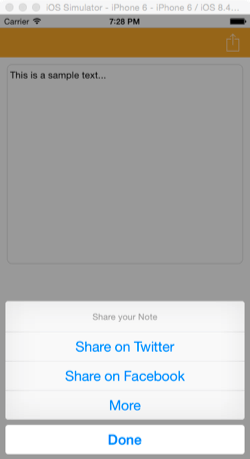
The bar button item in the toolbar will be used to present an action sheet, which in turn will give us three options:
- Share on Facebook
- Share on Twitter
- More
For the purposes of the first two options we’ll use the Social framework, and we’ll display the default (built-in) compose view controller that iOS provides to write some text and post. Using the third option, UIActivityViewController will be presented, where the first two sharing options can be found as well.
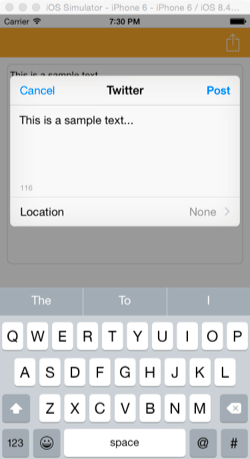
The next screenshot illustrates the default compose view controller provided by iOS for posting some text to Twitter:
There is one important detail that I must mention necessarily, and that is that you must login to Facebook and Twitter in the device settings before you run the app. In a following part of this tutorial I’ll show you exactly what to do, but keep it in mind from now. Of course, in our code we’ll consider the case that the user is not logged in to a social network, and we’ll display a proper message. But all these are coming in a while.
As you realize here the demo application is not complicated at all to make, so this time I won’t give you a starter project to work with. We’ll start from the ground up, and within five minutes we’ll be ready to start working with the Social framework and the sharing options it provides. However, for you who just want to read this text and test the demo app directly, there’s always an alternative; to download it at the end of the tutorial.
Creating the App and the UI
Let’s get started by creating a new project in Xcode. Upon creation, make sure to set or select the following details:
- Create a Single-View Application
- Name the app EasyShare (or whatever you like)
- Select the Swift as language of the project
- Make iPhone the target device of the app
Once Xcode prepares the project, go straight ahead to the Interface Builder to setup the one and only scene we are going to have. Firstly, add a toolbar at the top side, right after the status bar (Y = 20). If you wish, set a tint color to it. In my demo app implementation, I used the #F39C12 color. Also, add a bar button item to the toolbar (preferably at the right). From the Attributes Inspector select the Action as its identifier, and set the white color as the tint.
Next, get a textview object from the Object library, and place it to the scene. Set the frame as shown below:
- X = 10
- Y = 74
- Width = 580
- Height = 300
In the next part we’ll add border and rounded corners to the textview, so for now it’s okay. Don’t forget to remove the default “Lorem ipsum” text.
Now it’s time to set the constraints. All the subviews we added are simple enough, so it’s easy to set the constraints. Go ahead for it, but in case you encounter any conflict, the following screenshots are showing the constraints I set. Regarding the toolbar:
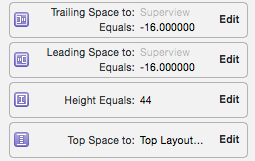
And regarding the textview:
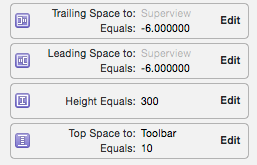
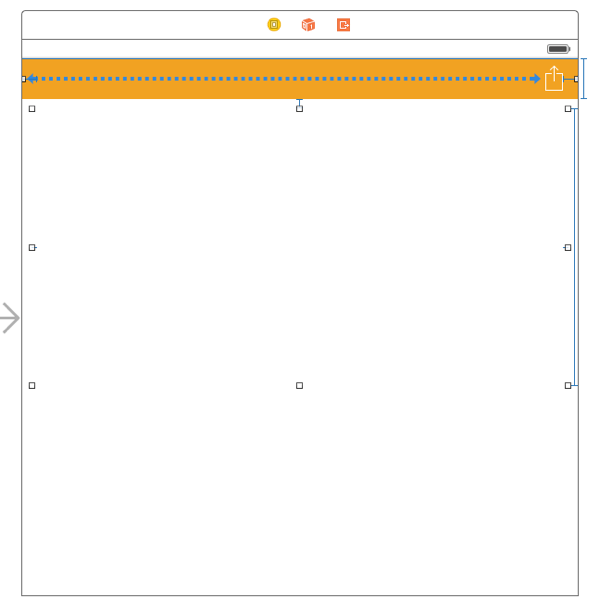
At the end, your scene should look like the next one:
Now it’s time to create and connect one IBOutlet property to the textview and one IBAction method to the bar button item. In the ViewController.swift file add the following line at the top of the class:
@IBOutlet weak var noteTextview: UITextView!
and then connect it to the textview. Also, connect the following IBAction method to the bar button item:
@IBAction func showShareOptions(sender: AnyObject) {
}
A lot of our work will take place in the above method, but for now we just let it be there.
As we’ve started adding some easy code, let’s also add the following custom function to the ViewController class. It will make the textview have rounded borders and a border line:
func configureNoteTextView() {
    noteTextview.layer.cornerRadius = 8.0
    noteTextview.layer.borderColor = UIColor(white: 0.75, alpha: 0.5).CGColor
    noteTextview.layer.borderWidth = 1.2
}
The first line results to rounded corners, the other two set the border line color and width respectively.
In the viewDidLoad() function now let’s call it:
override func viewDidLoad() {
    super.viewDidLoad()

    configureNoteTextView()
}
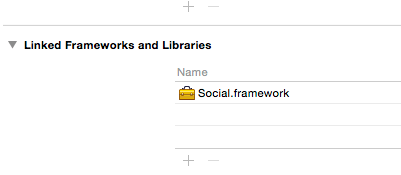
Finally, let’s add the Social framework to the project, as we are going to need it pretty soon. Click to the project item in the Project Navigator, and then select the General tab. Scroll down until you reach the Linked Frameworks and Libraries, and then click to the plus (+) button. In the modal window that appears just type the word “social” to the search bar, select it, and click Add to add it:
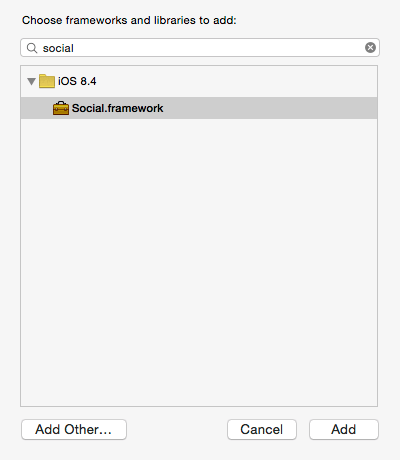
The Social.framework should now appear under the Linked Frameworks and Libraries sections as shown below:
As a last step, go to the ViewController.swift file, and at the top of the file append the next line:
import Social
That’s it. For starters we are okay, as our demo app is now fully set up, waiting for us to add the sharing features. You can give a first try to the app at this point and see how everything looks:
Displaying the Share Options
All the sharing options that we’ll provide in our demo app will be accessible through an action sheet that will be presented when the action bar button item is tapped. For that reason we created the showShareOptions(_:) IBAction method earlier. The following screenshot will show you the result of the (easy) work that will take place here:
So, let’s get started, and first of all we’ll consider the keyboard. The bar button item can be tapped even when the keyboard is appeared and the textview is being edited, so our first move is to dismiss it:
@IBAction func showShareOptions(sender: AnyObject) {
    // Dismiss the keyboard if it's visible.
    if noteTextview.isFirstResponder() {
        noteTextview.resignFirstResponder()
    }
}
Now, we can initialize a new alert controller and set its style to action sheet:
@IBAction func showShareOptions(sender: AnyObject) {
    ...

    let actionSheet = UIAlertController(title: "", message: "Share your Note", preferredStyle: UIAlertControllerStyle.ActionSheet)
}
As you’ve seen, we need to display three options to the action sheet, so we need three equivalent actions. However, don’t forget that we should provide one more button to the user; the option to dismiss the action sheet without choosing anything from the above, so we must create four alert actions in total. Let’s see them:
@IBAction func showShareOptions(sender: AnyObject) {
    ...

    // Configure a new action for sharing the note in Twitter.
    let tweetAction = UIAlertAction(title: "Share on Twitter", style: UIAlertActionStyle.Default) { (action) -> Void in

    }


    // Configure a new action to share on Facebook.
    let facebookPostAction = UIAlertAction(title: "Share on Facebook", style: UIAlertActionStyle.Default) { (action) -> Void in

    }

    // Configure a new action to show the UIActivityViewController
    let moreAction = UIAlertAction(title: "More", style: UIAlertActionStyle.Default) { (action) -> Void in

    }


    let dismissAction = UIAlertAction(title: "Close", style: UIAlertActionStyle.Cancel) { (action) -> Void in

    }


    actionSheet.addAction(tweetAction)
    actionSheet.addAction(facebookPostAction)
    actionSheet.addAction(moreAction)
    actionSheet.addAction(dismissAction)

    presentViewController(actionSheet, animated: true, completion: nil)
}
That’s all. As you see at the end we present the action sheet. Now you can run the app and use the bar button item to show the action sheet. Nothing is still working, but starting from the next part we’ll write step by step all the missing code that will enable us to share our hypothetic note first on Twitter, and then on Facebook.
Tweet, Tweet
As I mentioned at some point earlier, the user must be logged in to any of the accounts that he wants to use for posting to a social network. In programming terms, that means for us that the first step before even try to display the default post composer view controller that the Social framework provides is to check if the user is indeed logged in or not. In case he is we’ll proceed normally, otherwise we’ll just display an alert with a customized message.
We’ll begin by enabling sharing on Twitter first, and more specifically we’ll create a condition to check if the user is logged in to his Twitter account or not. As you’ll notice right next, we are focusing on the tweetAction alert action we created right before.
let tweetAction = UIAlertAction(title: "Share on Twitter", style: UIAlertActionStyle.Default) { (action) -> Void in
    // Check if sharing to Twitter is possible.
    if SLComposeViewController.isAvailableForServiceType(SLServiceTypeTwitter) {

    }
    else {
        self.showAlertMessage("You are not logged in to your Twitter account.")
    }
}
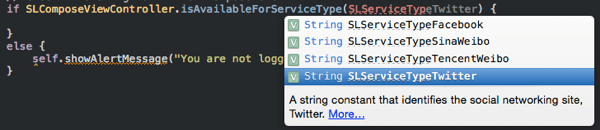
As you can see in the above snippet, the isAvailableForServiceType(_:) class method of the SLComposeViewController class is the one that actually checks if the user is logged in or not, and it returns true or false respectively. As a parameter it accepts a string value that specifies the social network we care about. Apple has assigned into constants the proper values regarding each network, and you can see all of them if you start typing the “SLServiceTyp” (without the quotes) instead of the value shown above:
In the else part of the above condition you notice that we make a call to a function named showAlertMessage(_:), so we display a custom message to the user in case he’s not logged in. This function doesn’t exist yet, and we’ll create it right before the end of this part. I must say however that its job is to display an alert controller using the message we provide as an argument, and the purpose of its existence totally relies to the fact that we must avoid writing more than once the same code. To make it clearer, we’ll use it again when we’ll check if the user is connected to his Facebook account as well.
Let’s continue now, and let’s initialize an instance of the SLComposeViewController class. This one will display the default view controller for composing the message we want to share, and most importantly, it will give us the desired “Post” button.
let tweetAction = UIAlertAction(title: "Share on Twitter", style: UIAlertActionStyle.Default) { (action) -> Void in
    // Check if sharing to Twitter is possible.
    if SLComposeViewController.isAvailableForServiceType(SLServiceTypeTwitter) {
        // Initialize the default view controller for sharing the post.
        let twitterComposeVC = SLComposeViewController(forServiceType: SLServiceTypeTwitter)

    }
    else {
        self.showAlertMessage("You are not logged in to your Twitter account.")
    }
}
Once again we must use the proper service type upon the initialization of the SLComposeViewController class.
The above class contains a method named setInitialText(_:). By using it, we can set directly the text from our textview to the compose view controller. As you understand, it’s going to become handy, however we must make sure that we don’t overlook one simple fact: That the maximum text length should be up to 140 characters, and not greater than that. It’s the Twitter’s limitation when posting tweets.
So, what are we going to do? Simply, at first we’ll check the length of the text in the textview. If it’s less than or equal to 140 characters, we’ll make use of the method I mentioned in the previous paragraph and we’re ready to proceed. On the other hand, if the text length is greater than 140 characters, then we’ll “extract” as a substring only the first 140 characters and we’ll use it as the text that will be posted.
Let’s translate what I just said in code:
let tweetAction = UIAlertAction(title: "Share on Twitter", style: UIAlertActionStyle.Default) { (action) -> Void in
    // Check if sharing to Twitter is possible.
    if SLComposeViewController.isAvailableForServiceType(SLServiceTypeTwitter) {
        // Initialize the default view controller for sharing the post.
        let twitterComposeVC = SLComposeViewController(forServiceType: SLServiceTypeTwitter)

        // Set the note text as the default post message.
        if count(self.noteTextview.text) <= 140 {
            twitterComposeVC.setInitialText("\(self.noteTextview.text)")
        }
        else {
            let index = advance(self.noteTextview.text.startIndex, 140)
            let subText = self.noteTextview.text.substringToIndex(index)
            twitterComposeVC.setInitialText("\(subText)")
        }

    }
    else {
        self.showAlertMessage("You are not logged in to your Twitter account.")
    }
}
There's just a command missing above, the one that will present the compose view controller:
let tweetAction = UIAlertAction(title: "Share on Twitter", style: UIAlertActionStyle.Default) { (action) -> Void in
    // Check if sharing to Twitter is possible.
    if SLComposeViewController.isAvailableForServiceType(SLServiceTypeTwitter) {
        ...

        // Display the compose view controller.
        self.presentViewController(twitterComposeVC, animated: true, completion: nil)
    }
    else {
        self.showAlertMessage("You are not logged in to your Twitter account.")
    }
}
And with that, we're ready to post on Twitter!
Well, almost ready, as the showAlertMessage(_:) custom function is still missing:
func showAlertMessage(message: String!) {
    let alertController = UIAlertController(title: "EasyShare", message: message, preferredStyle: UIAlertControllerStyle.Alert)
    alertController.addAction(UIAlertAction(title: "Okay", style: UIAlertActionStyle.Default, handler: nil))
    presentViewController(alertController, animated: true, completion: nil)
}
As a last word here, it's difficult to overlook the fact that it takes as few code as you see so as to make an app capable of posting to Twitter (and the same applies for Facebook). And as it consists of a such easy and fast process, let's enable the sharing on Facebook as well, right before we go and give it a try.
Posting on Facebook
In this part we'll do once again what we just did for posting the textview text on Twitter, but this time for Facebook. Actually, what we'll do here is going to be simpler, as there's no limitation to the text length, so we can skip that check.
This time we'll focus on the facebookPostAction alert action. Right below I give you the whole implementation at once, as there's nothing new or noteworthy here:
let facebookPostAction = UIAlertAction(title: "Share on Facebook", style: UIAlertActionStyle.Default) { (action) -> Void in
    if SLComposeViewController.isAvailableForServiceType(SLServiceTypeFacebook) {
        let facebookComposeVC = SLComposeViewController(forServiceType: SLServiceTypeFacebook)

        facebookComposeVC.setInitialText("\(self.noteTextview.text)")

        self.presentViewController(facebookComposeVC, animated: true, completion: nil)
    }
    else {
        self.showAlertMessage("You are not connected to your Facebook account.")
    }
}
Once again we check if the user is connected to his Facebook account using the proper service type string value. The same value we also use upon the initialization of the SLComposeViewController instance. We set the textview text as the initial text for the compose view controller, and we present it. That's all. Finally, we display another message in case the user isn't logged in.
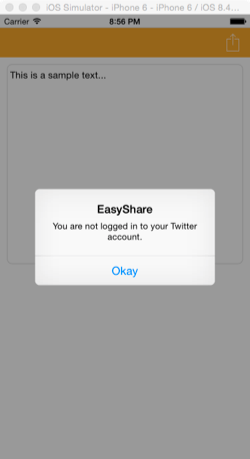
Just Before Testing
This demo application can be tested either on a real device, on in the Simulator. However, certain actions are required to be taken so you can successfully post on any of the two social networks. Before we see them, here's what the app will display in case you try to post in both networks without being connected to them:
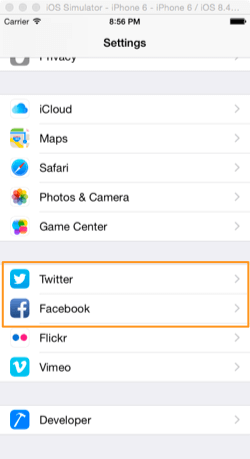
To connect to any social network (or both of them), you have to open the Settings app of the device or the Simulator. In there you'll find top-level settings for both of them:
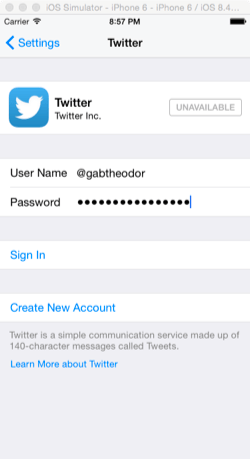
To log in with your Twitter account, select the Twitter option and in the following view controller fill in your Twitter name and your password. Then use the Sign-In button to connect:
Once you log in, a new row with your account name is added:
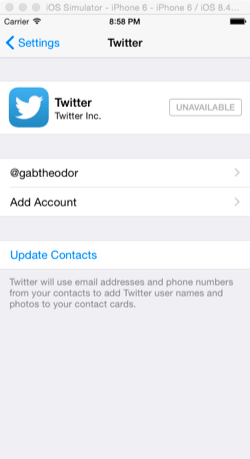
Use it if you want to change your password, or totally remove that account from your device.

Similarly you can connect to your Facebook account. Just provide your email address as the username and your password and then sign in. You can use the account row that will be added to the settings to disconnect from Facebook as well.
Make sure that you get connected to both social networks. After having done that, feel free to go and test the demo app.
Using the UIActivityViewController
The UIActivityViewController consists of a nice solution when you want various sharing options and other kind of activities gathered in one place. What options will be provided each time depend on the content you want to apply an action to, on the device you're running the app, and whether you're logged in or not to the supported social networks. Some of the most often options are:
- Send an email
- Send a SMS
- Share on Twitter and Facebook
- Add to Reading List
- Copy
- Send using AirDrop
As you're about to see right next, initializing an instance of the UIActivityViewController and using it, it really takes just two lines of code. Upon initialization you have to provide two arguments, where the second is optional and can be set to nil:
The first is an array with all the items you want the activity view controller to be used for. As an example, in our case we'll create an array with just one item, the textview text. However, if we were using an image view, we could set its image to the items array too. Depending on the items you add here, the system decides what options must be shown and what not. For instance, there's no reason to have the "Add to reading list" option for an image.
The second argument is also an array. In this one you can explicitly tell the system what type of activities you want to have. If you set it to nil, then all the allowed available activity types will be provided to the activity view controller.
There's also the option to exclude activity types you don't want to be shown, but we'll see about that in a while. For now, let's focus on the third alert action, named moreAction. In the following snippet we initialize an instance of the UIActivityViewController, and then we present it:
let moreAction = UIAlertAction(title: "More", style: UIAlertActionStyle.Default) { (action) -> Void in
    let activityViewController = UIActivityViewController(activityItems: [self.noteTextview.text], applicationActivities: nil)

    self.presentViewController(activityViewController, animated: true, completion: nil)
}
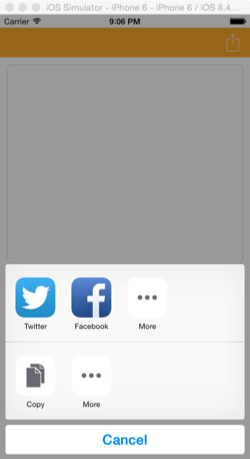
If you run the app now, the More option in the action sheet will be working. Note that if you run the app in the Simulator you'll get less options than running it to a real device. For example, you won't have the option to send a SMS:
As I said before, as a developer you have the ability to exclude options you don't really want to be there. All you have to do, is to use a property named excludedActivityTypes to specify them. What you have to do, is to assign to that property an array with all the activity types you don't wish to provide. As an example, I have updated the code snippet I gave you above, and as you see there's one more line now; with it, we exclude the email sending from being an option:
let moreAction = UIAlertAction(title: "More", style: UIAlertActionStyle.Default) { (action) -> Void in
    let activityViewController = UIActivityViewController(activityItems: [self.noteTextview.text], applicationActivities: nil)

    activityViewController.excludedActivityTypes = [UIActivityTypeMail]

    self.presentViewController(activityViewController, animated: true, completion: nil)
}
Running the app once again, you'll notice that the email button is now missing:
Let's Summarize
As a developer, I have to admit that I was surprised by the simplicity of all the stuff I presented to you in this tutorial when I first-used them a long time ago. Undoubtably, everything we met today belongs to the easy programming tasks, and I hope I made it clear to you through the demo app we implemented here. Obviously, using either the Social framework to provide the built-in post capabilities of iOS, or the UIActivityViewController, it is not always allowed to do, even if you want to. That's because in both cases you have to use system controls, and definitely they won't fit in a custom UI. However, if that reason does not exist, then it's up to you to decide if all the solutions I showed to you can become handy or not. If you eventually are up to using them, then you already know that you need just a few minutes to put everything in action. In any case, I'd like to believe that what you've read in this post will become additional tools for all of you, and eventually they might make your programming life easier sometimes.
For reference, you can download the complete Xcode project here.


