iOS apps exist in millions out there, and most of them communicate with servers to exchange data. In their majority, the server implements and provides RESTful APIs that apps can use for the communication. When an app needs to send data to the server, or fetch from it, it makes the proper request and after a while the data has been returned. That happens several times during the app runtime period.
The above covers the most use cases, but not all. What if, for example, an app should show some sort of a news feed that needs to be updated all the time? Or what if real-time conversation between users should be supported as an app feature? A solution would be to let the app ask for new data the server quite frequently, so anything new to be grabbed as soon as possible. However, this is not the best approach for two basic reasons: First, performing endless and repeated requests leads to unnecessary waste of resources without any doubt at all, and that’s critical when talking about mobile devices. Second, there is no guarantee on how soon the new-to-be-fetched data will be really fetched, even if a short interval between requests is set.
Thankfully, there’s a better solution when it’s necessary to receive data from a server instantly (every time such data becomes available), and without having the app to send any request to the server at all. That solution is based on making use of websockets, and it totally erases the couple aforementioned issues. You can find a couple of interesting topics about websockets here and here, but also feel free to search the web for additional information. On my part, I’ll give you the big picture in simple words, so you are able to better understand what comes later.
The websocket communication relies on the client-server logic, where a persistent connection between a server and a client always exists. To be more precise, the server “opens” a dedicated port where clients get connected to it. Once that happens, all the connected apps can send messages to that port (outgoing messages), and listen to it for any incoming messages. And as that’s the default behaviour when connecting to sockets, every connected client to a server will automatically get its messages without any additional request at all. Most importantly, when a message is sent to that port by a server, the recipient clients will instantly receive it, so they can take any further actions (like updating a news feed for example) immediately.
A word of notice: Keep in mind that from now on I’ll mostly use the term “socket(s)” instead of “websocket(s)” just for simplicity. Besides that, the term “client” refers to any application that can get connected to a server: Web, mobile or desktop app. However, by saying “client” in this text we’ll be referring to iOS apps, and to our demo app more specifically later on.
Implementing the connection to a socket and communicating through it with a server is not the easiest task on the world. Even though the whole idea sounds fascinating, there might exist several problems until it’s possible to achieve a proper communication. Thankfully (once again), here it comes into the play a really handful framework that takes charge of all the connection issues behind the scenes, and makes the socket-based communication a real piece of cake. It’s called Socket.IO.
It happened to me to work with Socket.IO in a big project recently, and I had the chance to see how easy it actually is to have bidirectional communication with the server, and get messages instantly to the app. I strongly advice you to pay a visit to the official website, so you understand what is all about and how it works. Even though Socket.IO has been designed mostly for web applications, it offers a library for iOS that can be integrated into a project in no-time at all.
With all the above in mind, I intend to give you in this tutorial a first taste of the Socket.IO. I’ll show you how to integrate it and use it so you can exchange messages with a server, and I’ll try to explain through examples how the client-server communication works. As this introduction has become quite long already, I leave the details for later. As a last word though I’d like to say that the server-side part will operate on your own computer (localhost), and I’ll provide you all the details and code you need for doing that.
Demo App Overview
In order to show to you how to make use of the Socket.IO library (client) for iOS and how to achieve real-time communication with a server, I decided that our best hit would be to create a chat application as the demo app of this tutorial. Of course, we won’t make everything from scratch, as the point is to focus on the important details only. Therefore, before you continue reading, please download a starter project to work with.
Even though we’ll see everything in details in the following parts, let me give you a short brief of our goal here. First of all, the app will be parted by two view controllers: In the first one, the user will be able to “sign in” to the app by providing a nickname only (we’ll avoid a more complicated login mechanism for obvious reasons). Once that happens, all existing users will be listed in a tableview, where next to their names a connection status indication will be displayed (Online or Offline). Right below the tableview we find a “Join Chat” button that takes us to the next view controller for performing the chat.


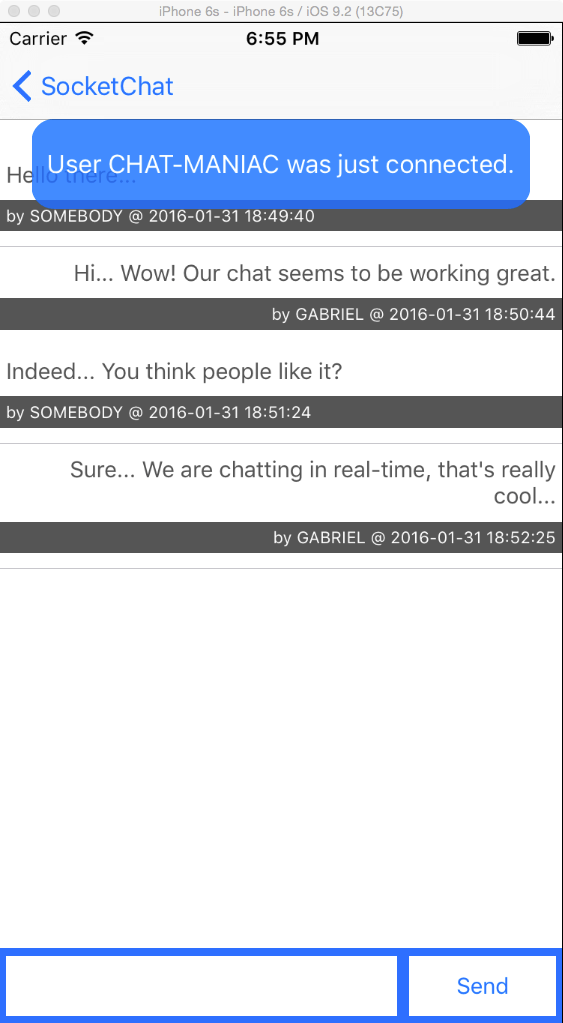
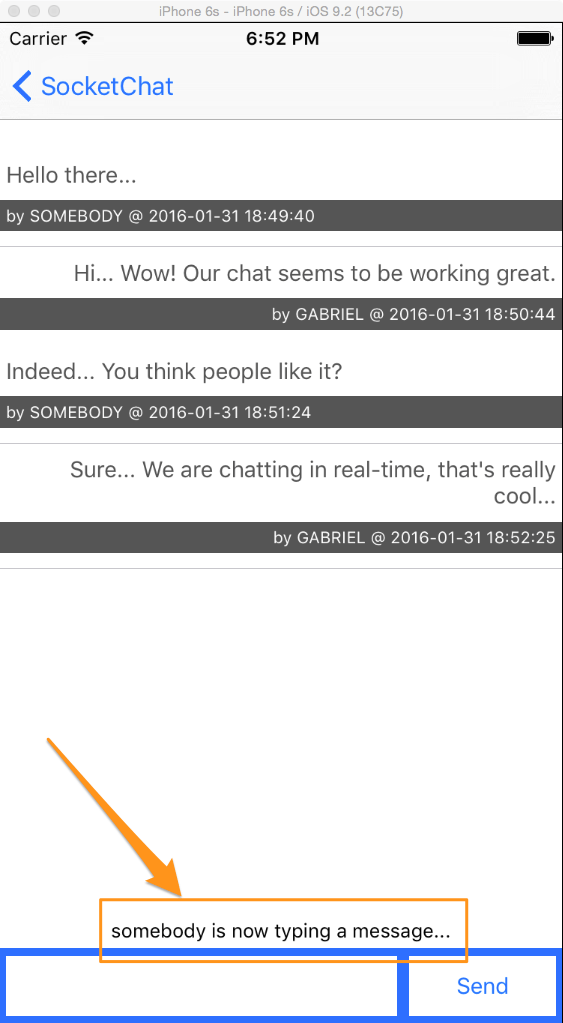
The second view controller is dedicated to the chat functionality. Besides sending and getting messages, we’ll add a couple of other interesting features to the app: We’ll display a popup label when a new user is getting connected to the chat, or an existing one leaves it. Furthermore, when one or more users are typing messages, the other users will be notified for that by a label that will appear right above the textview used to write messages.
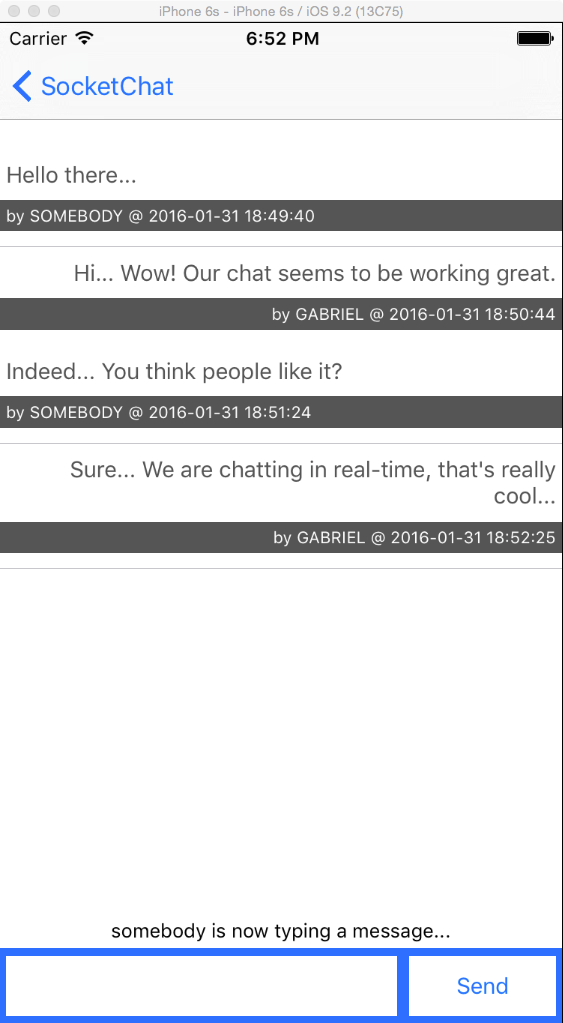
The server-side part is interesting in this tutorial too, because a couple of actions are required in order to make it work. Actually, having the server locally on your machine (localhost) consists of the simplest and safest way for you to test the app, and optionally make any server-side changes if you want so. Apart from the starter project that you have to download, you must also grab another .zip file from here. For now just get the file, and you’ll see next how to use it. Just note that even if you get the final project to test the app without getting involved in the implementation at all, the server part is something you have to mandatorily do if you want to see the app running. Additionally, even though I won’t show any server-side code at all in this tutorial, I’ll be talking quite frequently about the server part because in every single step it’s important to make clear what kind of data we are expecting from the server, or what the server is expecting from the app.
As you understand, this meant-to-be chat app is going to support one chat room only if we want to keep the discussion here in reasonable limits. I leave it to you to extend it the way you want. In addition, if you want to make changes to the server or add new features, or just simply to explore Socket.IO capabilities that are not mentioned here, visit all the provided documentation in the official website. It will fully cover you. On my part, I followed the Get Started guide to begin writing the server-side code, and added several new things after that. Anyway, make sure to spend some time in the Socket.IO website, it is useful.
Once you download all the necessary stuff you need to get started and feel ready for that, please continue.
Getting Started: The Server-Side Part
In normal conditions, there is nothing you should do regarding the server implementation, unless of course you it’s your duty to handle that besides the iOS app as well. The web developer(s) will have the server set up and coded for you, so all you have to care about is the client-side part of the communication. Actually, all you need to know are two things:
- The connection details, meaning the server URL and the port number that your app should get connected to.
- The messages and parameters that your app is allowed to exchange with the server.
However, this is not the case here. We’ll take care of the server-side in this tutorial too, but doing the minimum required effort. As this is an iOS tutorial and we are not really interested in web stuff details, the easiest way that will let us get started the soonest is to setup a server locally, and let it work for our purposes.
Diving into the details now, you have to install Node.js in your system, if it’s not already installed, so it’s possible for the server and the Socket.IO library to operate. Note that all the server side code that you’ve been provided with is written in Javascript. To download Node.js, go here and get the stable version. Once the package has been downloaded, double click on it to open it and start the installation process.
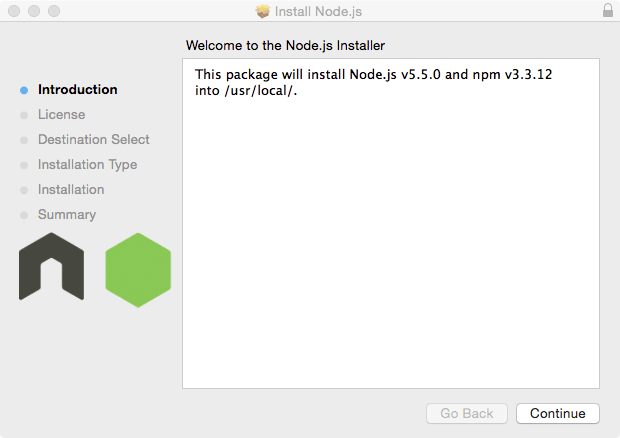
Follow the on-screen instructions, and get finished with it. At the end, the guide informs you where the Node.js and its package manager called npm have been installed, something that’s useful if you ever want to remove them.
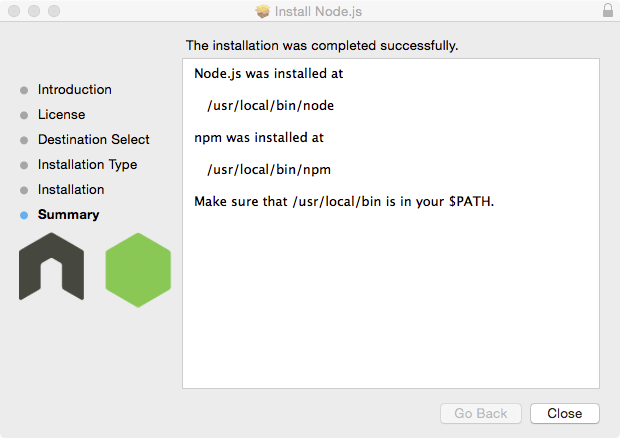
Next, uncompress the file called srv-SocketChat.zip you downloaded along with the starter project. For easy access, put the extracted folder on your Desktop. All the packages and code needed to make the sample server work exist on that uncompressed folder, so take a quick look at its contents in case you’re curious enough.
Now click to the spotlight to the upper-right corner on your Mac, and type Terminal to open the terminal window. The first thing we need to do here is to retrieve the IP address of the Mac in the internal network, so type the ifconfig command and hit Return.
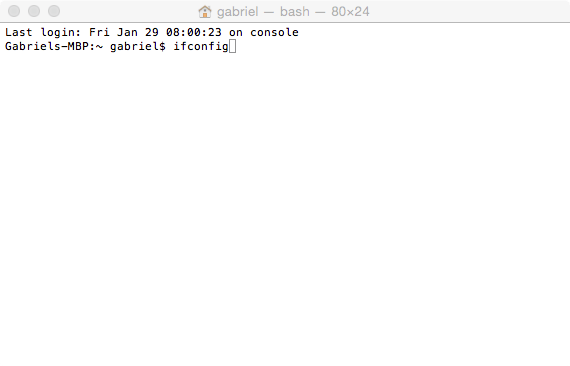
In the terminal window you’ll see a long log regarding your network, but what you are looking for is an IP address in the form of 192.168.X.X if you’re on a local area network as shown next, or some other IP address if you’re not on a LAN:
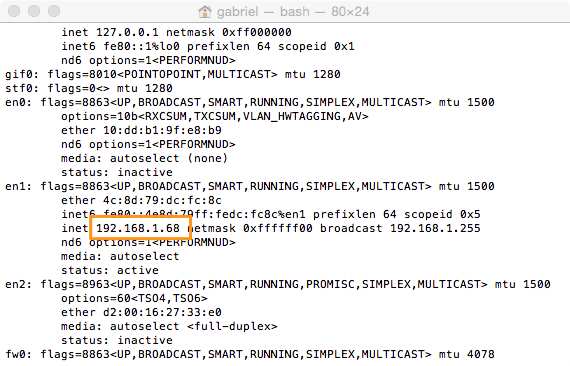
Once you spot it, note it somewhere as we’re going to need it pretty soon in the iOS project. After that, navigate to the uncompressed folder in the Desktop by typing the following command:
cd Desktop/srv-SocketChat
If you have chosen a different path or folder name, make sure to properly change the above command.
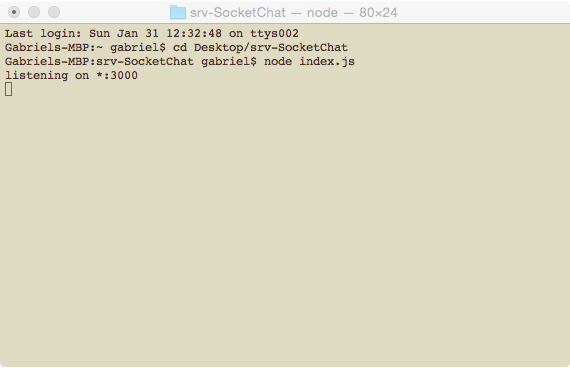
Then start the server with this:
node index.js
You can verify that the server is actually running if you see a message saying “listening on *:3000”. That means that the server is now using the port numbered 3000 and is ready to send and get messages. To stop it from running, just hit the Ctrl-C keys combination. Also, if you don’t want to use the port 3000 for some reason, open the index.js file and set your desired port number. Note that any changes you make to the server code will take effect after you have the server restarted as described right now.
Tip: Please follow the instructions in this page to setup a new local server from scratch in case you want to make your own projects after you’ve finished this tutorial.
Adding the Socket.IO Library to the Project
Now that our demo server is up and running, let’s focus on our iOS project. The first thing we have to do is to download the Socket.IO Swift Client library and add it to the project. The link I just gave you will take you to a GitHub page, where you can find various ways to install the Socket.IO client library, however I’ll describe the manual installation here shortly.
So, initially click to the Download ZIP button to the upper right side of the repository listing.

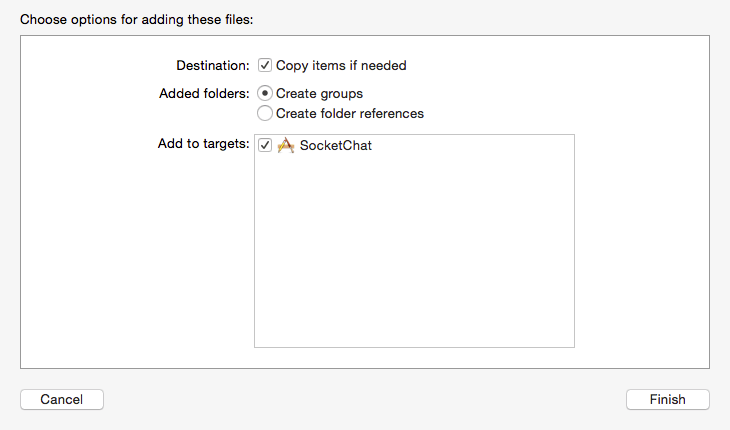
When the .zip file gets downloaded in your hard drive, uncompress it and go straight into the contents of the enclosed folder. Click to the Source subfolder, and drag and drop it straight to the Project Navigator in Xcode (you must have opened the SocketChat starter project of course prior to that). When Xcode asks you, make sure to check the option to add the files in your target before importing.
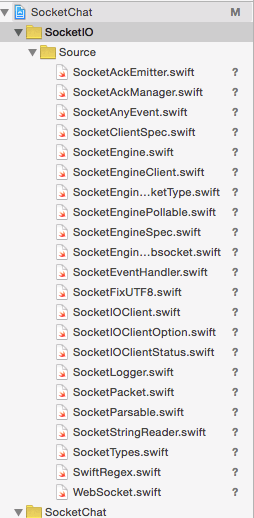
At the end you must be able to see a new group called Source in the Project Navigator, and a list of new files having being added there.
Getting Connected to the Server
We’ll begin coding now by creating a new class dedicated to the implementation of methods related to the Socket.IO library and the communication with the server. To clarify that even more, think of that class as the place where we’ll gather all the methods that send messages to the server or receive from it together. At the end, that class will work as a mechanism for performing socket-related actions.
So, in Xcode go to the File > New > File… menu, or press the Command-N key combination to your keyboard to start creating the new class. Select the Cocoa Touch Class as the template of your file, and proceed. Next, make it subclass of the NSObject class, and name it SocketIOManager. Create the new class, and click on the newly created file in the Project Navigator to open it.
For starters, it would be quite handy to adopt the Singleton pattern for this class, so we can easily access it from anywhere else in our code. In Swift it’s easy to do that; it’s actually a matter of one line of code:
class SocketIOManager: NSObject {
    static let sharedInstance = SocketIOManager()
}
By doing that, we can simply write SocketIOManager.sharedInstance anywhere around the code and have access to all public properties and methods of the above class.
Besides that, we also need an init method as well:
override init() {
    super.init()
}
And now, let’s go straight into the point: We need to begin by declaring a property of type SocketIOClient. This is the basic class of Socket.IO that will enable us to send and receive messages from the server. As Swift is flexible enough we’ll initialise that property in the same line, and we’ll provide the IP address of our computer and the designated port as arguments upon initialisation.
var socket: SocketIOClient = SocketIOClient(socketURL: NSURL(string: "http://192.168.1.XXX:3000")!)
Needless to mention that you have to replace the 192.168.1.XXX with your own IP address, and change the 3000 number if you’ve set another port to the server.
Let’s define two methods now that will make use of the above socket property. The first one connects the app to the server, and the second makes the disconnection.
func establishConnection() {
    socket.connect()
}


func closeConnection() {
    socket.disconnect()
}
As you see, all you need are two commands only: socket.connect() and socket.disconnect(). No hassle for performing the connection at all, as that is totally handled by the Socket.IO under the hood when you ask for it, and that’s a huge benefit for us.
The above two methods must be used somehow now. We are going to establish a connection to the server whenever the app becomes active, and we’ll close that connection when it enters background. Simple enough, so open the AppDelegate.swift file and in the delegate method you see next call the first one defined above:
func applicationDidBecomeActive(application: UIApplication) {
    SocketIOManager.sharedInstance.establishConnection()
}
Similarly, make the disconnection:
func applicationDidEnterBackground(application: UIApplication) {
    SocketIOManager.sharedInstance.closeConnection()
}
That was our first real encounter with the Socket.IO library in this tutorial. Even though there’s nothing to see in the app yet, if you run it now (device or Simulator, you choose) and go to the terminal window where the server is running, you’ll see a message saying that a new client has been connected. That’s great news, because it means that we managed to establish our first connection successfully.
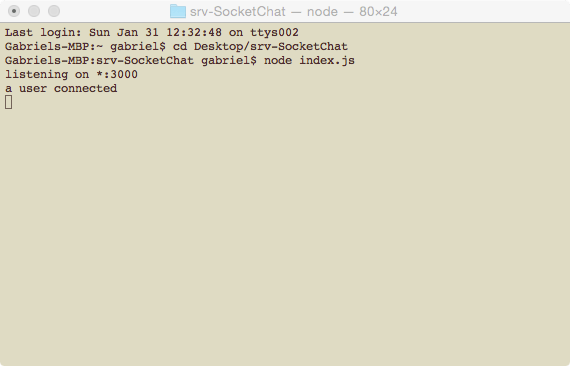
If you terminate the app, you’ll see a new message on terminal saying that a user has been disconnected:
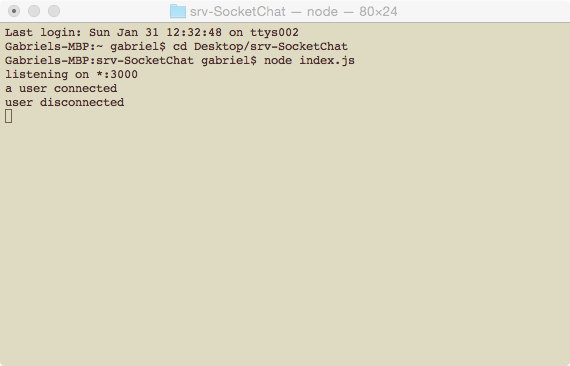
Connecting a User to the Chat Room
According to what I’ve said in the demo app overview already, we are going to support one chat room only. That means that each new user will be listed there and that the conversation that we’ll implement next will be visible to anyone. In order for this to happen, we must get each new user connected to the chat room (some sort of sign in) prior to any interaction with the rest of the app.
To keep things simple, we won’t implement any complicated login system, or something like that. We’ll just ask for a nickname from each new user, and we’ll make two important assumptions:
- That each new user gets connected with a unique nickname. Even though we’re not going to control that, we’ll just assume for the sake of the demo that there will not be two or more users with the same nickname.
- That an existing nickname will be used just to let an existing user get connected again in case he had previously left the chat.
Aiming to make the second point above clearer, as well as to help the next discussion in the tutorial, I have to say that the server side code maintains an array with all the connected users to it. Actually, that array stores three pieces of data for each single user:
- A unique ID that is assigned automatically by the server to each client when is connected to the port.
- The nickname of the user.
- The connection status (true or false, depending on whether the user is connected or not).
A user doesn’t get deleted from that array even if the app gets terminated and there’s no more connection to the server’s socket. Instead, the user is marked as not connected only. In order for a user to be totally deleted from the server’s list, the Exit button must be used by the user inside the app.
But let’s don’t rush, and let’s see everything in the proper order so nobody gets confused. The first action we have to take is to send a new user’s nickname to the server, using of course the Socket.IO library. Open the SocketIOManager.swift file, and define the following method:
func connectToServerWithNickname(nickname: String, completionHandler: (userList: [[String: AnyObject]]!) -> Void) {

}
Sending the nickname to the server takes one line only, the following:
func connectToServerWithNickname(nickname: String, completionHandler: (userList: [[String: AnyObject]]!) -> Void) {
    socket.emit("connectUser", nickname)
}
The emit(...) method of the socket object is what we need for sending any message to the server using the Socket.IO client library.
The above line is simply sending to the server a single message named connectUser, along with one parameter (one piece of data, the user nickname). On the other side, the server is listening for incoming messages to the socket, and when such a message arrives, it instantly performs the following tasks:
- It checks if the user is a new one or not. In the first case it stores the new user in its internal array (client ID, nickname, connected state), otherwise it updates the connected state by setting it to true.
- It returns its user list updated so it contains the recently connected user as well.
MARKDOWN_HASH69adb32223120a64c2bfaa1bcf690c7fMARKDOWN_HASH function.Based on what I just said, our next move is to listen to the socket for any message regarding the user list, and grab it when it comes back from the server. To listen for incoming messages to an iOS app, we have to use the on(...) method of the socket object like it’s shown here:
socket.on("SomeMessage") { ( dataArray, ack) -> Void in

}
The first argument we have to specify is the literal of the message we are interested in. If you’re not the server developer as well, then all the message literals you should care about are going to be known to you in first place. The literal we want for the incoming user list here is “userList“.
The second argument is a closure with two parameters. The first one is a NSArray object, where the number of the contained elements depends on the number of results sent by the server. Always remember that the first parameter in that closure is an array, even if the server returns a single value back. It will exist in the first index of the array. The second parameter is an acknowledge message that can be used to notify the server that the message has been received. Note that the naming properly the above parameters is up to you, meaning that the dataArray and ack are just names that I chose here.
Back to our example again, we continue the implementation of our new method by having the app listening for the user list message:
func connectToServerWithNickname(nickname: String, completionHandler: (userList: [[String: AnyObject]]!) -> Void) {
    ...

    socket.on("userList") { ( dataArray, ack) -> Void in
        completionHandler(userList: dataArray[0] as! [[String: AnyObject]])
    }
}
When the user list is received from the server, we call our own method’s completion handler passing as an argument that list. It is obviously an array with dictionaries as objects, and that’s why the conversion above is necessary to happen.
An important notice: The above socket.on(...) method will be invoked automatically by the Socket.IO every time that the server sends the user list. Putting that in a different way, the app will keep listening for the “userList” message endlessly, and when such one arrives it will call our completion handler. Of course, all that activity stops when the app gets disconnected from the server.
Displaying Users
Now that we have implemented the mechanism to connect a user to the chat room and get the user list back, it’s time to use it. For starters, open the UsersViewController.swift file, and add a new custom method that displays an alert controller with a textfield when the app starts, so the user can type a nickname in.
Here’s the implementation you need. Just copy and paste it to your project:
func askForNickname() {
    let alertController = UIAlertController(title: "SocketChat", message: "Please enter a nickname:", preferredStyle: UIAlertControllerStyle.Alert)

    alertController.addTextFieldWithConfigurationHandler(nil)

    let OKAction = UIAlertAction(title: "OK", style: UIAlertActionStyle.Default) { (action) -> Void in

    }

    alertController.addAction(OKAction)
    presentViewController(alertController, animated: true, completion: nil)
}
The OKAction body is the point of interest for us, because we’re going to add some logic in there. Initially we’ll check if the alert controller’s textfield contains a value indeed or not. If not, we’ll make a recursion and call the same method, so the alert controller appears again:
func askForNickname() {
    ...

    let OKAction = UIAlertAction(title: "OK", style: UIAlertActionStyle.Default) { (action) -> Void in
        let textfield = alertController.textFields![0]
        if textfield.text?.characters.count == 0 {
            self.askForNickname()
        }
        else {

        }
    }

    ...
}
If the textfield contains a value however, then we’ll first store it to a property named nickname, and then we’ll call the connectToServerWithNickname(_:completionHandler:) method we implemented in the previous part.
func askForNickname() {
    ...

    let OKAction = UIAlertAction(title: "OK", style: UIAlertActionStyle.Default) { (action) -> Void in
        let textfield = alertController.textFields![0]
        if textfield.text?.characters.count == 0 {
            self.askForNickname()
        }
        else {
            self.nickname = textfield.text

            SocketIOManager.sharedInstance.connectToServerWithNickname(self.nickname, completionHandler: { (userList) -> Void in
                dispatch_async(dispatch_get_main_queue(), { () -> Void in
                    if userList != nil {
                        self.users = userList
                        self.tblUserList.reloadData()
                        self.tblUserList.hidden = false
                    }
                })
            })
        }
    }

    ...
}
Upon getting the user list and making sure that it’s not empty, we assign it to the users property of the UsersViewController class, we update the tableview, and make it visible, as it’s hidden by default.
With the above code snippet, you see how each part interacts with the rest in harmony: This class that needs to send and get data uses our intermediate SocketIOManager class, which in turn deals with the Socket.IO library directly.
Let’s don’t forget that we have to make a call to the above method somewhere. In my opinion, the most suitable place to do that is in the viewDidAppear(:_) method so the UI has been properly initialised. There we go:
override func viewDidAppear(animated: Bool) {
    super.viewDidAppear(animated)

    if nickname == nil {
        askForNickname()
    }
}
Note that we ask for the nickname only when the respective property is nil. Otherwise, it’s pointless and logically wrong to do so.
It’s time to display the users’ information to the tableview. In the starter project you’ll find the tableview related methods mostly implemented, however the logic to display the proper data to cells is still missing. Here it is:
func tableView(tableView: UITableView, cellForRowAtIndexPath indexPath: NSIndexPath) -> UITableViewCell {
    let cell = tableView.dequeueReusableCellWithIdentifier("idCellUser", forIndexPath: indexPath) as! UserCell

    cell.textLabel?.text = users[indexPath.row]["nickname"] as? String
    cell.detailTextLabel?.text = (users[indexPath.row]["isConnected"] as! Bool) ? "Online" : "Offline"
    cell.detailTextLabel?.textColor = (users[indexPath.row]["isConnected"] as! Bool) ? UIColor.greenColor() : UIColor.redColor()


    return cell
}
Leaving the Chat Room
As I explained earlier, when the user stops using the app and the app enters in the background, the connection to the server is terminated and lost. However, the user will still remain to the server as a record (as long as the server keeps running on our demo), while his “isConnected” flag will be set to false. In our iOS app, this will be reflected by showing the Offline indication to the users tableview.
What I just described is actually something that you can test even right now. For that purpose, you need to install and run the app either in a Simulator and a device, or in two devices. Once you eventually do so, run the app in both devices (Simulator or real one), and enter two different nicknames. Upon connection, you’ll see in both devices the two users listed, having both the indication Online next to their nicknames. Terminate the application in one device, and keep watching the other one; you’ll see that the user whose connection was terminated is still in the list, but his status has been updated to Offline.
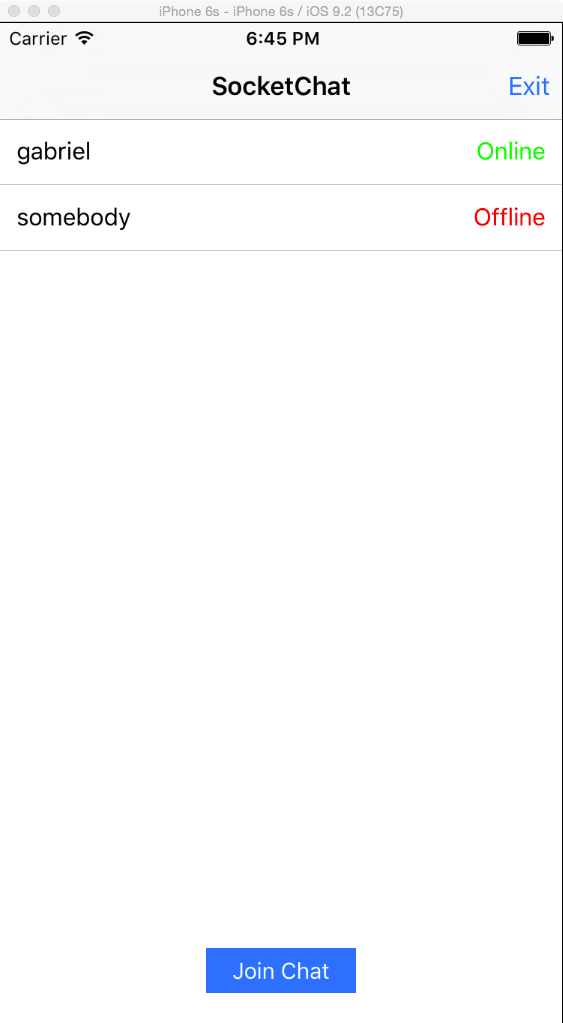
In order to make the server totally delete a user from its internal array of users, we will create a new custom method in the SocketIOManager class. In it we will emit a specific message to the server along with the nickname of the user that we want to be removed, and pretty much that’s all we need.
So, open the SocketIOManager.swift file, and copy-paste the following new method:
func exitChatWithNickname(nickname: String, completionHandler: () -> Void) {
    socket.emit("exitUser", nickname)
    completionHandler()
}
Our server immediately understands that it must delete the specified user when it receives the “exitUser” message, and that’s exactly what it does.
Back to the UsersViewController.swift file, and straight to the exitUser(:_) IBAction method. This is the place where the above code will be called. We have to remove the user list and ask from user to enter his nickname again after the message has been emitted to the server, because that action is equal to a sign out process. So, let’s do that:
@IBAction func exitChat(sender: AnyObject) {
    SocketIOManager.sharedInstance.exitChatWithNickname(nickname) { () -> Void in
        dispatch_async(dispatch_get_main_queue(), { () -> Void in
            self.nickname = nil
            self.users.removeAll()
            self.tblUserList.hidden = true
            self.askForNickname()
        })
    }
}
By testing the app again, you’ll see that when using the Exit button in one device the user is instantly being removed from the list in the other device. Before testing, remember to install to both devices so all of our additions to apply. Also, it would be a good idea to restart the server (Ctrl-C to stop it, node index.js to start it), so any previously added users to be removed.
Chatting
It’s about time to implement the actual chat between users. As you might suspect, we are going to create new methods in the SocketIOManager class to both send a message to the server, and to fetch new ones from it. Obviously, we are going to use new message literals for those two operations so the server knows how to respond, and moreover, we’ll add all the missing code for sending and displaying messages in our app.
First things first, so open the SocketIOManager class. We’ll define a new method and in its body we’ll have one line only: The one that emits a chat message and the user’s nickname to the server:
func sendMessage(message: String, withNickname nickname: String) {
    socket.emit("chatMessage", nickname, message)
}
When the server receives the “chatMessage” message, it will emit in turn that message to all connected users. All this communication will take place almost instantly, so any new message will appear to all users in real time. And that’s what exactly we want to achieve by using the SocketIO library.
Besides the actual message, the server also sends to users two other useful pieces of information: The nickname of the sender and the date and time of the message. Let’s keep that in mind and let’s implement the next new method that listens for new incoming chat messages:
func getChatMessage(completionHandler: (messageInfo: [String: AnyObject]) -> Void) {
    socket.on("newChatMessage") { (dataArray, socketAck) -> Void in
        var messageDictionary = [String: AnyObject]()
        messageDictionary["nickname"] = dataArray[0] as! String
        messageDictionary["message"] = dataArray[1] as! String
        messageDictionary["date"] = dataArray[2] as! String

        completionHandler(messageInfo: messageDictionary)
    }
}
The dataArray array of the socket.on(...) closure this time contains three elements: The nickname of the sender, the actual message and the date of the message. All of them are being sent as string values, and they’re being added to a dictionary. This dictionary is returned back to the caller of the method through the completion handler. Note once again that the on(...) method will be automatically invoked from now on every time a new chat message is received.
The mechanism to send and receive chat messages is now existing, so let’s go to integrate it in the app flow. For first time in this tutorial, open the ChatViewController.swift file and locate the sendMessage(:_) IBAction method. Note that the nickname of the user is passed from the UsersViewController to ChatViewController along with the segue, so it’s possible for us to use it here too.
In the IBAction method we’ll make sure first that there’s text to send. Then, we’ll send the message, we’ll clear the textview and finally we’ll hide the keyboard:
@IBAction func sendMessage(sender: AnyObject) {
    if tvMessageEditor.text.characters.count > 0 {
        SocketIOManager.sharedInstance.sendMessage(tvMessageEditor.text!, withNickname: nickname)
        tvMessageEditor.text = ""
        tvMessageEditor.resignFirstResponder()
    }
}
Now, we must implement the logic for receiving new messages. In the viewDidAppear(_:) method add the following content:
override func viewDidAppear(animated: Bool) {
    super.viewDidAppear(animated)

    SocketIOManager.sharedInstance.getChatMessage { (messageInfo) -> Void in
        dispatch_async(dispatch_get_main_queue(), { () -> Void in
            self.chatMessages.append(messageInfo)
            self.tblChat.reloadData()
            //                self.scrollToBottom()
        })
    }
}
With the above, the details of a new chat message will be appended to the chatMessages array as a dictionary, and the tableview will be reloaded so the new message to be displayed to the chat feed.
Speaking of the tableview, let’s make the cell contents to be properly displayed. Before that, I have to highlight one fact: When a message is sent from us (our user), the cell contents will be aligned to the right. When the sender is another user, the cell contents will be aligned to the left.
func tableView(tableView: UITableView, cellForRowAtIndexPath indexPath: NSIndexPath) -> UITableViewCell {
    let cell = tableView.dequeueReusableCellWithIdentifier("idCellChat", forIndexPath: indexPath) as! ChatCell

    let currentChatMessage = chatMessages[indexPath.row]
    let senderNickname = currentChatMessage["nickname"] as! String
    let message = currentChatMessage["message"] as! String
    let messageDate = currentChatMessage["date"] as! String

    if senderNickname == nickname {
        cell.lblChatMessage.textAlignment = NSTextAlignment.Right
        cell.lblMessageDetails.textAlignment = NSTextAlignment.Right

        cell.lblChatMessage.textColor = lblNewsBanner.backgroundColor
    }

    cell.lblChatMessage.text = message
    cell.lblMessageDetails.text = "by \(senderNickname.uppercaseString) @ \(messageDate)"

    cell.lblChatMessage.textColor = UIColor.darkGrayColor()

    return cell
}
Congratulations! Our chat app is pretty much ready! We won’t stop here however, as are about to add a couple more interesting features.
The app can be tested again now. Install it to both devices, tap on the Join Chat button, and start sending messages among users.

Being Notified When Users Join and Leave the Chat
It is always useful in a chat application to know when new users join the discussion, or existing users leave it. In our demo app, we’ll add this feature and we will display a popup label for a few seconds mentioning the user that joined or left the chat.
Back to the SocketIOManager.swift file, we’ll implement a new method for listening to two new messages: “userConnectUpdate” and “userExitUpdate“. The first one is sent by the server when a new user is connected to it after having provided a nickname, while the second one is sent either when the user terminates the app, or uses the Exit button to totally be deleted from the user list.
Furthermore, we are going to send notifications (NSNotifications) when the above messages are received. We’ll then observe for those notifications in the ChatViewController class, and eventually display the popup label with a proper message.
Here’s the new method you have to add to the SocketIOManager.swift file, where we listen for both of the above two messages:
private func listenForOtherMessages() {
    socket.on("userConnectUpdate") { (dataArray, socketAck) -> Void in
        NSNotificationCenter.defaultCenter().postNotificationName("userWasConnectedNotification", object: dataArray[0] as! [String: AnyObject])
    }

    socket.on("userExitUpdate") { (dataArray, socketAck) -> Void in
        NSNotificationCenter.defaultCenter().postNotificationName("userWasDisconnectedNotification", object: dataArray[0] as! String)
    }
}
In the first case, the server returns a dictionary that contains all the new user information (ID, nickname, connection status). In the second case, the server returns just the nickname of the user that left the chat. In both cases though, we send the respective information using the object property of the notification.
The above method must be called somewhere, otherwise the app will never listen to those two messages. The best place to do that is in the connectToServerWithNickname(_:completionHandler:) method that we implemented a few steps before, right after the user gets connected to the server. Let’s update that method accordingly:
func connectToServerWithNickname(nickname: String, completionHandler: (userList: [[String: AnyObject]]!) -> Void) {
    ...

    listenForOtherMessages()
}
Let’s head to the ChatViewController.swift now, and specifically to the viewDidLoad(_:) method. What we have to do here is to observe for the above two notifications:
override func viewDidLoad() {
    ...

    NSNotificationCenter.defaultCenter().addObserver(self, selector: "handleConnectedUserUpdateNotification:", name: "userWasConnectedNotification", object: nil)
    NSNotificationCenter.defaultCenter().addObserver(self, selector: "handleDisconnectedUserUpdateNotification:", name: "userWasDisconnectedNotification", object: nil)
}
Notice in the above code snippet that we specify two new methods as the selectors for the notifications. That means that our next step is to define both of them.
Beginning with the first one, we’ll first extract the connected user’s nickname from the notification’s object property. We’ll then specify the label’s text, and we’ll trigger its appearance.
func handleConnectedUserUpdateNotification(notification: NSNotification) {
    let connectedUserInfo = notification.object as! [String: AnyObject]
    let connectedUserNickname = connectedUserInfo["nickname"] as? String
    lblNewsBanner.text = "User \(connectedUserNickname!.uppercaseString) was just connected."
    showBannerLabelAnimated()
}
The lblNewsBanner IBOutlet property, as well as the showBannerLabelAnimated() method, already exist to the starter project you downloaded and you’re using.
In a similar way we’ll implement the following method that will display the nickname of the disconnected user.
func handleDisconnectedUserUpdateNotification(notification: NSNotification) {
    let disconnectedUserNickname = notification.object as! String
    lblNewsBanner.text = "User \(disconnectedUserNickname.uppercaseString) has left."
    showBannerLabelAnimated()
}
If you run the app once again now, go to the chat view controller and disconnect or connect another user; you’ll see a label with the proper message appearing for a few seconds to the upper side of the screen.
Being Notified When Users Type Messages
A last interesting feature that we’re about to add to our app, is the capability to be informed when another user is typing a message. Actually, our goal is to display a label with the nickname of the users that are currently typing a chat message, and hide it when there is not anyone left writing any. To make that feature possible, we are going to notify the server when a user starts and stops typing, and as a result we’ll receive a dictionary with all users typing a message.
Following the same logic as many times before, open the SocketIOManager.swift file and add the next new custom method that emits a new message to the server whenever a chat message is being typed:
func sendStartTypingMessage(nickname: String) {
    socket.emit("startType", nickname)
}
We will also send a similar message in case the user stops typing. That could happen if for example a swipe down gesture is being made and the keyboard gets dismissed.
func sendStopTypingMessage(nickname: String) {
    socket.emit("stopType", nickname)
}
By calling any of the above each time we start or stop typing something, the server can inform in turn all connected users that other users are typing a message, therefore it will emit its own message, the following one, that we have to be listening for. Note that the next code snippet is an addition to the existing listenForOtherMessages() method.
private func listenForOtherMessages() {
    ...


    socket.on("userTypingUpdate") { (dataArray, socketAck) -> Void in
        NSNotificationCenter.defaultCenter().postNotificationName("userTypingNotification", object: dataArray[0] as? [String: AnyObject])
    }
}
We are ready now to switch for one last time to the ChatViewController.swift file, where we’ll continue by observing for the above notification in the viewDidLoad(_:) method:
override func viewDidLoad() {
    ...

    NSNotificationCenter.defaultCenter().addObserver(self, selector: "handleUserTypingNotification:", name: "userTypingNotification", object: nil)
}
In the implementation of the handleUserTypingNotification(_:) method, we’ll make sure that we won’t display the label if the user that is typing is our user. Further than that, the rest is easy; We’ll compose a string that contains the nicknames of all users contained in the returned dictionary from the server and we’ll prepare the output message properly:
func handleUserTypingNotification(notification: NSNotification) {
    if let typingUsersDictionary = notification.object as? [String: AnyObject] {
        var names = ""
        var totalTypingUsers = 0
        for (typingUser, _) in typingUsersDictionary {
            if typingUser != nickname {
                names = (names == "") ? typingUser : "\(names), \(typingUser)"
                totalTypingUsers += 1
            }
        }

        if totalTypingUsers > 0 {
            let verb = (totalTypingUsers == 1) ? "is" : "are"

            lblOtherUserActivityStatus.text = "\(names) \(verb) now typing a message..."
            lblOtherUserActivityStatus.hidden = false
        }
        else {
            lblOtherUserActivityStatus.hidden = true
        }
    }

}
Great, but we still don’t let the server know when the user is typing or not. For the first case, just go to the textViewShouldBeginEditing(_:) delegate method of the textview, and update it as shown next:
func textViewShouldBeginEditing(textView: UITextView) -> Bool {
    SocketIOManager.sharedInstance.sendStartTypingMessage(nickname)

    return true
}
To indicate that the user has stopped typing by dismissing the keyboard, spot an existing custom method named dismissKeyboard(), and modify it by adding one more line:
func dismissKeyboard() {
    if tvMessageEditor.isFirstResponder() {
        tvMessageEditor.resignFirstResponder()

        SocketIOManager.sharedInstance.sendStopTypingMessage(nickname)
    }
}
That’s it! The above brings our last effort to its end. All you have to do is to test the app once again and get notified when another user is typing a message on the chat!
Summary
Reaching the end of this tutorial, I would like to believe that through the demo app that I presented today I managed to show in the best possible way how easy it is to work with the Socket.IO client library for iOS and how it can be proved to be an interesting and useful tool. Moving from part to part in this tutorial, we managed to create a chat application in order to send and receive messages to and from a server in real time. This chat application of course might be still far from becoming a real-world app, however what we are interested in is its core functionality, and I am confident that we’ve been successful on that.
Keep in mind that Socket.IO doesn’t consist of a “super-weapon” that is suitable for all kinds of tasks, and it cannot replace traditional ways to communicate with servers. However, you just saw that it’s a wonderful tool for specific cases, and in my opinion your best option when you need real-time solutions. Anyway, I hope you’ve found what you read useful, and that you’ve learnt something new. Moreover, I hope that you’ve enjoyed reading this text as much as I have during its writing.
For reference, you can check out the full source code at GitHub.


