

Among the numerous applications existing on the App Store today, it would be hard for someone to find more than a few of them that do not deal with data. Most of the apps handle some sort of data, no matter in what format they are, and always perform some actions upon it. There are various solutions offered to developers for storing and managing data, and usually each one of them is suitable for different kind of applications. However, when working with large amount of data, the preferred method it seems like a one-way path: That is the use of a database.
Indeed, making use of a database can solve various kind of problems that should be solved programmatically in other cases. For programmers who love working with databases and SQL, this is the favorite data-managing method at 90% of the cases, and the first think that crosses their minds when talking about data. Also, if you were used to working with other databases or database management systems (DBMSs), then you’ll really appreciate the fact that you can keep applying your SQL knowledge in the iOS platform as well.
The database that can be used by apps in iOS (and also used by iOS) is called SQLite, and it’s a relational database. It is contained in a C-library that is embedded to the app that is about to use it. Note that it does not consist of a separate service or daemon running on the background and attached to the app. On the contrary, the app runs it as an integral part of it. Nowadays, SQLite lives its third version, so it’s also commonly referred as SQLite 3.

SQLite is not as powerful as other DMBSs, such as MySQL or SQL Server, as it does not include all of their features. However, its greatness lies mostly to these factors:
- It’s lightweight.
- It contains an embedded SQL engine, so almost all of your SQL knowledge can be applied.
- It works as part of the app itself, and it doesn’t require extra active services.
- It’s very reliable.
- It’s fast.
- It’s fully supported by Apple, as it’s used in both iOS and Mac OS.
- It has continuous support by developers in the whole world and new features are always added to it.
Focusing now on our tutorial, let me start by stating that my goal is not to show you how to become a SQLite expert. Instead, my plan is to implement a database class step by step, which will utilize the most important features of the SQLite library, but it will also become a reusable tool for your own applications. Unfortunately, even though SQLite is supported by Apple, a mechanism or a pre-made database management library does not exist. Going into more details, the database class that we will implement will be capable of executing all the standard SQL queries (select, insert, update, delete). The most important is that we’ll create it in such way, so it accepts clear SQL statements, and if you had worked with SQL in the past, you’ll definitely know what to do here too.
Besides the database class that we’ll develop, we’ll also create a sample application to test it and to see it in action. More details about that you’ll find in the next section though. Note that the queries we’ll write in the demo app will be simple enough for the sake of the tutorial, however be sure that more complex queries can be executed as well.
As a final word before we proceed, I would recommend to make a web search and read some more stuff about the SQLite itself. Of course, the first one should be the the official website.
App Overview
One could say that this tutorial is composed by three parts. In the first and most important one, we are going to create a new class and in there we’ll implement all the database handling. As I have already said in the introduction, after we have it finished, you can take it and use it as a reusable component to your own apps. In the second part we are going to leave Xcode for a while, as it’s necessary to work in the Terminal and in the SQLite command line environment. There, we will create a simple database, which we will add to the project and use it. Finally, in the third part, we are going to implement a sample application where we will make use of both the database class and the database file. More specifically about the third part, we will make the necessary configuration in the Interface Builder, and then we’ll write the required code so we’ll have a fully functional app in which the database class will have the most significant role.
Regarding the database class that we will create in a while, I would say that it can be used as-is in the most cases of applications. To tell the truth, I rarely needed to do any updates or modifications to the class’s code after its initial implementation, as it has been suitable for every app I developed or have been developing. Nevertheless, keep in mind that even though we will build a reusable tool, you should feel free to change it, evolve it and add any extra features you might think that would be useful for your own needs. Nothing is set of stone.
In the sample database that we will create to test the class, we are going to add just one table. We’ll name that table peopleInfo, and it will contain some basic people’s data. These will be the first name, the last name and the age. The datatype of the first two fields will be set to text, while the age will be an integer value. For the primary key of the table, we will set an auto-increment integer value. Generally, using such a key is recommended in most of cases, unless special requirements of your app define otherwise. The sample database will be created in Terminal, and then it will be added to the project. Maybe you are wondering if there are any Mac applications that could be used for that purpose, and the answer is that there are. To be honest though, I prefer and like a lot more to use the command line environment, as I think that it consists of the fastest and most efficient way to work with a database.
Finally, focusing a bit more on the sample app, it’s necessary to say that it’s going to be a navigation based app. However, initially we will create a simple, view-based app, and later through the Interface Builder we will convert it to navigation-based. Furthermore, the app will be parted by two view controllers. In the first view controller, we will display all the records fetched from the database in a table view. Besides than simply listing them, we’ll also make our app capable of editing and deleting records. The second view controller will be used to add a new record, or edit an existing one. Upon finishing, our app will be able to perform all the basic kind of queries: select for loading the data, insert for adding new records, update for editing existing records and delete to completely delete a record.
In the animated graphic below you can see the final outcome of our effort in this tutorial:
Having said all the above, I think is time to get started. We have a long journey ahead of us, so let’s don’t waste any more time.
Creating the Project
Unless we have a very special topic to discuss, the first step will always be the creation of our project. So, let me guide you through the necessary steps and make sure that we get along in all that.
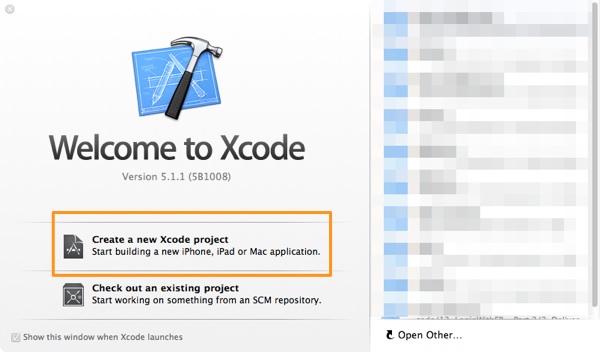
Initially, launch Xcode and wait for the Welcome screen to appear. There, select to create a new project, as shown in the next figure:
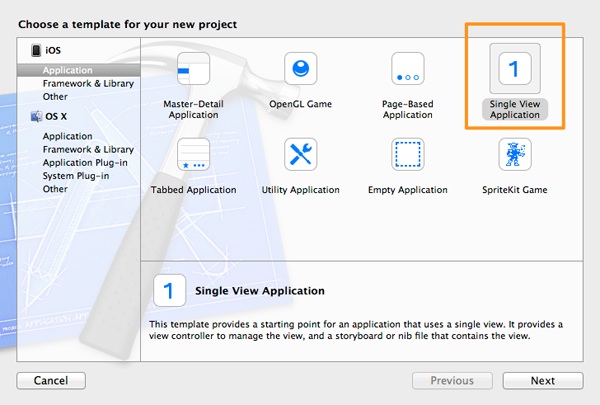
Next, in the first step of the guide that is appeared, select the Single View Application template, in the Application category, under the iOS section.
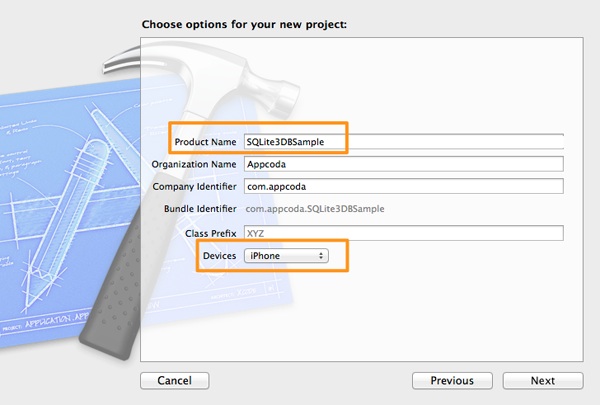
Click on the Next button to proceed. In the second step, in the Product Name field set the SQLite3DBSample as the project’s name, and also make sure that the iPhone is the selected value in the Device drop down control.
Click on the Next button once again, and in the last step of the guide select a directory in your computer to save the project. Click on the Create button and wait until Xcode prepares the project.
The SQLite 3 Library
Before we begin implementing, it’s necessary to perform a small prerequisite step. That is to add the appropriate SQLite 3 library to the project, so we can import it later on to our class.
In the Project Navigator on Xcode click on the project name. Next, make sure that the General tab is on, and then go to the bottom of the page, in the Linked Frameworks and Libraries section. Click on the small plus icon as shown in the next image:
![]()
In the modal window that appears, type the term sqlite, and from the suggested options select the one with the libsqlite3.dylib title.
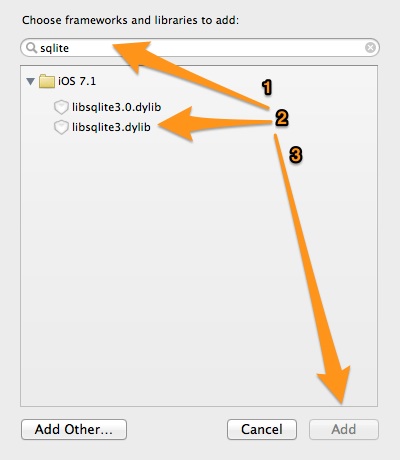
Finally, click on the Add button and this step is over.
Creating and Initializing the Database Class
So, now that the SQLite 3 library has been added to the project, the first thing we are going to do is to create a new class to manage all the database functionality. In this class, we will write all the code needed to execute queries and to load data from the database.
Let’s get started by adding a new class file to the project. Go to the File > New > File… menu of the Xcode, or just hit the Command-N key combination on your keyboard. The familiar Xcode guide will appear. In the first step, select the Objective-C class option in the Cocoa Touch category, under the iOS section.

Click on the Next button, and in the next step perform two tasks: First, make sure that the Subclass of field contains the NSObject value. If not, then type it. Next, in the Class field type the name of our class, which is DBManager.
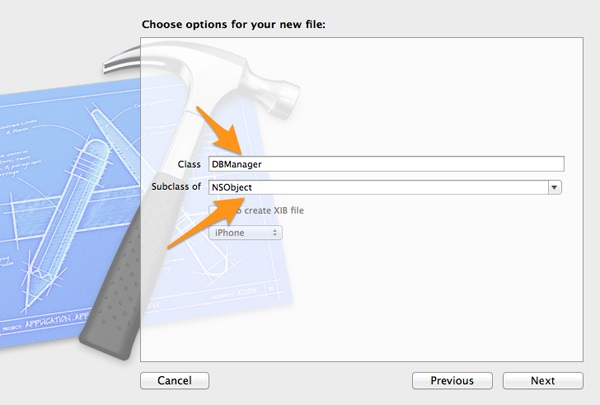
After having done the above, click once again on the Next button, and in the third and last step make sure that the SQLite3DBSample target is selected. If not do it now, and click on the Create button. The guide will close and the new class will be ready.
Now we have an empty class in our hands, and we just have to write code in it. We’ll begin by creating a custom init method, as upon initialization we want to specify the database file name. Click on the DBManager.h file on the Project Navigator to open it. In there, add the following declaration:
@interface DBManager : NSObject

-(instancetype)initWithDatabaseFilename:(NSString *)dbFilename;

@end
Now, go to the DBManager.m file, and write the standard definition of all the init methods:
-(instancetype)initWithDatabaseFilename:(NSString *)dbFilename{
    self = [super init];
    if (self) {

    }
    return self;
}
As I have already said, the original database file will reside in the application’s bundle (in other words, the app package). Our mission is to make a copy of that file to the application’s documents directory, and work with that copy later on. Note that you should never work directly with a file existing in the app bundle, especially if your app is going to modify it. Always make a copy of it to the documents directory.
Focusing on the init method again, we’re going:
- To specify the path to the documents directory of the app and store it to a property .
- To store the database filename that is provided as an argument in the above init method to another property.
- To copy the database file from the app bundle into the documents directory if that’s necessary.
We’ll use properties to store the documents directory and the database filename values, as we’ll need them later as well.
Having said all the above, go at the top of the file and create the private class section, by declaring at the same time the two properties as described.
@interface DBManager()

@property (nonatomic, strong) NSString *documentsDirectory;
@property (nonatomic, strong) NSString *databaseFilename;

@end
Now, once being at the top of the file, make the next import:
#import
So far, so good. Back to the init method, let’s do some initialization. Right next you are given the method again, containing this time all the proper code:
-(instancetype)initWithDatabaseFilename:(NSString *)dbFilename{
    self = [super init];
    if (self) {
        // Set the documents directory path to the documentsDirectory property.
        NSArray *paths = NSSearchPathForDirectoriesInDomains(NSDocumentDirectory, NSUserDomainMask, YES);
        self.documentsDirectory = [paths objectAtIndex:0];

        // Keep the database filename.
        self.databaseFilename = dbFilename;

        // Copy the database file into the documents directory if necessary.
        [self copyDatabaseIntoDocumentsDirectory];
    }
    return self;
}
At first, we specify the path to the documents directory and we store it to the documentsDirectory property. Next, we assign the database filename to the databaseFilename property, and finally we copy the database file from the app bundle to the documents directory.
As you correctly assume, the copyDatabaseIntoDocumentsDirectory is a custom, private method that we must implement, and in here we’ll do the file copying, if needed of course. Surely Xcode have issued an error by now, so let’s work against it.
Go back to the private class section, and declare the method as shown below:
@interface DBManager()

@property (nonatomic, strong) NSString *documentsDirectory;
@property (nonatomic, strong) NSString *databaseFilename;

-(void)copyDatabaseIntoDocumentsDirectory;

@end
Let’s go to the definition right away. What we’ll do here is fairly simple: We’ll check if the database file exists or not in the documents directory, and if it’s not there we’ll copy it. Here’s the implementation:
-(void)copyDatabaseIntoDocumentsDirectory{
    // Check if the database file exists in the documents directory.
    NSString *destinationPath = [self.documentsDirectory stringByAppendingPathComponent:self.databaseFilename];
    if (![[NSFileManager defaultManager] fileExistsAtPath:destinationPath]) {
        // The database file does not exist in the documents directory, so copy it from the main bundle now.
        NSString *sourcePath = [[[NSBundle mainBundle] resourcePath] stringByAppendingPathComponent:self.databaseFilename];
        NSError *error;
        [[NSFileManager defaultManager] copyItemAtPath:sourcePath toPath:destinationPath error:&error];

        // Check if any error occurred during copying and display it.
        if (error != nil) {
            NSLog(@"%@", [error localizedDescription]);
        }
    }
}
There’s nothing especially difficult in the above method. We are based on the NSFileManager class to check for the file existence and to copy it if needed. It’s also quite interesting the way we access the original file in the app bundle: [[[NSBundle mainBundle] resourcePath] stringByAppendingPathComponent:self.databaseFilename].
The above method will be called every time that an object of the DBManager class is initialized. If the database file won’t be found in the documents directory, then the code in the condition block will be executed, otherwise it will be skipped. Normally, that code should be executed just once per app install, as the database file should always remain in the documents directory after having been copied in there.
So, quickly summarizing, we’ve managed to perform two important tasks here: To create the DBManager class files, and to create a custom init method, which makes sure that the database file will exist to the documents directory of the app. Now, we are ready to go deeper in the details of the SQLite 3 database.
SQLite 3 Functions Preview
Our next step is to implement the heart of our class, the method that will take care of all the work with the database. However, I believe it would be much better to take a quick look at the SQLite 3 functions that we are going to need first, and then proceed to implementation. There’s a great number of functions supported and provided, but we’ll need just some of them. Let’s see them one by one:
- sqlite3_open: This function is used to create and open a database file. It accepts two parameters, where the first one is the database file name, and the second a handler to the database. If the file does not exist, then it creates it first and then it opens it, otherwise it just opens it.
- sqlite3_prepare_v2: The purpose of this function is to get a SQL statement (a query) in string format, and convert it to an executable format recognizable by SQLite 3.
- sqlite3_step: This function actually executes a SQL statement (query) prepared with the previous function. It can be called just once for executable queries (insert, update, delete), or multiple times when retrieving data. It’s important to have in mind that it can’t be called prior to the sqlite3_preprare_v2 function.
- sqlite3_column_count: This method’s name it makes it easy to understand what is about. It returns the total number of columns (fields) a contained in a table.
- sqlite3_column_text: This method returns the contents of a column in text format, actually a C string (char *) value. It accepts two parameters: The first one is the query converted (compiled) to a SQLite statement, and the second one is the index of the column.
- sqlite3_column_name: It returns the name of a column, and its parameters are the same to the previous function’s.
- sqlite3_changes: It actually returns the number of the affected rows, after the execution of a query.
- sqlite3_last_insert_rowid: It returns the last inserted row’s ID.
- sqlite3_errmsg: It returns the description of a SQLite error.
- sqlite3_finalize: It deletes a prepared statement from memory.
- sqlite3_close: It closes an open database connection. It should be called after having finished any data exchange with the database, as it releases any reserved system resources.
Core Functionality Implementation
Now that you’ve been provided with a short description of every SQLite function we’ll meet next, let’s go to the implementation of the core method of our class. In this one, we are going to run both executable and non-executable queries. Based on that, we will make sure to implement it that way so it accepts two parameters: The query itself, and a boolean value indicating whether the query is executable or not. The logic applied in the method is quite simple, but let’s give it a look:
- Initially, we’ll perform some necessary initializations, regarding mostly the structures that will store our data (NSMutableArray objects).
- Then, we’ll open the database and if that’s successful, we’ll compile the query to a SQLite 3 statement (prepared statement).
- If the query is not executable, meaning that is a select statement, we’ll fetch the desired data row by row. For each one, we’ll get each single column’s contents as a text value, and we’ll add it to a temporary mutable array. When all the columns of a data row have been read, we’ll add the temporary array to the final results array. At the same time, we’ll use another array to save the column names, as it’s quite possible to become handy when the database class will be used.
- If the query is executable, meaning that is an insert, update, or delete statement, things will be much simpler. We’ll just execute the query and if the result is successful, then we’ll store to properties the affected rows and the last inserted ID values.
- In case of any error, we’ll just output its description.
- Finally, we’ll make sure to free up all used resources.
Let me now denote a couple of things. First of all, and according to what I said in the above description, we’ll get each column’s contents as a text value. This is a generic approach and you may think that it doesn’t suit to all kind of data existing to a database table. However, don’t forget that we want to implement a class that will work for all applications (or the most of them), so our solution shouldn’t be oriented to specific data. Moreover, the text (string) results can be converted to other data types and be handled in any desired way by an app.
At second, the fetched results will be stored to a two-dimensional array. Into each index of the results array, there will be another array containing the data of a single row. Personally, I consider this to be the best option for having the result set from the database file to memory. If you wish so, you could try to modify the implementation and use NSDictionary objects instead.
Let’s get started with the implementation now. We’ll do one step at the time, so we discuss each action we take. Besides that, there are plenty of comments in the code that will help you understand it much better.
First off, go to the private class section, and declare a mutable array property for storing our results, and of course, the private method itself:
@interface DBManager()

...
...
@property (nonatomic, strong) NSMutableArray *arrResults;


-(void)runQuery:(const char *)query isQueryExecutable:(BOOL)queryExecutable;

@end
If you wonder why this method is private, while it should be public, then the answer is simple: After having finished with it, we’ll create two small public methods, where we’ll use the first one just to load data from the database, and the second one to run executable queries. Both of those methods will call this, providing each one the proper arguments. Besides that, notice that the query parameter is a const char (a C string) and not a NSString* object. That’s because the SQLite functions don’t know anything about NSStrings, they just know how to handle C strings.
Next, go to the DBManager.h file, and in the public class section declare the next three properties:
@interface DBManager : NSObject

...
...

@property (nonatomic, strong) NSMutableArray *arrColumnNames;

@property (nonatomic) int affectedRows;

@property (nonatomic) long long lastInsertedRowID;

@end
I think there’s no need to explain what these properties are for.
Back to the DBManager.m file to get started with the implementation. As you’ll see right next, initially we perform four specific tasks: We declare a local SQLite 3 object to handle the database, we set the path to the database file, and we initialize the two array properties (the arrResults and the arrColumnNames arrays).
-(void)runQuery:(const char *)query isQueryExecutable:(BOOL)queryExecutable{
    // Create a sqlite object.
    sqlite3 *sqlite3Database;

    // Set the database file path.
    NSString *databasePath = [self.documentsDirectory stringByAppendingPathComponent:self.databaseFilename];

    // Initialize the results array.
    if (self.arrResults != nil) {
        [self.arrResults removeAllObjects];
        self.arrResults = nil;
    }
    self.arrResults = [[NSMutableArray alloc] init];

    // Initialize the column names array.
    if (self.arrColumnNames != nil) {
        [self.arrColumnNames removeAllObjects];
        self.arrColumnNames = nil;
    }
    self.arrColumnNames = [[NSMutableArray alloc] init];
}
Note that if any previous data exist in any of the arrays, we get rid of them before we initialize the arrays again to make sure that nothing remains on memory.
Next, we must open the database, and if no error occurs we will use the sqlite3_prepare_v2 function to convert the query into a executable SQLite part:
    // Open the database.
    BOOL openDatabaseResult = sqlite3_open([databasePath UTF8String], &sqlite3Database);
    if(openDatabaseResult == SQLITE_OK)
        // Declare a sqlite3_stmt object in which will be stored the query after having been compiled into a SQLite statement.
        sqlite3_stmt *compiledStatement;

    // Load all data from database to memory.
    BOOL prepareStatementResult = sqlite3_prepare_v2(sqlite3Database, query, -1, &compiledStatement, NULL);
    if(prepareStatementResult == SQLITE_OK) {
        ...
    }
    ...
}
As you see, we check if the database was opened successfully comparing with the SQLITE_OK value. Then, we declare the compiledStatement variable, which is a sqlite3_stmt type, for storing the compiled statement. Finally, we make use of the sqlite3_prepare_v2 function, in which we pass the database handler, the query and the compiled statement variable as parameters.
Inside the inner if clause above, we’ll check if the query is executable or not. In case it’s a select query, we’ll load all data specified by the query. Here we go:
// Check if the query is non-executable.
    if (!queryExecutable){
        // In this case data must be loaded from the database.

        // Declare an array to keep the data for each fetched row.
        NSMutableArray *arrDataRow;

        // Loop through the results and add them to the results array row by row.
        while(sqlite3_step(compiledStatement) == SQLITE_ROW) {
            // Initialize the mutable array that will contain the data of a fetched row.
            arrDataRow = [[NSMutableArray alloc] init];

            // Get the total number of columns.
            int totalColumns = sqlite3_column_count(compiledStatement);

            // Go through all columns and fetch each column data.
            for (int i=0; i 0) {
                [self.arrResults addObject:arrDataRow];
            }
        }
    }
We wrote some code here, so let’s discuss it. At first we declare a local array, named arrDataRow. In this one, we’ll store each data row fetched from the dataset existing in memory. Then, using the sqlite3_step function, we go through all the results row by row. Inside the while loop, we initialize the arrDataRow array and we get the total number of columns existing in the result set. Then, inside a new for loop, we get each column’s contents and we assign them to a char variable. If that value is not null, we add it to the temp arrDataRow array converted to a NSString* object. Next, if we haven’t done so already, we store each column name to the arrColumnNames array. Finally, when the for loop is over, we add the fetched data row to the arrResults array.
Let’s proceed to the case of an executable query:
    else {
        // This is the case of an executable query (insert, update, ...).

        // Execute the query.
        BOOL executeQueryResults = sqlite3_step(compiledStatement);
        if (executeQueryResults == SQLITE_DONE) {
            // Keep the affected rows.
            self.affectedRows = sqlite3_changes(sqlite3Database);

            // Keep the last inserted row ID.
            self.lastInsertedRowID = sqlite3_last_insert_rowid(sqlite3Database);
        }
        else {
            // If could not execute the query show the error message on the debugger.
            NSLog(@"DB Error: %s", sqlite3_errmsg(sqlite3Database));
        }
    }
}
else {
    // In the database cannot be opened then show the error message on the debugger.
    NSLog(@"%s", sqlite3_errmsg(sqlite3Database));
}
Things are much simple here. We run the query, and if it’s all okay, we store the affected rows and the last inserted row ID to the respective properties. In the else cases you see that we show on the debugger the error description, when the query cannot be executed and when the database can’t be opened.
Finally, we need to free up the memory by releasing all used resources, and by closing the connection to database:
// Release the compiled statement from memory.
        sqlite3_finalize(compiledStatement);

    }

    // Close the database.
    sqlite3_close(sqlite3Database);
That was the last step needed to be performed in the method. Right below it’s given in one piece, as all the if-else cases and the curly brackets become confusing enough:
-(void)runQuery:(const char *)query isQueryExecutable:(BOOL)queryExecutable{
    // Create a sqlite object.
    sqlite3 *sqlite3Database;

    // Set the database file path.
    NSString *databasePath = [self.documentsDirectory stringByAppendingPathComponent:self.databaseFilename];

    // Initialize the results array.
    if (self.arrResults != nil) {
        [self.arrResults removeAllObjects];
        self.arrResults = nil;
    }
    self.arrResults = [[NSMutableArray alloc] init];

    // Initialize the column names array.
    if (self.arrColumnNames != nil) {
        [self.arrColumnNames removeAllObjects];
        self.arrColumnNames = nil;
    }
    self.arrColumnNames = [[NSMutableArray alloc] init];


    // Open the database.
    BOOL openDatabaseResult = sqlite3_open([databasePath UTF8String], &sqlite3Database);
    if(openDatabaseResult == SQLITE_OK) {
        // Declare a sqlite3_stmt object in which will be stored the query after having been compiled into a SQLite statement.
        sqlite3_stmt *compiledStatement;

        // Load all data from database to memory.
        BOOL prepareStatementResult = sqlite3_prepare_v2(sqlite3Database, query, -1, &compiledStatement, NULL);
        if(prepareStatementResult == SQLITE_OK) {
            // Check if the query is non-executable.
            if (!queryExecutable){
                // In this case data must be loaded from the database.

                // Declare an array to keep the data for each fetched row.
                NSMutableArray *arrDataRow;

                // Loop through the results and add them to the results array row by row.
                while(sqlite3_step(compiledStatement) == SQLITE_ROW) {
                    // Initialize the mutable array that will contain the data of a fetched row.
                    arrDataRow = [[NSMutableArray alloc] init];

                    // Get the total number of columns.
                    int totalColumns = sqlite3_column_count(compiledStatement);

                    // Go through all columns and fetch each column data.
                    for (int i=0; i 0) {
                        [self.arrResults addObject:arrDataRow];
                    }
                }
            }
            else {
                // This is the case of an executable query (insert, update, ...).

                // Execute the query.
                BOOL executeQueryResults = sqlite3_step(compiledStatement);
                if (executeQueryResults == SQLITE_DONE) {
                    // Keep the affected rows.
                    self.affectedRows = sqlite3_changes(sqlite3Database);

                    // Keep the last inserted row ID.
                    self.lastInsertedRowID = sqlite3_last_insert_rowid(sqlite3Database);
                }
                else {
                    // If could not execute the query show the error message on the debugger.
                    NSLog(@"DB Error: %s", sqlite3_errmsg(sqlite3Database));
                }
            }
        }
        else {
            // In the database cannot be opened then show the error message on the debugger.
            NSLog(@"%s", sqlite3_errmsg(sqlite3Database));
        }

        // Release the compiled statement from memory.
        sqlite3_finalize(compiledStatement);

    }

    // Close the database.
    sqlite3_close(sqlite3Database);
}
Loading Data and Executing Queries
Now that the core method of our class has been implemented, we have only left to make use of it. That’s simple, as we just have to implement two new small, public methods: One for running select queries and loading data, and one for executing insert, update and delete queries.
Let’s begin by declaring both of them. Open the DBManager.h file, and add the next two lines:
@interface DBManager : NSObject

...

-(NSArray *)loadDataFromDB:(NSString *)query;

-(void)executeQuery:(NSString *)query;

@end
Let’s focus on the first method, named loadDataFromDB:. This method accepts as a parameter value the query we want to be executed as a NSString object. For example, such a valid string would be this: “select * from people where age > 18”. The fetched result set is returned as an array, and according to what I said in the previous section, this is going to be a two-dimensional array. The first array represents the rows, while each sub-array represents the columns of each row. Having said all that, let’s go back to the DBManager.m file, and let’s implement it:
-(NSArray *)loadDataFromDB:(NSString *)query{
    // Run the query and indicate that is not executable.
    // The query string is converted to a char* object.
    [self runQuery:[query UTF8String] isQueryExecutable:NO];

    // Returned the loaded results.
    return (NSArray *)self.arrResults;
}
As you see, it’s just a matter of two lines. In the first line, we call the runQuery:isQueryExecutable: method and we convert the query to a C string object. At the same time, we specify that the query is not executable.
In the second line we return the arrResults array that contains the query results, casting it first to a NSArray object. It would be a bad idea to make the arrResults array public and allow apps to have direct access to it, as then the returned data could be potentially altered before it used.
Going to the executeQuery: method now, here’s it its definition:
-(void)executeQuery:(NSString *)query{
    // Run the query and indicate that is executable.
    [self runQuery:[query UTF8String] isQueryExecutable:YES];
}
In this one, there is not a return value. However, the affectedRows property can be used to verify whether there were any changes or not after having executed a query.
A Sample Database
The database class is ready to be used, but how can we do that without having an actual database to test it? So, in this part I’m going to show you how to create a new database on Terminal, how to create a new table and finally how to embed the database file to the Xcode project. If you’re not used to work in a command line environment don’t worry; you’ll find out that doing so it’s interesting, different, even amusing.
For the purpose of this example we won’t create a complex database. On the contrary, we will create just one table, named peopleInfo, with the following fields:
- peopleInfoID: An integer value, the primary key of the table.
- firstname: A text value.
- lastname: A text value.
- age: An integer value.
Such a table is just fine to try out all the functionalities we want. Let’s see everything in action now. Click on the Spotlight icon, and type the Terminal word in the textfield:

Once it gets spotted, hit the Return key on the keyboard, or click on its name with your mouse and the terminal window will appear. We are going to create a new database file named sampledb.sql. For the record, let me say that you can use any extension you would like for the file, or no extension at all. The most common extensions are:
- .sql
- .sqlite
- .db
Personally, I like to give the .sql extension to my database files, but feel free to use anything that better suits to your preferences.
To create the above database, simply write the following in the terminal:
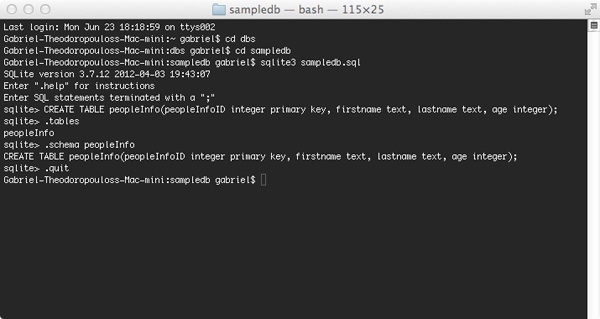
sqlite3 sampledb.sql
The database file will be created at once, and you’ll enter into the SQLite command line environment. The command needed to create a new table is quite similar to other SQL databases or DBMSs, with some slight differences though. Here it is:
CREATE TABLE peopleInfo(peopleInfoID integer primary key, firstname text, lastname text, age integer);
Even though this tutorial has nothing to do with offering instructions on how to use the SQLite command line environment, I believe that it would be useful to mention just a couple of commands. These are the .tables and the .schema TABLE_NAME. The first one displays a listing with all the tables you’ve created in a database. The second one displays the the Create Table command for the table specified by the Table_Name parameter. Notice that both commands are preceded by the dot point (.), and there’s not a semicolon at the end of the commands. For clear SQL commands, you use no dot mark, but you add the semicolon.
To quit from the SQLite environment, just type:
.quit
That way you’ll return back to the terminal environment. The next screenshot of my terminal synopsizes all the above:
Our next task is to add the database file to the Xcode project. You have two options for doing that:
- Either open the Finder, locate the file, and then drag and drop to the Project Navigator on Xcode, or,
- Go to Xcode, open the menu File > Add Files to “SQLite3DBSample”…, and then locate the file and click on the Add button.
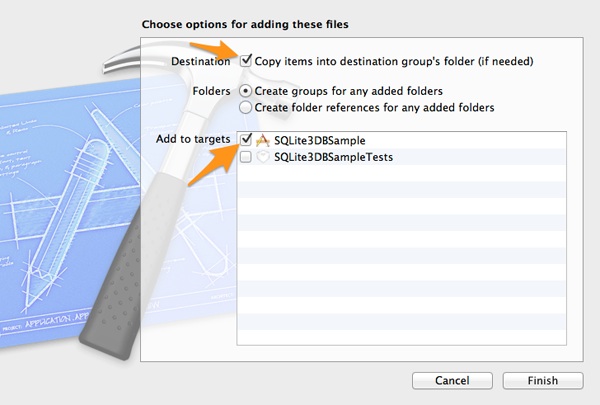
No matter which way you’ll choose, make sure that the Copy items into destination group’s folder (if needed) and the SQLite3DBSample target checkmarks are selected in the window that will appear before the database file gets added to the project.
Demo App Interface Setup
In most of my tutorials, this part is usually one of the first things you read. However, due to the fact that at the previous sections we created the database class and the sample file, the setup of the interface for our demo app had to be waiting up to this point. In here, as you’ve already assumed, we’ll work in the Interface Builder, and we will add all those subviews needed to make the app working, just like the sample demonstrated at the beginning of the tutorial. Further than that, we’ll add the necessary IBOutlet properties and IBAction methods that will make everything properly work.
On the Project Navigator, click on the Main.storyboard file and wait until it appears in the Interface Builder. As I said in the App Overview section, this is going to be a navigation based app, therefore select the View Controller scene and then go to the menu: Editor > Embed In > Navigation Controller. Instantly, a navigation controller will be added at the left side of the scene, and a new arrow will point from the navigation controller to the View Controller scene.
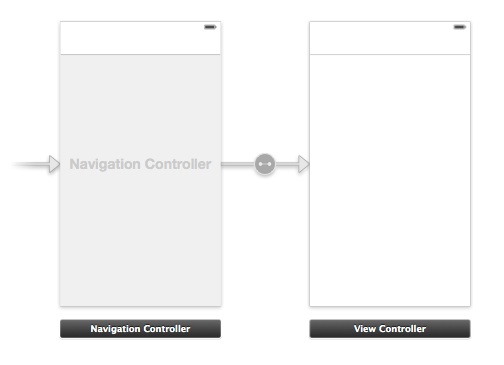
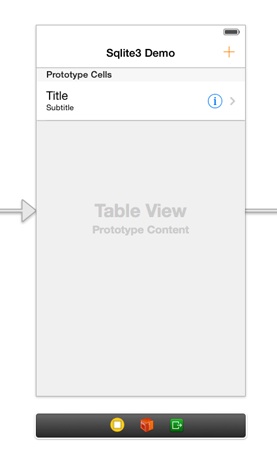
Let’s focus now on adding all the necessary subviews to the scene, and after having finished with that, we’ll add one more scene (a new view controller) which we’ll use to add new records to the database. Right next you are given all the subviews you need to drag from the Objects library to the scene, along with the attributes needed to be specified:
UITableView
- Frame: X=0, Y=0, Width=320, Height=568
UITableViewCell
Drag a table view cell in the table view to make it prototype
* Row Height: 60
* Style: Subtitle
* Identifier: idCellRecord
* Selection: None
* Accessory: Detail Disclosure
UIBarButtonItem
- Add it to the right side of the navigation bar
- Identifier: Add
- Tint: Red=255, Green=128, Blue=0
Besides all the above, select the Navigation Item and set the next two attributes:
1. Title: SQLite 3 Demo
2. Back Button: Go Back
These are all the subviews of the View Controller scene. Here’s how it should look like:
Now, from the Objects library take a UIViewController object and drop it to the canvas. For this view controller, we need to create a new class, so for the time being we’ll just pause our work here.
Following the same way you did when you added the database class file to the project, add a new class of UIViewController kind. Specifically:
- Go to the menu: File > New > File….
- As the template for the file, select the Objective-C class in the Cocoa Touch category, under the iOS section.
- In the second step, make sure that in the Subclass of field there is the UIViewController value. If there is not, just type it. In the Class field, set the EditInfoViewController as the name for the new class, and then click on the Next button to proceed.
- In the last step, make sure that the SQLite3DBSample is checked, and click on the Create button.
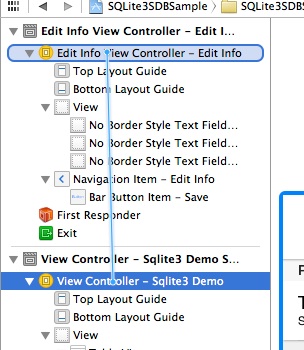
Head back to the Interface Builder, and select the second, new scene. In the Utilities pane show the Identity Inspector, and in the Class field type the EditInfoViewController value. Immediately, the second view controller scene will turn into the Edit Info View Controller scene.
To connect the View Controller scene with the Edit Info View Controller scene, go to the Document Outline pane, Ctrl-Click on the View Controller scene object, and drag right onto the Edit Info View Controller object.
In the black popup window that appears (titled Manual Segue), select and click the Push option:
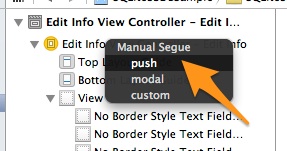
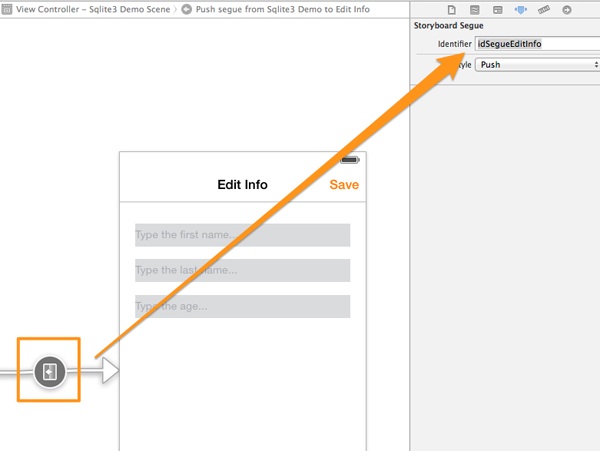
The two scenes will become connected, but there’s still one last thing to do. Click on the circle of the connection line, and in the Attributes inspector set the idSegueEditInfo as the identifier value for the segue.
Now, we can add the necessary subviews here too:
UITextField
- Frame: X=20, Y=93, Width=280, Height=30
- Placeholder: Type the first name…
- Color: Red=255, Green=128, Blue=0
- Border Style: No border style
- Background: Red=217, Green=219, Blue=221
- Capitalization: Words
- Return Key: Done
UITextField
- Frame: X=20, Y=139, Width=280, Height=30
- Placeholder: Type the last name…
- Color: Red=255, Green=128, Blue=0
- Border Style: No border style
- Background: Red=217, Green=219, Blue=221
- Capitalization: Words
- Return Key: Done
UITextField
- Frame: X=20, Y=186, Width=280, Height=30
- Placeholder: Type the age…
- Color: Red=255, Green=128, Blue=0
- Border Style: No border style
- Background: Red=217, Green=219, Blue=221
- Capitalization: Words
- Return Key: Done
- Keyboard: Numbers and Punctuation
UIBarButtonItem
- Add it to the right side of the navigation bar
- Identifier: Save
- Tint: Red=255, Green=128, Blue=0
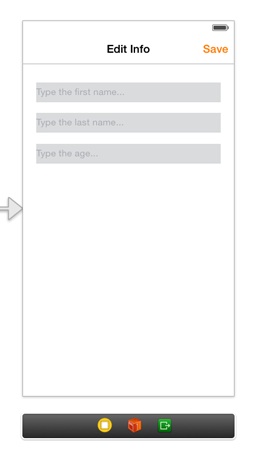
Also, edit the navigation item and set the Edit Info value as its title.
Here’s how the second view controller should look like:
Let’s see now what IBOutlet properties and IBActions are needed to be declared for the subviews we previously added. Starting from the View Controller scene, we want an IBOutlet property for the table view, so as we can display our data, and an IBAction method for the bar button item, which we’ll use to perform the segue and transit to the EditInfoViewController view controller. Open the ViewController.h file, and add the next two declarations:
@interface ViewController : UIViewController

@property (weak, nonatomic) IBOutlet UITableView *tblPeople;


- (IBAction)addNewRecord:(id)sender;

@end
Go back to the Interface builder and make the proper connections.
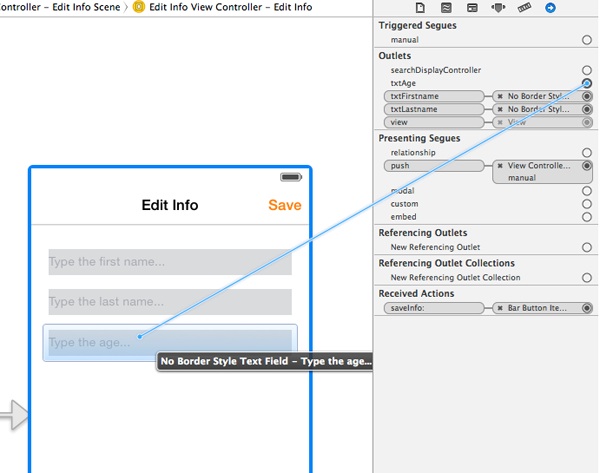
Next, for the Edit Info View Controller scene we’ll need an IBOutlet property for each textfield, and an IBAction method for the save button. Similarly to the previous steps, open the EditInfoViewController.h file and declare them:
@interface EditInfoViewController : UIViewController

@property (weak, nonatomic) IBOutlet UITextField *txtFirstname;

@property (weak, nonatomic) IBOutlet UITextField *txtLastname;

@property (weak, nonatomic) IBOutlet UITextField *txtAge;


- (IBAction)saveInfo:(id)sender;

@end
Finally, go to the Interface Builder once again and do the appropriate connections, as shown in the next figure:
Note that when you’ll be viewing the EditInfoViewController view controller, the back button will appear to the navigation bar along with the Save button. To let it have the same color to the Save button you just need to go to the EditInfoViewController.m file, and to add the next line in the viewDidLoad method:
- (void)viewDidLoad
{
    [super viewDidLoad];
    // Do any additional setup after loading the view.

    // Set the navigation bar tint color.
    self.navigationController.navigationBar.tintColor = self.navigationItem.rightBarButtonItem.tintColor;

}
Adding New Records
Having the interface of the sample app prepared, we can go towards the implementation of our sample app where we’ll try out our database class. As no data still exist in our database, the best point to start from would be to develop the feature of adding a new record. That requires work in both of our view controllers: In the View Controller class we should make the Add (plus button) functioning, so we can navigate to the next view controller. In the Edit Info View Controller class, we will get all values from textfields, and using an insert command, we’ll add a new record to database.
Let’s see everything in details. Go to the ViewController.m file, and straight ahead to the addNewRecord: IBAction method. Navigating to a new view controller using segues is easy, so the only thing we have to do here is to write just one line of code:
- (IBAction)addNewRecord:(id)sender {
    [self performSegueWithIdentifier:@"idSegueEditInfo" sender:self];
}
Focusing now our attention on the EditInfoViewController class, the first thing we should take care about is to dismiss the keyboard every time the Done button on it is tapped. To do so, we must implement one textfield delegate method, but first, we must adopt the respective protocol. So, open the EditInfoViewController.h file, and modify the header line as follows:
@interface EditInfoViewController : UIViewController
Next, we must indicate that our class is the delegate of the textfields, and that can be done in two ways: Either to do it in Interface Builder, or to do it programmatically. The second is the way I prefer, as I think is much simpler. Open the EditInfoViewController.m file and go to the viewDidLoad method. In there add these three lines:
- (void)viewDidLoad
{
    ...

    // Make self the delegate of the textfields.
    self.txtFirstname.delegate = self;
    self.txtLastname.delegate = self;
    self.txtAge.delegate = self;
}
Now, we are ready to implement a simple delegate method and know when the Done button of the keyboard gets tapped. That method is the textFieldShouldReturn:, and in its implementation we’ll perform just one task: We’ll resign the textfield from first responder. Here it is:
-(BOOL)textFieldShouldReturn:(UITextField *)textField{
    [textField resignFirstResponder];
    return YES;
}
Time to work with the database. Go to the top of the file, and import our custom class:
#import "DBManager.h"
Now that the database class can be used, let’s declare a private property to do so. Go to the private class section and add the next declaration:
@interface EditInfoViewController ()

@property (nonatomic, strong) DBManager *dbManager;

@end
Then, in the viewDidLoad method initialize it using the custom init method we implemented:
- (void)viewDidLoad
{
    ...

    // Initialize the dbManager object.
    self.dbManager = [[DBManager alloc] initWithDatabaseFilename:@"sampledb.sql"];

}
By initializing as shown above, upon the first run the database class will check if the sampledb.sql file exists or not in the documents directory, and it will copy it there if not found.
What we have left to do now is easy, but the most important part. Using all the textfield text values, we’ll prepare an insert query and we’ll execute it. To verify the outcome of the execution we’ll output to the debugger either a success message, or the error message if any error occurs. Also, upon successful saving we’ll display the number of the affected rows, so we’ll manage to see if our class works as expected.
To do all that go to the saveInfo: IBAction method. Right next is given its implementation:
- (IBAction)saveInfo:(id)sender {
    // Prepare the query string.
    NSString *query = [NSString stringWithFormat:@"insert into peopleInfo values(null, '%@', '%@', %d)", self.txtFirstname.text, self.txtLastname.text, [self.txtAge.text intValue]];

    // Execute the query.
    [self.dbManager executeQuery:query];

    // If the query was successfully executed then pop the view controller.
    if (self.dbManager.affectedRows != 0) {
        NSLog(@"Query was executed successfully. Affected rows = %d", self.dbManager.affectedRows);

        // Pop the view controller.
        [self.navigationController popViewControllerAnimated:YES];
    }
    else{
        NSLog(@"Could not execute the query.");
    }
}
Notice that after having added a new record successfully, we also pop the view controller and return back to the View Controller one.
The app can be tested now for first time. Compile and run it, and try to add a new record. When you finish typing data, tap on the Save button and watch at the debugger. If you see a message similar to the next one, then congratulations, the database is working!
![]()
Loading and Displaying Records
Now that we can successfully add records to the database, the most reasonable next step is to display them, so we’ll work on the View Controller class. Summarizing what we have to do here, I would say that our job has two parts: The first one is to implement all the necessary, required table view methods so our loaded data from the database get listed properly on the table view. The second one is to create a select query, load our data and finally display them.
If you recall, when we did all the setup in the Interface Builder, we declared an IBOutlet property for the table view. Using it, we’ll make the View Controller class both the delegate and datasource of it, but prior to that we must adopt two necessary protocols, the UITableViewDelegate and the UITableViewDataSource. As always, this will take place in the ViewController.h file, where we’ll modify the @interface header line as follows:
@interface ViewController : UIViewController
Next, in the ViewController.m file and in the viewDidLoad method we just have to write these:
- (void)viewDidLoad
{
    [super viewDidLoad];
    // Do any additional setup after loading the view, typically from a nib.

    // Make self the delegate and datasource of the table view.
    self.tblPeople.delegate = self;
    self.tblPeople.dataSource = self;
}
Now, let’s get started by loading the data from the database. To do so, we need three things:
- To declare and initialize a DBManager property.
- To declare and array for storing the returned data.
- A private method to do the job.
Go to the private section of the class, and declare the next two properties, and one private method:
@interface ViewController ()

@property (nonatomic, strong) DBManager *dbManager;

@property (nonatomic, strong) NSArray *arrPeopleInfo;


-(void)loadData;

@end
Don’t worry if Xcode is showing an error. We just need to import our database class header:
#import "DBManager.h"
Now, as we exactly did in the EditInfoViewController class, we’ll initialize the database property here as well:
- (void)viewDidLoad
{
    ...

    // Initialize the dbManager property.
    self.dbManager = [[DBManager alloc] initWithDatabaseFilename:@"sampledb.sql"];

}
Our next task is to implement the loadData method, and prepare the select query. Let’s see it first:
-(void)loadData{
    // Form the query.
    NSString *query = @"select * from peopleInfo";

    // Get the results.
    if (self.arrPeopleInfo != nil) {
        self.arrPeopleInfo = nil;
    }
    self.arrPeopleInfo = [[NSArray alloc] initWithArray:[self.dbManager loadDataFromDB:query]];

    // Reload the table view.
    [self.tblPeople reloadData];
}
Three things happen here: At first, the query string is prepared, and as you see, is a simple select statement. Then, the arrPeopleInfo array gets initialized, and upon its initialization we call the loadDataFromDB: method of the dbManager object. Once the data has been fetched and returned, we reload the table view to display it. For the time being the last line will do nothing, but after we have had our table view ready, it will be working just fine.
Loading data is as simple as you see in the previous code snippet. Having done so, enables us to move ahead and work with the table view. Note that based on the arrPeopleInfo array, we will be able to define the total rows of the table view.
Regarding the table view methods, let’s get started from the easy ones:
-(NSInteger)numberOfSectionsInTableView:(UITableView *)tableView{
    return 1;
}


-(NSInteger)tableView:(UITableView *)tableView numberOfRowsInSection:(NSInteger)section{
    return self.arrPeopleInfo.count;
}


-(CGFloat)tableView:(UITableView *)tableView heightForRowAtIndexPath:(NSIndexPath *)indexPath{
    return 60.0;
}
In the first one, we tell our table view that we want to have just one section. With the second one, we specify the total number of rows displayed in the table view. Actually, this method will return as many rows as those existing in the result set that will be loaded from the database. Finally, with the third one we set each row’s height to 60.0 points.
To display a row’s data, we’ll use the tableView:cellForRowAtIndexPath: method. In it, initially we’ll dequeue the prototype cell we created in the Interface Builder. Then, making use of the arrColumnNames array of the dbManager property we’ll define the index of each column (field) in the sub-array for the current index of the arrPeopleInfo array. Finally, we’ll get the actual data and assign it to the textLabel and detailTextLabel labels of the cell. Here’s the implementation:
-(UITableViewCell *)tableView:(UITableView *)tableView cellForRowAtIndexPath:(NSIndexPath *)indexPath{
    // Dequeue the cell.
    UITableViewCell *cell = [tableView dequeueReusableCellWithIdentifier:@"idCellRecord" forIndexPath:indexPath];

    NSInteger indexOfFirstname = [self.dbManager.arrColumnNames indexOfObject:@"firstname"];
    NSInteger indexOfLastname = [self.dbManager.arrColumnNames indexOfObject:@"lastname"];
    NSInteger indexOfAge = [self.dbManager.arrColumnNames indexOfObject:@"age"];

    // Set the loaded data to the appropriate cell labels.
    cell.textLabel.text = [NSString stringWithFormat:@"%@ %@", [[self.arrPeopleInfo objectAtIndex:indexPath.row] objectAtIndex:indexOfFirstname], [[self.arrPeopleInfo objectAtIndex:indexPath.row] objectAtIndex:indexOfLastname]];

    cell.detailTextLabel.text = [NSString stringWithFormat:@"Age: %@", [[self.arrPeopleInfo objectAtIndex:indexPath.row] objectAtIndex:indexOfAge]];

    return cell;
}
Notice that instead of using the indexOfFirstname, indexOfLastname and indexOfAge variables for accessing the proper data, we could have used the index number for each field directly. For example, instead of writing this:
cell.detailTextLabel.text = [NSString stringWithFormat:@"Age: %@", [[self.arrPeopleInfo objectAtIndex:indexPath.row] objectAtIndex:indexOfAge]];
we could just have written this:
cell.detailTextLabel.text = [NSString stringWithFormat:@"Age: %@", [[self.arrPeopleInfo objectAtIndex:indexPath.row] objectAtIndex:3]];
Using or not the column names array is totally up to you, and I used it here just for demonstrative reasons. I just wanted to make clear how you can specify the index of a field programmatically, even though our example is quite simple and it is not necessary to do this.
So, it seems that we’ve finished taking all the proper actions for loading the data and showing it to the table view. However, if you run the app now, you’ll see no data displayed at all. That’s because of a simple reason: We didn’t call the loadData method anywhere. So, go to the viewDidLoad method and add the next line:
- (void)viewDidLoad
{
    ...

    // Load the data.
    [self loadData];
}
Run the app once again. This time, the records you added in the previous step are shown in the table view. That’s great.
Before we consider this section as finished, there’s one more detail we should take care about. You’ll definitely notice that when adding a new record and then tapping on the Save button, the record is saved and you’re transferred back to the View Controller view controller, but the table view doesn’t get updated with the new data, unless you re-launch the app. That’s because for the time being the View Controller view controller cannot know whether new data have been added to the database after the Edit Info View Controller view controller has popped from the navigation stack. To workaround this, we must create a protocol in the EditInfoViewController class, declare a delegate method to be used for notifying when a new record has been added, and adopt that protocol to the ViewController class.
Let’s give life to all the above. Start by opening the EditInfoViewController.h file. At the top of it, add the next code fragment:
@protocol EditInfoViewControllerDelegate

-(void)editingInfoWasFinished;

@end
Next, in the interface right below, add a declaration for the delegate property:
@interface EditInfoViewController : UIViewController

...

@property (nonatomic, strong) id delegate;

@end
Finally, go to the saveInfo: IBAction method and modify it, so the delegate method is called before popping the view controller. Right next, you are given that method updated:
- (IBAction)saveInfo:(id)sender {
    // Prepare the query string.
    NSString *query = [NSString stringWithFormat:@"insert into peopleInfo values(null, '%@', '%@', %d)", self.txtFirstname.text, self.txtLastname.text, [self.txtAge.text intValue]];

    // Execute the query.
    [self.dbManager executeQuery:query];

    // If the query was successfully executed then pop the view controller.
    if (self.dbManager.affectedRows != 0) {
        NSLog(@"Query was executed successfully. Affected rows = %d", self.dbManager.affectedRows);

        // Inform the delegate that the editing was finished.
        [self.delegate editingInfoWasFinished];

        // Pop the view controller.
        [self.navigationController popViewControllerAnimated:YES];
    }
    else{
        NSLog(@"Could not execute the query.");
    }
}
With the above three steps, the EditInfoViewController will notify the delegate class every time a new save action occurs.
Let’s go now to the ViewController.h file. Go to the top of it, and make the next import:
#import "EditInfoViewController.h"
Then, modify the @interface header a bit:
@interface ViewController : UIViewController
As you see, now we are adopting the EditInfoViewControllerDelegate protocol, so the only thing we have left is to implement the delegate method. Go to the ViewController.m file, and add the next code segment:
-(void)editingInfoWasFinished{
    // Reload the data.
    [self loadData];
}
As you may have expected, the only thing we do is to load our data once again.
However, nothing is going to happen until we make the ViewController class the delegate of the EditInfoViewController one. We’ll do that in the prepareForSegue:sender: method, which is called before the segue is performed. Here it is:
-(void)prepareForSegue:(UIStoryboardSegue *)segue sender:(id)sender{
    EditInfoViewController *editInfoViewController = [segue destinationViewController];
    editInfoViewController.delegate = self;
}
If you run the app, you’ll see that is working and behaving much better now. When adding new records, they immediately appear in the table view after having tapped on the Save button.
Editing a Record
Our sample app will be much better if we add support for editing and deleting records, apart from just adding new and loading existing ones. Also, that way we’ll see in action how the update and delete queries work, and we’ll test our database class even more.
In this section we’ll see how to edit a record. Running the app and looking at the table view, you notice that we have added a detail disclosure indicator on the prototype cell. That’s what we’ll use to edit a record matching to the respective row. The actual editing will take place in the EditInfoViewController class, which we’ll modify a little bit, so when saving it will either execute an insert or an update query.
The most important part of the underlying logic is the existence of a public int property in the EditInfoViewController class, in which the edited record’s ID will be assigned. When saving, that property will be used to specify the exact data that should be updated. However, in case of adding a new record, we’ll set the −1 value to this property, indicating that way we want to run an insert query, not an update. Lastly, when the EditInfoViewController view controller is appeared to edit a record, the data for that specific record will be loaded and assigned to the textfields.
If all the above seem confusing, don’t worry. Come along to perform some simple steps, and everything will become crystal clear.
Let’s get started from the EditInfoViewController.h file, where we should declare the public int property:
@interface EditInfoViewController : UIViewController

...

@property (nonatomic) int recordIDToEdit;

@end
Now, open the EditInfoViewController.m file and declare a private method which will be used to load the edited data. Go to the private section of the class, and add the next line:
@interface EditInfoViewController ()

...

-(void)loadInfoToEdit;

@end
Now, let’s implement it:
-(void)loadInfoToEdit{
    // Create the query.
    NSString *query = [NSString stringWithFormat:@"select * from peopleInfo where peopleInfoID=%d", self.recordIDToEdit];

    // Load the relevant data.
    NSArray *results = [[NSArray alloc] initWithArray:[self.dbManager loadDataFromDB:query]];

    // Set the loaded data to the textfields.
    self.txtFirstname.text = [[results objectAtIndex:0] objectAtIndex:[self.dbManager.arrColumnNames indexOfObject:@"firstname"]];
    self.txtLastname.text = [[results objectAtIndex:0] objectAtIndex:[self.dbManager.arrColumnNames indexOfObject:@"lastname"]];
    self.txtAge.text = [[results objectAtIndex:0] objectAtIndex:[self.dbManager.arrColumnNames indexOfObject:@"age"]];
}
Everything is quite straightforward here. At first, we form the query. As you notice, it’s the first time we have a where clause. Then, we get the data from the database and assign the appropriate values to the textfields.
The above method won’t work if we don’t call it, so go to the viewDidLoad method and make a conditional call:
- (void)viewDidLoad
{
    ...

    // Check if should load specific record for editing.
    if (self.recordIDToEdit != -1) {
        // Load the record with the specific ID from the database.
        [self loadInfoToEdit];
    }
}
Great, but we’ve left one more step in this class: To modify the saveInfo: IBAction method and make it update an existing record instead of just inserting new records to the database. Right below you’re given the method implemented in its final form. Notice how using the recordIDToEdit property we specify the query type:
- (IBAction)saveInfo:(id)sender {
    // Prepare the query string.
    // If the recordIDToEdit property has value other than -1, then create an update query. Otherwise create an insert query.
    NSString *query;
    if (self.recordIDToEdit == -1) {
        query = [NSString stringWithFormat:@"insert into peopleInfo values(null, '%@', '%@', %d)", self.txtFirstname.text, self.txtLastname.text, [self.txtAge.text intValue]];
    }
    else{
        query = [NSString stringWithFormat:@"update peopleInfo set firstname='%@', lastname='%@', age=%d where peopleInfoID=%d", self.txtFirstname.text, self.txtLastname.text, self.txtAge.text.intValue, self.recordIDToEdit];
    }


    // Execute the query.
    [self.dbManager executeQuery:query];

    // If the query was successfully executed then pop the view controller.
    if (self.dbManager.affectedRows != 0) {
        NSLog(@"Query was executed successfully. Affected rows = %d", self.dbManager.affectedRows);

        // Inform the delegate that the editing was finished.
        [self.delegate editingInfoWasFinished];

        // Pop the view controller.
        [self.navigationController popViewControllerAnimated:YES];
    }
    else{
        NSLog(@"Could not execute the query.");
    }
}
Our job in the EditInfoViewController class is over. However, that was just the half part of what we should do. We must go to the ViewController class now and make the detail disclosure button of the cells functional.
To detect tappings on the detail disclosure buttons, UITableViewDelegate protocol provides the tableView:accessoryButtonTappedForRowWithIndexPath: delegate method. We are going to implement it, and inside its body we’ll do two simple tasks:
- We will specify the record ID that’s about to be edited.
- We’ll perform the segue so the EditInfoViewController view controller gets pushed to the navigation stack and make us able to edit.
We’ll get started by declaring a private property to the ViewController class similar to the recordIDToEdit, because we’ll need a way to keep the record ID matching to the row of the tapped button. So, go to the private section of the interface, and do so:
@interface ViewController ()

...

@property (nonatomic) int recordIDToEdit;

@end
With the above private property declared, we can proceed to the tableView:accessoryButtonTappedForRowWithIndexPath: implementation:
-(void)tableView:(UITableView *)tableView accessoryButtonTappedForRowWithIndexPath:(NSIndexPath *)indexPath{
    // Get the record ID of the selected name and set it to the recordIDToEdit property.
    self.recordIDToEdit = [[[self.arrPeopleInfo objectAtIndex:indexPath.row] objectAtIndex:0] intValue];

    // Perform the segue.
    [self performSegueWithIdentifier:@"idSegueEditInfo" sender:self];
}
Easy enough, but now we must tell the EditInfoViewController class what the record ID we want to edit is. This should take place before the segue is performed, so go to the prepareForSegue:sender: and add just one line:
-(void)prepareForSegue:(UIStoryboardSegue *)segue sender:(id)sender{
    ...
    editInfoViewController.recordIDToEdit = self.recordIDToEdit;
}
We are almost finished. The only issue that we’re still having, is that we haven’t specified the value of the recordIDToEdit property when we’re about to add a new record. That can be easily fixed, as we just have to go to the addNewRecord: IBAction method definition, and modify it as follows:
- (IBAction)addNewRecord:(id)sender {
    // Before performing the segue, set the -1 value to the recordIDToEdit. That way we'll indicate that we want to add a new record and not to edit an existing one.
    self.recordIDToEdit = -1;

    // Perform the segue.
    [self performSegueWithIdentifier:@"idSegueEditInfo" sender:self];
}
Everything is ready now. Feel free to run the app once again, and then try to edit one or more of any existing records. As it seems, our database class perfectly works and our sample app gains more features.
Deleting a Record
Now that we can insert, load and update records, let’s make our app able to delete them as well. To delete a record, we’ll use the built-in table view functionality, where by swiping on a row towards left, the delete button is appeared.
To do that possible, we must implement the tableView:commitEditingStyle:forRowAtIndexPath: table view method. In it, if the editing style is a delete style, we’ll execute a delete query, and then we’ll reload the data. As simple as that, and the record deletion will be ready. Let’s see it:
-(void)tableView:(UITableView *)tableView commitEditingStyle:(UITableViewCellEditingStyle)editingStyle forRowAtIndexPath:(NSIndexPath *)indexPath{

    if (editingStyle == UITableViewCellEditingStyleDelete) {
        // Delete the selected record.
        // Find the record ID.
        int recordIDToDelete = [[[self.arrPeopleInfo objectAtIndex:indexPath.row] objectAtIndex:0] intValue];

        // Prepare the query.
        NSString *query = [NSString stringWithFormat:@"delete from peopleInfo where peopleInfoID=%d", recordIDToDelete];

        // Execute the query.
        [self.dbManager executeQuery:query];

        // Reload the table view.
        [self loadData];
    }
}
At first, we set the ID of the record to be deleted. Then, we compose the query string appropriately, we execute it using the executeQuery: method of our database class, and finally we load the data once again. That way, every time the delete button of a row is tapped, the respective record on the database will be permanently removed.
If you want now give the app one more try, and see how it works. All the basic features are now implemented and fully functional.
Compile and Run the App
This section exists in almost every tutorial in case you are one of those guys who wait to arrive at the finish point, and then run and test the app. Well, we’re almost at the end of our mission, so if you still haven’t run it, do it now. Begin by adding a new record, and then save it. Next, try to edit it, and finally delete it. Add as many records as you want and generally do whatever you want for testing both the sample app and the database class. Even more, add any extra features you may think of and build more complex queries.
Right next it’s demonstrated the animated graphic presented at the beginning of the tutorial too:
Summary
I’ve always believed that working with databases is the best possible solution when dealing with data, and having relevant tools or libraries ready for use is a must for every developer. SQLite might not be as powerful as other databases or database management systems, however is light and maybe the most suitable solution for a mobile platform. The class we developed in this tutorial is not set of stone, so keep in mind that you can change it and evolve it at any time and in any possible way that serves you. With it, I just wanted to provide you with a working, suitable for the most cases, reusable component, which could potentially have double results: Both to teach you the basics of SQLite, and to get you out of the hassle of developing other custom data handling solutions. That said, I truly hope you have learned and earned something new by this tutorial, and as always let me know your thoughts or questions. Until next time, I wish an easy, bug-free programming to all!
For your reference, you can download the complete Xcode project from here.


