

Welcome to another programming tutorial in the Swift programming language! Today we we are going to talk about a topic that usually everybody knows something more or less, but it’s important for new developers in Swift to really understand what is all about and how it works. It’s quite often for the subject of our discussion not to receive the proper attention, so it’s either misused or not used at all. It’s a topic that the more someone advances in Swift, the more necessary it becomes in order to write better and clearer code. And that topic is about Access Levels in Swift!
In an effort to provide a definition, access levels actually define the accessibility, or in other words, the visibility of code entities out of the type, file or module that they have been defined. This could also be rephrased to that access levels define the protection level of the code in terms of visibility among programming entities, files and modules. For example, you might have an instance method that you want to be accessible only inside the class it belongs to, but being inaccessible from another class in a different file. You can achieve that by setting the proper access level to the method.
Or, another example, you have a custom type (class, structure, enumeration) that you want to keep just for internal use inside another custom type. Once again, you can achieve that by changing the access level of the first custom type. Or, you are creating your own library as a Swift package, or a closed framework, and you want to have a specific set of classes and methods available to be used publicly; once again… access levels.
Right above I mentioned the term “module”. If you are not sure what exactly a module is, the last example in the previous paragraph it’s what a module is all about. A library that you integrate as a Swift package, a framework, even a Xcode project that you add to another one; each one of them is considered to be a module. The project that accepts them is also another module. You will read more about all that later in this post.
Before changing the access levels of the various entities in your code, you must know why you want to do so, and being able to handle any side effects that such an action might have. Don’t worry though; nothing terrible or irreversible can happen. You can go back to previous states easily. My purpose in this post is to showcase how different access levels can be applied by using simple examples, and through that process to help you understand how all that works. Then, it’ll be easy to decide when and where you should change the default access levels, and what would be the meaning of such an action.
Access levels regard almost everything in Swift: Classes, structures, enumerations, properties, methods, protocols. Applying different access levels is not difficult; it’s just a matter of writing a special keyword, a specifier, right before the entity you need it. In a more general context, it’s mostly a matter of decision making than a matter of doing something programmatically heavy or intensive.
The Available Access Levels
The available access levels in Swift are the following:
- private: This is the most strict access level, as entities marked as private are accessible only inside their defining type (such as properties or methods inside a class or structure), or their defining source file if they’re top-level types (such as classes, structures, enumerations or protocols defined in a file). None of these entities can be accessed by parts of code being outside their defining type or file.
- file-private: This is a less strict access level, as it’s between the private and the internal (see next). Entities marked as file-private are visible and accessible from any other entity only inside the same source file, but not outside of it.
- internal: The internal access level is the default one that is given automatically to all entities that they have not been marked otherwise. It’s actually the access level of all entities by default even though it’s not explicitly written (it’s implied). Internal entities are normally accessible in the scope of their defining module, but inaccessible by parts of code belonging to other modules. We’ll talk about modules later in this post.
- public: The less restrictive access level existing in Swift. By making an entity public you make it accessible by other parts of code inside the same module, and to other modules as well. For example, you have a library integrated into a project as a Swift Package; entities that should be available to the project out of the library must be marked as public, otherwise they won’t be accessible. More about that later.
- open: Similar to public, but it provides an additional “freedom”: Classes and methods marked as open can be subclassed and overridden respectively out of their defining module. More about that later too.
The Starter Material
Before we begin, please download the starter material pack that you will need to have in order to follow along. You will find the following in it:
- A starter project to use called AccessLevels. It contains a few source files that we’ll add code to. Note that the starter project is a Command Line Tool for macOS that you simply run and get the results in the output area of Xcode.
- A Swift Package named AccessLevelsPackage with the few necessary bits of code already implemented. We’ll add that package later to the starter project when we’ll talk about access levels and modules.
Once you get the starter project open it in Xcode. Through simple examples we are going to meet all access levels and how they work under various circumstances.
Note: As I said the starter project is a command line app for macOS. That makes it easy to get printed messages to the Xcode’s output area simply by pressing Cmd+R. However, if you are curious about how to run it from Terminal, then follow these steps:
1. Open Xcode preferences.
2. Click on the Locations tab.
3. Click on the small arrow right after the Derived data path.
4. A new Finder window will open with folders of derived data from all your projects. Find the one that contains the AccessLevel in its name.
5. Navigate to Build > Products > Debug.
6. Right click or Cmd+click on the Debug folder. Select New Terminal At Folder (or Services > New Terminal at Folder if you’re using macOS Mojave).
7. The Terminal application will show app right into the selected folder. Type ./AccessLevels and the program will be executed in Terminal.
The Internal Access Level
Let’s start with something simple, and that is the internal access level. As I mentioned already, this is the access level that all declared entities get by default, and in this part we’ll emphasize on that.
An internal entity is accessible by any part of code anywhere inside the same module, no matter if it exists on a different file or belongs to another type than the one we are working on. Even though we’ll talk about modules in details later, I should say shortly here that a module is any third party code like a library, a framework, or a project that is added to the working project, and it’s usually necessary to include its features to a file using the import statement. So, in short, an internal entity is visible throughout the scope of its defining module.
Usually internal entities don’t have to be explicitly specified, but doing so isn’t wrong; it’s just redundant. To see that, open the MessagePrinter.swift file where you will find the MessagePrinter class defined. Add the following method to it:
func show(message: String) {
    print(message)
}
This is an extremely simple method. It accepts a String value as an argument and prints it to the output area. See that we didn’t specify any access level, so the above method is automatically marked as internal. The same applies to the class, as it doesn’t have any explicit specifier to change its access level. Both of them are visible anywhere in the project.
Open now the main.swift file, where we will create an instance of the MessagePrinter class and we’ll call the show(message:) method providing a message:
let printer = MessagePrinter()
printer.show(message: "Access levels in Swift!")
Press Cmd+R in your keyboard to run the program. In the output area you will see the above message printed.
Now go back to the MessagePrinter.swift file, and add the internal specifier right at the beginning of the method:
internal func show(message: String) { ... }Run the program again. You will see the message printed to the output area and Xcode won’t complain by showing any errors. show(message:) method is still normally accessible by the main.swift file and the result is the same as before, even though we marked it explicitly as internal.
You could do the same to the MessagePrinter class and set the internal access level manually; nothing would change either.
So, it’s up to you to decide whether you’ll be writing the internal specifier in front of your entities or not; it’s not mandatory to do that, so you can skip it. But always remember that when you don’t see any access level specified, then most probably entities are internal by default. An exception on that rule is the methods declared in a protocol, but in that case they inherit the access level defined to the protocol.
Making Entities Inaccessible
One of the most common reasons that we want to change the default access levels is for making certain entities inaccessible out of their defining type or file, and therefore hide them from other parts of code in the module.
Let’s suppose that we don’t want the show(message:) method to be available out of the class that has been defined. In order to achieve that, we can set the method either as private, or as fileprivate.
In the MessagePrinter.swift file set the private access level to the show(message:) method:
private func show(message: String) { ... }Try to run the app now. You will get the following error in the main.swift file:

The error message that appears is quite explanatory:
‘show’ is inaccessible due to ‘private’ protection level
It clearly tells us that the show(message:) method cannot be reached because it has been marked as private. It’s only visible inside the type that was declared in, MessagePrinter in this case.
We would have had the exact same result if the show(message:) method had been marked as fileprivate. It would remain inaccessible from the main.swift file, but in that case it would still be visible in the MessagePrinter.swift file.
If private and file-private access levels cause some confusion right now we’ll make it clear right next. What you should keep from this part is that by declaring a method (or any other entity) as private or file-private it immediately becomes inaccessible by other parts of code, depending always on the access level you specify (private or file-private).
The Difference Between Private And File Private Levels
Even though private and file-private access levels look similar at first glance, and even though in the most cases that they are used lead to the same result, they have a certain difference that we ought to point out here.
Before you continue, go to the MessagePrinter.swift file and set the fileprivate access level to the show(message:) method:
fileprivate func show(message: String) { ... }What we are going to do now is to add the following right after the end of the MessagePrinter implementation (inside the MessagePrinter.swift file):
- An extension of the
MessagePrinterclass that will contain a new method, which in turn will call theshow(message:). - A class that will be a subclass of
MessagePrinterand that will accessshow(message:)to print a message. - A class that won’t be a subclass of
MessagePrinter, but it will use an instance of it in order to accessshow(message:)and print a message.
Following the above order, here is the MessagePrinter extension.
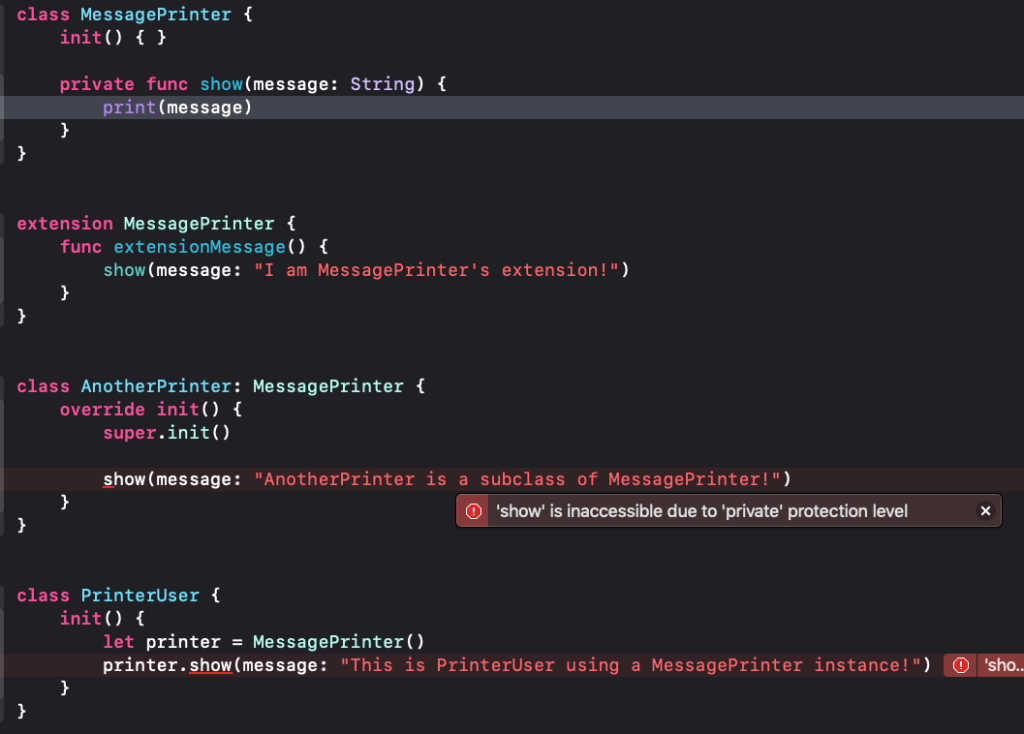
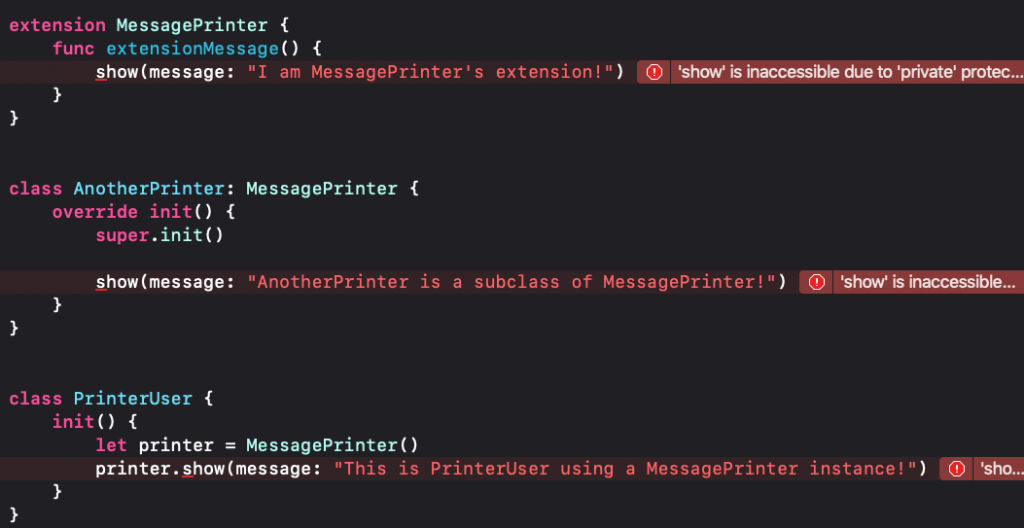
extension MessagePrinter {
    func extensionMessage() {
        show(message: "I am MessagePrinter's extension!")
    }
}
Next, we’re adding a new class called AnotherPrinter that is declared as a subclass of MessagePrinter and inherits from it.
class AnotherPrinter: MessagePrinter {
    override init() {
        super.init()

        show(message: "AnotherPrinter is a subclass of MessagePrinter!")
    }
}
Finally, let’s add one more class called PrinterUser that is not a subclass of any other class, but it initializes an instance of MessagePrinter so it can access the show(message:) method:
class PrinterUser {
    init() {
        let printer = MessagePrinter()
        printer.show(message: "This is PrinterUser using a MessagePrinter instance!")
    }
}
Here we can make our first conclusion: fileprivate access level makes show(message:) accessible everywhere inside the file that has been defined into, regardless of the type of code that tries to access it (extension, subclass, another class). At the same time, it makes it inaccessible to any piece of code that tries to use it out of the MessagePrinter.swift file. The proof of that is that Xcode shows the error message in the main.swift file.
Change now the fileprivate access level of show(message:) to private and look at what happens to the code:
By changing the access level of the show(message:) method to private, AnotherPrinter and PrinterUser instantly lose access to it, but MessagePrinter‘s extension still keeps it. That’s normal, as it’s known that methods and properties are not visible by other types once they’re declared as private. One might would expect here to find a protected access level, like other programming languages have, so by using that instead of private then AnotherPrinter could keep having access to the show(message:) method. Unfortunately, Swift does not have such an access level. Consequently, private level affects the same way both subclasses of the parent class, and third classes (or structures) that use instances of it.
So, time for conclusion #2 in this part:
Only extensions of a custom type (class, structure) can access methods (or properties) that have been set as private to the type. Everything else, even if it exists in the same file, loses access to the private entity.
Let’s proceed to one last “experiment” in this part of the post. Cut the MessagePrinter extension, the AnotherPrinter and PrinterUser definitions from the MessagePrinter.swift file, and paste them in the Assistive.swift file you will find in the starter project.
What do you observe now?
MessagePrinter‘s extension loses access to the show(message:) method too!
So, here we can make an addition to the previous conclusion:
Extensions of custom types can have access to private entities of the main type if only they are implemented in the same file. If they are defined in a different file, then they lose access to private entities, like any other custom type or piece of code that normally does.
All the discussion above also apply to properties (not only methods) or other custom types inner to top-level types, and you can put structures in place of classes as well. Of course, subclassing is impossible in case of structures, but all the rest remain the same.
Note: You can remove the private access level of the show(message:) method so you can get rid of all errors Xcode shows.
Access Levels And Properties
When defining custom types such as classes or structures, it’s almost impossible not to declare properties in them. When instances of these custom types are used in other parts of code, then properties are accessible and easy to be changed even accidentally if they are left to the default, internal access level. The best strategy is to increase the protection level of those properties that are meaningful only internally to the custom type, so they are not visible out of it, and treat carefully other properties that should be visible out of their defining type, but they shouldn’t be changed that easily.
We’ll see how to achieve that through another simple example. For starters, go to MessagePrinter class and add the following property:
class MessagePrinter {
    var message: String?

    ...
}
message property will keep the message given to the show(message:) method as an argument. Of course, we need to update that method too in order to make this happen:
func show(message: String) {
    self.message = message
    print(message)
}
Now, let’s define another simple method in MessagePrinter that prints the given message uppercased.
Note: We don’t really need a method to do that, but we’re defining it just for the sake of the example.
func showUppercasedMessage() {
    guard let message = message else { return }
    print(message.uppercased())
}
Switch to the main.swift file and append the next line:
printer.showUppercasedMessage()Run the program now to see the result in the output area:
Access levels in Swift!
ACCESS LEVELS IN SWIFT!
Program ended with exit code: 0
Let’s become a little bit vicious now and let’s temper with the message property before we call the showUppercasedMessage() method. Since it has the internal access level, we can easily access it from the main.swift file and change the original message.
Between the the call of the show(message:) and showUppercasedMessage() add the next line:
printer.show(message: "Access levels in Swift!")

// Add this line that changes the original message.
printer.message = "Hehehe... I altered the original message!"

printer.showUppercasedMessage()
Now press Cmd+R to run again. This time the uppercased message is not the original one:
Access levels in Swift!
HEHEHE... I ALTERED THE ORIGINAL MESSAGE!
Program ended with exit code: 0
Even though we messed with the message property intentionally here, it’s quite possible such a change to happen accidentally sometimes. And even though doing so here is harmless, in real projects can cause problems.
So, let’s protect the message property by setting the private access level to it. Open the MessagePrinter.swift file and update the message property as shown below:
private var message: String?Altering its value now in the main.swift file is impossible, and Xcode shows this error:
‘message’ is inaccessible due to ‘private’ protection level
Ok, comment out the problematic line in main.swift file and run. You see once again in the output area what is expected to be seen.
Now, what if we wanted to have read access to the message property? It’s acceptable not to be able to set its value out of the MessagePrinter class, but what about getting it?
To make that even more clear, let’s suppose we need to add the next line to main.swift file after all previous lines:
print("My original message was: \(printer.message)")The above statement forces Xcode to show the error message again that origins from the inability to access the private message property. The most obvious solution in order to get the message property’s value is to implement a new method that will simply return the message‘s value.
In MessagePrinter.swift file add the following inside the MessagePrinter class:
func getMessage() -> String {
    return message ?? ""
}
This method returns either the actual message if it’s not nil, or an empty string in case it’s nil.
Back to main.swift file, let’s use the above so the line that triggers the error to be fixed:
print("My original message was: \(printer.getMessage())")This time there is no problem, and we get the proper output by running the program.
However, despite the fact that the approach above works, the idea of creating a new method in order to get the value of each property is not right. There is a better way to do that using access levels.
To be precise, it’s possible to make a property maintain the private access level when setting its value, but keep the internal level when it comes to get its value. Here is how this is done in the message property of the MessagePrinter class:
private(set) var message: String?By doing so, we are now able to get the message value, but unable to set it out of the MessagePrinter class.
In main.swift file now we can access message normally:
print("My original message was: \(printer.message!)")If we enable the following:
printer.message = "Hehehe... I altered the original message!"then Xcode shows a new error indicating that it’s impossible to set a value to message property out of the MessagePrinter class:
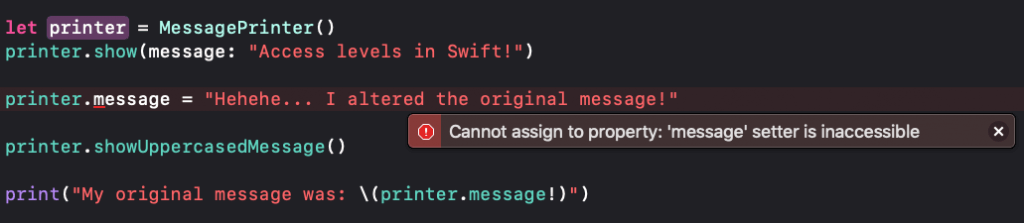
The getMessage() method is no longer needed in MessagePrinter class, as there is a better way to protect and access at the same time the message property!
Entities And Types With Different Access Levels
Sometimes does not only matter if an entity has been given an access level that makes it accessible from code out of the file or the type that was defined. It also matters whether that entity uses other entities with a more restrictive access level.
Think of the following example: Suppose that you have a method with an internal access level, but it returns a value of a custom type that has been given the private access level. What happens in such a case?
We’re about to find out, so go to MessagePrinter.swift file and start by adding the following enum as an inner custom type to MessagePrinter:
class MessagePrinter {
    enum MessageSize {
        case small, medium, long, none
    }

    ...
}
Still inside the MessagePrinter body, define the following new method. It returns a MessageSize value depending on how long the message is. If it’s nil, then it just returns the .none value:
class MessagePrinter {
    ...

    func getMessageSize() -> MessageSize {
        guard let message = message else { return .none }
        if message.count < 10 { return .small }
        else if message.count < 25 { return .medium }
        else { return .long }
    }
}
Right now, both the MessageSize enum and the getMessageSize() methods have the same access level, which is internal. Now, make the MessageSize enum private:
private enum MessageSize { ... }Here’s what happens:

Xcode shows a new error pointing to getMessageSize() method:
Method must be declared private because its result uses a private type
Quite clear, don’t you think? The error is caused because we are trying to return a value of a private type from a method with a less protective level. Even though getMessageSize() is allowed to be accessed by code out of MessagePrinter, MessageSize enum must remain protected inside the class, therefore using it as a result type is not allowed. Xcode also suggests a solution: Method must be declared private. So, in order to get rid of this error, we must also make getMessageSize() private as well. Alternatively, we can change MessageSize enum’s access level to internal.
So, what’s the conclusion here? It’s not allowed to use a type with a more restrictive access level to an entity with less restrictive access level. Both must have the same, or compatible access levels. For example, public and internal access levels would have the same result inside the same module.
Note that if the MessageSize private type had not been used as a result value, but only inside the body of the getMessageSize() method, then we would have no problem at all. To demonstrate that, first make the getMessageSize() method private:
private func getMessageSize() -> MessageSize { ... }Then, add the next, internal new method:
func isSmall() -> Bool {
    return getMessageSize() == .small
}
As you can see, Xcode shows no error here. Regardless of whether getMessageSize() is private and it also uses the private MessageSize, no problem really exists since all private entities are used inside the isSmall() method and nothing is exposed to third party code.
Let’s see another example, and this time let’s use structures as custom types. Open the Structs.swift file and add the following two structure implementations:
struct SizeStruct {
    var width: CGFloat?
    var height: CGFloat?
}


struct Shape {
    private var size: SizeStruct

    // Other properties that describe a shape...

    init(withSize size: SizeStruct) {
        self.size = SizeStruct()
        self.size.width = size.width
        self.size.height = size.height
    }
}
The first structure, called SizeStruct contains two properties that describe the width and height of a size value. The second structure is supposed to represent a shape programmatically, and among other properties that describe it, it also contains a SizeStruct object in order to keep the shape’s size. Shape size is declared as private so it’s visible only inside the Shape struct.
Both structures have the internal access level, as it’s the one automatically assigned given that we did not explicitly set another one. That means that both structures are accessible by other parts of code out of that file inside the project.
Let’s change now the access level of the SizeStruct structure to file-private:
fileprivate struct SizeStruct { ... }Instantly Xcode shows a complication:
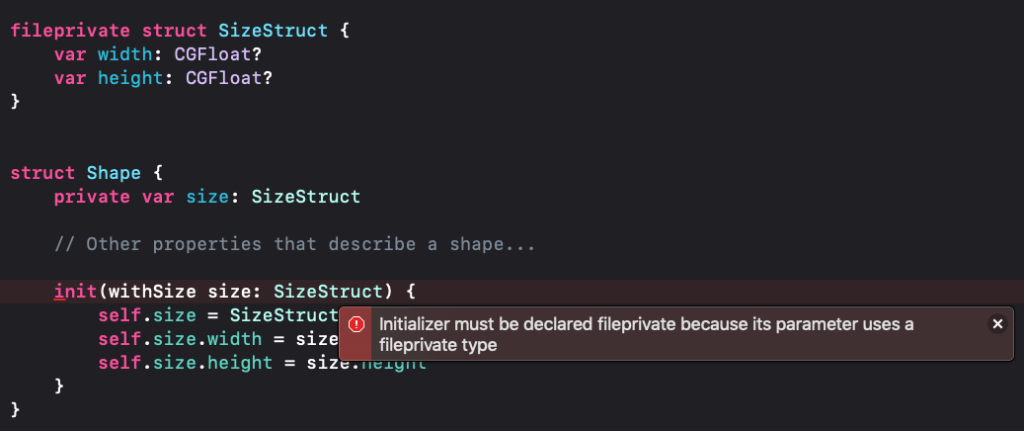
The message that describes the error says:
Initializer must be declared fileprivate because its parameter uses a fileprivate type
The problem in this case is that we have a method, an initializer in particular here, that has a parameter value with a lower access level than the one that the initializer has. In other words, we cannot initialize a Shape object using that specific initializer because it’s using a parameter value of a strictly protected type. But once again, the root of the error is the exact same to the one we met in the previous example with the MessageSize enum and the getMessageSize() method. We cannot use a type or entity with a more restrictive protection level to another entity with a less restrictive access level.
The workaround here would be:
- either to remove the file-private level from the
SizeStructstruct, - or to define two separate parameter values that describe the width and height, and use those in order to set values to the
sizeobject inside the initializer:
init(width: CGFloat, height: CGFloat) {
    size = SizeStruct()
    size.width = width
    size.height = height
}
Note that the same problem as above would exist if the SizeStruct had been marked as private.
Access Levels And Protocols
Let’s carry on now by going through a few examples that regard Swift protocols and access levels. Open the Protocols.swift file and add the following protocol definition:
protocol MathOperations {
    func add(op1: Double, op2: Double) -> Double
}
This protocol is supposed to contain methods that perform simple math operations.
Right below the protocol add the following class that adopts the MathOperations protocol:
class MathMaker: MathOperations {

    init() { }

}
Xcode will display the error: Type ‘MathMaker’ does not conform to protocol ‘MathOperations’. That’s because the add(op1:op2:) required method is not implemented by the MathMaker class. To fix that, either click on the proposed Fix button, or copy and paste the following in the MathMaker class:
class MathMaker: MathOperations {
    init() { }

    // Add this method to conform to MathOperations protocol.
    func add(op1: Double, op2: Double) -> Double {
        return op1 + op2
    }
}
Switch now to main.swift file where we are going to initialize an object of the MathMaker class, and then call the add(op1:op2:) method in order to add two numbers:
let mathMaker = MathMaker()
let sum = mathMaker.add(op1: 2.5, op2: 4.5)
print(sum)
If you run the program you will see the result in the output area:
7.0
Program ended with exit code: 0
So far, so good. Back to the Protocols.swift file again, change the default internal access level of the MathOperations protocol to private:
private protocol MathOperations { ... }You see that nothing changes, even though MathOperations has been marked as private. That’s because the add(op1:op2:) method implementation is internal and still accessible by the main.swift file.
Go to the add(op1:op2) method declaration now in the MathOperations protocol and change the access level to private. Xcode shows an error that says:
‘private’ modifier cannot be used in protocols
It also provides a button to remove it. Actually, try to set various access levels. You will notice that for all cases except for the internal, Xcode prompts to remove the access level specifier.
So, that means that access levels cannot be specified in methods declared inside a protocol. Remove it.
Next, inside the MathMaker class change the access level of the add(op1:op2) method to private as well. Xcode shows another error this time:
Method ‘add(op1:op2:)’ must be declared fileprivate because it matches a requirement in private protocol ‘MathOperations’
Keep experimenting by changing the MathOperations protocol access level to internal, and by keeping the add(op1:op2) method in the MathMaker class private. There’s a new error message:
Method ‘add(op1:op2:)’ must be declared internal because it matches a requirement in internal protocol ‘MathOperations’
Change the MathOperations access level now to public. The error message changes again:
Method ‘add(op1:op2:)’ must be as accessible as its enclosing type because it matches a requirement in protocol ‘MathOperations’
Finally, change one last time the MathOperations access level to file-private. Here’s the error message:
Method ‘add(op1:op2:)’ must be declared fileprivate because it matches a requirement in fileprivate protocol ‘MathOperations’
The conclusion that results from the above experiments is clear:
The access level of the protocol’s methods that are defined in another type (like the MathMaker class here) must be equal to or less restrictive than the access level specified to the protocol, depending on the case.
Let’s suppose that you make both protocol and the method inside the MathMaker class file-private, so protection levels match. In that case, add(op1:op2:) method becomes inaccessible from the main.swift file, so a new error is appearing there.
Let’s try something else now. Comment out or delete the add(op1:op2:) method in the MathMaker class, and add the following protocol extension right after the MathOperations protocol:
extension MathOperations {
    func add(op1: Double, op2: Double) -> Double {
        return op1 + op2
    }
}
This extension is meant to provide a default implementation of the methods declared in the protocol.
Remove now any access level specified to the MathOperations protocol (or specify the internal level), and set the private level to the add(op1:op2:) method inside the protocol’s extension:
internal protocol MathOperations { ... }

extension MathOperations {
    private func add(op1: Double, op2: Double) -> Double { ... }
}
add(op1:op2:) method is no longer visible to MathMaker class, therefore an error saying that Type ‘MathMaker’ does not conform to protocol ‘MathOperations’ shows up. That’s expected to happen, so change the access level of the method to file-private:
fileprivate func add(op1: Double, op2: Double) -> Double { ... }The fileprivate level of the method does not match to the internal level of the protocol, so Xcode prompts to change the access level of the method:
Method ‘add(op1:op2:)’ must be declared internal because it matches a requirement in internal protocol ‘MathOperations’
A similar message would appear if we would mark MathOperations protocol as public:
Method ‘add(op1:op2:)’ must be as accessible as its enclosing type because it matches a requirement in protocol ‘MathOperations — Mark the instance method as ‘internal’ to satisfy the requirement’
In both cases Xcode provides a Fix button to automatically fix the problem, and see that in both cases it suggests to use the internal access level. Notice also that so far the protocol has a less restrictive level, while we are trying to set a more restrictive access level to the method in the protocol’s extension.
So, it’s obvious that this cannot happen, and that:
- the access levels of the protocol and the methods in the protocol’s extension must be the same,
- or methods should be marked as internal,
- or methods should have a less restrictive access level than the protocol’s.
Private access level is the only exception to the above, as it totally hides the method implementation in the protocol extension to types that adopt the protocol.
To verify the last option presented above, set the private or file-private level to protocol, and either the internal or public to add(op1:op2:) method in the protocol’s extension. You will notice that MathMaker class can now “see” the method from the extension, but the problem is in the main.swift file. The more restrictive protection level of the protocol prevails over the less restrictive level of the method in the extension, so eventually the method is not accessible in the main.swift file according to Xcode’s message:
‘add’ is inaccessible due to ‘private’ protection level
Generally, it’s up to you to decide if and when you’ll set different access levels to methods than the one that has been specified to the protocol when providing default implementations through protocol extensions. Most of the times it won’t be necessary to do that, unless you want to keep some methods inside the file or module that they were defined (for example, in the scope of a library only), and have some others publicly accessible from other modules or parts of code within the same module.
Modules And Access Levels
Time to talk about how access levels work when using other modules into a project, and to see what kind of limitations come up that do not exist when all code lies within the same module. To start, let’s make clear what a module is. According to Apple docs:
A module is a single unit of code distribution—a framework or application that is built and shipped as a single unit and that can be imported by another module with Swift’s import keyword.
Each build target (such as an app bundle or framework) in Xcode is treated as a separate module in Swift. If you group together aspects of your app’s code as a stand-alone framework—perhaps to encapsulate and reuse that code across multiple applications—then everything you define within that framework will be part of a separate module when it’s imported and used within an app, or when it’s used within another framework.
Also, according to Wikipedia:
Modular programming is a software design technique that emphasizes separating the functionality of a program into independent, interchangeable modules, such that each contains everything necessary to execute only one aspect of the desired functionality.
I’ll add to the above two definitions what I have already mentioned: Any library, framework, or even another project that you add into your project and you’re using the import statement in order to make it available into your source files is a module.
To demonstrate modules and access levels, there’s a sample Swift Package in the starter pack you downloaded and that should be added to our demo Xcode project. Open Finder and Xcode side by side, and drag and drop the AccessLevelsPackage folder to Project Navigator in Xcode.
Then, click on the AccessLevels project in the Project Navigator, make sure that the General tab and the AccessLevels target are selected, and click on the plus (+) button under the Frameworks and Libraries section.
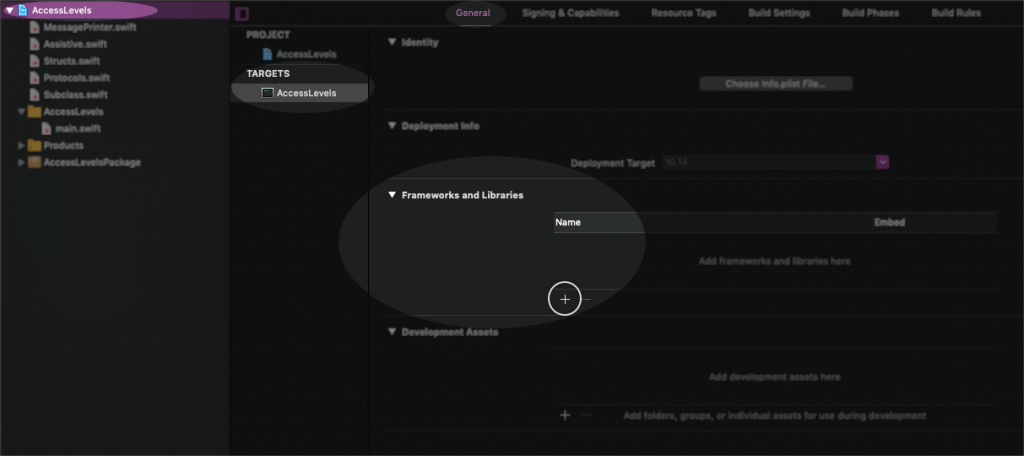
In the window that will show up, locate and select the AccessLevelsPackage library, and then click on the Add button.
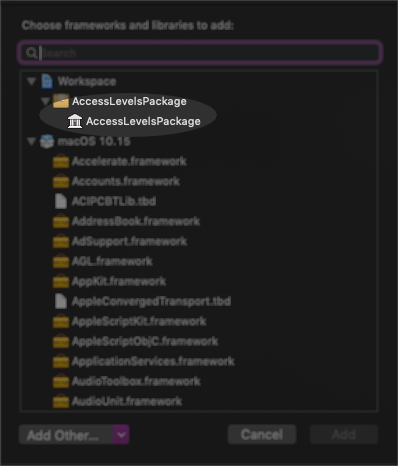
At the end, you should be seeing AccessLevelsPackage in the Frameworks and Libraries section. Doing the above will make possible to use the import statement and include the AccessLevelsPackage module anywhere we want in our project.

Note: If you haven’t done it already, then now it’s a good time to take a quick look at the contents of the AccessLevelsPackage’s package. You will find a simpler version of the MessagePrinter class that we met above already, the SimpleMessagePrinter, and the BasicMathOperations protocol in homonymous files.
Accessing Code Into The Package
Modules contain code. But they must provide ways to make that code accessible, or more precisely, they must provide a public API (application programming interface) to other modules so that code can be actually used. A module does not have to disclose everything to other modules or entities out of it; whatever can be kept internally, should be kept internally. But there should be public access points that make possible the use of the module’s features.
Currently there’s nothing public in the AccessLevelsPackage that the AccessLevels project can have access to. If you explore both simple code files it includes you will instantly find this out. To see what’s the effect of that out of the module, open the main.swift file and start by importing the package:
import Foundation

// Import the package...
import AccessLevelsPackage
Next, let’s create a new instance of the SimpleMessagePrinter class that has been defined in the module:
let printer = SimpleMessagePrinter()Note: You might want to comment out any content you added previously in the main.swift file.
Xcode will display the error:
Use of unresolved identifier ‘SimpleMessagePrinter’:

That’s happening because the AccessLevels module (our original project) cannot see the SimpleMessagePrinter class; it exists in a different module, the AccessLevelsPackage, therefore it cannot be accessed.
The current access level of the SimpleMessagePrinter is set to internal by default, and that makes it visible only within the AccessLevelsPackage module. Not outside of it.
Let’s change that, so open the SimpleMessagePrinter.swift file in the AccessLevelsPackage (make sure to expand it first in the Project Navigator), and add the public level specifier in front of the SimpleMessagePrinter class:
public class SimpleMessagePrinter {
    ...
}
Switch back to main.swift file and press Cmd+B to build the project. There’s a new message now from Xcode:
‘SimpleMessagePrinter’ initializer is inaccessible due to ‘internal’ protection level
We come to realize here that not only we need a public class, but also a public initializer as well! So, in the SimpleMessagePrinter.swift change the access level of the init() method to public too:
public class SimpleMessagePrinter {

    public init() { }

    ...
}
Press once again Cmd+B to build the project. This time everything should be okay.
Note: Changes made to another module that has been added to the project like the AccessLevelsPackage here are not instantly visible to the entire project. That’s why it’s always necessary to build after every edit.
In the main.swift file now, let’s use the show(message:) method of the SimpleMessagePrinter class to print a message:
printer.show(message: "This message is printed from another module!")Xcode is complaining again about the access level of the method:
‘show’ is inaccessible due to ‘internal’ protection level
It’s like Xcode is saying: “Change the access level of the show method if you really want to access it!”
So, let’s do that. In the SimpleMessagePrinter.swift again set the public access level to show(message:) method:
public func show(message: String) { ... }Build the project again, or even better, run it. There should be no problem now so you will get the message specified in the output area of Xcode.
SimpleMessagePrinter class contains the message stored property that has been marked as private(set) so its value can be set only privately in the class. However, can we access it from the main.swift file or anywhere else out of the AccessLevelsPackage module?
Yes, we can. All we need is to make it public too:
public private(set) var message: String?By doing the above we can access the message property and get its value from anywhere in our project. For example, the following will work in the main.swift file as message is accessible through the printer object:
print(printer.message)You realize at this point that whatever has to be used out of its defining module must be declared as public (or open as we’ll see right next). The collection of the public entities consist of the public API that AccessLevelsPackage provides.
Subclassing A Class That Exists In A Different Module
In a previous part of the tutorial we subclassed the MessagePrinter class that was defined in the MessagePrinter.swift file. That was easy to do, as both the parent class and its subclass either existed in the same file, or in different files but in the same module (the AccessLevels projects), so MessagePrinter was easily accessible by its subclass.
We’ll make now another experiment: We’ll subclass the SimpleMessagePrinter that is defined in the AccessLevelsPackage package to AccessLevels project. Open the Subclass.swift file and first of all import the AccessLevelsPackage:
import AccessLevelsPackageThen, define the following class:
class ChildPrinter: SimpleMessagePrinter {

}
Xcode shows the next error:
Cannot inherit from non-open class ‘SimpleMessagePrinter’ outside of its defining module
It makes it clear that the SimpleMessagePrinter class has not been marked as open, and since it lives in a different module it’s not possible to create a subclass of it out of that module.
So, in the SimpleMessagePrinter.swift file change the access level of the SimpleMessagePrinter from public to open and press Cmd+B to build again:
open class SimpleMessagePrinter { ... }What changes with that? Open access level is similar to public, so classes marked as open are accessible outside of their defining module. However, the addition that comes with open is that it makes subclassing possible.
Let’s add the following custom initializer now to Subclass.swift file:
class ChildPrinter: SimpleMessagePrinter {
    init(withMessage message: String) {
        super.init()
        self.message = message
    }
}
This initializer initiates a new instance of the class and accepts a message as an argument. Once the super.init() is called to initialize the parent, it’s trying to assign the given message to the message property of the parent class.
But now, here it comes again the next Xcode error:
Cannot assign to property: ‘message’ setter is inaccessible
Of course, message property has been marked with the private(set) access level in the SimpleMessagePrinter class. So, how can we work around this problem?
One solution would be to remove the private(set) level and have the message property public, available both for get and set operations. However, we would take the risk that way to allow unwanted access to message from parts of code that should not be able to set its value. Given that there’s not a protected access level specifier as we said in a previous part of the tutorial, the best approach would be to have a custom initializer in the SimpleMessagePrinter class too that accepts the message as an argument. In the SimpleMessagePrinter class inside the SimpleMessagePrinter.swift file add this:
public init(withMessage message: String) {
    self.message = message
}
And then in the ChildPrinter class update init with this:
override init(withMessage message: String) {
    super.init(withMessage: message)
}
Notice that the override keyword is necessary in the beginning of the init method; parent has a similar initializer.
Building the program again produces no errors this time! What we’ve seen in this part so far covers how to subclass a class that exists in a different module using the open access level, and how to deal with a custom initializer. Why not to try to override a method too and see what is going to happen?
In the ChildPrinter class inside the Subclass.swift file override the one and only method of the SimpleMessagePrinter class:
override func show(message: String) {
    print(message.uppercased())
}
And what a surprise… another error from Xcode:
Overriding non-open instance method outside of its defining module
That message indicates that show(message:) method must be marked as open, as public is not enough to let it be overridden. So, here you can see that the open access level is not used only in classes, but in methods too when they are about to be overridden in subclasses that exist in other modules.
Fixing the above is easy; simply change the public access level to open in the show(message:) method of the SimpleMessagePrinter class in the AccessLevelsPackage module:
open func show(message: String) { ... }Our project now can build successfully!
Preventing Subclassing
In case you want to prevent a class from being subclassed, then you can mark it as final. The same specifier can be used with methods so it’s impossible to override them. To get a taste of that, change temporarily the open level of the SimpleMessagePrinter class to final public:
final public class SimpleMessagePrinter { ... }You will also need to change the open access level in show(message:) to public:
final public func show(message: String) { ... }Building now will make Xcode show the following two new errors in the Subclass.swift file:
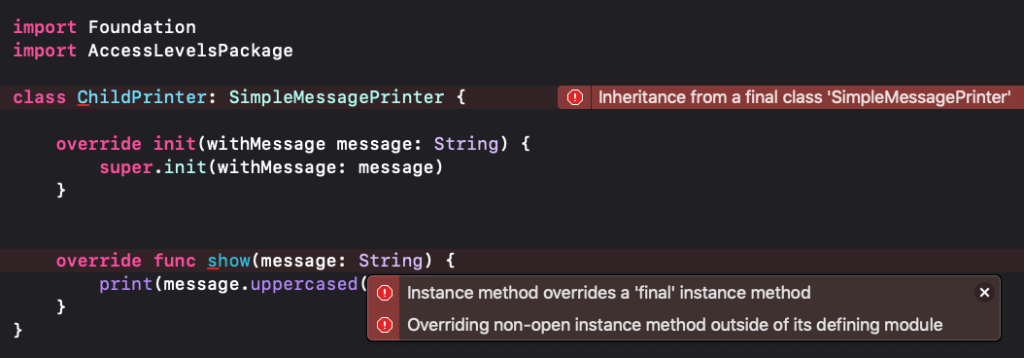
The first one regards the inheritance we’re trying to achieve for the ChildPrinter class:
Inheritance from a final class ‘SimpleMessagePrinter’
The second error regards the show(message:) method we’re trying to override:
Instance method overrides a ‘final’ instance method
Along with that, there’s also a message that we’ve seen already: Overriding non-open instance method outside of its defining module.
By marking SimpleMessagePrinter class as final, as well as doing the same in the show(message:) method, we prevented any effort to subclass the class and override the method respectively.
Note that final is not an access level specifier, rather an indication about whether a class is allowed to be subclassed, and a method to be overridden or not. Here we matched it with the public access level, but it can match with any of the other levels too, but not with open. Open allows subclassing and overriding, and it’s the exact opposite of the restrictions that final brings. So, open and final just don’t go together! If you try to do so Xcode won’t leave you with many options:
Class cannot be declared both ‘final’ and ‘open’
You can undo at this point the few recent changes you did for demonstrating final so Xcode errors to disappear.
Using Protocols Defined To Another Module
AccessLevelsPackage contains another source file besides the SimpleMessagePrinter.swift; that is the BasicMathOperations.swift that contains the definition of the BasicMathOperations protocol along with an extension that provides default implementation to the four methods that perform the four basic math operations.
By opening that file you will notice that there’s no special indication neither about the access level of the protocol, nor the implemented methods in the extension. Therefore, they have the default level, internal, and that makes them accessible only by parts of code inside their own module; AccessLevelsPackage.
Let’s try now to use that protocol in a class that we have already defined for that purpose in the Protocols.swift file, the MathMaker. For the sake of the examples in previous parts, this class already adopts the MathOperations protocol that is implemented inside the same source file:
class MathMaker: MathOperations { ... }Change that so it adopts the BasicMathOperations from the AccessLevelsPackage module:
class MathMaker: BasicMathOperations { ... }Also, don’t forget to import the module at the beginning of the file:
import AccessLevelsPackageSince BasicMathOperations protocol is accessible internally in its defining module only (AccessLevelsPackage), MathMaker class cannot access it, so the following error that Xcode shows is absolutely justified:
Use of undeclared type ‘BasicMathOperations’
Let’s switch back to BasicMathOperations.swift file, and let’s make the protocol public:
public protocol BasicMathOperations { ... }The above will make it accessible from the MathMaker class, but the following problem will come up:
Type ‘MathMaker’ does not conform to protocol ‘BasicMathOperations’
Do you want to add protocol stubs?
Xcode says here that the methods defined in the protocol must be implemented by the MathMaker class. But it shouldn’t be asking for that, since there’s a default implementation for them in the protocol’s extension. So, why is it doing that?
The problem is that even though the BasicMathOperations protocol has been marked as public, the implemented methods in the extension remain visible internally only; it’s mandatory to explicitly make them public too if we want to access them out of their module. They don’t get the access level of the protocol automatically.
So, in the BasicMathOperations.swift file let’s mark them as public:
extension BasicMathOperations {
    public func add(op1: Double, op2: Double) -> Double { ... }

    public func subtract(op1: Double, op2: Double) -> Double { ... }

    public func multiply(op1: Double, op2: Double) -> Double { ... }

    public func divide(op1: Double, op2: Double) -> Double? { ... }
}
Building the program now succeeds! Both protocol and the default implementation of its required methods are now public and they can be used by the MathMaker class. To make sure about that, let’s go to main.swift file and let’s make a few math operations:
let mathMaker = MathMaker()
print(mathMaker.add(op1: 12.5, op2: 67.48))
print(mathMaker.subtract(op1: 20, op2: 10))
print(mathMaker.multiply(op1: 5, op2: 25))
print(mathMaker.divide(op1: 12.8, op2: 0) ?? "Cannot divide with zero")
Here’s what is printed in the output area:
79.98
10.0
125.0
Cannot divide with zero
Program ended with exit code: 0
Conclusion
So, that discussion about access levels in Swift is about to come to its end. The examples that we went through in this tutorial were quite simple, but I believe that they demonstrated clearly how access levels are used in various situations.
As a final advice I’d like to recommend this: Use access levels even if you’re not importing other modules into your project. By doing so, you can hide file-specific or type-specific entities and implementations from the rest of the code, and make accessible only those entities (properties, methods, custom types) that you really need out of their defining file or type.
Knowing how to deal with access levels becomes mandatory especially when you create your own libraries and frameworks; you must know what entities will consist of the public API, and what to keep hidden inside the modules. I hope you enjoyed this post, and thanks for reading!


