Other than all the big features such as AsyncImage and searchable, the iOS 15 SDK also introduced some minor improvements to streamline the development of iOS apps. In this tutorial, we will show you how to use Markdown in SwiftUI’s Text view.
What’s Markdown
I assume you have used Markdown before, but in case if you have no idea what it is, let me give you a quick walkthrough. Created by John Gruber, Markdown is a lightweight markup language for adding formatting to a plain text document. Most importantly, it allows you to easily turn the formatted text into an HTML web page (or other types of documents). I have used Markdown for years to write my programming books. Because of its plain text nature, you don’t need any special tools to write Markdown, just a plain text editor is good enough.
Markdown is dead simple to learn and use. Let me show you a few examples. To bold some text, all you need to do is enclose the text in double asterisks (**):
**this text is bold**Similarly, to make the text italic, you use a single asterisk like this:
*this text is italic*You can cross the text like this:
~This text is removed~To format the text as a heading, you write the Markdown syntax like this:
# Heading 1 (Largest)
## Heading 2
### Heading 3
#### Heading 4
##### Heading 5
###### Heading 6 (Smallest)
To highlight a command or a line of code, you can enclose the text with single backticks. Here is an example:
To show all processess running on macOS, you can type `ps aux` in Terminal.You can easily embed hyperlinks in a document by wrapping link text in square brackets (i.e. []) and then specify the URL inside parentheses. Here is an example:
The tutorial is provided by [AppCoda](https://www.appcoda.com).When the text is rendered in HTML, it will show a hyperlink.
The above are just a few examples of the Markdown syntax. For details, you can refer to this document on GitHub.
Using Markdown in SwiftUI
I believe you should have some ideas about Markdown. So, how can you use Markdown in SwiftUI development? Starting from iOS 15, SwiftUI comes with built-in support for this markup language. You can easily format text using Markdown with the Text view.
To do that, all you need to do is pass the Text view with text in Markdown syntax. Here is a sample code snippet:
VStack(alignment: .leading) {
    Text("**Text in bold**")
    Text("*Text in italic*")
    Text("~This text is crossed out~")
    Text("`This line of code`")
    Text("You can [click this link](https://www.appcoda.com) to visit the website.")
}
If you enter the code in your SwiftUI project, Xcode will automatically format the text.

Of course, you can format a paragraph of text using Markdown. Here is another example:

Working with AttributedString
AttributedString in iOS 15, which is the Swift version of NSAttributedString, also has a built-in support of Markdown. To create an attributed string in Markdown, you write the code like this:
do {
    var text = var text = try AttributedString(markdown: "**This text is bold**")
} catch {
    print("Failed to create the attributed text")
}
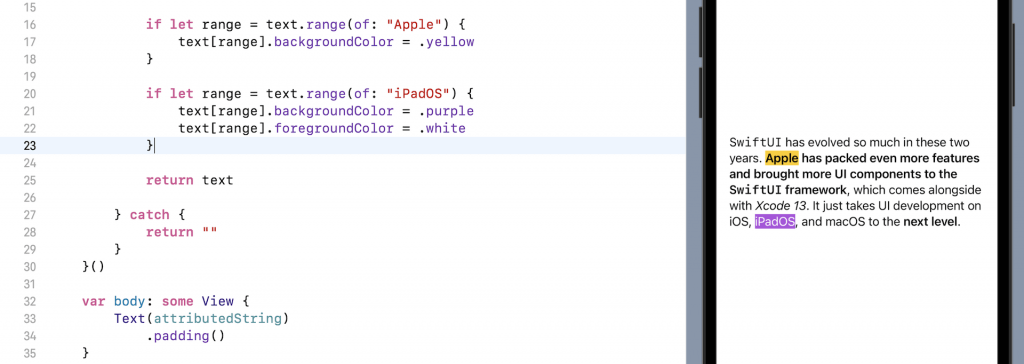
And, you can mix Markdown and apply your preferred styling to the text. Here is an example that highlights some text with various colors:
var attributedString: AttributedString = {
    do {
        var text = try AttributedString(markdown: "`SwiftUI` has evolved so much in these two years. **Apple has packed even more features and brought more UI components to the `SwiftUI` framework**, which comes alongside with *Xcode 13*. It just takes UI development on iOS, iPadOS, and macOS to the **next level**.")

        if let range = text.range(of: "Apple") {
            text[range].backgroundColor = .yellow
        }

        if let range = text.range(of: "iPadOS") {
            text[range].backgroundColor = .purple
            text[range].foregroundColor = .white
        }

        return text

    } catch {
        return ""
    }
}()
SwiftUI’s text component has a built-in support for AttributedString. You can simply pass it to the Text view for rendering.

Current Limitations
The current version of Swift doesn’t support all the Markdown syntax. For example, it can’t render heading, numbered list, and image. Hopefully, Apple will provide further improvement in future updates of SwiftUI.


