

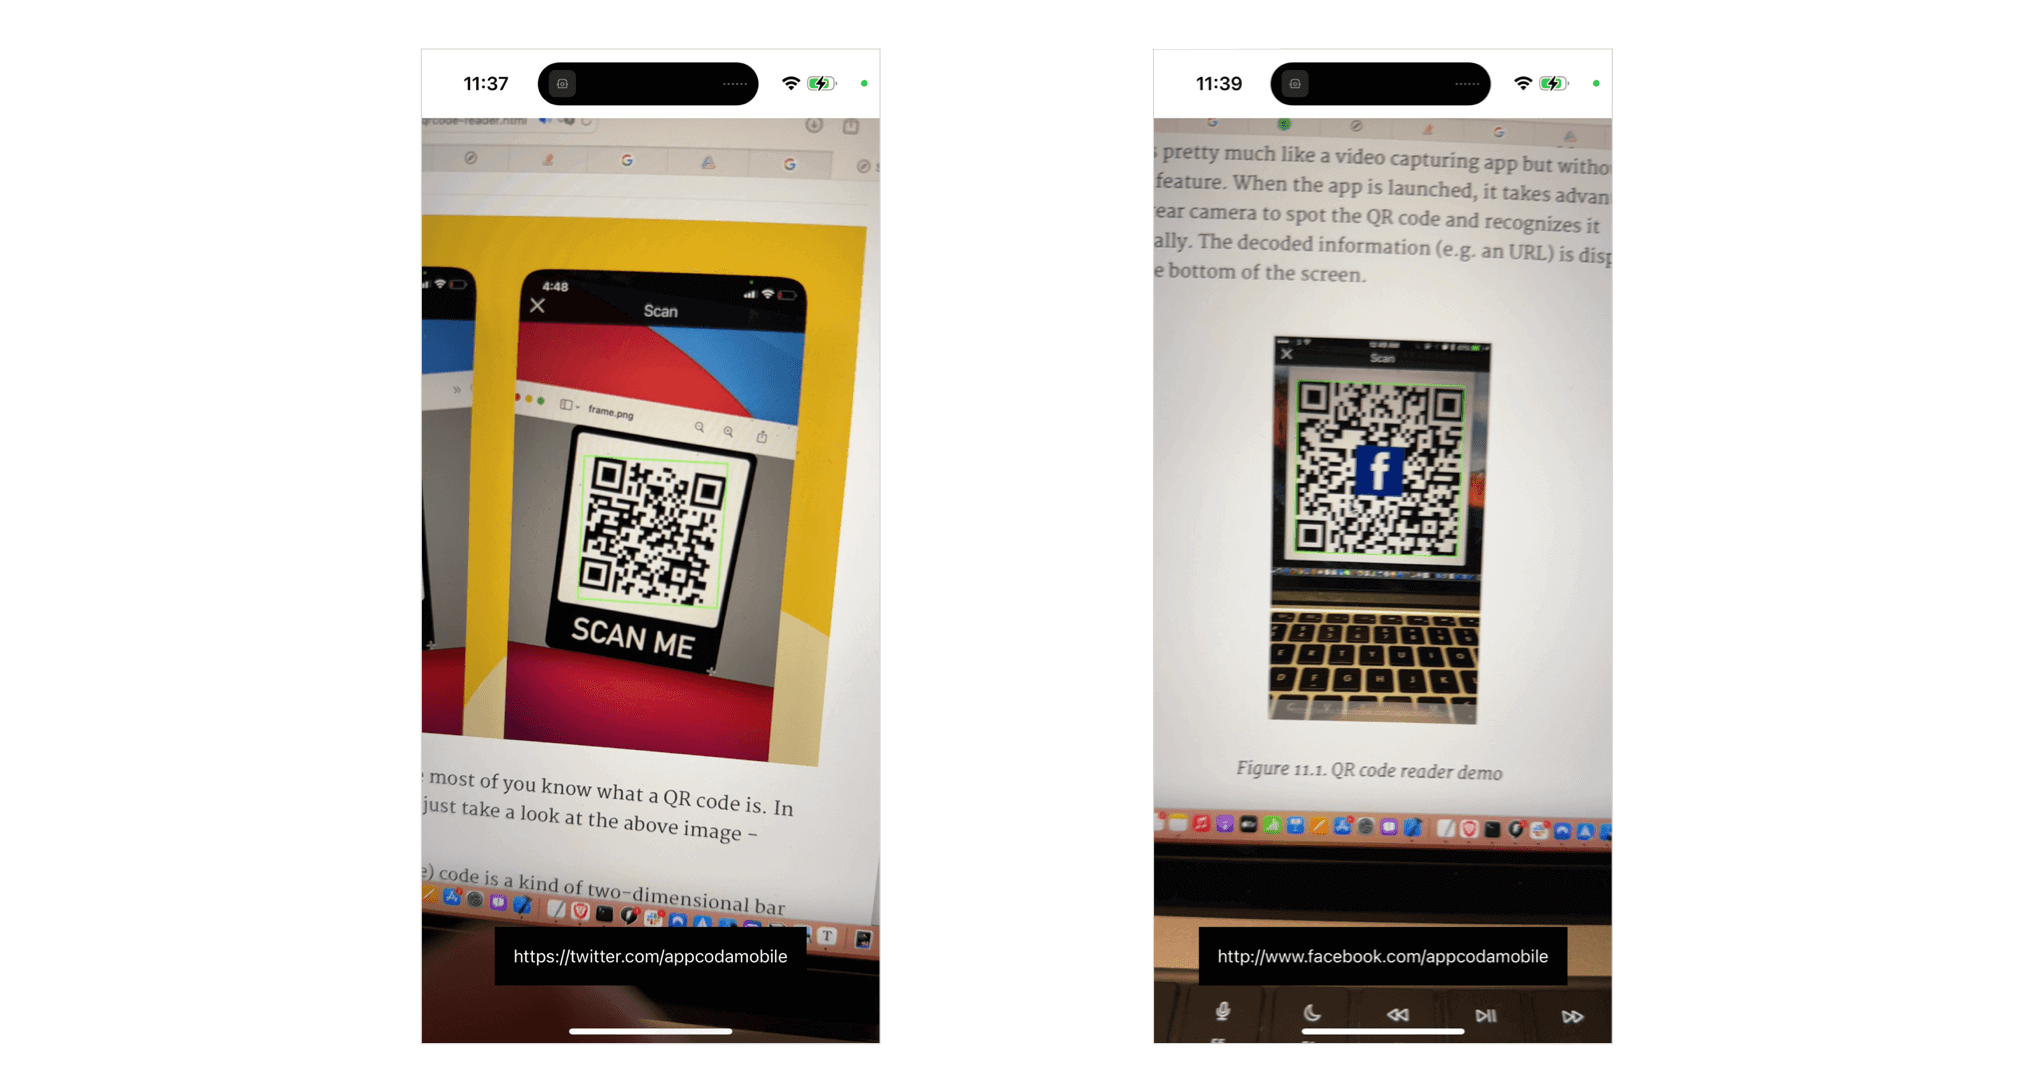
So, what’s QR code? I believe most of you know what a QR code is. In case you haven’t heard of it, just take a look at the above image – that’s a QR code.
QR (short for Quick Response) code is a kind of two-dimensional bar code developed by Denso. Originally designed for tracking parts in manufacturing, QR code has gained popularity in consumer space in recent years as a way to encode the URL of a landing page or marketing information. Unlike the basic barcode that you’re familiar with, a QR code contains information in both the horizontal and vertical direction. Thus, this contributes to its capability of storing a larger amount of data in both numeric and letter form. I don’t want to go into the technical details of the QR code here. If you’re interested in learning more, you can check out the official website of QR code.
As an iOS developer, you may wonder how you can empower your app to read a QR code. Earlier, I’ve written a tutorial on building a QR Code reader using UIKit and AVFoundation. With the release of SwiftUI, let’s see how the same QR Code Scanner app can be implemented using this new UI framework.
Take a Quick Look at the QR Code Scanner App
The demo app that we’re going to build is fairly simple and straightforward. Before we proceed to build the demo app, however, it’s important to understand that all types of barcode scanning in iOS, including QR code scanning, is totally based on video capture. Keep this point in mind, as it’ll help you understand this tutorial.
So, how does the demo app work?
Take a look at the screenshot below. This is how the app UI looks. The app works pretty much like a video capturing app but without the recording feature. When the app is launched, it makes use of the iPhone’s rear camera to spot a QR code and decodes it automatically. The decoded information (e.g. an URL) is displayed right at the bottom of the screen.
Now that you understand how the demo app works, let’s get started and develop the QR code reader app in SwiftUI.
Building the QRScannerController Class
The SwiftUI framework doesn’t come with a built-in API for launching the camera. To use the device’s camera, we need to use UIKit to build a view controller for capturing videos. And then we make use of UIViewControllerRepresentable to add the view controller to the SwiftUI project.
Assuming you’ve created a new SwiftUI project in Xcode, let’s first create a new Swift file named QRScanner.swift. In the file, import both SwiftUI and AVFoundation frameworks:
import SwiftUI
import AVFoundation
Next, implement a new class called QRScannerController like this:
class QRScannerController: UIViewController {
    var captureSession = AVCaptureSession()
    var videoPreviewLayer: AVCaptureVideoPreviewLayer?
    var qrCodeFrameView: UIView?

    var delegate: AVCaptureMetadataOutputObjectsDelegate?

    override func viewDidLoad() {
        super.viewDidLoad()

        // Get the back-facing camera for capturing videos
        guard let captureDevice = AVCaptureDevice.default(.builtInWideAngleCamera, for: .video, position: .back) else {
            print("Failed to get the camera device")
            return
        }

        let videoInput: AVCaptureDeviceInput

        do {
            // Get an instance of the AVCaptureDeviceInput class using the previous device object.
            videoInput = try AVCaptureDeviceInput(device: captureDevice)

        } catch {
            // If any error occurs, simply print it out and don't continue any more.
            print(error)
            return
        }

        // Set the input device on the capture session.
        captureSession.addInput(videoInput)

        // Initialize a AVCaptureMetadataOutput object and set it as the output device to the capture session.
        let captureMetadataOutput = AVCaptureMetadataOutput()
        captureSession.addOutput(captureMetadataOutput)

        // Set delegate and use the default dispatch queue to execute the call back
        captureMetadataOutput.setMetadataObjectsDelegate(delegate, queue: DispatchQueue.main)
        captureMetadataOutput.metadataObjectTypes = [ .qr ]

        // Initialize the video preview layer and add it as a sublayer to the viewPreview view's layer.
        videoPreviewLayer = AVCaptureVideoPreviewLayer(session: captureSession)
        videoPreviewLayer?.videoGravity = AVLayerVideoGravity.resizeAspectFill
        videoPreviewLayer?.frame = view.layer.bounds
        view.layer.addSublayer(videoPreviewLayer!)

        // Start video capture.
        DispatchQueue.global(qos: .background).async {
            self.captureSession.startRunning()
        }

    }

}
If you’ve read the previous tutorial, you should understand how the code works. Anyway, let me quickly walk you through the code again. As mentioned in the earlier section, QR code scanning is based on video capture. To perform a real-time capture, all we need to do is:
- Look up the back camera device.
- Set the input of the
AVCaptureSessionobject to the appropriateAVCaptureDevicefor video capturing.
So, in the viewDidLoad method, we initialize the back camera using AVCaptureDevice. Next, we create an instance of AVCaptureDeviceInput using the camera device. The input device is then added to the captureSession object. An instance of AVCaptureMetadataOutput is created and added to the same session object as an output to the capture session.
We also set the delegate object (AVCaptureMetadataOutputObjectsDelegate) for processing the QR code. When QR codes are captured from the receiver’s connection, they are vended to the delegate object. We haven’t implemented this delegate object yet and will do it later.
The metadataObjectTypes property is used to specify what kind of metadata we are interested in. The value of .qr clearly indicates that we just want to do QR code scanning.
The last few lines of the code above is to create the video preview layer and add it as a sublayer to the viewPreview view’s layer. This displays the video captured by the device’s camera on screen.
Integrating QRScannerController with SwiftUI
Now that we’ve prepared the view controller for capturing video and scanning QR code, how can we integrate it with our SwiftUI project. SwiftUI provides a protocol called UIViewControllerRepresentable to create and manage a UIViewController object.
In the same file, let’s create a struct named QRScanner that adopts the protocol:
struct QRScanner: UIViewControllerRepresentable {

    func makeUIViewController(context: Context) -> QRScannerController {
        let controller = QRScannerController()

        return controller
    }

    func updateUIViewController(_ uiViewController: QRScannerController, context: Context) {
    }
}
We implement the two required methods of the UIViewControllerRepresentable protocol. In the makeUIViewController method, we return an instance of QRScannerController. Since we do not need to update the state of the view controller, the updateUIViewController method is empty.
This is how you use a UIViewController object in SwiftUI project.
Using QRScanner
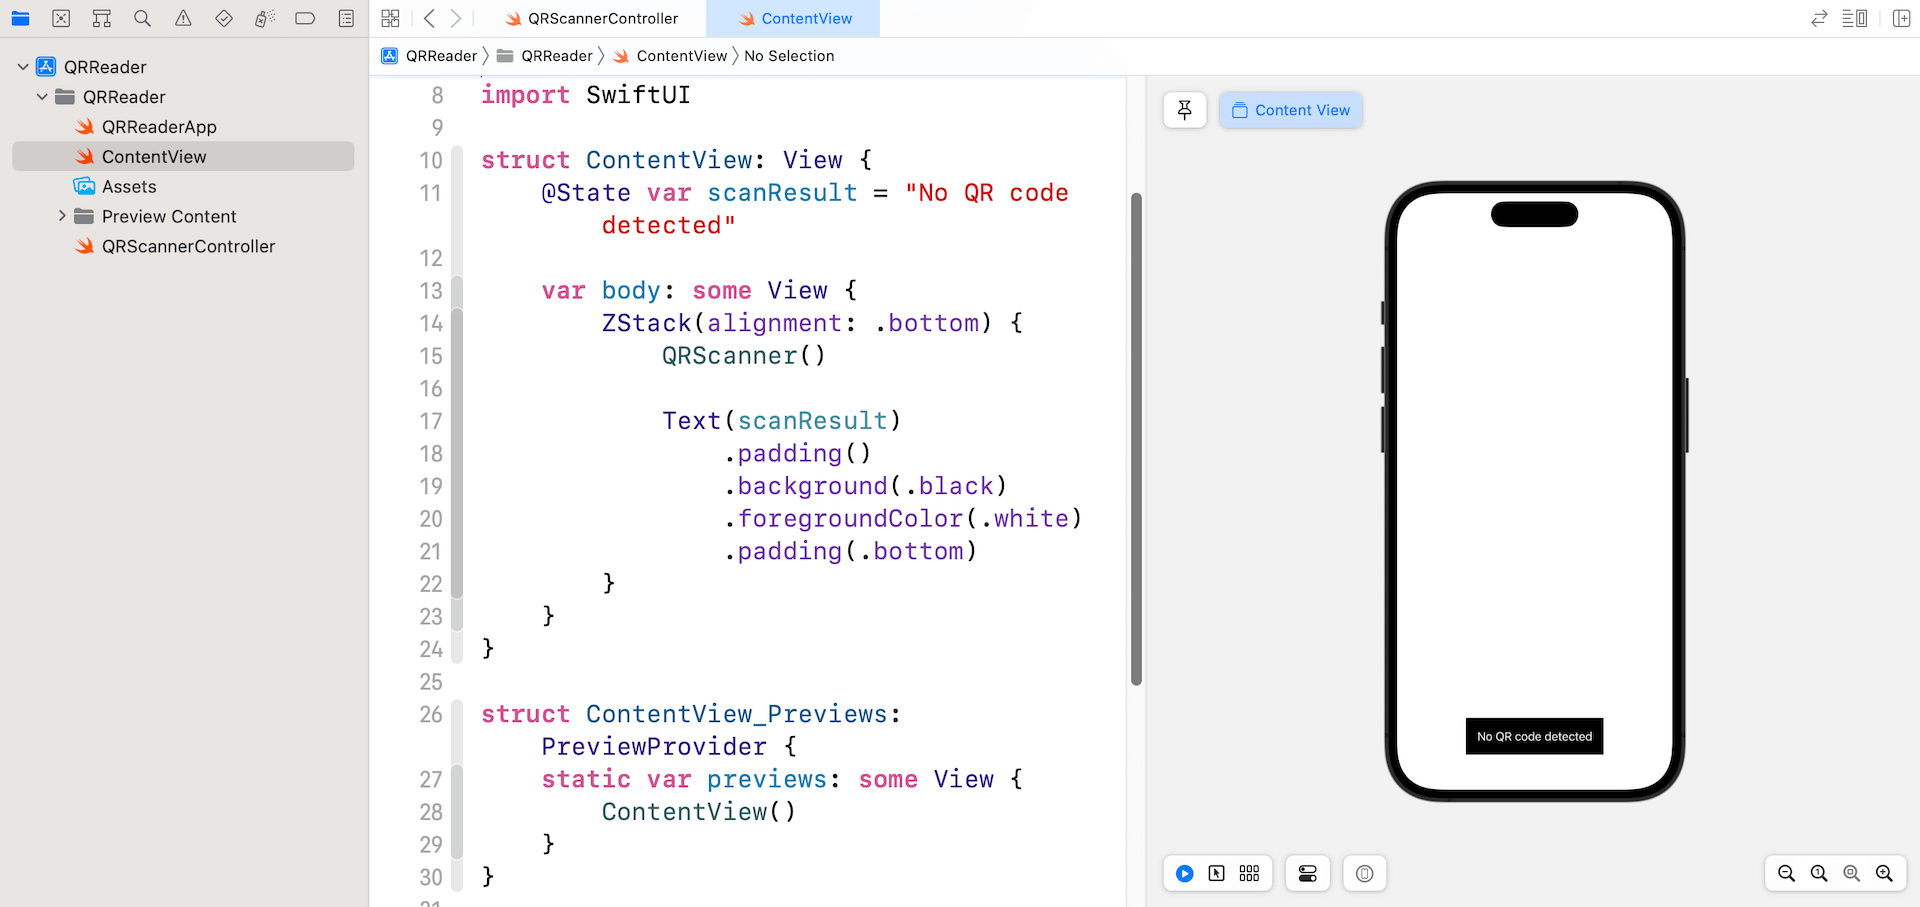
Now let’s switch over to ContentView.swift and use the QRScanner struct we just created. All you need to initialize in the body part of ContentView:
struct ContentView: View {
    @State var scanResult = "No QR code detected"

    var body: some View {
        ZStack(alignment: .bottom) {
            QRScanner()

            Text(scanResult)
                .padding()
                .background(.black)
                .foregroundColor(.white)
                .padding(.bottom)
        }
    }
}
I also added a text label for displaying the result of QR scan. In the simulator, it only displays the text label. Later, if you run the app in a real device (iPhone/iPad), the app should start the built-in camera.
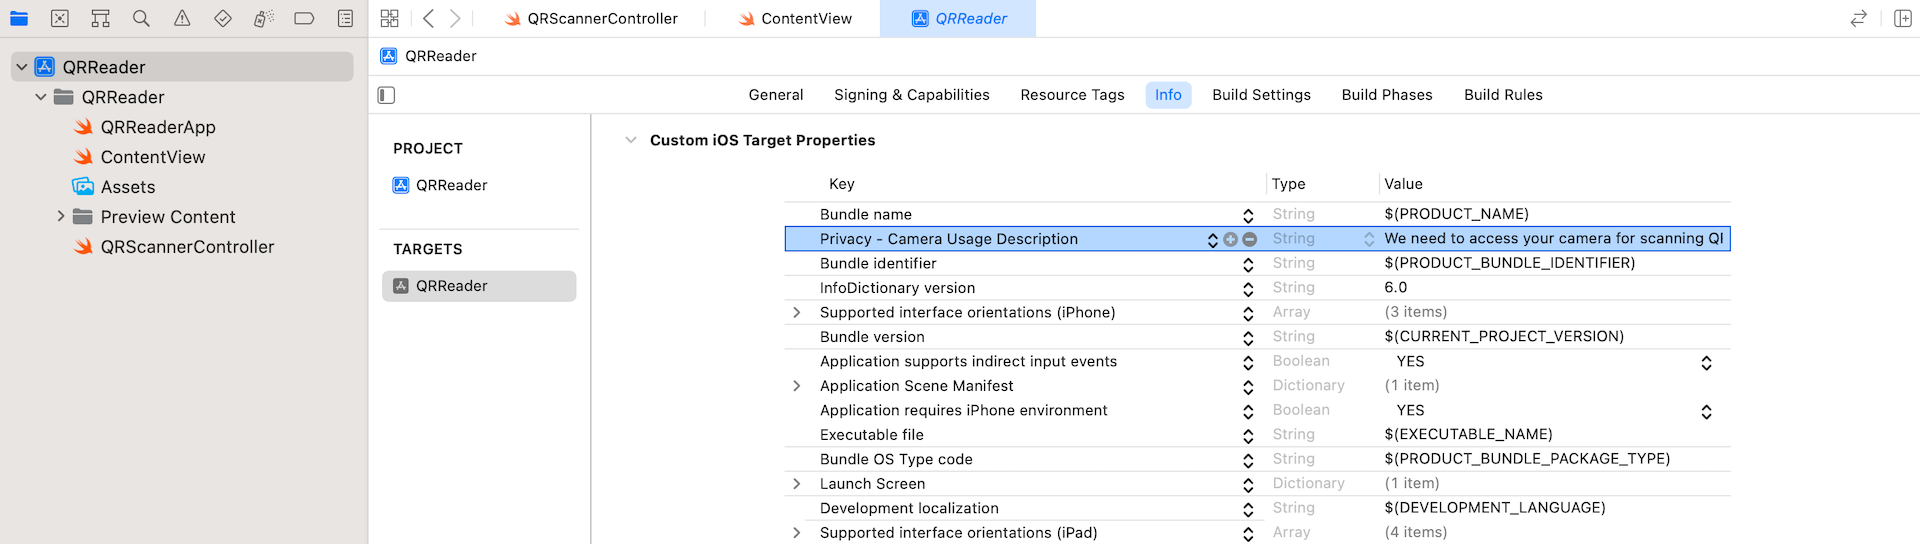
Before you can successfully launch the app, you have to add a key named NSCameraUsageDescription in the Info.plist file. In the project navigator, select the project file and go to the Info section. Add a new row and set the key to Privacy – Camera Usage Description. For its value, set it to We need to access your camera for scanning QR code.
If you run the app now, it should automatically access the built-in camera and start capturing video. However, the QR code scanning doesn’t work yet.
Handling Scan Results
In ContentView, we have a state variable to store the scan result. The question is how can the QRScanner (or QRScannerController) pass the decoded information of the QR code back to ContentView?
If you are not forgetful, we haven’t implemented the delegate (i.e. the instance of AVCaptureMetadataOutputObjectsDelegate) for processing the QR code. The following delegate method of AVCaptureMetadataOutputObjectsDelegate is required to be implemented:
optional func metadataOutput(_ output: AVCaptureMetadataOutput, didOutput metadataObjects: [AVMetadataObject], from connection: AVCaptureConnection)The task of this delegate is to retrieve the decoded information and pass it back to the SwiftUI app. To exchange data between the view controller object and the SwiftUI interface, we need to provide a Coordinator instance, which also adopts the AVCaptureMetadataOutputObjectsDelegate protocol, to handle those interactions.
First, declare a binding in QRScanner:
@Binding var result: StringNext, insert the following code in QRScanner to set up the Coordinator class:
class Coordinator: NSObject, AVCaptureMetadataOutputObjectsDelegate {

    @Binding var scanResult: String

    init(_ scanResult: Binding<String>) {
        self._scanResult = scanResult
    }

    func metadataOutput(_ output: AVCaptureMetadataOutput, didOutput metadataObjects: [AVMetadataObject], from connection: AVCaptureConnection) {

        // Check if the metadataObjects array is not nil and it contains at least one object.
        if metadataObjects.count == 0 {
            scanResult = "No QR code detected"
            return
        }

        // Get the metadata object.
        let metadataObj = metadataObjects[0] as! AVMetadataMachineReadableCodeObject

        if metadataObj.type == AVMetadataObject.ObjectType.qr,
           let result = metadataObj.stringValue {

            scanResult = result
            print(scanResult)

        }
    }
}
The class has a binding for updating the scan result. This is how we pass the scan result back to the SwiftUI objects.
To process the scan result of QR codes, we also implement the metadataOutput method. The second parameter (i.e. metadataObjects) of the method is an array object, which contains all the metadata objects that have been read. The very first thing we need to do is make sure that this array is not nil, and it contains at least one object. Otherwise, we set the value of scanResult to No QR code detected.
If a metadata object is found, we check to see if it is a QR code and decode the embedded data. The decoded information can be accessed by using the stringValue property of an AVMetadataMachineReadableCode object.
Once we prepare the Coordinator class, insert the following method to create the Coordinator instance in QRScanner:
func makeCoordinator() -> Coordinator {
    Coordinator($result)
}
Also, update the makeUIViewController method like below. We have to assign the coordinator object to the controller’s delegate:
func makeUIViewController(context: Context) -> QRScannerController {
    let controller = QRScannerController()
    controller.delegate = context.coordinator

    return controller
}
The project is almost complete. Now switch back to ContentView.swift. Update QRScanner() like below to pass the scan result:
QRScanner(result: $scanResult)That’s it! You are ready to go! Hit the Run button to compile and test the app on a real device.


