

By using a combination of SwiftUI and WidgetKit, you can increase the visibility of your app’s content and enhance the user experience by placing one or more “widgets” on the user’s iOS Home screen, macOS Notification Center, and/or iOS Today View.
Widgets should display your app’s most relevant content, allowing users to get important information with a glance. When a user taps/clicks a widget, they go straight to your app and should land on a page that gives them more details about what they just glanced at. Take a look at your iPhone’s Today View right now. There are widgets for weather, battery power, maps, stock exchanges — with many more available. For example, you can get an almost-instant read on the current atmospheric conditions by glancing at one of several available weather widgets. This time of year, before I leave the house, I glance at the weather widget to determine if I need a coat and hat before going outside. If I want to get the forecast for later in the day, I just tap on that weather widget to open the respective weather app.
Since widgets display content with SwiftUI views, they are generally easy to create and portable across Apple’s devices, like iPhones and Macs. Each of your apps can provide multiple widgets, multiple instances of the same or different widgets, and three different sizes of the same widgets.
Let’s talk about at an example of design considerations for building a widget, from my sample project. You should click that link and download my project to follow along with this article. I used Xcode 13.1 to write this sample app and iOS 15.0 on the Simulator and on an iPhone 12 to test.
My “Events” app has a widget that shows the important events that occur during a workday along with the times at which they occur. Look at the following two images. The first highlights my widget showing the events of the day in fast motion, because we wouldn’t want to wait to watch the widget over a 15-hour period. The widget simply shows the nearest-occurring event and its time; information that can be seen at a glance. The second image shows what happens when you tap on the widget: the app opens showing all the events of the day including the one that was being shown in the widget at the time of the tap. Remember that this app is a proof of concept highlighting WidgetKit and SwiftUI, and is not fully-functional.
It should be apparent to you by now that, because of a widget’s limited amount of space, it should only display information that users see as most valuable in your app. Don’t clutter things up. Design for simplicity, ease of use, and elegance.
Because widgets are portable between iOS and macOS, are pretty small, and should convey concise, glanceable information, SwiftUI is the perfect tool to use for building their user interfaces. Indeed, WidgetKit requires that you use SwiftUI views to design and render widgets’ content.
A word about my sample app
The sample app that we’ll walk through in this article is very simple and not fully functional on purpose. I want you to get a basic understanding of SwiftUI and WidgetKit without getting bogged down in a bunch of implementation details about how a daily to-do list app would be written. My app implements just enough of a to-do list to introduce you to SwiftUI and WidgetKit; the rest is a facade.
So, if fully functional, my app would allow a user to define 5 to 6 essential life events in a day, assign times to those events, and, at any time, glance at the widget to see the nearest approaching event, based on some type of timing algorithm. If the app was completed, tapping on the widget would take a user to a detail screen for the nearest event where one could, say, make some notes, set a reminder or alarm, add contacts, add directions, then go back to the main summary screen showing a list of all the day’s events and times, and edit another event. Since my app is still a prototype, when the user taps on the widget (or opens the app itself), he or she is sent directly to a screen to see a read-only list of events and times.
Creating the base app
Let’s walk through the steps I went through to develop my sample “Events” app. I made it a SwiftUI-based app. Open Xcode 13.x and go to:
- New > Project…
- On the Choose a template for your new project: screen, select iOS and App, then click Next.
- On the Choose options for your new project: screen, fill in Product Name: with “Events,” select your own Team:, set your own Organization Identifier:, set the Interface: to “SwiftUI,” set the “Language:” to “Swift,” then click Next.
- Select the new project location and click Create.
The new app will have two code files, “EventsApp.swift” and “ContentView.swift.” We’ll leave “EventsApp.swift” alone. It’s custom App protocol conformer, EventsApp, provides the entry point into the app and will render the simple user interface defined in “ContentView.swift.”
Take a look at “ContentView.swift.” I wrote a simple declarative SwiftUI user interface (UI) using the struct named ContentView. The app’s entire UI is in the body member of the ContentView:
import SwiftUI

let events = ["Wake up", "Breakfast", "Go to work", "Lunch", "Come home", "Go to sleep"]
let eventTimes = ["7:00 AM", "8:00 AM", "8:30 AM", "12:00 PM", "5:00 PM", "11:00 PM"]

struct ContentView: View {

    var body: some View {

        // Screen title
        Text("Daily Events").bold().italic().padding()

        // List of daily events with times
        Form {
            ForEach(0..<events.count) { event in
                Text("- \(events[event]) [ \(eventTimes[event]) ]")
            }
        }.padding().border(Color.blue)

    } // end body

} // end ContentView
First, I used a Text view to give my list of events a title, using some view modifiers to highlight that title (.bold().italic().padding()). Then I used a Form view as the main container for the app’s list of events because, in real life, I’d allow editing of my events here. Right now, the app only displays the events and their times read-only, but always think ahead. The ForEach writes out the events and their respective times as Text views, one per line, for all to-do list items that I’ve stored in arrays. The Form has a colored border and some padding around it. There’s a reason I used 2 arrays and it has to do with widgets auto-updating, but that’s beyond the scope of this article.
Running the “Events” app now shows this screen:
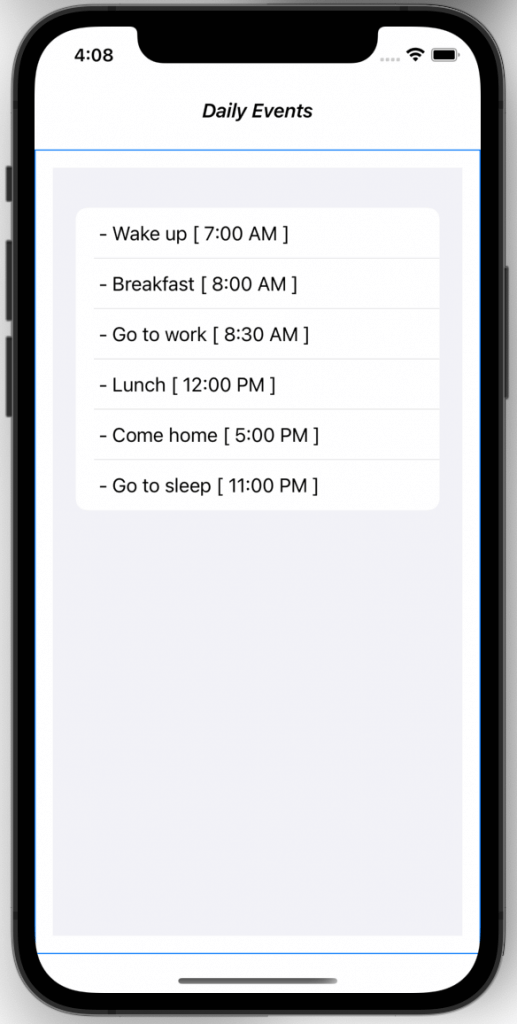
For those of you following along, test your “Events” app and make sure it looks like the previous picture.
Adding the WidgetKit extension
Widget functionality can be added to the SwiftUI “Events” app I started up above. All’s I have to do is to add a new target — a WidgetKit extension — to my existing app. Head back to Xcode 13 and go to:
- File > New > Target…
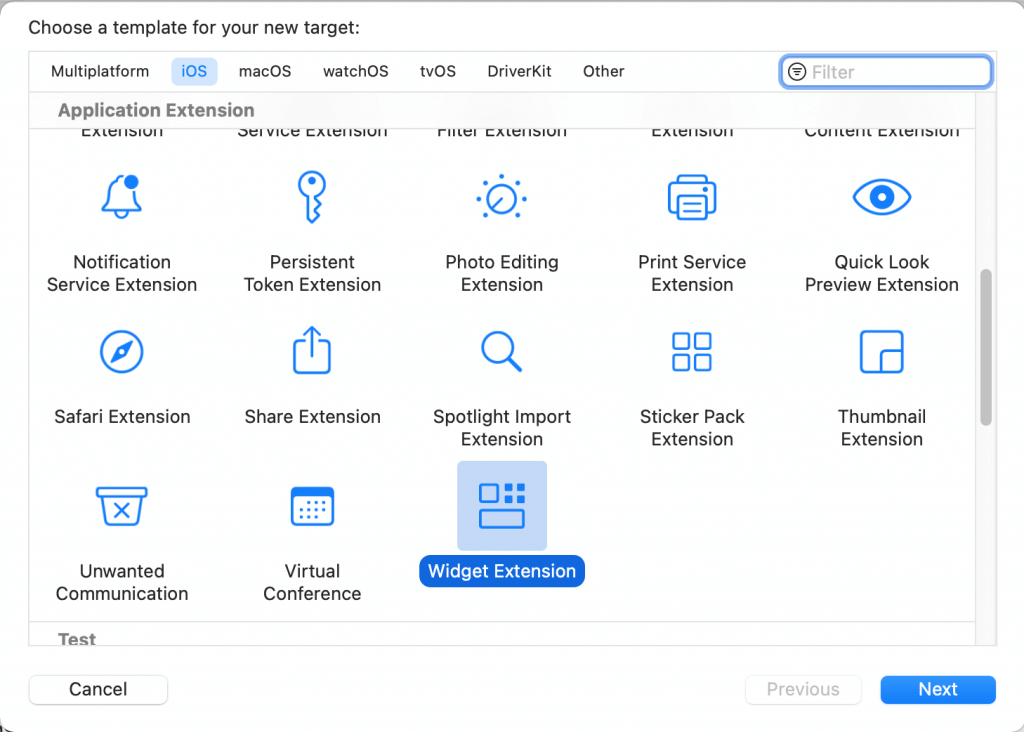
- On the Choose a template for your new target: screen, select iOS and Widget Extension, then click Next.
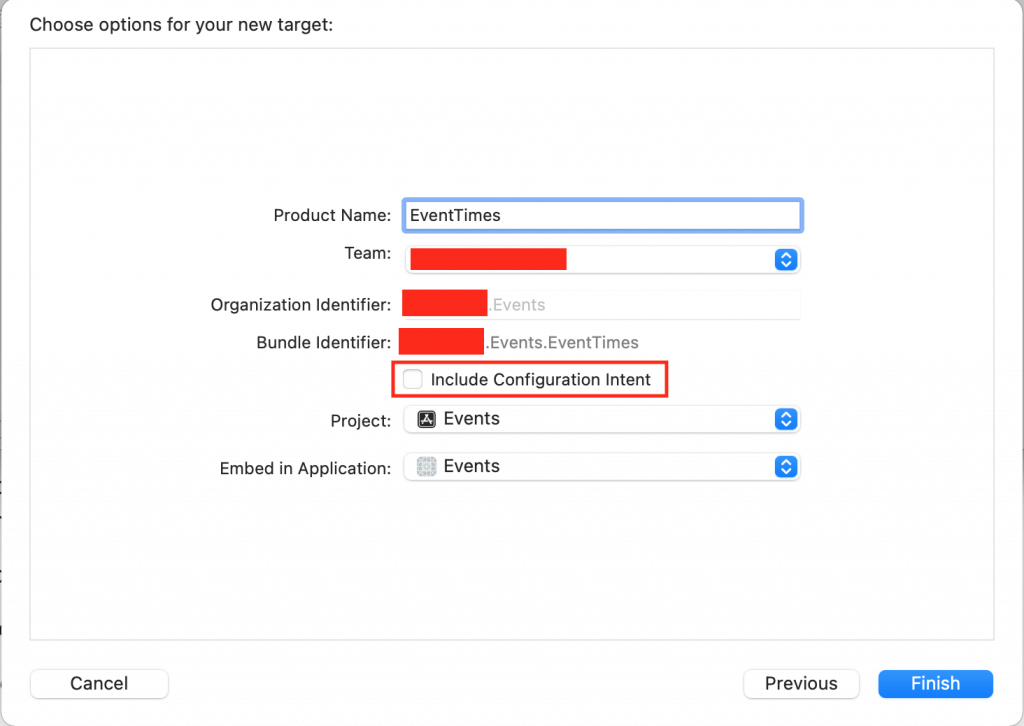
- On the Choose options for your new target: screen, fill in Product Name: with “EventTimes,” select your own Team:, set your own Organization Identifier: (same as “Events” app), do not set the Include Configuration Intent, make sure that “Project:” and “Embed in Application:” are both set to “Events,” and then click Finish.
- You’ll be prompted to activate your new “EventTimesExtension” scheme; make sure you press the “Activate” button now.
A few items have been added to your “Events” app project, most notably, the “EventTimes.swift” WidgetKit code and the WidgetKit.framework. We’ll spend most of the rest of the article discussing “EventTimes.swift.”
Data sharing between the app and widget?
Notice that I’ve defined the same data model (2 arrays) at the top of the extension’s “EventTimes.swift” that I already defined in the containing app’s “ContentView.swift”:
let events = ["Wake up", "Breakfast", "Go to work", "Lunch", "Come home", "Go to sleep"]
let eventTimes = ["7:00 AM", "8:00 AM", "8:30 AM", "12:00 PM", "5:00 PM", "11:00 PM"]
Remember that “Even though an app extension bundle is nested within its containing app’s bundle, the running app extension and containing app have no direct access to each other’s containers.” In other words, the 2 arrays defined in just the containing app are not accessible to the extension and vice versa. One solution would be to define an app group to which both the “Events” app and “EventTimesExtension” extension belong. They could then share the same data model. But that is way beyond the scope of this article — and I already wrote a tutorial on app groups for AppCoda which I urge you to read: “Using App Groups for communication between macOS/iOS apps from the Same Vendor”.
How WidgetKit works
Widgets are driven by, like many other aspects of our reality, time. With my “Events” app and widget, we have a relatively fixed list of events that occur throughout the day. What drives the updating of the widget to show the next nearest coming-up event is that event’s time. Think of the iPhone weather widget. It also is driven by time, probably polling a server every 30 seconds so it can update the current conditions, the current temperature, and the day’s current high and low.
Let’s go through the code in the WidgetKit extension’s “EventTimes.swift” file from top to bottom, even though that might not may be the most logical order. But if I jump around, you’re likely to get confused — plus I urge you to compare my version of the file to the template version as first generated when you created the WidgetKit extension.
Let’s start at the top of the file:
import WidgetKit
import SwiftUI

let events = ["Wake up", "Breakfast", "Go to work", "Lunch", "Come home", "Go to sleep"]
let eventTimes = ["7:00 AM", "8:00 AM", "8:30 AM", "12:00 PM", "5:00 PM", "11:00 PM"]
var currentEvent = 0

struct Provider: TimelineProvider {
    func placeholder(in context: Context) -> SimpleEntry {
        SimpleEntry(date: Date(), eventName: "Daily event", eventTime: "N/A")
    }

.
.
.
From the first struct we encounter, of type TimelineProvider, you can see why I said that widgets are driven by time. The placeholder function “displays a generic representation of your widget, giving the user a general idea of what the widget shows”. It is called if your widget is displayed but no real data is ready to be displayed, perhaps because the containing app hasn’t been configured or established network connections yet. SimpleEntry is the struct that holds instances of data that are shown one at a time in your widget. To be specific, this SimpleEntry reference is the struct constructor that returns an instance.
.
.
.

    func getSnapshot(in context: Context, completion: @escaping (SimpleEntry) -> ()) {
        let entry = SimpleEntry(date: Date(), eventName: events[currentEvent], eventTime: eventTimes[currentEvent])
        completion(entry)
    }

.
.
.
The getSnapshot function provides an app timeline entry for the current time (and perhaps state) of the widget. For my “Events” app, this would be the nearest event in time in your daily schedule about to occur.
.
.
.

    func getTimeline(in context: Context, completion: @escaping (Timeline<Entry>) -> ()) {
        var entries: [SimpleEntry] = []

        // Generate a timeline consisting of six entries an second apart, starting from the current time.
        let currentDate = Date()

        for timeOffset in 0 ..< events.count {
            let entryDate = Calendar.current.date(byAdding: .second, value: timeOffset, to: currentDate)!
            let entry = SimpleEntry(date: entryDate, eventName: events[timeOffset], eventTime: eventTimes[timeOffset])
            entries.append(entry)
        }
        currentEvent = 0

        let timeline = Timeline(entries: entries, policy: .atEnd)
        completion(timeline)
    } // end getTimeline

.
.
.
For a static prototype like my sample “Events” app, the getTimeline function can build the entire timeline to be displayed in my widget. Because of the policy: .atEnd, the timeline is created over and over. I already explained why a real version of my “Events” app would need a more sophisticated algorithm to calculate a timeline of the “next, nearest” event relative to the current point in time. For a weather app, some type of polling algorithm could be used to make network requests to get the current conditions for the current times throughout the day.
struct SimpleEntry: TimelineEntry {
    let date: Date
    let eventName: String
    let eventTime: String
}
As I mentioned above, the SimpleEntry is the struct that holds instances of data that are shown one at a time in your widget. Note that the date is essential to a timeline.
struct EventTimesEntryView : View {
    var entry: Provider.Entry

    var body: some View {
        VStack {
            Text(entry.eventTime)
            Text(entry.eventName)
        }
    }
} // end EventTimesEntryView
This is the SwiftUI I used to display the widget. Do I even need to explain what I’m drawing here? Just look at my widget. It just amazes me how I can write such short, simple, and elegant code to get a UI. The declarative UI is here!
@main
struct EventTimes: Widget {
    let kind: String = "EventTimes"

    var body: some WidgetConfiguration {
        StaticConfiguration(kind: kind, provider: Provider()) { entry in
            EventTimesEntryView(entry: entry)
        }
        .configurationDisplayName("My Daily Events")
        .description("Shows my typical workday schedule.")
    }
} // end EventTimes
The @main attribute specifies the single entry point to my Widget extension. My widget is given a string tag for system identification purposes. I’m specifying the SwiftUI that my widget uses and I provide template text that people will see when they look up my widget so they can add it to my iPhone Home or Today View screens, as described in the next section.
Adding widgets after the app is installed
Once you install my sample app on an iPhone, you want to install one or more instances of its widget in one or more of the three available sizes. This ani-GIF shows you how to install a widget on the Home screen:
Note that I started the process by long-pressing on empty Home screen space. You can follow the same process on the Today View or, instead of starting by long-pressing, you can scroll down to the bottom of the page and tap the “Edit” button.
Static versus user-configurable widgets
Mainly because my “Events” app and widget are proofs of concept, they are static. While I’ve mentioned possibilities for editing the events and times, those values are currently fixed. But you can make your widget user-configurable. When the good folks who were writing the iPhone weather app added their widget extension, they ticked the Include Configuration Intent checkbox — that’s the checkbox we didn’t tick.
To make a long story short, you can configure the weather widget by long-tapping it until the context menu appears and selecting the “Edit Widget” item. The widget “flips over” to present an interface that allows you select from a list of nationwide locations that the widget will then show weather snapshots for.
Conclusion
Adding a widget to your app can add a whole lot of value to your app. You can make it so much more useful by allowing one glance to give users the gist of the main purpose of your app. Think of ways to make your apps indispensable to users — an essential part of their lives. Widgets are one of the best ways I’ve seen in recent years to accomplish this lofty goal.


