

iOS is an operating system with many possibilities, allowing to create from really simple to super-advanced applications. There are times where applications have to be multi-featured, providing elegant solutions that exceed the limits of the common places, and lead to a superb user experience. Also, there are numerous technologies one could exploit, and in this tutorial we are going to focus on one of them, which is no other than the Text to Speech.
Text-to-speech (TTS) is not something new in iOS 8. Since iOS 7 dealing with TTS has been really easy, as the code required to make an app speak is straightforward and easy to be handled. To make things more precise, iOS 7 introduced a new class named AVSpeechSynthesizer, and as you understand from its prefix it’s part of the powerful AVFoundation framework. The AVSpeechSynthesizer class, along with some other classes, can produce speech based on a given text (or multiple pieces of text), and provides the possibility to configure various properties regarding it.

The AVSpeechSynthesizer is the responsible class for carrying out the heavy work of converting text to speech. It’s capable of initiating, pausing, stopping and continuing a speech process. However, it doesn’t interact directly with the text. There’s an intermediate class that does that job, and is called AVSpeechUtterance. An object of this class represents a piece of text that should be spoken, and to put it really simply, an utterance is actually the text that’s about to be spoken, enriched with some properties regarding the final output. The most important of those properties that the AVSpeechUtterance class handles (besides the text) are the speech rate, pitch and volume. There are a few more, but we’ll see them in a while. Also, an utterance object defines the voice that will be used for speaking. A voice is an object of the AVSpeechSynthesisVoice class. It always matches to a specific language, and up to now Apple supports 37 different voices, meaning voices for 37 different locales (we’ll talk about that later).
Once an utterance object has been properly configured, it’s passed to a speech synthesizer object so the system starts producing the speech. To speak many pieces of text, meaning many utterances, doesn’t require any effort at all; all it takes is to set the utterances to the synthesizer in the order that should be spoken, and the synthesizer automatically queues them.
Along with the AVSpeechSynthesizer class comes the the AVSpeechSynthesizerDelegate protocol. It contains useful delegate methods that if they get used properly, they allow to keep track of the progress of the speech, and the currently spoken text too. Tracking the progress might be something that you won’t need in your apps, but if you will, then here you’ll see how you can achieve that. It’s a bit of a tricky process, but once you understand how everything works, all will become pretty clear.
If you want, feel free to take a look at the official documentation about all those classes. In my part, I stop this introductory discussion here, as there are a lot of things to do, but trust me, all of them are really interesting. As a final note, I need to say that all the testings of the demo app must be done in real device (iPhone). Unfortunately, text-to-speech doesn’t work in the Simulator, so plug your phones and let’s go.
Demo App Overview
We’ll begin our today exploration with an overview of the demo application (as we always do). The first thing I must say, is that we’re not going to build it from scratch. You can download a starter project from this link, which contains a minimum implementation, and of course, the interface already made in the Interface Builder. I would suggest to look around a bit before we continue, so you get familiarized with it and be able to move faster in the upcoming parts.
Let me describe now the app details. It is a navigation based application parted from two distinct view controllers. In the first one, there’s a textview where we’ll be adding the text that we want to be spoken. This textview occupies the most of the screen, and right below there are three buttons. The first button will be used to start the speech, while the other two are for pausing and stopping it. They won’t appear simultaneously; when the Speak button is visible the other two will be hidden, and the opposite. We’ll switch between them by implementing an easy animated effect. Additionally, right below the buttons exists a progress view. We’ll use it to show the progress of the speech during time.
The second view controller will be used to specify various settings regarding the speech. More specifically, through this view controller we’ll be able to change the values of the rate, pitch and volume properties, but furthermore we’ll be able to pick a different voice for the speech, other than the default one.
Through the implementation that follows in the next parts, you’ll find out that bringing text-to-speech to life is relatively easy. Once we get finished with the creation of all the TTS-related stuff, I’ll give you an extra section in this tutorial that will make the demo application much more alive and interactive. We’ll work with some text properties, and eventually we will make it capable of highlighting the currently spoken word by changing its foreground (text) color from black to orange. Even though what we’ll do there is not a part of the TTS process, I think it’s a pretty interesting topic to work with. It’s up to you to decide whether you’ll read it or not, as it consists of an extra content.
The following screenshots illustrate the two view controllers of the app, and an instance of it during the speech where the currently spoken word is highlighted. Take a first taste, and we will begin the real work.


Speaking Made Easy
So, now you are aware of what the today project is about and you have downloaded the starter project, let’s begin implementing. This time we’ll go straight to the point, as we are about to make the currently empty demo application capable of speaking without any delay. As I said in the beginning, the main role when dealing with text to speech features has the AVSpeechSynthesizer class. This is the one that will perform the actual speech, however it doesn’t just work on its own. It is always used in conjunction with other classes as we’ll see next, because various configurations regarding the speech outcome do not apply directly to this one.
First things first, and begin by opening the ViewController.swift file in Xcode. There, we need to declare and initialize a class variable (a constant actually) of the aforementioned class. So, go to the top of the class where all the outlet properties are already declared, and somewhere there add the following line. It’s just one, but a really important one:
let speechSynthesizer = AVSpeechSynthesizer()
That simple. Now, in order for the speechSynthesizer to “speak”, it’s needed to be provided it with some text to do that. However, we don’t just set a string value representing the text directly to that object as a property. Instead, we must make use of the AVSpeechUtterance class that I mentioned in the introduction. This, besides than accepting the text that should be spoken, it also contains properties that affect the final result. We’ll see about them in just a while. So, putting it all together, we are going to create an object of this class so as to set the text we want to be spoken, and finally to perform the actual speech using the object we declared right above.
An object of the AVSpeechUtterance class doesn’t have to be public like the last one; instead it can be locally declared, and that’s what we’ll do. Among the few implemented stuff existing in the starter project you’ve got in your hands, there’s an action method called speak(_:). This method is just defined in the class and connected to the proper button in Interface Builder. Navigate there, as it’s time to make it speak for first time by adding the couple next lines:
@IBAction func speak(sender: AnyObject) {
    let speechUtterance = AVSpeechUtterance(string: tvEditor.text)

    speechSynthesizer.speakUtterance(speechUtterance)
}
Obviously, upon the speechUtterance object initialization we specify the text that should be spoken. In this case we want our app to say everything existing in the textview, therefore we pass it the whole text of the textview. Next, we simply make a call to the speakUtterance(_:) method of the speech synthesizer object, and we’re telling the synthesizer to speak using the text we set in the utterance variable. As you’ll see next, this method also says to the synthesizer object to apply any settings or effects to the speech.
Now you can go ahead and run the application. Whatever you have written in the textview it will be spoken out loud from your device! Cool!
The voice that you’ll be hearing during the speech progress matches to the current locale settings of your device. By changing that, another voice matching to the new locale will be used to speak. You can find out that by modifying your current language settings if you’re curious enough. However, if you can sit back and wait for a while, you won’t really have to do that; we will add a feature later so we can pick a voice right through our demo app!
Now, let’s play around a bit with three properties regarding the actual speech: The rate, the pitchMultiplier and the volume. All these three properties have default values, and belong to the AVSpeechUtterance class. They also have maximum and minimum values. Right next you’re given with the maximum and minimum values they can get:
- Rate: Its minimum value specified by the AVSpeechUtteranceMinimumSpeechRate constant (0.0), and the maximum by the AVSpeechUtteranceMaximumSpeechRate (1.0). Its default value is defined by the AVSpeechUtteranceDefaultSpeechRate constant.
- pitchMultiplier: The pitch multiplier acceptable values are between 0.5 and 2.0, where 1.0 is the default value.
- volume: It ranges from 0.0 to 1.0, and by default it’s set to 1.0.
Time to use all these three properties to see how they can affect out spoken text. In the speak(_:) action method once again, add the next lines, but make sure to call the speakUtterance(_:) method as the last command. Note that you can set any value you desire in the following properties (within range of course); the following are just random values:
@IBAction func speak(sender: AnyObject) {
    let speechUtterance = AVSpeechUtterance(string: tvEditor.text)

    speechUtterance.rate = 0.25
    speechUtterance.pitchMultiplier = 0.25
    speechUtterance.volume = 0.75

    speechSynthesizer.speakUtterance(speechUtterance)
}
Run the app once again now, and listen to the new way the text is spoken. It’s really great that the default speech way is modified according to our preferences, and in order to achieve a perfect result in a real app, it’s necessary to play with the above values or give users the option to change them.
Making a quick sum-up at this point, you see that we wrote no more than five lines, but yet we managed to implement the basic feature of the application. Now that we have taken the first taste, we’ll keep adding new stuff and transforming the app to a more complex and advanced one.
Handling Rate, Pitch and Volume
As you can assume by running the application, applying various values to the rate, pitch and volume can result to interesting speech outcome. However, it’s quite annoying to terminate the app and re-run it every time you want to change any of them. It would be much more handy to be able to do so in the app, and if you remember, that’s one of our goals here. However, before we implement that functionality, we much find a more general way to work with these three values, and of course, we must figure out how we will save them permanently.
Let’s get started by declaring three new class variables. Each one of them will match to a value (rate, pitch, volume), and we’ll assign them to the speech utterance object properties, instead of using plain numbers. Let’s see:
var rate: Float!

var pitch: Float!

var volume: Float!
Then, go back again in the speak(_:) method, and replace any number values with the above variables, similarly to what is shown next:
@IBAction func speak(sender: AnyObject) {
    let speechUtterance = AVSpeechUtterance(string: tvEditor.text)

    speechUtterance.rate = rate
    speechUtterance.pitchMultiplier = pitch
    speechUtterance.volume = volume

    speechSynthesizer.speakUtterance(speechUtterance)
}
Nice, this is a more general way, and the speech will be produced according to the values of the above variables.
There are several approaches to store permanently the above variables. The easiest one, and perfectly suitable for the demo application we are implementing, is to use the user defaults (NSUserDefaults). Further than simply saving and loading from the user defaults dictionary, we will also register default values, meaning that we’ll set predefined values for the above three variables upon the first app run. Even though that sounds a bit unnecessary to do, you’ll understand later that it’s required, because we are going to load the existing stored values during the settings implementation. Let’s don’t run though, we’ll do everything in turn.
Let’s implement a couple of custom methods now. In the first one, we’ll register the user defaults as shown next:
func registerDefaultSettings() {
    rate = AVSpeechUtteranceDefaultSpeechRate
    pitch = 1.0
    volume = 1.0

    let defaultSpeechSettings: Dictionary = ["rate": rate, "pitch": pitch, "volume": volume]

    NSUserDefaults.standardUserDefaults().registerDefaults(defaultSpeechSettings)
}
In the above segment we set some initial values to each variable, and then we add them to a dictionary. We save this dictionary to the user defaults file by calling the registerDefaults(_:) method, and with that we manage to have data from the beginning of the app.
In the second method we will load the data from the user defaults dictionary, and we’ll assign it to the proper variables. It’s easy enough:
func loadSettings() -> Bool {
    let userDefaults = NSUserDefaults.standardUserDefaults() as NSUserDefaults

    if let theRate: Float = userDefaults.valueForKey("rate") as? Float {
        rate = theRate
        pitch = userDefaults.valueForKey("pitch") as Float
        volume = userDefaults.valueForKey("volume") as Float

        return true
    }

    return false
}
Two things to mention here: At first, notice that the method returns a Bool value; True when the data has been loaded and assigned to the variables successfully, and False when there’s no data at all. At second, we check if there is stored data in the user defaults simply by using an if let statement and asking for the rate value. If it exists, then they all exist (we’ll stick to that logic here, however in a real app you would be much more safe if you would check each value separately).
Now, let’s use the above methods, as simply defining them is not good enough. In the viewDidLoad method, we will try to load the data from the user defaults. If there’s no data, then we’ll register the default values:
override func viewDidLoad() {
    ...

    if !loadSettings() {
        registerDefaultSettings()
    }
}
Note here that we are not going to create any method at all to save altered values to the user defaults. This is something that will take place later in the settings view controller, where after having changed any value graphically we’ll store it so it gets reflected during the speech.
Pausing and Stopping the Speech
If you took a look in the storyboard of the starter project you downloaded, then you would have noticed that besides the Speak button there are two more: Pause and Stop. As you correctly assume, these two buttons will be used to pause and stop the speech process respectively, as a talking app would be useless if it only speaks, but it’s unable to stop doing that.
The pause and stop functionalities are not the same, as they have one important difference. When pausing, the speech can continue from the point it was left off. On the other hand, when stopping, the speech does not continue from the point it was stopped, but it starts over again.
In the ViewController.swift file you can find two other action methods, named pauseSpeech(_:) and stopSpeech(_:) respectively. Let’s go to add the missing code, starting from the pause method:
@IBAction func pauseSpeech(sender: AnyObject) {
    speechSynthesizer.pauseSpeakingAtBoundary(AVSpeechBoundary.Word)
}
Pausing the speech is literally a matter of a single line. By calling the pauseSpeakingAtBoundary(_:) method of the synthesizer object, we force the speech to pause. There’s one important element here, and that is the parameter value. This method wants to know whether it should pause immediately and then continue from the point it was left off, or it should pause after it has spoken the current word, and continue that way from the next word later. This kind of information is described from an enum value, named AVSpeechBoundary. This enum has two values:
- AVSpeechBoundaryImmediate: Using this, the pause happens instantly.
- AVSpeechBoundaryWord: With this, the pause happens once the current word has been spoken.
In the above code, I chose to set the second value, but you can change that if you want.
Similarly to the above implementation, the stop method is the following:
@IBAction func stopSpeech(sender: AnyObject) {
    speechSynthesizer.stopSpeakingAtBoundary(AVSpeechBoundary.Immediate)
}
This time we make use of another method of the synthesizer object, named stopSpeakingAtBoundary(_:). This method makes the speech process stop, and the argument it accepts is the same as before; a speech boundary value. In contrary to the previous method, here I chose to stop immediately the speech process.
Go now and run the app. Tap on the Speak button to let it start speaking, and then try both the Pause and Stop buttons.
You don’t see the buttons? But of course! That’s reasonable to happen, as we didn’t perform any action at all to make them visible. The only button shown there is the Speak button.
Let’s fix that by implementing another custom method. In it, we’ll apply an easy animation for showing and hiding the buttons. I think it’s pointless to say that when the Pause and Stop buttons are visible, the Speak button must be hidden. Just before we see this method, let me underline that these two buttons are not actually hidden; their alpha value has been set to zero.
In the next code segment I give you the implementation of this new method, and we’ll discuss it right next:
func animateActionButtonAppearance(shouldHideSpeakButton: Bool) {
    var speakButtonAlphaValue: CGFloat = 1.0
    var pauseStopButtonsAlphaValue: CGFloat = 0.0

    if shouldHideSpeakButton {
        speakButtonAlphaValue = 0.0
        pauseStopButtonsAlphaValue = 1.0
    }

    UIView.animateWithDuration(0.25, animations: { () -> Void in
        self.btnSpeak.alpha = speakButtonAlphaValue

        self.btnPause.alpha = pauseStopButtonsAlphaValue

        self.btnStop.alpha = pauseStopButtonsAlphaValue
    })
}
As you see in the first line, the method accepts a Bool argument telling whether the Speak button should be hidden or not. When it’s true, we’ll show the Speak button, and when it’s false, we’ll hide it and we’ll make the Pause and Stop buttons visible. In the method body we begin by specifying two float (CGFloat) variables representing the desired alpha value of the buttons. Note that if the Speak button must be hidden, we change the values of these variables. Then, using a simple UIView animation block we assign the final alpha value to each button. Note that the pauseStopButtonsAlphaValue variable describes the alpha state for both the Pause and Stop button.
The above method will result in a fade-in and fade-out effect. If you want, you can change the animation duration (0.25 seconds) to any value you want. Now that is ready, we can go an call it. That must take place in all the action methods of the buttons, and let’s begin by updating the most recent ones, those we saw in the beginning of this part. Right next you can see them containing the call to the above method:
@IBAction func pauseSpeech(sender: AnyObject) {
    speechSynthesizer.pauseSpeakingAtBoundary(AVSpeechBoundary.Word)

    animateActionButtonAppearance(false)
}


@IBAction func stopSpeech(sender: AnyObject) {
    speechSynthesizer.stopSpeakingAtBoundary(AVSpeechBoundary.Immediate)

    animateActionButtonAppearance(false)
}
In both of them we call the animateActionButtonAppearance(_:) method passing the false argument.
In the speak(_:) method things are a bit more complex, as further than simply calling the above method, we must also check if the synthesizer is currently speaking or not. That’s really important, because if it is speaking and gets paused, we must tell the synthesizer to simply continue when the Speak button gets tapped again. If it’s not speaking, then we must tell it to start doing so. To put it in other words, we must tell the synthesizer how to proceed after any of the Pause or Stop buttons has been tapped.
In the following code snippet you can see all the needed changes:
@IBAction func speak(sender: AnyObject) {
    if !speechSynthesizer.speaking {
        let speechUtterance = AVSpeechUtterance(string: tvEditor.text)
        speechUtterance.rate = rate
        speechUtterance.pitchMultiplier = pitch
        speechUtterance.volume = volume

        speechSynthesizer.speakUtterance(speechUtterance)
    }
    else{
        speechSynthesizer.continueSpeaking()
    }

    animateActionButtonAppearance(true)
}
At first we check if the synthesizer is not speaking using the speaking property of the object. If that’s the case, then we do what we saw earlier. However, if it’s speaking (meaning that was speaking before the Pause button was tapped), then we call the continueSpeaking method to let the synthesizer continue right from the point it was paused. Lastly, we hide the Speak button and show the other two animated, and this time we pass the true value as an argument, denoting that we want the Speak button to be hidden.
Now you can try to run the app again. You will see the Pause and Stop buttons appearing, and you can use them to pause and stop the speech. That’s nice, and with little effort, uh?
Speaking Multiple Utterances
At this point our synthesizer can speech pretty well the text we provide it with, and that is the content of the textview. However, a synthesizer is capable of doing more than that, and to be specific, it can queue and speech multiple texts, instead of just one.
Queueing multiple text so they’re spoken by the synthesizer is not something we need to manually do. Each piece of text is provided to the synthesizer to the way we have already seen, and it is automatically queued. What we only have to take care about, is to make sure that we give synthesizer the texts in the proper order.
In this example we’ll “feed” our synthesizer with multiple texts in such way: We’ll break the text of the textview in pieces based on the line break character (\n). Each piece of text that will come up (let’s name it paragraph, because actually this is it), will be set in order to the synthesizer, so it gets spoken. Besides that, we’ll meet a new property here that we will use to set a small delay between subsequent text speeches.
In the speak(_:) action method, go in the body of the if statement, and just comment-out or delete its contents:
@IBAction func speak(sender: AnyObject) {
    if !speechSynthesizer.speaking {

    }
    ...
}
In the empty if now add the code shown in the next snippet:
@IBAction func speak(sender: AnyObject) {
    if !speechSynthesizer.speaking {
        let textParagraphs = tvEditor.text.componentsSeparatedByString("\n")

        for pieceOfText in textParagraphs {
            let speechUtterance = AVSpeechUtterance(string: pieceOfText)
            speechUtterance.rate = rate
            speechUtterance.pitchMultiplier = pitch
            speechUtterance.volume = volume
            speechUtterance.postUtteranceDelay = 0.005

            speechSynthesizer.speakUtterance(speechUtterance)
        }
    }
    ...
}
Let’s see what happens here: At first, we break the text in paragraphs, separating the text based on the break line character. The componentsSeparatedByString(:_) method returns an array of substrings, and of course all break line characters are missing. Next, in a loop we access each piece of text (each paragraph) one by one. We initialize at first the utterance object using the current paragraph, and we set all of the properties we desire. At the end, we ask from the synthesizer to speak the utterance, and with that each text is queued to be spoken in the correct order.
Note in the above snippet the postUtteranceDelay property. This is used to add a delay after the current text has been spoken, and in our case we set it to a really small value. You can add a delay before the new text as well, you just need to access the preUtteranceDelay property (we don’t use it here). Using either of these aforementioned properties is something we want here, because we need our synthesizer to “take a breath” before it continues to the next paragraph. Also, we want it to speak in a more natural way (make bigger pauses between paragraphs).
Everything else in the above method remains the same. You can try the app again now. This time make sure that you “break” your text in the textview by tapping the Return key. You might think that the synthesizer says everything as one text, but the truth is that this time uses multiple texts.
Tracking Speech Progress
Text-to-Speech solutions can be useful in various kind of applications, and maybe there will be times where you’ll need to keep track of the speech progress. Once you have this information, you can use it in many ways: Internally in your app, to display the current progress graphically to the user, and many more. However, getting the speech progress from the synthesizer might be a bit of a tricky job, so here I am going to show you how to succeed this. I believe that what I’ll show you is going to be good enough in most cases, however definitely is not the only way to track the speech progress. I’ll show you a solution, and then you can step on it to implement your own. Unfortunately, speech synthesizer doesn’t provide a simple, straightforward way to inform us about that.
In the storyboard file of the project and in the View Controller scene specifically, you will find a progress bar lying right under the action buttons we used earlier. Our goal is to reflect the speech progress on it, so we have an idea how long the speech process has gone.
As I said, there is no straight way to get the tracking information we want. However, the delegate methods of the synthesizer class can help us a lot towards that goal. As you will see next, we are going to adopt the AVSpeechSynthesizerDelegate protocol, and then we will be based on three delegate methods to calculate the progress. Things are going to become a bit complex here, so I’ll try to be as detailed as possible.
At first, let’s adopt the protocol I just mentioned about, and let’s tell the synthesizer object that our class is its delegate. In the ViewController.swift file go to the class opening line, and declare the protocol’s name:
class ViewController: UIViewController, AVSpeechSynthesizerDelegate {...
In the viewDidLoad method:
override func viewDidLoad() {
    ...

    speechSynthesizer.delegate = self
}
Now, let’s define, without adding any code yet, the following three methods:
func speechSynthesizer(synthesizer: AVSpeechSynthesizer!, didFinishSpeechUtterance utterance: AVSpeechUtterance!) {

}


func speechSynthesizer(synthesizer: AVSpeechSynthesizer!, didStartSpeechUtterance utterance: AVSpeechUtterance!) {

}


func speechSynthesizer(synthesizer: AVSpeechSynthesizer!, willSpeakRangeOfSpeechString characterRange: NSRange, utterance: AVSpeechUtterance!) {

}
Before we proceed, it’s important to explain the logic we’re about to follow, so we are all in the same page. I’ll begin talking about the last delegate method above, where as you see there’s a parameter named characterRange. This value is really an important one, because it “tells” us the range of the currently spoken word in the utterance that the synthesizer speaks. To make that clear, imagine that the spoken text is the following line:
My name is Gabriel
… and that currently the synthesizer says the “name” word. The range in this case is: (3, 4), where 3 is the location of the range, and 4 is its length.
Note: I advice you to read a bit about the NSRange structure in the web, so you get the meaning not only of that, but of what we’ll also do next. In short, a NSRange variable specifies a text range using two values: The location that shows the position of the first character in the whole text, and the length that shows how long the range is.
So, returning to our work again, you can guess that if we know the range of the currently spoken word and also know the total length of the text (which we do through the utterance parameter), we can calculate the progress as a percentage. Great, but that’s good just in case we have one utterance only. What happens if there are more than one, and the synthesizer must produce speech for multiple utterances?
The solution in that problem will rely on the previous thoughts regarding the range parameter, and I will advance it by saying that we will calculate the progress made in the whole text (all pieces of text, not just the current one) by mixing the current range with the length of texts that have been already spoken. Of course, that means that we must keep track of various data regarding the utterance that is currently spoken, the total number of utterances, the total text length, and more.
Let’s make everything clear and specific now. Go to the top of the ViewController class, and declare the following properties:
var totalUtterances: Int! = 0

var currentUtterance: Int! = 0

var totalTextLength: Int = 0

var spokenTextLengths: Int = 0
Here’s what they are for:
- totalUtterances: In it we will store the total utterances (the total different texts queued) that the synthesizer will produce speech for.
- currentUtterance: The number of the utterance that’s currently being spoken (ex. 2 out of 10).
- totalTextLength: It will keep the length of the whole text (all text pieces). We’ll compare the range of the words against this value later.
- spokenTextLengths: In this variable we’ll store the length of the texts that have been already spoken.
The above variables must get their initial values, and the proper place to do that is the speak(_:) action method. Go in it, make sure you are in the if statement body, and then add the lines noted below:
@IBAction func speak(sender: AnyObject) {
    if !speechSynthesizer.speaking {
        let textParagraphs = tvEditor.text.componentsSeparatedByString("\n")

        // Add these lines.
        totalUtterances = textParagraphs.count
        currentUtterance = 0
        totalTextLength = 0
        spokenTextLengths = 0

        for pieceOfText in textParagraphs {
            let speechUtterance = AVSpeechUtterance(string: pieceOfText)
            speechUtterance.rate = rate
            speechUtterance.pitchMultiplier = pitch
            speechUtterance.volume = volume
            speechUtterance.postUtteranceDelay = 0.005

            // Add this too.
            totalTextLength = totalTextLength + pieceOfText.utf16Count

            speechSynthesizer.speakUtterance(speechUtterance)
        }
    }
    ...
}
In the first addition above, we store the total number of utterances to the totalUtterances variable, and as you see, it’s equal to the total number of the text pieces. To the rest variables we just set the zero as their initial value. Next, in the for loop we calculate the total length of all texts, as we queue them to the synthesizer.
Now, let’s take advantage of the delegate methods to do some calculations. At first, when the synthesizer starts to speak an utterance, we must increase the currentUtterance value by one. That way we will be always able to know what the number of the currently spoken text is (among all). Here it is:
func speechSynthesizer(synthesizer: AVSpeechSynthesizer!, didStartSpeechUtterance utterance: AVSpeechUtterance!) {
    currentUtterance = currentUtterance + 1
}
Next, we must take some actions when the speech of a text gets finished. Let me show you first what I mean exactly, and then it will be easier to discuss about it:
func speechSynthesizer(synthesizer: AVSpeechSynthesizer!, didFinishSpeechUtterance utterance: AVSpeechUtterance!) {
    spokenTextLengths = spokenTextLengths + utterance.speechString.utf16Count + 1

    let progress: Float = Float(spokenTextLengths * 100 / totalTextLength)
    pvSpeechProgress.progress = progress / 100

    if currentUtterance == totalUtterances {
        animateActionButtonAppearance(false)
    }
}
Initially, we calculate the total length of all the spoken texts up to now. Note that +1 at the end of the line: If we won’t add it, the total progress calculation will be wrong, because the total length of the original text contains the line breaks characters, which are not processed during the speech progress.
Next, we calculate the progress after a piece of text (an utterance) has been spoken. This will make the whole progress calculation and representation smoother. Note that this is not the main spot where the progress is calculated; instead, it works as a complementary calculation. As you see, we assign that progress to the pvSpeechProgress progress view.
Lastly, and regardless the progress tracking functionality, we make sure to hide the Pause and Stop buttons once the utterance that was just spoken is the last one.
Now, the last delegate method where we’ll make use of the current range. This is the place where the most of the progress will be calculated, and here’s how it should be done:
func speechSynthesizer(synthesizer: AVSpeechSynthesizer!, willSpeakRangeOfSpeechString characterRange: NSRange, utterance: AVSpeechUtterance!) {
    let progress: Float = Float(spokenTextLengths + characterRange.location) * 100 / Float(totalTextLength)
    pvSpeechProgress.progress = progress / 100
}
Note that we add the total spoken text lengths to the current range location, and use that value against the total text length to find the progress percentage. Then we set it to the progress view (note that the progress view’s progress must be between 0.0 and 1.0, that’s why we divide by 100).
You may run the app now, but if you do so you won’t see the progress view. That’s because initially its alpha value is set to zero. To fix this, simply go to the custom method where we animated the alpha value changing of the buttons, and add the progress view in the animation block as shown next:
func animateActionButtonAppearance(shouldHideSpeakButton: Bool) {
    ...

    UIView.animateWithDuration(0.25, animations: { () -> Void in
        ...

        self.pvSpeechProgress.alpha = pauseStopButtonsAlphaValue
    })
}
Feel free now to run the app. Let it speak, and watch the progress view growing as the speech moves forward.
Working in Settings View Controller
The SettingsViewController is the place where all the important utterance-related values are going to be modified in a graphical way. The next screenshot displays the final outcome of our work in this view controller:
As you see in the above image, we are going to change the values of the speech rate, pitch and volume using a slider view. Any modification to them will be reflected to the speech after the Save button has been tapped. But that’s not only. There is going to be a picker view with all the available speech voices listed on it, so the current voice can be changed when picking another one.
We’ll implement all of the above and we’ll see the details as we move along. The first and quite important task we have to do, is to load the current rate, pitch and volume values from the user defaults, and set them to the proper controls in the Settings view controller. Open the SettingsViewController.swift file, and at the top of the class declare the following variables:
let speechSettings = NSUserDefaults.standardUserDefaults()

var rate: Float!

var pitch: Float!

var volume: Float!
The speechSettings constant is declared and initialized at once. It’s a NSDictionary object containing all the existing values being in the user defaults dictionary. Also, we declare three float values for the rate, pitch and volume. The next step is to initialize them in the viewDidLoad:
override func viewDidLoad() {
        ...

        rate = speechSettings.valueForKey("rate") as Float
        pitch = speechSettings.valueForKey("pitch") as Float
        volume = speechSettings.valueForKey("volume") as Float
    }
Note here that I omit to check if the values actually exist in the user defaults. I consider they’re there and nothing it’s nil. However in a real application you should really avoid what I do here and do all the proper checking.
If you examine the Settings View Controller scene in the storyboard file, you’ll notice that there are two prototype cells, but for now we’re only interested in the first one:

Notice that there are two labels there, right above the slider view: The left one will be used to display the name of the current setting (such as “Rate”), and the right one will be used to display the actual value. Also, the slider’s value will be properly set. These three subviews (two labels and the slider) have tag values so they can be recognized in code. These tag values are:
- Left label: Tag value = 10
- Right label: Tag value = 20
- Slider: Tag value = 30
With the above fact in mind, let’s return to the SettingsViewController.swift file. In there you can find already defined the most important and necessary tableview methods, but for now there’s not logic implemented yet. So, let’s start adding some logic by specifying the total number of rows that will exist in the tableview:
func tableView(tableView: UITableView, numberOfRowsInSection section: Int) -> Int {
    return 3
}
Later we’ll change the above return value to 4, so we include the voices prototype cell. For now, we’re just good.
The rest of our work will take place in the tableView(_:cellForRowAtIndexPath:) method. The first step here is to make sure that the current cell regards a rate, pitch or volume cell, to dequeue the prototype cell, and “extract” the above controls from the cell. Let’s see what I mean up to this point:
func tableView(tableView: UITableView, cellForRowAtIndexPath indexPath: NSIndexPath) -> UITableViewCell {
    var cell: UITableViewCell!

    if indexPath.row < 3 {
        cell = tableView.dequeueReusableCellWithIdentifier("idCellSlider", forIndexPath: indexPath) as UITableViewCell

        let keyLabel = cell.contentView.viewWithTag(10) as? UILabel
        let valueLabel = cell.contentView.viewWithTag(20) as? UILabel
        let slider = cell.contentView.viewWithTag(30) as UISlider
    }

    return cell
}
As you can find out in the snippet above, we check the current row number to make sure that the cell regards any of the three values of interest. Next, we dequeue the cell, and here I should make an important notice: We use the dequeueReusableCellWithIdentifier(_:forIndexPath:) tableview method (notice the index path parameter), instead of the dequeueReusableCellWithIdentifier(_:), because in the second case the cell returns nil values for its subviews.
Lastly, we get the two labels and the slider using their tag values.
Next, depending on the current index path row we are going to display the rate, pitch and volume values to the labels:
func tableView(tableView: UITableView, cellForRowAtIndexPath indexPath: NSIndexPath) -> UITableViewCell {
    var cell: UITableViewCell!

    if indexPath.row < 3 {
        ...

        var value: Float = 0.0
        switch indexPath.row {
        case 0:
            value = rate

            keyLabel?.text = "Rate"
            valueLabel?.text = NSString(format: "%.2f", rate)

        case 1:
            value = pitch

            keyLabel?.text = "Pitch"
            valueLabel?.text = NSString(format: "%.2f", pitch)

        default:
            value = volume

            keyLabel?.text = "Volume"
            valueLabel?.text = NSString(format: "%.2f", volume)
        }
    }

    return cell
}
Two points to note here: At first, there's a float local variable declared right before the switch statement, named value. As you see in the code following the declaration, we store the actual value of each speech property to that variable, and if you're wondering why we do that, then I just have to say that we'll use it to set the sliders' values. You'll see pretty soon. The second point I'd like to highlight here is how we assign each value to the valueLabel label properly formatted using the NSString class. With the syntax above we let the three values to be displayed using two decimal points.
Now we must setup the sliders. In each case of the switch statement we'll do two things at the same time: We'll set the maximum and minimum values of each slider, and we'll connect them with an action method that will be called every time their value gets changed. Here is that addition:
func tableView(tableView: UITableView, cellForRowAtIndexPath indexPath: NSIndexPath) -> UITableViewCell {
    var cell: UITableViewCell!

    if indexPath.row < 3 {
        ...

        switch indexPath.row {
        case 0:
            ...
            slider.minimumValue = AVSpeechUtteranceMinimumSpeechRate
            slider.maximumValue = AVSpeechUtteranceMaximumSpeechRate
            slider.addTarget(self, action: "handleSliderValueChange:", forControlEvents: UIControlEvents.ValueChanged)

        case 1:
            ...
            slider.minimumValue = 0.5
            slider.maximumValue = 2.0
            slider.addTarget(self, action: "handleSliderValueChange:", forControlEvents: UIControlEvents.ValueChanged)

        default:
            ...
            slider.minimumValue = 0.0
            slider.maximumValue = 1.0
            slider.addTarget(self, action: "handleSliderValueChange:", forControlEvents: UIControlEvents.ValueChanged)
        }
    }

    return cell
}
Lastly, we must set the real values to the sliders. We won't do that in each case above, as that's something common for all of them. What we'll only do is to go after the switch statement and add the next couple of lines:
func tableView(tableView: UITableView, cellForRowAtIndexPath indexPath: NSIndexPath) -> UITableViewCell {
    var cell: UITableViewCell!

    if indexPath.row < 3 {
        ...

        if slider.value != value {
            slider.value = value
        }
    }

    return cell
}
The condition above is super-important, because if we omit it the sliders are never going to work as expected. In the next part we're going to implement their behavior and change the respective values, and without that condition the sliders will never follow our finger towards the direction we order them to move.
Changing Rate, Pitch and Volume Values
In the previous part we specified the handleSliderValueChanged(_:) as the action method that should be called when the sliders change value. As you noticed, we didn't implement this method, but here's the place that we'll do that. Here's its definition:
func handleSliderValueChange(sender: UISlider) {

}
Now, depending on the slider that has changed value, we must update the proper property (rate, pitch, volume) appropriately. But, how can we determine and really say which slider is?
Well, there are two solutions to that. The first one is to get the slider's superview, which is the cell containing it. Then, we can specify the index path of the cell using the tableview and finally decide which property the slider regards.
The second solution is quite different, and it relies on subclassing the UISlider class. To make that clear, we can subclass the UISlider class, and add a new property to that subclass. That property will be an identifier value, which we'll use for distinguishing our three sliders. Of course, we'll also have to change the class of each slider from UISlider to the new one. Generally, subclasses can be really powerful, as they allow you to add properties and methods not existing to parent classes. If you don't use subclasses, maybe it would be a nice idea to start doing so when it's needed.
Let's create our new subclass. Hit the Cmd + N in Xcode, and create a new Cocoa Touch Class file. Make it subclass of the UISlider class, and name it CustomSlider. Once you create it, open it so we can edit it.
As I said before, we are going to declare just one property here, named sliderIdentifier. It's going to be an Int value. Besides than simply declaring it, we must add a couple of init methods, as the consist of the minimum implementation that should be done when subclassing:
class CustomSlider: UISlider {

    var sliderIdentifier: Int!

    override init() {
        super.init()

        sliderIdentifier = 0
    }


    required init(coder aDecoder: NSCoder) {
        super.init(coder: aDecoder)

        sliderIdentifier = 0
    }

}
The second init method is required and can't be omitted. As you see, the extremely simple implementation above will give the solution to our problem.
Open now the Main.storyboard file and go straight ahead to the Settings View Controller scene. There, select the slider in the prototype cell and open the Identity Inspector in the Utilities pane. In the Custom Class section, set the CustomSlider value in the Class field.

Now, let's return to the SettingsViewController.swift file. Go to the definition of the above action method, and change its parameter type as shown next:
func handleSliderValueChange(sender: CustomSlider) {

}
Before we implement it, let's make an addition to the tableView(_:cellForRowAtIndexPath:) method. In here, we must set value to the sliderIdentifer property of each slider, but also set the proper class of the slider when downcasting:
func tableView(tableView: UITableView, cellForRowAtIndexPath indexPath: NSIndexPath) -> UITableViewCell {
    var cell: UITableViewCell!

    if indexPath.row < 3 {
        ...

        // Change the class when down casting next.
        let slider = cell.contentView.viewWithTag(30) as CustomSlider

        switch indexPath.row {
        case 0:
            ...
            slider.sliderIdentifier = 100

        case 1:
            ...
            slider.sliderIdentifier = 200

        default:
            ...
            slider.sliderIdentifier = 300
        }

        ...

    }

    return cell
}
Now it's easy to implement the action method; we'll be based on the above identifier values:
func handleSliderValueChange(sender: CustomSlider) {

    switch sender.sliderIdentifier {
    case 100:
        rate = sender.value

    case 200:
        pitch = sender.value

    default:
        volume = sender.value
    }

    tbSettings.reloadData()
}
Notice that we must reload the tableview once we change a value.
If you run the application now and go to settings view controller, you'll see the rate, pitch and volume values to get changed when you move the sliders.
Applying Settings
All the implementation we did in the Settings view controller will be totally meaningless if we don't save the changed values, so they can be used in the View Controller class. So, here we'll save everything by making two easy steps.
The first step is to save all properties managed in the Settings (modified and not) to the user defaults. This will take place in the saveSettings(_:) action method which can be found in the SettingsViewController.swift file. This action method is called when the save bar button item gets tapped. Let's see that:
@IBAction func saveSettings(sender: AnyObject) {
    NSUserDefaults.standardUserDefaults().setFloat(rate, forKey: "rate")
    NSUserDefaults.standardUserDefaults().setFloat(pitch, forKey: "pitch")
    NSUserDefaults.standardUserDefaults().setFloat(volume, forKey: "volume")
    NSUserDefaults.standardUserDefaults().synchronize()
}
All it's easy in the above implementation. Note that we call the synchronize() method to update the user defaults with the new values.
The second step we must make is to notify the ViewController class that the above values have been changed, so the speech synthesizer uses them the next time that will speak out some text. We'll succeed this by using the delegation pattern.
In the SettingsViewController.swift file, go at the top of it right before the class definition. There, add the following protocol:
protocol SettingsViewControllerDelegate {
    func didSaveSettings()
}
Next, in the SettingsViewController class declare a delegate object:
var delegate: SettingsViewControllerDelegate!
Back in the saveSettings(_:) action method now, let's add a couple of missing rows. As you'll see in the following segment, at first we make a call to the delegate method we just declared, and then we pop the settings view controller from the navigation stack so we return back to the first view controller:
@IBAction func saveSettings(sender: AnyObject) {
    ...

    self.delegate.didSaveSettings()

    navigationController?.popViewControllerAnimated(true)
}
Okay, now the half job has been done. The above call to the delegate method will have no effect at all if we don't make the ViewController class conform to the SettingsViewControllerDelegate, and then to implement that delegate method in there.
Switch now to the ViewController.swift file. First of all, adopt our custom protocol:
class ViewController: UIViewController, AVSpeechSynthesizerDelegate, SettingsViewControllerDelegate
Now, there's an intermediate stage before we implement the delegate method. We must make this class the delegate of the SettingsViewController, for that reason implement the next one:
override func prepareForSegue(segue: UIStoryboardSegue, sender: AnyObject?) {
    if segue.identifier == "idSegueSettings" {
        let settingsViewController = segue.destinationViewController as SettingsViewController
        settingsViewController.delegate = self
    }
}
By overriding the prepareForSegue(_:sender:) method, we can access the view controller that is about to be loaded (in this case the SettingsViewController), and this can be done through the destinationViewController of the segue that will be performed. Note that the identifier value of the segue is "idSegueSettings", and I set it in the Interface Builder. Remember that this identifier can be any value you want, as long as it's unique and no other segue with the same identifier exists. Anyway, in the above condition we finally set our class as the delegate for the settings view controller.
Now, we're able to implement the delegate method. In it, we'll load the saved values from the user defaults and we'll set them to the respective properties of our class (rate, pitch, volume). With that, the next time the synthesizer will speak, all utterances will use the new settings. Here's the implementation:
func didSaveSettings() {
    let settings = NSUserDefaults.standardUserDefaults() as NSUserDefaults!

    rate = settings.valueForKey("rate") as Float
    pitch = settings.valueForKey("pitch") as Float
    volume = settings.valueForKey("volume") as Float
}
That's all! Go now and run the app, change the various settings and let the synthesizer speak. Do many tests and see how each setting affects the produced speech.
Selecting a Different Voice
The default voice used to produce the speech in iOS matches to the current locale of the system (the language settings, etc). That means that if you currently have the US locale applied, the US voice will speak. If you have the French locale, the French voice will speak. However, it's possible to change the default voice and have your text to be spoken with a different voice, and with a different accent.
Our goal in this part is to make the demo application capable of using another voice, and we'll succeed this by providing such a setting in the settings view controller. Up to this point, Apple supports 37 different voices. Programmatically speaking now, we are going to use another class named AVSpeechSynthesisVoice, and through this we'll access all voices for the supported locales.
There's a class method called speechVoices() that returns all voices. You can see really easily what the supported locales are, if you simply add the following line to any viewDidLoad method you want:
println(AVSpeechSynthesisVoice.speechVoices())
The first five results the above line returns are:
[[AVSpeechSynthesisVoice 0x170007470] Language: ar-SA,
 [AVSpeechSynthesisVoice 0x1700075a0] Language: en-ZA,
 [AVSpeechSynthesisVoice 0x1700075b0] Language: nl-BE,
 [AVSpeechSynthesisVoice 0x170007590] Language: en-AU,
 [AVSpeechSynthesisVoice 0x1700075d0] Language: th-TH
...]
As you guess, we are going to be based on that method to fetch all the supported locales, make it possible to select one, and eventually allow the synthesizer to speak using another voice. From the returned data (the one you see above) we are going to use the language code. With that code then we'll specify the language name, and we'll create a dictionary containing both the name and code for each language. Then, this dictionary will be added to an array, so we can access later all of those dictionaries and display all languages to the settings.
Let's get started, as there are more than a few things to do here. Open the SettingsViewController.swift file, and declare the following array and integer variable at the top of the class:
var arrVoiceLanguages: [Dictionary] = []

var selectedVoiceLanguage = 0
As I said, we'll use the array to store all language names and codes matching to the supported voices. The integer value will be used as an index for the selected voice language.
Now, let's create a custom method where we'll do all what I described earlier. Let's see it, and then we'll talk about it:
func prepareVoiceList() {
    for voice in AVSpeechSynthesisVoice.speechVoices() {
        let voiceLanguageCode = (voice as AVSpeechSynthesisVoice).language

        let languageName = NSLocale.currentLocale().displayNameForKey(NSLocaleIdentifier, value: voiceLanguageCode)

        let dictionary = ["languageName": languageName, "languageCode": voiceLanguageCode]

        arrVoiceLanguages.append(dictionary)
    }
}
The code is pretty straightforward; the only thing I'd like to highlight is that we use the NSLocale class to get the language name using the code as shown above. Now that this method is implemented, we must call it, and we'll do so in the viewDidLoad method:
override func viewDidLoad() {
    ...

    prepareVoiceList()
}
Our next step is to display the data we just prepared. In the Settings view controller scene in the storyboard file, there's a second prototype cell with a picker view in it. We'll use this cell to display all voice languages, and that means that we have to deal again with the tableview methods.
First of all, change the number of the returned rows from 3 to 4:
func tableView(tableView: UITableView, numberOfRowsInSection section: Int) -> Int {
    return 4
}
Next, in the tableView(_:cellForRowAtIndexPath:) method add the following else, right before you return the cell:
func tableView(tableView: UITableView, cellForRowAtIndexPath indexPath: NSIndexPath) -> UITableViewCell {
    var cell: UITableViewCell!

    if indexPath.row < 3 {
        ...
    }
    else{
        cell = tableView.dequeueReusableCellWithIdentifier("idCellVoicePicker", forIndexPath: indexPath) as UITableViewCell

        let pickerView = cell.contentView.viewWithTag(10) as UIPickerView
        pickerView.delegate = self
        pickerView.dataSource = self
    }

    return cell
}
You see that we make the settings view controller class the delegate and datasource of the picker view, as through the methods of those protocols we're able to provide data to it and also be aware of the user selection. Before we continue we must fix the errors Xcode is currently showing simply by adopting the following two protocols:
class SettingsViewController: UIViewController, UITableViewDelegate, UITableViewDataSource, UIPickerViewDelegate, UIPickerViewDataSource
Let's implement now the required picker view delegate and datasource methods. At first, we must return the number of the components the picker view will have (obviously just one), and how many rows this component will contain:
func numberOfComponentsInPickerView(pickerView: UIPickerView) -> Int {
    return 1
}


func pickerView(pickerView: UIPickerView, numberOfRowsInComponent component: Int) -> Int {
    return arrVoiceLanguages.count
}
Now, let's display the voice languages to the picker view:
func pickerView(pickerView: UIPickerView, titleForRow row: Int, forComponent component: Int) -> String! {
    let voiceLanguagesDictionary = arrVoiceLanguages[row] as Dictionary

    return voiceLanguagesDictionary["languageName"]
}
It's really simple what we do here: We get the dictionary existing in the index of the array matching to the row specified by the parameter value, and from this dictionary we "extract" and return the language name. Just that.
There's one last method missing, and in this one we must keep the selection of the user when taps on a row:
func pickerView(pickerView: UIPickerView, didSelectRow row: Int, inComponent component: Int) {
    selectedVoiceLanguage = row
}
To sum up here, we have managed to get all the languages for the supported voices, display them to the picker view, and made it possible to select a row. But how are we going to let the synthesizer know about the selected voice?
The answer is to use once again the delegation pattern, and this time we have it already implemented. Actually, we must only add one line in the saveSettings(_:) method:
@IBAction func saveSettings(sender: AnyObject) {
    ...
    NSUserDefaults.standardUserDefaults().setObject(arrVoiceLanguages[selectedVoiceLanguage]["languageCode"], forKey: "languageCode")

    ...
}
Note that this line should be added before the user defaults synchronization. With this single line, we manage to store in the user defaults the language code of the selected voice.
Now, let's open the ViewController.swift file, where we need to make a couple of new additions. First of all, declare the following variable at the top of the class:
var preferredVoiceLanguageCode: String!
You may assume from its name what is for. Next, head to the didSaveSettings() delegate method, and enrich it with the next line:
func didSaveSettings() {
    ...

    preferredVoiceLanguageCode = settings.objectForKey("languageCode") as String
}
As you see, we store in the preferredVoiceLanguageCode variable the value of the selected voice language code.
Lastly, in the speak(_:) action method we must tell the synthesizer about the selected voice. Actually, we are not going to do something like that in the synthesizer object, but we'll set the voice language code to each utterance object. In the for loop add the next snippet:
@IBAction func speak(sender: AnyObject) {
    if !speechSynthesizer.speaking {
        ...

        for pieceOfText in textParagraphs {
            ...

            if let voiceLanguageCode = preferredVoiceLanguageCode {
                let voice = AVSpeechSynthesisVoice(language: voiceLanguageCode)
                speechUtterance.voice = voice
            }

            ...

            speechSynthesizer.speakUtterance(speechUtterance)
        }
    }
    ...
}
We're ready. Go and test the app once again. As you'll see, now you can pick another voice for the produced speech in the settings view controller. I'm pretty sure that you'll find the result really interesting.
Bonus Material: Highlighting the Spoken Text
Normally, at this point this tutorial comes to its end. So, if you want to give a final try to the demo application and stop reading, feel free to do it. On the other hand, if you want to see how to make the app more interesting and alive, then keep reading, as I considered to be really nice to make the spoken text to be highlighted during the speech process. There are cases where this feature is useful, and even it sounds easy, it requires some amount of work. Note though that this task has nothing to do with the text-to-speech process; instead we'll use another framework to achieve this goal: The UITextKit framework.
If you're comfortable working with Text Kit (which was first introduced in iOS 7), then you will be just fine with the rest content in this part. If you're not familiar with Text Kit, then here is a link of an older tutorial of mine regarding it. I won't provide much details about the Text Kit specifics; I'll mostly describe the steps required to highlight the spoken text, so if there's something that you don't understand beyond any short explanation I give, go and search either on the above link or in the web for more information.
So, let's get started. Trust me, this is a part that I find pretty interesting as I enjoy playing with Text Kit, and I hope that you will do so. The first step before performing any programming actions, is to convert the plain text of the textview to an attributed text. That's important and necessary, as we're going to apply changes to a textview property which is part of the Text Kit, named TextStorage. Actually, the text storage property of the textview is an object of the NSTextStorage class, and it's responsible for storing the textview text along with its attributes. Such an attribute is the font name, including information whether the text is bold or italic (this information is called font traits). Another such an attribute is the text foreground color. Even custom attributes can be set regarding an attributed text. Anyway, I won't go any further on that, but I have to tell you that we're going to access the text attributes to change the text color (foreground color) of the currently spoken word, therefore we need to use the text storage property, and furthermore, we need to work on an attributed text.
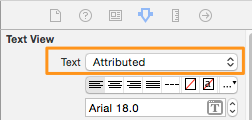
With that, open the storyboard file in the Interface Builder. Go to the View Controller scene, and select the textview. Open the Utilities pane, and then the Attributes Inspector. There, click on the Text drop down control and select the Attributed value instead of the Plain and you're done:
Now, the next step is to set the initial font to the textview text as an attribute. We'll do that before performing any text highlighting, because we will need to revert the selected text back to its normal state, and of course, using its normal font. So, in the ViewController.swift file let's write the next custom method:
func setInitialFontAttribute() {
    let rangeOfWholeText = NSMakeRange(0, tvEditor.text.utf16Count)
    let attributedText = NSMutableAttributedString(string: tvEditor.text)
    attributedText.addAttribute(NSFontAttributeName, value: UIFont(name: "Arial", size: 18.0)!, range: rangeOfWholeText)
    tvEditor.textStorage.beginEditing()
    tvEditor.textStorage.replaceCharactersInRange(rangeOfWholeText, withAttributedString: attributedText)
    tvEditor.textStorage.endEditing()
}
Here's what takes place above:
- At first, we specify the range of the whole text. In a previous part I had talked about the NSRange structure, but I think it's good to remind here too that the first parameter is the start of the range, while the second one is its length.
- Next, we assign the text of the area specified by the range (actually the whole text) to a mutable attributed string, so it's possible to add attribute to it.
- Using the addAttribute(_:value:range:) method of the attributed string object we set the font attribute (NSFontAttributeName), specifying the font name and size, and the range that this attribute will apply.
- Lastly, we prepare the text storage for editing. We replace the current text with the attributed one, and we end by making any changes in the text storage valid.
The above method must be called in the viewDidLoad:
override func viewDidLoad() {
    ...

    setInitialFontAttribute()
}
Now it is coming the interesting path, the highlighting of the words. Our target here is to change the foreground color of the currently spoken word, and make it orange when is spoken, while we'll turn it back to black after it has been spoken. Our whole work will take place in the speechSynthesizer(_:willSpeakRangeOfSpeechString:utterance:) delegate method because, if you remember, it's the only place where we can get the range of the currently spoken word. At this point is necessary to declare a new variable in the class:
var previousSelectedRange: NSRange!
In this variable we are going to store the range of the previously selected word, so we can make it black again after it has been spoken.
Let's go in the aforementioned method now to start adding some code. I'll give it in pieces as it's easier to understand it. There are also comments that will help you in that.
So, initially we want to specify the range of the current word, not in the context of the current text, but in the context of all texts (utterances) that are about to be spoken. Once that range has been determined, we will use it to select the appropriate area in the textview:
func speechSynthesizer(synthesizer: AVSpeechSynthesizer!, willSpeakRangeOfSpeechString characterRange: NSRange, utterance: AVSpeechUtterance!) {
    ...

    // Determine the current range in the whole text (all utterances), not just the current one.
    let rangeInTotalText = NSMakeRange(spokenTextLengths + characterRange.location, characterRange.length)

    // Select the specified range in the textfield.
    tvEditor.selectedRange = rangeInTotalText
}
Next, we must access the current attributes of the selected text, and keep a copy of the font attribute. We'll need it later to make sure that the font won't get changed. Besides finding the current attributes, we'll also assign the selected text to a mutable attributed string, so we can add the foreground color attribute later:
func speechSynthesizer(synthesizer: AVSpeechSynthesizer!, willSpeakRangeOfSpeechString characterRange: NSRange, utterance: AVSpeechUtterance!) {
    ...

    // Store temporarily the current font attribute of the selected text.
    let currentAttributes = tvEditor.attributedText.attributesAtIndex(rangeInTotalText.location, effectiveRange: nil)
    let fontAttribute: AnyObject? = currentAttributes[NSFontAttributeName]

    // Assign the selected text to a mutable attributed string.
    let attributedString = NSMutableAttributedString(string: tvEditor.attributedText.attributedSubstringFromRange(rangeInTotalText).string)

}
Time to highlight the selected text, and of course to set the original font again. If we don't do that, it will be replaced by the system font:
func speechSynthesizer(synthesizer: AVSpeechSynthesizer!, willSpeakRangeOfSpeechString characterRange: NSRange, utterance: AVSpeechUtterance!) {
    ...

    // Make the text of the selected area orange by specifying a new attribute.
    attributedString.addAttribute(NSForegroundColorAttributeName, value: UIColor.orangeColor(), range: NSMakeRange(0, attributedString.length))

    // Make sure that the text will keep the original font by setting it as an attribute.
    attributedString.addAttribute(NSFontAttributeName, value: fontAttribute!, range: NSMakeRange(0, attributedString.string.utf16Count))
}
There's a small detail we have to take care of here: If the selected word is out of the visible area of the screen, then it won't be shown, therefore we should scroll the textview a bit:
func speechSynthesizer(synthesizer: AVSpeechSynthesizer!, willSpeakRangeOfSpeechString characterRange: NSRange, utterance: AVSpeechUtterance!) {
    ...

    // In case the selected word is not visible scroll a bit to fix this.
    tvEditor.scrollRangeToVisible(rangeInTotalText)
}
The last step in this method is to update the text storage property of the textview, so any changes we made to actually apply. During the editing session of the text storage property, we won't just replace the selected word with the new attributed string we set above; we will also check if there was another highlighted word previously that has been spoken already, and we'll change its foreground color back to normal (black). Note that we have already done once all that you see below:
func speechSynthesizer(synthesizer: AVSpeechSynthesizer!, willSpeakRangeOfSpeechString characterRange: NSRange, utterance: AVSpeechUtterance!) {
    ...

    // Begin editing the text storage.
    tvEditor.textStorage.beginEditing()

    // Replace the selected text with the new one having the orange color attribute.
    tvEditor.textStorage.replaceCharactersInRange(rangeInTotalText, withAttributedString: attributedString)

    // If there was another highlighted word previously (orange text color), then do exactly the same things as above and change the foreground color to black.
    if let previousRange = previousSelectedRange {
        let previousAttributedText = NSMutableAttributedString(string: tvEditor.attributedText.attributedSubstringFromRange(previousRange).string)
        previousAttributedText.addAttribute(NSForegroundColorAttributeName, value: UIColor.blackColor(), range: NSMakeRange(0, previousAttributedText.length))
        previousAttributedText.addAttribute(NSFontAttributeName, value: fontAttribute!, range: NSMakeRange(0, previousAttributedText.length))

        tvEditor.textStorage.replaceCharactersInRange(previousRange, withAttributedString: previousAttributedText)
    }

    // End editing the text storage.
    tvEditor.textStorage.endEditing()
}
And one last, but important detail:
func speechSynthesizer(synthesizer: AVSpeechSynthesizer!, willSpeakRangeOfSpeechString characterRange: NSRange, utterance: AVSpeechUtterance!) {
    ...

    // Keep the currently selected range so as to remove the orange text color next.
    previousSelectedRange = rangeInTotalText
}
At this point our work is pretty much done. There's though one minor flaw that you'll be able to see if only you run the application, but I'll tell you what exactly is it in advance. The last highlighted word (last word in orange color) doesn't get un-highlighted, and that's something that must be fixed.
You probably already imagine the solution, which no other than doing something similar to all the above but not in that method. Right next I give you one more custom method where we fix the problem I mentioned, and the inner comments will help you understand each step:
func unselectLastWord() {
    if let selectedRange = previousSelectedRange {
        // Get the attributes of the last selected attributed word.
        let currentAttributes = tvEditor.attributedText.attributesAtIndex(selectedRange.location, effectiveRange: nil)
        // Keep the font attribute.
        let fontAttribute: AnyObject? = currentAttributes[NSFontAttributeName]

        // Create a new mutable attributed string using the last selected word.
        let attributedWord = NSMutableAttributedString(string: tvEditor.attributedText.attributedSubstringFromRange(selectedRange).string)

        // Set the previous font attribute, and make the foreground color black.
        attributedWord.addAttribute(NSForegroundColorAttributeName, value: UIColor.blackColor(), range: NSMakeRange(0, attributedWord.length))
        attributedWord.addAttribute(NSFontAttributeName, value: fontAttribute!, range: NSMakeRange(0, attributedWord.length))

        // Update the text storage property and replace the last selected word with the new attributed string.
        tvEditor.textStorage.beginEditing()
        tvEditor.textStorage.replaceCharactersInRange(selectedRange, withAttributedString: attributedWord)
        tvEditor.textStorage.endEditing()
    }
}
Lastly, let's perform a small update in the speechSynthesizer(_:didFinishSpeechUtterance:) delegate method, where we'll call the above one:
func speechSynthesizer(synthesizer: AVSpeechSynthesizer!, didFinishSpeechUtterance utterance: AVSpeechUtterance!) {
    ...

    if currentUtterance == totalUtterances {
        ...

        unselectLastWord()
        previousSelectedRange = nil
    }
}
That's all. Now, every time the synthesizer speaks, the spoken word will be highlighted with an orange color.
Summary
Now that we have reached the end of the tutorial, I hope you've enjoyed it as much as I did while I was writing it. If you're thinking to develop an application that will feature the text to speech technology, you have no reason to hesitate anymore. As you witnessed, implementing and handling the TTS essentials is a really easy and straightforward process, and for the more tricky parts regarding the tracking of the progress and the spoken text highlighting you've been given with some useful guidelines that will help you stay in track. There are many ways that a text to speech app can be exploited, but focusing on the "funnier" side of it, it's definitely amusing to hear your iPhone saying whatever you dictate it to. Having nothing more to say, I leave you play with the app, and I farewell you, hoping that you've obtained important benefits out of this tutorial.
For your reference, you can download the final project here. As always, leave me comment to share your thought on the tutorial.


