

Video game live streaming has been a trend in the gaming industry the past few years, and game developers have implemented features into their games to enhance the live streaming process for the users. However, not many mobile games have supported live streaming due to the complexity of enabling the live streaming feature while doing extensive graphics processing.
Hence, in this tutorial we will demonstrate how to render a SceneKit scene into video buffers, connect to any live stream server, and stream the rendered video buffers to Twitch’s live stream server in real-time. To do so, we will use ARVideoKit to render the SceneKit scene into video buffers, Twitch Ingest Stream Endpoints to connect to Twitch’s live stream server, and LFLiveKit to push the rendered video buffers to the live stream server!
Let’s Get Started
We will start off by cloning or downloading both ARVideoKit and LFLiveKit from GitHub. ARVideoKit is an iOS Framework that enables developers to capture videos, photos, Live Photos, and GIFs with ARKit content, while LFLiveKit is a RTMP streaming SDK for iOS. We will use both libraries for implementing live streaming.
You may clone both projects using the following command in your terminal:
$ git clone https://github.com/AFathi/ARVideoKit.git
$ git clone https://github.com/LaiFengiOS/LFLiveKit.git
Or simply click the Download ZIP button found when you visit both projects’ GitHub page.
Adding the Frameworks
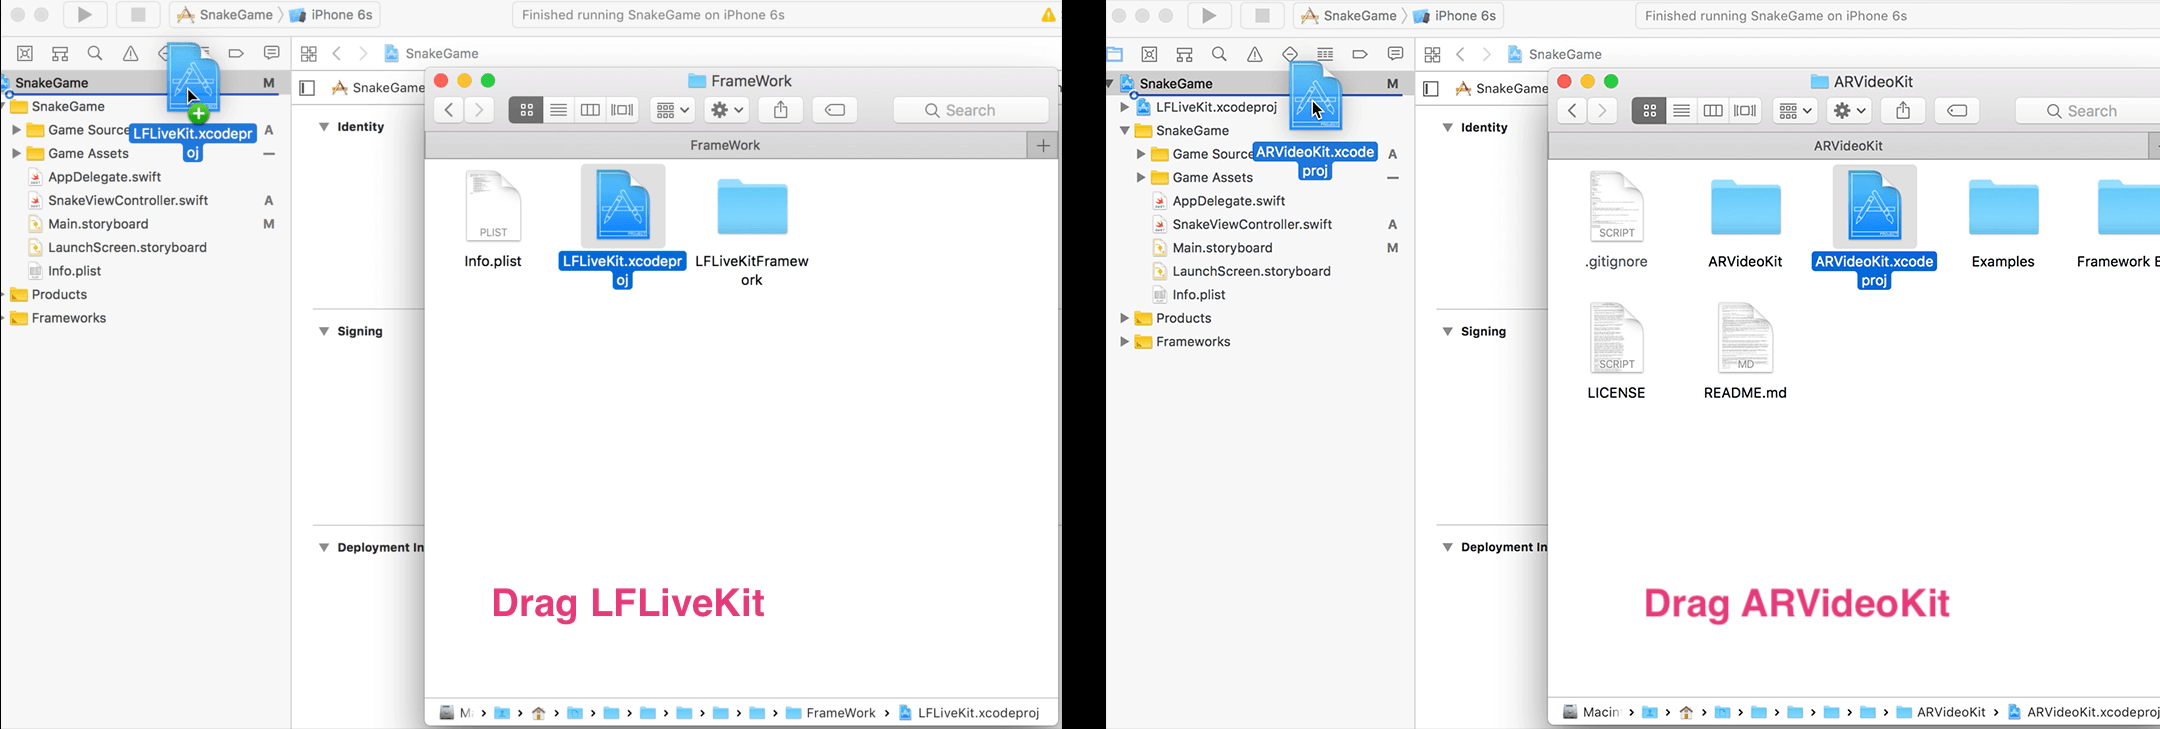
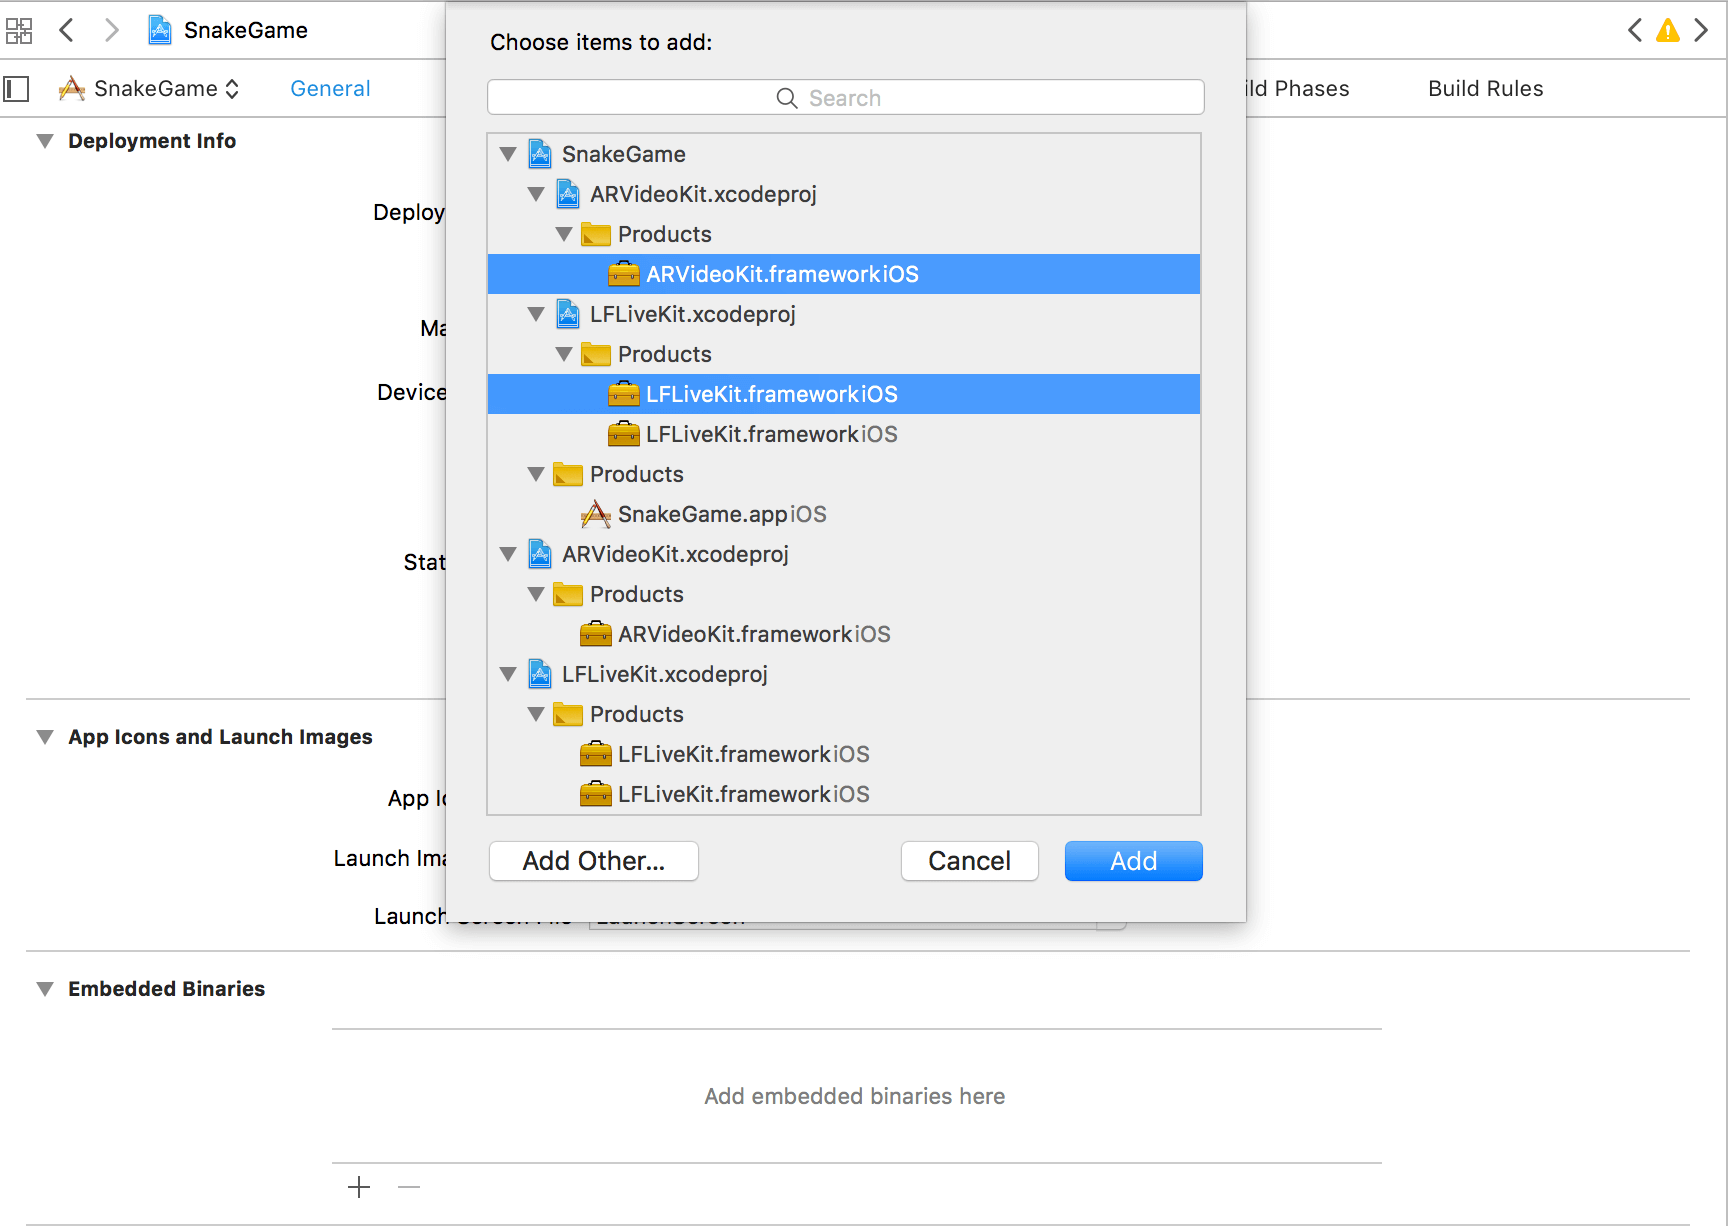
After downloading both projects, we will add them into a previously built game project by doing the following:
- Drag them into the project
- Add the
.frameworkfiles as embedded binaries
Adding User Interface
We will build the user interface programmatically instead of using Interface Builder. To keep things simple, we will create a UIButton, a UIAlertController, and a UILabel.
To do so, we will declare and initialize the following objects in the main game scene class:
// Declare and Initialize an alert controller to request the user's stream key.
var streamKeyAlert: UIAlertController = {
    let requestKeyAlert = UIAlertController(title: "Enter your Stream Key", message: "Please enter your Twitch Stream Key to begin your live stream", preferredStyle: UIAlertControllerStyle.alert)

    requestKeyAlert.addTextField { textField in
        textField.placeholder = "Insert Twitch Stream Key"
        textField.isSecureTextEntry = true
    }

    let goToTwitch = UIAlertAction(title: "Get Key from Twitch", style: .default) { _ in
        guard let url = URL(string: "https://www.twitch.tv/broadcast/dashboard/streamkey") else {return}
        UIApplication.shared.open(url, options: [:])
    }

    requestKeyAlert.addAction(UIAlertAction(title: "Save Stream Key", style: .default))
    requestKeyAlert.addAction(goToTwitch)
    requestKeyAlert.addAction(UIAlertAction(title: "Cancel", style: .cancel, handler: nil))
    return requestKeyAlert
}()

// Start Live Stream button
var startLive: UIButton = {
    let btn = UIButton(type: .system)
    btn.setTitle("Add Twitch Stream Key", for: .normal)
    btn.setTitleColor(.red, for: .normal)
    btn.backgroundColor = .white
    btn.frame = CGRect(x: 0, y: 0, width: 180, height: 60)
    btn.center = CGPoint(x: UIScreen.main.bounds.width/2, y: UIScreen.main.bounds.height*0.93)
    btn.layer.cornerRadius = btn.bounds.height/2
    btn.tag = 0
    return btn
}()

// Status Label
var statusLbl: UILabel = {
    let lbl = UILabel(frame: CGRect(x: 0, y: 0, width: 250, height: 65))
    lbl.backgroundColor = UIColor.gray.withAlphaComponent(0.6)
    lbl.center = CGPoint(x: UIScreen.main.bounds.width/2, y: lbl.bounds.height/2)
    lbl.text = "Preparing Live Stream..."
    lbl.textColor = .yellow
    lbl.textAlignment = .center
    return lbl
}()
Next, add the button and the label as subviews of the main game scene. Insert the following lines of code in the viewDidLoad() method:
self.view.addSubview(startLive)
self.view.addSubview(statusLbl)
In order to handle the button action, we then create a method called startEndLive(_:):
@objc func startEndLive(_ sender: UIButton) {

}
Now, back in viewDidLoad(), add the button’s target and connect it to the method we’ve created above:
startLive.addTarget(self, action: #selector(startEndLive(_:)), for: .touchUpInside)
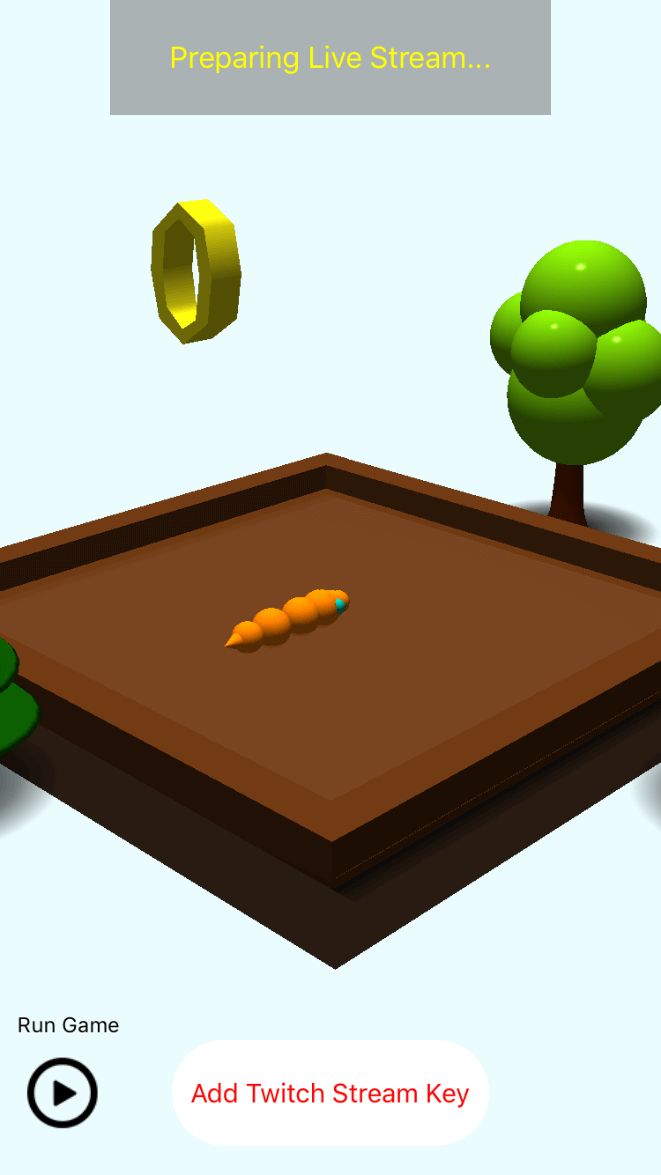
Before moving to the next section, let’s test the app and see what we’ve added so far. Your app should have a new button and a new label visible on the screen, as seen here:
Implementing the Frameworks
Now it’s time to enable the live streaming feature! We will implement ARVideoKit and LFLiveKit frameworks into the main game scene. The very first step is to import both frameworks:
import ARVideoKit
import LFLiveKit
Next, add the following delegates and their methods as an extension to your game scene class:
extension SnakeViewController: LFLiveSessionDelegate, RenderARDelegate, UITextFieldDelegate {
    // MARK: - UITextField Delegate Method
    func textFieldDidEndEditing(_ textField: UITextField, reason: UITextFieldDidEndEditingReason) {

    }

    // MARK: - RenderAR Delegate Method
    func frame(didRender buffer: CVPixelBuffer, with time: CMTime, using rawBuffer: CVPixelBuffer) {

    }

    // MARK: - LFLiveSession Delegate Method
    func liveSession(_ session: LFLiveSession?, liveStateDidChange state: LFLiveState) {

    }
}
After adding the delegate methods into the project, create an empty Swift file named TwitchIngest.swift and add the following enum (or download from here):
public enum TwitchRTMPCity: String {
    case jfk = "rtmp://live-jfk.twitch.tv/app/" //"New York City, New York"
    case mia = "rtmp://live-mia.twitch.tv/app/" //"Miami, Florida"
    case ord = "rtmp://live-ord.twitch.tv/app/" //"Chicago, Illinios"
    case atl = "rtmp://live-atl.twitch.tv/app/" //"Atlanta, Georgia"
    case dfw = "rtmp://live-dfw.twitch.tv/app/" //"Dallas, Texas"
    case sjc = "rtmp://live-sjc.twitch.tv/app/" //"San Jose, California"
    case sea = "rtmp://live-sea.twitch.tv/app/" //"Seattle, Washington"
    case ymq = "rtmp://live-ymq.twitch.tv/app/" //"Qubec, Canada"
    case yto = "rtmp://live-yto.twitch.tv/app/" //"Toronto, Canada"
    case lhr = "rtmp://live-lhr.twitch.tv/app/" //"London, United Kingdom"
    case ams = "rtmp://live-ams.twitch.tv/app/" //"Amsterdam, Netherlands"
    case rio = "rtmp://live-rio.twitch.tv/app/" //"Rio de Janiero, Brazil"
    case syd = "rtmp://live-syd.twitch.tv/app/" //"Sydney, Australia"
    case ber = "rtmp://live-ber.twitch.tv/app/" //"Berlin, Germany"
    case cdg = "rtmp://live-cdg.twitch.tv/app/" //"Paris, France"
    case hkg = "rtmp://live-hkg.twitch.tv/app/" //"Hong Kong, Hong Kong"
    case tpe = "rtmp://live-tpe.twitch.tv/app/" //"Taipei, Taiwan"
    case sel = "rtmp://live-sel.twitch.tv/app/" //"Seoul, South Korea"
    case tyo = "rtmp://live-tyo.twitch.tv/app/" //"Tokyo, Japan"
}
The enum above consist of the Twitch Stream endpoints that we will use to connect to their server. You may find the full list of endpoints here.
After implementing the delegate methods and adding the TwitchIngest.swift file to the project, we will create the needed objects to render the game’s scene and live stream the game to Twitch. We’ll start with adding the following as global variables:
// Declare a RecordAR object
var recorder:RecordAR?

// Declare and Initialize a LFLiveSession object
var session: LFLiveSession = {
    /*----👇---- LFLiveKit Configuration ----👇----*/
    let audioConfiguration = LFLiveAudioConfiguration.defaultConfiguration(for: LFLiveAudioQuality.high)
    let videoConfiguration = LFLiveVideoConfiguration.defaultConfiguration(for: LFLiveVideoQuality.high2)

    // Initialize LFLiveKit session using the audio and video configurations above
    let twitchSession = LFLiveSession(audioConfiguration: audioConfiguration, videoConfiguration: videoConfiguration, captureType: LFLiveCaptureTypeMask.captureMaskAudioInputVideo)

    // Assign the initalized LFLiveSession to `var session:LFLiveSession`
    return twitchSession!
}()

// Retrieve user's stream key from UserDefaults. If user's key is nil, return an empty string.
var userStreamKey:String = {
    if let key = UserDefaults.standard.object(forKey: "userStreamKey_Twitch") as? String {
        return key
    }else{
        return ""
    }
    }()
    // Store `userStreamKey` new value to UserDefaults.
    {
    willSet {
        UserDefaults.standard.set(newValue, forKey: "userStreamKey_Twitch")
    }
}
In the viewDidLoad() method we will initialize and configure recorder (a RecordAR variable) and session (a LFLiveSession variable), by adding the following:
// Initialize ARVideoKit recorder
recorder = RecordAR(SceneKit: mainSceneView)
/*----👇---- ARVideoKit Configuration ----👇----*/

// Set the renderer's delegate
recorder?.renderAR = self

recorder?.requestMicPermission = .manual

// Configure the renderer to retrieve the rendered buffers and push it a live stream 📺
recorder?.onlyRenderWhileRecording = false

// Set the LFLiveSession's delegate
session.delegate = self
session.preView = self.view
To prepare the recorder, insert the following statement in the viewWillAppear(_ animated: Bool) method:
override func viewWillAppear(_ animated: Bool) {
    // Prepare ARVideoKit recorder with the new configurations
    recorder?.prepare()
}
Implement the Start/End Live Stream Function
Now that the configuration of the RecordAR and LFLiveSession variables are ready, let’s move on to the implementation of start and end live stream feature.
For the startEndLive(_:) method, update the method by adding the following:
// MARK: - Live Stream Functions
@objc func startEndLive(_ sender: UIButton) {
    // Check if user stream key is stored. If so, enable Start Live Stream button. Otherwise, ask for user's stream key.
    if userStreamKey.count > 8 {
        sender.isSelected = !sender.isSelected
        if sender.isSelected {
            sender.setTitle("End Live Video", for: UIControlState())

            // Prepare RTMP server address
            let stream = LFLiveStreamInfo()
            stream.url = "\(TwitchRTMPCity.jfk.rawValue)\(userStreamKey)"

            // Begin a live stream to the RTMP address above
            self.session.running = true
            self.session.startLive(stream)

            // Update current Live stream status UI
            self.statusLbl.alpha = 1
            self.statusLbl.text = "Preparing Live Stream..."
            self.statusLbl.textColor = .yellow
        } else {
            sender.setTitle("Start Live Video", for: UIControlState())
            // End the live stream
            self.session.running = false
            self.session.stopLive()

            // Update current Live stream status UI
            self.statusLbl.alpha = 1
            self.statusLbl.text = "Live Video ended"
            self.statusLbl.textColor = .gray
        }
    } else {
        streamKeyAlert.textFields?.first?.text = ""
        streamKeyAlert.textFields?.first?.delegate = self
        present(streamKeyAlert, animated: true)
    }
}
In the block of code above, we are checking whether the user have previously stored their Twitch Stream Key in the game. If so, the user will be able to begin their live stream to the New York City (jfk) streaming server. Otherwise, we request the user to enter their Twitch stream key.
Next, we will update the viewWillAppear(_:) method by adding the following:
override func viewWillAppear(_ animated: Bool) {
    // Prepare ARVideoKit recorder with the new configurations
    recorder?.prepare()

    // Check if user stream key is stored. If so, enable Start Live Stream button. Otherwise, enable "Add Twitch Stream Key" button.
    if userStreamKey.count > 8 {
        startLive.setTitle("Start Live Video", for: .normal)
        startLive.setTitleColor(.black, for: .normal)
    } else {
        startLive.setTitle("Add Twitch Stream Key", for: .normal)
        startLive.setTitleColor(.red, for: .normal)
    }

}
In the block of code above, we simply update the startLive button title and color depending on whether the app has the user’s Twitch Stream key stored or not.
Using the Delegate Methods
So far we have the start/end live stream functionality implemented; however, we only start the live stream session without pushing the rendered video buffers from the game scene to the server. This part is where we finally use the delegate methods to stream both audio and video to Twitch’s server!
To begin, we will update the textFieldDidEndEditing(_:,_:) delegate method to store the user’s Twitch Stream key locally:
// MARK: - UITextField Delegate Method
func textFieldDidEndEditing(_ textField: UITextField, reason: UITextFieldDidEndEditingReason) {
    guard let keyField = streamKeyAlert.textFields?.first, let key = keyField.text else { return }
    if reason == .committed && textField == keyField && key.count > 8 {
        userStreamKey = key

        // Enable "Start Live Video" button
        startLive.setTitle("Start Live Video", for: .normal)
        startLive.setTitleColor(.black, for: .normal)
    }
}
After having the user’s stream key stored locally, we will be ready to stream the rendered audio & video buffers of the game to Twitch. To stream the rendered buffers, update the frame(didRender:, with:, using:) delegate method:
func frame(didRender buffer: CVPixelBuffer, with time: CMTime, using rawBuffer: CVPixelBuffer) {
    if session.running {
        session.pushVideo(buffer)
    }
}
Finally, let’s update the liveSession(_ :, liveStateDidChange:) delegate method to change the statusLbl text based on the live stream status.
// MARK: - LFLiveSession Delegate Method
func liveSession(_ session: LFLiveSession?, liveStateDidChange state: LFLiveState) {
    switch state {
    case LFLiveState.ready:
        statusLbl.alpha = 1
        statusLbl.text = "Ready to start live video"
        statusLbl.textColor = .green
        break;
    case LFLiveState.pending:
        statusLbl.alpha = 1
        statusLbl.text = "Getting ready..."
        statusLbl.textColor = .red
        break;
    case LFLiveState.start:
        statusLbl.alpha = 1
        statusLbl.text = "You're LIVE!"
        statusLbl.textColor = .green
        break;
    case LFLiveState.error:
        statusLbl.alpha = 1
        statusLbl.text = "An Error Occurred. Try Again."
        statusLbl.textColor = .red

        let errorAlert = UIAlertController(title: "Error", message: "An error occurred while connecting to your Twitch Stream. Would you like to edit your Twitch stream key?", preferredStyle: .actionSheet)
        let editKey = UIAlertAction(title: "Edit Stream Key", style: .default) { _ in
            self.present(self.streamKeyAlert, animated: true)
        }
        errorAlert.addAction(editKey)
        errorAlert.addAction(UIAlertAction(title: "Cancel", style: .cancel))
        present(errorAlert, animated: true)

        SwiftSpinner.hide()
        break;
    case LFLiveState.stop:
        statusLbl.alpha = 1
        statusLbl.text = "Ready to start new live video"
        statusLbl.textColor = .green
        break;
    default:
        break;
    }
}
In the block of code above, I created a UIAlertController that asks the user if they want to update their Twitch stream key if an error occurs while live streaming.
Before running the application on your iOS device, we need to make sure to add the usage description of the camera and microphone in the app’s Info.plist.
To do so, add the following to the plist source code:
NSMicrophoneUsageDescription
stream audio
NSCameraUsageDescription
stream video
Alternatively, you can add the properties using the Property Editor:

Ready to Test!
That’s it, I hope you find the tutorial helpful! You may now run your app and click Add Twitch Stream Key to test it out.
To download the full project, you can find it on GitHub. If you have any questions or thoughts on this tutorial, please leave me comment below and let me know.


