By now, if you’ve followed our tutorials, you should have a basic understanding about UITableView and how to build a simple app. This week, we’ll talk about something new – Storyboards. This is one of the most exciting features introduced in Xcode 4.2 and iOS 5 SDK. It makes your life, as an iOS developer, simpler and lets you easily design the user interface of your iOS app.
In this tutorial, we’ll show you how to use Storyboards to build a Navigation interface and integrate it with UITableView. We try to keep thing simple and focus on explaining the concept. So no fancy interface or pretty graphic. We’ll leave the artwork to future tutorials.
Okay, let’s get started.
What’s Navigation Controller?
Before we move onto the coding part, as usual, let’s have a brief introduction about Navigation Controller and Storyboards.
Like table view, navigation controller is another UI element you commonly find in iOS app. It provides a drill-down interface for hierarchical content. Take a look at the built-in Photos app, YouTube, and Contacts. They’re all built using Navigation Controller to display hierarchical content. Usually table view and navigation controller work hand in hand for most of the apps. This doesn’t mean you have to use both together, however.
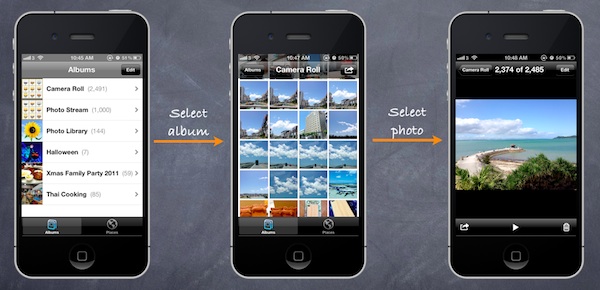
An example of Navigation Controller – Photos App
Storyboards Overview
Storyboard, as mentioned earlier, is a new feature available since the release of Xcode 4.2. It offers a complete new way for iOS developer to create and design user interface. Before the introduction of Storyboard, it’s especially hard for beginner to create navigation (and tab) interface. Every interface is stored in a separate nib file. On top of it, you have to write code to link all interfaces together and describe how the navigation works.
With Storyboards, all screens are stored in a single file. This gives you a conceptual overview of the visual representation for the app and shows you how the screens are connected. Xcode provides a built-in editor to layout the Storyboards. You can define the transition (known as segues) between various screens simply using point and click. This doesn’t mean you do not need to write code for the user interface. But Storyboards significantly reduce the amount of code you need to write. Here is a sample screenshot to show you how Storyboards look like in Xcode.
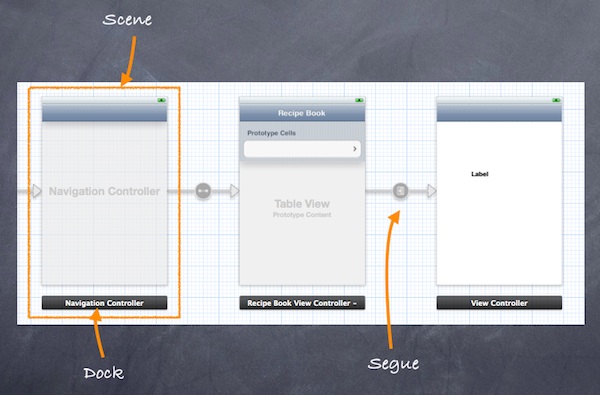
Storyboards – Scene and Segue
Scene and Segues
When working with Storyboards, Scene and Segues are two terms you always come across. Within a Storyboard, a scene refers to a single view controller and its view. Each scene has a dock, which is used primarily to make action and outlet connections between the view controller and its views.
Segue sits between two scenes and manages the transition between two scenes. Push and Modal are two common types of transition.
Creating Navigation Controller in Storyboards
Now let’s get our hands dirty and create our own Storyboards. In this tutorial, we’ll build a simple app that makes use of both UITableView and UINavigationController. We use the table view to display a list of recipes. When users select any of the recipe, the app navigates to the next screen showing the details. It’ll be easy.
First, fire up Xcode (make sure you’re using 4.2 or up) and create a new project using “Single View application” template.

Xcode Project Template Selection
Click “Next” to continue. In reference to the below figure, fill in all the required values for the Xcode project. Make sure you enables the “Use Storyboards” option.
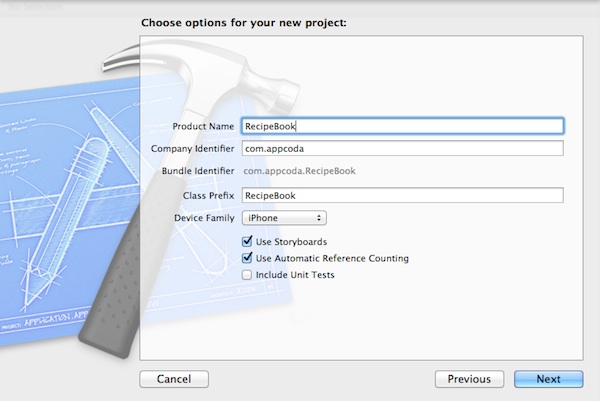
RecipeBook Xcode Project
Click “Next” to continue. Xcode then asks you where you saves the “SimpleTable” project. Pick any folder (e.g. Desktop) to save your project.
You may notice there is a minor difference in the Xcode project, as compared with those you came across in previous tutorials. The .xib file (interface builder) is replaced with the MainStoryboard.storyboard file.
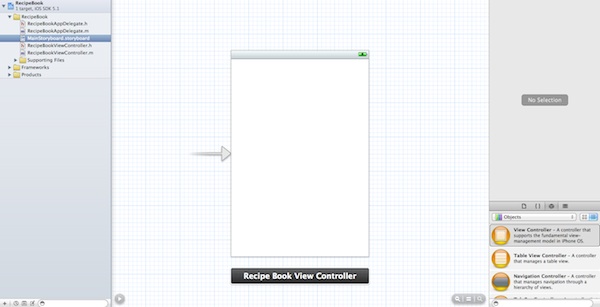
Default Storyboard in Xcode
By default, Xcode creates a standard view controller. As we’ll use navigation controller to control the screen navigation, we first change the view controller to navigation controller. Select the Simply select “Editor” in the menu and select “Embed in”, followed by “Navigation Controller”.
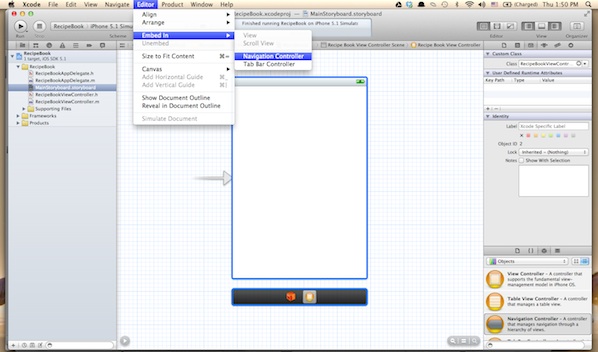
Embed View Controller in Navigation Controller
Xcode automatically embeds the RecipeBook View Controller with Navigation Controller. Your screen should look like this:
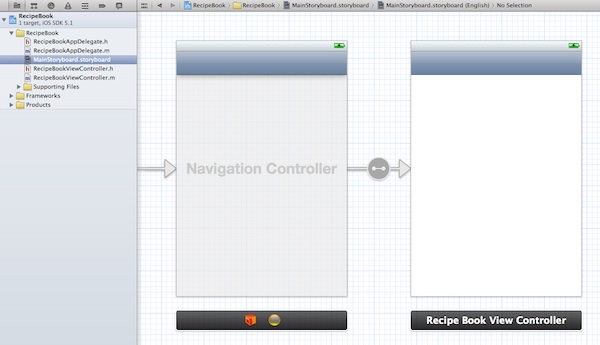
Embedded View Controller with Navigation Controller
Before moving on, let’s run the app and see how it looks. Hit the “Run” button and you should get an app with a blank view but added with a navigation bar. This shows you’ve successfully embed your RecipeBook View Controller in a Navigation Controller.
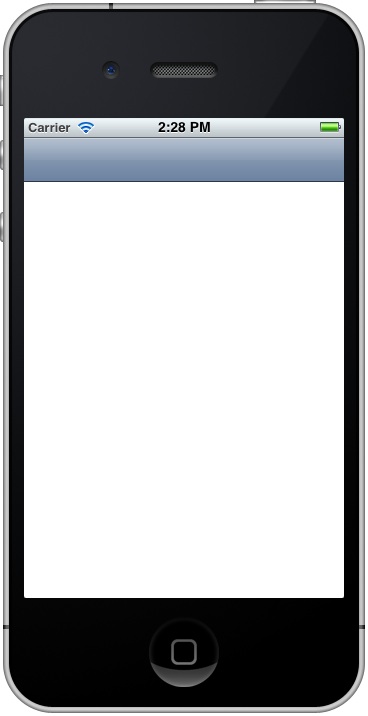
Recipe Book App with Empty View Controller
Adding Table View for Your Data
Next, we’ll add a table view for displaying our recipes. Select “Table View” in Object Library and drag it into “Recipe Book View Controller”.
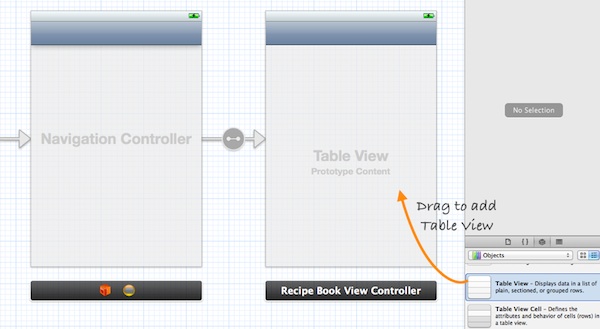
Add Table View to Recipe Book View Controller
The next thing we have to do is to write code to populate the table data (i.e. recipes). In Project Navigator, select “RecipeBookViewController.h”. Append “
#import

@interface RecipeBookViewController : UIViewController

@end
Next, select “RecipeBookViewController.m” and define an instance variable (i.e. recipes array) for holding the table data.
@implementation RecipeBookViewController {
    NSArray *recipes;
}
In the “viewDidLoad” method, add the following code to initialize the “recipes” array:
- (void)viewDidLoad
{
    [super viewDidLoad];
	// Initialize table data
    recipes = [NSArray arrayWithObjects:@"Egg Benedict", @"Mushroom Risotto", @"Full Breakfast", @"Hamburger", @"Ham and Egg Sandwich", @"Creme Brelee", @"White Chocolate Donut", @"Starbucks Coffee", @"Vegetable Curry", @"Instant Noodle with Egg", @"Noodle with BBQ Pork", @"Japanese Noodle with Pork", @"Green Tea", @"Thai Shrimp Cake", @"Angry Birds Cake", @"Ham and Cheese Panini", nil];
}
Lastly, we have to implement two datasource methods to populate the table data: “tableView:numberOfRowsInSection” and “tableView:cellForRowAtIndexPath”. Recalled that these two methods are part of the UITableViewDataSource protocol, it’s mandatory to implement the methods when configuring a UITableView. The first method is used to inform the table view how many rows are in the section, while the second method is used to fill the cell data. So let’s add the below code.
- (NSInteger)tableView:(UITableView *)tableView numberOfRowsInSection:(NSInteger)section
{
    return [recipes count];
}

- (UITableViewCell *)tableView:(UITableView *)tableView cellForRowAtIndexPath:(NSIndexPath *)indexPath
{
    static NSString *simpleTableIdentifier = @"RecipeCell";

    UITableViewCell *cell = [tableView dequeueReusableCellWithIdentifier:simpleTableIdentifier];

    if (cell == nil) {
        cell = [[UITableViewCell alloc] initWithStyle:UITableViewCellStyleDefault reuseIdentifier:simpleTableIdentifier];
    }

    cell.textLabel.text = [recipes objectAtIndex:indexPath.row];
    return cell;
}
For your reference, this is the complete source code of “RecipeBookViewController.m”.
//
//  RecipeBookViewController.m
//  RecipeBook
//
//  Created by Simon Ng on 14/6/12.
//  Copyright (c) 2012 Appcoda. All rights reserved.
//

#import "RecipeBookViewController.h"

@interface RecipeBookViewController ()

@end

@implementation RecipeBookViewController {
    NSArray *recipes;
}

- (void)viewDidLoad
{
    [super viewDidLoad];
	// Initialize table data
    recipes = [NSArray arrayWithObjects:@"Egg Benedict", @"Mushroom Risotto", @"Full Breakfast", @"Hamburger", @"Ham and Egg Sandwich", @"Creme Brelee", @"White Chocolate Donut", @"Starbucks Coffee", @"Vegetable Curry", @"Instant Noodle with Egg", @"Noodle with BBQ Pork", @"Japanese Noodle with Pork", @"Green Tea", @"Thai Shrimp Cake", @"Angry Birds Cake", @"Ham and Cheese Panini", nil];
}


- (void)viewDidUnload
{
    [super viewDidUnload];
    // Release any retained subviews of the main view.
}

- (BOOL)shouldAutorotateToInterfaceOrientation:(UIInterfaceOrientation)interfaceOrientation
{
    return (interfaceOrientation != UIInterfaceOrientationPortraitUpsideDown);
}

- (NSInteger)tableView:(UITableView *)tableView numberOfRowsInSection:(NSInteger)section
{
    return [recipes count];
}

- (UITableViewCell *)tableView:(UITableView *)tableView cellForRowAtIndexPath:(NSIndexPath *)indexPath
{
    static NSString *simpleTableIdentifier = @"RecipeCell";

    UITableViewCell *cell = [tableView dequeueReusableCellWithIdentifier:simpleTableIdentifier];

    if (cell == nil) {
        cell = [[UITableViewCell alloc] initWithStyle:UITableViewCellStyleDefault reuseIdentifier:simpleTableIdentifier];
    }

    cell.textLabel.text = [recipes objectAtIndex:indexPath.row];
    return cell;
}

@end
Lastly, we have to establish the connection between the Table View and the two methods we just created. Go back to the Storyboard. Press and hold the Control key on your keyboard, select the “Table View” and drag to the View Controller icon. Your screen should look like this:
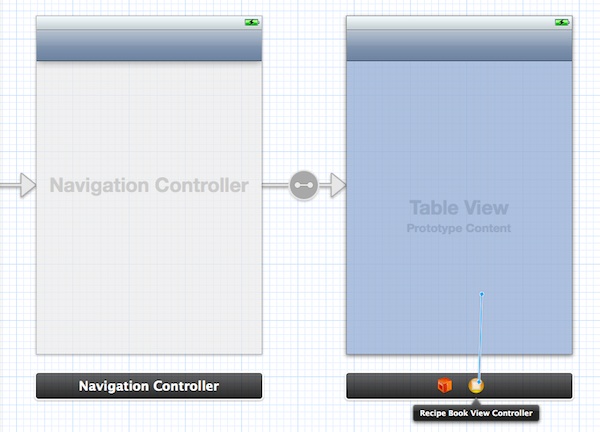
Connect Table View with Datasource and Delegate
Release both buttons and a pop-up shows both “dataSource” & “delegate”. Select “dataSource” to make a connection between the Table View and its data source. Repeat the above steps and make a connection with the delegate.
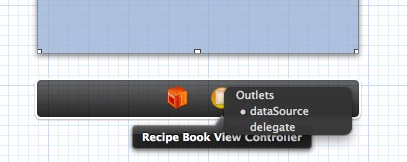
Datasource and Delegate Outlets
Before we test out the app, one last thing to do is add a title for the navigation bar. Simply select the navigation bar of “Recipe Book View Controller” and fill in the “Title” under “Attributes Inspector”. Remember to hit ENTER after keying in the title to effectuate the change.
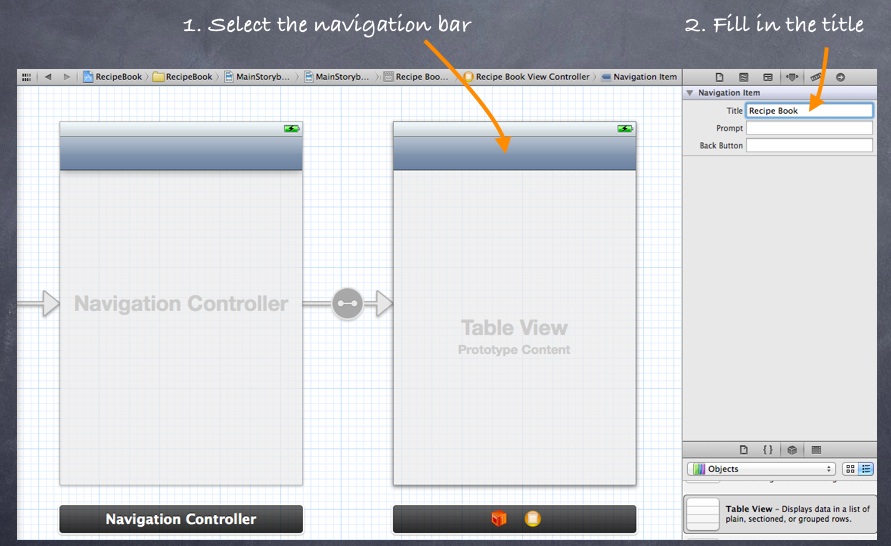
Assign a Title for the Navigation Bar
Now, it’s time to execute your code. Hit the Run button and test out your app. If your code is correct, you should end up with an app displaying a list of recipes. The app should be very similar to the Simple Table app you’ve built before. Here, the major difference is it’s embedded in a Navigation Controller.
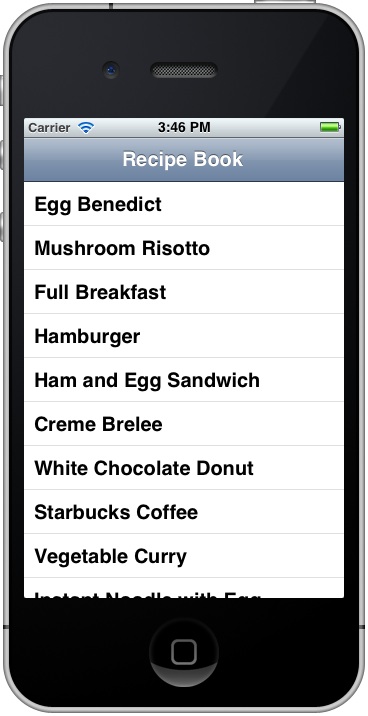
Simple Table App with Navigation Bar
Introducing Prototype Cell
Do you remember how we customize the table cell? Several weeks ago, we showed you how to design your own custom table cell using Interface Builder. In brief, you need to create a separate nib for the cell and programmatically load it in the table. With the introduction of Prototype Cell in Storyboard, it’s much simpler to create a custom cell. Prototype cell allows you to easily design the layout of a table cell right in the Storyboard editor.
We will not go into the details of the customization in this tutorial but just simply add “Disclosure Indicator” in the cell.
To add a prototype cell, select the Table View. Under “Attributes Inspector”, change the “Prototype Cells” value from “0” to “1”. As soon as you change the value, Xcode automatically shows you a prototype cell. In order to show you another table style, let’s also change the “Style” option from “Plain” to “Group”.
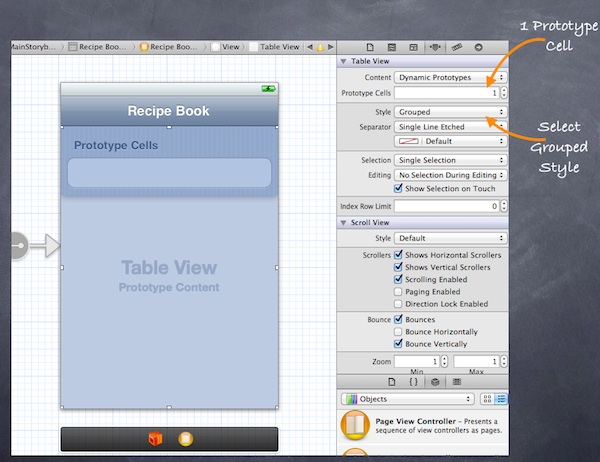
Adding Prototype Cell for Table View
Next, select the “Prototype Cell”. You should be able to customize the options of the cell. To display a disclosure indication for each cell, change the “Accessory” to “Disclosure Indicator”. It’s important to define the Reuse identifier. You can think of this identifier as the cell’s ID. We can use it to refer to a particular prototype cell. Here, we define the identifier as “RecipeCell” that matches with our code.
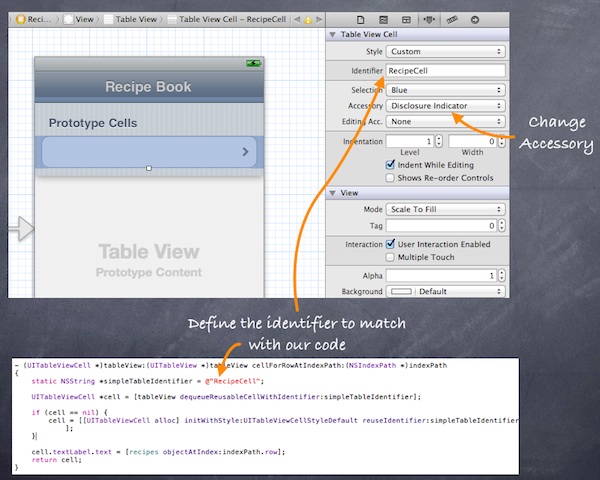
Define Identifier and Accessory for Prototype Cell
Now, run the app again. It looks a bit difference and we’re making progress. We’ve changed the table style to “Grouped” style and added the disclosure indicator.
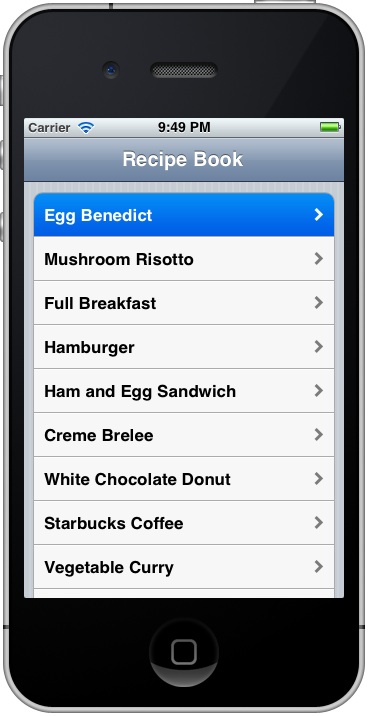
Recipe App with Disclosure Indicator
Adding Detail View Controller
Finally it comes to the last part of the tutorial. What’s missing is the detail view controller that shows the details of recipe. The detail view controller should be displayed when user taps on any of the recipes.
Okay, let’s add a new View Controller as the detail view controller.
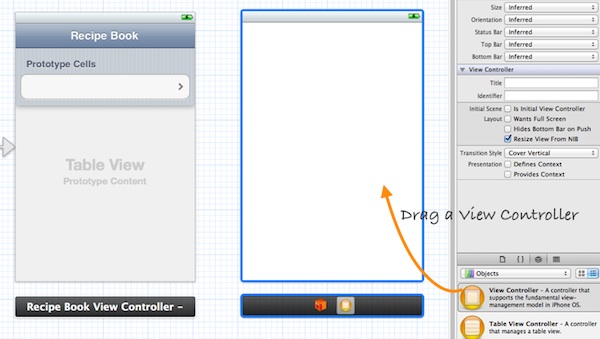
Add a New View Controller
The primary purpose of this tutorial is to show you how to implement navigation controller. We’ll keep the detail view as simple as possible. Let’s just a label displaying the recipe name. Drag the label from Object library and place it at the center of the view. You may change the font size or type to make the label look better.
Next, we’ll add a segue to connect the prototype cell and the new View Controller. It’s very straightforward to add a segue object. Press and hold the control key, click on the prototype cell and drag to the View Controller.
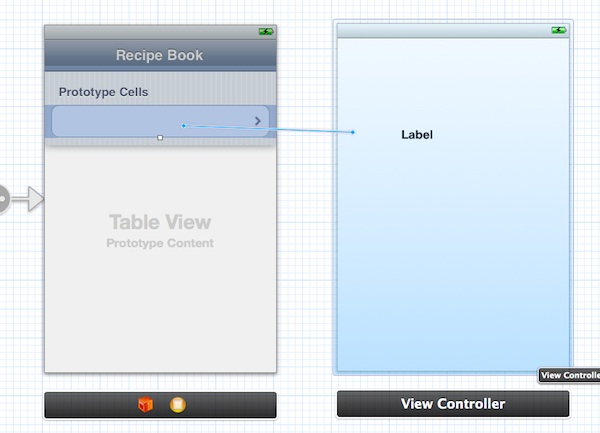
Connect Both Scenes with Segue
Release both buttons and a pop-up shows three types of Segues (push, modal and custom).

Storyboard Segues (Push, Modal and Custom)
As explained before, segue defines the type of transition between scenes. For standard navigation, we use “Push”. Once chosen, Xcode automatically connects both scenes with Push segue. Your screen should look like this:
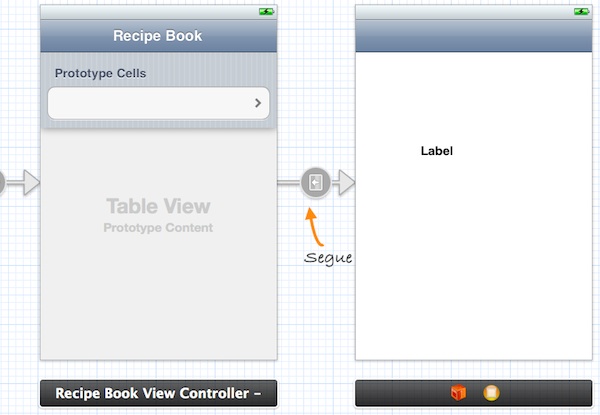
Storyboard Segue
Now, let’s run the app again. As you select any of the recipes, the app shows the detail view controller. Though the detail view controller just shows a label, you already make the navigation work.

Receipe App With Detail Controller
What’s Coming Next?
This is a lengthy tutorial and finally it comes to an end. I hope you have a better understanding about Storyboards and know how to design your own navigation controller. However, there is still one thing left: how can you pass the recipe name from the “Recipe Book View Controller” to the “Detail View Controller”? I’ll leave this to the next tutorial which should be published by the end of this week.
Storyboards, UITableView and Navigation Controller are the fundamental UI elements and commonly used when building iOS apps. So take some time to go through the tutorial and make sure you have a thorough understanding of the material. As always, if you have any questions, leave me comment or ask it at our forum.
Update #1: The next tutorial about data passing is now available!
Update #2: You can now download the full source code for your reference.


