Editor’s note: This is a guest post contributed by Eugene Trapeznikov. Imagine you’ve completed the development and testing of your app, you’re now ready to submit it for production release. The problem is that some of the web service URLs are pointing to the testing servers, and the API keys are configured for the test environment. Before submitting the app for Apple’s review, you’ll need to modify all these API keys and URLs to fit for production. This sounds good, right? But instead of changing the values back and forth between the development and production environment, is there a better approach to handle both the development and production builds? This is exactly what Eugene is going to discuss with you.
Enter Eugene’s tutorial.
For starters, some of you may be wondering why you should use two separate databases and environments while developing your app. The reason is because as you continue to build new features or develop your app, you want to separate the development version from the existing public production app. Standard software development practice is to use different environments for the different versions of the software, and in our case, iPhone apps. The development version of an app typically uses a different database (or other systems such as analytics) from the production environment. This is one reason why we should use separate servers and databases for different environments. Developers commonly use dummy images or data during testing. In testing or development environments, it’s not uncommon for one to use test data such as “test comment”, “argharghargh” and “one more test comment”. Obviously, you don’t want your real users to see these kind of messages. In the case of if your app using an analytics system, you may even send thousands of events during the testing stage. Again, you don’t want to mix the test data with the production data in the same database. This is why its always recommended to separate the development and production environments.
While using two separate environments, your app needs to have a way to find out which environment it should connect to. One popular method is to define a global variable in your main app delegate, which will initialize your app to development or production mode.
enum environmentType {
    case development, production
}

let environment:environmentType = .production

switch environment {
case .development:
    // set web service URL to development
    // set API keys to development
    print("It's for development")
case .production:
    // set web service URL to production
    // set API keys to production
    print("It's for production")
}
This approach requires you to change the global variable every time you want to switch from one environment to another. While this method maybe quick and convenient, it comes with some major limitations. First, because we are using a single bundle ID for both the development and production environments, you cannot install both app versions on a single device. This becomes inconvenient when you want to test the development version of the app, but still use the production version of the app on the same device. Also, this approach allows for an opportunity to accidentally ship the development app to the store. If you forget to change that single global variable, you will be shipping the wrong app to your users. I remember once I forgot to change the global variable before submitting my app to the App Store, and users got the development version of the app. That was awful.
In this article I will show you a better approach to differentiate between the development and production builds. Specifically, we will create a development target in XCode. This method is suitable for both new and existing large projects, so you can use one of your existing apps to follow along in this tutorial.
By applying this approach, the production and development versions of the app will have the same base code, but can have different icons, bundle IDs and point to separate databases. The distribution and submission processes will be very straightforward. Most importantly, your testers and managers will be able to install both versions of the app on the same device, so they fully understand which version they’re trying out.
How to Create a New Target
So how can you create a development target in Xcode? I will walk you through the procedure step-by-step with my template project “todo”. You can use your own project and follow the procedures:
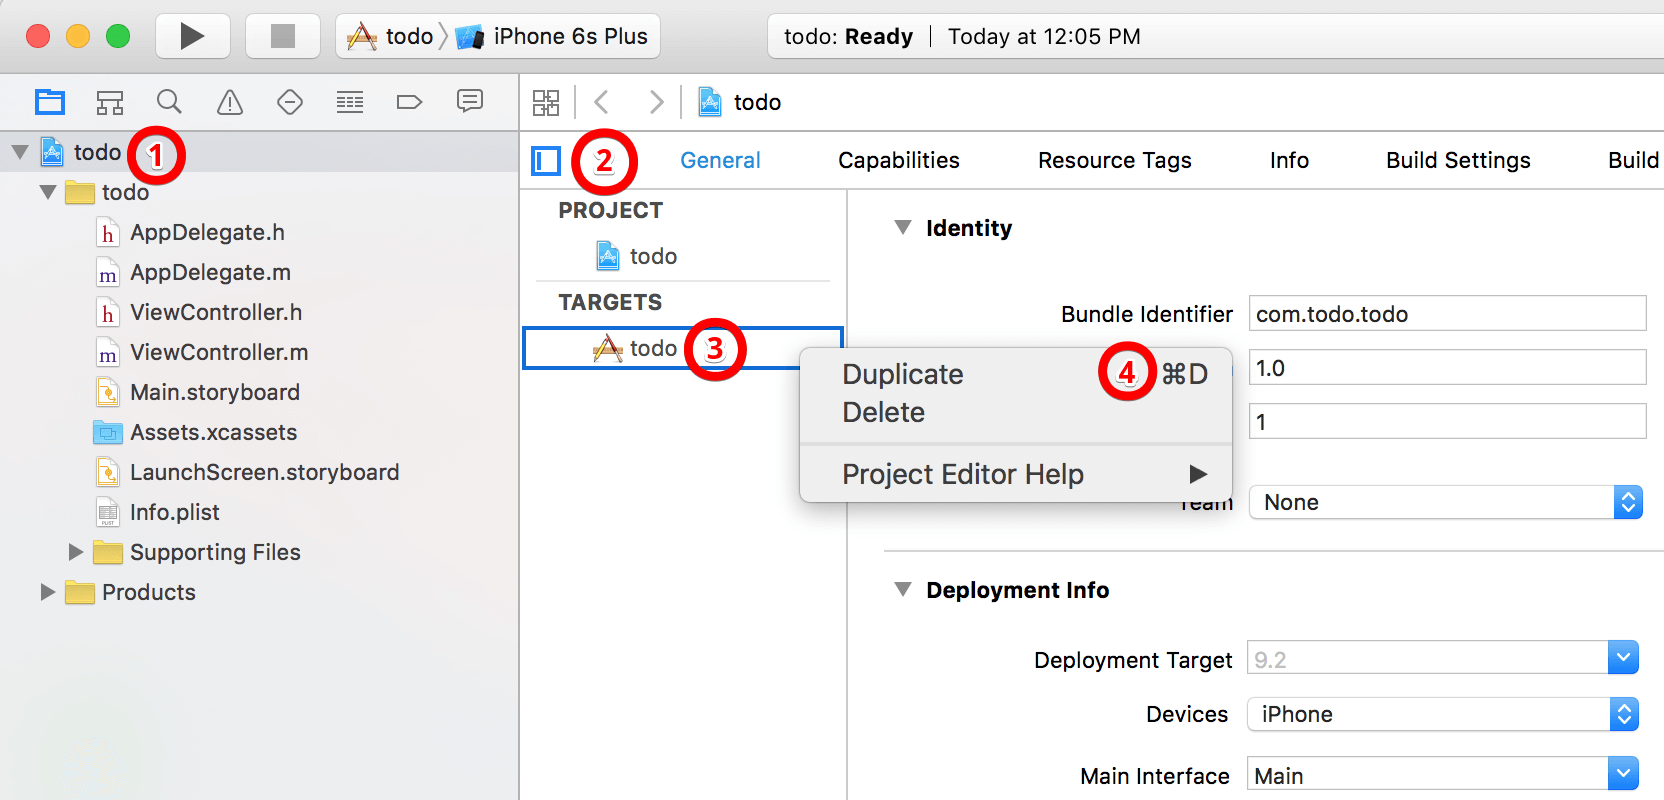
1. Go to project’s settings in the Project Navigator panel. Under the Targets sections, right click the existing target and select Duplicate to copy your existing target.
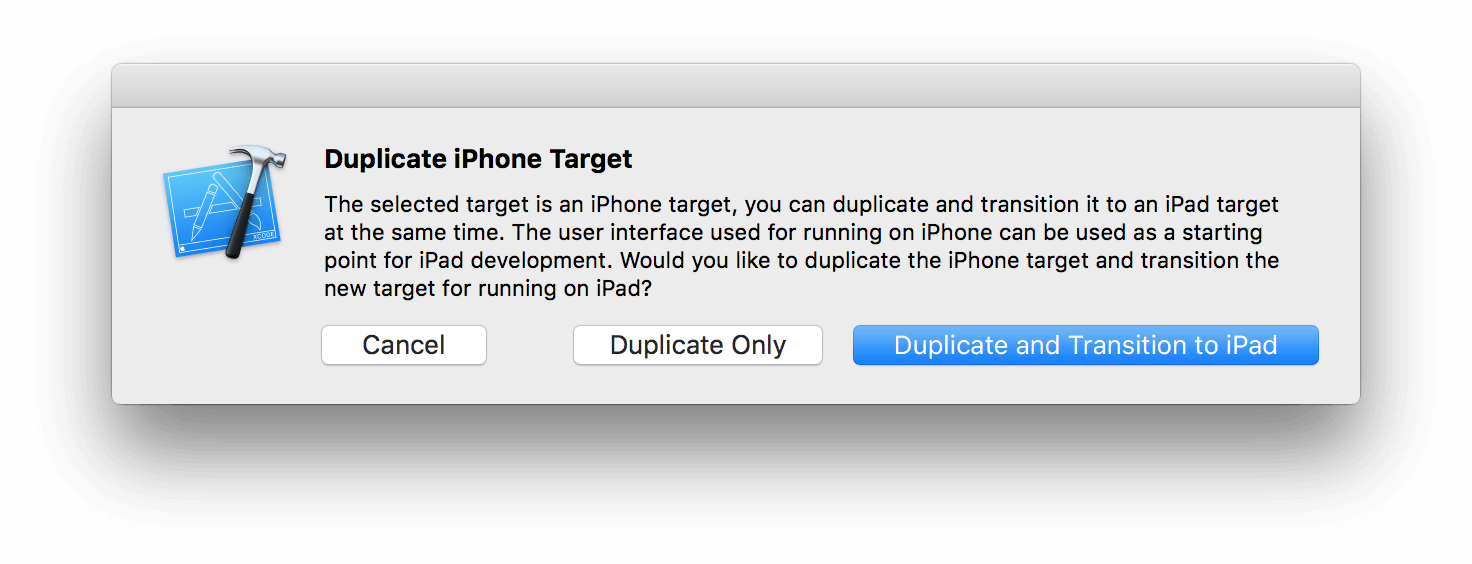
2. Xcode will ask you if your new target is for iPad development. For this tutorial, we just select “Duplicate Only”.
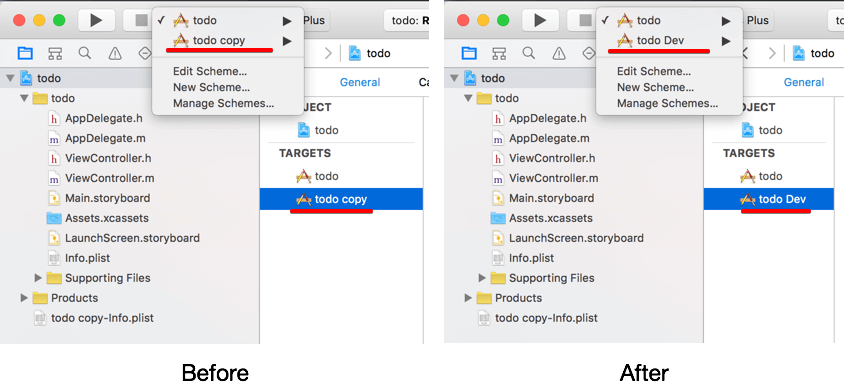
3. Now that we have a new target and a new build scheme with the name todo copy. Let’s rename it so it is easier to understand.
- Select the new target in the TARGETS list. Press
Enterto edit the text and put a more appropriate name. I prefer “todo Dev”. You’re free to choose whatever name you like. - Next, go to “Manage Schemes…”, select the new scheme you created in step 1 and press “Enter”. Make the scheme name the same as the new target name (which is the one you choose for the new target.)
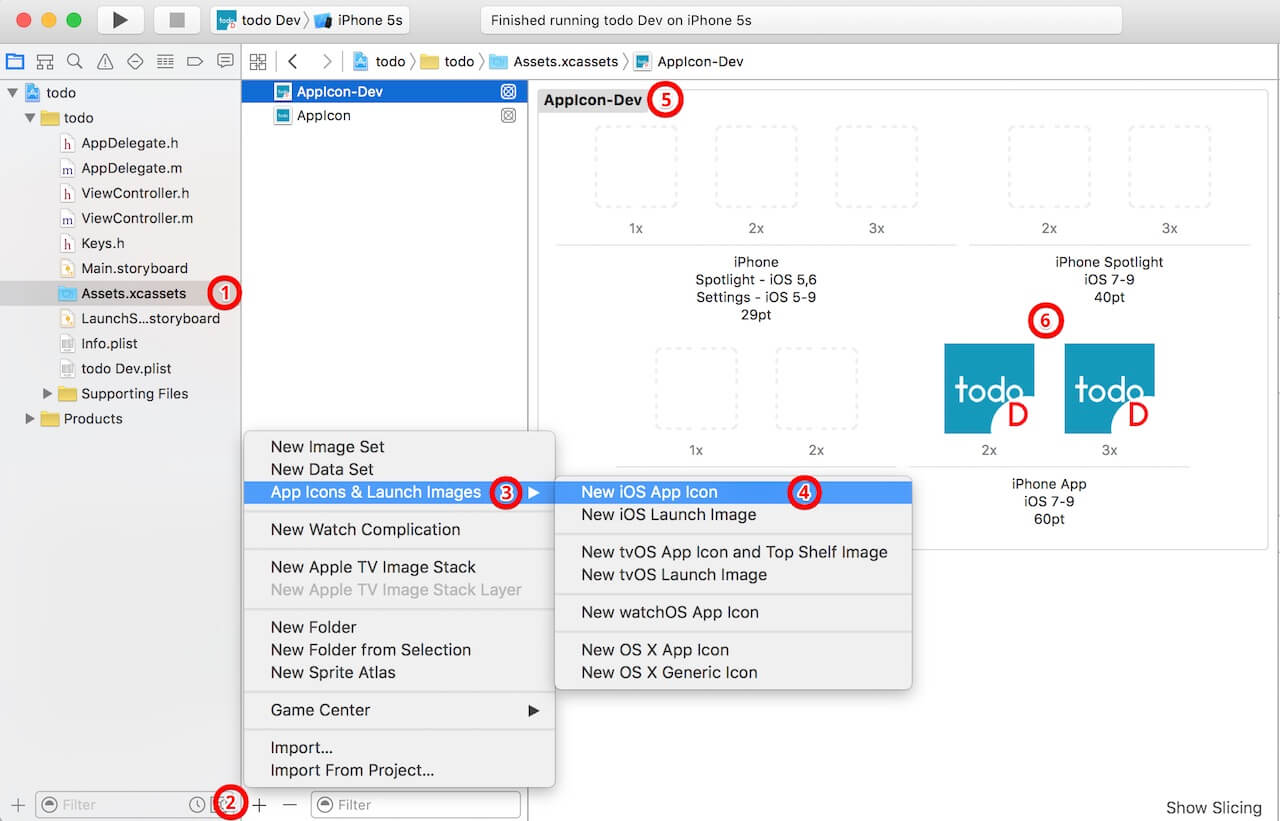
4. Steps 4 is optional, but highly recommended. If you want to make it easy and dummy-proof to distinguish between the development and production builds, you should use separate icons and launch screens for each version. This will make it obvious for your testers to know which app they are using, and hopefully prevent you from shipping a development version. 🙂
Go to Assets.xcassets and add a new icon. Right click icon > App Icons & Launch Images > New iOS App Icon. Rename the new icon to “AppIcon-Dev” and add your own images.
5. Now go back to project settings, select your development target and change the bundle identifier. Say, you can simply append “Dev” to the original ID. If you performed step 4, make sure you change the app icon setting to the one created in the previous step.
![]()
6. Xcode automatically added a plist file for your target (e.g. todo copy-Info.plist). You can find it at the root folder of your project. Rename it from “copy” to “Dev”, and place it right below your original plist file. Here, it will be easier for you to manage the file.
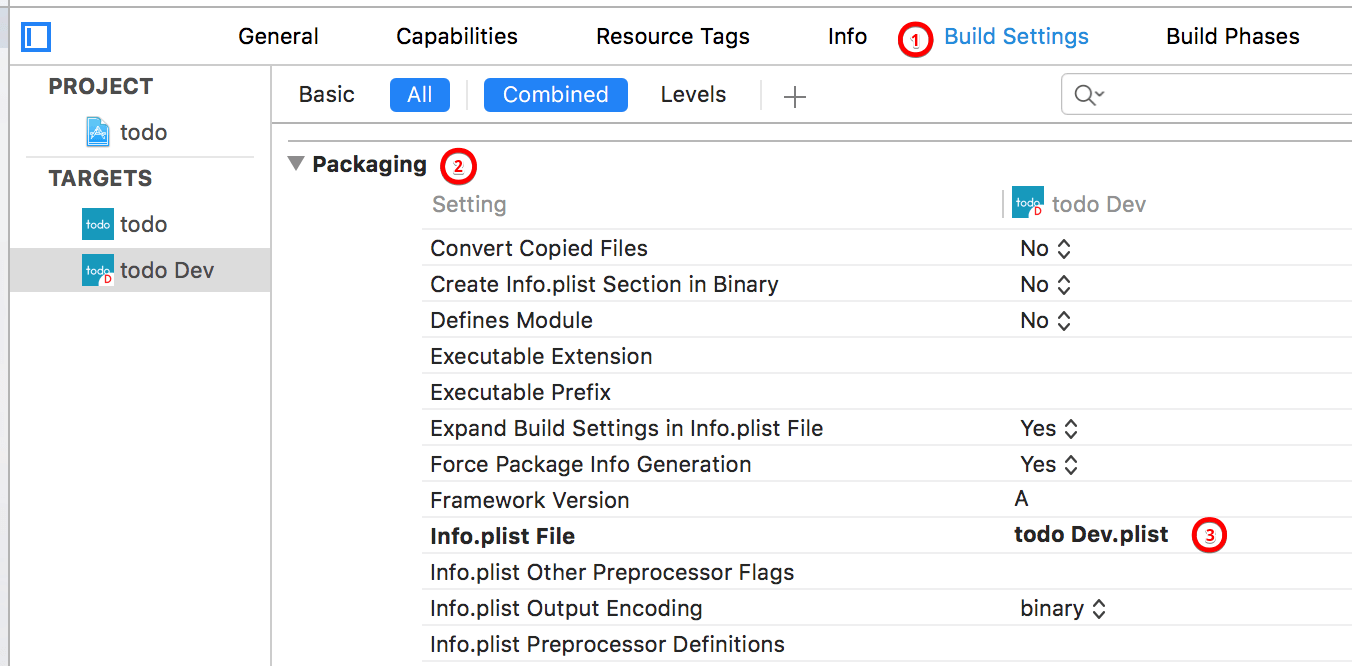
7. Now open “Build Settings” of your development target, scroll to “Packaging”, and change the value to the development plist file (e.g. todo Dev.plist).
8. Lastly, we’ll configure a preprocessing macro/compiler flag for both production and development targets. So later we can use the flag in our code to detect which version the app is currently running.
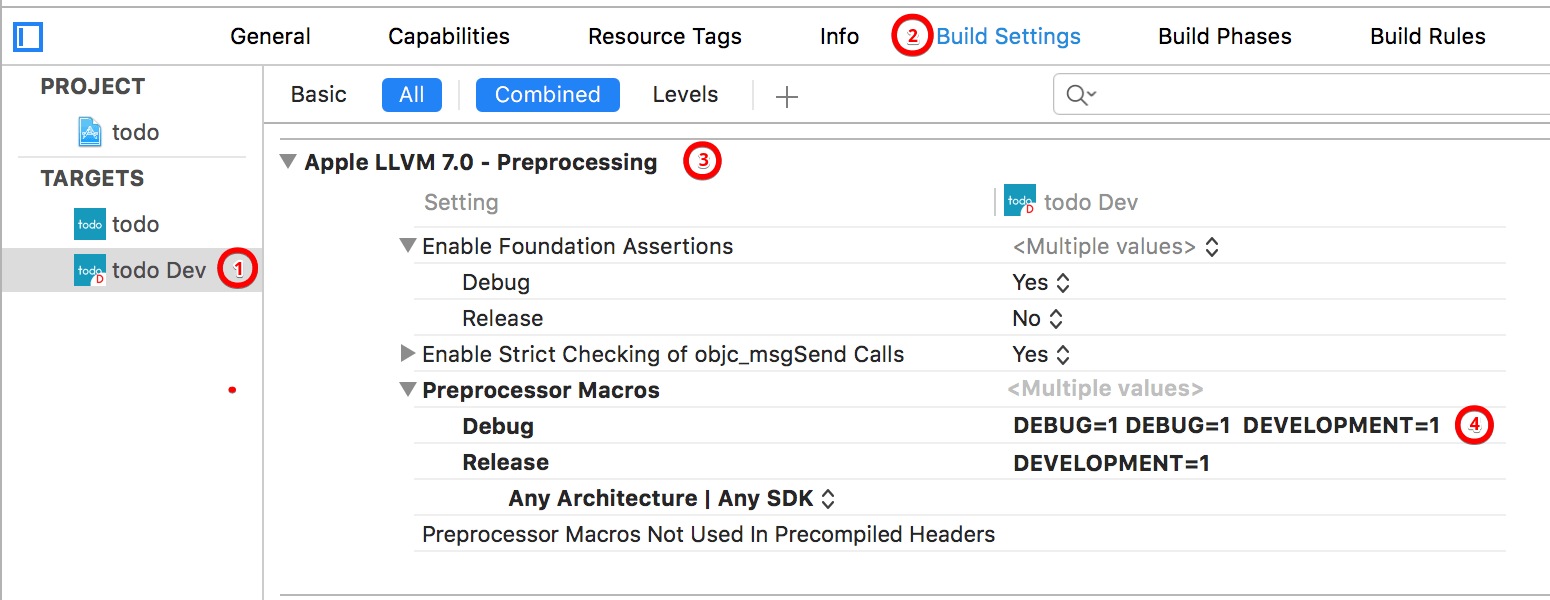
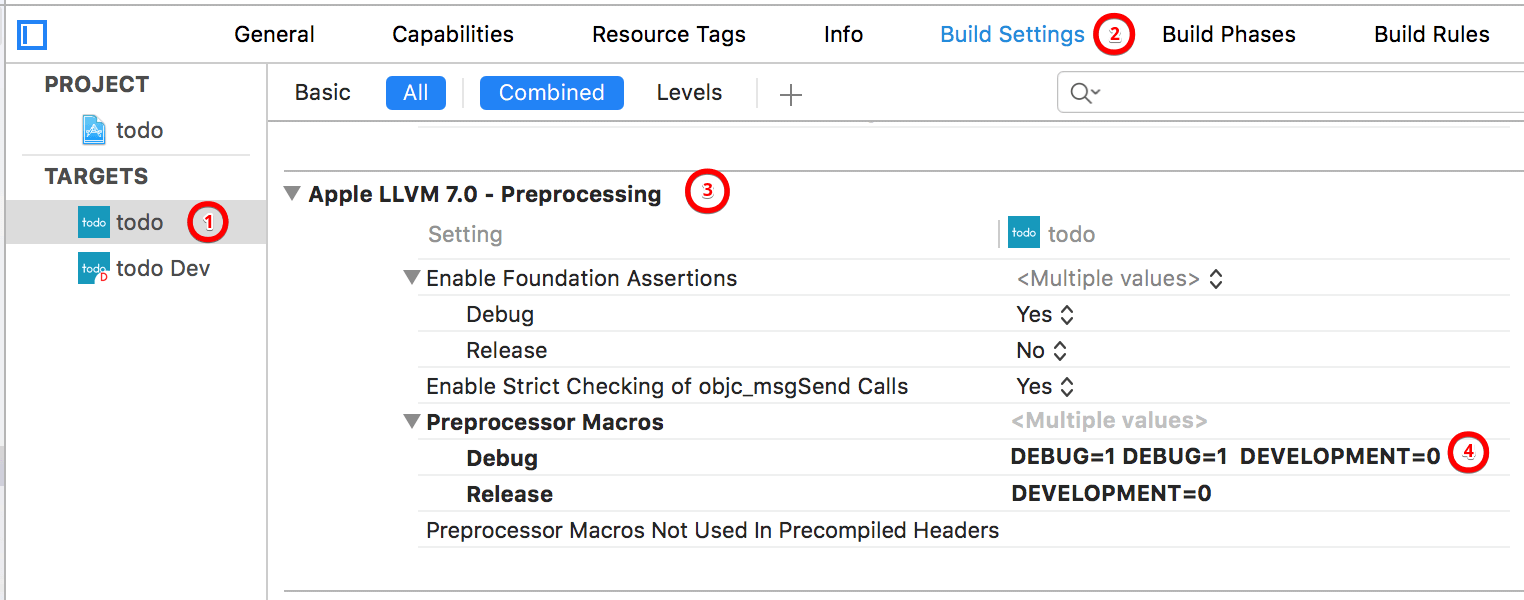
For Objective-C projects, go to Build Settings and scroll to Apple LLVM 7.0 - Preprocessing. Expand Preprocessor Macros and add a variable to both Debug and Release fields. For the development target (i.e. todo Dev), set the value to DEVELOPMENT=1. On the other hand, set the value to DEVELOPMENT=0 to indicate a production version.
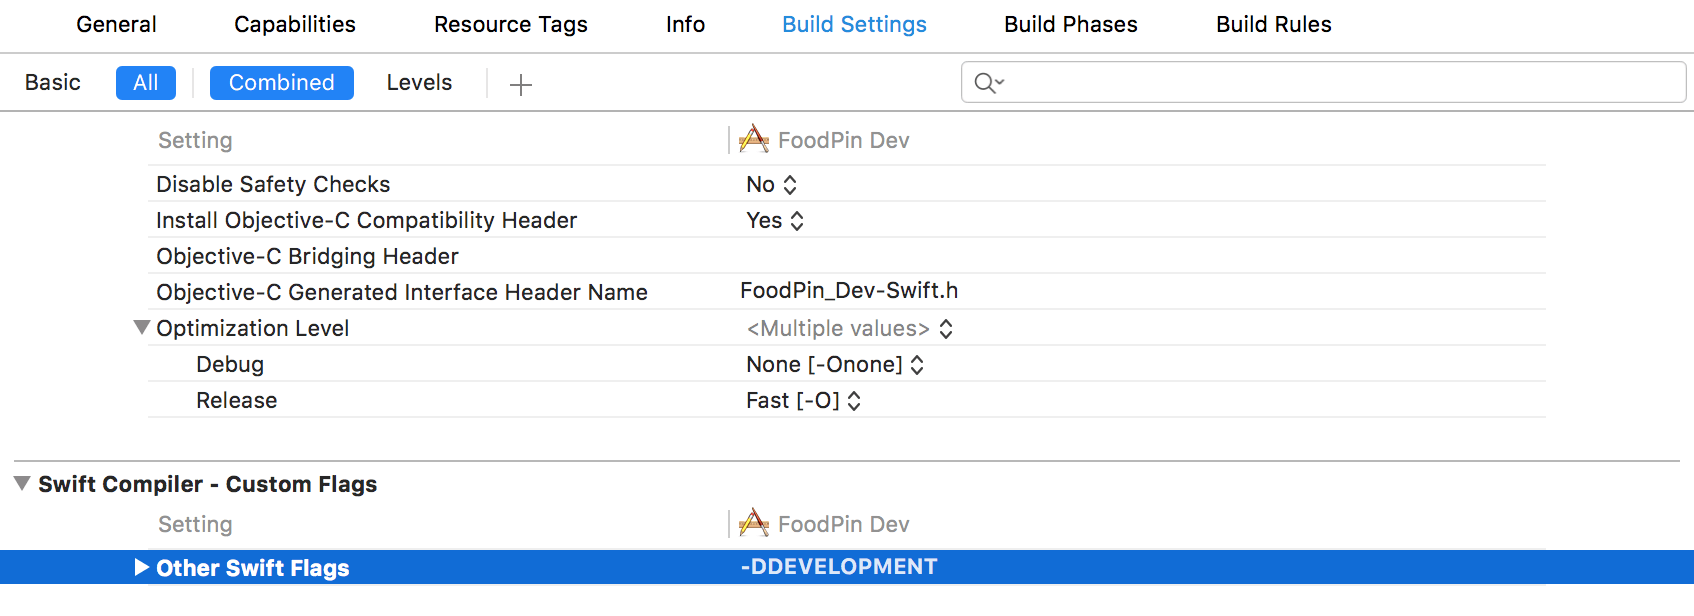
For Swift project, the compiler no longer supports preprocessor directives. Instead, it uses compile-time attributes and build configurations. To add a flag to indicate a development build, select the development target. Go to Build Settings and scroll down to the Swift Compiler - Custom Flags section. Set the value to -DDEVELOPMENT to indicate the target as a development build.
Now that you have created and configured the development target, what’s next?
Using the Target and Macro
With the macro DEV_VERSION configured, we can utilize it in the code and perform dynamic compilation for your project. Here is a simple example:
Objective-C:
#if DEVELOPMENT
#define SERVER_URL @"http://dev.server.com/api/"
#define API_TOKEN @"DI2023409jf90ew"
#else
#define SERVER_URL @"http://prod.server.com/api/"
#define API_TOKEN @"71a629j0f090232"
#endif
In Objective-C, you can use #if to check the condition of DEVELOPMENT, and set up the URLs/API keys accordingly.
Swift:
#if DEVELOPMENT
let SERVER_URL = "http://dev.server.com/api/"
let API_TOKEN = "DI2023409jf90ew"
#else
let SERVER_URL = "http://prod.server.com/api/"
let API_TOKEN = "71a629j0f090232"
#endif
In Swift, you can still use #if to evaluate the build configurations for dynamic compilations. However, instead of using #define to define a primitive constant, we simply use let to define a global constant in Swift.
Now when you select the “todo Dev” scheme and run the project, you’ll create the development build automatically with the server configuration set to the development environment. You’re now ready to upload the development build to TestFlight or HockeyApp for your testers and managers to test out.
Later if you need to create a production build, you can simply select the “todo” scheme. No code change is required.
Some Notes on Managing Multiple Targets
1. When you add new files to the project, don’t forget to select both targets to keep your code in sync in both builds.
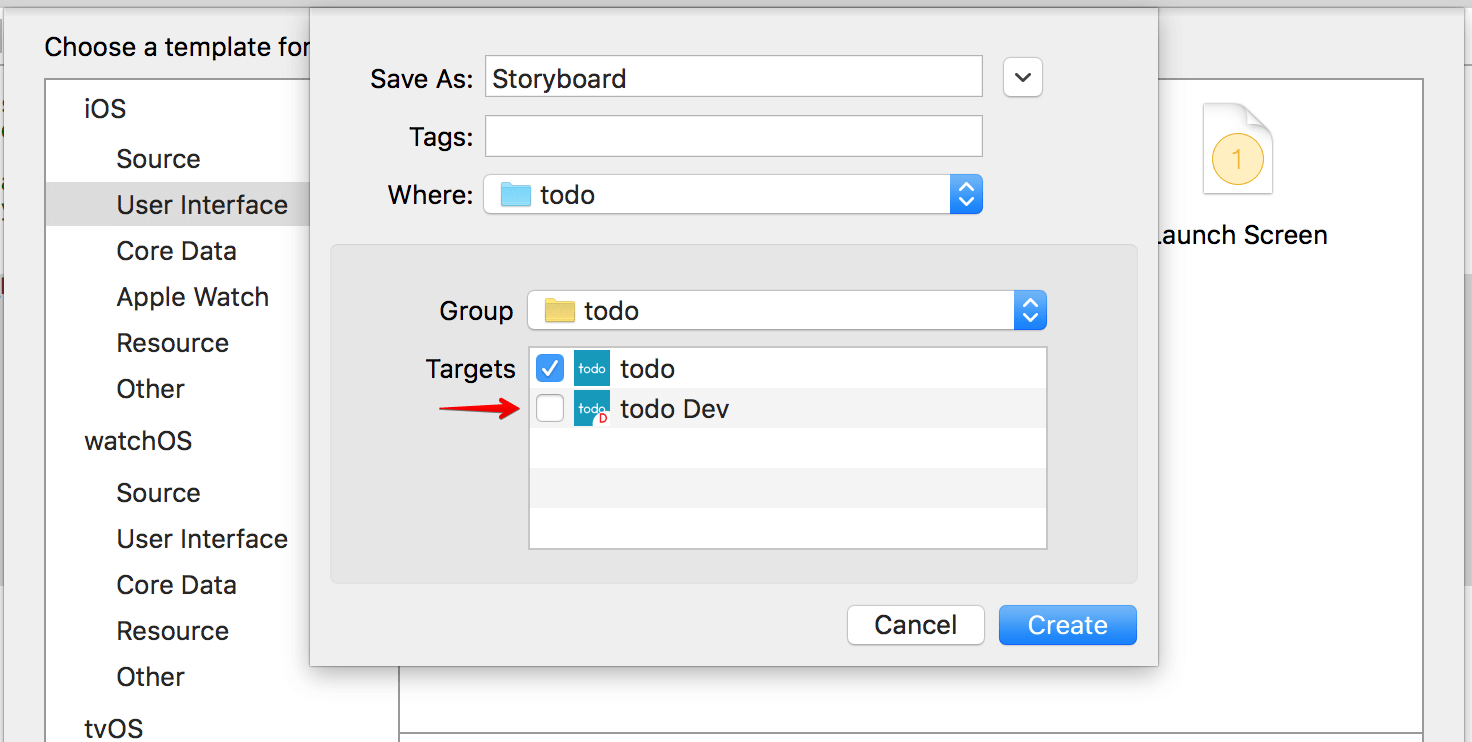
2. In case you’re using Cocoapods, don’t forget to add the new target to your podfile. You can use link_with to specify multiple targets. You can further consult the Cocoapods documentation for details. Your podfile should look something like this:
source 'https://github.com/CocoaPods/Specs.git'
platform :ios, '7.0'
workspace 'todo'
link_with 'todo', 'todo Dev'
pod 'Mixpanel'
pod 'AFNetworking'
3. If you use continuous integration system such as Travis CI or Jenkins, don’t forget to configure to build and deliver both targets.
What do you think about this tutorial? How do you manage your development and production builds? Leave me comment and share your thought.


