

In WWDC 2019, Apple announced a brand new feature for Xcode 11; the capability to create a new kind of binary frameworks with a special format called XCFramework. That was fantastic news to anyone, since an ongoing inconvenient situation that was lasting for years finally came to its end. Up until then, a binary framework could be used in one target platform only, and for a specific family of devices.
For example, it was officially impossible to build a framework that would contain code aiming on both real iOS devices and the Simulator; unofficial solutions had come up of course with the so-called fat frameworks, however such a framework usually didn’t make it all the way to App Store; it was a good reason for rejection, so fat frameworks were good just for development. Similarly, it was impossible to add a single framework to multiple platforms, such as on both iOS and macOS, so distributing different frameworks for different platforms was the rule.
All that came to change with the XCFramework format, since it’s a type of framework that provides a common roof for multiple variants of the same framework. A XCFramework can wrap up a variant of a framework that would be working on iOS devices, another variant that would be working on Simulator, another one for macOS, one more for watchOS, and so on. In short, XCFramework can bundle up any framework with flavours for any platform or device that Xcode supports. Everything in one single place, with one single item to distribute only.
However, all that is news from last year. This year, in WWDC 2020, Apple announced something else regarding XCFrameworks that boosts their distribution, starting in Xcode 12, Swift packages can be used to distribute binary frameworks of the XCFramework format. That is really amazing news, because so far a Swift package could be used in order to distribute only open-source code. Now, it’s becoming feasible to distribute binary code as well bundled up in a XCFramework. We had talked thoroughly about Swift packages in the past in this post, and you’re prompted to read it if you haven’t done so already.
This post is dedicated to all the above, and to be specific, it has a double goal:
- To teach how to create a XCFramework binary framework based on frameworks variants that provide similar functionality for multiple target platforms.
- To teach learn how to use Swift packages in order to distribute a XCFramework, either those are local or remote.
Before I present the roadmap of this tutorial, I really recommend you to watch the WWDC 2019 – Session 416, because it contains several interesting stuff that won’t be discussed here, such as versioning or framework author considerations. You should also watch this year’s video about how to distribute binary frameworks as Swift packages as it will give you an overview of how all this works. Finally, keep this help page as it provides the outline on how to create a XCFramework.
Having said all the above, let’s have a quick look to what’s coming next, and then let’s start working our way towards the creation of a XCFramework binary framework.
An Overview Of What’s Coming Up
One could say that this tutorial is composed by two parts. The first one is the place where we’re going to learn how to create a XCFramework binary framework from the beginning. In order to do that, we’ll start from scratch with two other frameworks that offer similar features for both iOS and macOS platforms, and we’ll use Terminal (extensively in this post) to archive them, to build the desired XCFramework, as well as to perform other command line based tasks. The final goal here is to make it possible to add the same binary framework only (the XCFramework) to an iOS and a macOS application, and have everything work properly in all possible devices; iOS devices, Simulator, Macs.
The second part of the tutorial focuses on how to use the XCFramework that we’ll produce in the first step along with Swift packages. In fact, we’ll meet two different variations of that; in the first one, we’ll see how to have a binary framework as a Swift package where both the framework and the package exist locally. In the second, we’ll learn how to make both of them reside remotely, with the binary framework and the package being stored in different locations but still being possible to use them as one entity.
Even though we’ll create various projects in Xcode in order to create the base frameworks or the Swift packages, the demo applications that we’ll use to try everything on can be downloaded from here. What you’ll find in that starter pack is two projects, one for iOS and one for macOS, that contain a view subclass (UIView and NSView respectively) along with a counterpart XIB file. In the next part you’re going to understand what these views are all about, and what we want to achieve with them. For now download that starter material, take a quick look if you want, and then get ready for some really interesting work.
Creating The Two Binary Frameworks
We’ll start off by creating the two frameworks mentioned in the previous part from scratch. One for the iOS platform, and one for macOS. We’ll add similar source code to both of them that will be performing the exact same functionality on both platforms, which will be no more than just loading a view’s contents from a XIB file. That simple functionality is more than enough in order to demonstrate the topic of this post, and it has the least importance in the overall process.
Focusing for a moment on the source code, both frameworks will implement a protocol called XIBLoadable. It will contain two required methods; one for loading the XIB contents, and one that will be adding the view object using XIBLoadable to its parent view by setting the necessary auto layout constraints. A default implementation of both methods will be provided in a protocol’s extension, so they can be used out of the box on each platform. Obviously, their implementation will depend on the UIKit framework on iOS, and on the AppKit framework on macOS. However, the way they’ll be used eventually is going to be identical for both platforms. The best thing above all is that the same framework (XCFramework) will be used in both cases!
Before we begin, you are advised to store both framework projects we’re just about to create in the same subfolder. This will help you get along smoothly later with the commands that we’ll need to write on Terminal.
With that said, it’s about time to bring the iOS based framework to life.
The XIBLoadable-iOS Framework
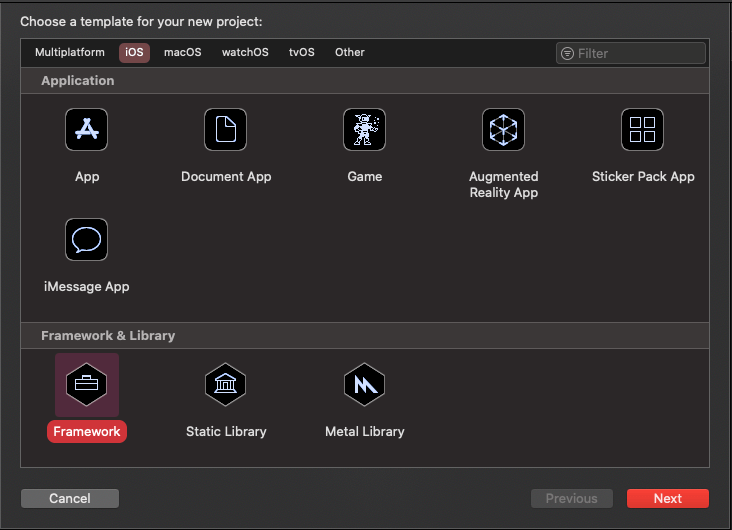
In Xcode, go to the File > New > Project… menu in order to start a new project. Choose the iOS platform, and the Framework template in the Framework & Library section.
In the next step name the framework as XIBLoadable-iOS. We’ll call the macOS version XIBLoadable-macOS respectively, and that naming will help perform common operations on both frameworks, making possible to easily distinguish them later on.
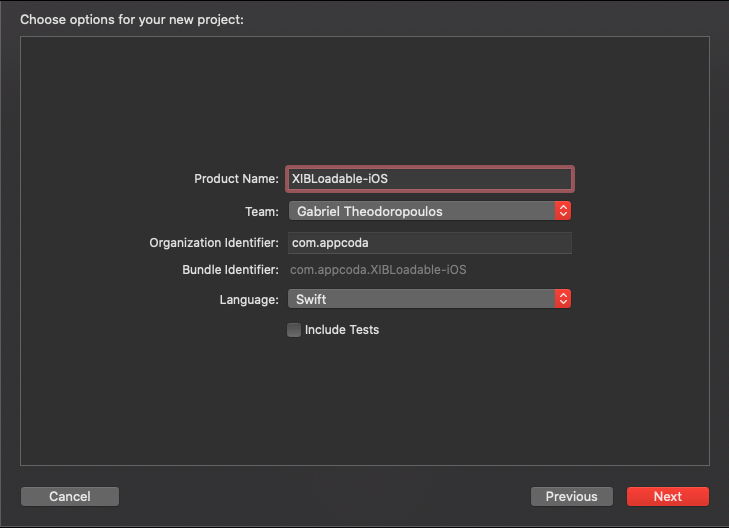
Finally, find a proper place to save the new project in your disk and get finished with that creation process.
Right after the project gets ready and lies just in front of your eyes, press Cmd+N in your keyboard and choose to create a new Swift File for the iOS platform. We need a source file in order to add the XIBLoadable protocol implementation.
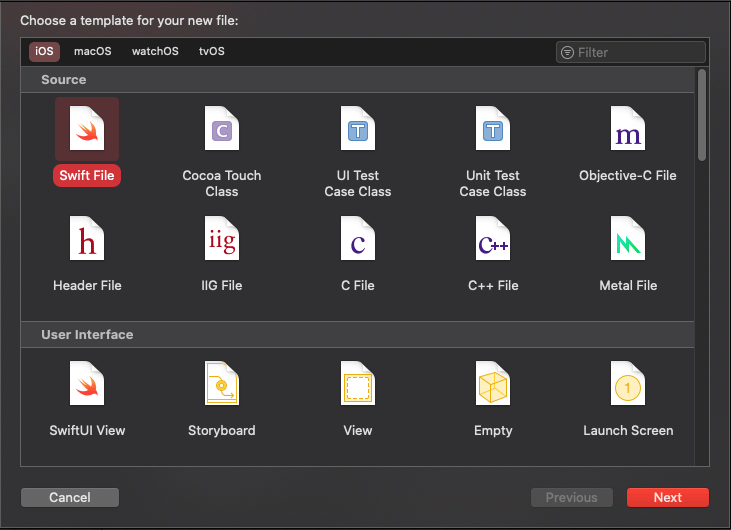
It doesn’t really matter how that file will be named. For convenience though, let’s give it the name of the protocol we’ll implement right next; XIBLoadable.
Once the new file is created, start by replacing the existing import statement with the following:
import UIKitNext, let’s define the protocol along with the two required methods:
public protocol XIBLoadable {
    func load(from xibName: String) -> Bool
    func add(to view: UIView)
}
See that the protocol is marked as public in order to be accessible from any other module that will be using it (such as the demo project you downloaded). The two methods will also be marked as public in the default implementation that is coming right next.
Note: Want to know more about access levels in Swift? Take a look at this tutorial.
Right after the protocol’s closing, add its extension:
extension XIBLoadable where Self: UIView {

}
The Self: UIView condition limits the use of the protocol methods to UIView types only; what they’re supposed to do is meaningful just to views, so no other type should be able to use the default implementation.
Next, here’s the default implementation for the first method:
@discardableResult
public func load(from xibName: String) -> Bool {
    guard let xibContents = Bundle.main.loadNibNamed(xibName, owner: self, options: nil),
        let view = xibContents.first as? UIView
        else { return false }

    self.addSubview(view)
    view.translatesAutoresizingMaskIntoConstraints = false
    view.leadingAnchor.constraint(equalTo: self.leadingAnchor).isActive = true
    view.trailingAnchor.constraint(equalTo: self.trailingAnchor).isActive = true
    view.topAnchor.constraint(equalTo: self.topAnchor).isActive = true
    view.bottomAnchor.constraint(equalTo: self.bottomAnchor).isActive = true

    return true
}
Describing the above shortly, the method first tries to load the contents of the XIB file given as an argument. If for some reason that fails, it returns false. Otherwise, is adds the top level view loaded from the XIB as a subview to the current view object that adopts the XIBLoadable protocol, and sets the necessary auto layout constraints. It’s marked with the @discardableResult attribute in case the result value of the method is not necessary to be used.
The next method now:
public func add(to view: UIView) {
    view.addSubview(self)
    self.translatesAutoresizingMaskIntoConstraints = false
    self.leadingAnchor.constraint(equalTo: view.leadingAnchor).isActive = true
    self.trailingAnchor.constraint(equalTo: view.trailingAnchor).isActive = true
    self.topAnchor.constraint(equalTo: view.topAnchor).isActive = true
    self.bottomAnchor.constraint(equalTo: view.bottomAnchor).isActive = true
}
This one simply adds the view using the XIBLoadable protocol to the given view as a subview, and snaps it to all of the parent view edges by setting the auto layout constraints using the matching anchors as shown above.
The implementation of the source code in the XIBLoadable-iOS framework is now done. With all the above now in place, let’s do the same in a new framework that will be targeting the macOS platform.
The XIBLoadable-macOS Framework
We’re going to repeat the above steps here in order to create the macOS-based framework, but since they have all already been presented, this part is going to be faster than before.
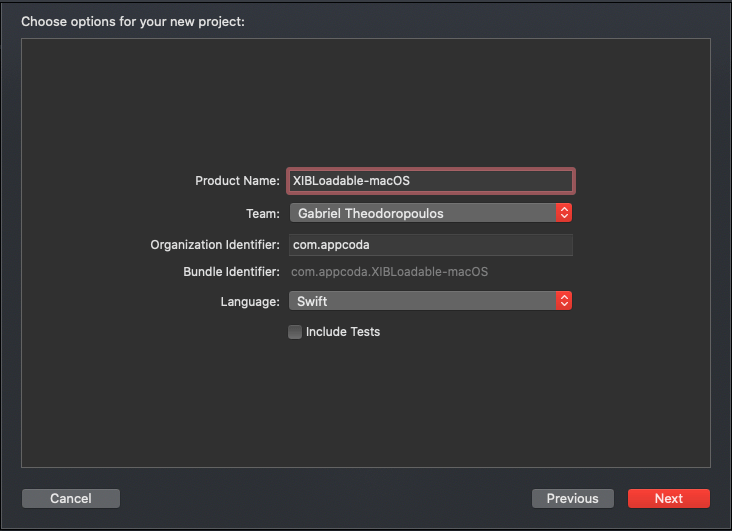
So, start with another new project in Xcode, but this time make sure to choose the macOS platform, and then the Framework template in the Framework & Library section.

In the next step fill in the product name field with the XIBLoadable-macOS value.
Eventually, save the new project in the disk, in the same subfolder where you stored the XIBLoadable-iOS project as well. Doing so will better help follow the steps coming up next.
With the new project ready, press Cmd+N and create a new Swift file. Once again, even though the file name is not important, name it XIBLoadable just for convention and to be in align to what we’ve already done.
Similarly to what we previously did, start by replacing the default import statement with the following:
import AppKitAppKit is the counterpart framework of UIKit on macOS, and as we were needing UIKit in order to work with UIView, here we need AppKit to work with NSView.
Let’s add the XIBLoadable protocol definition now, with the exact two methods as before:
public protocol XIBLoadable {
    func load(from xibName: String) -> Bool
    func add(to view: NSView)
}
Passing to the default implementation of the methods, first let’s define the protocol’s extension:
extension XIBLoadable where Self: NSView {

}
Here’s the implementation of the first method:
@discardableResult
public func load(from xibName: String) -> Bool {
    var xibObjects: NSArray?
    let xibName = NSNib.Name(stringLiteral: xibName)

    if Bundle.main.loadNibNamed(xibName, owner: self, topLevelObjects: &xibObjects) {
        guard let nibObjects = xibObjects else { return false }
        let viewObjects = nibObjects.filter { $0 is NSView }

        if viewObjects.count > 0 {
            guard let view = viewObjects[0] as? NSView else { return false }
            self.addSubview(view)
            view.translatesAutoresizingMaskIntoConstraints = false
            view.leadingAnchor.constraint(equalTo: self.leadingAnchor).isActive = true
            view.trailingAnchor.constraint(equalTo: self.trailingAnchor).isActive = true
            view.topAnchor.constraint(equalTo: self.topAnchor).isActive = true
            view.bottomAnchor.constraint(equalTo: self.bottomAnchor).isActive = true

            return true
        }
    }

    return false
}
The way to load XIB contents on macOS is slightly different comparing to iOS, but the final result remains the same; this method loads the first top level view it finds along with its contents in the given XIB file, and adds it as a subview to the view object that adopts the XIBLoadable protocol.
Note: To find out more about this method and about how to create custom views on macOS, please read this macOS tutorial.
The implementation of the second protocol’s required method is identical to the equivalent one in the previous part. The only difference is that instead of using the UIView class, we’re using the NSView:
public func add(to view: NSView) {
    view.addSubview(self)
    self.translatesAutoresizingMaskIntoConstraints = false
    self.leadingAnchor.constraint(equalTo: view.leadingAnchor).isActive = true
    self.trailingAnchor.constraint(equalTo: view.trailingAnchor).isActive = true
    self.topAnchor.constraint(equalTo: view.topAnchor).isActive = true
    self.bottomAnchor.constraint(equalTo: view.bottomAnchor).isActive = true
}
The source code implementation is now complete on the macOS-based framework too. In the next step we’re going to archive both frameworks using Terminal, and after that we’ll eventually build the single XCFramework that will contain all the above.
Archiving The Frameworks
As just said, the next step in the flow is to archive both frameworks created previously like any other project that we usually archive in Xcode. However, we’ll use Terminal for doing that; it’s the recommended way for being possible later to build the XCFramework.
Regarding the iOS-based framework, we’re going to create two different archives. One that will be working on real iOS devices, and one that will be working in the Simulator. The process will be almost identical in order to create the archives; as you’ll see, there will be only minor changes that will let us generate the Simulator archive.
In Finder, select the XIBLoadable-iOS project folder and right click on it. Then go to menu Services > New Terminal at Folder as the following image shows:
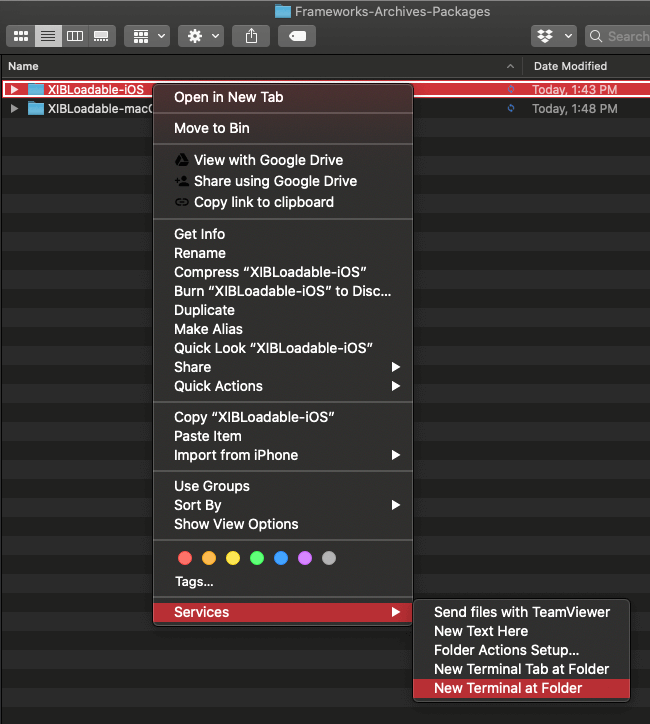
This will open a new Terminal window with the path already specified to the iOS-based framework folder.
Before archiving the framework, let’s create another folder where we’ll output the archived frameworks, as well as the final XCFramework. Normally that’s not mandatory to do. All new archives are saved in the /Users/username/Library/Developer/Xcode/Archives folder by default. However, working with custom folders here we’ll help the overall educational purpose of the tutorial and the easier usage of the Terminal commands.
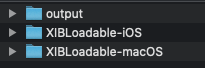
We’ll create that new folder as a subfolder of the one that contains the XIBLoadable-iOS and XIBLoadable-macOS projects. You can do that either in Finder, or with the following command in Terminal:
mkdir ../outputThe “../” points to the parent folder in folders hierarchy, and the “output” name is following right after. You should be seeing the following folders now:
Now we can use the xcodebuild archive command to create the archive meant for actual iOS devices. In the series of options given to the command following next, notice that:
- The
destinationoption specifies the target platform and devices. - The path to the folder that the archive will be stored into is specified with the
archivePathoption. - We set
SKIP_INSTALLandBUILD_LIBRARY_FOR_DISTRIBUTIONsettings to NO and YES respectively, and it’s really crucial not to skip them. The first one will install the framework to the archive that will be created, while the second one will make all the necessary configuration so the framework that will be written in the archive to be distributable. Note that both of these settings can be also set in Xcode, in the Build Settings tab of the project target, but specifying them here guarantees that they’ll work as expected.
xcodebuild archive \
-scheme XIBLoadable-iOS \
-destination "generic/platform=iOS" \
-archivePath ../output/XIBLoadable-iOS \
SKIP_INSTALL=NO \
BUILD_LIBRARY_FOR_DISTRIBUTION=YES
Press the Return key once you type or paste the above in Terminal to execute the command. The backslash character (“\”) makes it possible to break the command parameters in multiple lines, making it more readable that way.
After a few moments and a bunch of output to Terminal, you should be seeing the XIBLoadable-iOS archive created in the output folder.
Now let’s create the archive for the iOS Simulator destination. The Terminal command is pretty much the same; the destination and the archive path are the two things changed here:
xcodebuild archive \
-scheme XIBLoadable-iOS \
-destination "generic/platform=iOS Simulator" \
-archivePath ../output/XIBLoadable-Sim \
SKIP_INSTALL=NO \
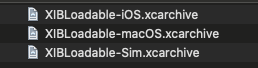
BUILD_LIBRARY_FOR_DISTRIBUTION=YESNow you should be seeing two archives in the output folder:

Let’s do the same for the macOS-based framework. Here we’ll generate one archive only. First though, let’s change the working folder and let’s jump in the XIBLoadable-macOS that contains the respective framework:
cd ../XIBLoadable-macOSSimilarly as before, the following command creates the archive for this framework. Once again, we change the destination and archive path as necessary:
xcodebuild archive \
-scheme XIBLoadable-macOS \
-destination "generic/platform=OS X" \
-archivePath ../output/XIBLoadable-macOS \
SKIP_INSTALL=NO \
BUILD_LIBRARY_FOR_DISTRIBUTION=YES
When archiving is finished, the archives folder should be containing three archives:
With the archives generated, we can now move on to building the desired XCFramework. But first, let’s examine them a bit.
Building The XCFramework
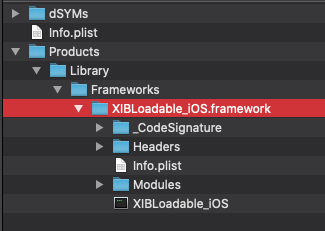
An archive is a package of files, and it can be opened in order to see what it contains. You can choose any of the three archives we created, right click on it, and select the Show Package Contents option from the context menu.

The framework we want to reach on each package is under the Products > Library > Frameworks folder. And guess what; a framework is actually a folder that contains other files and subfolders.
In Terminal, accessing the framework inside a package is like accessing any other normal folder. For example, the following will list the framework’s contents in the XIBLoadable-iOS archive:
ls -l ./XIBLoadable-iOS.xcarchive/Products/Library/Frameworks/XIBLoadable_iOS.frameworkThe above command assumes that we’re already inside the output folder, so before writing the above in Terminal, change the working directory to the output directory. Anyway, we’d need to do so in order to build the XCFramework:
cd ../outputCreating the XCFramework is just a matter of a simple command in Terminal; the xcodebuild -create-xcframework. Provided options must contain two things:
- The path to each framework; in this case it’s going to be the path to the framework inside each package as just said right above.
- The output folder where the XCFramework is going to be written to. Here it’s going to be the output folder.
With that information in mind, here’s the full command that will create the XCFramework:
xcodebuild -create-xcframework \
-framework ./XIBLoadable-iOS.xcarchive/Products/Library/Frameworks/XIBLoadable_iOS.framework \
-framework ./XIBLoadable-Sim.xcarchive/Products/Library/Frameworks/XIBLoadable_iOS.framework \
-framework ./XIBLoadable-macOS.xcarchive/Products/Library/Frameworks/XIBLoadable_macOS.framework \
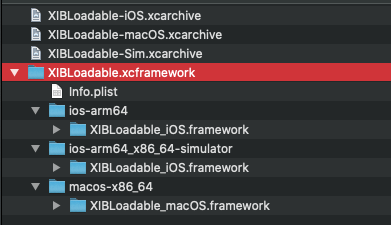
-output ./XIBLoadable.xcframeworkA few moments later after pressing the Return key on the keyboard, the XCFramework will show up in the output folder, along with the archives created previously. If you expand or open it, you’ll see that all three frameworks for each destination are contained in it:

After a small number of steps we eventually managed to achieve our first goal in this post; to create the XCFramework that contains the other two frameworks for three different destinations; iOS devices, iOS Simulator and macOS systems. With the XCFramework being now available, let’s give it a spin before we pass to the creation of a Swift package that we’ll use to distribute and share that new framework.
Trying Out The Built XCFramework
Time to use the starter projects you downloaded earlier. Open the LoadableViewDemo-iOS project in Xcode first, in order to test the XCFramework we just built on the iOS platform.
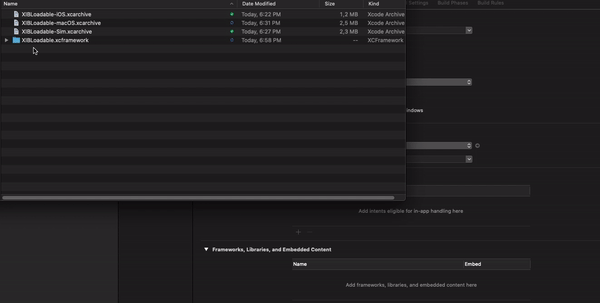
At first, select the project in the Project navigator, and then open the General tab. Place Finder next to Xcode, and then drag and drop the XIBLoadable.xcframework folder in the Frameworks, Libraries, and Embedded Content section in Xcode.
You’ll notice that a new group called Frameworks has been created in Xcode automatically, and it contains the framework that we just dragged in it.
Next, press Cmd+B to build the project once, and then open the DemoView.swift file. Right below the existing import statement, add the following:
import XIBLoadable_iOSWhile typing it, you’ll see that Xcode suggests it automatically.
Note: If there’s no auto-completion in Xcode, then you might need to close and restart it.
Then, update the DemoView class header so it adopts the XIBLoadable protocol:
class DemoView: UIView, XIBLoadable {
    ...
}
The DemoView class has a XIB counterpart file that we want to load contents from. Let’s do so in the init() method using the load(from:) protocol’s method:
init() {
    super.init(frame: .zero)

    load(from: "\(Self.self)")
}
The "\(Self.self)" argument provides the name of the current class a String value. Instead of that, we could have written the following:
load(from: "DemoView")In this case we explicitly specify the XIB name to use.
Switching to the ViewController.swift file now, let’s go to the viewWillAppear(_:) method to initialise the demoView object that’s already declared in the ViewController class. In fact, not only we’ll make the initialisation, but we’ll also call the add(to:) protocol’s method through demoView in order to add that view to the root view of the view controller and set its constraints automatically.
override func viewWillAppear(_ animated: Bool) {
super.viewWillAppear(animated)
if demoView == nil {
demoView = DemoView()
demoView?.add(to: self.view)
}
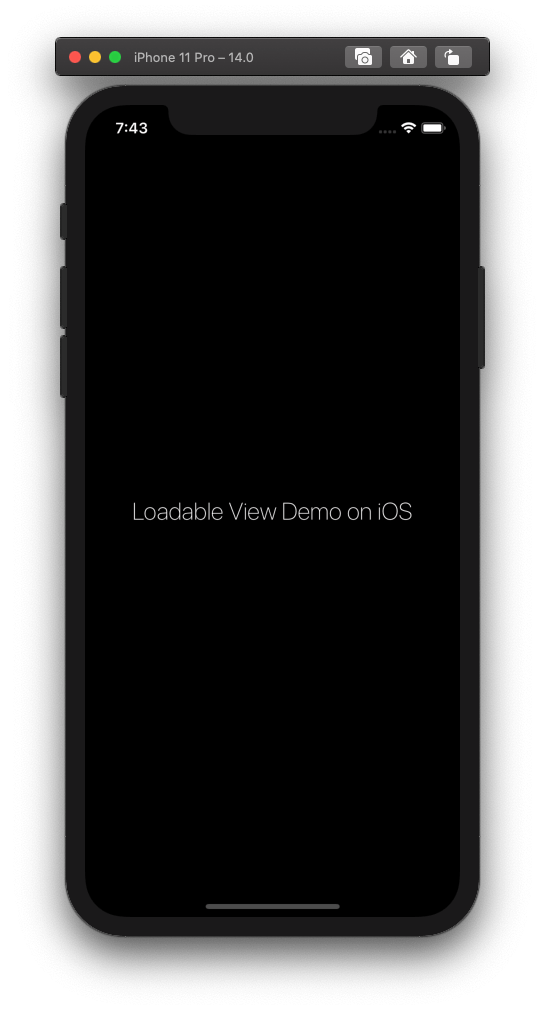
}The moment of truth has finally come. For starters, let’s run the app in the Simulator and see if the DemoView contents will appear on screen.
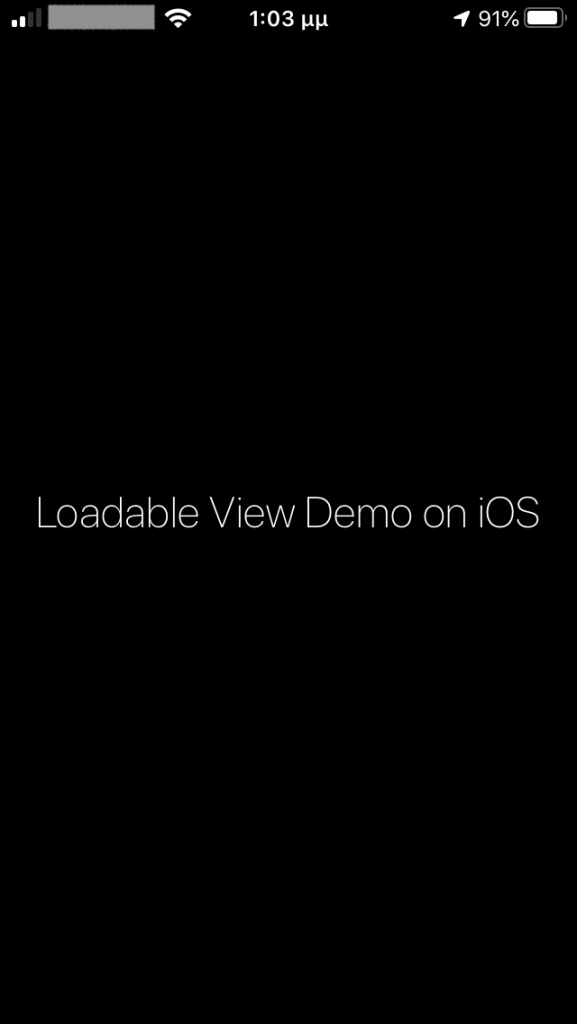
Seeing that it’s working in Simulator, let’s run to an actual device to see if it’ll work there too. And yes, it works on the device as well!
Finally, we’re left to test it on the LoadableViewDemo-macOS demo app too. Open it in Xcode, and follow the procedure described above to add the XIBLoadable.xcframework to the Frameworks, Libraries, and Embedded Content section, in the General tab of the project target. After doing so, press Cmd+B to build the project once.
Then, open the DemoView.swift file, and add the following import statement right below the import Cocoa:
import XIBLoadable_macOSAs it happened in the iOS project, Xcode recognises and auto-suggests the proper framework to use; in this case the XIBLoadable_macOS.
Then, adopt the XIBLoadable protocol:
class DemoView: NSView, XIBLoadable {
    ...
}
Finally, in the init() method load the XIB file’s contents:
init() {
    super.init(frame: .zero)

    load(from: "\(Self.self)")
}
Open the ViewController.swift file and in the viewWillAppear() method initialise the demoView object exactly as before, and then add it to the root view of the view controller:
override func viewWillAppear() {
    super.viewWillAppear()

    if demoView == nil {
        demoView = DemoView()
        demoView?.add(to: self.view)
    }
}
Press Cmd+R to run the app. Here’s what you should see:
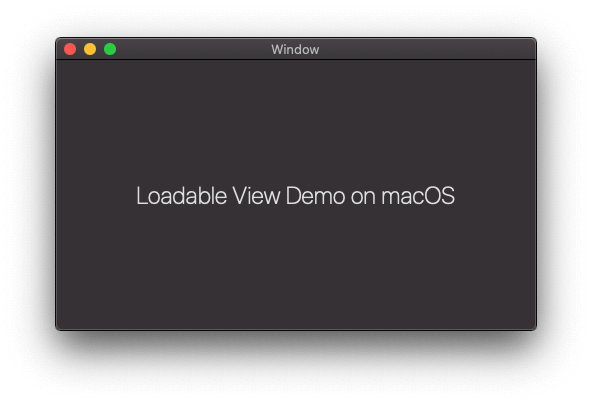
The XCFramework is working as it supposed to, so let’s focus on the second goal of this post; to create a Swift package that will be used to easily distribute the XCFramework and add it as a dependency to a project.
Binary Framework In A Swift Package
We’ve already talked about Swift packages a couple of times in the past. In particular, we’ve posted a hands-on tutorial on how to create a Swift package (which I recommend you to read if you haven’t done so), and how to reuse SwiftUI views with Swift packages. So here I won’t stick to the details of making a Swift package, instead I’ll take as granted that you have a basic knowledge about it. In case you want to make yourself comfortable with Swift packages, then check out the first link I just provided and then keep reading here.
Up until Xcode 12, Swift packages had been useful for distributing and sharing source code that was visible to everyone. A Swift package was definitely not the ideal way to distribute closed-sourced projects and binary code, but all that have changed with Xcode 12. As of that version, packages can be the vessel for distributing binary code, and to be precise, binary frameworks in the XCFramework format, just like the one we created right above.
Usually Swift packages exist in remote repositories, such as on GitHub. Now that binary frameworks can be contained in them, a package’s checkout time might increase considerably depending the size of the framework. In order to avoid that, frameworks can be hosted in other servers compressed as zip archives. URL to the framework is what is actually needed in such cases, without being necessary for it to be contained in the package.
All that regard remote packages with binary frameworks residing remotely as well. However, it’s also possible to keep and use both the Swift package and the framework from a local path, and that usually is the preferred approach while still being in the development stage. In that case things are a bit different; the binary framework must be included in the package, on top of any configuration required to be done in the package’s manifest file.
A Local Swift Package
We’ll start from the second case that was just described above, and we’ll see how to configure a Swift package that uses the binary framework from a local path. Before creating the package though, let’s begin from a different point; let’s make a copy of the XIBLoadable.xcframework first.
Although not mandatory, we’ll do it deliberately here for one simple reason; to keep the original instance of the binary framework in the output folder. By adding the framework to the package right next, the entire framework folder will move to the package’s folder and will no longer exist under its current location. However, I’d like us to have it in the output folder as well, because we’ll need it again in order to demonstrate the steps for creating a remote Swift package and framework.
So, back in Terminal make sure that you’re still in the output folder. Then type the following command to create a copy of the XIBLoadable.xcframework folder:
cp -r XIBLoadable.xcframework XIBLoadablePackage.xcframeworkWe’re duplicating the XIBLoadable framework and we’re temporarily give it the XIBLoadablePackage.xcframework name. We’ll rename it properly when we’ll add that to the Swift package next.
Let’s return to Xcode. Go to the File > New > Swift Package… menu to initiate the creation of a brand new Swift package, and name it XIBLoadableLocal. You are strongly advised to store it in the same subfolder where you have the output folder, as well as both XIBLoadable-iOS and XIBLoadable-macOS framework projects. This will help a lot to work with paths in Terminal later.
Once it’s ready, and before we add the binary framework to it, we can delete almost all files created by default; we don’t need them, but it’s okay even if you leave them untouched. I choose to delete them here so we have a clean package, so select the Tests folder and delete it entirely.
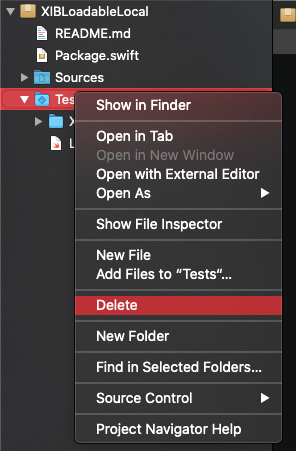
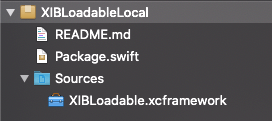
Then, delete the XIBLoadableLocal folder under Sources, and let Sources be the only folder you are seeing in the package.
After that, drag and drop the XIBLoadablePackage.xcframework from the output folder in Finder under the Sources folder in Xcode. Then rename it to its original name, XIBLoadable.xcframework.
Now open the Package.swift file; the package’s manifest file where we’ll specify the binary framework as a target. At first, go to the targets array, and delete all the default content you’ll find there. Then add the following:
targets: [
    .binaryTarget(name: "XIBLoadable", path: "./Sources/XIBLoadable.xcframework")
]
See that the path to the XCFramework is in relation to the root path of the package.
Besides that, it’s also necessary to update the targets argument in the library(name:targets:) method right above, and provide the XIBLoadable as the target name for the library that the package will produce.
library(
    name: "XIBLoadable",
    targets: ["XIBLoadable"])
Here’s how the entire Package.swift file should look like:
// swift-tools-version:5.3
// The swift-tools-version declares the minimum version of Swift required to build this package.

import PackageDescription

let package = Package(
    name: "XIBLoadablePackage",
    products: [
        // Products define the executables and libraries a package produces, and make them visible to other packages.
        .library(
            name: "XIBLoadablePackage",
            targets: ["XIBLoadable"]),
    ],
    dependencies: [],
    targets: [
        .binaryTarget(name: "XIBLoadable", path: "./Sources/XIBLoadable.xcframework")
    ]
)
Testing The Swift Package With The Local Binary Framework
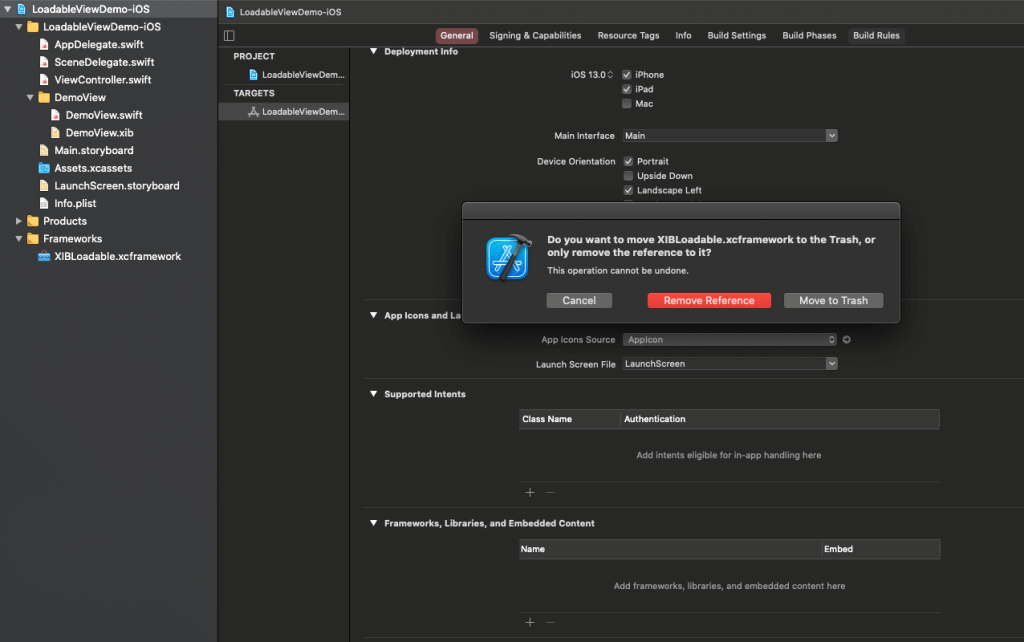
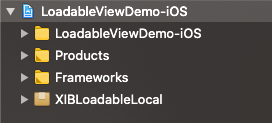
Open the LoadableViewDemo-iOS project in Xcode, and at the same time close the XIBLoadableLocal Swift package. Select the project name in the Project navigator, go to the General tab, under the Frameworks, Libraries, and Embedded Content section select the XIBLoadable.xcframework framework and then click to the minus button to remove it. In addition, delete the XIBLoadable.xcframework item from the Project navigator, under the Frameworks group. When asked, click on the Remove Reference button so the binary framework won’t be deleted from its original location.
Once you do all that, place Finder and Xcode one next to another, and drag and drop the XIBLoadableLocal package folder onto the Project navigator.
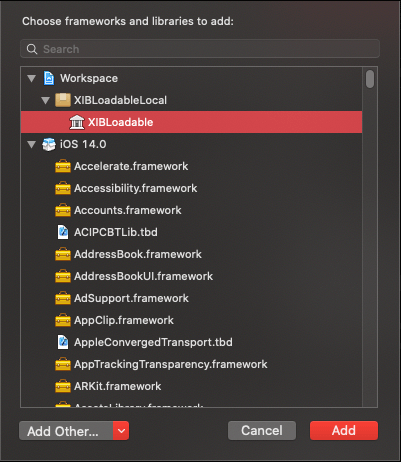
Then, in the General tab again press the plus button in the Frameworks, Libraries, and Embedded Content section, and in the sheet that appears choose to add the XIBLoadable library.
Without making any other change, either build the project to ensure that no errors exist, or run it straight either in the Simulator or on a device. If everything runs as before, then congratulations, you just managed to use the local Swift package as a dependency with the binary framework embedded in it, instead of having the framework added to the project alone.
Feel free to follow the same steps as above and use the Swift package in the LoadableViewDemo-macOS project as well.
Remote Swift Package With Remote Binary Framework
As I’ve already said, the Swift package and the binary framework don’t have to exist in the same remote location when they’re not meant to exist locally. XCFramework can be hosted on a server, and the Swift package to exist in a remote repository.
Let’s see that case, so let’s work our way towards that direction. After all the necessary configuration to the Swift package is made, we’ll upload it in a private repository on GitHub so we can add it as a remote dependency later. The binary framework will also be uploaded to a remote server. The recommended choice is your own personal or company server, but for testing purposes you can even store it to a local server, if you’re running one.
There’s a particularity we have to watch out for here. The remote server should not contain the framework’s folder as is, but compressed as a zip file. Actually, and in order to avoid encountering any errors in Xcode later on, don’t use cloud services that they don’t return a share link with the zip extension at the end of the URL. That’s why a custom server is usually the best approach.
Having said that, bring Terminal in front, and supposing that you’re still in the output folder type the following command to compress the XIBLoadable.xcframework folder into a zip archive:
zip -r XIBLoadable.xcframework.zip XIBLoadable.xcframeworkThe XIBLoadable.xcframework.zip file should be listed along with everything else in the output folder now.
Let’s create a new Swift package now which we’ll call XIBLoadableRemote. Since we’ve already done that in the previous part, please follow all steps described there, including the default files clean up as well as deleting the predefined targets in the Package.swift file, and updating the library(name:targets:) parameter values with the XIBLoadable value.
In the targets array now we’ll add another method called binaryTarget(name:url:cheksum). There are three parameter values we have to provide here:
- The name of the framework. This will be the same as before, XIBLoadable.
- The URL to the remote framework zip file.
- The checksum of the framework zip file. Using it, Xcode will be in a position to verify the downloaded framework’s archived file.
To calculate the checksum, go one last time to Terminal and first change the working directory to the root folder of the Swift package (that’s why I advised you earlier to save Swift package along with output and the other folders, so as to make it easy here):
cd ../XIBLoadableRemoteThen, type in the following command to generate the checksum of the zip file. Note that we provide the relative path to it:
swift package compute-checksum ../output/XIBLoadable.xcframework.zipA few moments later you will see checksum showing up on Terminal. It’ll be something like that:
8580a0031a90739830a613767150ab1a53644f6e745d6d16090429fbc0d7e7a4
Now it’s a good time to upload the XIBLoadable.xcframework.zip file to the server. Do that and come back to keep reading. Don’t forget to have the URL to the remote location of the archived framework handy when come back.
Having at this point the remote URL and the checksum available, let’s head back to Xcode in order to specify what the remote binary target is. This time we’ll use the binaryTarget(name:url:checksum) method in the targets array:
.binaryTarget(name: "XIBLoadable", url: "https://SERVER_URL/XIBLoadable.xcframework.zip", checksum: "8580a0031a90739830a613767150ab1a53644f6e745d6d16090429fbc0d7e7a4")As a reminder, make sure that the above URL ends with the zip extension, otherwise you’ll encounter errors in Xcode.
The new Swift package has been configured, so now we’ll push it to a remote, private repository on GitHub. To continue, it’s necessary to have a GitHub account, or alternatively, a Bitbucket account to use instead.
The detailed steps to do that task in Xcode have been thoroughly described in this tutorial, even though Xcode 12 introduces some changes to the naming of certain functionalities. Regardless, the overall process remains the same, and here I’m going to present them really shortly.
So, let’s walk through these steps.
At first, go to Source Control > New Git Repositories… menu in Xcode. In the window that shows up make sure that the XIBLoadableRemote package is selected and click Create. This action creates a local repository and commits the package.
Then, to create the remote repository:
- Open the Source Control navigator (Cmd+2).
- Right click on the XIBLoadableRemote repository to show the context menu.
- Select the New “XIBLoadableRemote” Remote… menu option.
- In the new window that appears, either select an existing GitHub account or create one. Also, select the Private radio button to keep it private. Leave the repository name as is and click Create.
To push the package version in the remote repository:
- In the Source Control navigator again right click on the XIBLoadableRemote repository to show the context menu.
- Select the Tag “main”… option.
- In the next window set the version number; 1.0.0 here is okay. No need to type a message so click Create.
- Open the Source Control > Push… main menu in Xcode.
- Check the Include tags checkbox and click Push.
The Swift package now exists remotely on GitHub (or any other service you might be using), so we can finally test whether it’s working properly or not.
Testing The Remote Swift Package
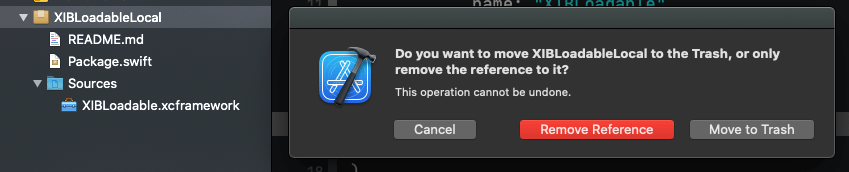
While being in Xcode, close the XIBLoadableRemote package and open the LoadableViewDemo-iOS project. If you still have the XIBLoadableLocal package added to the project, then simply right click on it in the Project navigator and choose the delete option. However, in the confirmation alert, make sure to click on the Remove Reference button, so the Swift package won’t be deleted from the disk too.
Next, let’s add the remote package we configured right above as a dependency to the project. Go to the File > Swift Packages > Add Package Dependency… menu option, and either choose the new package repository if it’s automatically listed there, or just type the URL to it so it’s fetched.
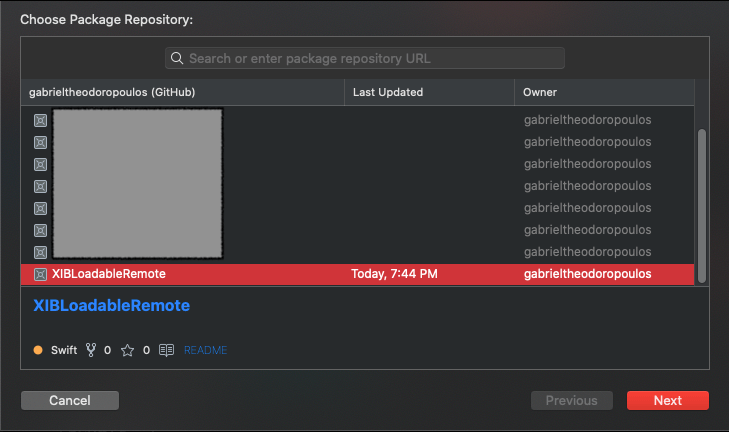
Continue to the next steps until the overall process is finished, just make sure that the XIBLoadable package product is selected in the last step.
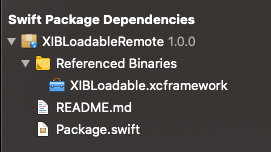
In the end, you’ll see that a new section named Swift Package Dependencies is showing up in Project navigator. In it you’ll see the XIBLoadableRemote Swift package that contains the XIBLoadable binary framework under a special group called Referenced Binaries.
At this point we’re all set, and we can run the app once again to make sure that it’s working. In case you get any error messages, make sure that the XIBLoadable protocol is listed under the Frameworks, Libraries, and Embedded Content section in the General tab of the target settings. Otherwise, go through all presented steps above and ensure that you haven’t skipped any.
Conclusion
Getting to the end of this post, there’s a confession I’d like to make; this is one of the tutorials that I enjoyed writing the most, as it’s about stuff that’s not only interesting, but also quite useful. If you ever tried to create a binary framework that was supposed to be working in both iOS devices and the Simulator, then you can definitely appreciate the significance of the XCFramework format. But even if you did not, you can still recognise how important the ability to bundle up framework variants in one single place is, and eventually use and distribute just that.
And if you’re a Swift package fan like I am, then you have all the reasons to feel happy with the marriage of XCFrameworks and Swift packages, regardless of whether you’re sharing code with others or you’re creating your own, personal library of reusable components. I really hope you found this post helpful, and that there’s something new you learnt here today. And with that I leave you, so, take care!
For reference, you can download the full project on GitHub.


