It’s a well-known fact that Google provides a big number of electronic products and services that can be used from the simplest end-user, to the most sophisticated one. But further than those who just use the Google services as they’re provided, there are people who need to have a different kind of access to them; developers. Indeed, Google gives great assistance to developers of all kind to create multi-platform applications that use their services, as it provides various Application Protocol Interfaces (APIs) that can be used in many ways, as well as already-made libraries and SDKs for various programming languages.
As the Google APIs and services can be utilized in mobile platforms as well, apparently we could not just be left uninterested here, and as a matter of fact, we’ve already dealt with Google technologies in the past. For example, here’s a tutorial about the Google Maps SDK. Now, in this tutorial, we’re going to see for first time a totally different service, the YouTube API.
Working with that specific API is fairly easy, but there are a few certain aspects you should already know about, otherwise your life could become a bit difficult. Let me give you some clues: First of all, we won’t use any SDK, or iOS-specific library. Instead, we’ll make simple HTTP requests (GET requests actually) to fetch data from Google. The results are in JSON format, so it’s required you already know how data is formed in JSON. You don’t have to be a JSON expert; just to understand the format. If you need assistance, here you can find some valuable information.
The Google documentation regarding the YouTube API is really big, so my intention here is to gather information from various pages into one place and help you get started with this API fast and easily. Even though we are about to cover just a small portion of the YouTube API, what you will learn will show you the way for the rest of it. However, I have to mandatorily mention a few facts before we continue.
As I mentioned above, we are going to make HTTP requests to the YouTube API for getting data back. Those requests trigger specific methods to be performed, and they actually represent a specific task of the API. For example, the channels.list method refers to the request needed to be made so data for one or more channels can be retrieved. Of course, I will provide you with the respective documentation link for every method (HTTP request) we are about to meet next. Each method accepts some parameters and filters. In the parts that we’ll make use of such methods I’ll let you know what parameters and filters we are about to use (and why), but for details about them you have to go and read more information in the provided links. It would be totally pointless to copy here the Google documentation.
From all the requests that can be made to the API, some of them require user authorization and some not. For the first case, the OAuth 2.0 protocol must be used so a user can securely sign in with a Google account. For the second, a simple API key is just enough to allow unauthorized requests. In this tutorial though we will deal with the second case only, and we won’t ask from users to sign in. Trust me, it takes more than one tutorial to cover all these topics in one place.
I strongly advice you to read this tutorial and some specific parts of the Google documentation side by side. If you want to get a first taste, the following links may help you:
- YouTube Data API Reference
- YouTube Data API Overview
- Implementation and Migration Guide
- Searching for Content
Besides the above, feel free to navigate around and read everything you find interesting. Just for the record, we are going to use the YouTube API v3, as this is what Google suggests nowadays. As a final note, it has been unavoidable to give you all those links (not only the links above, but those that are about to come too), as the Google documentation is too extended. It’s been also necessary so I manage to keep the scope of this tutorial in reasonable limits.
So, let’s get going, and by the end of this tutorial you will have an application that will be able to download channels and videos, make searches, and playback videos. The details are coming.
Demo App Overview
I’ll start presenting the demo application we are about to develop in this tutorial by saying first that you have to download a starter project that will be your intro point. In it you’ll find the interface and the necessary IBOutlet properties and IBAction methods already defined and connected, as well as any other needed code, so here we’ll just focus on implementing the logic of the app.
Before we write the first line of code, we must acquire an API key from Google that will enable us to make requests to the YouTube API. There’s a specific process that we’ll follow to do so, but I won’t get into details about that now; everything is described step by step in the next part.
So, speaking for the demo application only, here’s a first taste of it:
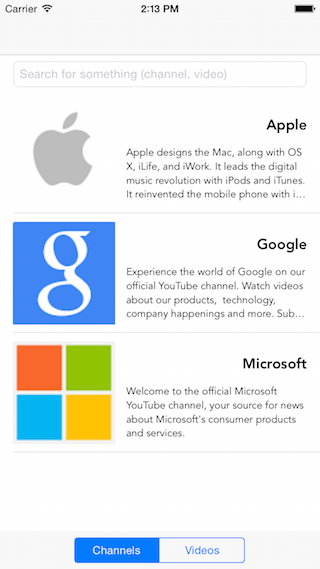
The demo application is going to have multiple goals:
- To download (and display) the details of YouTube channels.
- To download (and display) the video playlist of a channel.
- To be able to search for channels and videos.
- To play a video.
Regarding the user interface, our app is composed by two view controllers. In the first one there are three subviews: A tableview, a textfield, and a segmented control. Here’s the purpose of each one:
- In the tableview we are going to display either channel or video information. Those videos can be the playlist of a channel, or the results of a search.
- The textfield is going to be our search field. The term that will be written there, it will be searched in YouTube in turn.
- The segmented control is quite important. When the first index is selected, then the tableview will display the channels. Furthermore, the search results will regard only channels. On the other hand, when the second index is selected (the videos index), then the tableview will display any existing video playlist, and the search will return just video-related results.
The second view controller is going to be our player view controller; here a selected video will be streamed and played back. I won’t provide any more details intentionally here, as we’ll see them in the last part. All I have to say, is that we’ll use a helper library from Google that will “create” the player and perform the actual streaming.
Having said all the above, we’ve pretty much done with that quick presentation, therefore, let’s get started.
Creating an API Key
We are going to get started with our YouTube API exploration by performing a preliminary and mandatory step: To create a new record (a new project) for our application in the Google Developers Console, so we eventually have access to the YouTube API. Actually, once we create a new project in the Console, we’ll do two things:
- We’ll enable the YouTube API so we can use it through our application.
- We’ll create an API key so we are allowed to perform requests to the API.
Note (once again) that the requests that we’ll make to the YouTube API in this tutorial are not authorized, meaning that we won’t ask from users to sign in with their Google accounts to the app. Of course, only by using an API key limits the requests that can be performed, and for full access we need full authorization. Regarding the scope of this tutorial though, the API key is what we need, so we are good to go just with that.
So, let’s get connected to the Developers Console and let’s create a new record for our project. If you’re not currently signed in with Google, do it now. Needless to say that you can’t proceed if you don’t have a Google account. The following screen looks like the one you’ll see once you get access:
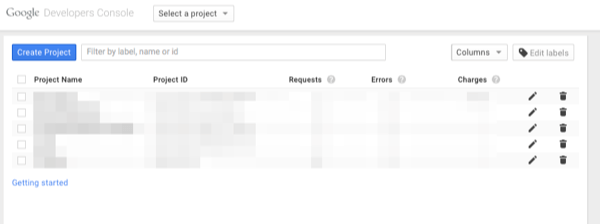
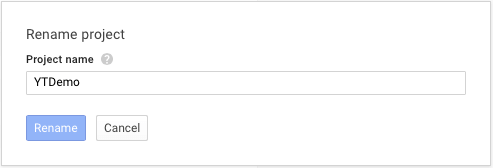
Click to the blue Create Project button in the top-left corner, and in the modal window that appears write a name for the new project we’re creating. I named it YTDemo, but choose any other name you like. Note that at the end you can delete this project record from the Console in case you don’t want it anymore.
The next step is to enable the YouTube API for our project. Keep in mind that you can enable more than one APIs in a single project, but right now we don’t need anything else.
To enable the YouTube API, click to the APIs & auth > APIs option to the menu in the left side of the window. In the main window area locate the YouTube Data API and click on its link.
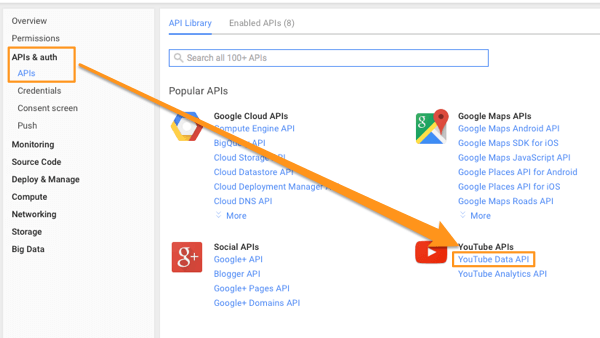
Your browser will take you in a new window where you can (and have to) enable the API. Just click to the Enable API button to the upper side, and you are ready to go.
Now that we have enabled the API, we must create the API key we want. Go to the APIs & auth > Credentials menu, and in the new window that you’ll see in your browser click to the Create new Key button. In the modal window that appears you have to select the platform of our project. At this point, I’d bet that you are quite sure that you have to click to the iOS key button. However, don’t do that. According to Google documentation, iOS keys don’t work for all APIs, and it seems that YouTube API is one of them. I can verify that, as I tried out of curiosity to create such a key and use it in the demo application, but at no avail.
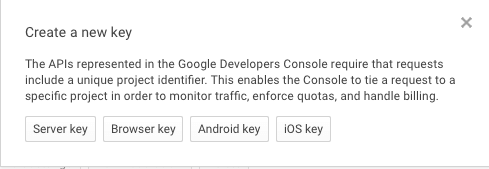
What you should actually do, is to click to the Browser key button. In the new modal window, just click to the Create without typing anything to the box, and you’ll be fine. By going back to the credentials window, you’ll notice the new key that has been created for you. As you can see, you can apply various actions on it, and of course you can delete it, but this is not our case now. For the time being, our work in the Developers Console is over, but don’t sign out yet. Keep your browser open because pretty soon you’ll need to copy the generated key into our iOS application.
A Mechanism To Fetch Data
With the API key already generated we are able to go back to Xcode and begin working with the starter project. If we give some thinking to our goals and the features that we want to implement (get channels and videos, perform searches), we’ll realize that there is a common element here. That is no other than the requests (HTTP requests) that have to be made to Google’s servers, which in turn will give us back the data we look for in JSON format. Having that fact in mind, it would be nice if we would write a general function capable of performing the actual request, and of course, capable of returning the data.
So, as you assume, that’s exactly what we are about to do in this part. Being more specific, in our ViewController class we’ll implement a function where we’ll make simple GET requests. For our cause we will use the NSURLSession and NSURLSessionDataTask classes. Note that all this work takes place asynchronously, therefore once we get any results back (or an error message), we’ll use the main thread for parsing and then updating our UI. But, let’s see everything step by step.
Initially, let’s define that function:
func performGetRequest(targetURL: NSURL!, completion: (data: NSData?, HTTPStatusCode: Int, error: NSError?) -> Void) {

}
As you see, it expects from us to provide it with the URL (a NSURL object) of the request. The second parameter is a closure, also known as a completion handler block. As I said before, the actual data fetching happens asynchronously, and when it’s over this completion handler will be called in the main thread so we proceed with the parsing. Note that there are three parameters in the completion handler:
- data: The fetched data in JSON format.
- HTTPStatusCode: The HTTP status code. The value we desire is 200 (meaning that everything is okay).
- error: Any error message that might be returned.
Now, let’s go to the implementation:
func performGetRequest(targetURL: NSURL!, completion: (data: NSData?, HTTPStatusCode: Int, error: NSError?) -> Void) {
    let request = NSMutableURLRequest(URL: targetURL)
    request.HTTPMethod = "GET"

    let sessionConfiguration = NSURLSessionConfiguration.defaultSessionConfiguration()

    let session = NSURLSession(configuration: sessionConfiguration)

    let task = session.dataTaskWithRequest(request, completionHandler: { (data: NSData!, response: NSURLResponse!, error: NSError!) -> Void in
        dispatch_async(dispatch_get_main_queue(), { () -> Void in
            completion(data: data, HTTPStatusCode: (response as! NSHTTPURLResponse).statusCode, error: error)
        })
    })

    task.resume()
}
Let’s see what’s going on above. Initially, we create a NSMutableURLRequest object using the parameter URL object. Necessarily, we set the GET as the preferred HTTP method. This consists of the request that is made right next. Then, we initiate a NSURLSessionConfiguration object and we pass it as a parameter to the initialization of the NSURLSession. Next, using the session instance we instantiate a data task object, in which we provide the request as an argument. In the completion handler of the data task we make a call to the dispatch_async() function, so we invoke our own completion handler in the main thread. Notice in the arguments how we get the HTTP status code out from the response (NSURLResponse). Lastly, we start the fetching process using the resume() method of the data task.
Now, all we miss is the data parsing, but this will take place later. For the time being we can be sure that we won’t bother any more with the data fetching, as the above function will carry out that work for us when we need it.
Getting Channel Info
The first thing we will “ask” the YouTube API for is going to be a list of channels. Specifically, we’ll request the title, description and thumbnail image data for the YouTube channels of Apple, Google and Microsoft. In addition to that data, we’ll also get one more value, the playlist ID of the uploaded videos for each channel, so we can request for them as well later on.
All of our work is going to take place in a new function. In this one we won’t get the details of just one channel, but we’ll implement it in that way so it can recursively get the details of all channels. However, let’s add a few variable declarations right before we write that function because we’ll need them. So, go to the top of the ViewController class and add the next lines:
var apiKey = "YOUR_API_KEY"

var desiredChannelsArray = ["Apple", "Google", "Microsoft"]

var channelIndex = 0

var channelsDataArray: Array> = []
Make sure to set your API key value in the apiKey variable. Copy and paste it carefully, because if it’s not correct the requests we’ll make next are going to fail.
Besides the API key variable, we have three more:
- desiredChannelsArray: This array contains the names of the channels we want to get information for.
- channelIndex: This variable will point to the proper channel that the app should request data for in the function we’ll write in a while.
- channelsDataArray: This array is going to hold the data that we’ll fetch for the channels. Specifically, the data that we’ll extract from the JSON response regarding a single channel will be added into a dictionary, and this dictionary (for each channel) in turn will eventually be stored to this array.
A few words now about the YouTube API method that we are going to use. This is the channels.list, and you can find more information about it here. The URL of the request is the following:
https://www.googleapis.com/youtube/v3/channels
That URL is completed by parameters that specify or filter the data that will be returned back. Before I give you those parameters, let me say that there are three different ways to make the API call for getting the channel details:
- By indicating that you are the owner of the channel.
- By specifying the user name of the owner.
- By providing the channel’s ID (a unique value that each channel has).
From the three ways listed above, we’ll use the last two. In both of them we’ll definitely use the part required parameter that specifies what the results of the request will include. In our example we’ll set the “snippet, contentDetails” values (comma separated values, without the quotes) for this parameter, as the snippet will give us the details of the channel (those details that we’ll display later), and the contentDetails will return the playlist ID of the uploaded videos that a channel contains. For fetching channels based on the username, we are also going to use the forUsername parameter, while we’ll use the id parameter for getting channels based on their ID.
Let me note at this point that even though we don’t need to get channel details using the ID at least for now, we’ll need it later when we’ll search for channels. Right now I’m just giving you all this information in advance.
Besides the parameters that we’ll specify, we must necessarily use the API key in any case, otherwise the request will fail.
So, having all the above in mind, let’s start implementing our new function. As you’ll see, the parameter value indicates the preferred way for making the request:
func getChannelDetails(useChannelIDParam: Bool) {
    var urlString: String!
    if !useChannelIDParam {
        urlString = "https://www.googleapis.com/youtube/v3/channels?part=contentDetails,snippet&forUsername=\(desiredChannelsArray[channelIndex])&key=\(apiKey)"
    }
    else {

    }

    let targetURL = NSURL(string: urlString)
}
Notice that the else case above is empty. We’ll see that later, but here’s an example of the URL based on the ID value of the channel:
urlString = "https://www.googleapis.com/youtube/v3/channels?part=contentDetails,snippet&id=SOME_ID_VALUE&key=\(apiKey)"
Also note that after having formed the final URL string, it is converted to a NSURL object. This object will be provided right next to the performGetRequest(…) function we implemented in the previous part.
Before we continue, let me give you a sample of the JSON data that is returned when requesting for the Apple’s channel using the username parameter (you can actually test the API call here, as well as other request variations):
{
 "kind": "youtube#channelListResponse",
 "etag": "\"Y3xTLFF3RLtHXX85JBgzzgp2Enw/vTcBxrLzIZMaCeqgOzHFbBhLTUs\"",
 "pageInfo": {
  "totalResults": 1,
  "resultsPerPage": 5
 },
 "items": [
  {

   "kind": "youtube#channel",
   "etag": "\"Y3xTLFF3RLtHXX85JBgzzgp2Enw/Wd_D4NnOqPTiOtqOKvlNDEMuMxY\"",
   "id": "UCE_M8A5yxnLfW0KghEeajjw",
   "snippet": {
    "title": "Apple",
    "description": "Apple designs the Mac, along with OS X, iLife, and iWork. It leads the digital music revolution with iPods and iTunes. It reinvented the mobile phone with iPhone and App Store. And it's defining the future of mobile media and computing with iPad.",
    "publishedAt": "2005-06-22T05:12:23.000Z",
    "thumbnails": {
     "default": {
      "url": "https://yt3.ggpht.com/-KdgJnz1HIdQ/AAAAAAAAAAI/AAAAAAAAAAA/4vVN7slJqj4/s88-c-k-no/photo.jpg"
     },
     "medium": {
      "url": "https://yt3.ggpht.com/-KdgJnz1HIdQ/AAAAAAAAAAI/AAAAAAAAAAA/4vVN7slJqj4/s240-c-k-no/photo.jpg"
     },
     "high": {
      "url": "https://yt3.ggpht.com/-KdgJnz1HIdQ/AAAAAAAAAAI/AAAAAAAAAAA/4vVN7slJqj4/s240-c-k-no/photo.jpg"
     }
    },
    "localized": {
     "title": "Apple",
     "description": "Apple designs the Mac, along with OS X, iLife, and iWork. It leads the digital music revolution with iPods and iTunes. It reinvented the mobile phone with iPhone and App Store. And it's defining the future of mobile media and computing with iPad."
    }
   },
   "contentDetails": {
    "relatedPlaylists": {
     "uploads": "UUE_M8A5yxnLfW0KghEeajjw"
    },
    "googlePlusUserId": "115967756576401290385"
   }
  }
 ]
}
From the above results, we only care about the title, description and default thumbnail of the snippet dictionary, and for the uploads value we are interested in the contentDetails > relatedPlaylists dictionary.
Based on the above results, we can “decode” the path to each piece of data we want, so we can continue with our implementation. To make things easier, I’ve added comments in almost above every single line to the code that follows, so you’re able to understand what’s going on in each step:
func getChannelDetails(useChannelIDParam: Bool) {
    ...

    performGetRequest(targetURL, completion: { (data, HTTPStatusCode, error) -> Void in
        if HTTPStatusCode == 200 && error == nil {
            // Convert the JSON data to a dictionary.
            let resultsDict = NSJSONSerialization.JSONObjectWithData(data!, options: nil, error: nil) as! Dictionary

            // Get the first dictionary item from the returned items (usually there's just one item).
            let items: AnyObject! = resultsDict["items"] as AnyObject!
            let firstItemDict = (items as! Array)[0] as! Dictionary

            // Get the snippet dictionary that contains the desired data.
            let snippetDict = firstItemDict["snippet"] as! Dictionary

            // Create a new dictionary to store only the values we care about.
            var desiredValuesDict: Dictionary = Dictionary()
            desiredValuesDict["title"] = snippetDict["title"]
            desiredValuesDict["description"] = snippetDict["description"]
            desiredValuesDict["thumbnail"] = ((snippetDict["thumbnails"] as! Dictionary)["default"] as! Dictionary)["url"]

            // Save the channel's uploaded videos playlist ID.
            desiredValuesDict["playlistID"] = ((firstItemDict["contentDetails"] as! Dictionary)["relatedPlaylists"] as! Dictionary)["uploads"]


            // Append the desiredValuesDict dictionary to the following array.
            self.channelsDataArray.append(desiredValuesDict)
        }
    })
}
Let’s see the highlights. Initially, we make sure that there’s actual JSON data by checking the HTTP status code value and the error object. If everything is okay, we begin by converting the fetched data (NSData object) into a dictionary. Then, we use that dictionary to access all the returned items (dictionaries with data about the channel). Usually when requesting for a channel’s details there’s just one item returned back. In our case, that item is represented by the firstItemDict object. At this point it’s easy to get the snippet dictionary.
After having accessed the snippet dictionary, we create a new one for storing only the values we actually need to keep. So, in the desiredValuesDict dictionary we store the channel’s title, description and thumbnail image URL. Notice that I chose to pick the default thumbnail (the smaller size). For getting that value some more “digging” was required.
By having finished with the channel’s details (title, etc), we access the uploads value so we get the ID of the playlist that contains all the channel’s videos. As you see, this value is stored to the desiredValuesDict dictionary as well.
Lastly, our custom dictionary is appended to the channelsDataArray array, so we can use it later for displaying and managing the channels.
The above method is not yet ready, however before we proceed let me give you the order of structures (let’s say the “path”) that were accessed for fetching all the desired values:
For accessing the snippet dictionary:
Converted-from-JSON dictionary > “items” array > First item dictionary > “snippet” dictionary
For accessing the thumbnail URL of the channel:
Converted-from-JSON dictionary > “items” array > First item dictionary > “snippet” dictionary > “thumbnails” dictionary > “default” dictionary > “url” value
For accessing the playlist ID:
Converted-from-JSON dictionary > “items” array > First item dictionary > “contentDetails” dictionary > “relatedPlaylists” dictionary > “uploads” value
As you see, you need to go deep down in the contained dictionaries and arrays of the JSON results, however it’s not difficult at all to do so, and the sample results from Google can really help you stay on track.
Let’s get going now with the implementation by adding the missing parts. What comes next is to reload the table view (even though we’ll implement the actual data display in the next part) right after a channel’s data has been added to the channelsDataArray array, and to fetch the data for the next one (if of course there are still channels to get).
func getChannelDetails(useChannelIDParam: Bool) {
    ...

    performGetRequest(targetURL, completion: { (data, HTTPStatusCode, error) -> Void in
        if HTTPStatusCode == 200 && error == nil {
            ...

            // Reload the tableview.
            self.tblVideos.reloadData()

            // Load the next channel data (if exist).
            ++self.channelIndex
            if self.channelIndex < self.desiredChannelsArray.count {
                self.getChannelDetails(useChannelIDParam)
            }
            else {
                self.viewWait.hidden = true
            }
        }
    })
}
The self.viewWait.hidden = true part ensures that after having fetched all the channels the activity indicator and the transparent view will disappear from the screen.
Lastly, let's handle the case where the HTTP status code is other than 200, or an error has occurred. In both cases we'll just display a message to the console, and we won't deal with them any further:
func getChannelDetails(useChannelIDParam: Bool) {
    ...

    performGetRequest(targetURL, completion: { (data, HTTPStatusCode, error) -> Void in
        if HTTPStatusCode == 200 && error == nil {
            ...
        }
        else {
            println("HTTP Status Code = \(HTTPStatusCode)")
            println("Error while loading channel details: \(error)")
        }
    })
}
Our new function is finally ready. All we have to do is to call it, and that will happen in the viewDidLoad method:
override func viewDidLoad() {
    ...

    getChannelDetails(false)
}
By reviewing the getChannelDetails(...) function, you'll end up to the conclusion that we haven't actually done anything specifically difficult. We just handled the returned data and stored the parts of it that we were interested in. In the upcoming parts we'll implement a couple more functions similar to this one; when we'll get the videos of a channel and when we'll implement the search feature. But this won't be any problem at all, as you now have the "baptism of fire" in making calls to the YouTube API.
Displaying Channels
As I explained to the app overview part, the segmented control that exists in the ViewController class plays an important role, as it actually determines the kind of data that should be displayed in the tableview. When the first index of it named Channels is selected, then the respective details are the ones that should be displayed, otherwise videos should be listed in the tableview. This fact must be taken under consideration at this point, because right now we must show the fetched channel data under conditions in the tableview.
So, first of all, let's specify the number of rows that the tableview must have:
func tableView(tableView: UITableView, numberOfRowsInSection section: Int) -> Int {
    if segDisplayedContent.selectedSegmentIndex == 0 {
        return channelsDataArray.count
    }
    else {

    }

    return 0
}
As you see, deciding for the proper data source is easy, as all we have to do is to be based to the selectedSegmentIndex property of the segDisplayedContent segmented control. Accordingly we can dequeue the proper cell for the tableview:
func tableView(tableView: UITableView, cellForRowAtIndexPath indexPath: NSIndexPath) -> UITableViewCell {
    var cell: UITableViewCell!

    if segDisplayedContent.selectedSegmentIndex == 0 {
        cell = tableView.dequeueReusableCellWithIdentifier("idCellChannel", forIndexPath: indexPath) as! UITableViewCell
    }
    else {
        cell = tableView.dequeueReusableCellWithIdentifier("idCellVideo", forIndexPath: indexPath) as! UITableViewCell
    }

    return cell
}
If you take a look in the View Controller scene in the Interface Builder you'll notice that the prototype cell regarding the channels contains three subviews, and each one has been assigned with a specific tag value:
- A UILabel for the channel title, tag value = 10
- A UILabel for the channel description, tag value = 11
- A UIImageView for the channel thumbnail, tag value = 12

Our first concern is to "extract" those subviews for each dequeued cell, so we can set to them the fetched values. Here it is:
func tableView(tableView: UITableView, cellForRowAtIndexPath indexPath: NSIndexPath) -> UITableViewCell {
    var cell: UITableViewCell!

    if segDisplayedContent.selectedSegmentIndex == 0 {
        cell = tableView.dequeueReusableCellWithIdentifier("idCellChannel", forIndexPath: indexPath) as! UITableViewCell

        let channelTitleLabel = cell.viewWithTag(10) as! UILabel
        let channelDescriptionLabel = cell.viewWithTag(11) as! UILabel
        let thumbnailImageView = cell.viewWithTag(12) as! UIImageView

    }
    else {
        cell = tableView.dequeueReusableCellWithIdentifier("idCellVideo", forIndexPath: indexPath) as! UITableViewCell
    }

    return cell
}
Next, let's get the details for each channel and let's assign them to the subviews:
func tableView(tableView: UITableView, cellForRowAtIndexPath indexPath: NSIndexPath) -> UITableViewCell {
    var cell: UITableViewCell!

    if segDisplayedContent.selectedSegmentIndex == 0 {
        ...

        let channelDetails = channelsDataArray[indexPath.row]
        channelTitleLabel.text = channelDetails["title"] as? String
        channelDescriptionLabel.text = channelDetails["description"] as? String
        thumbnailImageView.image = UIImage(data: NSData(contentsOfURL: NSURL(string: (channelDetails["thumbnail"] as? String)!)!)!)
    }
    else {
        cell = tableView.dequeueReusableCellWithIdentifier("idCellVideo", forIndexPath: indexPath) as! UITableViewCell
    }

    return cell
}
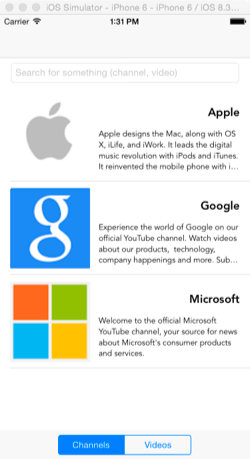
Now you can try to run the app for first time. If you followed all steps properly until here, and if you set your API key, you'll see the three channels appearing in the tableview.
Fetching Videos
The first feature of our demo app is now working properly, so let's continue to the next one. This time, we want to retrieve the videos that a selected channel has, and to list them in our tableview (this will happen in the next part). Obviously, the whole process will begin when a channel is tapped, and that's the starting point for our implementation here too.
As it usually happens, we need to declare a new variable to the top of the class:
var videosArray: Array> = []
As you suspect, in the videosArray array we'll store the videos details once we parse them. Notice that the array is initialized at the same time.
Now, let's handle a tapped channel cell:
func tableView(tableView: UITableView, didSelectRowAtIndexPath indexPath: NSIndexPath) {
    if segDisplayedContent.selectedSegmentIndex == 0 {
        // In this case the channels are the displayed content.
        // The videos of the selected channel should be fetched and displayed.

        // Switch the segmented control to "Videos".
        segDisplayedContent.selectedSegmentIndex = 1

        // Show the activity indicator.
        viewWait.hidden = false

        // Remove all existing video details from the videosArray array.
        videosArray.removeAll(keepCapacity: false)

        // Fetch the video details for the tapped channel.
        getVideosForChannelAtIndex(indexPath.row)
    }
    else {

    }
}
The comments above help you understand the flow. As we are going to display videos, initially we change the selected segmented control index to the proper value. Then, we show the viewWait view that contains the activity indicator for obvious reasons. An important detail that we should not forget is to clear the videosArray from any previous contents. Of course, the first time the app will run this array will be empty, but this line is necessary for subsequent video requests. Lastly, we call the getVideosForChannelAtIndex(...) function, which is the heart of what we want to achieve here. It doesn't still exist, so we'll implement it now. Notice that we pass the index of the tapped cell as an argument.
This time we are going to use the playlistItem.list method of the YouTube API, and the respective documentation can be found here. We will provide three parameters to the GET request that we will make; apparently one of them is the API key. Besides that, we will also set the required part parameters with the snippet value so we get the video details we need, and the ID of the playlist that contains them. This parameter is called playlistID. We have already acquired the playlist ID values for all the fetched channels, and now it's time to use it. If you want to see a live example of that request, you can visit this page (make sure to set only the snippet value to the part parameter).
In the new function that we'll start implementing, initially we'll get the playlist ID of the selected channel. Then we'll form the URL string properly specifying the parameters that I just mentioned, and then we'll create the NSURL object that we'll use to make the request:
func getVideosForChannelAtIndex(index: Int!) {
    // Get the selected channel's playlistID value from the channelsDataArray array and use it for fetching the proper video playlst.
    let playlistID = channelsDataArray[index]["playlistID"] as! String

    // Form the request URL string.
    let urlString = "https://www.googleapis.com/youtube/v3/playlistItems?part=snippet&playlistId=\(playlistID)&key=\(apiKey)"

    // Create a NSURL object based on the above string.
    let targetURL = NSURL(string: urlString)
}
As you imagine, a channel's playlist may contain a big number of videos, but it's totally pointless to get them all in the scope of this tutorial. Getting only the first five videos is more than enough. In this case though, we don't need to explicitly limit the results as by default the YouTube API returns them in groups of five.
Further than that, here's a sample of the JSON results we expect to get back. As previously, it guides us properly so we can access the right values:
{
 "kind": "youtube#playlistItemListResponse",
 "etag": "\"Y3xTLFF3RLtHXX85JBgzzgp2Enw/ep-DtNxjJwMQbpCO1Lk3_ggMScU\"",
 "nextPageToken": "CAUQAA",
 "pageInfo": {
  "totalResults": 1636,
  "resultsPerPage": 5
 },
 "items": [
  {

   "kind": "youtube#playlistItem",
   "etag": "\"Y3xTLFF3RLtHXX85JBgzzgp2Enw/SYrDBZ2Ywgpf3zgCreEdB4PIf1o\"",
   "id": "UUZwDRPIG5DD2lxeCjap51NdbKiDO_M62c",
   "snippet": {
    "publishedAt": "2015-06-25T01:50:54.000Z",
    "channelId": "UCK8sQmJBp8GCxrOtXWBpyEA",
    "title": "The Google app: Summer",
    "description": "\"OK Google, when is Summer over?\"\n\nTalk to Google to get answers, find stuff nearby, and get things done. The Google app. Available on iOS and Android. \n\nDownload the app here: http://www.google.com/search/about/download/",
    "thumbnails": {
     "default": {
      "url": "https://i.ytimg.com/vi/BVGKskYZrw8/default.jpg",
      "width": 120,
      "height": 90
     },
     "medium": {
      "url": "https://i.ytimg.com/vi/BVGKskYZrw8/mqdefault.jpg",
      "width": 320,
      "height": 180
     },
     "high": {
      "url": "https://i.ytimg.com/vi/BVGKskYZrw8/hqdefault.jpg",
      "width": 480,
      "height": 360
     },
     "standard": {
      "url": "https://i.ytimg.com/vi/BVGKskYZrw8/sddefault.jpg",
      "width": 640,
      "height": 480
     },
     "maxres": {
      "url": "https://i.ytimg.com/vi/BVGKskYZrw8/maxresdefault.jpg",
      "width": 1280,
      "height": 720
     }
    },
    "channelTitle": "Google",
    "playlistId": "UUK8sQmJBp8GCxrOtXWBpyEA",
    "position": 0,
    "resourceId": {
     "kind": "youtube#video",
     "videoId": "BVGKskYZrw8"
    }
   }
  },
  ... MORE ITEMS ...
 ]
}
From all the returned values regarding a video item, we'll keep only the title, the default thumbnail, and the videoID values. The last one will be used later to stream play the video.
Let's see the code:
func getVideosForChannelAtIndex(index: Int!) {
    ...

    // Fetch the playlist from Google.
    performGetRequest(targetURL, completion: { (data, HTTPStatusCode, error) -> Void in
        if HTTPStatusCode == 200 && error == nil {
            // Convert the JSON data into a dictionary.
            let resultsDict = NSJSONSerialization.JSONObjectWithData(data!, options: nil, error: nil) as! Dictionary

            // Get all playlist items ("items" array).
            let items: Array> = resultsDict["items"] as! Array>

            // Use a loop to go through all video items.
            for var i=0; i)["snippet"] as! Dictionary

                // Initialize a new dictionary and store the data of interest.
                var desiredPlaylistItemDataDict = Dictionary()

                desiredPlaylistItemDataDict["title"] = playlistSnippetDict["title"]
                desiredPlaylistItemDataDict["thumbnail"] = ((playlistSnippetDict["thumbnails"] as! Dictionary)["default"] as! Dictionary)["url"]
                desiredPlaylistItemDataDict["videoID"] = (playlistSnippetDict["resourceId"] as! Dictionary)["videoId"]

                // Append the desiredPlaylistItemDataDict dictionary to the videos array.
                self.videosArray.append(desiredPlaylistItemDataDict)

                // Reload the tableview.
                self.tblVideos.reloadData()
            }
        }
    })
}
The logic we follow to "extract" the desired values is similar to the one we followed in the channels parsing, so it's meaningless to explain it once again. The idea is simple; we are based on the sample results and we modify accordingly our code.
Notice that once the data for a video is added to the array, we reload the tableview to update the UI.
Finally, let's complete our method:
func getVideosForChannelAtIndex(index: Int!) {
    ...

    // Fetch the playlist from Google.
    performGetRequest(targetURL, completion: { (data, HTTPStatusCode, error) -> Void in
        if HTTPStatusCode == 200 && error == nil {
            ...
        }
        else {
            println("HTTP Status Code = \(HTTPStatusCode)")
            println("Error while loading channel videos: \(error)")
        }

        // Hide the activity indicator.
        self.viewWait.hidden = true
    })
}
Simply, we display the HTTP status code and any error that might have occurred (in case that we don't have data to parse), and we hide again the viewWait view.
Displaying Videos
Now it's time to show the fetched videos list, but things are easy as we are going to handle everything accordingly to what we already did for the channels. So, first of all, we must specify the number of rows in the tableview:
func tableView(tableView: UITableView, numberOfRowsInSection section: Int) -> Int {
    if segDisplayedContent.selectedSegmentIndex == 0 {
        return channelsDataArray.count
    }
    else {
        return videosArray.count
    }
}
Obviously, the number of rows must match to the number of video dictionaries existing in the videosArray array.
Next, let's handle the dequeued cell, where first we will access the cell's subviews using their tag values, and then we will set to them the video title and thumbnail image. Unlike to channels, in this case we have just one label object for the video title, and there's no description label. There's also an image view for displaying the video thumbnail image; once again we'll get it in real time from the Internet using the URL value we parsed.
func tableView(tableView: UITableView, cellForRowAtIndexPath indexPath: NSIndexPath) -> UITableViewCell {
    var cell: UITableViewCell!

    if segDisplayedContent.selectedSegmentIndex == 0 {
        cell = tableView.dequeueReusableCellWithIdentifier("idCellChannel", forIndexPath: indexPath) as! UITableViewCell
        ...
    }
    else {
        cell = tableView.dequeueReusableCellWithIdentifier("idCellVideo", forIndexPath: indexPath) as! UITableViewCell

        let videoTitle = cell.viewWithTag(10) as! UILabel
        let videoThumbnail = cell.viewWithTag(11) as! UIImageView

        let videoDetails = videosArray[indexPath.row]
        videoTitle.text = videoDetails["title"] as? String
        videoThumbnail.image = UIImage(data: NSData(contentsOfURL: NSURL(string: (videoDetails["thumbnail"] as? String)!)!)!)
    }

    return cell
}
Now the app is capable of downloading and displaying the video list of a selected channel, and actually you can give it a try if you wish. However, now it's the best time to enable one more feature of the app: The capability to switch from channels to videos and back simply by using the segmented control. In the ViewController class there's an IBAction method already defined, named changeContent(...). This one is triggered each time you select a different segment, and all we have to write is this:
@IBAction func changeContent(sender: AnyObject) {
    tblVideos.reloadSections(NSIndexSet(index: 0), withRowAnimation: UITableViewRowAnimation.Fade)
}
The above line will result to a faded reload of the tableview data. As the index of the segmented control gets changed, the proper data source will be selected automatically and the proper contents will be displayed to the tableview.
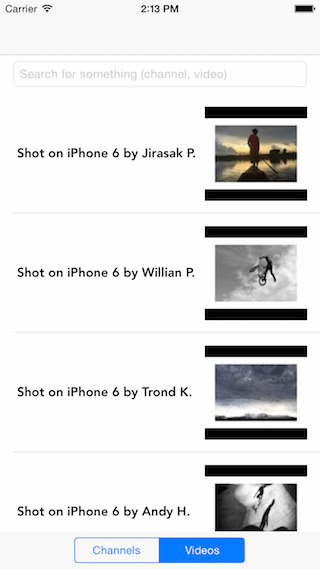
Right next you can see a screenshot of the Apple channel's videos list:
Searching for Channels and Videos
A really important functionality that users always make use of is the content searching, no matter what Google product or API they aim to. Based on that fact, I felt that something was going to be missing from this demo application if I wouldn't have added the capability of searching the YouTube using its API, therefore here we are. Generally, in YouTube one can search for videos, channels and playlists. Here we'll enable searching just for the first two options, and we won't bother with playlists.
Being a bit more specific, I have to say that we won't be searching for channels and videos at the same time. The search type will depend on the selected index of the segmented control. So, if the channels index is selected, by default our "search engine" will return us channels. Otherwise, if the videos index is selected, we'll get videos as a result.
In the starter project you have downloaded, I've already made the ViewController class the delegate of the textfield (our search field), and defined the textFieldShouldReturn(...) delegate method. We'll begin implementing in this method, and initially we'll do two things: We'll hide the keyboard, and we'll determine the type of search based on the segmented control's selected index. Let's see that:
func textFieldShouldReturn(textField: UITextField) -> Bool {
    textField.resignFirstResponder()
    viewWait.hidden = false

    // Specify the search type (channel, video).
    var type = "channel"
    if segDisplayedContent.selectedSegmentIndex == 1 {
        type = "video"
        videosArray.removeAll(keepCapacity: false)
    }

    return true
}
The YouTube API method we are about to use is the search.list, and you can see the relevant documentation here. In the GET request that we'll make, we'll provide besides the API key three more parameters. The first one is the required part parameter, which must be assigned with the snippet value (so we get details about the result items). The second parameter is called type, and here we'll set the type value we specified right above so we get the proper results back. The third and most important parameter is called "q" (no quotes), and is the actual search string (in other words, the textfield's contents). Without it, no search will be made.
Having said all the above, let's prepare our URL for the request. This time we add something new at this part, as for first time we actually URL-encode our request. This is necessary so any special characters or spaces to be properly replaced by percent escape characters (for example %20 instead of a space character).
func textFieldShouldReturn(textField: UITextField) -> Bool {
    ...

    // Form the request URL string.
    var urlString = "https://www.googleapis.com/youtube/v3/search?part=snippet&q=\(textField.text)&type=\(type)&key=\(apiKey)"
    urlString = urlString.stringByAddingPercentEscapesUsingEncoding(NSUTF8StringEncoding)!

    // Create a NSURL object based on the above string.
    let targetURL = NSURL(string: urlString)

    return true
}
The next step is to make the request. The initial steps are easy, as we get the JSON data and we convert it to a dictionary. Then we get all the search result items and lastly we create a loop so we process them one by one.
func textFieldShouldReturn(textField: UITextField) -> Bool {
    ...

    // Get the results.
    performGetRequest(targetURL, completion: { (data, HTTPStatusCode, error) -> Void in
        if HTTPStatusCode == 200 && error == nil {
            // Convert the JSON data to a dictionary object.
            let resultsDict = NSJSONSerialization.JSONObjectWithData(data!, options: nil, error: nil) as! Dictionary

            // Get all search result items ("items" array).
            let items: Array> = resultsDict["items"] as! Array>

            // Loop through all search results and keep just the necessary data.
            for var i=0; i

                // Gather the proper data depending on whether we're searching for channels or for videos.
                if self.segDisplayedContent.selectedSegmentIndex == 0 {

                }
                else {

                }
            }
        }
    })


    return true
}
There's nothing difficult above, so let's focus to the channel results first. In this case, handling the results is quite easy because all we have to do is to get each channel ID value and append it to the desiredChannelsArray array. If you remember, we started our work with that array by adding the channel names of Apple, Google and Microsoft. Also, we created the getChannelDetails(...) function, which is responsible for accessing the API and fetching all the desired data regarding channels. When we were implementing it, we said that the request can be based either on the username of the channel owner, or on the ID of the channel; furthermore, we applied the proper logic for doing that, and we just left for later (for now actually) the creation of the request URL string using the channel ID.
So, let's make a small turn here, and let's add that missing part in the getChannelDetails(...) function. All you need is to add the line in the following else case:
func getChannelDetails(useChannelIDParam: Bool) {
    var urlString: String!
    if !useChannelIDParam {
        ...
    }
    else {
        urlString = "https://www.googleapis.com/youtube/v3/channels?part=contentDetails,snippet&id=\(desiredChannelsArray[channelIndex])&key=\(apiKey)"
    }

    ...
}
Now let's head back to the search results parsing, and let's add the fetched channel ID in the desiredChannelsArray array. Notice that besides that, right after the for loop we call the getChannelDetails(...) function, passing the true value as argument to indicate that the request must be made based on the channel ID:
func textFieldShouldReturn(textField: UITextField) -> Bool {
    ...

    // Get the results.
    performGetRequest(targetURL, completion: { (data, HTTPStatusCode, error) -> Void in
        if HTTPStatusCode == 200 && error == nil {
            ...

            // Loop through all search results and keep just the necessary data.
            for var i=0; i

                // Gather the proper data depending on whether we're searching for channels or for videos.
                if self.segDisplayedContent.selectedSegmentIndex == 0 {
                    // Keep the channel ID.
                    self.desiredChannelsArray.append(snippetDict["channelId"] as! String)
                }
                else {

                }
            }

            // Call the getChannelDetails(...) function to fetch the channels.
            if self.segDisplayedContent.selectedSegmentIndex == 0 {
                self.getChannelDetails(true)
            }
        }
    })

    return true
}
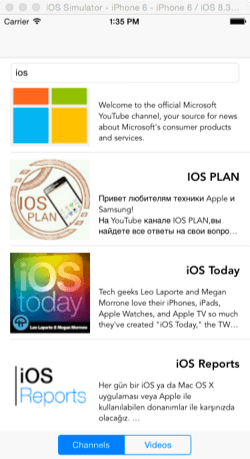
Having done the above steps, we are ready to search for channels. Any new channels that our search returns, are going to be added to the tableview right below the existing ones. Note that by default only five results are returned in a single request, and that serves us as we don't need to set any limits or filters.
Now let's handle the results of the video search. In this case, we are going to create a new dictionary where we'll store the title, the thumbnail URL and the ID of the video. Then, this dictionary will be appended to the videosArray array and the tableview will be refreshed:
func textFieldShouldReturn(textField: UITextField) -> Bool {
    ...

    // Get the results.
    performGetRequest(targetURL, completion: { (data, HTTPStatusCode, error) -> Void in
        if HTTPStatusCode == 200 && error == nil {
            ...

            // Loop through all search results and keep just the necessary data.
            for var i=0; i

                // Gather the proper data depending on whether we're searching for channels or for videos.
                if self.segDisplayedContent.selectedSegmentIndex == 0 {
                    ...
                }
                else {
                    // Create a new dictionary to store the video details.
                    var videoDetailsDict = Dictionary()
                    videoDetailsDict["title"] = snippetDict["title"]
                    videoDetailsDict["thumbnail"] = ((snippetDict["thumbnails"] as! Dictionary)["default"] as! Dictionary)["url"]
                    videoDetailsDict["videoID"] = (items[i]["id"] as! Dictionary)["videoId"]

                    // Append the desiredPlaylistItemDataDict dictionary to the videos array.
                    self.videosArray.append(videoDetailsDict)

                    // Reload the tableview.
                    self.tblVideos.reloadData()
                }
            }

            ...
        }
    })


    return true
}
Now, all we've left to do is to add the missing code regarding any error that might occur, and of course to hide the viewWait view.
func textFieldShouldReturn(textField: UITextField) -> Bool {
    ...

    // Get the results.
    performGetRequest(targetURL, completion: { (data, HTTPStatusCode, error) -> Void in
        if HTTPStatusCode == 200 && error == nil {
            ...
        }
        else {
            println("HTTP Status Code = \(HTTPStatusCode)")
            println("Error while loading channel videos: \(error)")
        }

        // Hide the activity indicator.
        self.viewWait.hidden = true
    })


    return true
}
Let's give another try to the app, searching this time for videos.
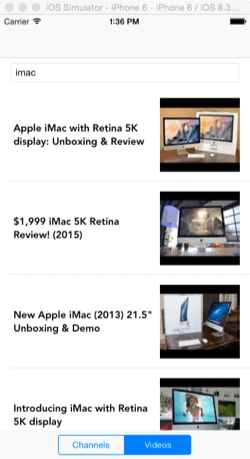
Playing Videos
Playing YouTube videos into an iOS app is quite easy, as Google provides a helper library that is responsible for embedding a player and streaming the actual video contents. That helper class creates a special web view with an iframe in it, and integrating it is really easy. You can find its documentation in this link.
Regarding iOS, this library is written in Objective-C, so using it in a Swift app requires to create the necessary header bridging file. For making things easier and save us some time, I've already created that file in the starter project you've downloaded, and also I've added the library's required files. Specifically, for the video helper library in the project you have:
- A group named Assets
- The YTPlayerView.h file
- The YTPlayerView.m file
Furthermore, in the Player View Controller scene (in the Interface Builder), I added a view object as a subview. The class of this view has been set to YTPlayerView, and with that all the initial required steps have been completed. Now, we just have to write a few code to make the player stream a YouTube video.
If you recall, we only stored some specific values during the fetching and parsing of the video data. One of them is the video ID, and now it's time to make use of it. We will provide it to the YTPlayerView, and pretty much we end there. But, let's take things from the beginning, and let's start by the time we tap on a video cell in the ViewController class. When that happens two things are required to be done: At first, to get the proper video ID value from the videosArray array, and then to load the PlayerViewController view controller. In the meantime, while the segue is prepared to be performed, we'll pass the video ID to the next view controller.
Back in action again, initially go to the top of the ViewController class and declare the following (last) variable:
var selectedVideoIndex: Int!
Then, update the following tableview delegate method:
func tableView(tableView: UITableView, didSelectRowAtIndexPath indexPath: NSIndexPath) {
    if segDisplayedContent.selectedSegmentIndex == 0 {
        ...
    }
    else {
        selectedVideoIndex = indexPath.row
        performSegueWithIdentifier("idSeguePlayer", sender: self)
    }
}
Nothing difficult here, as we just keep the index of the tapped row, and then we perform the segue. Let's go now to the segue preparation, where we will actually access the video ID and we'll pass it to the PlayerViewController class.
override func prepareForSegue(segue: UIStoryboardSegue, sender: AnyObject?) {
    if segue.identifier == "idSeguePlayer" {
        let playerViewController = segue.destinationViewController as! PlayerViewController
        playerViewController.videoID = videosArray[selectedVideoIndex]["videoID"] as! String
    }
}
Don't worry if Xcode shows an error here. That's because the videoID property doesn't still exist in the PlayerViewController class, but this is going got be fixed right now.
Open the PlayerViewController class and add the next declaration:
var videoID: String!
Lastly, let's just call one method of the YTPlayerView class in the viewDidLoad:
override func viewDidLoad() {
    super.viewDidLoad()

    playerView.loadWithVideoId(videoID)
}
We are ready. Go and run the app now, and select any video you want to watch. You'll also notice that the player allows you to go full screen, and perform some other actions too.
Summary
Working with the YouTube API is not especially difficult, as long as you find the proper resources and documentation in Google. For each single request there is detailed documentation and samples that can guide you properly, so you manage to get and handle the data in the most appropriate way. As I said in the introduction, in this tutorial we made requests that they required just a simple API key, and not user authentication. There are cases though that it's necessary for users to sign in before they perform certain actions (e.g. to upload a video). As you guess, it was impossible to cover that aspect as well in a single tutorial, but what you've learned here is good enough to get you started with the YouTube API. Obviously you can deal with other APIs too in manners similar to those you saw in the previous parts, so find an API that you want to work with and... have fun!
For reference, you can download the complete Xcode project from Github.


