Live Activities, first introduced in iOS 16, are one of Apple's most exciting updates for creating apps that feel more connected to users in real time. Instead of requiring users to constantly reopen an app, Live Activities let information remain visible right on the Lock Screen and Dynamic Island. Whether it's tracking a food delivery, checking sports scores, or monitoring progress toward a goal, this feature keeps important updates just a glance away.
Later in iOS 17, Apple expanded Live Activities even further by supporting push updates from the server side, which makes them even more powerful for apps that rely on real-time information. But even without server-driven updates, Live Activities are incredibly useful for client-side apps that want to boost engagement and provide timely feedback.
In this tutorial, we'll explore how to implement Live Activities by building a Water Tracker app. The app allows users to log their daily water intake and instantly see their progress update on the Lock Screen or Dynamic Island. By the end of the tutorial, you'll understand how to integrate Live Activities into your SwiftUI apps.
A Quick Look at the Demo App
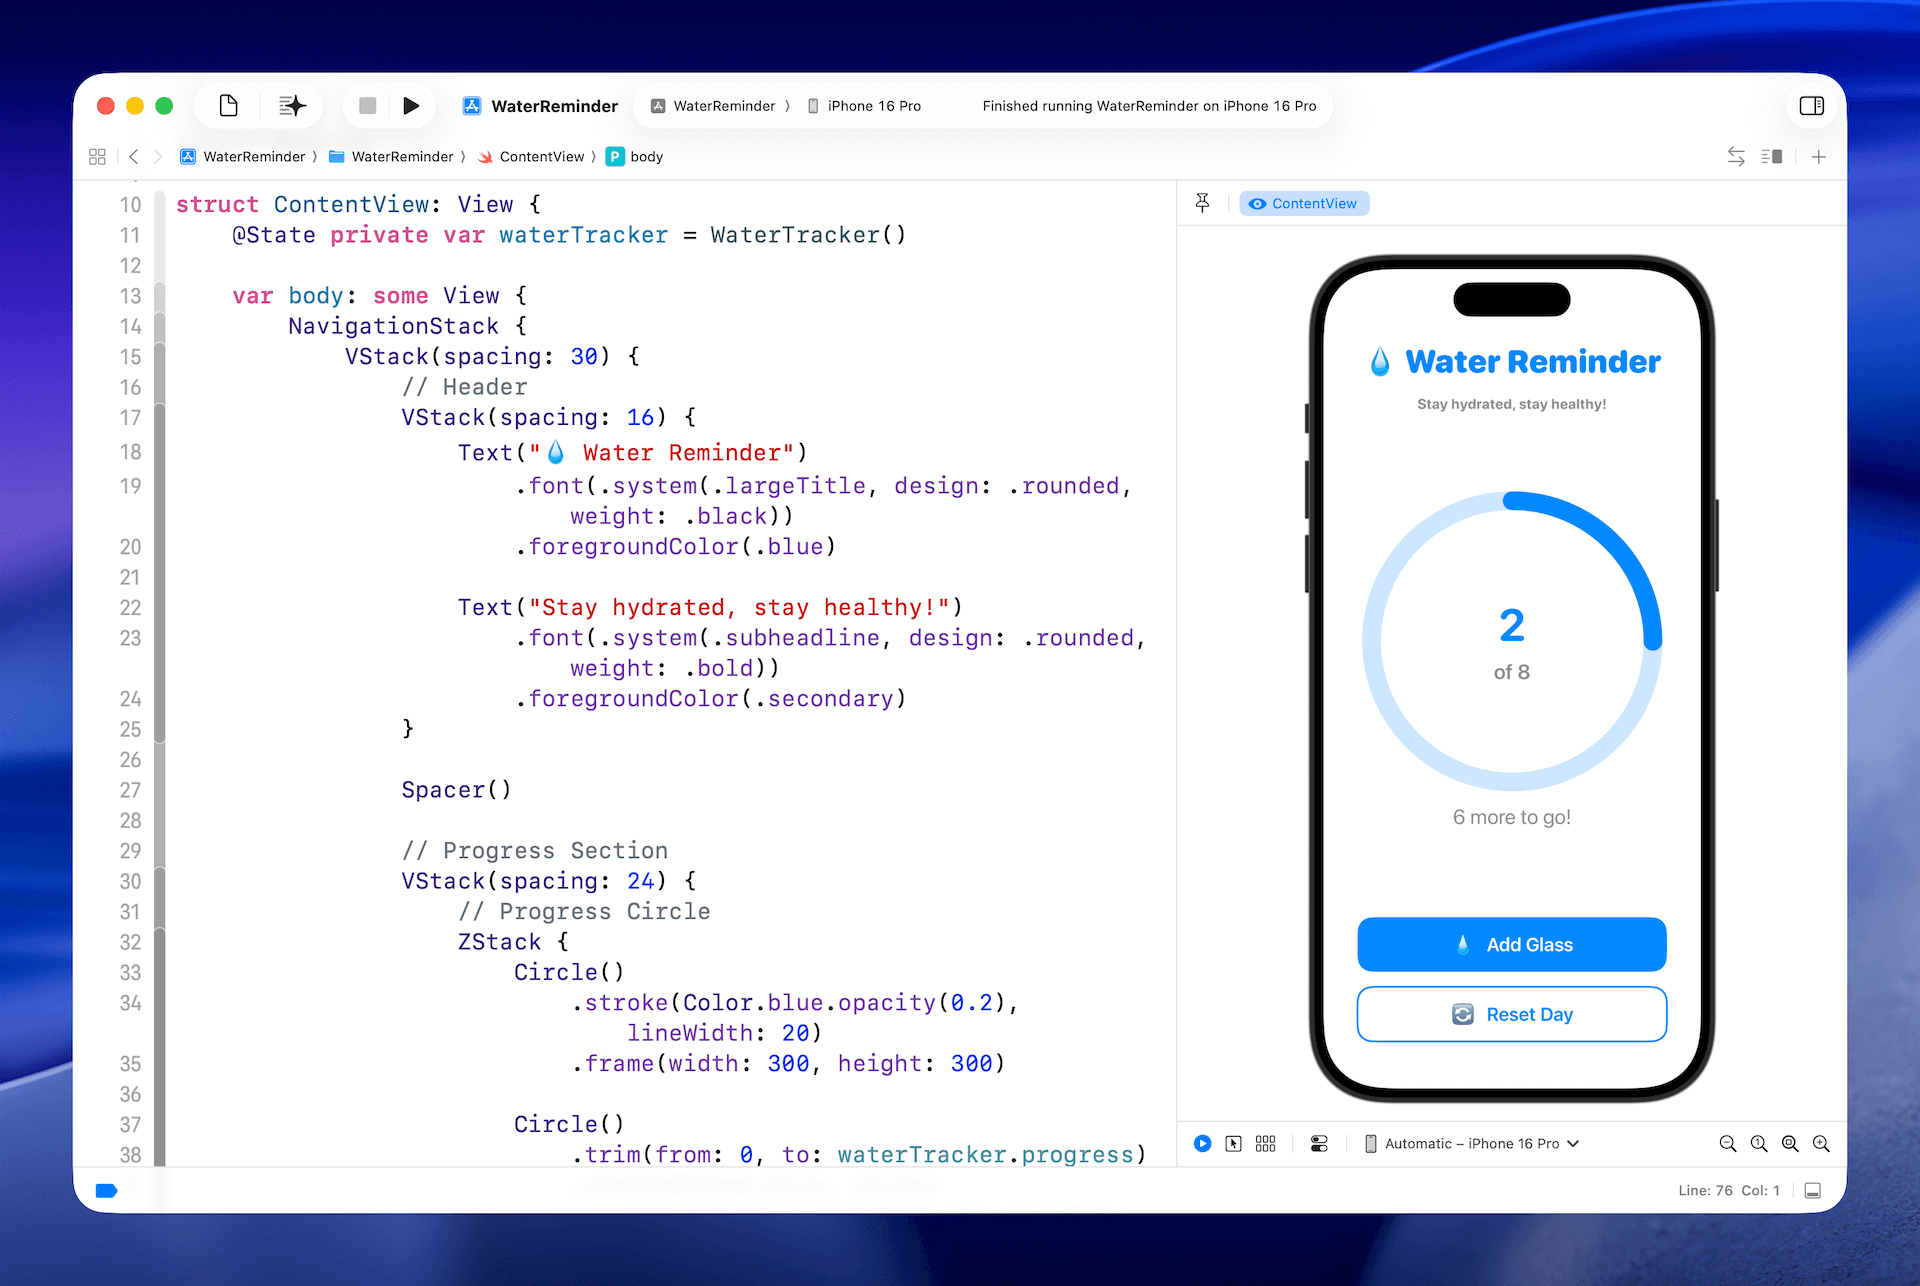
Our demo app, Water Tracker, is a simple and fun way to keep track of your daily water intake. You’ve probably heard the advice that drinking eight glasses of water a day is a good habit, and this app helps you stay mindful of that goal. The design is minimal on purpose: there's a circular progress bar showing how far along you are, and every time you tap the Add Glass button, the counter goes up by one and the progress bar fills a little more.
Behind the scenes, the app uses a WaterTracker class to manage the logic. This class keeps track of how many glasses you’ve already logged and what your daily goal is, so the UI always reflects your current progress. Here’s the code that makes it work:
import Observation

@Observable
class WaterTracker {
    var currentGlasses: Int = 0
    var dailyGoal: Int = 8

    func addGlass() {
        guard currentGlasses < dailyGoal else { return }

        currentGlasses += 1
    }

    func resetDaily() {
        currentGlasses = 0
    }

    var progress: Double {
        Double(currentGlasses) / Double(dailyGoal)
    }

    var isGoalReached: Bool {
        currentGlasses >= dailyGoal
    }

}
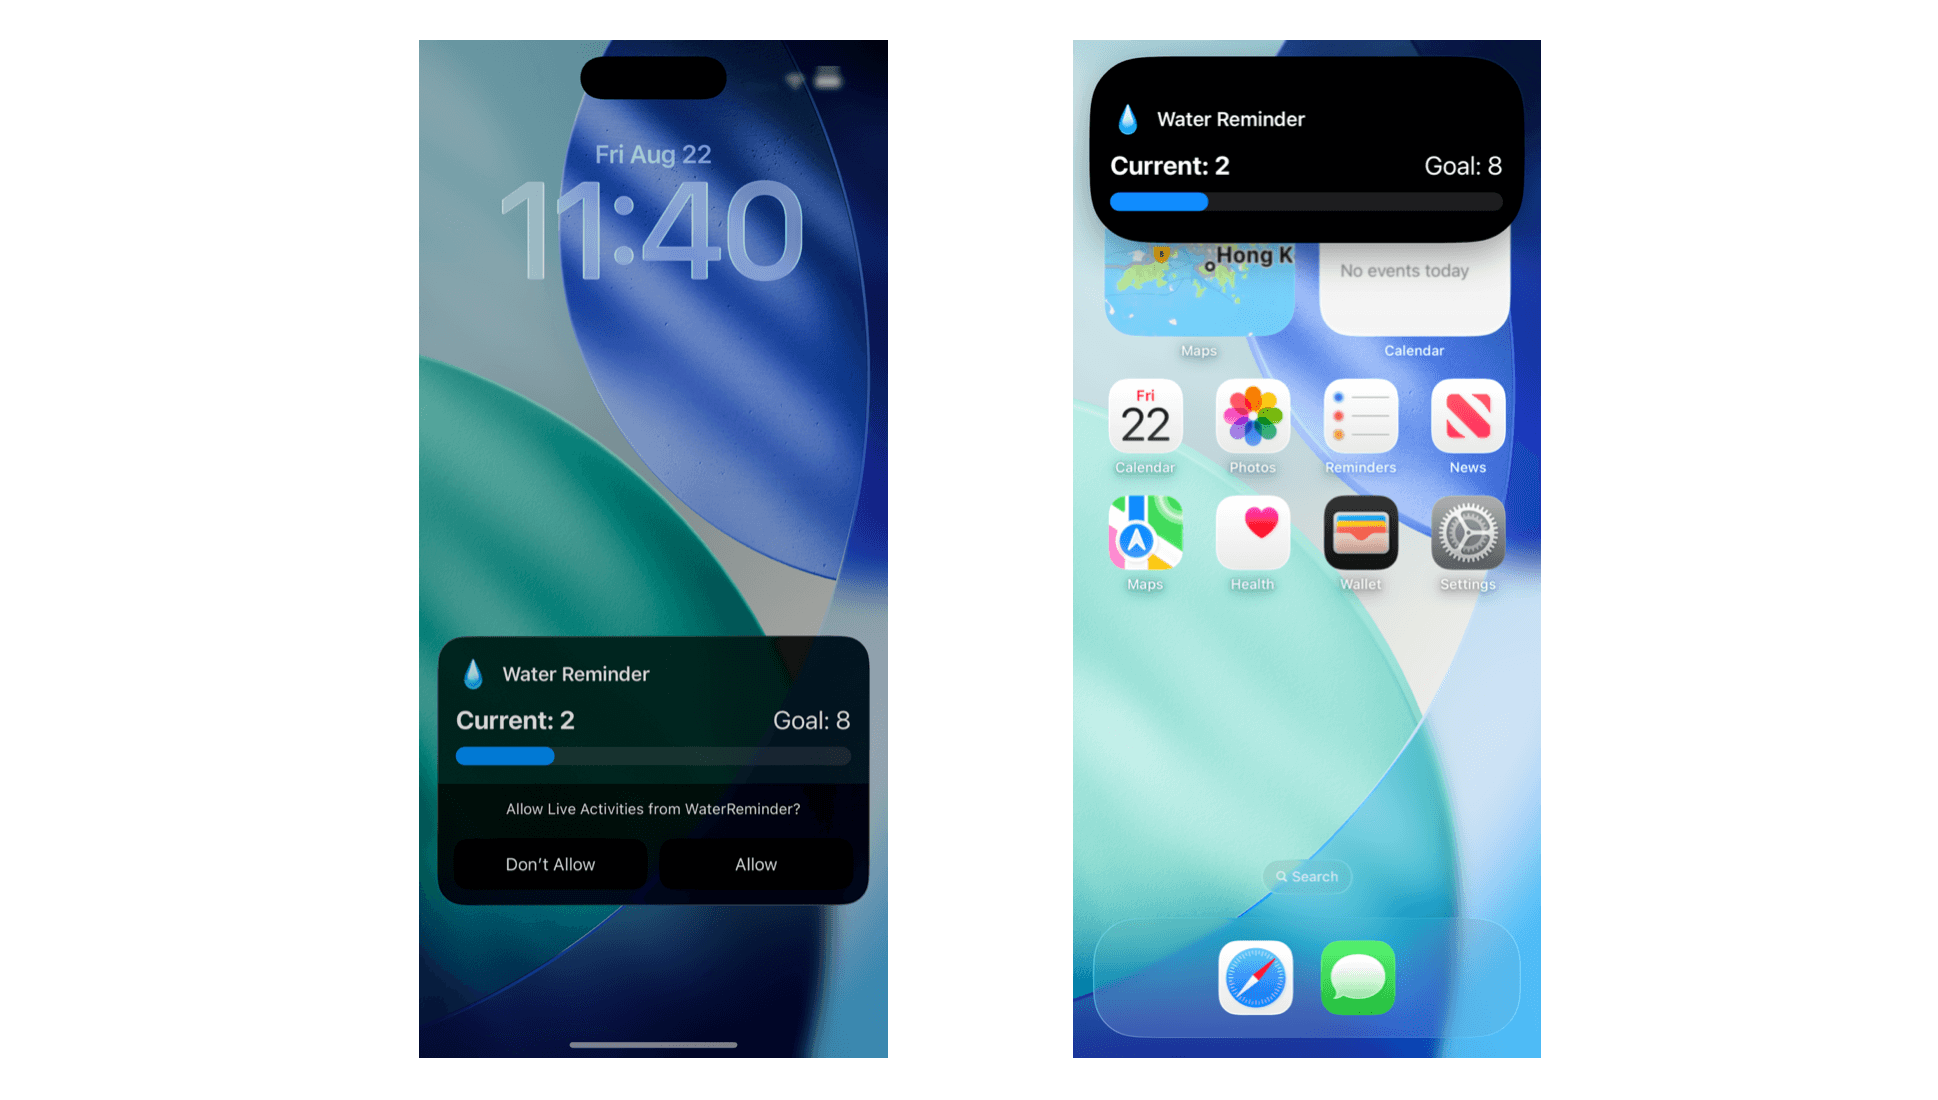
What we are going to do is to add Live Activities support to the app. Once implemented, users will be able to see their progress directly on the Lock Screen and in the Dynamic Island. The Live Activity will show the current water intake alongside the daily goal in a clear, simple way.
Creating a Widget Extension for Live Activities
Live Activities are built as part of an app's widget extension, so the first step is to add a widget extension to your Xcode project.
In this demo, the project is called WaterReminder. To create the extension, select the project in Xcode, go to the menu bar, and choose Editor > Target > Add Target. When the template dialog appears, select Widget Extension, give it a name, and make sure to check the Include Live Activity option.
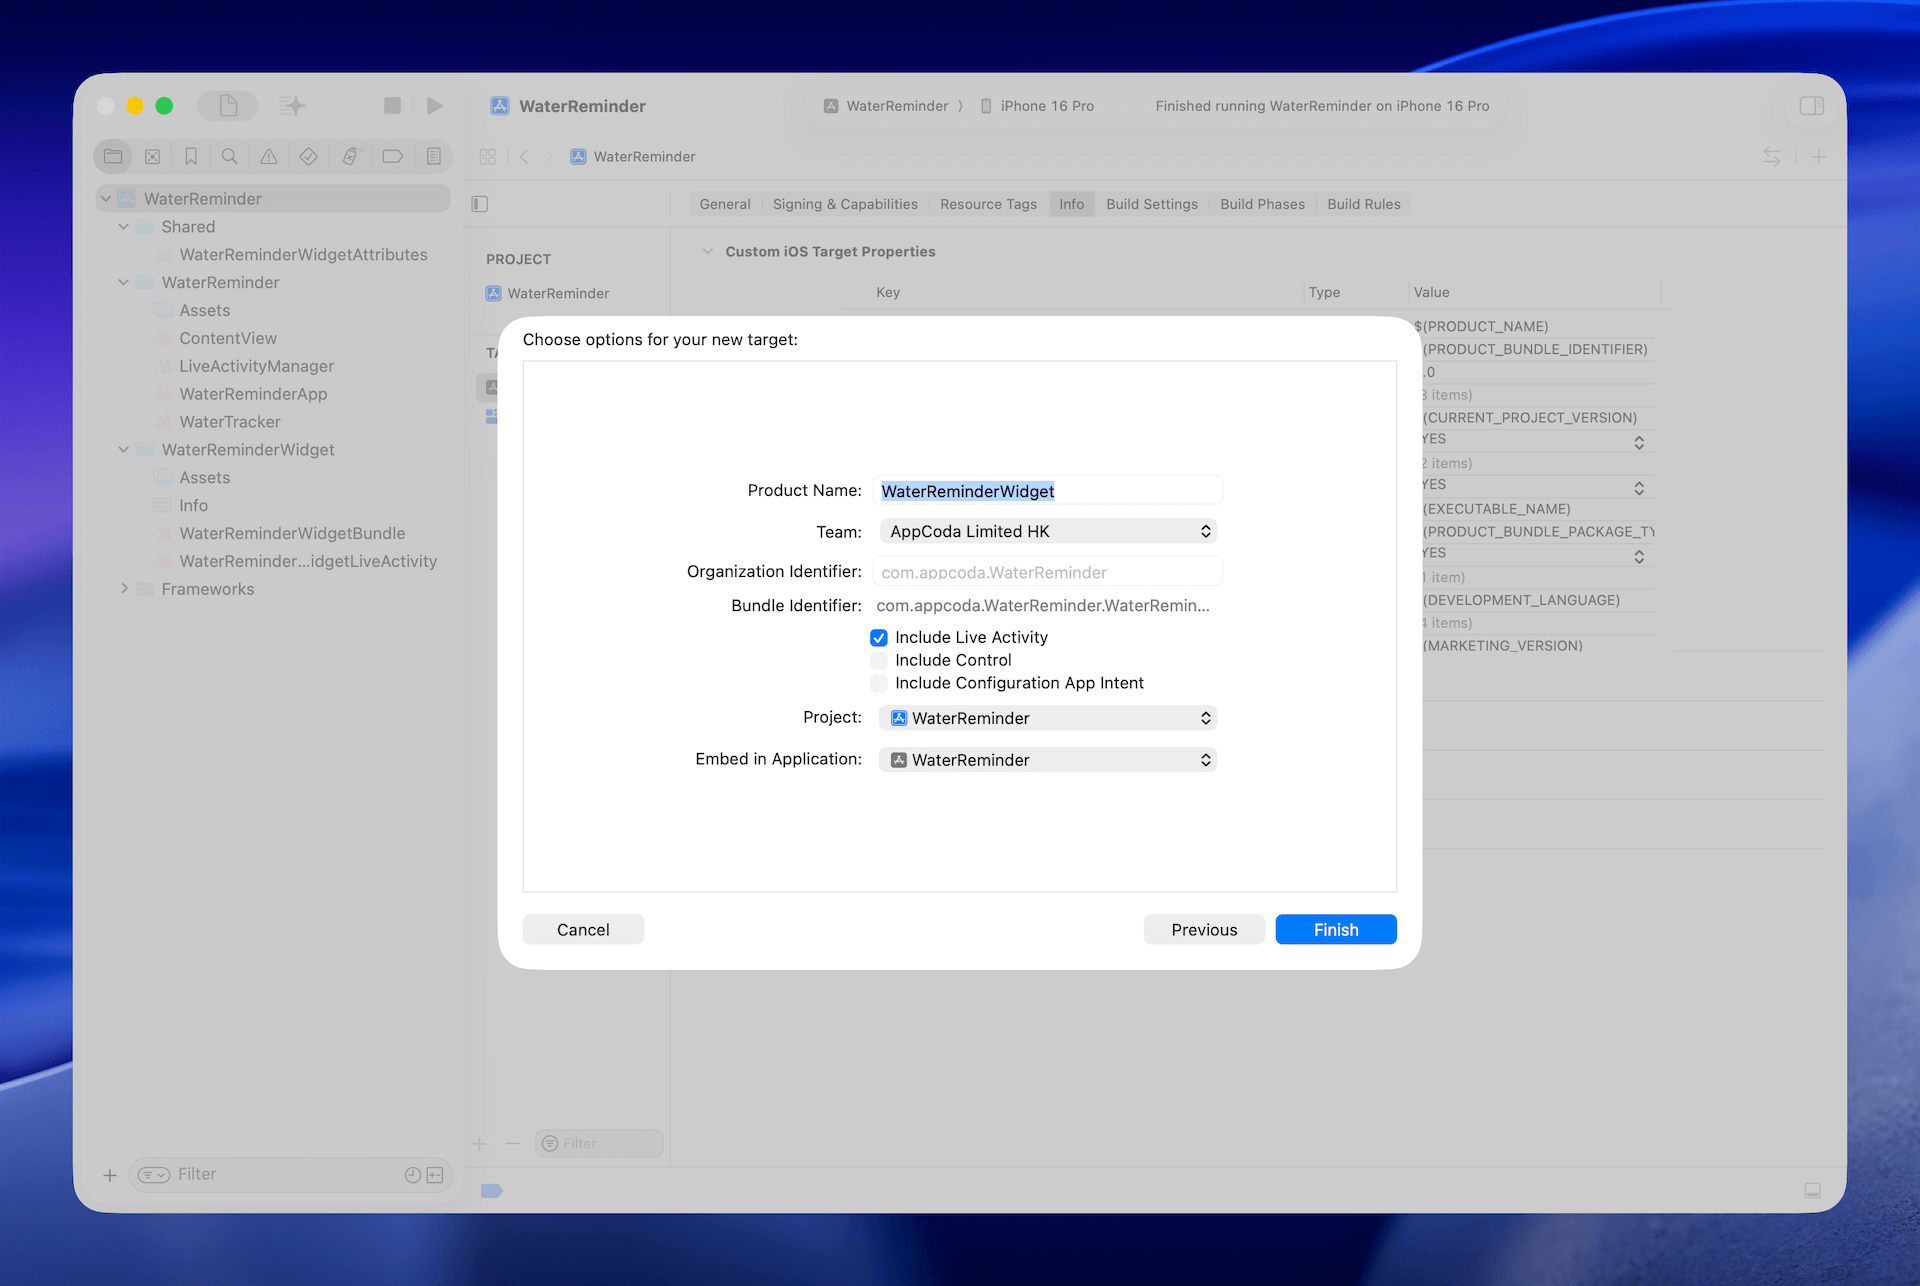
When Xcode asks, be sure to activate the new scheme. It will then generate the widget extension for you, which appears as a new folder in the project navigator along with the starter code for the Live Activity and the widget.
We’ll be rewriting the entire WaterReminderWidgetLiveActivity.swift file from scratch, so it’s best to clear out all of its existing code before proceeding.
Since the Live Activity doesn’t rely on the widget, you can optionally remove the WaterReminderWidget.swift file and update the WaterReminderWidgetBundle struct like this:
struct WaterReminderWidgetBundle: WidgetBundle {
    var body: some Widget {
        WaterReminderWidgetLiveActivity()
    }
}
Defining the ActivityAttributes Structure
The ActivityAttributes protocol describes the content that appears in your Live Activity. We have to adopt the protocol and define the dynamic content of the activity.
Since this attributes structure is usually shared between both the main app and widget extension, I suggest to create a shared folder to host this Swift file. In the project folder, create a new folder named Shared and then create a new Swift file named WaterReminderWidgetAttributes.swift.
Update the content like this:
import Foundation
import ActivityKit

struct WaterReminderWidgetAttributes: ActivityAttributes {
    public struct ContentState: Codable, Hashable {
        var currentGlasses: Int
        var dailyGoal: Int
    }

    var activityName: String
}

extension WaterReminderWidgetAttributes {
    static var preview: WaterReminderWidgetAttributes {
        WaterReminderWidgetAttributes(activityName: "Water Reminder")
    }
}

extension WaterReminderWidgetAttributes.ContentState {
     static var sample: WaterReminderWidgetAttributes.ContentState {
        WaterReminderWidgetAttributes.ContentState(currentGlasses: 3, dailyGoal: 8)
     }

    static var goalReached: WaterReminderWidgetAttributes.ContentState {
        WaterReminderWidgetAttributes.ContentState(currentGlasses: 8, dailyGoal: 8)
     }
}
The WaterReminderWidgetAttributes struct adopts the ActivityAttributes protocol and includes an activityName property to identify the activity. To conform to the protocol, we define a nested ContentState struct, which holds the data displayed in the Live Activity—specifically, the number of glasses consumed and the daily goal.
The extensions are used for SwiftUI previews, providing sample data for visualization.
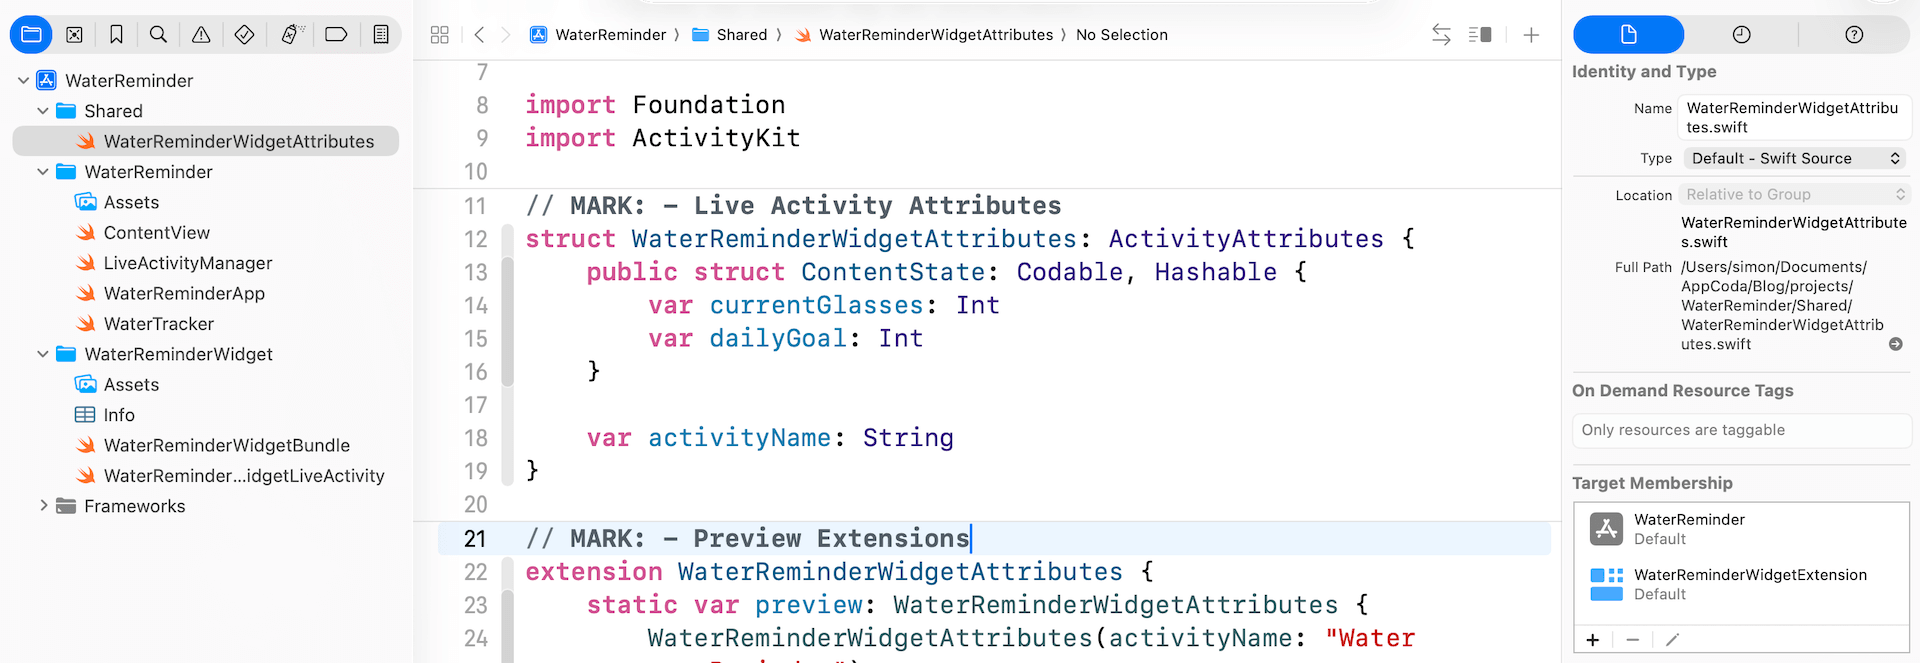
Please take note that the target membership of the file should be accessed by both the main app and the widget extension. You can verify it in the file inspector.
Implementing the Live Activity View
Next, let’s implement the live activity view, which handles the user interface in different settings. Open the WaterReminderWidgetLiveActivity.swift file and write the code like below:
import ActivityKit
import WidgetKit
import SwiftUI

struct WaterReminderLiveActivityView: View {

    let context: ActivityViewContext<WaterReminderWidgetAttributes>

    var body: some View {
        VStack(alignment: .leading, spacing: 10) {
            HStack {
                Text("💧")
                    .font(.title)
                Text("Water Reminder")
                    .font(.headline)
                    .fontWeight(.semibold)
                Spacer()
            }

            HStack {
                Text("Current: \(context.state.currentGlasses)")
                    .font(.title2)
                    .fontWeight(.bold)
                Spacer()
                Text("Goal: \(context.state.dailyGoal)")
                    .font(.title2)
            }

            // Progress bar
            Gauge(value: Double(context.state.currentGlasses), in: 0...Double(context.state.dailyGoal)) {
                EmptyView()
            }
            .gaugeStyle(.linearCapacity)
        }

    }
}
This view defines the main interface of the Live Activity, which appears on both the Lock Screen and the Dynamic Island. It displays a progress bar to visualize water intake, along with the current number of glasses consumed and the daily goal.
Next, create the WaterReminderWidgetLiveActivity struct like this:
struct WaterReminderWidgetLiveActivity: Widget {
    var body: some WidgetConfiguration {
        ActivityConfiguration(for: WaterReminderWidgetAttributes.self) { context in
            // Lock screen/banner UI goes here
            WaterReminderLiveActivityView(context: context)
                .padding()
        } dynamicIsland: { context in
            DynamicIsland {
                // Expanded UI goes here.  Compose the expanded UI through
                DynamicIslandExpandedRegion(.center) {
                    WaterReminderLiveActivityView(context: context)
                        .padding(.bottom)
                }
            } compactLeading: {
                Text("💧")
                    .font(.title3)
            } compactTrailing: {

                if context.state.currentGlasses == context.state.dailyGoal {
                    Image(systemName: "checkmark.circle")
                        .foregroundColor(.green)
                } else {
                    ZStack {
                        Circle()
                            .fill(Color.blue.opacity(0.2))
                            .frame(width: 24, height: 24)

                        Text("\(context.state.dailyGoal - context.state.currentGlasses)")
                            .font(.caption2)
                            .fontWeight(.bold)
                            .foregroundColor(.blue)
                    }
                }

            } minimal: {
                Text("💧")
                    .font(.title2)
            }
        }
    }
}
The code above defines the Live Activity widget configuration for the app. In other words, you configure how the live activity should appear under different configurations.
To keep it simple, we display the same live activity view on the Lock Screen and Dynamic Island.
The dynamicIsland closure specifies how the Live Activity should look inside the Dynamic Island. In the expanded view, the same WaterReminderLiveActivityView is shown in the center region. For the compact view, the leading side displays a water drop emoji, while the trailing side changes dynamically based on the progress: if the daily goal is reached, a green checkmark appears; otherwise, a small circular indicator shows how many glasses are left. In the minimal view, only the water drop emoji is displayed.
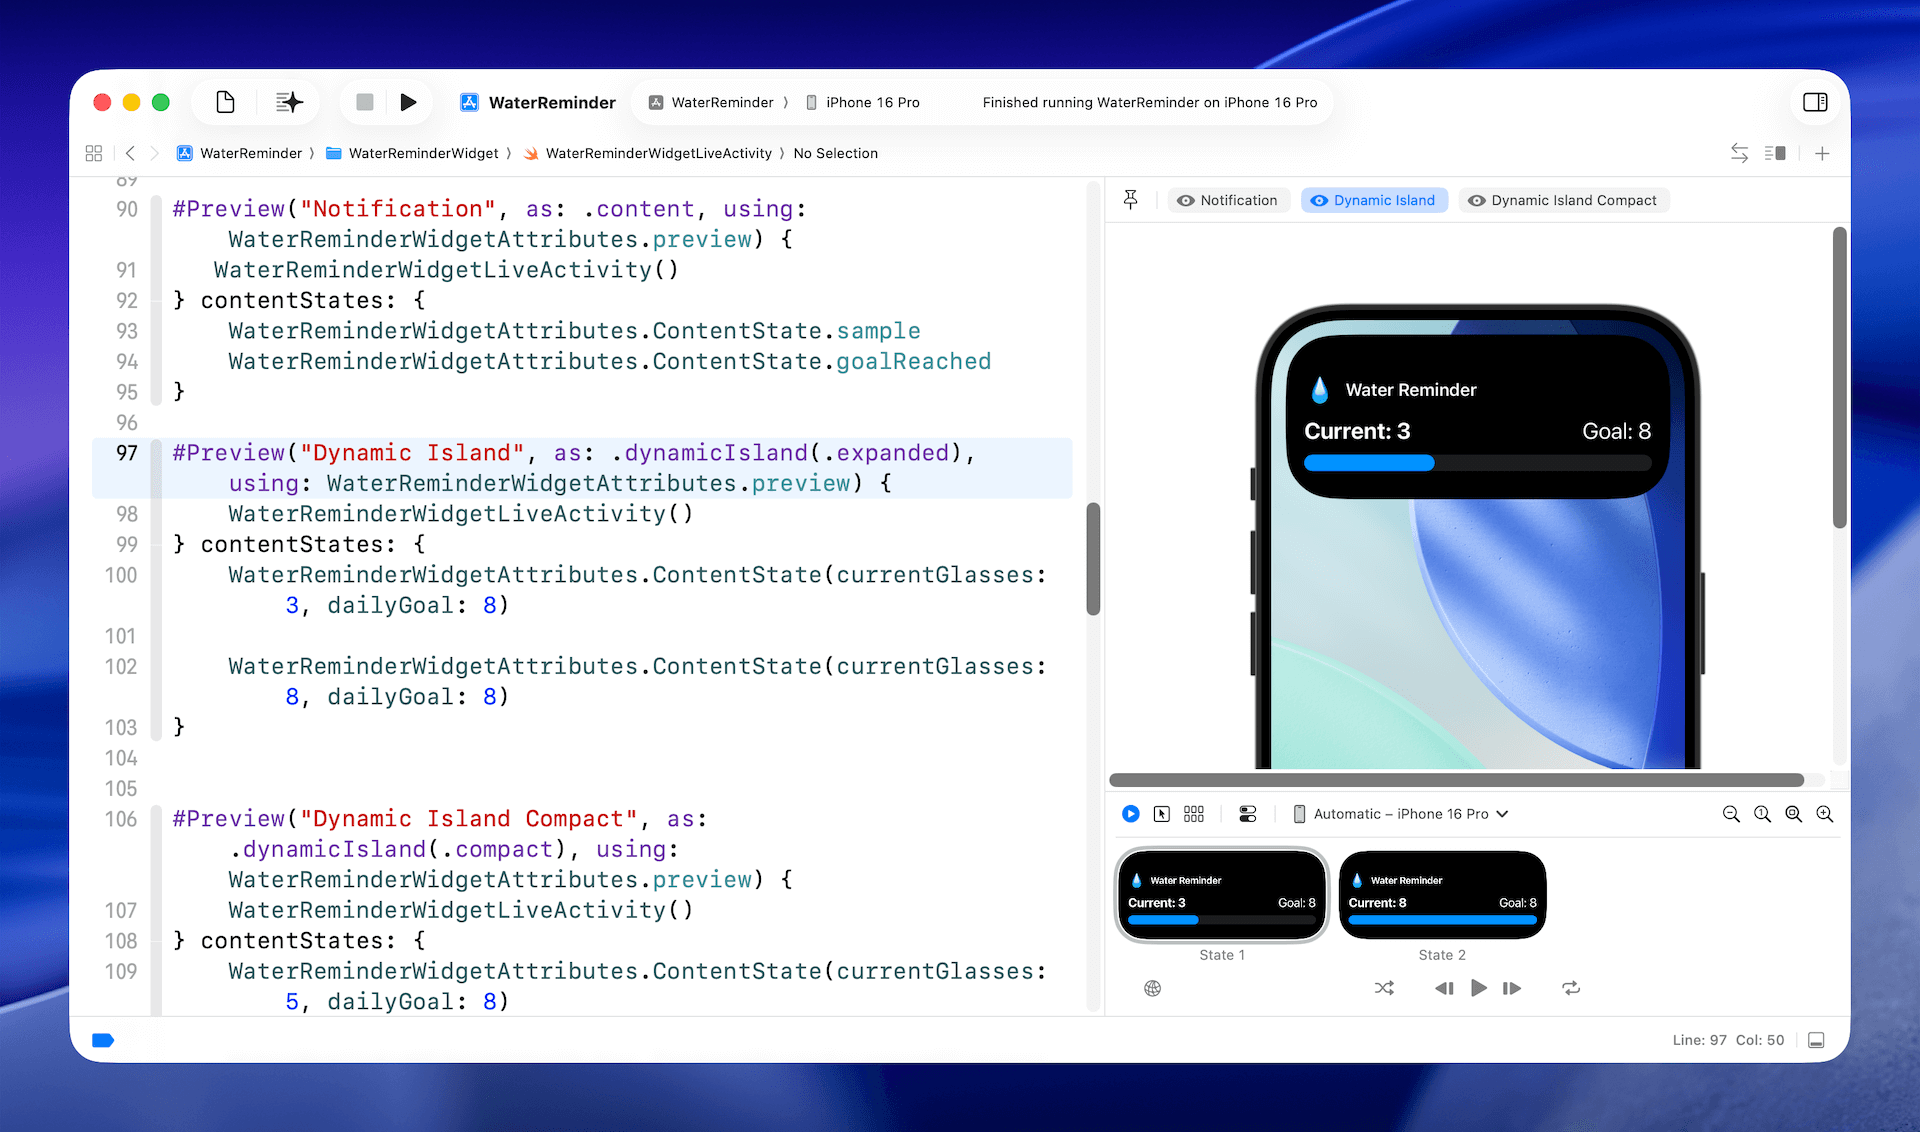
Lastly, let’s add some preview code to render the preview of the Live Activity:
#Preview("Notification", as: .content, using: WaterReminderWidgetAttributes.preview) {
   WaterReminderWidgetLiveActivity()
} contentStates: {
    WaterReminderWidgetAttributes.ContentState.sample
    WaterReminderWidgetAttributes.ContentState.goalReached
}

#Preview("Dynamic Island", as: .dynamicIsland(.expanded), using: WaterReminderWidgetAttributes.preview) {
    WaterReminderWidgetLiveActivity()
} contentStates: {
    WaterReminderWidgetAttributes.ContentState(currentGlasses: 3, dailyGoal: 8)

    WaterReminderWidgetAttributes.ContentState(currentGlasses: 8, dailyGoal: 8)
}


#Preview("Dynamic Island Compact", as: .dynamicIsland(.compact), using: WaterReminderWidgetAttributes.preview) {
    WaterReminderWidgetLiveActivity()
} contentStates: {
    WaterReminderWidgetAttributes.ContentState(currentGlasses: 5, dailyGoal: 8)

    WaterReminderWidgetAttributes.ContentState(currentGlasses: 8, dailyGoal: 8)
}
Xcode lets you preview the Live Activity in different states without needing to run the app on a simulator or a real device. By setting up multiple preview snippets, you can quickly test how the Live Activity will look on both the Lock Screen and the Dynamic Island.
Managing Live Activities
Now that we’ve prepare the view of the live activity, what’s left is to trigger it when the user taps the Add Glass button. To make our code more organized, we will create a helper class called LiveActivityManager to managing the live activity cycle.
import Foundation
import ActivityKit
import SwiftUI

@Observable
class LiveActivityManager {
    private var liveActivity: Activity<WaterReminderWidgetAttributes>?

    var isLiveActivityActive: Bool {
        liveActivity != nil
    }

    // MARK: - Live Activity Management

    func startLiveActivity(currentGlasses: Int, dailyGoal: Int) {
        guard ActivityAuthorizationInfo().areActivitiesEnabled else {
            print("Live Activities are not enabled")
            return
        }

        // End any existing activity first
        endLiveActivity()

        let attributes = WaterReminderWidgetAttributes(activityName: "Water Reminder")
        let contentState = WaterReminderWidgetAttributes.ContentState(
            currentGlasses: currentGlasses,
            dailyGoal: dailyGoal
        )

        do {
            liveActivity = try Activity<WaterReminderWidgetAttributes>.request(
                attributes: attributes,
                content: ActivityContent(state: contentState, staleDate: nil),
                pushType: nil
            )
            print("Live Activity started successfully")
        } catch {
            print("Error starting live activity: \(error)")
        }
    }

    func updateLiveActivity(currentGlasses: Int, dailyGoal: Int) {
        guard let liveActivity = liveActivity else { return }

        Task {
            let contentState = WaterReminderWidgetAttributes.ContentState(
                currentGlasses: currentGlasses,
                dailyGoal: dailyGoal
            )

            await liveActivity.update(ActivityContent(state: contentState, staleDate: nil))
            print("Live Activity updated: \(currentGlasses)/\(dailyGoal)")
        }
    }

    func endLiveActivity() {
        guard let liveActivity = liveActivity else { return }

        Task {
            await liveActivity.end(nil, dismissalPolicy: .immediate)
            self.liveActivity = nil
            print("Live Activity ended")
        }
    }

}
The code works with WaterReminderWidgetAttributes that we have defined earlier for managing the state of the live activity.
When a new Live Activity starts, the code first checks whether Live Activities are enabled on the device and clears out any duplicates. It then configures the attributes and uses the request method to ask the system to create a new Live Activity.
Updating the Live Activity is straightforward: you simply update the content state of the attributes and call the updatemethod on the Live Activity object.
Finally, the class includes a helper method to end the currently active Live Activity when needed.
Using the Live Activity Manager
With the live activity manager set up, we can now update the WaterTracker class to work with it. First, declare a property to hold the LiveActivityManager object in the class:
let liveActivityManager = LiveActivityManager()
Next, update the addGlass() method like this:
func addGlass() {
    guard currentGlasses < dailyGoal else { return }

    currentGlasses += 1

    if currentGlasses == 1 {
        liveActivityManager.startLiveActivity(currentGlasses: currentGlasses, dailyGoal: dailyGoal)
    } else {
        liveActivityManager.updateLiveActivity(currentGlasses: currentGlasses, dailyGoal: dailyGoal)
    }
}
When the button is tapped for the first time, we call the startLiveActivity method to start a live activity. For subsequent taps, we simply update the content states of the live activity.
The live activity should be ended when the user taps the reset button. Therefore, update the resetDaily method like below:
func resetDaily() {
    currentGlasses = 0

    liveActivityManager.endLiveActivity()
}
That’s it! We’ve completed all the code changes.
Updating Info.plist to Enable Live Activities
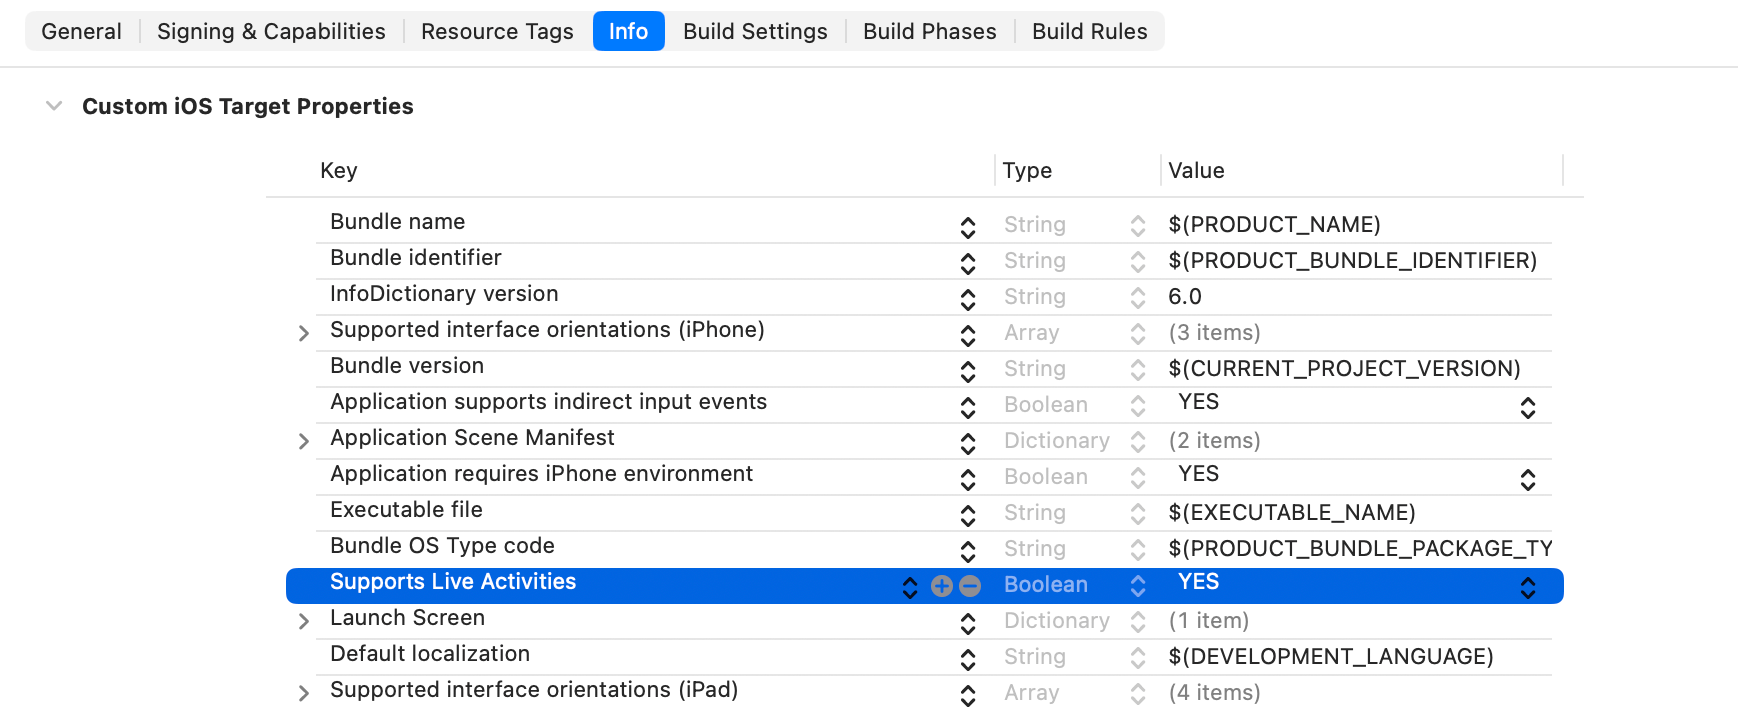
Before your app can execute Live Activities, we have to add an entry called Supports Live Activities in the Info.plist file of the main app. Set the value to YES to enable Live Activities.
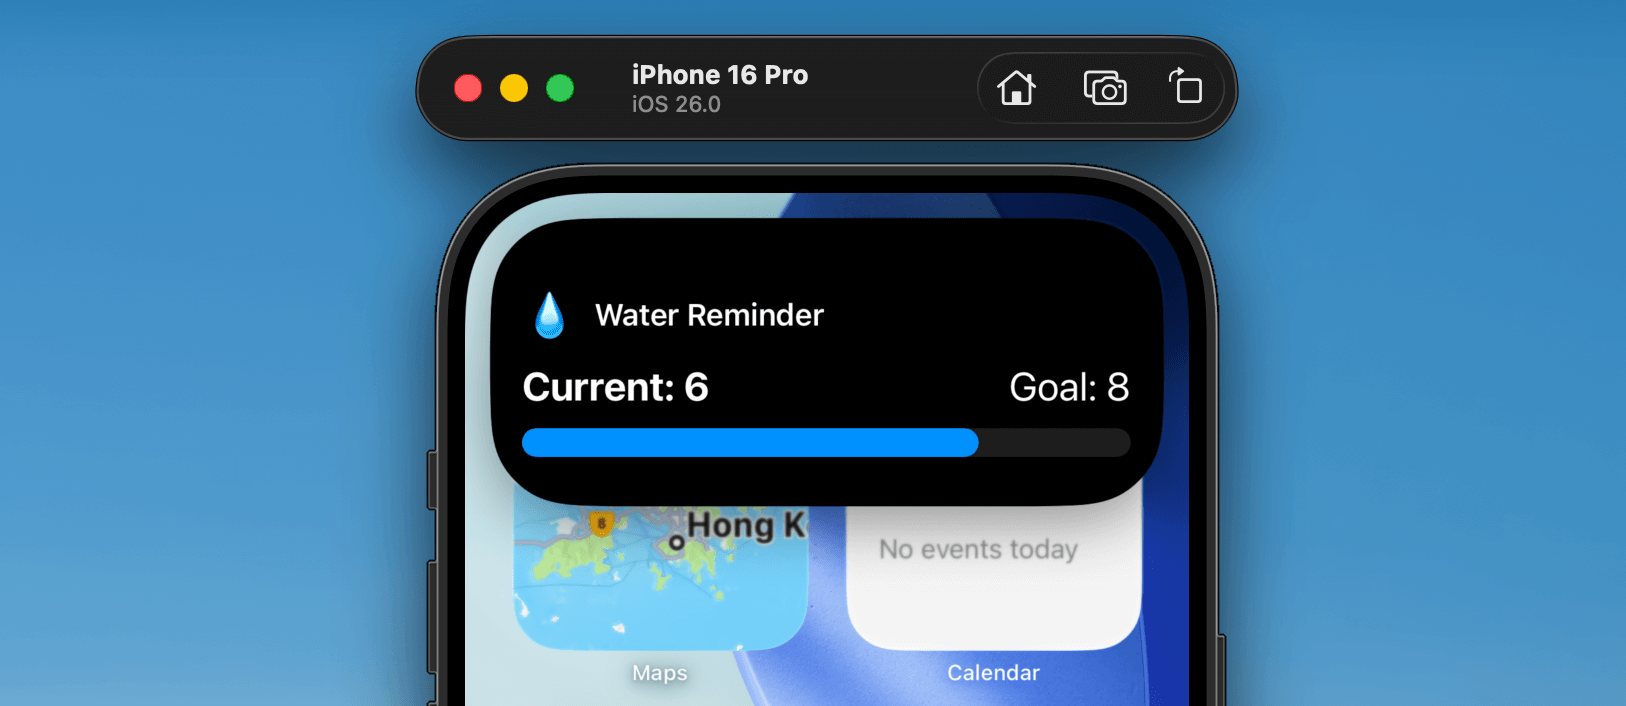
Great! At this point, you can try out Live Activities either in the simulator or directly on a real device.
Summary
In this tutorial, we explored how to add Live Activities to SwiftUI apps. You've learned how these features boost user engagement by delivering real-time information directly to the Lock Screen and the Dynamic Island, reducing the need for users to reopen your app. We covered the entire process, including creating the data model, designing the user interface, and managing the Live Activity lifecycle. We encourage you to integrate Live Activities into your current or future applications to provide a richer, more convenient user experience.


