

Who doesn’t love playing games on their iPhone? I think that my friends and family would agree that I waste way too much time on my phone playing games. However, games are one of the many things that show off the incredible things an iPhone can do with its crazy power and beautiful display.
Almost everyone who loves playing games on their iPhone loves to brag to their friends how great they are at them. That is why Apple announced ReplayKit at WWDC15 along with iOS 9. ReplayKit is an incredible API which makes it extremely simple for developers to integrate safe and efficient screen recording into their apps. This way, with a tap of a button, players can record their game and instantly share it with their friends. Now before you say it, I know that iOS 11 introduced a way to record your screen anywhere, but that feature is not as intuitive for gamers as it requires control center to be opened, and also requires that the user leaves the game to edit and send the video. ReplayKit is made specifically for gamers.
Today, I am going to show you how to make a simple screen recording app. The app will feature a recording start/stop button, a label that shows the status of the recording, and some UI elements to play with so you can record yourself doing something. Lets get started!
App Overview
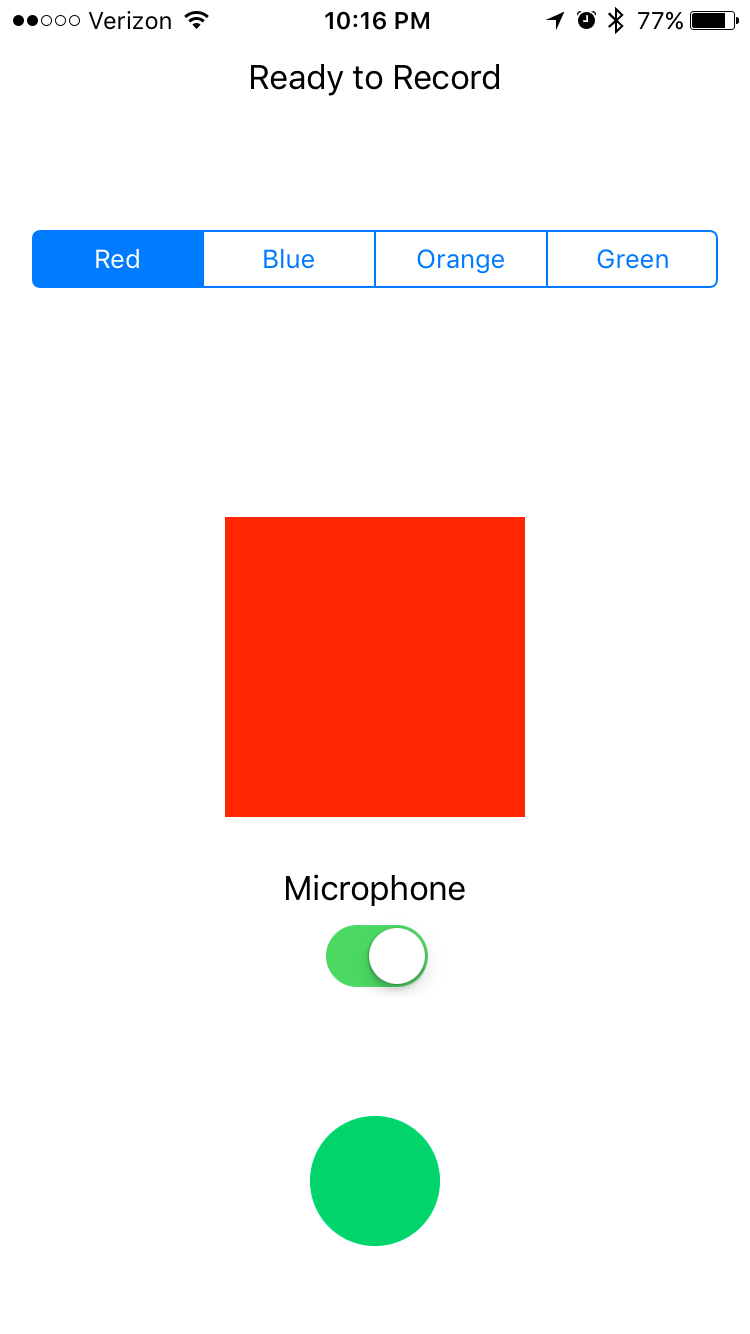
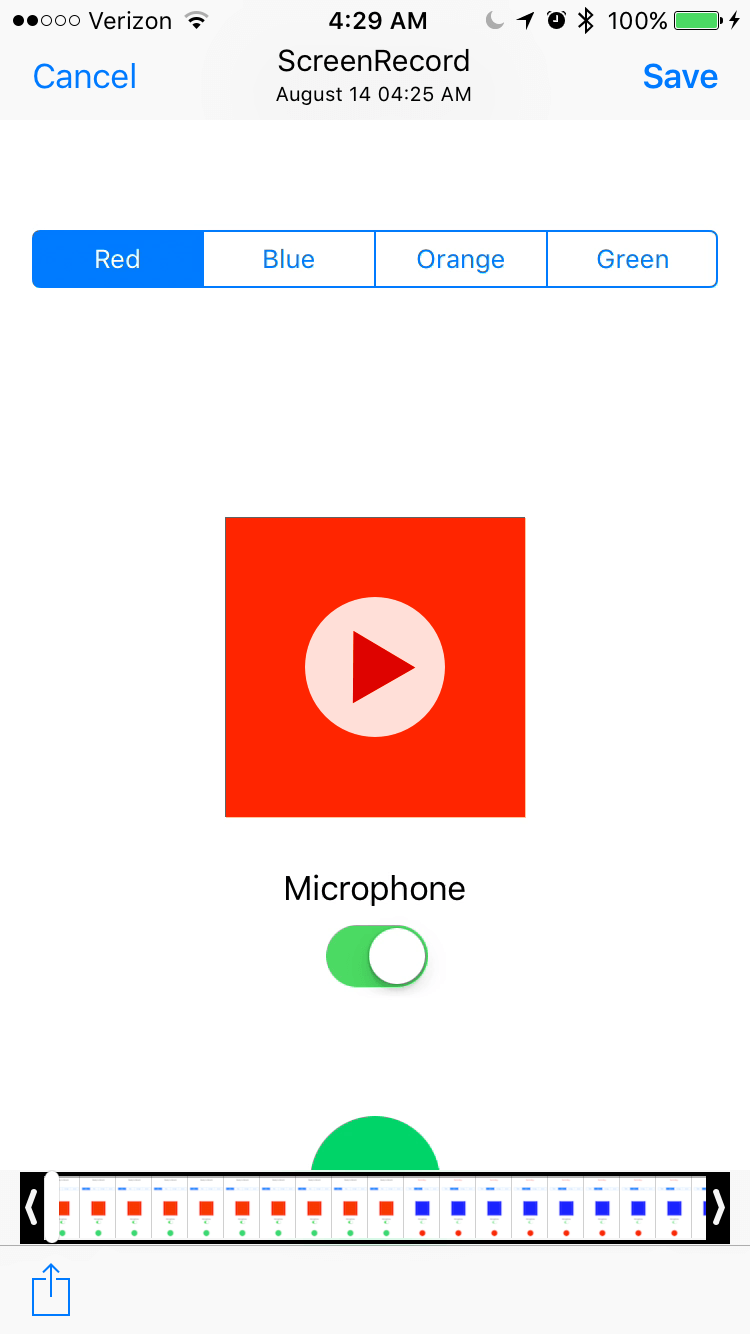
The app we will be making today is extremely simple to write and use. There is a green button which is used to start screen recording. Once tapped, the button will turn red and the status label at the top of the screen will indicate that it is currently recording. The app also features a segmented view with various color names in it. Tapping a color will change the background of the square in the middle of the screen to that color. This is here so you can record something changing on the screen. There is also a microphone toggle so you can choose if you want to record with the microphone or not.
Creating the Project
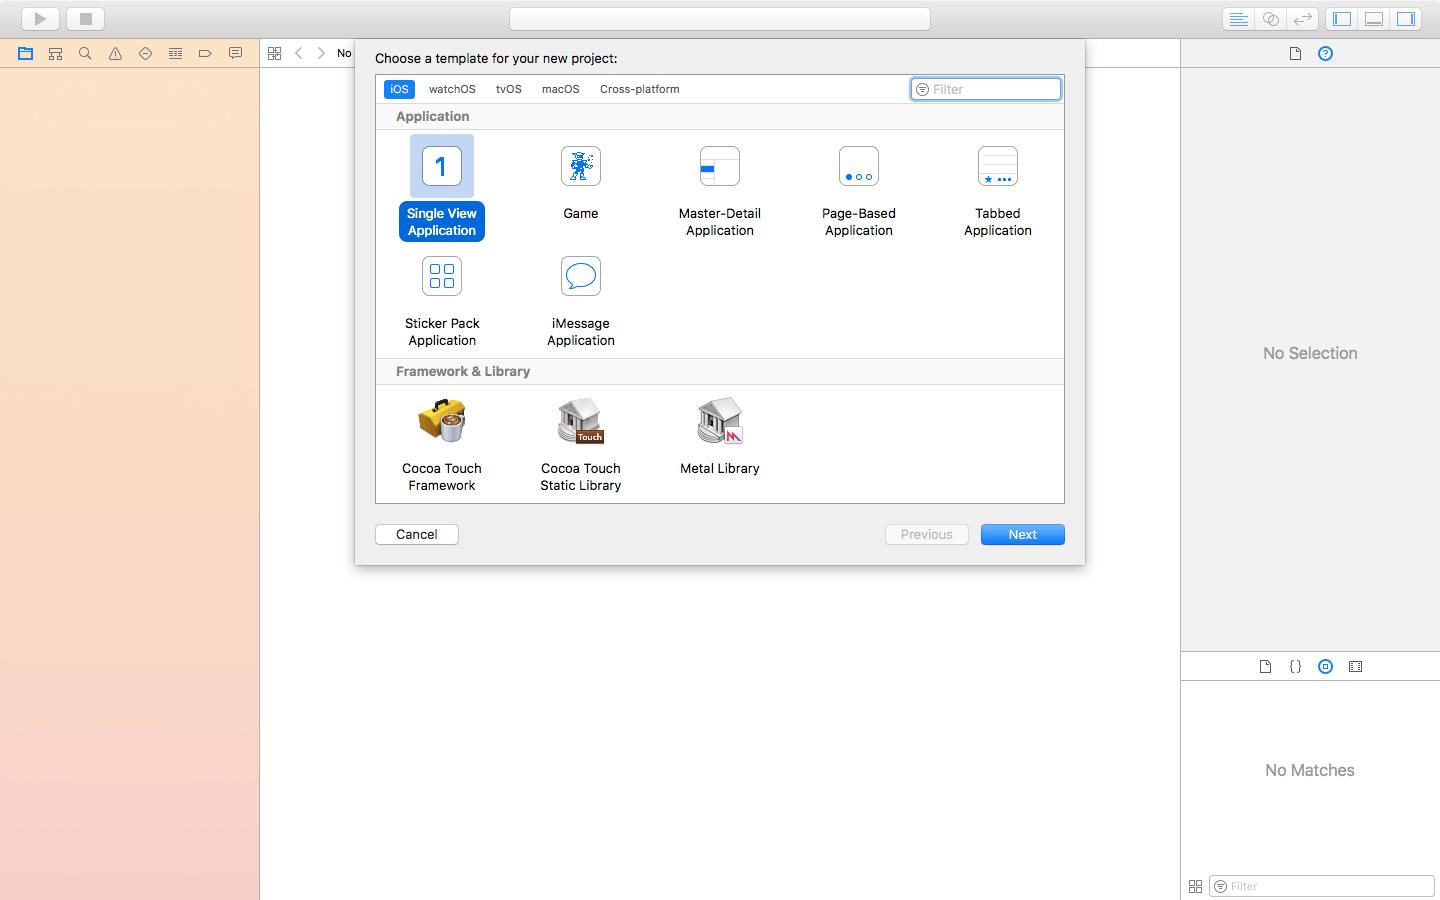
Let’s do this! Time to open Xcode and create a new project. Choose the Single View Application template for this app. I will be naming my project ScreenRecord but you can name it whatever you wish. Just be sure to set the language to Swift, and we don’t need Core Data in this app, so leave that unchecked.
Once you have created the project, go into the Deployment Info and uncheck the boxes next to Landscape Left and Landscape Right. No need for them in this project.

Creating the UI
With this app’s simple UI, this should not take long. Go ahead and open up the Main.Storyboard in the project navigator. Drag a Label to the top of the view and stretch it out a bit. I made mine 165 pixels wide. Make the label say Ready to Record (don’t forget to do that, it’s important). Add a Segmented Control a little under that. Make the segmented control have 4 segments and label each one a different color: red, blue, orange, and green. Make sure to stretch it out enough so the names are not cut off.
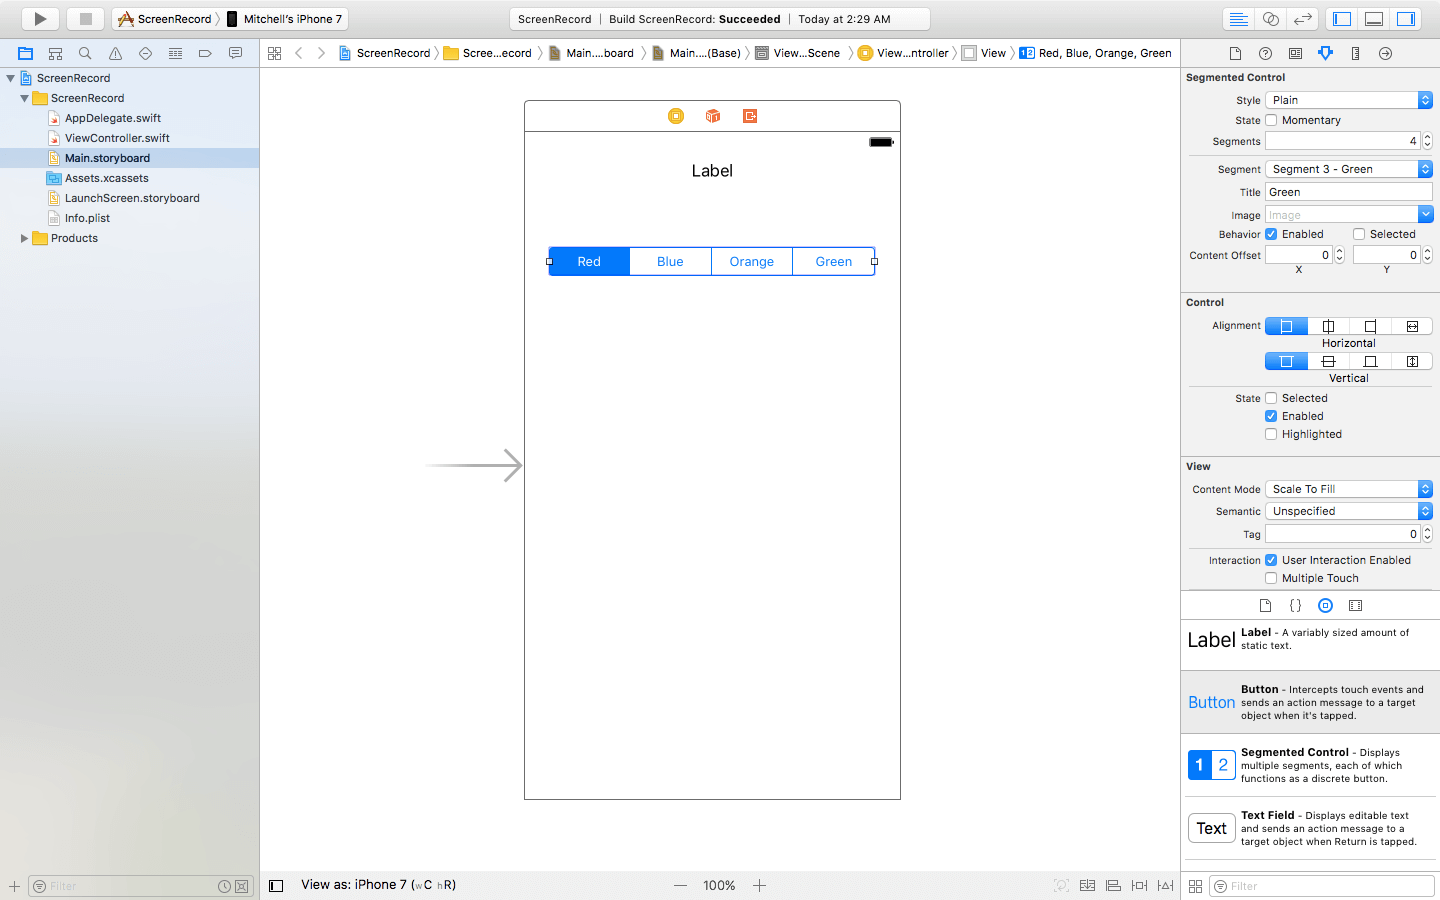
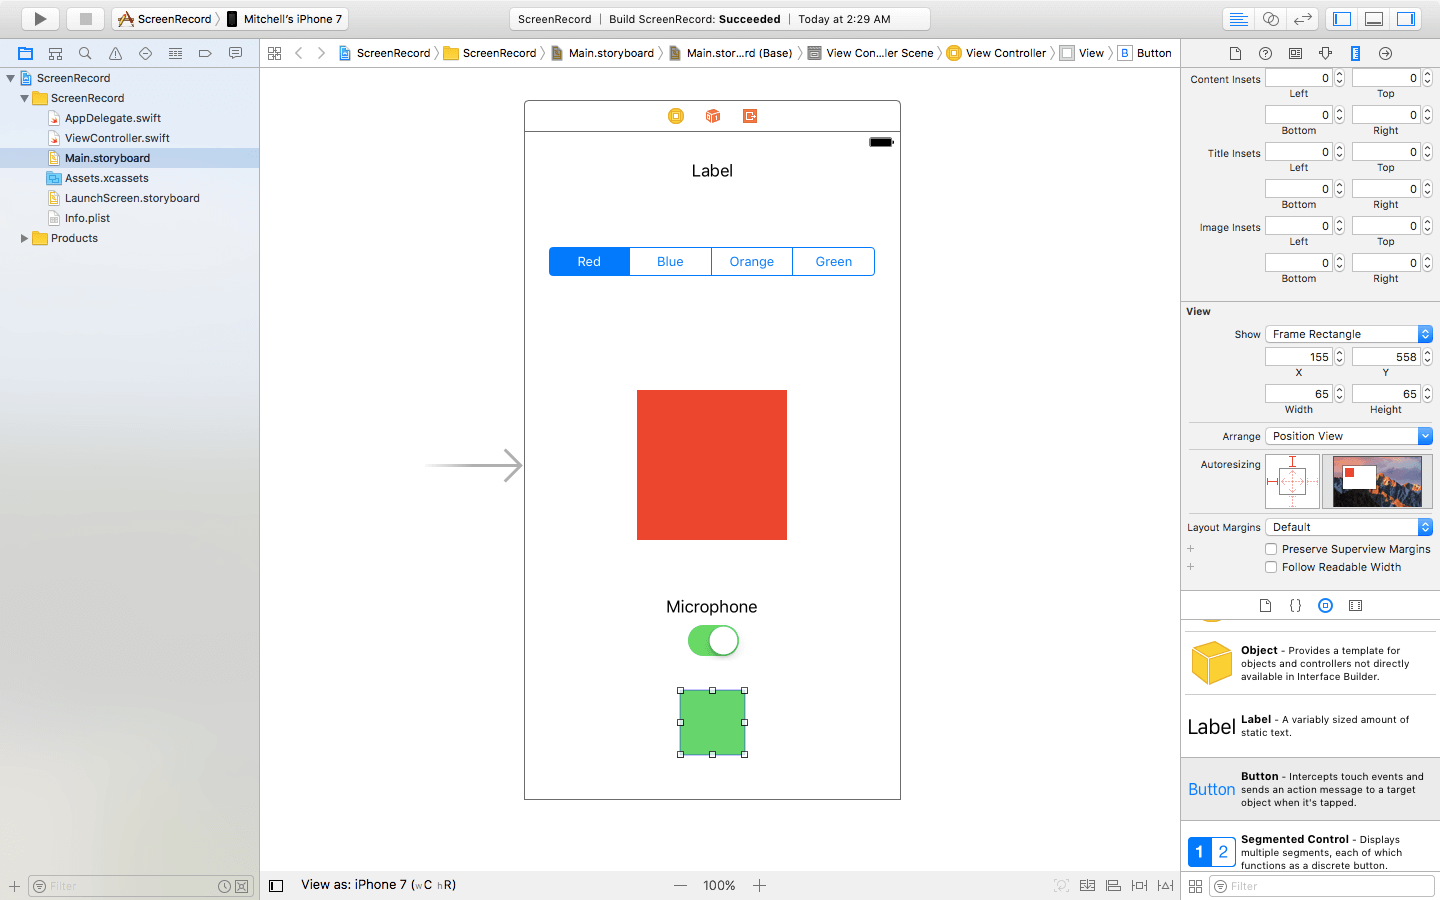
Next, add a View in the center of the view controller. Make it square (I made mine 150×150) and change its background color to red. Add a Switch a little under the square. If you wish, you can put a label over the switch that says Microphone like I did. Lastly, add a Button under the switch. Make it square (mine is 65×65), delete its title text, and change its background color to green.
Your view controller should now look like this:
I will not be covering how to constrain these elements with Auto Layout in this tutorial. However, I highly suggest that you do. Check out our Auto Layout Tutorial if you would like to learn how to use it. If you will not be using Auto Layout, be sure to set your storyboard size to the type of the device you will be running the app on.
Outlets, Objects, and View Setup
Now it’s finally time to start coding! Head over to your ViewController.swift file in the project navigator and start by importing the ReplayKit framework above the class under where it says import UIKit.
import ReplayKit
Now lets add the outlets so we can connect our code to the UI. We need five outlets in total:
@IBOutlet var statusLabel: UILabel!
@IBOutlet var colorPicker: UISegmentedControl!
@IBOutlet var colorDisplay: UIView!
@IBOutlet var recordButton: UIButton!
@IBOutlet var micToggle: UISwitch!
One outlet for each UI element. Your code should now look like this:
import UIKit
import ReplayKit

class ViewController: UIViewController {

    @IBOutlet var statusLabel: UILabel!
    @IBOutlet var colorPicker: UISegmentedControl!
    @IBOutlet var colorDisplay: UIView!
    @IBOutlet var recordButton: UIButton!
    @IBOutlet var micToggle: UISwitch!

    override func viewDidLoad() {
        super.viewDidLoad()
        // Do any additional setup after loading the view, typically from a nib.
    }

    override func didReceiveMemoryWarning() {
        super.didReceiveMemoryWarning()
        // Dispose of any resources that can be recreated.
    }


}
Now we need to create an object for our screen recorder. Declare the following variables under where we put the outlets.
let recorder = RPScreenRecorder.shared()
private var isRecording = false
RPScreenRecorder is the shared recorder object providing the ability to record audio and video of your app. The isRecording variable is used to keep track of the recording status, whether it is doing a screen recording or not.
Next, let’s make it so the start/stop button is rounded making it look more like a traditional record button. Add the following line into the viewDidLoad()
recordButton.layer.cornerRadius = 32.5
This make the button circular. If you made your record button the size that I did (65×65), this will make it a perfect circle since 32.5 is half of 65.
Now we’re going to add a function called viewReset(). We will call this function when we finish a recording and want to reset all the elements in the view controller. Add the following after the viewDidLoad(), not inside it:
func viewReset() {
    micToggle.isEnabled = true
    statusLabel.text = "Ready to Record"
    statusLabel.textColor = UIColor.black
    recordButton.backgroundColor = UIColor.green
}
What this does is turn the microphone switch on, set the statusLabel text to show that the app is ready, Changes the statusLabel text color to black, and changes the background color of recordButton back to green (it will be changed to red during recording).
We’re done with basic setup, your code should look like this:
import UIKit
import ReplayKit

class ViewController: UIViewController {

    @IBOutlet var statusLabel: UILabel!
    @IBOutlet var colorPicker: UISegmentedControl!
    @IBOutlet var colorDisplay: UIView!
    @IBOutlet var recordButton: UIButton!
    @IBOutlet var micToggle: UISwitch!

    let recorder = RPScreenRecorder.shared()
        private var isRecording = false

    override func viewDidLoad() {
        super.viewDidLoad()
        // Do any additional setup after loading the view, typically from a nib.
        recordButton.layer.cornerRadius = 32.5
    }

    func viewReset() {
        micToggle.isEnabled = true
        statusLabel.text = "Ready to Record"
        statusLabel.textColor = UIColor.black
        recordButton.backgroundColor = UIColor.green
    }

    override func didReceiveMemoryWarning() {
        super.didReceiveMemoryWarning()
        // Dispose of any resources that can be recreated.
    }


}
Adding Actions
So we have something to record, we added a segmented control which will change the color of a UIView. We only need one simple IBAction function to make this work. Add the following under the viewReset() function:
@IBAction func colors(sender: UISegmentedControl) {
    switch sender.selectedSegmentIndex {
    case 0:
        colorDisplay.backgroundColor = UIColor.red
    case 1:
        colorDisplay.backgroundColor = UIColor.blue
    case 2:
        colorDisplay.backgroundColor = UIColor.orange
    case 3:
        colorDisplay.backgroundColor = UIColor.green
    default:
        colorDisplay.backgroundColor = UIColor.red
    }
}
Let me explain what this does. The action is triggered by a sender that will be a UISegmentedControl. We have added a switch which takes the selected segment of the segmented control and changes the square view’s background to the right color.
Now add the action that will be called when the record button is tapped. Add the following under the colors function:
@IBAction func recordButtonTapped() {
    if !isRecording {
        startRecording()
    } else {
        stopRecording()
    }
}
This is a very simple function for toggling the recording mode. If the status of isRecording is false, that means that we’re not recording yet, so we call the startRecording() function. If the value is set to true, that means that the app is in recording mode, so it calls the stopRecording() function. Now, we have not created these two functions yet, so ignore the errors that come up for now.
Connecting UI elements
Now that we have finished adding all of the outlets and actions needed for this project, head back to the Main.storyboard so we can connect them to the proper UI elements. Click on the view controller and then click on the connections inspector (the little arrow in the utilities panel on the right). Now drag all of the outlets to their respective subviews.

Now it’s time to connect the actions. Connect the recordButtonTapped action to the record button at the bottom of the view, then select Touch Up Inside. Now connect the colorsWithSender action to the segmented control. This time make sure you select Value Changed so the action is called each time a new segment is selected.

Now that all the actions and outlets are connected, it’s time to head back into the ViewController.swift.
Starting a Recording
Now it is finally time to get to the ReplayKit part of this tutorial! First we’re going to be adding the startRecording() function. Add the following under the recordButtonTapped action:
func startRecording() {


}
Okay, so the first thing we need to do is ensure that the screen recorder is actually available for recording. Now there can be many reasons that it is not, such as the device being unsupported by ReplayKit, or the user streaming to a TV using AirPlay. To check if the recorder is available, we will add the following code to the startRecording function:
guard recorder.isAvailable else {
    print("Recording is not available at this time.")
    return
}
It’s simple as that. This guard checks if the recorder is available. If it’s not, an error will be printed and the function will be returned. Make sure to put all other code in this function under this guard.
Remember that microphone switch we added to our view? Now it’s time to check the value of that switch. Add the following code under the guard:
if micToggle.isOn {
    recorder.isMicrophoneEnabled = true

} else {
    recorder.isMicrophoneEnabled = false
}
If the switch is on, we enable the microphone by setting isMicrophoneEnabled to true. If not, we disable it. Simple as that.
Now it’s time to actually start the recording. Add the following code:
//1
recorder.startRecording{ [unowned self] (error) in
    //2
    guard error == nil else {
        print("There was an error starting the recording.")
        return
    }

    //3
    print("Started Recording Successfully")
    self.micToggle.isEnabled = false
    self.recordButton.backgroundColor = UIColor.red
    self.statusLabel.text = "Recording..."
    self.statusLabel.textColor = UIColor.red

        self.isRecording = true
}
Let’s go through what this does:
1: We call the startRecording function on the recorder. This function has a handler.
2: In the handler, we add a guard which makes sure there is no error. If there is an error, we print an error message and return the function.
3: The recording has successfully started. We print that it is working and change the UI elements to show the user that the app is recording. To do this, we disable the microphone switch, set the recording button background to red, set the status label to say recording and change its text color to red.
We’re now done with the startRecording function! The full function should look like this:
func startRecording() {

    guard recorder.isAvailable else {
        print("Recording is not available at this time.")
        return
    }

    if micToggle.isOn {
        recorder.isMicrophoneEnabled = true
    } else {
        recorder.isMicrophoneEnabled = false
    }

    recorder.startRecording{ [unowned self] (error) in

        guard error == nil else {
            print("There was an error starting the recording.")
            return
        }

        print("Started Recording Successfully")
        self.micToggle.isEnabled = false
        self.recordButton.backgroundColor = UIColor.red
        self.statusLabel.text = "Recording..."
        self.statusLabel.textColor = UIColor.red

                self.isRecording = true
    }

}
Stopping, Editing, and Saving
Now that we have started a recording, we need to stop it! Time to make the stopRecording() function. Add the following under the startRecording() function:
func stopRecording() {

}
Now we need to call the stopRecording() function on the recorder. Add the following to the stopRecording() function:
recorder.stopRecording { [unowned self] (preview, error) in
   print("Stopped recording")


}
Here we call the stopRecording function which of course stops the recording, but there is a little more to it…
Wouldn’t it be great if we can add a cool edit view where the user can preview their recording, trim it, and then send it to their friends all without leaving our app? Well lucky for us, Apple gave us the RPPreviewViewController which does just this and all we need to do is call it!
The stopRecording function creates a preview controller which we can call in the handler.
First we want to make sure that the preview controller is available. Add this guard after the print statement that says the recording was stopped:
guard preview != nil else {
    print("Preview controller is not available.")
    return
}
If the preview is not available, the function will be returned instead of the app crashing!
Next, we want to add an alert view. Say the gamer played a bad round and doesn’t want to share the recording with their friends. Well instead of going into the preview controller, watching their bad game moment, and then canceling, they can just delete the recording right after they stop it.
Add the following after the guard:
let alert = UIAlertController(title: "Recording Finished", message: "Would you like to edit or delete your recording?", preferredStyle: .alert)

let deleteAction = UIAlertAction(title: "Delete", style: .destructive, handler: { (action: UIAlertAction) in
    self.recorder.discardRecording(handler: { () -> Void in
        print("Recording suffessfully deleted.")
    })
})

let editAction = UIAlertAction(title: "Edit", style: .default, handler: { (action: UIAlertAction) -> Void in
    preview?.previewControllerDelegate = self
    self.present(preview!, animated: true, completion: nil)
})

alert.addAction(editAction)
alert.addAction(deleteAction)
self.present(alert, animated: true, completion: nil)

self.isRecording = false
self.viewReset()
Now after you add this, go back up to the class declaration way at the top of the ViewController. You need to add the preview controller delegate. Next to where it says UIViewController add a comma (,) and type RPPreviewViewControllerDelegate.
So what are we doing here?
1: We create an alert controller with the appropriate title, message, and style.
2: We create a destructive delete action which if called, will discard the recording to the gamer never has to relive their failed game. (We’re doing people some real favors here!)
3: We create an edit action. If tapped, this action will open up the preview controller so the gamer can watch their recording, save it to their phone, edit it, or do whatever they want with it.
4: We add the actions to the alert and present it.
5: We call the viewReset() function so the view is just like new when the alert is dismissed.
The stopRecording() function is done! The whole function should look like this:
func stopRecording() {

        recorder.stopRecording { [unowned self] (preview, error) in
            print("Stopped recording")

            guard preview != nil else {
                print("Preview controller is not available.")
                return
            }

            let alert = UIAlertController(title: "Recording Finished", message: "Would you like to edit or delete your recording?", preferredStyle: .alert)

            let deleteAction = UIAlertAction(title: "Delete", style: .destructive, handler: { (action: UIAlertAction) in
                self.recorder.discardRecording(handler: { () -> Void in
                    print("Recording suffessfully deleted.")
                })
            })

            let editAction = UIAlertAction(title: "Edit", style: .default, handler: { (action: UIAlertAction) -> Void in
                preview?.previewControllerDelegate = self
                self.present(preview!, animated: true, completion: nil)
            })

            alert.addAction(editAction)
            alert.addAction(deleteAction)
            self.present(alert, animated: true, completion: nil)

                        self.isRecording = false
            self.viewReset()

        }

    }
We are almost done with the project! There is just one more function we need to add. Type the following function after the stopRecording() function:
func previewControllerDidFinish(_ previewController: RPPreviewViewController) {
    dismiss(animated: true)
}
This short delegate function dismisses the preview controller when the user taps the cancel button.
Try it Out!
Now it’s time to put your hard work to the test. Run the app on your phone and tap the green record button. You will notice that an alert comes up asking for your permission to record the screen or record the screen with the microphone. This is an awesome thing about ReplayKit because Apple automatically has the app ask for permission. This way we don’t have to program it ourselves like we do with coreLocation and notifications.
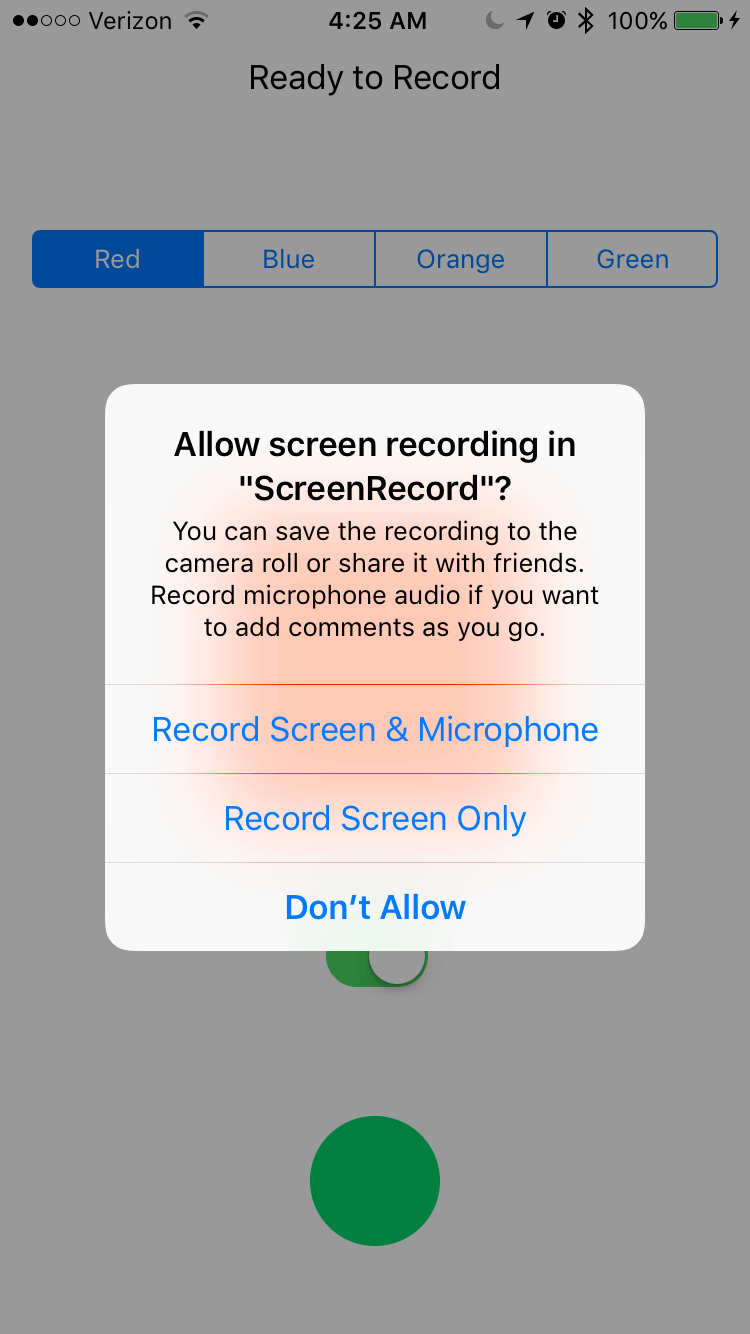
Tap Record Screen & Microphone. The status label should say recording… and turn red, as should the record button. You are now recording your screen! Play with the segmented control to change the colors of the square. If you left the microphone toggle on, say some stuff, maybe sing a song, whatever you want 🙂
When you’ve had your fun, tap the record button again to stop the recording, you should now see the alert view asking what you want to do with your recording. If you sang a song and you don’t think you’re a great singer, maybe delete your recording and take another one. However, if you want to show off your awesome color changing square and singing voice, hit the edit button.
Now you can watch your recording, trim it, save it to your photo library, or share it with the world. If you don’t think your friends will understand how amazing your new recording is, tap Cancel in the upper left to dismiss the view and delete your recording.
Wrap Up
Congratulations! You just made an epic screen recording app that will keep you entertained for hours… Well I guess not, but even though this app does not do much, it has taught you everything you need to know to add awesome screen recording into your game with ReplayKit. Go and add screen recording into your games and leave a comment telling me so I can check it out!
Wanna do more with ReplayKit? Stay tuned with my next tutorial on how to add live broadcasting. How can a game not be awesome if it has live broadcasting?!
If anything in this tutorial confused you or you have some suggestions, feel free to leave a comment below and I can help you out!
For reference, the complete demo app that I created while making this tutorial is available on GitHub.
For more details about the ReplayKit framework, you can refer to the documentation.
What do you think of ReplayKit? Did you ever think that it can be so easy to add screen recording into your app? Leave a comment and let me know.


