

Writing tests of any sort on a mobile application project has not been a very popular choice and in fact, most mobile project teams actually want to avoid writing tests as much as possible to speed up development.
As a “grown-up” developer, I have tasted the goodness of writing tests, not only does it ensure your app features function as expected, it also “lock” the code to prevent other developers from changing your code. Such coupling between tests and implementation codes help new developers to easily onboard or takeover the project.
Test-driven Development
Test-Driven Development (TDD) is like a new art of writing code. It follows this recursive loop of :
- Write a test that fails
- Write little code to pass the test
- Refactor
- Repeat till satisfied
Let me show you a simple example. Consider the following implementation:
func calculateAreaOfSquare(w: Int, h: Int) -> Double { }
Test 1:
Given w=2, h=2, Expect area to be 4. In this case, the test will fail because the implementation is not done yet.
Then we go on to write:
func calculateAreaOfSquare(w: Int, h: Int) -> Double { return w * h }
Test 1 now PASSED! Hurray!
Test 2:
Given w=-1,h=-1, Expect area to be 0. In this case, the test will fail because it will return 1 based on the current implementation.
Then we go on to write:
func calculateAreaOfSquare(w: Int, h: Int) -> Double {
    if w > 0 && h > 0 {
        return w * h
    }

    return 0
}
Test 2 now PASSED! Hurray!
This can then go on and on till you have handled all edge cases and you should also refactor to make your code better and passed all the tests writen.
Based on what we have discussed so far, we realised that not only does TDD produces quality code, It allows us to handle edge cases early. Additionally, it also allows for pair-programming to happen between 2 developers effectively where one can write the test, and the other can write code to pass the test. You can find out more about TDD through Dotariel’s Blog Post.
What will you learn in this tutorial?
By the end of this tutorial, this should be your takeaways:
- Have basic understanding of why TDD is good.
- Have basic understanding of how Quick & Nimble works.
- Know how to use Quick & Nimble to write a UI Test.
- Know how to use Quick & Nimble to write a Unit Test.
Pre-requisites
Here are some pre-requisites before we proceed to the field:
- Xcode 8.3.3 with Swift 3.1 installed
- Some prior experience working with Swift and iOS development
Setting up our project
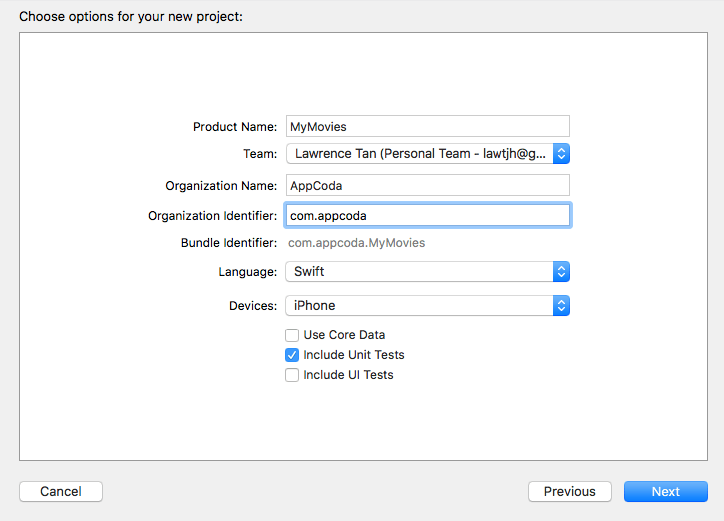
Let’s assume that we are given a task to develop a simple movie app that can list movies. So lets fire up Xcode and create a new Single View Application called MyMovies. We will check Unit Tests, we will revisit this target once we setup our libraries and view controllers.
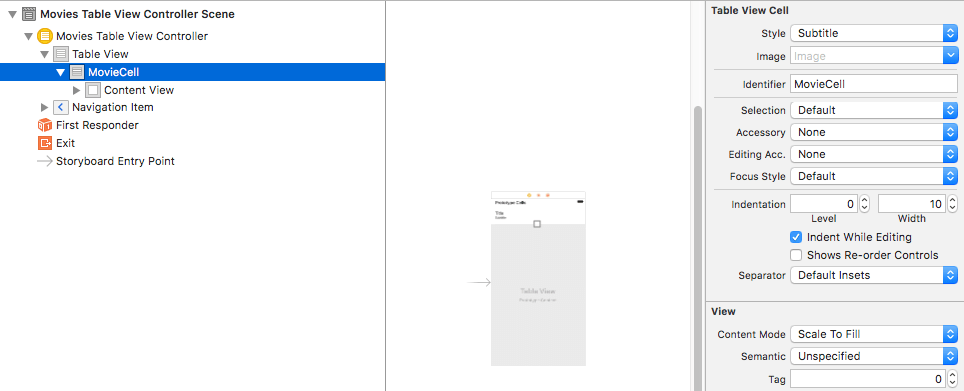
Next, let’s delete away ViewController and throw in a UITableViewController and call it MoviesTableViewController. In the Main.storyboard, remove ViewController and bring in a new Table View Controller and set the class as MoviesTableViewController. Now, let’s set the style of the prototype cell to Subtitle and the identifier as MovieCell so that we can show a movie’s title and genre later.
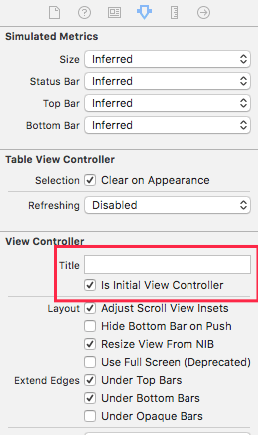
Remember to set the view controller as initial view controller.
At this juncture, your code should look like this:
import UIKit

class MoviesTableViewController: UITableViewController {

    override func viewDidLoad() {
        super.viewDidLoad()
    }

    // MARK: - Table view data source
    override func tableView(_ tableView: UITableView, numberOfRowsInSection section: Int) -> Int {
        return 0
    }
}
Movies
Now, let us create our movie data so we can use it to populate our views later.
Genre Enum
enum Genre: Int {
    case Animation
    case Action
    case None
}
This enum is used to identify the genre our movie.
Movie Struct
struct Movie {
    var title: String
    var genre: Genre
}
This movie data type is used to represent our individual movie data.
class MoviesDataHelper {
    static func getMovies() -> [Movie] {
        return [
            Movie(title: "The Emoji Movie", genre: .Animation),
            Movie(title: "Logan", genre: .Action),
            Movie(title: "Wonder Woman", genre: .Action),
            Movie(title: "Zootopia", genre: .Animation),
            Movie(title: "The Baby Boss", genre: .Animation),
            Movie(title: "Despicable Me 3", genre: .Animation),
            Movie(title: "Spiderman: Homecoming", genre: .Action),
            Movie(title: "Dunkirk", genre: .Animation)
        ]
    }
}
This movie data helper class helps us to call getMovies method directly so we can get our movies data in a single call.
We notice that at this stage, we have not perform any TDD yet as this is the setting up of our project. Let us now proceed to the main ingredient of this tutorial, Quick & Nimble!
Quick & Nimble
Quick is a test development framework designed for Swift and Objective-C which builds on top of XCTest. It provides a DSL to write a test very much similar to RSpec.
Nimble is like a partner to Quick where Nimble provides the matchers as assertions. For more information about the framework, checkout this link.
Installing Quick & Nimble using Carthage
As Carthage library starts growing, I have grown to love Carthage more than Cocoapods as its more decentralized where when one framework fails to build, the whole project still can be compiled.
#CartFile.private
github "Quick/Quick"
github "Quick/Nimble"
The above is the CartFile.private I used to install my dependencies. If you have no prior experience with Carthage, please check out this link.
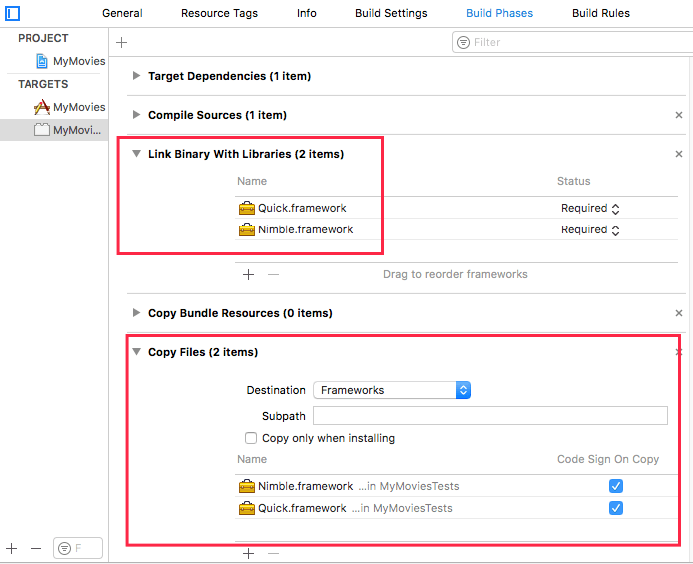
Place CartFile.private in your project folder and run carthage update. This will clone the dependencies and you should get both frameworks in your Carthage -> Build -> iOS folder. Then, add both frameworks into both test targets. You will also need to go to Build Phases, hit the plus sign at the top left, and choose “New Copy Files Phase”. Set destination as “Frameworks” and add both frameworks in.
Way to go! You now have your test libraries all set up!
Write our Test #1
Let’s start writing our first test. We all know that we have a list, we have some movies data, how can we make sure that the list view shows the correct number of items? Yes! We need to ensure that the rows of the table view matches the count of our movies data. That’s our first test. So let’s now head over to our MyMoviesTests and remove the XCTest codes and bring in our Quick and Nimble!
We have to make sure our class is a subclass of QuickSpec which is also a subclass of the original XCTestCase. Understand that the underlying layer of Quick & Nimble is still XCTest. The last thing we need to do here is to start an override function of spec(), which is where we define a set of example groups and examples.
import Quick
import Nimble

@testable import MyMovies

class MyMoviesTests: QuickSpec {
    override func spec() {
    }
}
At this juncture, you need to understand that we will be using it, describe and context a lot to write our tests. describe and context are just logical groupings of it examples.
Test #1 – Expect Table View Rows Count = Movies Data Count
First, let’s bring in our subject which is our view controller.
import Quick
import Nimble

@testable import MyMovies

class MyMoviesTests: QuickSpec {
    override func spec() {
        var subject: MoviesTableViewController!

        describe("MoviesTableViewControllerSpec") {
            beforeEach {
                subject = UIStoryboard(name: "Main", bundle: nil).instantiateViewController(withIdentifier: "MoviesTableViewController") as! MoviesTableViewController

                _ = subject.view
            }
        }
    }
}
Notice that here we have a @testable import of MyMovies, this line basically identifies the project target we are testing, and then allows us to import classes from there. As we will be testing the view layer of the table view controller, we need to grab an instance from the storyboard.
The describe closure kicks start my first umbrella grouping of tests cases that will be written for MoviesTableViewController.
The beforeEach closure runs before every example is executed in the describe closure. So you can read it as beforeEach test in MoviesTableViewController is executed, run these first.
_ = subject.view puts the view controller into the memory, it’s like calling viewDidLoad.
Finally, we can add our test assertion after the beforeEach { } like this :
context("when view is loaded") {
    it("should have 8 movies loaded") {
        expect(subject.tableView.numberOfRows(inSection: 0)).to(equal(8))
   }
}
Let’s unpack this a bit, we have context which is a grouped example closure that is identified as when view is loaded, and then followed by the main example it should have 8 movies loaded. Then we can expect or assert the number of rows of our table view to have 8. Now let’s run the test by hitting CMD+U or go to Product -> Test. After a few seconds, you will get this in the console:
MoviesTableViewController__when_view_is_loaded__should_have_8_movies_loaded] : expected to equal <8>, got <0>

Test Case '-[MyMoviesTests.MoviesTableViewControllerSpec MoviesTableViewController__when_view_is_loaded__should_have_8_movies_loaded]' failed (0.009 seconds).
So you just wrote a broken test that needs to be fixed. Let the TDD Begin!
Fix Test #1
Let’s go back to our main MoviesTableViewController and load in our movies data! Run the test again after adding these and you should pat yourself on the back for passing your first written test!
override func tableView(_ tableView: UITableView, numberOfRowsInSection section: Int) -> Int {
    return MoviesDataHelper.getMovies().count
}

override func tableView(_ tableView: UITableView, cellForRowAt indexPath: IndexPath) -> UITableViewCell {
    let cell = tableView.dequeueReusableCell(withIdentifier: "MovieCell")
    return cell!
}
So let’s recap, you just wrote a test that broke, went to fix it with 3 lines of codes, and now it passes. This is what we call TDD. A route to ensure high quality and well written codebase.
Write our Test #2
Now it’s time to wrap up the tutorial with our second test case. We realise that if we run the app, we are just setting “title” and “subtitle” everywhere. We are missing our actual movies data! Let’s write a test for the UI!
Let’s head over to our spec file. Introduce a new context call Table View. Grab the first cell from our table view and test if the data matches.
context("Table View") {
    var cell: UITableViewCell!

    beforeEach {
            cell = subject.tableView(subject.tableView, cellForRowAt: IndexPath(row: 0, section: 0))
    }

    it("should show movie title and genre") {
        expect(cell.textLabel?.text).to(equal("The Emoji Movie"))
        expect(cell.detailTextLabel?.text).to(equal("Animation"))
     }
}
Now run the test to see them fail.
MoviesTableViewController__Table_View__should_show_movie_title_and_genre] : expected to equal, got
Again, we need to fix this test! We need to give our cell labels the correct data to display.
Fix Test #2
Here we need to write more code as we used Genre as enum previously. So here’s the update to our Movie class :
struct Movie {
    var title: String
    var genre: Genre

    func genreString() -> String {
        switch genre {
        case .Action:
            return "Action"
        case .Animation:
            return "Animation"
        default:
            return "None"
        }
    }
}
and here’s the update to our cellForRow method :
override func tableView(_ tableView: UITableView, cellForRowAt indexPath: IndexPath) -> UITableViewCell {
    let cell = tableView.dequeueReusableCell(withIdentifier: "MovieCell")

    let movie = MoviesDataHelper.getMovies()[indexPath.row]
    cell?.textLabel?.text = movie.title
    cell?.detailTextLabel?.text = movie.genreString()

    return cell!
}
Hooray! You have just made your second test case passed! At this juncture, we can look at what can be refactor and try to make the code cleaner, but yet still pass all the tests written. Let’s remove empty functions and declare our getMovies() as a computed property.
class MoviesTableViewController: UITableViewController {

    var movies: [Movie] {
        return MoviesDataHelper.getMovies()
    }

    // MARK: - Table view data source
    override func tableView(_ tableView: UITableView, numberOfRowsInSection section: Int) -> Int {
        return movies.count
    }

    override func tableView(_ tableView: UITableView, cellForRowAt indexPath: IndexPath) -> UITableViewCell {
        let cell = tableView.dequeueReusableCell(withIdentifier: "MovieCell")

        let movie = movies[indexPath.row]
        cell?.textLabel?.text = movie.title
        cell?.detailTextLabel?.text = movie.genreString()

        return cell!
    }
}
If you run the tests again, all tests should still pass. Try it!
Recap
So what have we done?
- We wrote our first test to check for movies count, it fail.
- We implement our logic to load the movies and then it passes.
- We wrote our second test to check for correct display, it fail.
- We implement our logic for displaying and then it passes.
- We then take a break from tests and refactor.
This is generally what TDD is all about and you can continue on with this project to try experimenting more. If you have any questions about the tutorial, please leave your comment below and let me know.
For the sample project, you can download the full source code on GitHub.


